Defining Inbound Maps
This topic describes how to:
Create staging tables and work records.
Create inbound maps.
Define the inbound PeopleSoft business document format.
Specify staging tables.
You create one map for each EDI transaction.
Note: Electronic commerce maps help transfer data between PeopleSoft business documents and staging tables in a PeopleSoft database. They don’t apply to the application load or application extract processes, which copy data between the staging tables and the transactional tables.
To create staging tables and work records:
In Application Designer, create the staging tables for the incoming data.
Save the record definitions with the extension _EC to identify them as staging tables. Use SQL Create to create tables using the record definitions.
The tables should be structured as an intermediate step between the PeopleSoft Business Document format that you want to translate and the structure of the transaction tables.
The record definition for a staging table has three kinds of fields:
Required system fields, which must be key fields for the tables.
Field Name
Description
ECTRANSID
Transaction ID.
ECQUEUEINSTANCE
Instance ID.
ECTRANSINOUTSW
I or O, specifying an incoming or outgoing transaction.
Fields corresponding to the data fields in the PeopleSoft business documents.
(Optional) Extra fields for calculated data needed in the application tables, such as summary values, date stamps, or action codes.
In PeopleSoft Application Designer, create work records that mimic the structure of the records in the PeopleSoft business document that you want to translate.
You need to create a work record for each physical record in the PeopleSoft business document file.
One field in the work record needs to be designated as the record ID for the document record that it mimics. For most records, it’s the first field: the record ID in the PeopleSoft business document is usually the first data on the line.
The EDI agent uses the record ID in the work record to match the appropriate work record with each record in the PeopleSoft business document. You can add the appropriate record ID as a default value for the field; PeopleSoft EDI Manager will automatically supply the correct record ID when you describe the business document format on the Business Document Layout page.
The rest of the fields in the work record definition should match the corresponding fields in the PeopleSoft Business Document record. They should be in the same order and should have the same length. Add default values for any fields that have them.
Save the work record with the extension _WD to identify it as a work document.
Access the Inbound Maps - Description page.
Image: Inbound Maps - Description page
This example illustrates the fields and controls on the Inbound Maps - Description page.
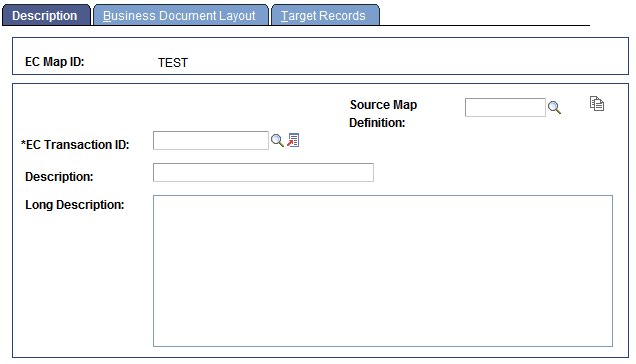
To create an inbound map:
In the EC Transaction ID field, select the transaction to which this map applies.
Enter a description of the map.
You can enter both a short description (in the Description text box) and a long description (in the larger box). These descriptions are for your information only; the system does not use them.
(Optional.) Copy the definition of a similar map.
You can copy the details of an existing map definition into this component and change just the parts that are different.
Select the existing map in the Source Map Definition field, and then click theEc Copy Map DefnSwitch button. The system copies the information from the selected map into this page.
Access the Inbound Maps - Business Document Layout page.
Image: Inbound Maps - Business Document Layout page
This example illustrates the fields and controls on the Inbound Maps - Business Document Layout page.

You have already created work record definitions that mimic the structure of the PeopleSoft business documents. On this page, you specify which work record definition to use for each record in the PeopleSoft business documents and what type of data appears in each field.
To define the inbound format:
Select a work record definition from the Business Doc Record field, and then click the EC Get File Fields button.
PeopleSoft EDI Manager copies data from the selected record definition into the Map group box, with one row for each field in the record.
Specify the record ID for this work record definition.
If the first field in the work record definition is not the one for record IDs, browse the rows in the Map group box to find the record ID field. The EDI agent uses this field to match the work record definition to the appropriate records in PeopleSoft business documents.
In the Map group box for the appropriate record ID, select the Record ID option in the Field Value Conversion group box. The EC File Row ID Value text box appears.
In the text box, enter the record ID of the records whose structure this work record definition mimics. When the EDI agent finds a record in a PeopleSoft business document with this record ID, it uses this work record definition to parse it.
Select the next field in the work record definition.
Check the location of a field in the record.
If you defined the work record definition properly, the correct field information appears in the text boxes, copied from the work record. You can verify the existing information rather than entering it. If the format of the PeopleSoft business document is slightly different than the work record definition, you can modify the formatting on this page to match the document without affecting the work record definition.
The Seq (sequence) text box gives the number of the field in the record. The first field in the record is field 1, the second is field 2, and so on. The Name field is the field name from the work record, and the Field Type field indicates the data type of the field’s data.
The Start and Length boxes specify the location and size of the field in the PeopleSoft business document. The start position is the number of characters from the beginning of the record to where the first character of this field’s data appears. The length is the number of characters reserved for this field; it’s also the number of characters that the system will transfer to the staging tables.
Note: Length is defined in characters, not in bytes.
For numeric data, the Dec (decimal positions) field indicates the number of characters to the right of the decimal point. If an incoming PeopleSoft business document uses implicit decimal format, that is, if it does not include decimal points in this field (in any row), the EDI agent inserts them (in all rows) at the position specified in this box. If the data already includes decimal points, the EDI agent does not change them or insert any other decimal points.
For date information, you also need to enter a date format and delimiter. You use these text boxes to specify the format for dates in this field in the incoming file. Use standard date formatting conventions, as shown in this table:
Date Value
Date Format
Delimiter
19961226
YYYYMMDD
N (for none)
1996/12/26
YYYYMMDD
/
DEC–96–26
MMMYYDD
–
26–DEC–1996
DDMMMYYYY
–
26.12.1996
DDMMYYYY
–
Select an option in the Special EDI Attribute group box to specify whether the data in the current field is transaction data or an EDI control code.
Options are:
Field or Control
Definition
None Normal transaction data.
EC Entity Code An entity code specifies the type of business entity that the trading partner ID for the current transaction refers to. The entity code tells the EDI agent that the table to use to find the list of valid IDs.
EC Queue Control Number A unique identifying number that you want to store in the EDI agent queue and refer to when reviewing EDI audit history. For example, in a purchase order, you might identify the PO number as the EC queue control number.
Pri Evt Cd (primary event code) and Sec Evt Cd (secondary event code) The primary event code, sometimes called the purpose code. The EDI agent uses event codes to determine the appropriate action code. If you identify a primary event code, you must also identify a secondary event code, sometimes called the transaction code, in the same record.
Specify how the EDI agent needs to convert the data as it copies data from the field into the staging tables.
Field value conversion options are:
Field or Control
Definition
None The EDI agent copies the data exactly as it appears in the PeopleSoft business document field.
TP Convert The EDI agent converts data from this field according to the rules defined in a conversion type definition. When you select this option, a drop-down list appears to select a conversion type definition.
Record ID Use this option for the first field in the work record definition only. (See step 3.)
Convert The EDI agent converts the data as specified in the From andTo boxes. When the field in the PeopleSoft business document contains the value in theFrom box, the EDI agent converts it into the value in theTo box. Enter a row for each possible value in the field.
Note: You can perform data conversion at several points during processing. Use the Convert option for conversions that apply to this map only and are valid for all trading partners.
Repeat steps 4 through 6 for each field in the work record definition.
Repeat steps 1 through 7 for each record in the PeopleSoft business document.
To associate another work record definition with this map, put the cursor in the Business Doc Record field and press the F7 key.
Access the Inbound Maps - Target Records page.
Image: Inbound Maps - Target Records page
This example illustrates the fields and controls on the Inbound Maps - Target Records page.
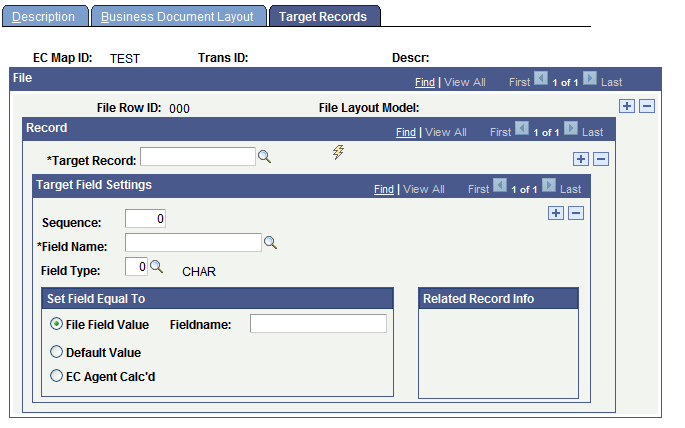
To specify staging tables:
Select a work record definition.
Browse the rows in the File group box to select a work record definition that you added to this mapping on the previous page. The record definition name appears in theFile Layout Model field.
In the Target Record field, select the staging table to copy data into, and then click theEC Get Recfields SW button.
Field information is copied from the record definition into the page.
Select a field in the staging table record definition.
Browse the rows in the Target Field Settings group box to select the field.
The Sequence field gives the position of the field in the record. The field name is from the record definition, and the field type indicates the data type of the field’s data. All of this information comes from the record definition that you selected.
In the Set Field Equal To group box, select the value that you want the EDI agent to copy into the selected field.
To copy the value from a field in the PeopleSoft business document, select the File Field Value option. Enter the name of the field whose value you want to copy in. Use the field name from the work record definition that appears as the file layout model at the top of the page.
To enter a default value into the table, select the Default Value option and enter the value in the text box that appears.
Note: You can specify both a file field to copy data from and a default value. The EDI agent enters the default value into the staging table only when the specified file field does not have a value.
To enter a value that the EDI agent calculates as it copies data into the staging table, select the EC Agent Calc’d (EC agent calculated) option, and then select a calculation option from the drop-down list box that appears. Options include:
Calculation Option
Value Written in the Field
Action Code Conversion
An action code.
The EDI agent gets the values from the fields in this record labeled Primary Event Code andSecondary Event Code, looks up the combination in the partner profile for the trading partner, and inserts the appropriate action code.
Apportion Parent Value
A percentage of the value from the parent line.
The EDI agent takes the numeric value from the preceding parent line, divides it by the number of child lines, and puts the resulting value in this field on each child line.
You have to complete out the Related Record Info group box to identify the parent line.
Average Summary Value
The average value from a particular field.
The EDI agent adds up the values in this field from all occurrences of this record reporting to the same parent line, divides by the number of records, and enters the result in this field.
You have to complete the Related Record Info group box to identify the field whose average you want.
Business Document Level External TPID (business document level external trading partner ID)
The trading partner ID of the trading partner that generated the EDI transaction.
The EDI agent gets the trading partner ID from the first record in the PeopleSoft business document.
Business Document Level Internal TPID (business document level internal trading partner ID)
The trading partner ID of the internal group to which the EDI transaction is addressed.
The EDI agent gets the trading partner ID from the first record in the PeopleSoft business document.
Current Date
The date on which the EDI agent processes the PeopleSoft business document.
Current Date and Time
The date and time when the EDI agent processes the PeopleSoft business document.
Current Time
The time when the EDI agent processes the PeopleSoft business document.
EC Queue Instance
The system-generated queue instance ID given to this PeopleSoft business document.
Note: To create a valid mapping, you must map this value to the ECQUEUEINSTANCE field.
EC Transaction ID
The transaction ID from the first record in the PeopleSoft business document.
Note: To create a valid mapping, you must map this value to the EDTRANSID field.
File Name/File ID
The name of the PeopleSoft business document file.
Incremented Key Sequence Number
A system-generated sequence number.
The EDI agent increments the number for each child row of a particular parent. It starts at one again when it reaches a new occurrence of the parent line.
You have to complete the Related Record Info group box to identify the parent line.
Inherit Parent Value
A value copied directly from the parent line.
You have to complete the Related Record Info group box to identify the parent line.
Maximum Summary Value
The maximum value of a field.
The EDI agent checks all the occurrences of a specified record and field and copies the maximum value into this field.
You have to complete the Related Record Info group box to identify the field whose maximum you want.
Minimum Summary Value
The minimum value of a field.
The EDI agent checks all the occurrences of a specified record and field, and copies the minimum value into this field.
You have to complete the Related Record Info group box to identify the field whose minimum you want.
Operator ID
The ID of the user who started the EDI agent.
Process Instance
The system-generated instance ID from PeopleSoft Process Scheduler.
Run Control ID
The run control ID of the run control used to start the EDI agent.
Total/Accumulate Summary Value
The total of the values in a field.
The EDI agent adds the values from a specified field in all occurrences of a record reporting to the same parent line and enters the result in this field.
You have to complete the Related Record Info (related record information) group box to identify the field whose total you want.
Trading Partner Conversion
The customer, vendor, or business unit that is associated with a trading partner ID.
Enter the related record information (for some calculated options only).
For some of the calculation options that you just selected, you identify the row, record, and field to use in the calculation.
For example, if you selected the Total/Accumulate Summary Value option, the EDI agent adds up the values from the specified row, record, and field.
Note: If you selected the Increment Key Sequence Number option, only theRow field appears. You don’t need to select a record or field.
Repeat steps 3 through 5 for each field in the staging table.
To create a valid mapping, you must enter the appropriate values in the three required system fields:
ECTRANSID: Use the EC Transaction ID option to have the EDI agent put the transaction ID in this field.
ECQUEUEINSTANCE: Use the EC Queue Instance ID option to have the EDI agent put the instance ID in this field
ECTRANSINOUTSW: Enter I to specify an incoming transaction.
Repeat steps 2 through 6 for each staging table that you want to copy data into.
Repeat steps 1 through 7 for each work record definition.