Using Customization Repository
Once customizations have been uploaded to the PUM Source, the Update Manager Dashboard provides the following components to manage the customizations:
Manage Customizations
Manage Customized Objects
Run Customization Calculation
The Customization Repository is used to identify the relationships to customized objects before the change package is created. The Customization Repository is delivered empty on the PUM Source and must be populated using Change Assistant to upload the customer data.
To access the Customization Repository page, select .
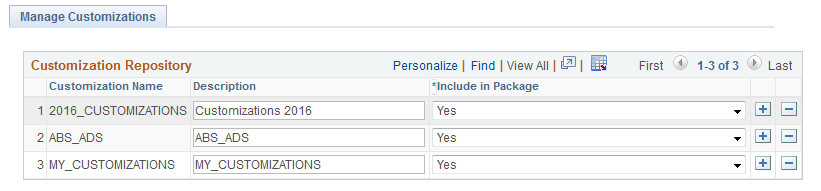
Image: Manage Customizations page
This example illustrates the fields and controls on the Manage Customizations page. You can find definitions for the fields and controls later on this page.
|
Field or Control |
Definition |
|---|---|
| Customization Name |
By default, this the name of the customization project that was uploaded to the PUM Source using Change Assistant. You can have 0–n customizations defined. Each defined customization must have a unique customization name. |
| Description |
Use this field to provide a more detailed description of the customization. |
| Include in Package |
Specify whether bug fixes which impact the specified customization should be, by default, included or excluded from change package creation.
Note: This value can be overridden in the PUM Search. |
Adding Customizations
To manually add customizations, use the + action in the grid. When this method is used, a new row is added, however no objects will be associated with the new row. Use the Customized Objects page to add the objects. See Manage Customized Objects
Rows can also be added by uploading customer data through Change Assistant. See Creating Customization Repository
Deleting Customizations
To delete a customization, use the – (delete row) action in the grid, you will be prompted that the delete will also delete all references at the object level to this customization.
If a customization is deleted, the customization calculation must be re-run to ensure that the correct metadata exists in the database.
The Managed Customized Objects page contains a list of the customized objects. The same object may exist in more than one customization.
Navigation
To access the Manage Customized Objects page, select .
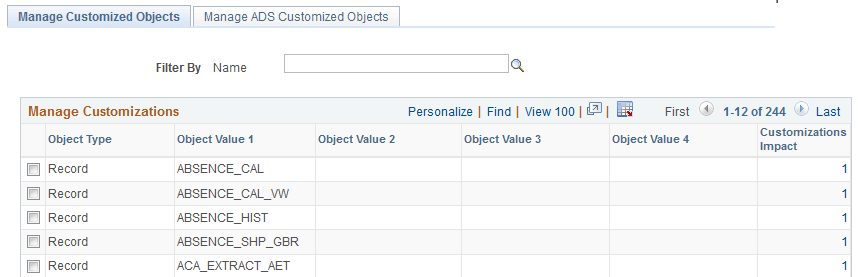
Image: Manage Customized Objects page
This example illustrates the fields and controls on the Manage Customized Objects page. You can find definitions for the fields and controls later on this page.
|
Field or Control |
Definition |
|---|---|
| Filter By |
Use the Filter By editbox to display customizations for a specific customization name. |
| Object Type |
Specifies the managed object type. |
| Object Value 1–4 |
These 4 columns are the same 4 key columns used to identify a managed object in PUM and managed object projects. |
| Customizations |
Displays the customization count. Click the count link to open the Add/Delete Customization References page. |
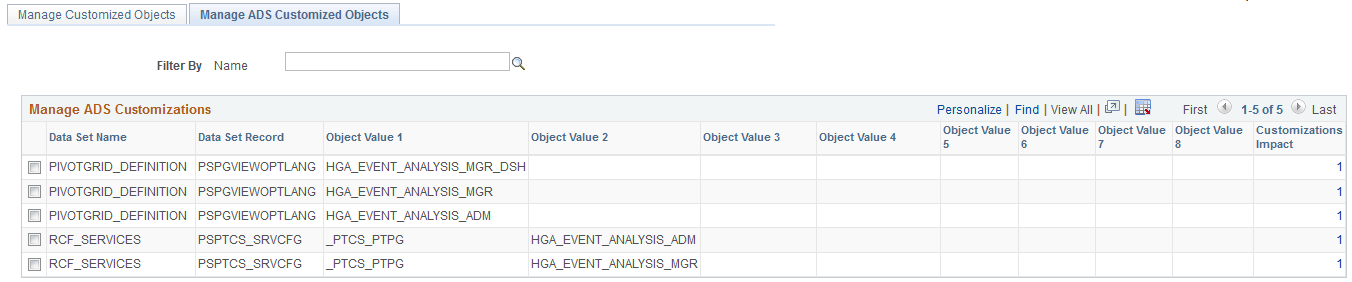
Image: Manage ADS Customized Objects
This example illustrates the fields and controls on the Manage ADS Customized Objects. You can find definitions for the fields and controls later on this page.
|
Field or Control |
Definition |
|---|---|
| Filter By |
Use the Filter By editbox to display customizations for a specific customization name. |
| Data Set Name |
Name of the Data Set. |
| Data Set Record |
The record in the Data Set. |
| Object Value 1–8 |
These are the key columns used to identify an ADS managed object in PUM and ADS managed object projects |
| Customizations |
Displays the customization count. Click the count link to open the Add/Delete Customization References page. |
Deleting Objects
To delete an object or objects, select one or more objects from the grid and click the Delete Selected button. This will delete all customization references for that object.
Adding and Deleting Customization References
To add or delete customization references, click the count link.. This will open the Add/Delete Customization Reference page. The list of customizations to add to an object is limited to the list of customizations defined in the Customization Repository.
Image: Add/Delete Customization References page
This example illustrates the fields and controls on the Add/Delete Customization References page. You can find definitions for the fields and controls later on this page.
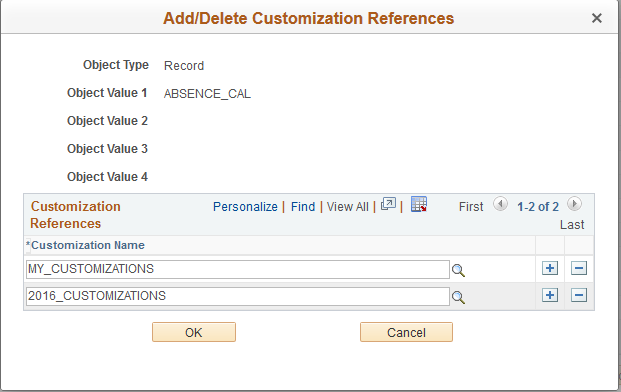
To add a reference:
Click the Add a row icon (+).
Select an existing Customization Name using the Lookup icon.
Note: Customization Names are defined in the Customization Repository.
Click OK.
Note: If a customization reference is added, the Customization Calculation must be rerun.
To delete a reference:
Click the Delete a row icon (+).
Click OK to delete the row.
Click OK.
If only one row exists in the Add/Delete Customization References page, the reference cannot be deleted from this page, it would need to be deleted from the Managed Customized Objects page.
Note: If a customization reference is deleted, the Customization Calculation must be rerun.
In order to manage and display the customization impact in the PUM Search UI, a customization calculation must be generated for each bug fix in the Image. The Customization Calculation page is used to run the calculation for the customizations identified in the Customization Repository.
Navigation
To access the Run Customization Calculation page, select .
Image: Run Customization Calculation page
This example illustrates the fields and controls on the Run Customization Calculation page.

Click the Run Customization Calculation button to update the bug calculations.
Bug fixes containing customizations will be flagged in the Custom Impact column when you define a change package. The color of the flag displayed is dependant on which option you selected on the Manage Customizations page. Green flag indicated you want to include the definition in the change package and red indicates you want to exclude it.
Note: If no data exists in the Customization Repository, then there is no customization impact and the Run Customization Calculation button will be grayed.