Using the Merge Interface
When you perform a merge, Change Assistant:
Compares the Parent database to the Child 1 database to detect changes in Child 1.
Compares the Parent database to the Child 2 database to detect changes in Child 2 of those objects changed in Child 1.
Displays the compare results on the merge page.
Merge Page
When the full database merge has completed, the Merge page is displayed.
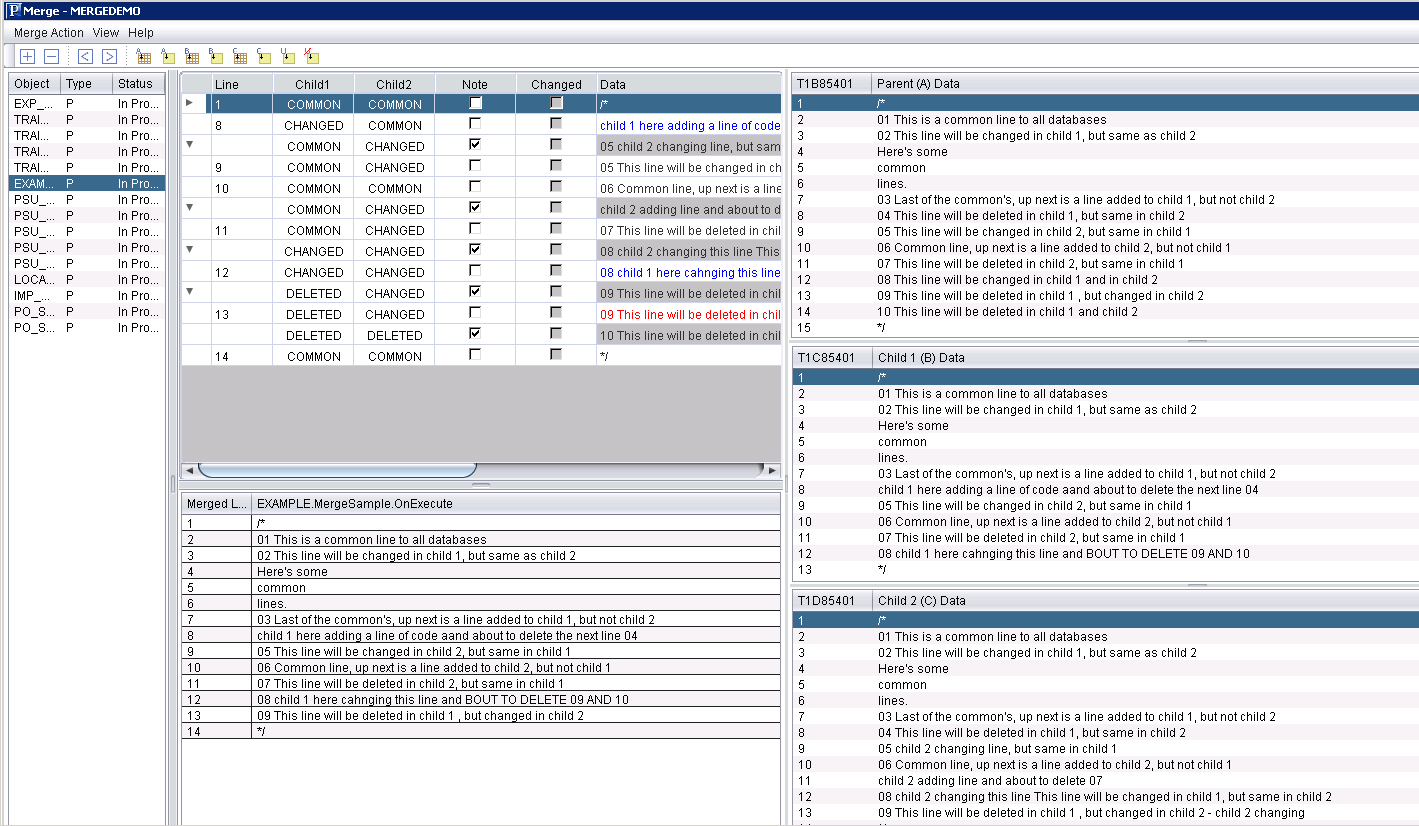
Image: Merge page
This example illustrates the fields and controls on the Merge page. You can find definitions for the fields and controls later on this page.
The Merge page contains these panes:
Program list
Merge edit pane
Merge output pane
Parent (A) Data
Child 1 (B) Data
Child 2 (C) Data
Program List
This pane lists the programs that were changed in Child 1 (If something was changed only in Child 2, it won’t show up here).
If the entire program name is not visible, hover over the name to display a tooltip with the full name.
Double-click an item in the list to open it for merging.
You can select a status for each program to indicate whether it is in progress, completed, or has no action.
Merge Edit Pane
Change Assistant displays the comparison in the merge edit pane. Lines from Child 1 and Child 2 are listed in the merge pane and in the output pane according to the merge rules.
In the merge edit pane, the Action column shows the state of the line and the database to which it belongs. The lines are also color coded to show the state of each line. The color codes are, by default:
|
Action |
Color |
|---|---|
|
COMMON |
Black |
|
ADDED |
Green |
|
CHANGED |
Blue |
|
DELETED |
Red |
|
COMMENT |
Gray |
|
READ ONLY |
Black |
Select View, Colors and Fonts to change the line display attributes.
Common lines are grouped in collapsed sections. Click the expand icon to expand each section.
Click in the text area of a line to edit the text.
To add lines to the merge edit pane from the individual data panes :
Highlight a line in the data pane.
Highlight a line in the merge edit pane.
The new line will be inserted below the highlighted line.
Click an action icon to either insert the line or insert it as a note.
To add a blank line or delete a line, select the line and click the Add line icon or the Delete line icon on the Merge toolbar.
The Merge toolbar contains these options:
|
Field or Control |
Definition |
|---|---|
 |
Add line. |
 |
Delete line. |
 |
Previous difference. |
 |
Next difference. |
 |
Insert Parent line. |
 |
Insert Parent line as note. |
 |
Insert Child 1 line. |
 |
Insert Child 1 line as note. |
 |
Insert Child 2 line. |
 |
Insert Child 2 line as note. |
Merge Output Pane
The output pane displays the current merge results. Initially, the output pane displays the results of the comparison based on the merge rules. When you apply changes, the new merge appears in the pane.
Data Windows
When you select a program, Change Assistant displays the three versions of the program in the respective Parent, Child 1, and Child 2 windows.
Merge Menu
The Merge menu contains these options:
|
Field or Control |
Definition |
|---|---|
| New Session |
Create a new merge session. |
| Open Session |
Open an existing merge session. [Crashes CA] |
| Save Session |
Save the session. |
| Apply to Target |
Apply changes to the Child 1 (Target) database and display the merged program in the merge worksheet pane. |
| Set Merge Rules |
Opens the Edit Session Rules dialog. See Defining Merge Rules. |
| Purge Session |
Purge the merge. |