Working with Tree Branches
This topic discuses how to work with tree branches.
Branching means taking a limb of the tree – a section of the tree that reports into a single node – and creating an actual tree object to hold that limb. Branching a tree can improve PeopleSoft Tree Manager performance (by reducing the amount of data it needs to load when you open a large tree). After you branch a tree, you can specify different object security settings for the branches. When a tree is branched, multiple users can maintain separate sections of the tree while working simultaneously.
When you branch a tree, you’re splitting the original tree into two parts. PeopleSoft Tree Manager creates one new object for your branch and another object to hold the remaining part of the tree. After branching, you have two objects:
The new branch, or subtree, that you created.
A branch that corresponds to the rest of the original tree (minus the new branch).
You can use PeopleSoft Object Security to give users different security access to these objects. For example, by restricting access to the new branch, you can give users access only to that branch.
Assigning different security access to different parts of the tree prevents users from making unauthorized changes to the parts of the original tree (tree branches) which they do not have access granted.
Note: Users can make copies of the entire tree by using the Save As option.
After you have created a branch, you can use it as you use any other tree. You can open it independently of the larger tree, modify it, or even create branches from it. When you’re using the original tree, you cannot edit the branch’s nodes or details until you open that branch.
Restrictions
The following restrictions have been applied to tree branches due to the risk of conflicts when multiple users are performing modifications to a branch tree at the same time:
Moving nodes with subbranches.
Switching levels on nodes with subbranches.
Unbranching nodes with subbranches.
Note: A message will appear if a user attempts to perform any of these actions.
When the multiuser environment is enabled, a user cannot check out a tree branch if another user working with a different branch of the same tree has modified the tree definition and either has or has not saved the changes.
If users edit specific branches without modifying the tree definition, other users can still edit different branches of the same tree at the same time.
To create a tree branch:
Select Tree Manager, Tree Manager.
Search for an existing tree in the Tree Manager page or create a new one.
Highlight the node that will be the root node of the branch.
Click the Create Branch icon.
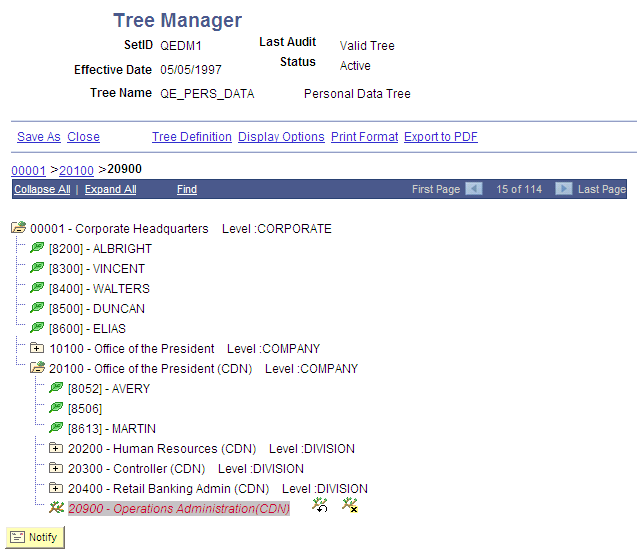
PeopleSoft Tree Manager replaces the node icon with a branch node icon. None of the nodes or detail values reporting to the branched node appears in the tree display.
Image: Example of the 20900 as a branch node
This is an example of a branch node.
To open a tree branch:
Select Tree Manager, Tree Manager.
Search for an existing tree in the Tree Manager page or create a new one.
Highlight the tree branch, and click the Open Branch icon.
Alternatively, in the Tree Manager search page, click a tree name link for the branch that is being defined by a value in the Tree Branch section.
To remove a tree branch:
Select Tree Manager, Tree Manager.
Search for an existing tree in the Tree Manager page or create a new one.
Highlight the tree branch node and click the Unbranch icon.
PeopleSoft Tree Manager replaces the branch icon with the node icon. Any nodes that report to the selected node are now available in the tree.
When you remove a tree branch, do not forget to update PeopleSoft Object Security.