Navigating Through Data
Scroll areas and grids contain similar navigation structures . You can use navigation buttons, links, and grid scroll bars to navigate through data. Buttons and links appear in the navigation header, within the row itself, or to the right of the tabs in a tabbed grid, as appropriate. Certain options, such as embedded horizontal and vertical scroll bars, the Personalize link, and the zoom and download to spreadsheet icons, appear only on grids.
You can view data in grids and scroll area by using navigation buttons and links. The following table describes the buttons and links that might appear in a grid or scroll area.
|
Field or Control |
Definition |
|---|---|
  |
Click to insert one new row after the current row. |
 |
Click to insert multiple rows. Specify the number of rows (1 to 99). |
  |
Click to delete the current row of data. |
 |
(Show Next Row) Click to display the next row or set of rows of data. Note: The Show Next Row and Show Previous Row buttons are disabled if you are viewing all rows of data. |
 |
(Show Previous Row) Click to display the previous row or set of rows of data. |
 |
(Show All Columns) In a tabbed grid only, click to expand grid columns to the right so that tabs are no longer needed. |
 |
(Show Tabs) In a tabbed grid only, click to return the expanded grid to its tabbed state. |
| Personalize |
Click to access the personalization page for that grid, which enables you to sort by column and reorder, hide, and freeze columns. |
 |
(Download) Click to display a new browser window, showing the contents of the grid in a spreadsheet-like format. |
 |
(Zoom) Click to display the grid in a modal window. |
| View All |
Click to display the maximum number of rows available to be viewed at once on a page. When this feature is enabled, the link morphs to read View x so that you can return to the original setting. The value of x can change, and the application developer sets it. |
| Find |
Click to find a row of data containing a specified search string. |
| First |
Click to access the first row or set of rows of data. Note: The First and Last links are not available if you are viewing all rows at once, in which case you scroll to see your data. |
| Last |
Click to access the last row or set of rows of data. |
Keyboard shortcuts are also available for all of the buttons and links described.
See Using Hot Keys.
In addition to these links and buttons, rows use a numbering system. For example, if a grid or scroll area were set to view only one row at a time, then the navigation header might read 1 of 2 or 1 of 20, depending on how many entries there were. If the grid or scroll area were set to view three rows of data at a time, it might read 1-3 of 20. Click the arrows to view the next or previous series of rows. In the Messages scroll area, for example, the count indicates that it contains 721 total rows of data, displaying just one row at a time. Select View 100 to see the rows in groups of 100 at a time.
Image: Sample scroll area
This example shows a sample scroll area.
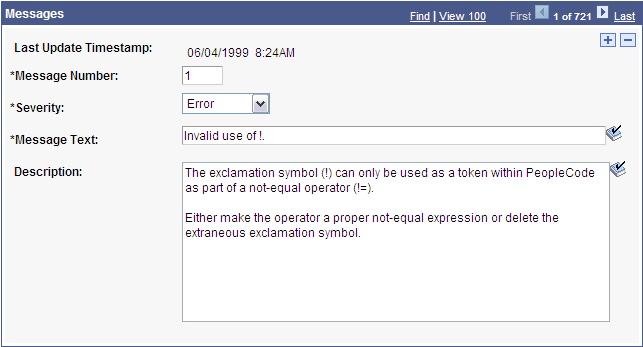
The example shows View 100 instead of View All because of the personalization (GRDRWS) that limits the number of rows that appear in View All mode. Setting it too high could affect performance; the default setting is 100.
Note: Be aware of the differences between the grid and scroll area navigation header, which can appear as a header and a footer in any grid or scroll area control, and the universal navigation header, which appears in the upper-right corner of every page.
You can click the Add or + button to add an empty row following the current row.
In some cases, you can add several rows at once to your grid or scroll area by clicking the +... (multi-row insert) button. When you click this button, the system prompts you to specify the number of rows needed. You can add up to 99 rows at once. This option is not available unless configured by the application developer.
When a grid or scroll area references a table with no data in it, the runtime system presents a dummy row to allow the user to access the add row button. This row might have default data in some fields, but it has no instantiation on the database unless the user enters data in this row and clicks the Save button. Deleting the dummy row results in a new dummy row being added to the display.
Note: If you do not insert a new row, any data that you enter overwrites the existing data in the current row. However, the changes that you make do not take effect until you save the page. If you exit the page without saving, the original data remains intact. When working with effective-dated tables, you can only make changes to existing data when in Correction mode.
You can also delete rows of data from a grid or scroll area. To delete a row of data, click the Delete or – button associated with the row you want to delete. The system confirms the deletion by asking if you want to proceed. It also reminds you that the row will not be deleted from the database until you save the transaction; however, the row is automatically removed from the grid or scroll area. To retrieve the row, click the Back button in your browser. You can also retrieve the deleted row by closing the transaction without saving your changes, however, all changes to the entire component since the last save are lost.
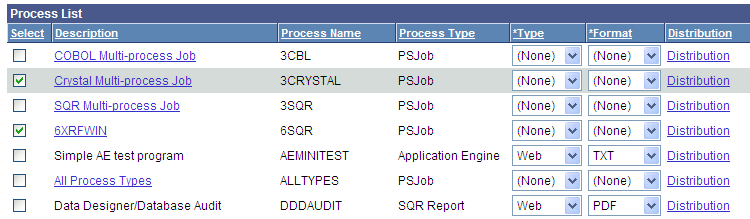
For certain grids and scroll areas, you can select a single row or multiple rows in case you need to batch a number of processes. Single-row selection is available when the system displays a radio button to the left of each grid row or in the upper-left corner of a scroll area. Select a row by selecting one of the radio buttons in front of the row. Multiple-row selection is available when the system displays a check box to the left of each grid row and in the upper-left corner of a scroll area. Select as many rows as you need by selecting each check box. This option must be enabled by the application developer.
In this example, the Process List grid shows check boxes, which enable you to select multiple rows for processing.
Image: Example of selecting rows
This example illustrates using the Select check box to select rows.
The find feature on grids and scroll areas enables you to locate specific data. This feature is particularly useful if your table contains hundreds of rows. Note that this feature enables you to search the data within a specific grid or scroll area only. It does not search for any data outside the control. The find feature looks for matches in edit boxes, display-only fields, disabled or shaded fields, dynamic links, and text in long edit boxes. It does not find column headings, field labels, text values on icons, static links, and hidden fields. It does not search HTML areas that are on the grid or scroll area. The find feature searches from the left-most visible object of the current row down, based on the text that you enter in the search prompt.
The Find link represents the find feature in the navigation bar of your grid or scroll area. Clicking this link displays a dialog box prompting you to enter your search string. In standard grid mode, the find feature searches through all rows of data in the buffer and brings the first occurrence in your search string to the top of the row list in the grid. In View All grid mode, the find feature searches through all rows of data in the buffer, however it does not bring the first occurrence in your search string to the top of the row list in the grid. Instead it highlights the found row. If you are in a scroll area that displays only one row of data at a time, the find feature opens that row of data. To find the next occurrence, click the Find link and enter your search string again.
If your search string does not appear in the currently visible rows, the find feature opens a new display of rows so that the row containing the search string appears in the grid.
On tabbed grids, the find feature searches all tabs to locate the search string. If your search string does not appear in the currently active tab, the find feature moves to the tab where the row containing the search string appears in the grid and makes active the tab where the string is found.
Each grid or scroll area control, if it is set up to perform a find, has a separate Find link in the navigation header of that control. If a scroll area has nested grids or scroll areas, the find feature searches only the current scroll level; it does not search the nested lower-level data.
Note: Your browser may also have a find feature. This tool, however, does not search through data in the entire data buffer for the grid or scroll area. It searches the HTML code for what appears on the current open page only. Thus, it searches field headings, read-only text, and headings in grids, group boxes, and scroll areas only.