Working With Rich Text Editor Fields
This section discusses how to use the rich text editor.
The rich text editor extends the capability of a long edit box. It allows for the rich formatting of text content, including common structural treatments such as lists, formatting treatments such as bold and italic text, and drag-and-drop inclusion and image sizing. You use the rich text editor toolbar to apply additional formatting elements. The toolbar is extensible by means of a custom settings configuration file that application developers can create and implement.
See Setting Page Field Properties for Controls.
Note: All rich text-enabled fields support multi-language entry.
The rich text editor provides an easy to use interface which should be familiar to users who work with common text editors such as Microsoft Word or Oracle Open Office. It consists of these three distinct elements:
Toolbar
Editing area
Pop-up menu
The Messages scroll area contains an example of the rich text editor control showing the toolbar, editing area, and pop-up menu elements:
Image: Rich text editor elements
This example shows the rich text editor controls.
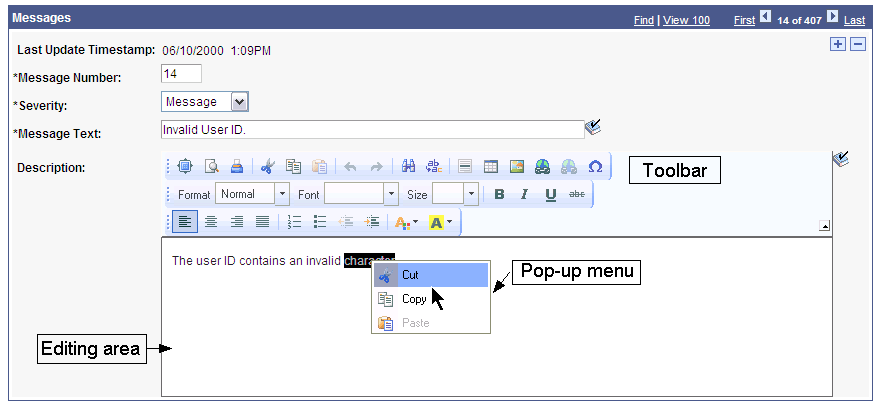
Toolbar
The toolbar, which is the area at the top of the editor, contains many different buttons that extend and activate a variety of editor functions. The toolbar is highly personalizable and can vary from field to field. The toolbar is collapsible. Click the triangle located next to the toolbar to toggle between visible and collapsed.
Editing Area
The editing area is directly below the toolbar. You enter text in this area.
Pop-up Menu
A pop-up menu is a contextual menu that appears when you right-click the mouse inside an editing area. The functions on the menu change based on what element, such as a table or an image, is under the cursor when you click the mouse.
Limitations
Note the following limitations for using the rich text editor:
-
The PeopleTools SVG Administrator role is required to be able to upload SVG images via the rich text editor.
When the Source button is enabled, <script> tags are not allowed in rich text editor content. If you include a <script> tag, then the entire content will be converted to text, including all HTML tags.
When the Source button is enabled, you cannot include <link> tags—for example, to reference style sheets.
The toolbar is the area in rich text editor where you can activate most of the editor features. Each button in the toolbar access a different function. Available functions are both simple, such as basic text formatting, and advanced, such as creating links and tables.
To use the buttons in the toolbar, place your cursor over the button. The button highlights and hover text with information about the function of the button appears. Click the button to execute its function. The graphics on the toolbar buttons are standard across many text editors, and you will probably find that you know how to use them intuitively. In addition to the toolbar buttons, toolbar drop-down list boxes are also available; they are white areas with an arrow on the side. You activate drop-down list boxes by clicking the white area or the arrow. After you click a menu, it expands so that you can select from the available options. To select an option, move your cursor to it and click it.
Writing in the rich text editor is similar to writing in desktop word processor text editors such as Microsoft Word or Open Office with one important difference. You use desktop word processors primarily to create printed content, limited by physical pages. You use the rich text editor to create text that you publish on PeopleSoft application pages and read using web browsers.
To enter text, move your cursor to the editing area and enter the data using your keyboard. You can also paste text into the area.
To format text, click the button before you begin entering text or highlight text and click the button for the format that you want.
To insert an image into the text, click the Image button. The maximum image size is database dependent. Some database platforms support large image sizes while others limit the size to 32000 bytes. Consult your database documentation for more information. Use the Image Properties dialog box to upload an image file or insert a URL link.
To modify images after you have inserted them, right-click the image and then click Image Properties.
Image Properties - Upload Tab
Access the Image Properties dialog box (click the Image button).
Image: Image Properties: Upload tab
This example illustrates the fields and controls on the Image Properties: Upload tab.
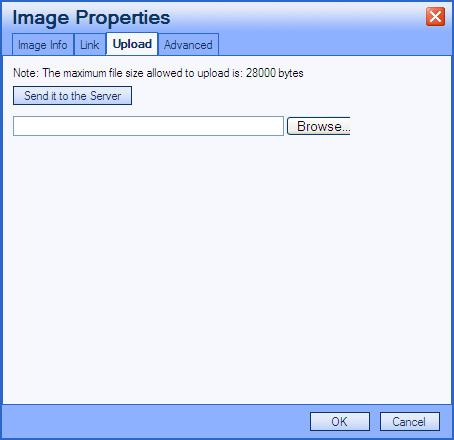
When you click the Image button, the Image Properties dialog box appears with the Upload tab activated. You must upload an image before you can change its properties.
Click the Browse button to locate the file that you want to insert into the text.
Click the Send it to the Server button to send the image to the database.
Image Properties - Image Info Tab
Access the Image Info tab.
Image: Image Properties: Image Info tab
This example illustrates the fields and controls on the Image Properties: Image Info tab.
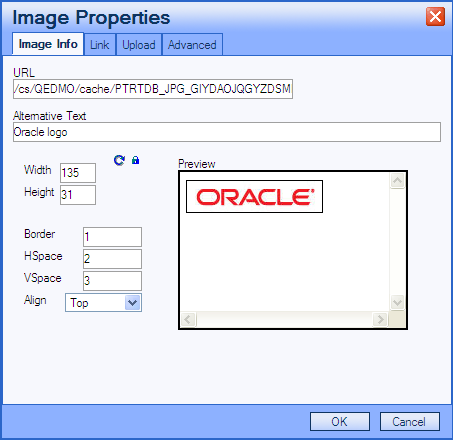
Use the Image Info tab to set the alternative text, width, height, border, hspace, vspace, and to align properties, which in turn set the HTML <img> tag attributes: alt, width, height, border, hspace, vspace, and align, respectively.
|
Field or Control |
Definition |
|---|---|
| URL |
This field is automatically populated when you send the image to the server. This is the URL ID for the image. |
Image Properties - Link Tab
Access the Link tab.
Image: Image Properties: Link tab
This example illustrates the fields and controls on the Image Properties: Link tab.
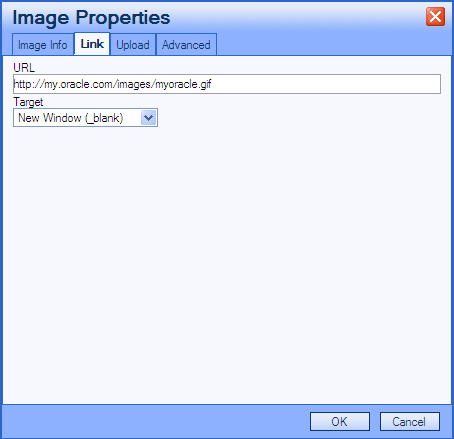
Use the Link tab to automatically link an image to another resource. You must set the Image Info tab URL value first, and then copy it to the Link tab URL field. The editor then encloses the <img> tag in an <anchor> tag. For example, if you specify http://my.oracle.com/images/myoracle.gif as the URL, the result is:
<a href="http://my.oracle.com/images/myoracle.gif"><img alt="" src="http://my.oracle.com/images/myoracle.gif" /></a>
The Target drop-down list specifies where or how the image link will appear. Selecting a target option of New Window, Topmost Window, Same Window, or Parent Window results in the editor setting the target attribute to “_blank”, “_top”, “_self” or “_parent”, respectively. For example:
<a target= "_top" href="http://my.oracle.com/images/myoracle.gif">.
Image Properties - Advanced Tab
Access the Advanced tab.
Image: Image Properties: Advanced tab
This example illustrates the fields and controls on the Image Properties: Advanced tab.
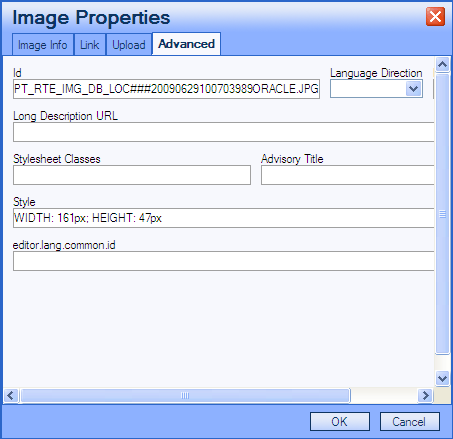
Use the Advanced tab to set the ID, language direction, language code, long description URL, stylesheet classes, advisory title, and style fields, which in turn set the HTML img tag attributes: id, dir, lang, longdescr, class, title and style, respectively.
Complete user documentation for the rich text editor is available from CKEditor.
You can click the Spell Check button that is outside of the rich text editor field to perform spell check on the field content. Clicking this button invokes the current PeopleTools spell check functionality. The HTML tags are stripped and only the text is considered for spell check.
While in Spell Check mode, images that you uploaded do not appear, but you will see a place holder image that contains an x in the upper left corner.