Setting Icon Properties
This section provides an overview of descriptive icons and discusses how to set icon properties.
Both business processes and activities can include descriptive icons. These icons typically do not have associated workflow processing; they are useful primarily if the map will be visible through PeopleSoft Navigator.
Note: Even though the Activity icon does not have any associated processing, it must be included in the business process to establish the relationship between the activity and the business process. That relationship is necessary for proper workflow processing.
To set properties for descriptive icons:
Right-click the descriptive icon and select Item Properties.
The Properties dialog box appears. Depending on the type of icon, the title bar reads Business Processes Definition, Activity Definition, or Description Symbol Definition.
Enter information in the dialog box.
The text that you enter in the Name field identifies the icon and, by default, appears as the display text under that icon. To display different text under the icon, enter it in the Icon Descr text box. Include line breaks in the text by pressing the Enter key.
Click OK to close the dialog box.
Set properties for the steps in an activity to associate the step with the proper page or external program and to establish the correct sequence of steps within the activity.
To set properties for step icons:
Right-click the step icon and select Item Properties.
The Step Definition dialog box appears.
Enter descriptive information about the step.
Enter the step and path numbers to place this step into the activity flow.
The Step Number and Path Number boxes order the steps in this activity. When the user always completes the same steps in the same order, specify the order of the step in the Step Number box and leave the number 1 in the Path Number box. The first step is Step 1; the second is Step 2.
When the user performs different tasks along the way, define multiple step paths. Start numbering the steps from Step 1, staying on Path 1 until you reach the first point at which a user has options. For each step that might come next, use the next consecutive step number, but a different path number, for each one. All of the steps should have the same step number sequence, but a different path number value.
If a user-facing workflow activity guide based on this map is available, you might want to make the more common path the default path. Select Default Step for the step that you want the workflow activity guide to take when a user progresses through the activity.
You can avoid the manual sequencing of steps if you use the automatic step sequencing options that are available in the property sheet for the activity. However, always review the sequence created by automatic numbering to verify that the sequence is correct.
(Optional) Click the Activity Guide button.
This button is available only if you have marked this as an activity guide in the activity properties. The Step Internet Client Attributes dialog box appears. If this map is an activity that will be used in a workflow activity guide, enter the necessary information in this dialog box.
This section discusses how to set step attributes.
Image: Step Attributes dialog box
This example illustrates the fields and controls on the Step Attributes dialog box.
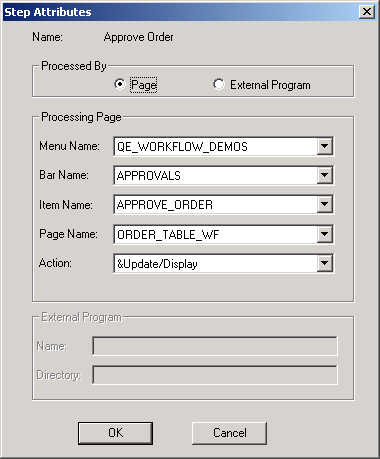
Use the Step Attributes dialog box to select the page or program that the system starts when a user selects this step and the action mode that is used to open the page.
To set step attributes:
On the Step Definition dialog box, click the Attributes button.
Specify whether the user completes this step on a PeopleSoft page or from an external program.
When you select Page or External Program, the appropriate section of the dialog box becomes available. If this is a workflow activity guide and you marked the activity guide option in the activity properties, then you must select Page.
Provide directions for starting the page or external program.
If a user performs the step by completing a PeopleSoft page, select the page from the list boxes in the Processing Page group box.
In the Action drop-down list box, select the type of activity that the user must perform on the database: Add, Update/Display, Update Display/All, or Correction. When a user selects this step, the system displays the specified page in the specified action mode.
Note: You must assign a page to a menu before you create a step that navigates to it.
If users perform the step using an external program, select the program name and its working directory from the External Program group box. The program name must be the name of the executable file, followed by command line parameters, if appropriate. When a user selects this step, the system starts the specified program.
Note: If this step is the first step in its activity (Step 1 Path 1) and the activity has an associated worklist, the system can pass additional parameters to the external program from the worklist record.
Click OK in the Step Attributes dialog box.
Click OK to close the Step Definition dialog box.