EXTENSIBLE POINTS IN SERVICE TIER
This Extensible Points In Service Tier includes following topics:
- REST Tier
- Service Extensions
- Business Policy
- Dictionary
- Domain Extensions
- Error Messages
- Adapter Tier
- Outbound web service extensions
- Security Customizations
- Miscellaneous
- Architecture of GUI Tier
Various extensible points / hooks provided by OBDX framework, are explained in detail in this section
REST Tier
Customization developer can extend the REST tier by writing new REST services. This new REST service will consume new or existing application service. Please note that it is not possible to customize the REST services provided out of the box. Extensibility in REST tier is limited to writing new services.

References:
Please refer to workspace setup of DTO (xface) and REST service.
Please refer to Use case 1 for steps to write new REST service along with sample code.
Guidelines
- OBDX REST tier follows façade pattern, meaning that it is just an endpoint built on top of application service(s).
- A REST service should not have any business logic. It should consume one or more application services and prepare the response.
- Before coding a new REST service, developer should decide the resource(s) and sub-resources(s) that s/he needs to develop. Based on this, the developer can design required URIs. E.g. A ‘Demand Deposit Account’ is a resource in the system and /accounts/demandDeposit/{accountId} is the REST URI to access it.
- The service should be annotated suitably using JAX-RS annotations.
- The service should wrap its operation in ‘Channel Interaction’.
- The service should use adequate logging.
HTTP Standards
HTTP Methods
OBDX resources support following HTTP methods. New services also should use these methods appropriately.
|
Method |
Purpose |
|---|---|
|
GET |
Retrieve / fetch the resource |
|
POST |
Create a new resource |
|
PUT |
Update / modify an existing resource. The payload is expected to have full resource. |
|
PATCH |
Update / modify very small part of an existing resource. The payload is expected to have only the fields to be updated. |
|
DELETE |
Delete a resource |
HTTP Response Codes
Following HTTP response codes are used. New REST services should return appropriate response code based on result of the operation.
|
Code |
Status |
Description |
|---|---|---|
|
200 |
OK |
Request successfully executed and the response has content |
|
201 |
Created |
Resource successfully created |
|
202 |
Accepted |
Request has been accepted for processing but processing has not been completed. |
|
204 |
No Content |
Request successfully executed and the response doesn't have content |
|
304 |
Not Modified |
The resource has not been modified for a conditional GET request |
|
400 |
Bad Request |
The request could not be understood by the server due to malformed syntax |
|
401 |
Unauthorized |
The request requires user authentication, or authorization has been refused for the credential passed in the request |
|
404 |
Not Found |
The requested resource was not found |
|
500 |
Internal Server Error |
The server encountered an unexpected condition which prevented it from fulfilling the request |
Service Extensions
This extension point should be used when the customization developer needs additional business logic for an application service. This additional logic, which is not available as part of the digital experience product functionality, but could be a client requirement. For these purposes, two hooks are provided in the application code:
Pre-extension hook
This extension point is available in application service before it performs any validations and executes business logic. This hook can be important in the following scenarios:
- Additional input validations
- Execution of business logic, which necessarily has to happen before going ahead with normal service execution.
Post-extension hook
This extension point is available in the application service after it has executed business logic. This hook can be important in the following scenarios:
- • Output response manipulation
- • Custom data logging for subsequent processing or reporting.
Both ‘pre’ and ‘post’ service extensions are available in the application service layer (also known as the ‘app’ layer) of OBDX.

This hook in implemented using service extension executor and service extensions. These components are explained in detail below. Customization developer can use these components suitably based on the requirement.
Below class diagram depicts the relationship between application service, extension executor and extensions. The diagram considers a sample ‘create’ method in application service.

Note: The RequestDTO and ResponseDTO components depicted in above diagram are explained in subsequent sections. For now, note that the RequestDTO contains inputs to the application service method and ResponseDTO contains output generated by the method.
Service Extension Interface
This interface has a pair of pre and post method definitions for each application service method of the present. A service extension class has to implement this interface. The ‘pre’ method is the pre-extension hook as explained before. Similarly the ‘post’ method is the post-extension hook.
Multiple implementations can be defined for a particular service. The service extensions executor invokes all the implementations defined for the particular service both before and after the actual service executes. The signatures of these methods are:
public void pre<Method_Name>(SessionContext, <Method_Parameters>) throws Exception;
public void post<Method_Name>(SessionContext, <Method_Parameters>, ResponseDTO) throws Exception;
Naming Convention
The naming convention of service extension interface is
I<Service_Name>Ext
For example, consider below code sample
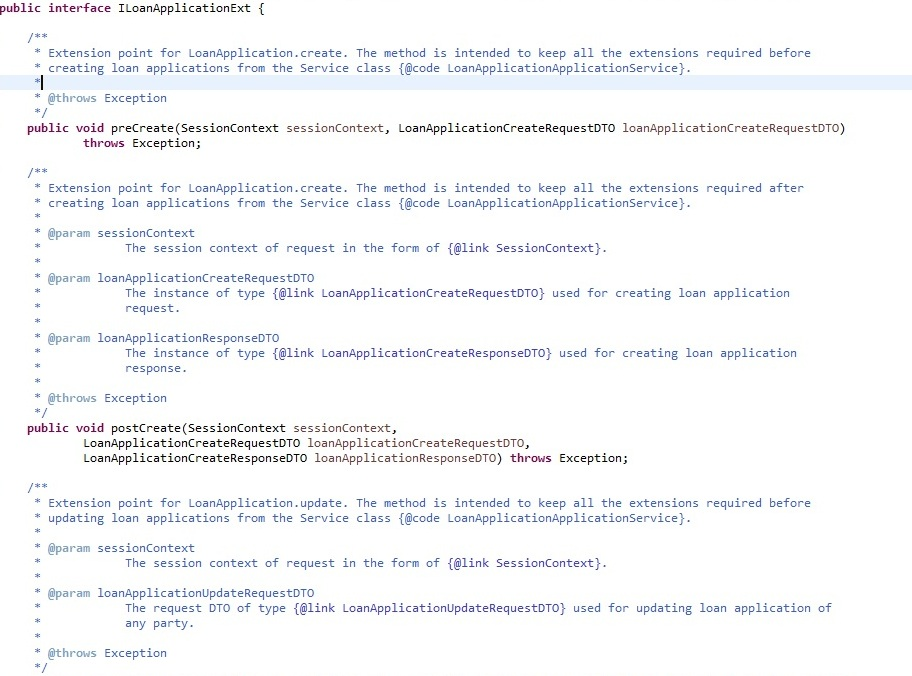
Service Extension Executor Interface
This acts as an interface for the application service to access service extensions. The implementing class creates an instance each of all the extensions defined in the service extensions configuration file. If no extensions are defined for a particular service, the executor creates an instance of the default extension for the service. The executor also has a pair of pre and post methods for each method of the actual service. These methods in turn call the corresponding methods of all the extension classes defined for the service (extension chaining).
Naming convention
The naming convention for extension executor class is as below:
Interface : I<Service_Name>ExtExecutor
Implementation : <Service_Name>ExtExecutor
For example, consider below code sample:
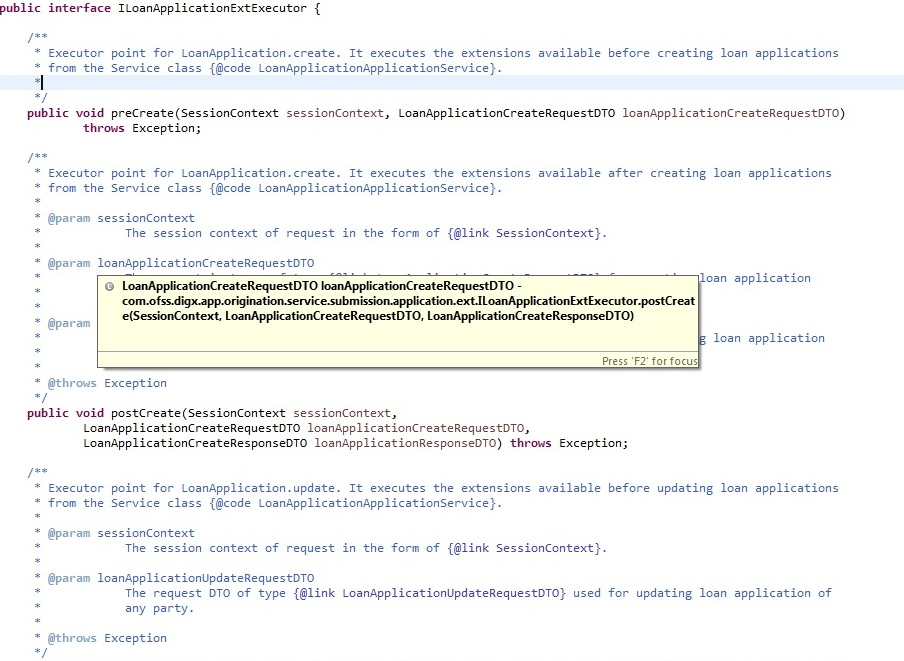
Default Extension (Void Extension)
This class, named as Void<Service_Name>Ext, is provided out of the box for each application service. This class implements the aforementioned service extension interface without any business logic viz. the implemented methods are empty.
The default extension is a useful & convenient mechanism to implement the pre and / or post extension hooks for specific methods of an application service. Instead of implementing the entire interface, one should extend the default extension class and override only required methods with the additional business logic. Product![]() A product is created based on the bank's business requirements and has certain typical parameters that describe its attributes or characteristics. Every product is defined under Product Class and Product Group.
For example, a product 'Fixed rate home loan' is defined under product group 'Home Loan' and product class 'Loans'. developers do not implement any logic, including product extension logic, inside the default extension classes.
A product is created based on the bank's business requirements and has certain typical parameters that describe its attributes or characteristics. Every product is defined under Product Class and Product Group.
For example, a product 'Fixed rate home loan' is defined under product group 'Home Loan' and product class 'Loans'. developers do not implement any logic, including product extension logic, inside the default extension classes.
For example:
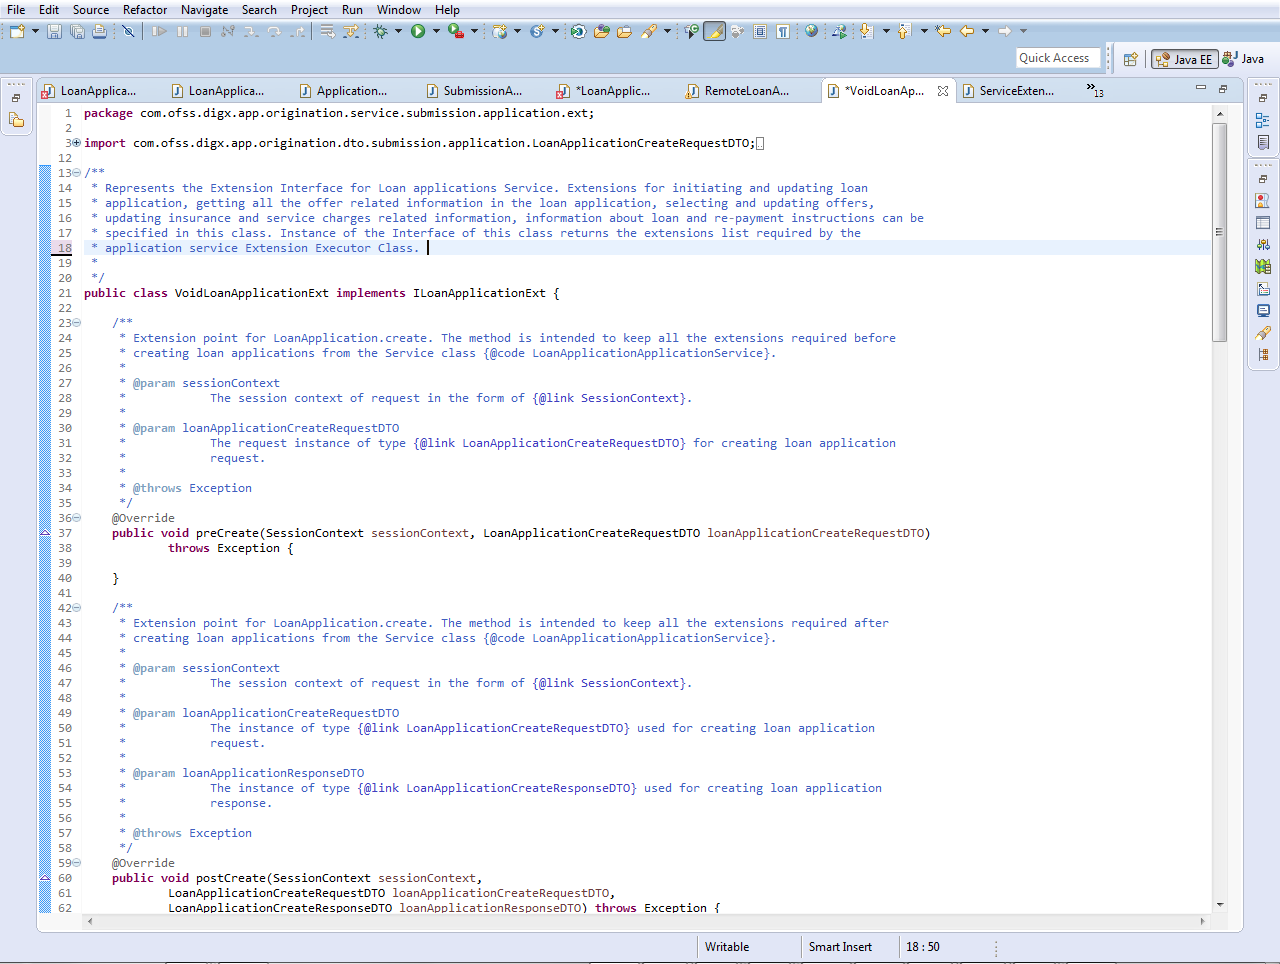
Custom Extension
Below is an example of customized service extension class that implements methods of application service extension interface. This class contains pre hook and post hook point for the service. The pre method of this customized extension is executed before the actual service method and the post method of this is executed after the service method.
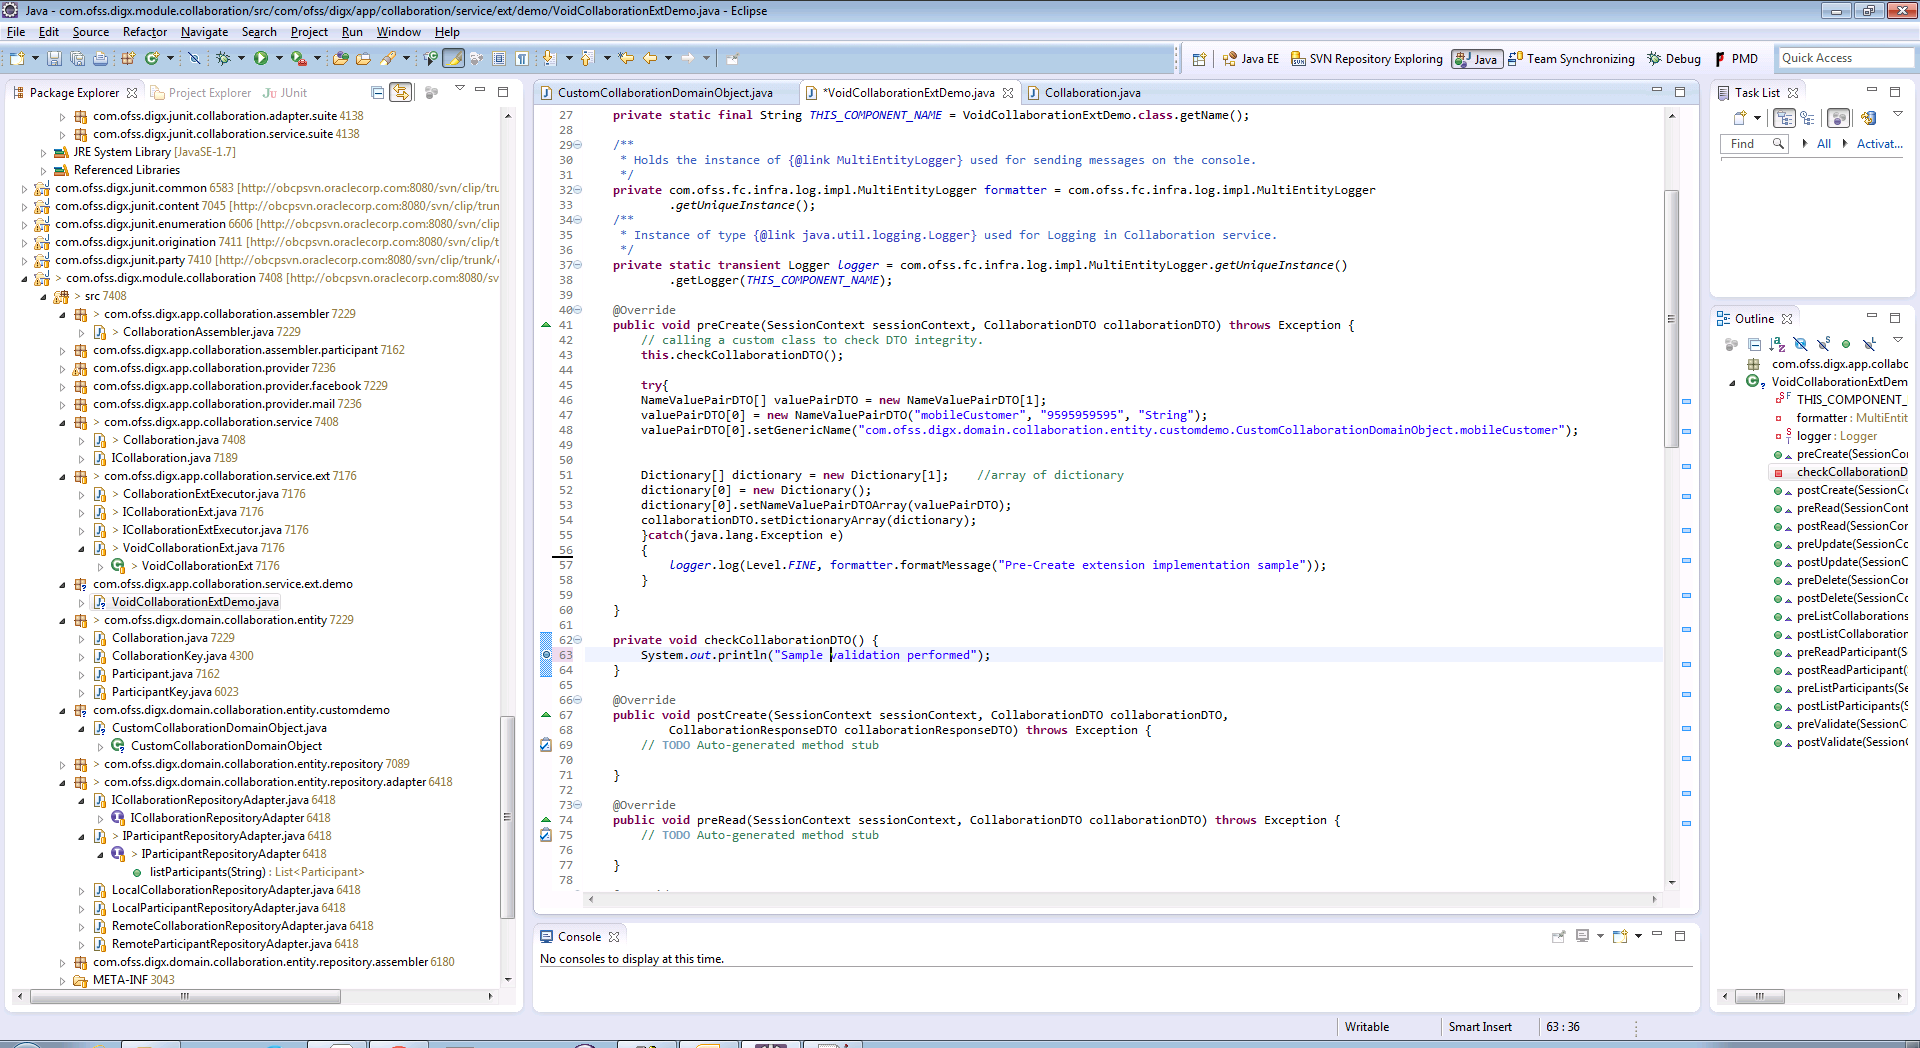
Note: The concept of ‘Dictionary’ is explained in detail in subsequent section.
Service Extension Configurations
Set the property id and the property values in the digx_fw_config_all_b table. The property id will be the fully qualified name of the service and the value will be the fully qualified name of the custom extension created.
For example:
insert into digx_fw_config_all_b (PROP_ID, CATEGORY_ID, PROP_VALUE, FACTORY_SHIPPED_FLAG, PROP_COMMENTS, SUMMARY_TEXT,
CREATED_BY, CREATION_DATE, LAST_UPDATED_BY, LAST_UPDATED_DATE, OBJECT_STATUS_FLAG, OBJECT_VERSION_NUMBER)
values ('com.ofss.digx.app.origination.service.submission.applicant.Applicant An applicant refers to an individual or a non-individual (organization or trust) who has applied for one or more main lines.', 'ServiceExtensionsConfig',
 'com.ofss.digx.app.origination.service.submission.application.ext.CustomLoanApplicationExtension', 'N', 'asdf',
'asdf', 'asdf', '', 'asdf', '', 'Y', 1);
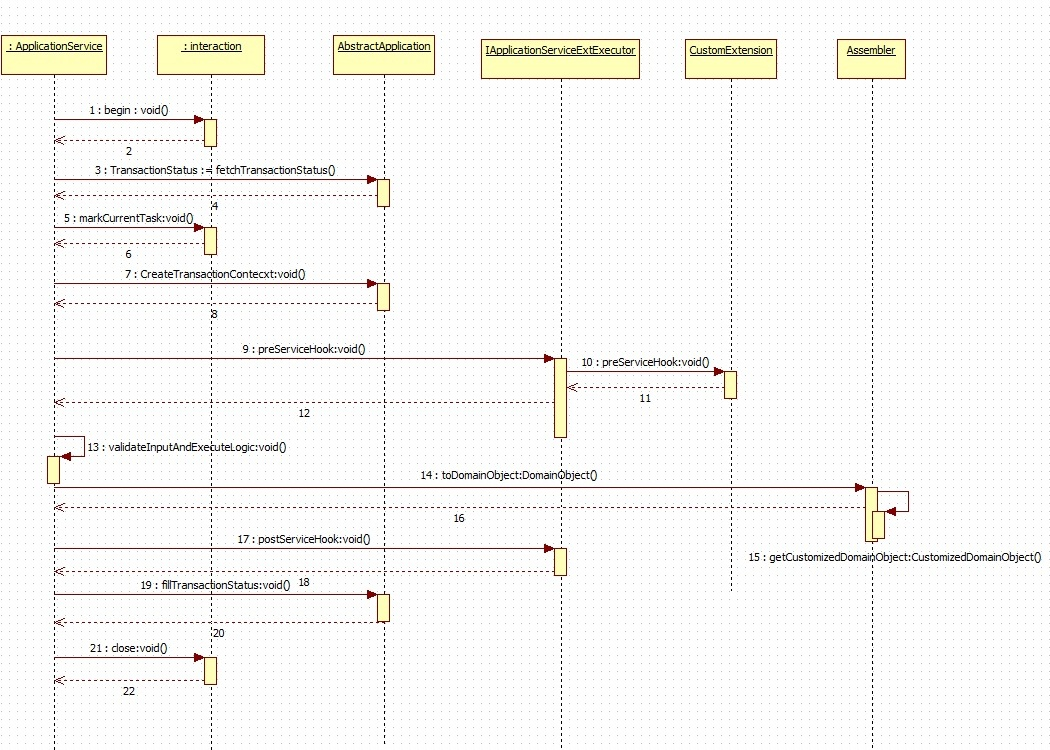
Sequence of events in service extension
Every application service method has a standard set of framework method calls as shown in the sequence diagram below.
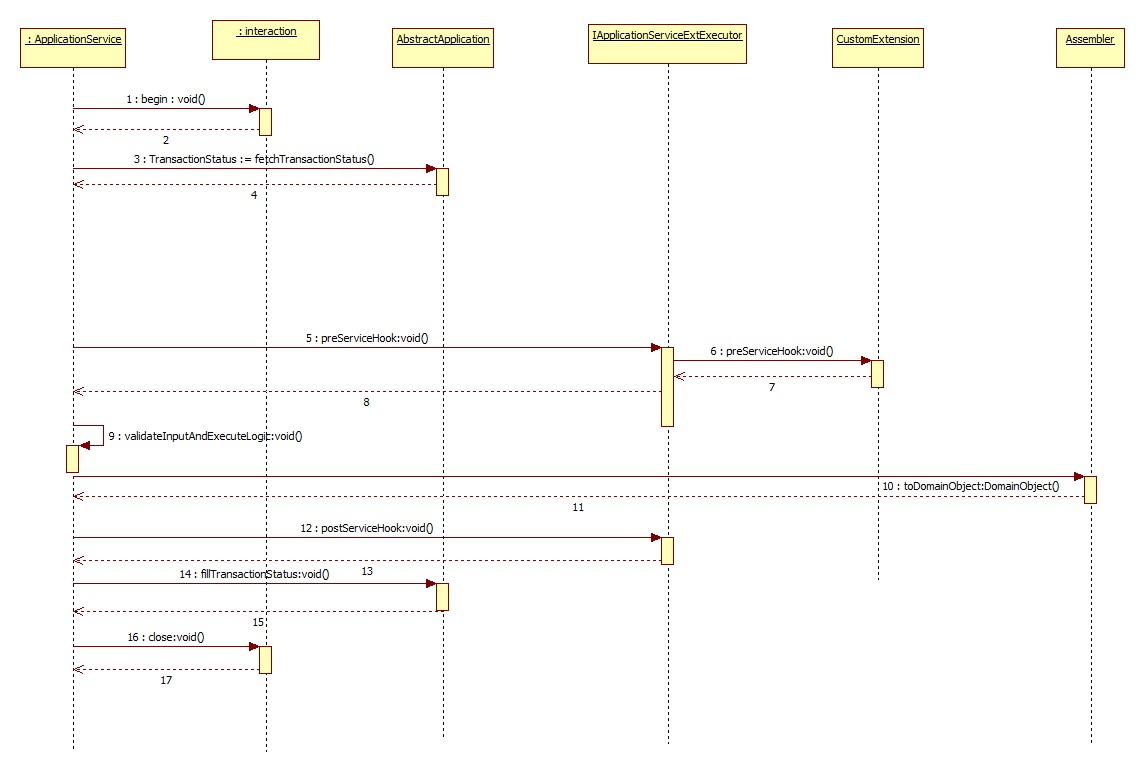
The pre hook is provided after the invocation of fetchTransactionStatus call inside the application service. At this step, the current task code is received , any additional manipulation of the input received from the User interface channel can be done in the pre hook. Apart from this additional data coming from the screen specific to client requirements can be handled in the pre hook.
The post hook is provided after the business logic corresponding to the application service invoked has executed and before the successful execution of the entire service is marked in the status object. This ensures that the status marking takes into consideration any execution failures of post hook prior to reporting the result to the calling source. Both, the pre and the post hooks accept the service input parameters as the inputs. The post hook also accepts the Response parameter as the input.
Business Policy
OBDX supports three types of validations
DTO field validations: These are the field level validations such as syntax check of the input. These validations are achieved by using field level annotations in request DTO. These validations are not available for extension. Below is the list of out of box annotations available
|
Annotation |
Description |
|---|---|
|
|
This annotation is used to validate the respective field with email regular- expression. If the field doesn't satisfy the mentioned regular-expression then the respective error code is thrown. |
|
@Mandatory |
This annotation marks the fields as mandatory. Once marked, if the field is null then respective error-code is thrown Eg. @Mandatory(errorCode = DemandDepositErrorConstants.DDA_MANDATORY_ACCOUNT_ID) private Account accountId; |
|
@Length |
This annotation marks the lengths of the fields. Once marked, if the validation is violated then the respective error code is thrown. Eg. @Length(min = 2, max = 20, errorCode = PartyErrorConstants.PI_LENGTH_EXTERNAL_REF_ID) |
|
@NonNegative |
This annotation checks that the value is non-negative |
|
@Regex |
This annotation checks if the value matches regular expression provided |
- System Constraints: System performs these checks mandatorily. It is not possible to override or bypass these checks.
- Business Policies: These are typically the business validations required to be performed before executing business logic. OBDX framework allows customization developer to override business policies as per the requirement.
Adding new business policy
Customization developer can add new business policy for new or existing services. Following are the steps to add a new business policy:
- Create new business policy DTO. This DTO is supposed to encapsulate all the input fields upon which validation is to be performed.
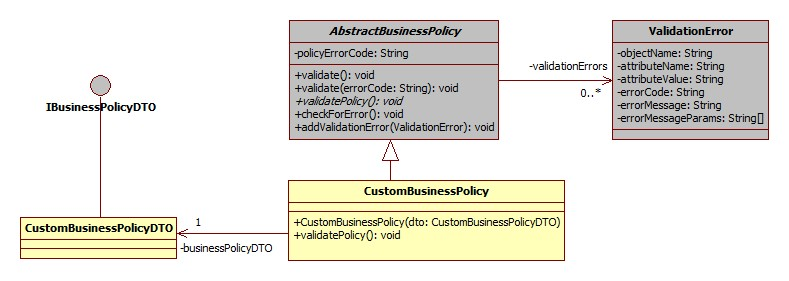
- Create new business policy. This class must extend AbstractBusinessPolicy class and implement the validatePolicy() method. This method should have the validation logic and if the validation fails, then it should call addValidationError() method with a new instance of ValidationError as parameter. One of the parameter to the constructor of ValidationError is error code. A new error could be added by following guidelines provided in Error Messages section.
- Configure new business policy. The business policy class created in above step should be configured in digx_fw_config_all_b table with category_id as ‘CustomBusinessPolicy’ and prop_id as the policy identifier. For example:
insert into digx_fw_config_all_b (PROP_ID, CATEGORY_ID, PROP_VALUE, FACTORY_SHIPPED_FLAG, PROP_COMMENTS, SUMMARY_TEXT,
CREATED_BY, CREATION_DATE, LAST_UPDATED_BY, LAST_UPDATED_DATE, OBJECT_STATUS_FLAG, OBJECT_VERSION_NUMBER)
values (CREATE_TERM_DEPOSIT_BUSINESS_POLICY ', ' CustomBusinessPolicy ', 'com.ofss.digx.cz.domain.td.entity.policy.CustomBusinessPolicy',
'N', 'asdf', 'asdf', 'asdf', '', 'asdf', '', 'Y', 1);
The class diagram for new custom business policy will be like this
Extending existing business policy
OBDX provides out of box business policies for all services. If only a part of the validation is to be modified or a new validation is to be added in addition to the validations that the existing business policy does, then it is possible to extend existing business policy and override existing validation.
Please note that this capability depends on how the original business policy is coded. If the out of box business performs all its validations in validatePolicy() method, then this approach may not be useful. On the other hand, if the out of box business policy has separate individual methods for validations and validatePolicy() method calls these methods one by one, then extension of the business policy is useful.
The steps to be followed as same as mentioned in earlier section, except the difference that the custom business policy class will extend the out of box business policy class and override its methods as per the requirement.
Dictionary
Dictionary is not an extension point in itself, but it plays an important role in enabling extensibility of domain. Hence, it is worth understanding the ‘Dictionary’ before proceeding to subsequent sections
Data transfer object (DTO)
Data transfer object (DTO) is a design pattern used to transfer data between an external system and the application service. All the information may be wrapped in a single DTO containing all the details and passed as input request as well as returned as an output response. The client can then invoke accessory (or getter) methods on the DTO to get the individual attribute values from the Transfer Object. All request response classes in OBDX application services are modelled as data transfer objects
Dictionary
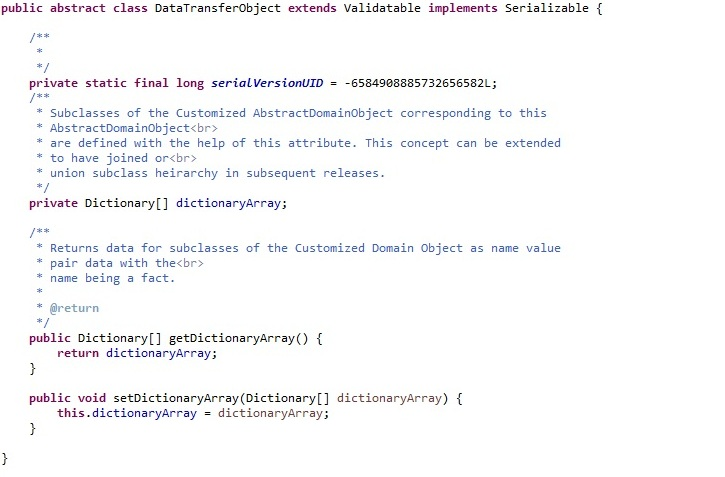
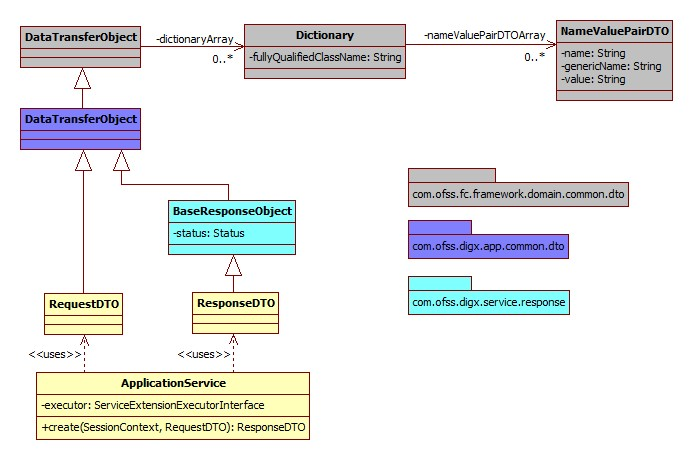
All data transfer objects extend a base class DataTransferObject which holds an array of Dictionary object. The Dictionary encapsulates an array of NameValuePairDTO which is used to pass data of custom data fields or attributes from the UI![]() User Interface layer to the host middleware. Below class diagram shows the relationship between these classes.
User Interface layer to the host middleware. Below class diagram shows the relationship between these classes.
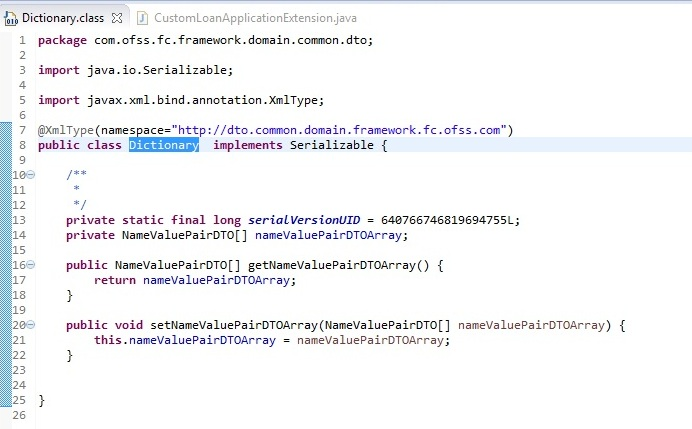
Dictionary class looks like
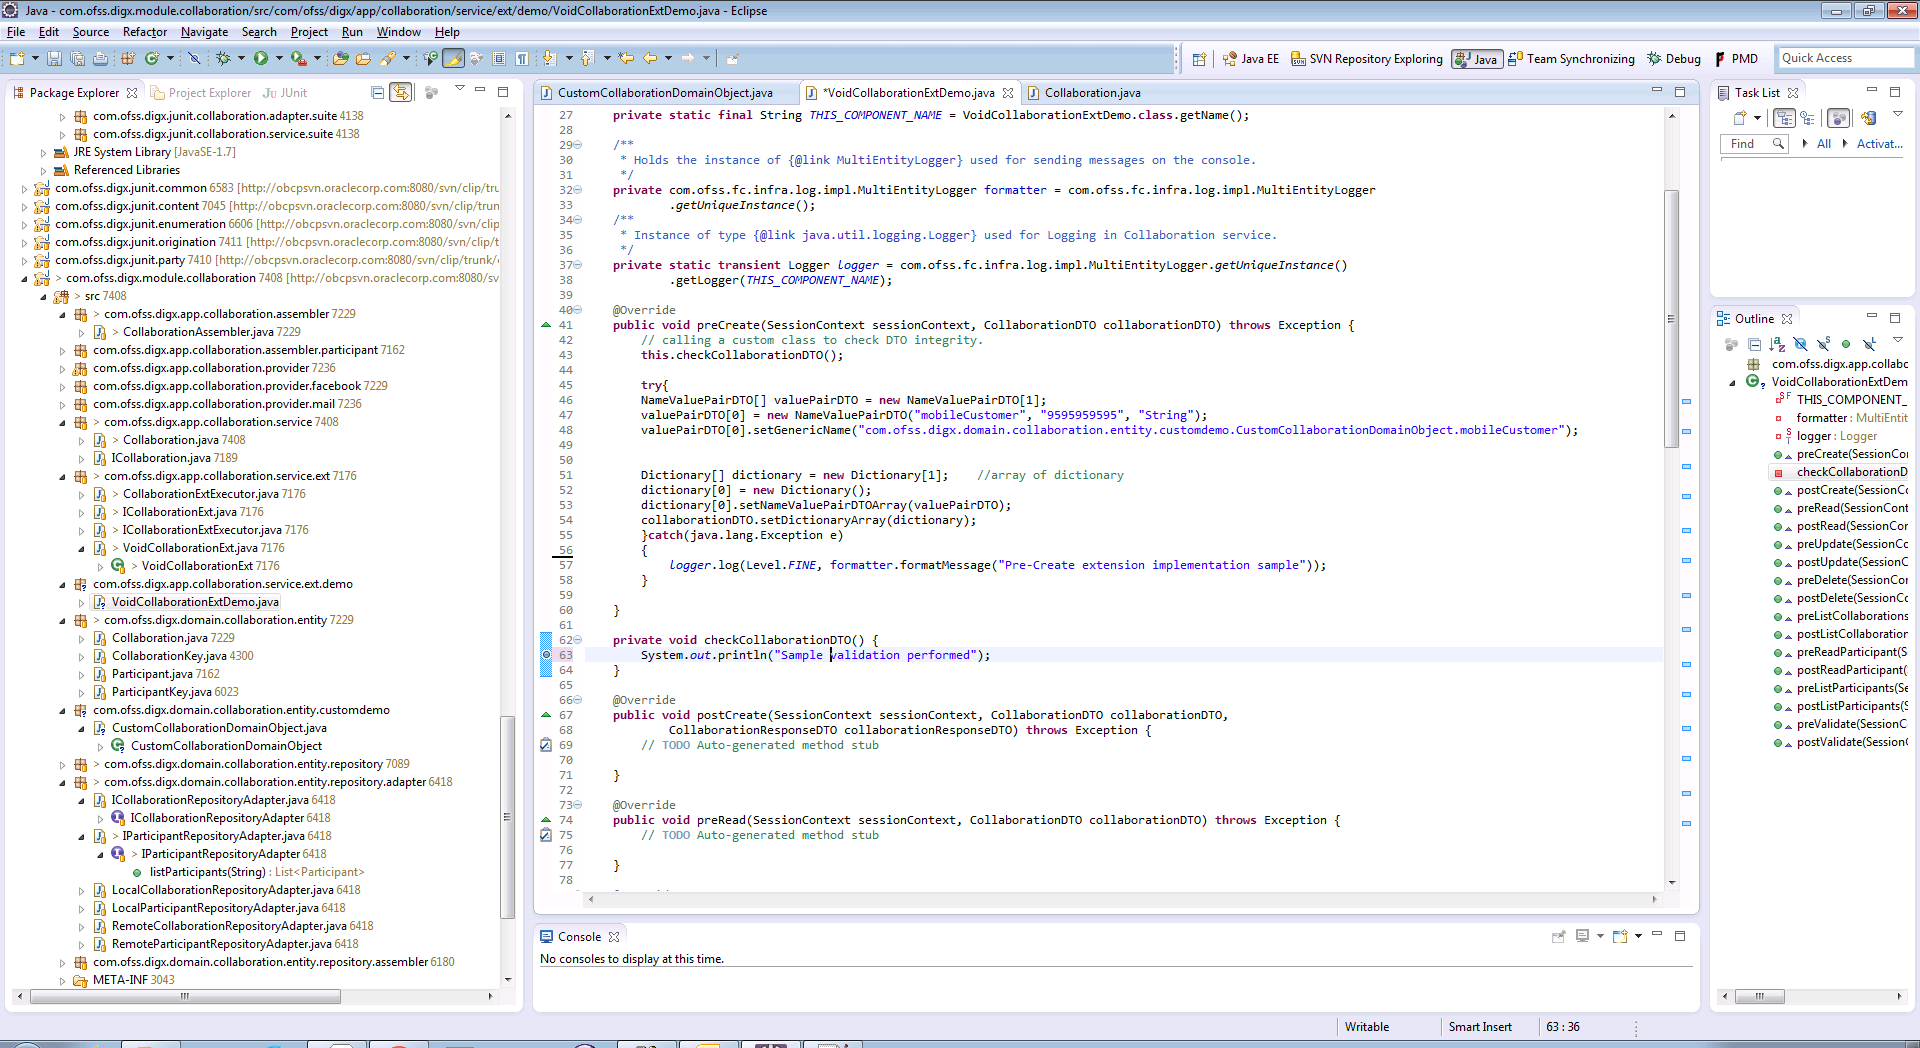
Following image shows use of dictionary with NameValuePairDTO and added it to the Data Transfer Object
Domain Extensions
The Domain layer is a central layer in designing entities in OBDX. The design philosophy is called domain driven design. In this, the domain object (also referred as ‘entity’ in OBDX context) is central to the design. The domain captures all attributes of the real time entity that it models.
OBDX provides infrastructure to customize existing domains. It also allows to add new domains.
Custom Domain Objects
OBDX framework (leveraging undelaying OBP![]() Oracle Banking Platform infrastructure) provides a standard mechanism to customize the domain objects that are provided out of the box. The Dictionary object plays an important role in this mechanism.
Oracle Banking Platform infrastructure) provides a standard mechanism to customize the domain objects that are provided out of the box. The Dictionary object plays an important role in this mechanism.
This section describes how consultants or other third parties can extend domain and achieve Extensibility. This provides true domain model extension capabilities by allowing addition of custom data fields to the underlying domain objects.
Translating Dictionary data into custom domain object
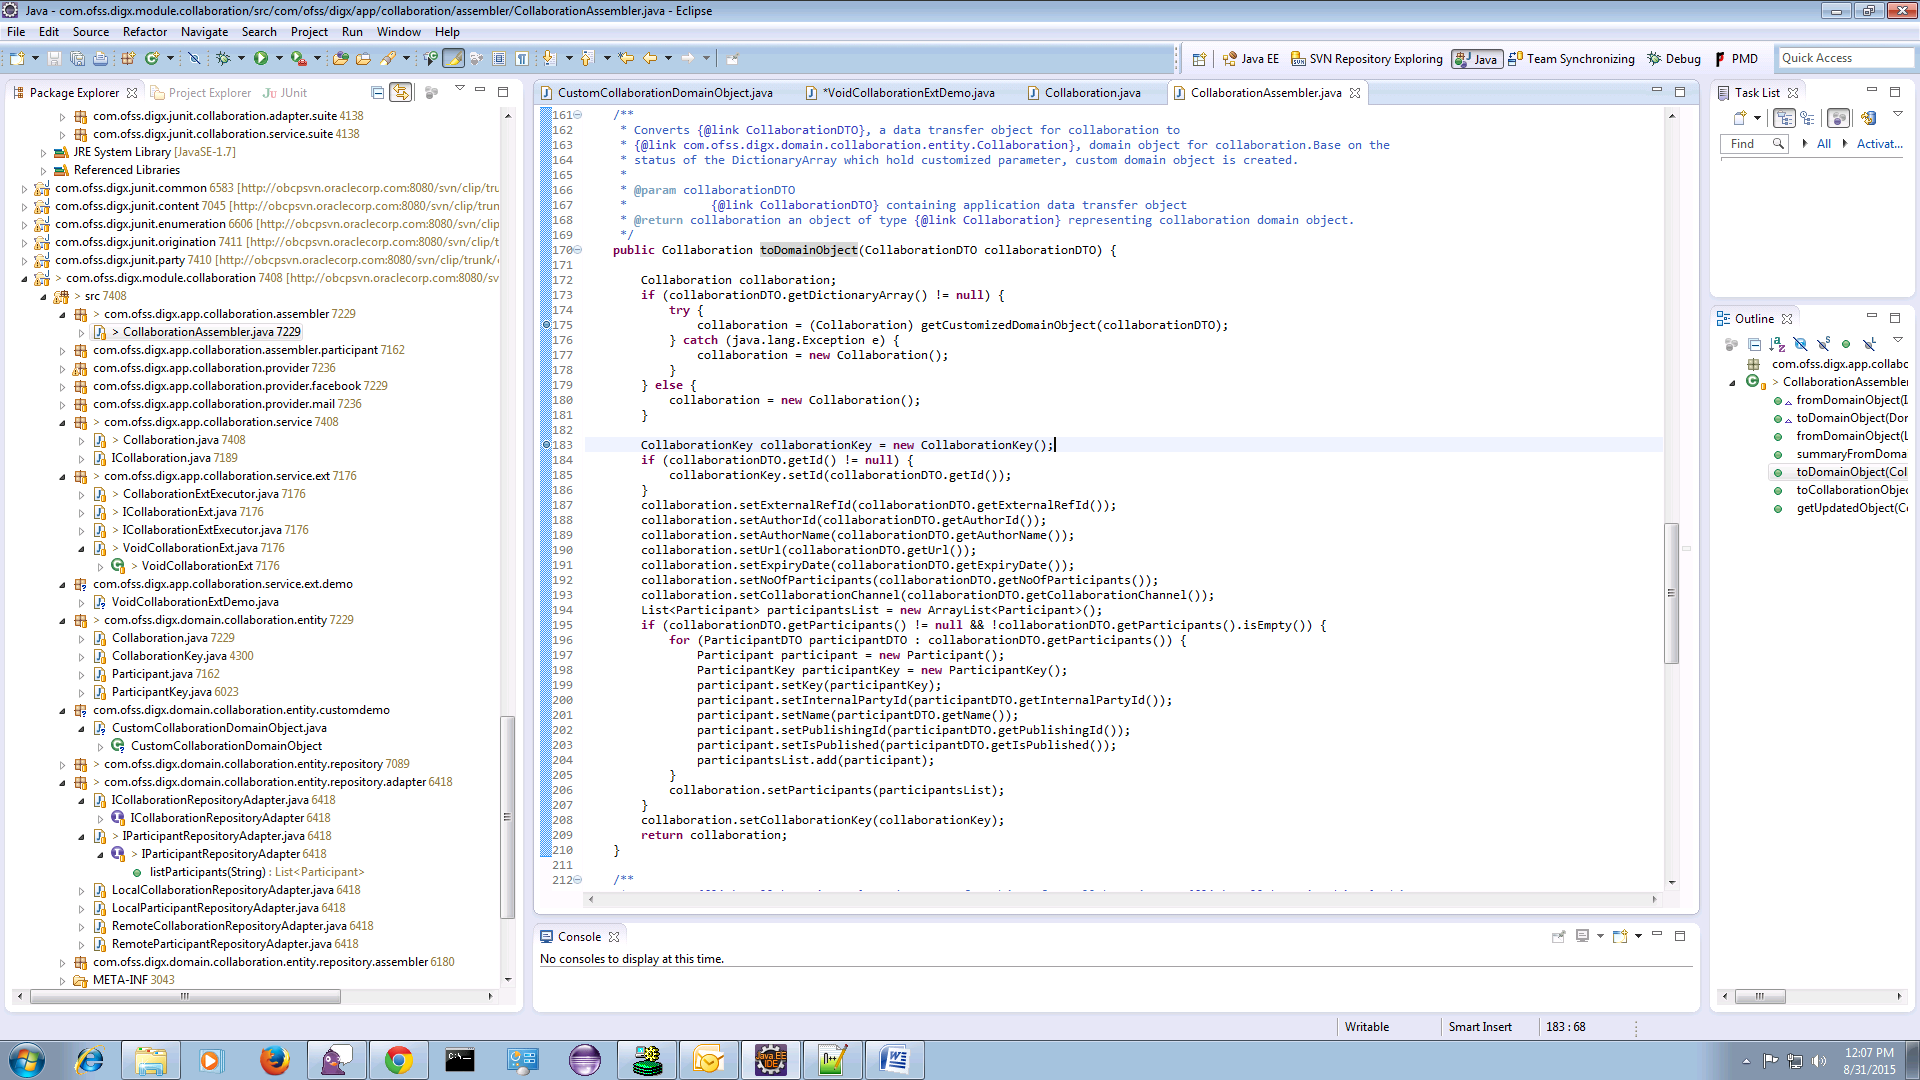
If dictionary is added to DTO then it is necessary to get customized domain Object which extends base Domain Object. Method getCustomizedDomainObject in AbstractAssembler is used for the same.
Following image shows call to get Customized domain Object if additional data (Dictionary) is added to the request DTO.
Writing Custom Domain Object
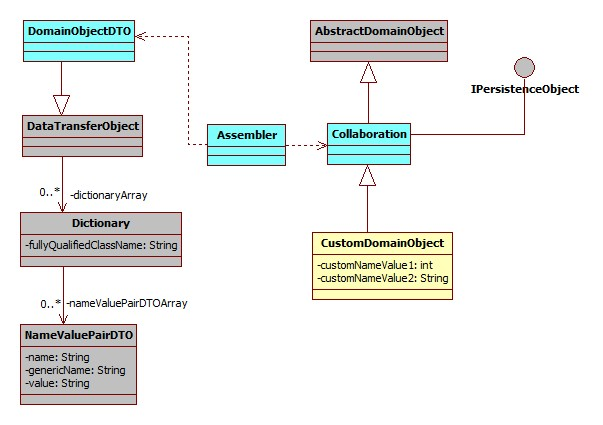
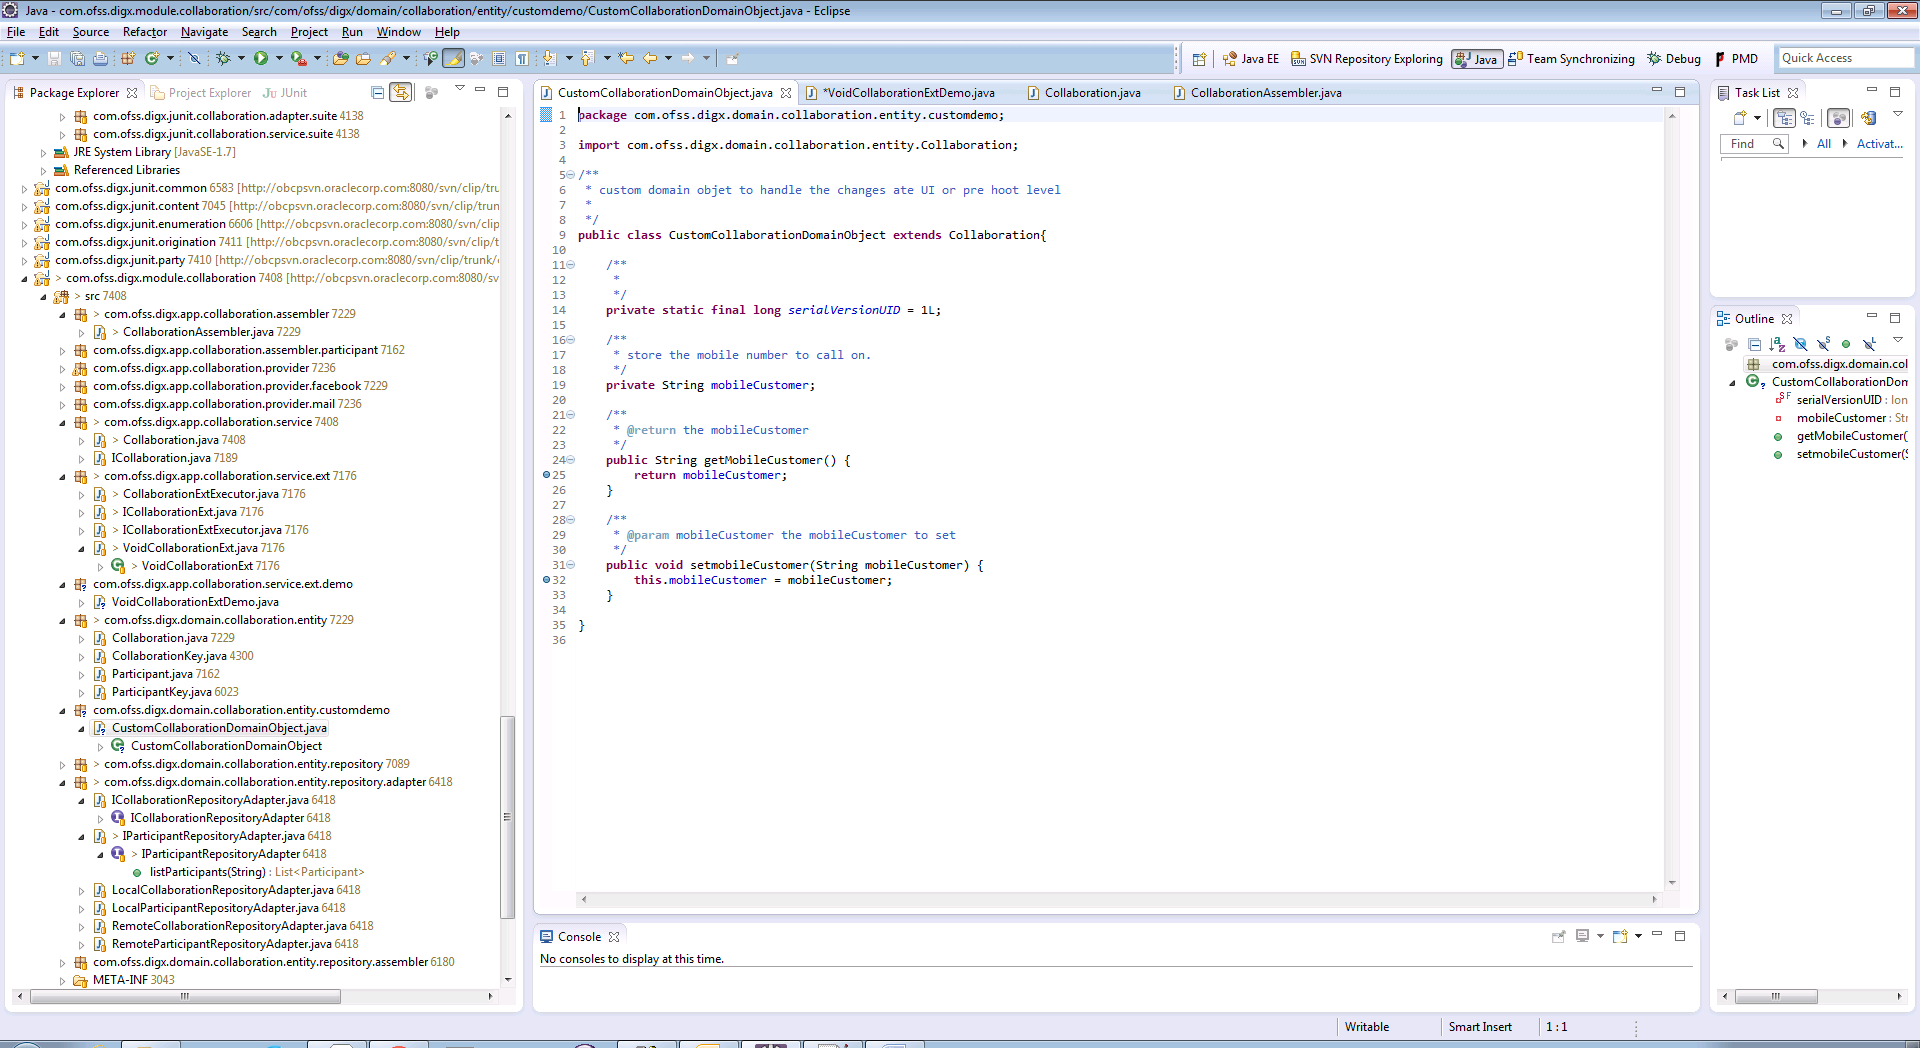
The custom domain object must extend existing domain object class. Mapping for same should be done in database as Customized Abstract Domain Object Configuration. This class contains additional fields added at UI layer and getter, setter for the same.
Below diagram shows the custom domain object and also depicts the role of Dictionary in mapping additional fields from DTO to this custom domain object.
For Example:
Configure Customized domain object in database
The domain object created needs to be mapped as a custom domain object for the existing domain object. For example:
insert into digx_fw_config_all_b (PROP_ID, CATEGORY_ID, PROP_VALUE, FACTORY_SHIPPED_FLAG, PROP_COMMENTS, SUMMARY_TEXT,
CREATED_BY, CREATION_DATE, LAST_UPDATED_BY, LAST_UPDATED_DATE, OBJECT_STATUS_FLAG, OBJECT_VERSION_NUMBER)
values ('com.ofss.digx.domain.origination.entity.submission.lending.application', 'CustomizedAbstractDomainObjectConfig', 'com.ofss.digx.domain.origination.entity.submission.lending.application.ext.Application', 'N', 'asdf', 'asdf', 'asdf',
'', 'asdf', '', 'Y', 1);
Three main columns that need to be fed with new information are.
- CATEGORY_ID : “CustomizedAbstractDomainObjectConfig”
- PROP_VALUE:” CLASS NAME of the class implementing the custom domain object ”
- PROP_ID:” CLASS NAME of the DomainObject”.
ORM Mapping
If this domain needs to be persisted in local database, then you need to create Eclipselink ORM mapping to map fields in the domain to database table. Follow these steps:
- We are going to use Eclipselink JPA inheritance strategy.
Refer to the below url to implement inheritance with Eclipselink JPA https://wiki.eclipse.org/EclipseLink/Examples/JPA/Inheritance
You can implement it using either Single Table inheritance or Joined Table inheritance approach.
Here we will see how to implement it with Single table inheritance:
Create a new ORM file to handle Customized Domain Object. This ORM file should contain entries only for those corresponding new fields, which you want to add.
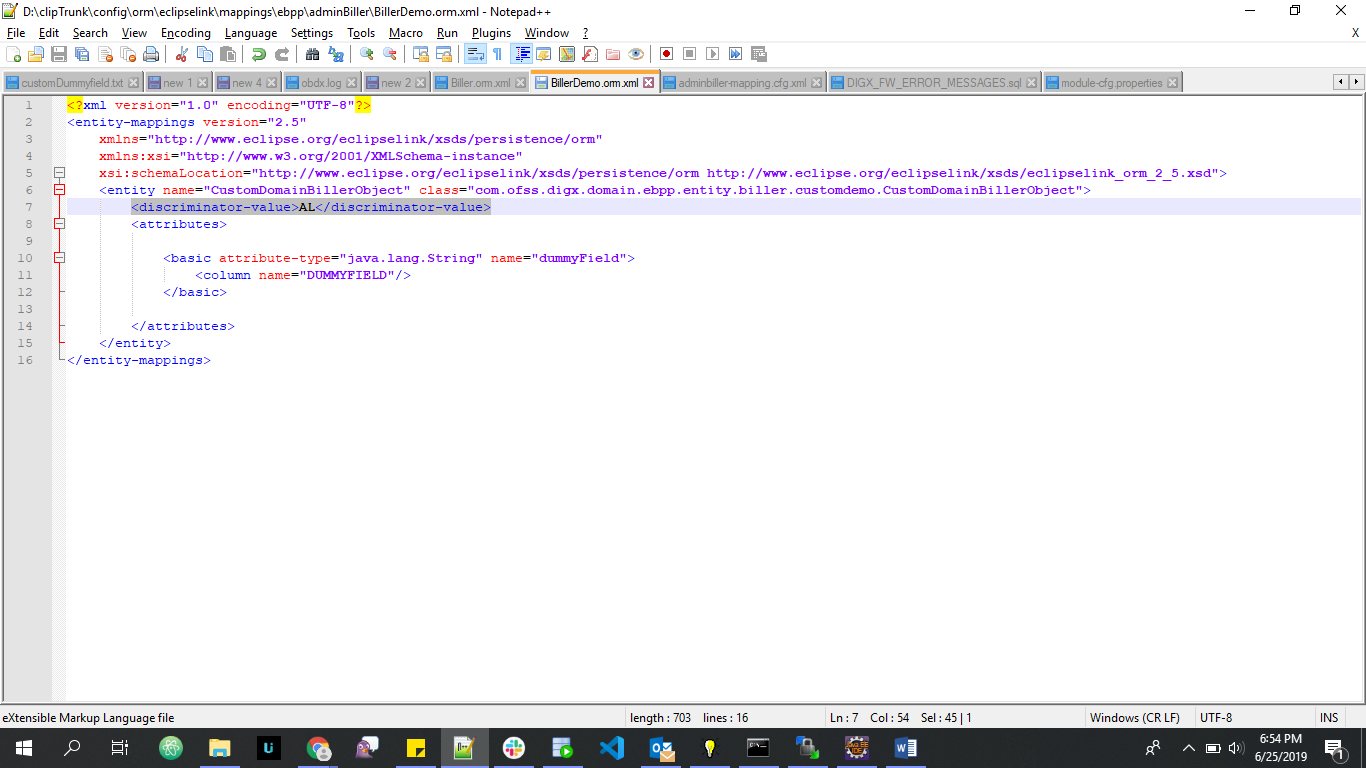
In above screenshot, you can see that BillerDemo.orm.xml is new ORM file to handle Customized Domain object. Also you will have to add discriminator value as shown below (see highlighted portion in above screenshot)
<discriminator-value>AL</discriminator-value>
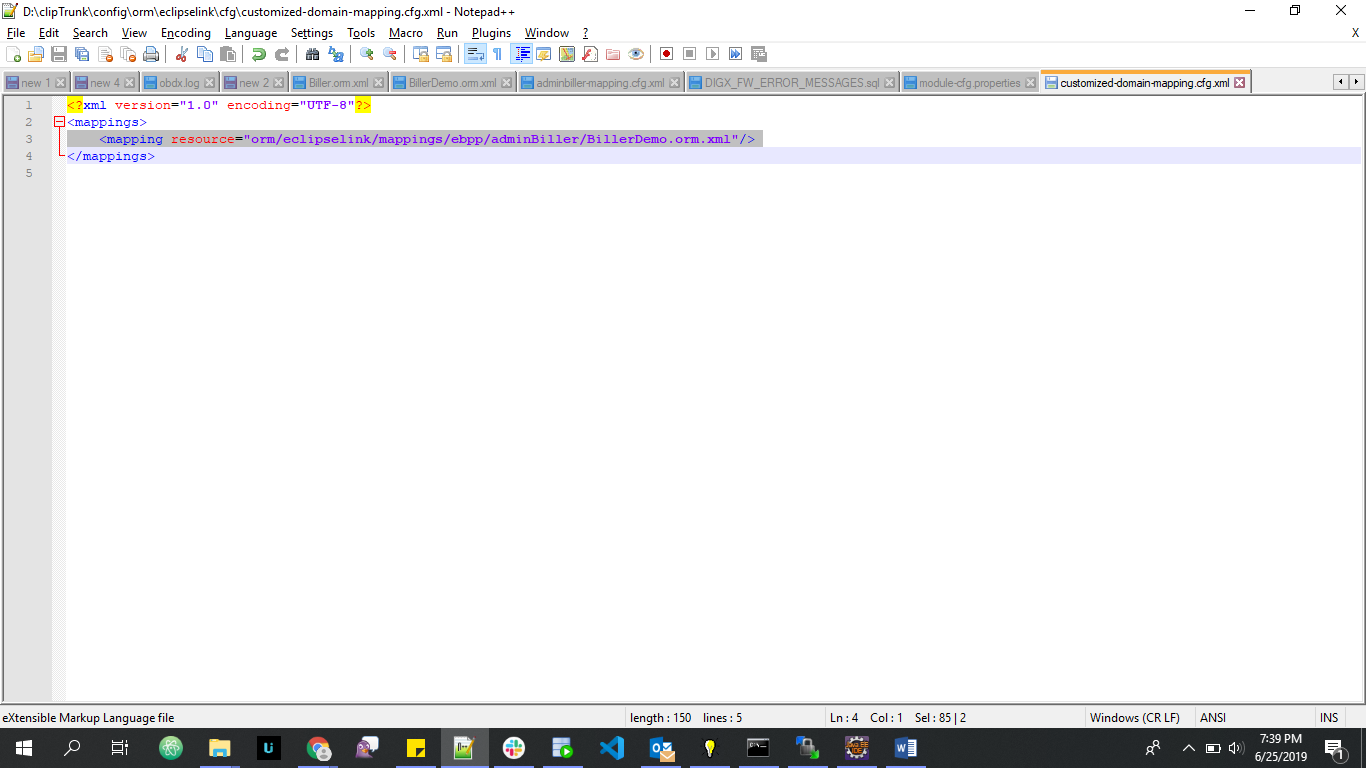
- Add this child ORM (newly created BillerDemo.orm.xml) file’s entry in a configuration file named customized-domain-mapping.cfg.xml
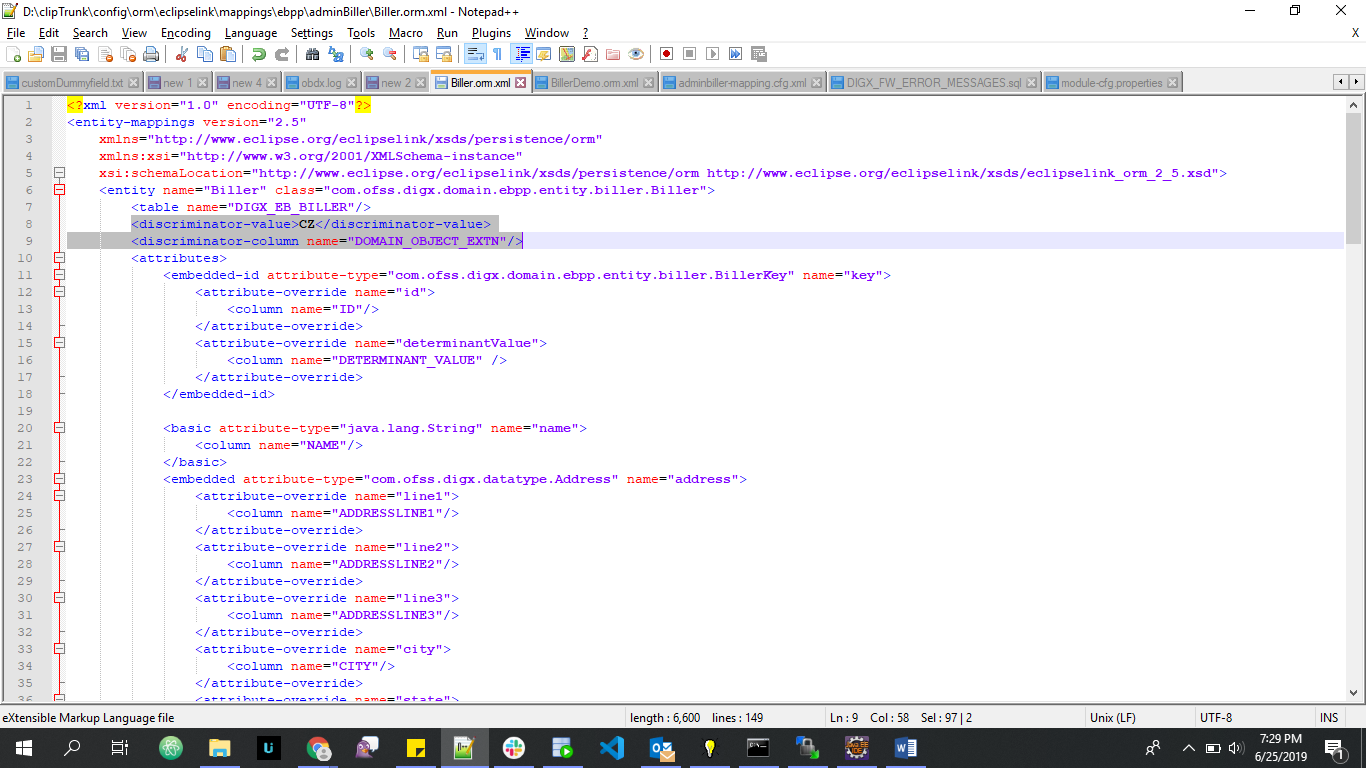
Add below properties in your parent ORM as shown
<discriminator-column discriminator-type="STRING" name="DOMAIN_OBJECT_EXTN"/>
<discriminator-value>CZ</discriminator-value>
Note: Add this discriminator property in ORM if and only if it already does not exists.
- If the custom domain object is extending a domain which already has a JPA inheritance strategy applied directly in the parent domain or in some domain up the hierarchy then you have 2 options
- Either follow the same inheritance strategy in the customized child domain as well.
- Or define the inheritance strategy in the parent domain’s orm mapping xml file on the basis of your requirement.
The JPA provides three type of Inheritance Strategies:
- SINGLE_TABLE (Default).
- TABLE_PER_CLASS
- JOINED
Out of these JOINED is the preferred strategy as it does not alter the DB table structure of the parent domain.
- Add few changes in parent ORM which maps to parent domain (i.e Biller.orm.xml) which is extended by customized domain object.
- Add new columns in parent domain Table for newly added fields in customized domain object and also add new column as DOMAIN_OBJECT_EXTN (This column is used to distinguish to which class type a database row belongs)
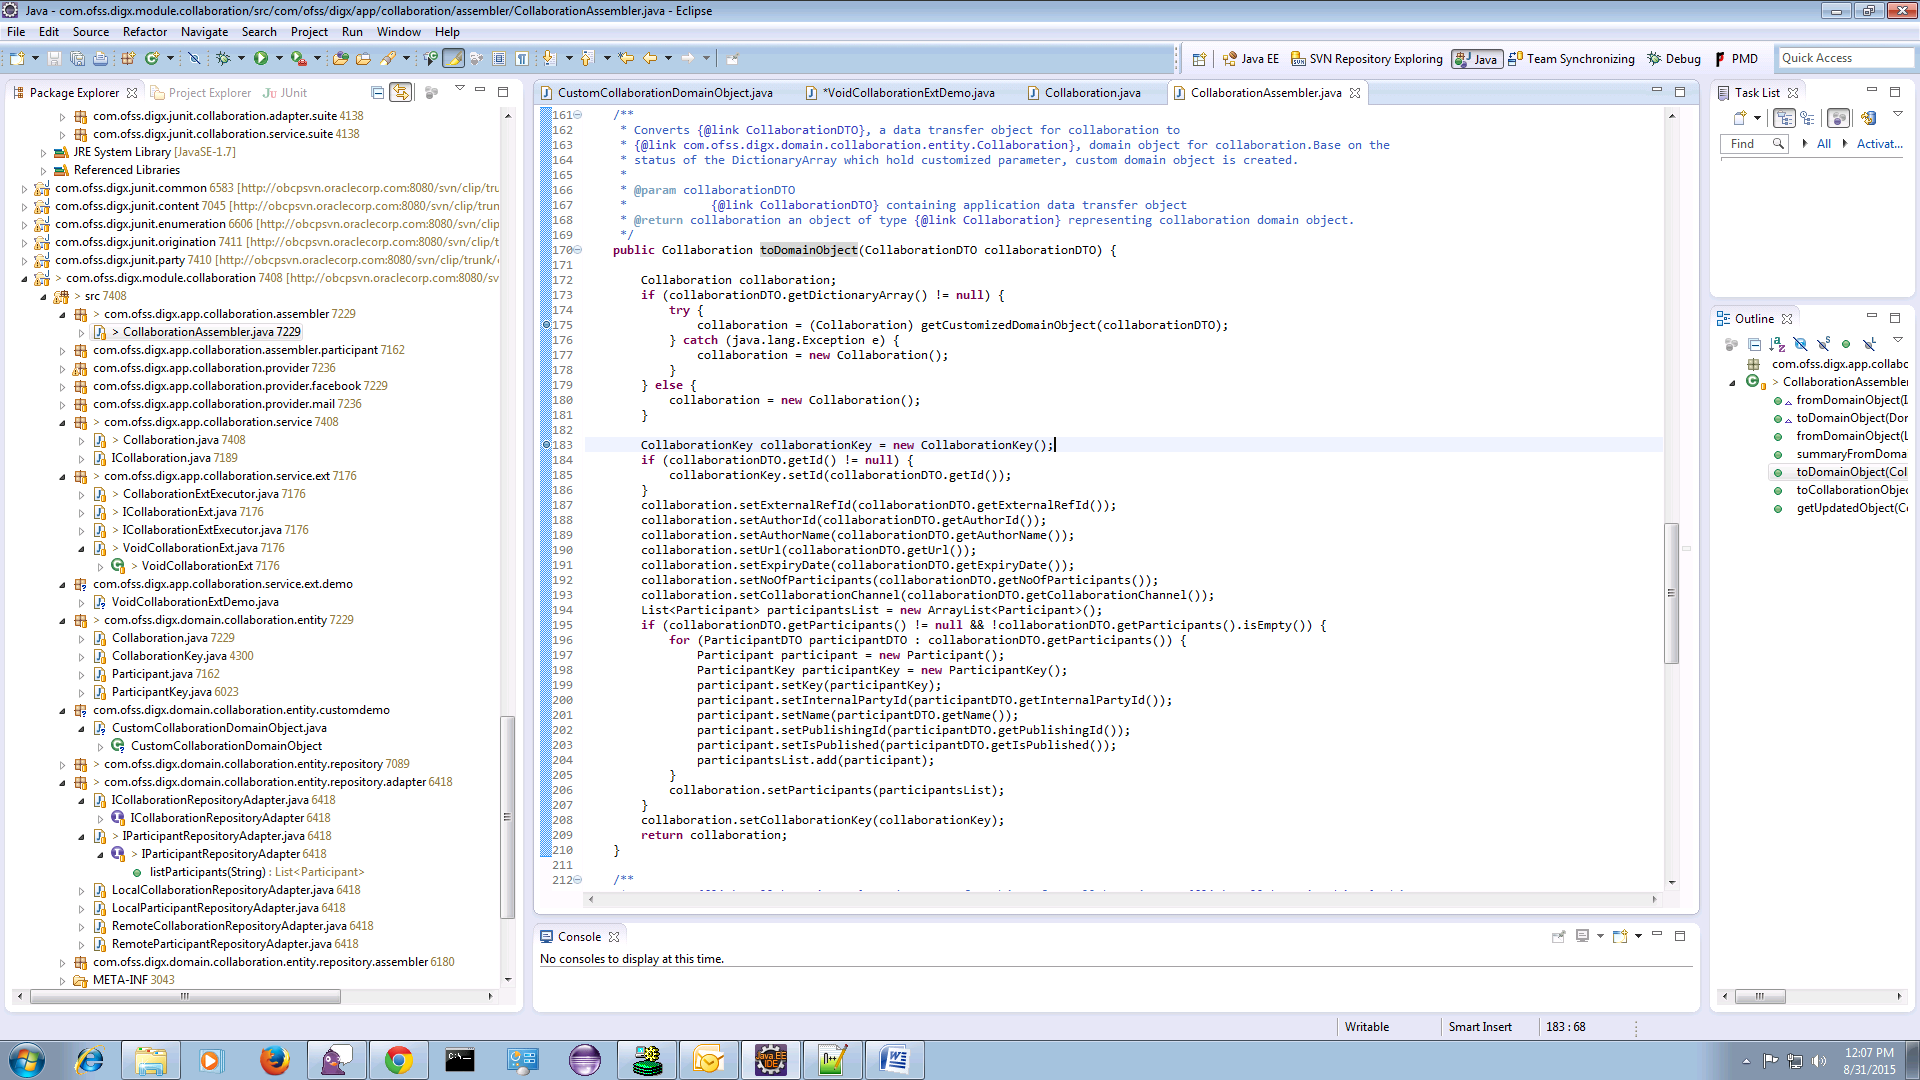
Here Assembler should fetch customized domain object. Following example shows Assembler calls getCustomizedDomainObject which returns customized domain object with mapping of nameValuePairDTOArray to this customized domain Object internally.
For example:
Sequence Diagram
Configuring this custom domain object at appropriate entity level
insert into digx_me_entity_determinant_b (DOMAIN_OBJECT_NAME, DETERMINANT_TYPE, REPRESENTED_FIELD, IS_FEATURE_ENABLED)
values ('<Fully qualified domain name>', '<Determinant Type>', '<Represented Name>', 'Y');
There are four possible determinant types as follows:
- Enterprise (ENT)
- Legal Entity (LGE)
- Market Entity (MKE)
- Business Unit (BNU)
Adding new Domain
The customization developer can add new domain. Below are the steps to add a new domain.
- Create new domain class. The new domain class must extend AbstractDomainObject and implement IPersistenceObject
- Identify attributes and operations supported by the domain and add them to above domain class accordingly
- The domain object will typically have associated DTO that encapsulates same fields as in domain. This DTO will be used in request and responses. An assembler will be used to map fields between domain object and the DTO. Below diagram depicts this relationship.

- Configure this new domain for appropriate entity level
insert into digx_me_entity_determinant_b (DOMAIN_OBJECT_NAME, DETERMINANT_TYPE, REPRESENTED_FIELD, IS_FEATURE_ENABLED)
values ('<Fully qualified domain name>', '<Determinant Type>', '<Represented Name>', 'Y');
For example,
insert into digx_me_entity_determinant_b (DOMAIN_OBJECT_NAME, DETERMINANT_TYPE, REPRESENTED_FIELD, IS_FEATURE_ENABLED)
values (' com.ofss.digx.cz.domain.payment.entity.payee.Payee', 'BNU', 'New Payee', 'Y');
Error Messages
If an API fails, It returns an error code and an error message which briefly specifies the failure reason of the API call. Error message is returned from service to convey the cause of transaction failure.
Adding Error Message
Error codes with their error messages are stored in DIGX_FW_ERROR_MESSAGES table. One can add a new error message in the table with a unique error code.
ERROR_CODE column should contain unique value.
ERROR_MESSAGE column contains the error message which need to be added
Mapping Host Error Code To OBDX Error Code
When a transaction fails in host, it provides an error code in response to the failed transaction. This error code provided by the host could be mapped with OBDX error code to provide a user friendly error message.
This host error code and OBDX error code mapping is done in DIGX_FW_ERR_COD_MAP table.
THIRD_PARTY_ERR_COD column holds the host error code.
LOCAL_ERR_COD column holds OBDX error code which must be present in DIGX_FW_ERROR_MESSAGES table from where error message will be picked.
Adapter Tier
An adapter, by definition, helps the interfacing or integrating components adapt. In software it represents a coding discipline that helps two different modules or systems to communicate with each other and helps the consuming side adapt to any incompatibility of the invoked interface work together. Incompatibility could be in the form of input data elements which the consumer does not have and hence might require defaulting or the invoked interface might be a third party interface with a different message format requiring message translation. Such functions, which do not form part of the consumer functionality, can be implemented in the adapter layer.
Service Provider Interface (SPI) Approach
This section provides information about the SPI approach and how adapters are packaged and derived at runtime based on current entity and domain under consideration.
Service Provider Interface (SPI) is an API intended to be implemented or extended by a third party. It can be used to enable framework extension and replaceable components.
- https://docs.oracle.com/javase/tutorial/ext/basics/spi.html
- http://www.developer.com/java/article.php/3848881/Service-Provider-Interface-Creating-Extensible-Java-Applications.htm
All the external facing adapters will be loaded using SPI.
Benefits of SPI
- No database entries are required.
- No need of adapter factories.
- Can add adapters at run-time.
- Provides the list of available implementations from which we can use the best suited one.
In this approach adapter is selected using the following call.
ExtxfaceAdapterFactory.getInstance().getAdapter(Interface.class, "method", DeterminantType);
Here,
- Interface.class’ is object of interface implemented by the host (external system) adapter.
- ‘Method’ is name of method which we are intended to call of that adapter.
- DeterminantType is determinant type of the domain from which this call is made.
Sample code is as follows:
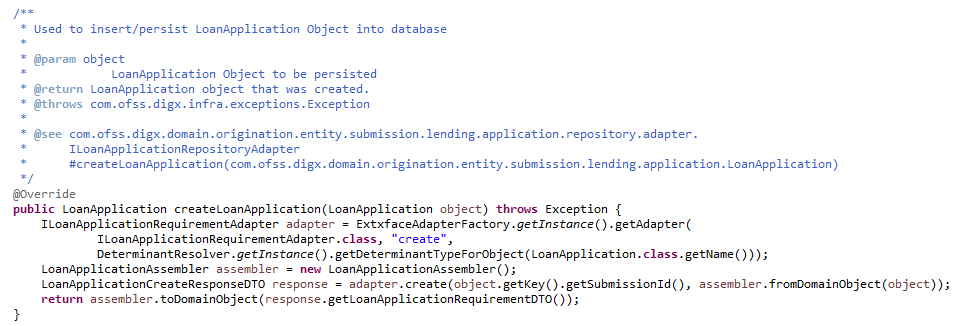
Adapter configuration
For adapter configurations, the preference ExtxfaceAdapterPreference is used. This preference contains Entity as key and External System (Host Name + Version) as value. So we can use select external systems (Hosts) on the basis of entity. E.g. For entity 000 we want to use UBS 12.4 and for entity 001 use OBP 2502 then the entries will be

We can also give multiple External System separated by comma “,” for an entity, and then adapter will get selected on the basis sequences of external systems given in value.
E.g. if the value is UBS12.4,BI1.0 then first implementation is searched in UBS 12.4 jar if is not found then it will look in BI1.0 jar.
Adapter Registration
After adding adapter java file in project it need to be register as provider. To register your service provider, create a provider configuration file, which is stored in the META-INF/services directory of the project. The name of the configuration file is the fully qualified class name of the service provider(interface implemented by adapter), and file content which is fully qualified name of the adapter class.

How will system derive adapter?
In the external system interface implementation project like (com.ofss.digx.extxface.ubs124.impl), inside src/META-INF folder, we will have a MANIFEST.MF file inside which we will define the following attributes:-
- Implementation-Title: UBS
- Implementation-Version: 12.4
It will tell us that the adapters are for external system UBS 12.4. While adding a new interface implementation project, we need to create MANIFEST.MF file too, defining implementation title and version.
While calling an adapter, we provide three parameters 1. Interface class name 2.method name 3.determinant type(for particular domain class).
Determinant type for particular domain class (digx_me_entity_determinant_b).

We match determinant type to market entity, then business unit and then legal entity.
On the first match, we derive the external systems using ExtxfaceAdapterPreference explained above. Then we derive external systems corresponding to others(lower order ones). Thus we have a list(list 1) of external systems in order.
For example, if 1st match is market entity. Then we will have external systems corresponding to entries for market entity, then business unit and finally legal entity if entries are found.(in order).
If 1st match is business unit, then we will have external systems corresponding to entries for business unit and legal entity if found(in order).
Here in the diagram above, for domain class ConfigVarBDomain, determinant_type is BNU(business unit). lets suppose corresponding determinant value is 000.

Now, for prop_id=000, it will fetch extsystems as UBS12.3,ipm1.0.
Now for legal entity(LGE), lets suppose corresponding determinant value is 001. so it will fetch external system as TP1.0.
So we have external system list (list 1) as {UBS12.3,imp1.0,TP1.0};
Also If none matches, we derive external system corresponding to enterprise. for eg. for enterprise, lets suppose corresponding determinant value as 01. so external system list(list 1) will be {UBS12.4,ipm1.0}.
How the adapters are loaded
Now we will load all those adapter classes, that will implement the interface whcih we get as first parameter. Now we will maintain another list or map (list 2) of external systems to adapter, that we will resolve from all those adapter classes. (How will system know that a adapter belongs to which external system or host?).
We will iterate through list 1(list of external systems that we got from preference entry) in order. When we find the first matching external system in list 2, we will return the corresponding adapter.
For example, we iterate through list 1 : {UBS12.3,imp1.0,TP1.0}. it will first find if loaded adapter class contains adapter that belongs to external system UBS12.3. then it will retun that adapter. if not found, it will search if any loaded adapter class belongs to imp1.0. if found it will return that adapter. if not, then it will similarly go for TP1.0.
How to override an adapter?
One can enter (interface class name + ''."+ method name or only interface class name) in ExtxfaceAdapterPreference against which one can specify the adapter that one want to be overriden by.
E.g.
Insert into digx_fw_config_all_b (PROP_ID,CATEGORY_ID,PROP_VALUE,FACTORY_SHIPPED_FLAG,PROP_COMMENTS,SUMMARY_TEXT,CREATED_BY,CREATION_DATE,LAST_UPDATED_BY,
LAST_UPDATED_DATE,OBJECT_STATUS,OBJECT_VERSION_NUMBER,EDITABLE,CATEGORY_DESCRIPTION)
values (<Fully qualified adapter interface name>,'extxfaceadapterconfig', <Fully qualified adapter implementation name>,
'N',null,'','ofssuser', sysdate,'ofssuser', sysdate,'Y',1,'N',null);
sample:-
Insert into digx_fw_config_all_b (PROP_ID,CATEGORY_ID,PROP_VALUE,FACTORY_SHIPPED_FLAG,PROP_COMMENTS,SUMMARY_TEXT,CREATED_BY,
CREATION_DATE,LAST_UPDATED_BY,LAST_UPDATED_DATE,OBJECT_STATUS,OBJECT_VERSION_NUMBER,EDITABLE,CATEGORY_DESCRIPTION)
values ('com.ofss.digx.app.loan.adapter. ILoanAccountAdapter','extxfaceadapterconfig', 'com.ofss.digx.extxface.loan.impl.LoanAccountMockAdapter','N',null,'','ofssuser', sysdate,'ofssuser', sysdate,'Y',1,'N',null);
Adding a custom adapter
Please follow below steps for adding a new custom adapter:
- Create a new project for customized adapter interfaces. Typically, there will be only one customized adapter interfaces project. The name of the project should have the phrase ‘cz’ indicating that it is customized version. For example, com.ofss.digx.cz.extxface
- Please refer to the ‘Workspace Setup’ section and its ‘Adapter Interfaces’ subsection for details.
- Add required adapter interfaces in this project
- Create another new project for customized adapter implementation classes. Typically, one project will need to be created per entity, however if the core banking host is same for different entities, then one project can be used for multiple entities. This decision should be taken based on implementation scenario. If you are interfacing with any other external system apart from core banking system (e.g. content management system), then separate project should be created for adapters interfacing with such systems.
- Please refer to the ‘Workspace Setup’ section and its ‘Adapter Implementation’ subsection for details.
- Name of the project should be having the phrase ‘cz’ indicating that it is part of the customization. The name should also include external system name and version. This will bring clarity about contents of the project by looking at the name. The same name will be used for the JAR packaged out of this project. For example, name of the project for customized adapters for UBS 12.4 will be com.ofss.digx.cz.extxface.ubs124.impl
- The MANIFEST.MF file within this project should have implementation title and implementation version. The implementation title should also capture the phrase ‘CZ’ to indicate that it is a customized adapter package.
Implementation-Title: CZUBS
Implementation-Version: 12.4
- Write required adapter implementation classes that implement appropriate adapter interface
- Create folder ‘META-INF/services’ under the ‘src’ folder.
- Create a file under this ‘services’ folder with the name as fully qualified name of the adapter interface.
- In this file, write the fully qualified name of the adapter implementation class
- Package the adapter interface in JAR
- Package the adapter implementation project(s) in JAR(s)
- Configure the adapter implementation package in digx_fw_config_all_b. The prop_value should have comma separated external system IDs. For example,
Insert into digx_fw_config_all_b (PROP_ID,CATEGORY_ID,PROP_VALUE,FACTORY_SHIPPED_FLAG,PROP_COMMENTS,SUMMARY_TEXT,CREATED_BY,
CREATION_DATE,LAST_UPDATED_BY,LAST_UPDATED_DATE,OBJECT_STATUS,OBJECT_VERSION_NUMBER,EDITABLE,CATEGORY_DESCRIPTION)
values ('01','extxfaceadapterconfig', 'CZUBS12.4,UBS12.4,ipm1.0','N',null,'','ofssuser', sysdate,'ofssuser', sysdate,'Y',1,'N',null);
- Package all customized adapters in obdx.cz.extsystem.domain.ear and deploy it as a library
Customizing Existing Adapters (Custom Adapter)
If an added functionality or replacement functionality is required for an existing adapter or existing method in an adapter, the customization developer has to develop a new adapter and corresponding adapter factory and override the method in a new custom adapter class. The custom adapter would have to override and implement the methods which need changes.
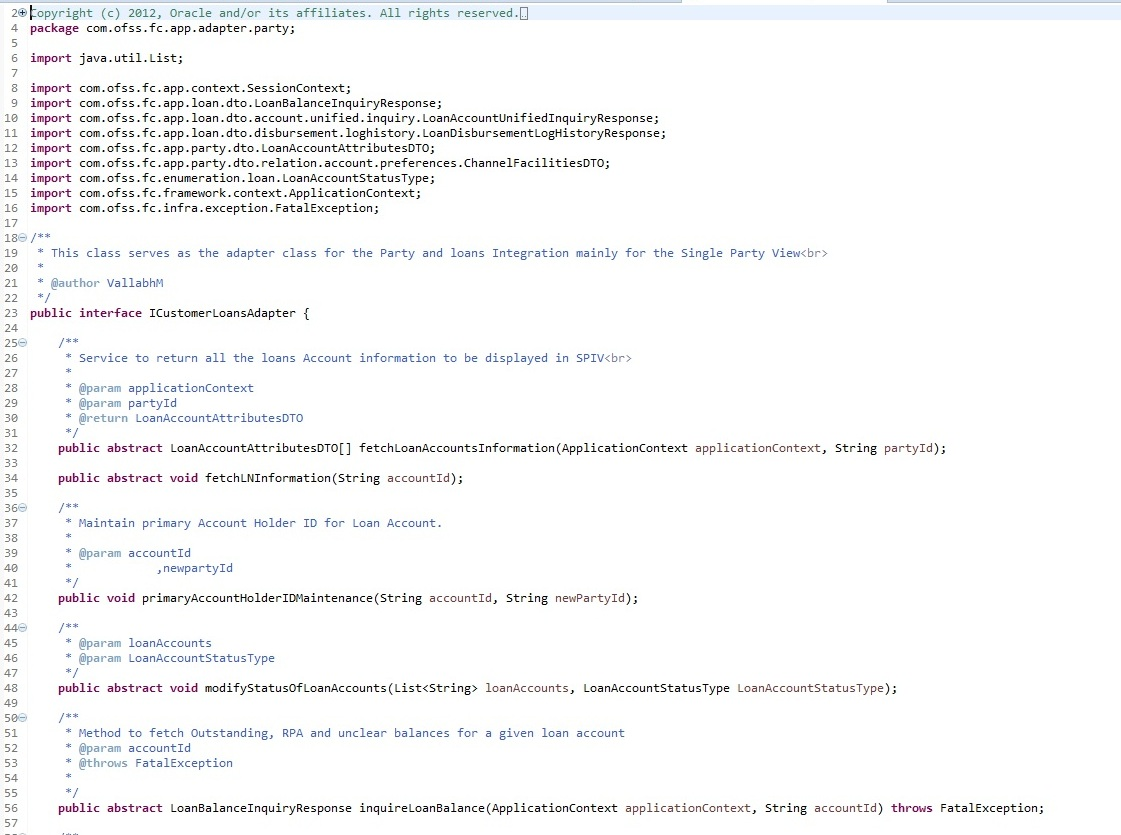
Custom Adapter Example
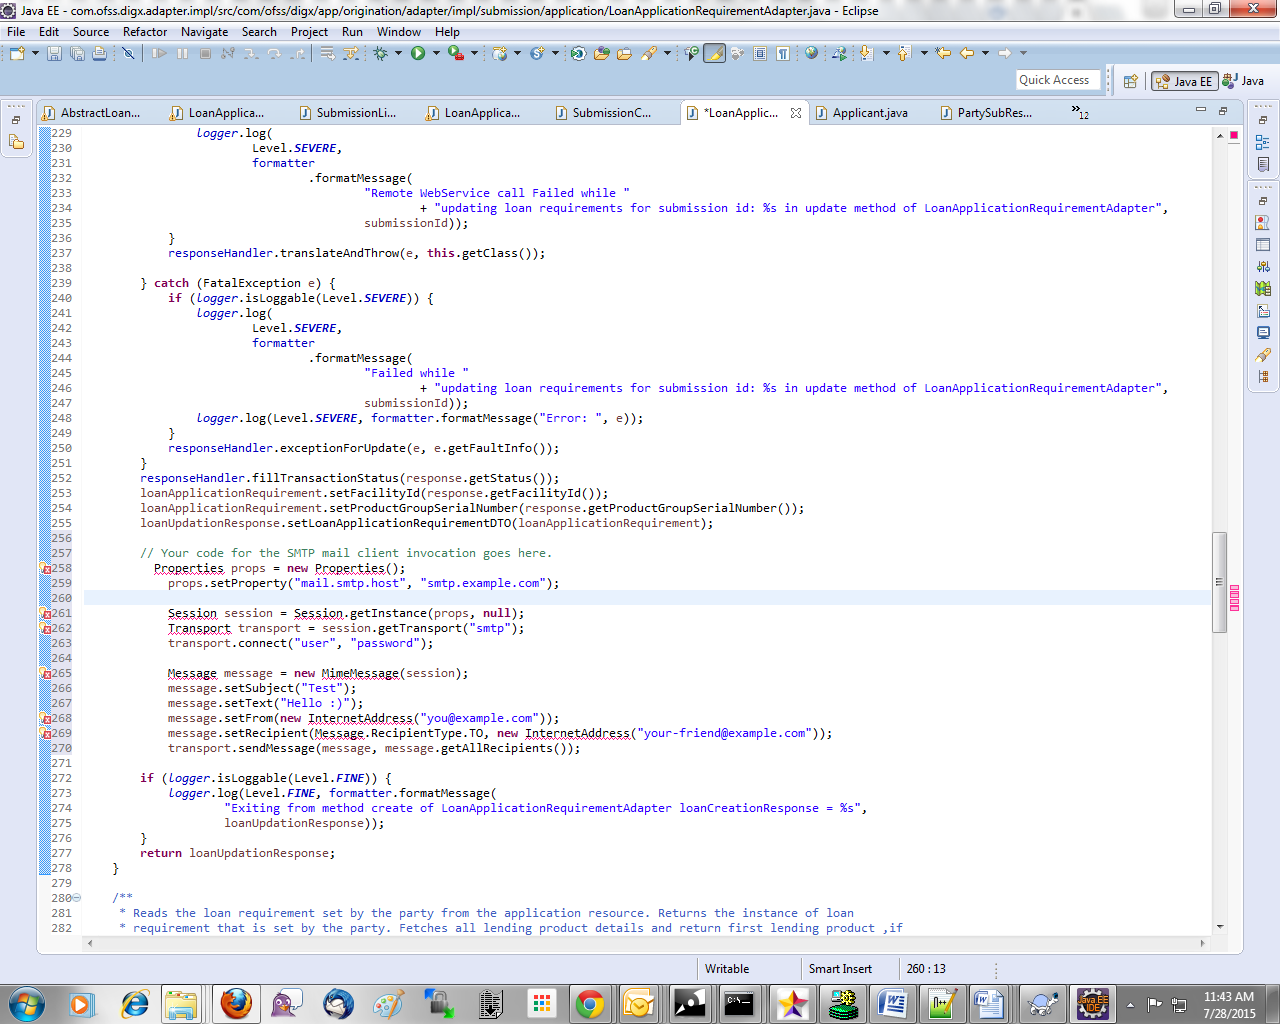
We take the example of LoanApplicationRequirementAdapter. For example the requirement is to send an email alert when the requirements of a particular loan application are updated. The OBDX application by default does not provide any integration with an SMTP/Email server. The additional interfacing with the gateway can be done in the custom adapter. . The following steps would have to be followed for implementation of a custom LoanApplicationRequirementAdapter.
Develop a CustomLoanApplicationRequirementAdapter and Custom LoanApplicationRequirementAdapterFactory. As a guideline, the custom adapter should extend the existing adapter and override the methods which needs to be replaced with new functionality.
For Example:
Custom Adapter Configuration
insert into digx_fw_config_all_b (PROP_ID, CATEGORY_ID, PROP_VALUE, FACTORY_SHIPPED_FLAG, PROP_COMMENTS, SUMMARY_TEXT,
CREATED_BY, CREATION_DATE, LAST_UPDATED_BY, LAST_UPDATED_DATE, OBJECT_STATUS_FLAG, OBJECT_VERSION_NUMBER)
values (‘IS_LOAN_APPLICATION_REQUIREMNT_ADAPTER_CUSTOM', ‘customadapterconfig’, 'true', 'N', 'asdf', 'asdf', 'asdf', '', 'asdf', '', 'Y', 1);
Mock Adapter
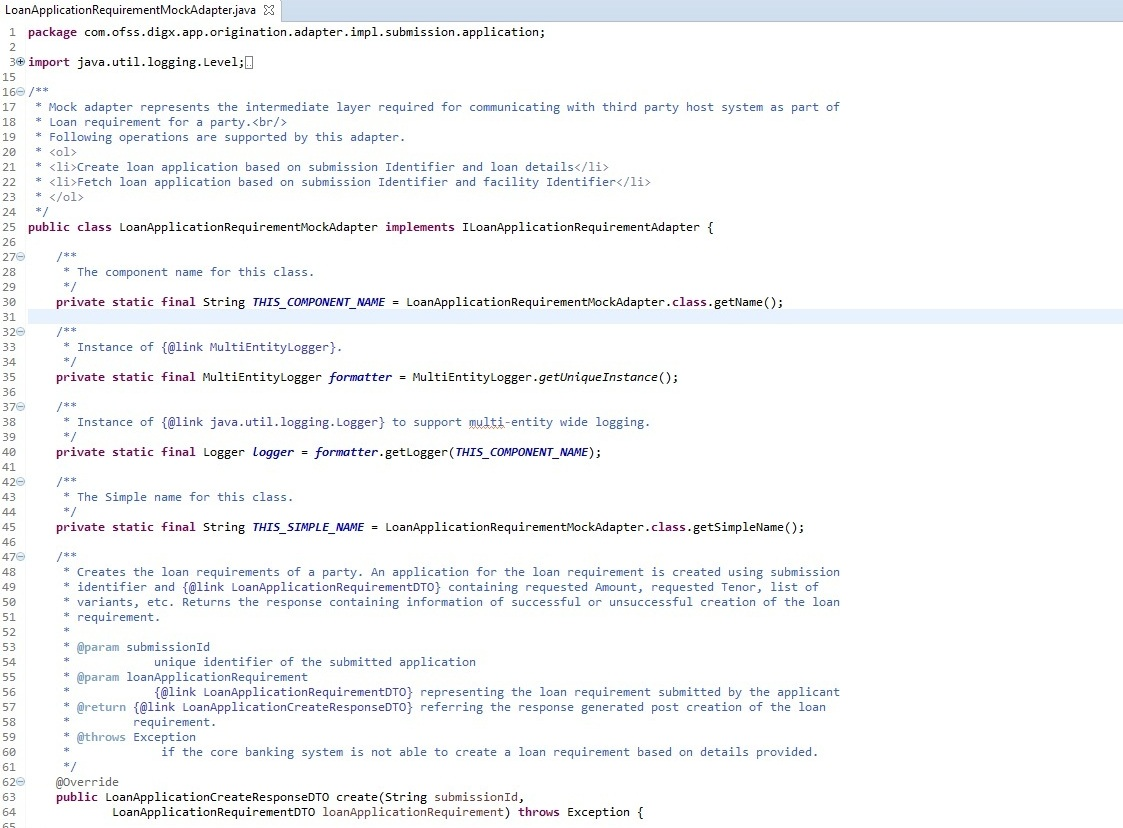
Mock adapter represents the intermediate layer required for communicating with third party host system. operations supported by Mock adapter are create, fetch, etc. Mock Adapter is basically responsible for generating required response from the core banking system for a given request.
Mock Adapter Example
Here it is responsible for communicating with third party host system as part of Loan requirement for a party
Mock Adapter Configuration
insert into digx_fw_config_all_b (PROP_ID, CATEGORY_ID, PROP_VALUE, FACTORY_SHIPPED_FLAG, PROP_COMMENTS, SUMMARY_TEXT,
CREATED_BY, CREATION_DATE, LAST_UPDATED_BY, LAST_UPDATED_DATE, OBJECT_STATUS_FLAG, OBJECT_VERSION_NUMBER)
values ('PARTY_COLLECTION_ADAPTER_MOCKED', 'adapterfactoryconfig', 'true', 'N', 'asdf', 'asdf', 'asdf', '', 'asdf', '', 'Y', 1);
Outbound web service extensions
The outbound webservice configurations are set of properties defined to invoke services from the host. The host is the core bank system where the business logic for core banking facilities is written and contains the corresponding services to access that data. The existing OBDX application has an Adapter layer which directly interacts with the host. There are extension endpoints available for configuring a different host in the adapter layer. Following steps need to be followed:
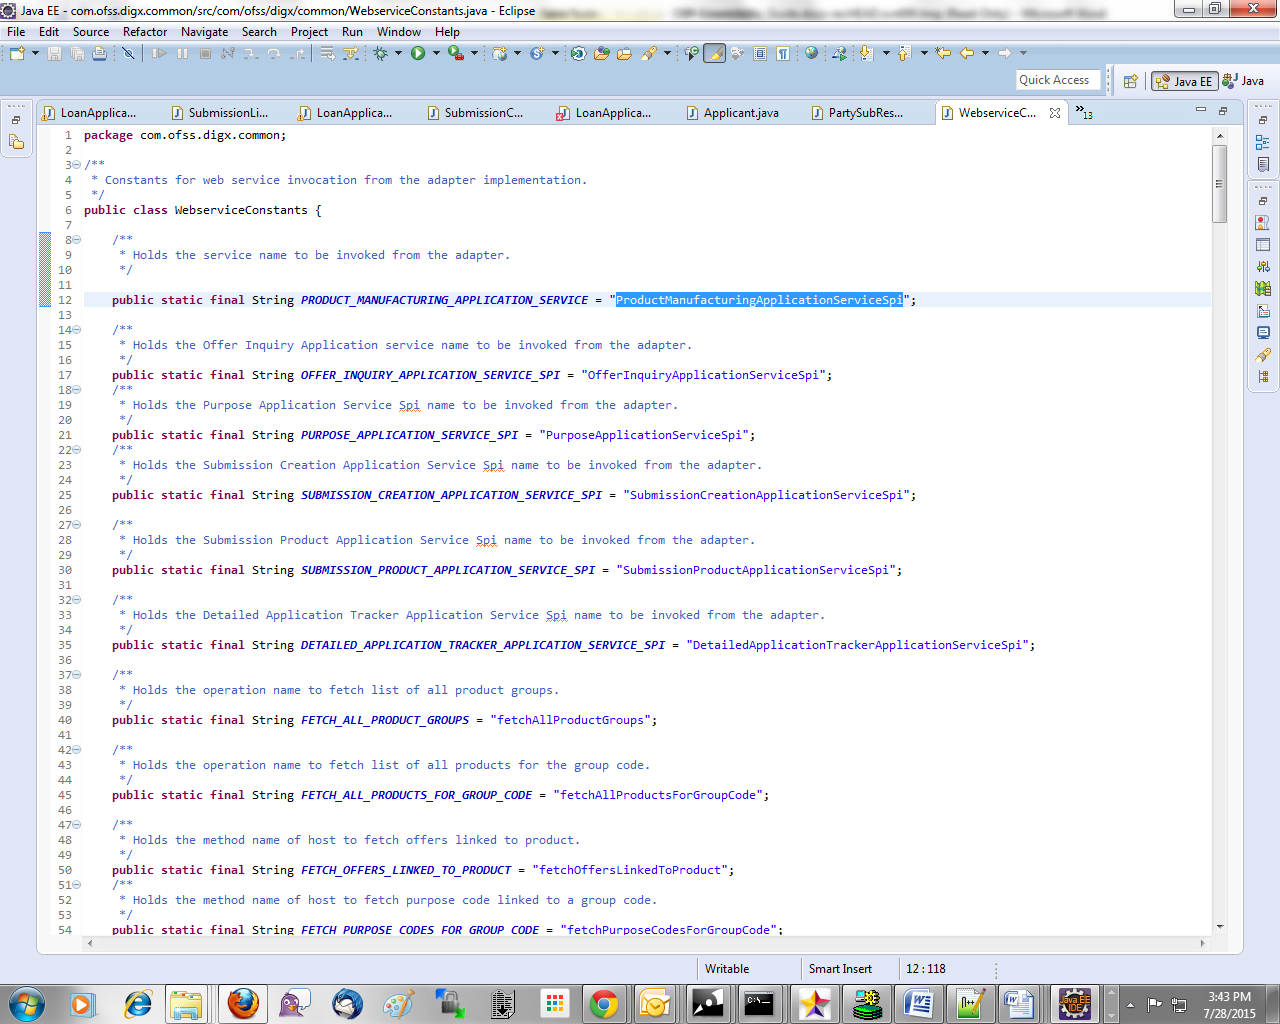
Using your own web service constants
The web service constants will change depending on the WSDL specification provided by the host system. An Example WebServiceConstants file is shown below:
Web Service Configuration
digx_fw_config_out_ws_cfg_b. Holds the entries for the host service endpoints.
For Example:
insert into digx_fw_config_out_ws_cfg_b (SERVICE_ID, PROCESS, URL, ENDPOINT_URL, NAMESPACE, TIME_OUT, SERVICE,
STUB_CLASS, SECURITY_POLICY, ENDPOINT_NAME, STUB_SERVICE, HTTP_BASIC_AUTH_CONNECTOR, HTTP_BASIC_AUTH_REALM,
PROXY_CLASS_NAME, IP, PORT, USERNAME, PASSWORD, CREATED_BY, LAST_UPDATED_BY, CREATION_DATE, LAST_UPDATED_DATE,
OBJECT_STATUS, OBJECT_VERSION_NUMBER, ANONYMOUS_SECURITY_POLICY, ANONYMOUS_SECURITY_KEY_NAME)
values ('inquireApplication', 'BaseApplicationServiceSpi', 'http://ofss310406.in.oracle.com:8001/com.ofss.fc.webservice/services/origination/BaseApplicationServiceSpi?wsdl', '', 'http://application.core.service.origination.appx.fc.ofss.com/
BaseApplicationServiceSpi', 1200000, 'BaseApplicationServiceSpi', '', '', 'BaseApplicationServiceSpiPort',
'com.ofss.fc.appx.origination.service.core.application.baseapplicationservice
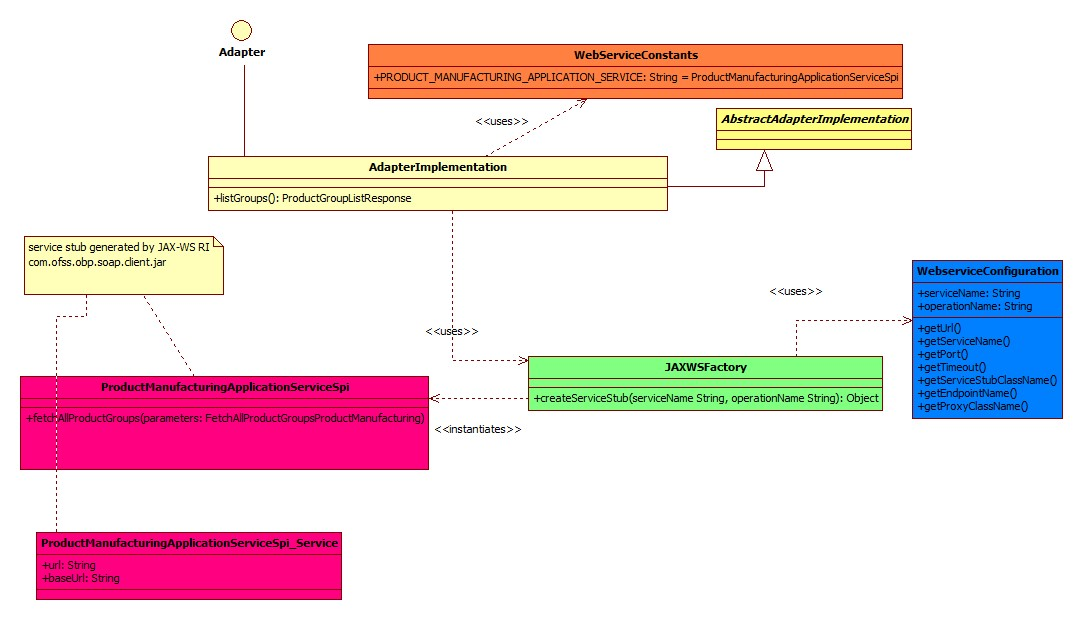
Class Diagram
Client Jar
Generate the corresponding service stubs from the WSDL specifications using The JAX-WS RI tool. Package the generated code as a jar and include it in the Adapter implementation.
Custom Adapter
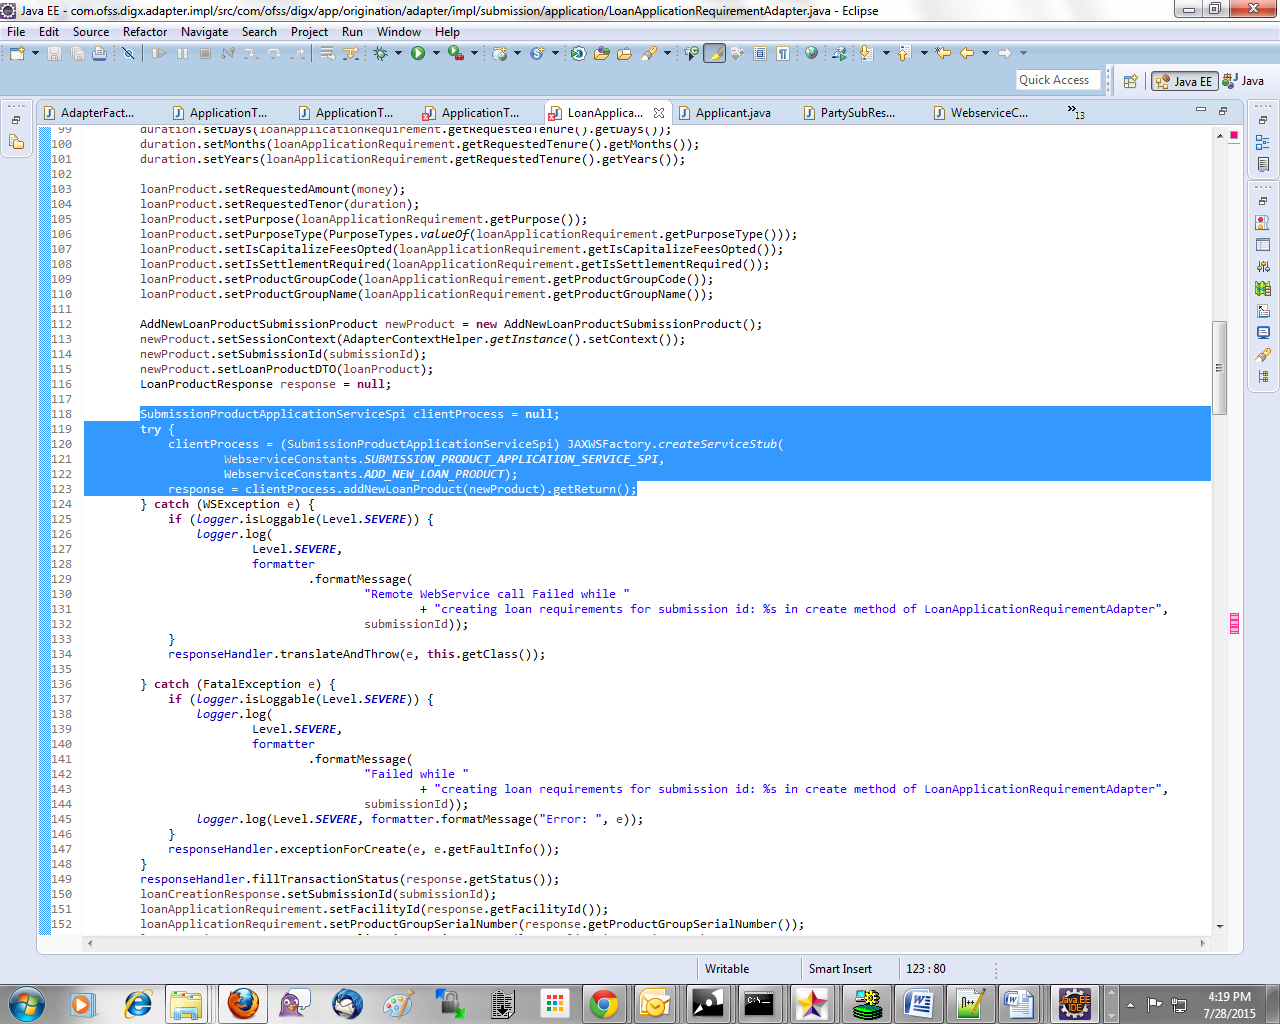
Lastly create a custom adapter to handle the changes made in the host configurations. The custom adapter will be using the JAXWSFacotry to create instances of the desired service stubs. The rest of the custom adapter implementation is the same as mentioned in the section 5.3
For example:
Security Customizations
OBDX comprising of several modules has to interface with various systems in an enterprise to transfer/share data which is generated during business activity that takes place during teller operations or processing. While managing the transactions that are within OBDX, it is needed to consider security & identity management and the uniform way in which these services need to be consumed by all applications in the enterprise.
OBDX provides a mechanism for creating permissions and role based authorization model that controls access of the user to OBDX services.
Security Configuration
Method checkAccess() in class AbstractSecureApplication called from ApplicationService checks flag IS_SECURITY_ENABLED. If this flag has value true then it checks for security.Below image depicts same.
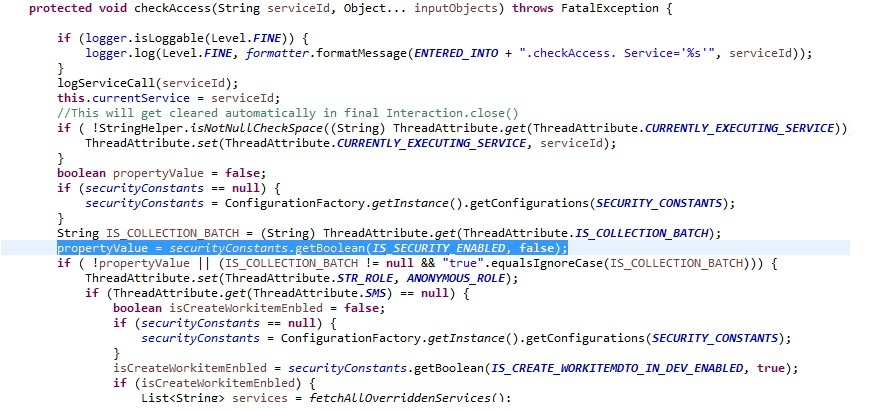
Following Query is used to configure IS_SECURITY_ENABLED flag in database.
insert into digx_fw_config_all_b (PROP_ID, CATEGORY_ID, PROP_VALUE, FACTORY_SHIPPED_FLAG, PROP_COMMENTS, SUMMARY_TEXT,
CREATED_BY, CREATION_DATE, LAST_UPDATED_BY, LAST_UPDATED_DATE, OBJECT_STATUS_FLAG, OBJECT_VERSION_NUMBER)
values ('IS_SECURITY_ENABLED', 'SecurityConstants', 'true', 'N', '', 'Security Constant', 'ofssuser', '30-JUN-15 04.04.49.000000 PM', 'ofssuser', '30-JUN-15 04.04.49.000000 PM', 'Y', 1);
checkAccess() calls method checkAccessInternal().This method delegates the calls to the appropriate methods during security access check process. First of all, if the service is blacked out for the period in which the user is accessing it, then he will not be allowed to perform the transaction. Access policies are seeded by the product during installation and can be added or modified by bank administrator. The bank administrator can either permit or deny access for particular user role to a particular service.
checkAccessInternal has call to method assertAccessPolicies.
assertAccessPolicies is responsible to check whether user has access to a particular service or not.
Out of box seeding of policies
When the application is installed, access policies are seeded such that a separate policy is created for each service (resource) and application role combination.
The application is shipped with two CSV files – Admin.csv and Clip.csv containing the policy data and the installer uses a tool called SeedPolicies.jar to seed these policies in database from where it will be used for application.
Administrative console for policy management
The bank administrator can grant or deny access of a user role to any services. Bank administrator can also create/modify/delete policies. Detailed description of these features is provided in the user manual ‘User Manual Oracle Banking Digital Experience Core’ under the heading ‘Role Transaction Mapping’. Below are some terminologies used in further discussion.
Policy Domain: A Policy Domain is a container for multiple policies created in the system.
One policy domain holds group of policies defined for a specific region. Administrator![]() Administrator is a set of individuals that administer the applicant/Affiliate entity. For example, Accountants, Authorized Signatories for organizations, Power of Attorney for individuals. can create,
Administrator is a set of individuals that administer the applicant/Affiliate entity. For example, Accountants, Authorized Signatories for organizations, Power of Attorney for individuals. can create,
update, delete Policy domain. For example below diagram shows two policy domains namely ADMIN and CLIP created in the system.

Policy: Policy defines mapping between resources/entitlements and application roles/enterprise roles. Each policy can be designed to PERMIT or DENY access to resources depending on business regulations. Policy can have multiple resources or multiple application roles. For example below screen shows a policies related to DemandDeposit service.
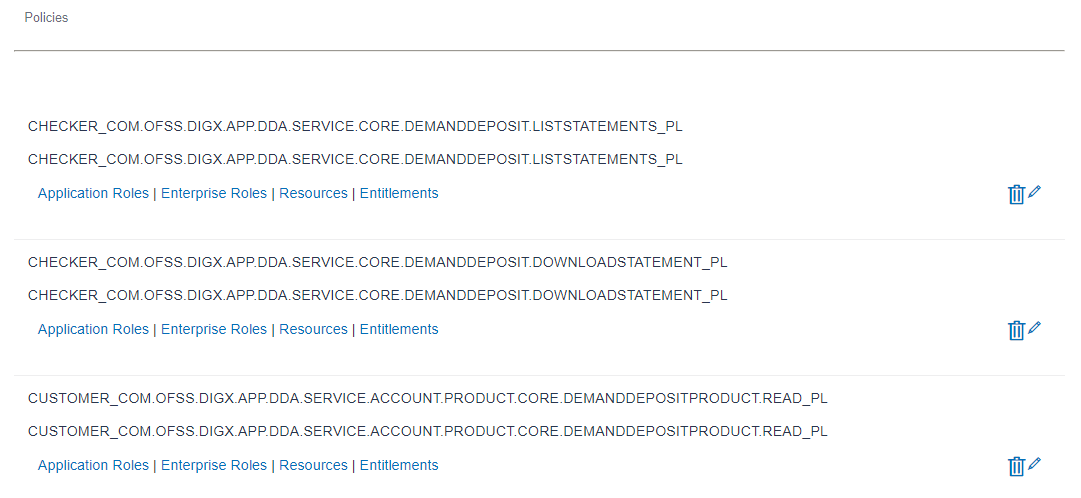
Resource: A resource is fully qualified name of the service. For example below screens the resource com.ofss.digx.app.dda.service.core.DemandDeposit.listStatements available in the first policy.

Application Role: An application role is logical grouping of one or more enterprise roles. For example, below screen shows that the role ‘Checker’ is added in above policy.

Above setup will ensure that a user with ‘Checker’ role will have access to the com.ofss.digx.app.dda.service.core.DemandDeposit.listStatements service. If administrator needs to deny this access then the Effect can be changed to ‘Deny’ as shown in the screen below.
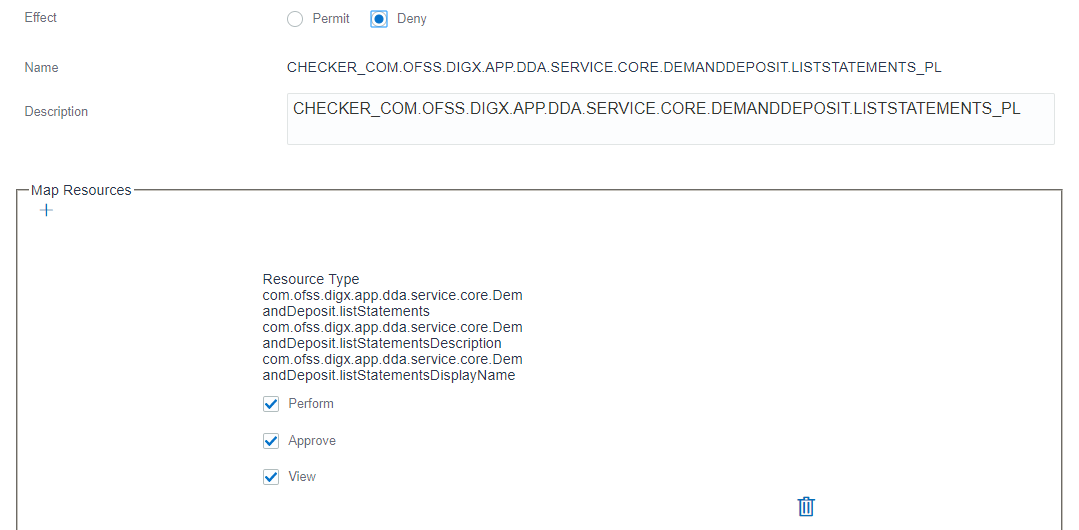
So there is no need to delete existing policy, only the access can be denied.
Seeding Policies for New Services
There are two ways in which policies can be created for newly added services.
Manual Policy Creation
This approach will usually be used when the number of services added is small. The bank administrator can create new policies and add necessary application roles and resources in this policy. The policy creation screen is shown below for reference. More details can be obtained from the user manual ‘User Manual Oracle Banking Digital Experience Core’.
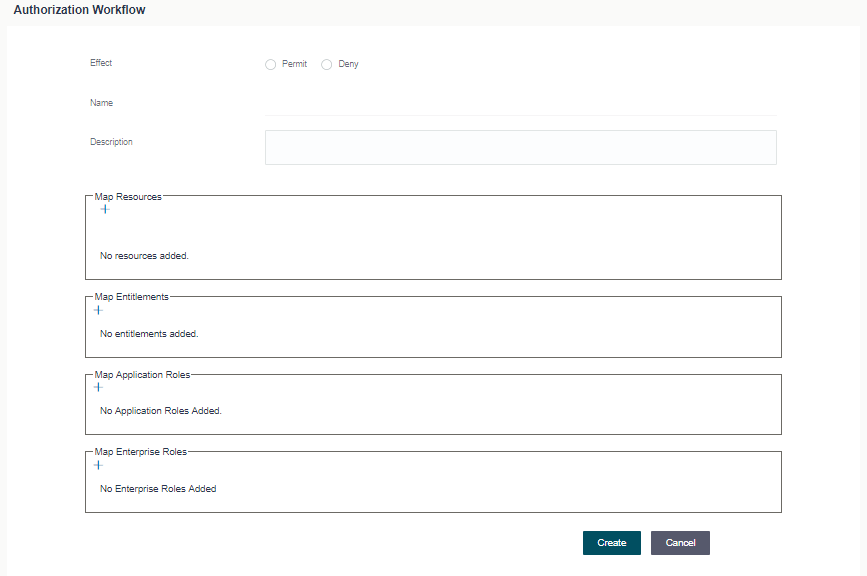
One this creation is done, then the service added in this policy will be accessible to the user.
Seeding policies using tool
OBDX provides a tool SeedPolicies.jar. This tool can be used if the number of services is large. This tool accepts a CSV file in below format.

The first field here is application role name. Second field is the resource name i.e. fully qualified name of the service along with method. Third field will be fixed as ‘Service’. Fourth field indicate what type of access you want to provide. Possible values are ‘view’, ‘perform’ and ‘approve’. The last option will be fixed as ‘GRANT’.
Once a CSV file is prepared in this format, then the SeedPolicies.jar can be used to upload these grants as policies in the database. This tool creates separate policies for each service and role combination. Command line arguments for this tool are as follows.

For example:
C:\\OBDX\\Customer.csv,C:\\OBDX\\AuthAdmin.csv CLIP,ADMIN C:\\OBDX_LOGS\\
Dev-oracle.jdbc.OracleDriver,<DEV schema name>,<password>,jdbc:oracle:thin:@<database IP address>:<port>:<SID>
UAT-oracle.jdbc.OracleDriver,<UAT schema name>,<password>,jdbc:oracle:thin:@<database IP address>:<port>:<SID>
Miscellaneous
This section lists some other features in OBDX platform that can be extended
Task Configurations
Task Registration:
Every new service to be integrated as a part of OBDX needs to provide a task code. This task code is required while integrating the service with various infrastructural aspects applicable to the service. Few examples of infrastructural aspects or cross cutting concerns provided out of the box with OBDX are:
- Limits
- Approvals
- Two Factor Authentication
- Transaction Blackout
- Working Window
Guidelines for formulating a task code are as follows:
A task code should ideally comprise of 3 parts:
- Module Name : The first 2 alphabets representing the module to which the service in question belongs. eg TD represents Term Deposits module
- Task Type(type of service) : OBDX supports the following 6 types of services.
- FINANCIAL_TRANSACTION(F) : Any transaction as a result of which there is a change in the status of the finances of accounts of the participating parties. In general any transaction that involves monetary transfer between parties via their accounts. Few examples include Self transfer, New deposit(Open term deposit), Bill payment etc
- NONFINANCIAL_TRANSACTION(N) : Any transaction that pertains to an account but there is no monetary payment or transfer involved in it. For example Cheque book request.
- INQUIRY(I) : Any read only transaction supported in OBDX that does not manipulate any business domain of the financial institution. For example list debit cards, read loan repayment details, fetch term deposit penalties etc.
- ADMINISTRATION(A) : Transactions performed by bank admins and corporate admins for a party come under this category. Few examples of such transactions include limit definition, limit package definition, user creation, rule creation and various others.
- MAINTENANCE(M) : Maintenances done by a party for itself fall under this category. Maintenance transactions performed by a non admin user which does not involve any account or monetary transaction comprise of this transaction type. Example add biller.
- COMMON(C) : Common transactions include transactions which do not fall under any of the above mentioned categorization. Example login. So 1 alphbet F,N,I,A,M or C for each of the above mentioned task types respectively forms the second part of the task code.
- Abbreviation for service name : A 3 to 10 lettered abbreviation for the service name. Example OTD for Open Term Deposit. All the above mentioned 3 parts are delimited by an underscore character Example : TD_F_OTD where TD represents module name. F represents that its a financial transaction i.e. task type and OTD is the abbreviated form of the transaction(service) name.
Task Aspects
An ‘aspect’ of a task is a behavior or feature supported by the task. OBDX framework defines a set of aspects that can be supported by a task in the system. These aspects need to be configured in table DIGX_CM_TASK_ASPECTS. So if a task supports given aspect, then only its entry should be made in this table. If for any task, entry does not exist in this table for given aspect, then system treats it as that aspect is not supported by the task.
Additionally an aspect can be temporarily disabled using the ‘ENABLED’ column of this table. If the ‘ENABLED’ value is set as ‘N’, then system will treat it as this aspect is not supported by the task. Note that if a task is never going to support an aspect, then its entry should not be there in DIGX_CM_TASK_ASPECTS table. The ‘ENABLED’=’N’ option for disabling aspect should be used only when the task generally supports the aspect but it needs to be disabled for small duration.
Note that just having an entry in this table does not imply that the feature will be enabled for the task. The entry in this table only tells that system that the task supports this feature. Individual feature might need further configurations for them to work properly.
List of aspects supported by OBDX framework is listed below. Please note that aspects are not extensible – in other words it is not possible to add new aspects as part of customization.
|
Aspect |
Description |
|---|---|
|
grace-period |
Indicates that the task supports grace period. Grace period is an additional period offered by Approval framework for approving a transaction. |
|
ereceipt |
Indicates that the task supports generation of e-receipts. |
|
audit |
Indicates that the task supports audit logging. |
|
2fa |
Indicates that the task supports two factor authentication. |
|
working-window |
Indicates that the task supports working window |
|
approval |
Indicates that the task supports approval. |
|
blackout |
Indicates that the task supports blackout |
|
limit |
Indicates that the task supports limit |
Steps to register a task with OBDX:
The task code needs to be configured in the database table DIGX_CM_TASK. For example if we consider Open Term Deposit then the below query fulfills the requirement mentioned in this step.
Insert into DIGX_CM_TASK (ID, NAME, PARENT_ID, EXECUTABLE, APPROVAL_SUPPORTED, LIMIT_REQUIRED, TASK_TYPE, MODULE_TYPE,
CREATED_BY, CREATION_DATE, LAST_UPDATED_BY, LAST_UPDATED_DATE, OBJECT_STATUS, OBJECT_VERSION_NUMBER,
WORKING_WINDOW_SUPPORTED, TFA_REQUIRED, BLACKOUT_SUPPORTED) values ('TD Term Deposit is a deposit accepted by bank, for a fixed term, from customers. A term deposit is a liability of a bank with fixed maturity period._F_OTD', 'New Deposit', 'TD_F', 'Y', 'Y', 'N',
 'FINANCIAL_TRANSACTION', 'TD', 'ofssuser', sysdate, 'ofssuser', sysdate, null, 1, 'Y', 'N', 'Y');
As evident from the above query example Tasks have a hierarchy. Every task might have a parent task denoted by the task code value held by the PARENT_ID column of DIGX_CM_TASK. In most of the cases its a 3 level hierarchy.
- Leaf level tasks to which services are mapped at the lowest level
- Task representing the module to which the service belongs at the mid level
- Task representing the task type at the root level
For instance consider the task code AP_N_CUG which represents the Usergroup creation service under module approvals(AP). So the PARENT_ID column of task AP_N_CUG(leaf level task) has task code as AP(mid level task). If we look at the entry for task code AP(mid level task) then the value in the PARENT_ID column of DIGX_CM_TASK has MT(root level task) which is the task code representing task type ADMINISTRATION. The leaf level task has 'Y' as the value in its EXECUTABLE column. The mid level and root level tasks have 'N' as the value in its EXECUTABLE column.
Step 2
Configure aspects supported by the task. For example, if above task supports blackout, approval and working window, then following entries should be made.
Insert into DIGX_CM_TASK_ASPECTS (TASK_ID,ASPECT,ENABLED) values ('TD_F_OTD','approval','Y');Insert into DIGX_CM_TASK_ASPECTS (TASK_ID,ASPECT,ENABLED) values ('TD_F_OTD','working-window','Y');Insert into DIGX_CM_TASK_ASPECTS (TASK_ID,ASPECT,ENABLED) values ('TD_F_OTD','blackout','Y');
Step 3 - Register the newly created service against this task
For this step firstly, you need to get the service id for your service(transaction). Service id is the fully qualified name of the class appended by the dot character (.) and the method name. For example taking open term deposit into consideration, the business logic for the service is encapsulated in the method named create of the service class com.ofss.digx.app.td.service.account.core.TermDeposit. Hence the service id is derived as : com.ofss.digx.app.td.service.account.core.TermDeposit.create Secondly the below query fulfills the requirement mentioned in this step.
insert into DIGX_CM_RESOURCE_TASK_REL (ID, RESOURCE_NAME, TASK_ID, CREATED_BY, CREATION_DATE, LAST_UPDATED_BY,
LAST_UPDATED_DATE, OBJECT_STATUS, OBJECT_VERSION_NUMBER) values ('1', 'com.ofss.digx.app.td.service.account.core.TermDeposit.create', 'TD_F_OTD', 'ofssuser', sysdate, 'ofssuser', sysdate, null,1);
The aforesaid procedure enrolls your newly created service as a task in OBDX.
Limit Configuration
The below procedure describes the steps required to enable Limits for a newly developed service.
A prerequisite to this configuration is that this newly developed service should be registered as a task in OBDX. Refer “Task Registration” section for further details. The types of Limits supported by the system are:
- Periodic Limit(Cumulative) : Limits that get reset after the expiration of a period. Example Daily-limits.
- Duration Limit(Cooling Period) : Limits that get applicable after the occurence of an event, for instance payee creation, and then are applicable for the specified duration after commencement of the event
- Transaction Limit : Limits applicable to each invocation of a transaction. Holds minimum and maximum amount that can be transacted in a single transaction invocation.
Limits are applicable to targets. The types of targets supported by OBDX are Task and Payee.
- Task : Any service developed as a part of OBDX and registered as a task as mentioned in earlier sections
- Payee : A payee resource created via Payee creation transaction in OBDX.
To enable limits for a service, rather for a task mapped to the service to be precise, we need to follow the below mentioned steps:
- Ensure that the LIMIT_REQUIRED column of the DIGX_CM_TASK table is updated as 'Y' for your task id.
- Step 2. Register taskEvaluatorFactory for your task code. This needs an insert in DIGX_FW_CONFIG_ALL_B table under the category_id 'taskEvaluatorFactories' as shown below
Insert into DIGX_FW_CONFIG_ALL_B (PROP_ID, CATEGORY_ID, PROP_VALUE, FACTORY_SHIPPED_FLAG, PROP_COMMENTS, SUMMARY_TEXT,
CREATED_BY, CREATION_DATE, LAST_UPDATED_BY, LAST_UPDATED_DATE, OBJECT_STATUS, OBJECT_VERSION_NUMBER) values
(<<taskcode>>, 'taskEvaluatorFactories', 'com.ofss.digx.framework.task.evaluator.DefaultTaskEvaluatorFactory', 'N',
null, 'Task Evaluator Factory for Mixed FT', 'ofssuser', sysdate, 'ofssuser', sysdate, 'Y', 1);
- Code a LimitDataEvaluator for the task. LimitDataEvaluator is a class that implements ILimitDataEvaluator interface present in com.ofss.digx.finlimit.core jar. This is a functional interface with a single method having signature as shown below :
/**
* provide {@link LimitData} of currently executing task.*
* @param serviceInputs
* the service inputs
* @return {@link LimitData} required for limit utilization and validation* @throws Exception
*/
public LimitData evaluate(List<Object> serviceInputs) throws Exception;
This method recieves a List<Object> as an input. This list has all the arguments that were passed to the newly coded service for which limits needs to be enabled. For instance consider the service to open a termed deposit. Signature of the service is as shown below.
public TermDepositAccountResponseDTO create(SessionContext sessionContext,
TermDepositAccountDTO termDepositAccountDTO) throws Exception
In this case when the LimitDataEvaluator coded for open term deposit task i.e. TD_F_OTD is invoked by the OBDX framework, the serviceInputs argument of evaluate method will contain 2 objects in the list namely SessionContext and TermDepositAccountDTO. The return type of evaluate method is LimitData. The state of a LimitData object comprises of three variables:
- CurrencyAmount : an Object of type CurrencyAmount which represents the monetary amount involved in the ongoing transaction along with the currency in the transfer or payment is made.
- payee : An object of type PayeeDTO. Needs to be populated in case a payee is involved in the transaction.
- limitTypesToBeValidated : A list of LimitTypes. For all unexceptional practical purposes this needs to be populated as shown below:
limitTypesToBeValidated = new ArrayList<LimitType>(Arrays.asList(LimitType.PERIODIC,LimitType.DURATION,LimitType.TRANSACTION));
These 3 fields in case applicable needs to be derived from the argument serviceInputs and populated in the returned LimitData object.
- Register the LimitDataEvaluator coded in Step 3.
This needs an insert in DIGX_FW_CONFIG_ALL_B table under the category_id 'limitDataEvaluator' as shown below
Insert into DIGX_FW_CONFIG_ALL_B (PROP_ID, CATEGORY_ID,PROP_VALUE, FACTORY_SHIPPED_FLAG, PROP_COMMENTS, SUMMARY_TEXT,
CREATED_BY, CREATION_DATE, LAST_UPDATED_BY, LAST_UPDATED_DATE, OBJECT_STATUS, OBJECT_VERSION_NUMBER) values
(<<task code>>, 'limitDataEvaluator', <<limitDataEvaluator>>, 'N', 'Limit data evaluator for <<service name>> service',
null, 'ofssuser', sysdate, 'ofssuser', sysdate, 'A', 1);
In the above query <<task code>> is the task code for the service, <limitDataEvaluator>> is the fully qualified name of the class coded in Step 3. <<service name>> is a descriptive name for the service.
- Step 5. Code a TargetEvaluator for your task.
Note: This step is needed only if your task requires limits involving Payees. Example Duration Limits and payee limits.
Payee limits are Periodic and Transactional limits applied on a Payee.
TargetEvaluator is a class that implements ITargetEvaluator interface. ITargetEvaluator is a functional interface that has only 1 method as shown below :
/**
* Evaluates the Target details for the given evaluated task code and service inputs in the form of
* {@link TargetDTO}.*
* @param evaluatedTaskCode
* the given evaluated task code
* @param serviceInputs
* inputs of the service using this evaluator
* @return target details of the target for this task code and service inputs in the form of {@link TargetDTO}.* @throws Exception
* exception while evaluating {@link TargetDTO}*/
public TargetDTO evaluate(String evaluatedTaskCode, List<Object> serviceInputs) throws Exception;
This method accepts the task code and serviceInputs in case something needs to be derived from the arguments passed to the service.
It returns a TargetDTO. TargetDTO has an id, name, value and TargetTypeDTO. TargetType tells whether the target is of type task or payee. If the TargetType is TASK then the variable value of TargetDTO holds the task code for the service.
If the TargetType is PAYEE then the variable value of TargetDTO holds the payeeId of the payee involved in the service.
As this step is required only for limits pertaining to payees so TargetType will be PAYEE and targetDTO's value will be payeeId.
Register the TargetEvaluator coded in Step 5.
Note: This step is needed only if your task requires limits involving Payees. Example Duration Limits and payee limts.
Payee limits are Periodic and Transactional limits applied on a Payee.
This needs an insert in DIGX_FL_TARGET_EVALUATOR table as shown below:
Insert into DIGX_FL_TARGET_EVALUATOR (TASK_CODE, TARGET_TYPE, EVALUATOR, PROP_COMMENTS, SUMMARY_TEXT, CREATED_BY,
CREATION_DATE, LAST_UPDATED_BY, LAST_UPDATED_DATE, OBJECT_STATUS, OBJECT_VERSION_NUMBER) values (<<task code>>,
'PAYEE', <<TargetEvaluator>>, null, 'target evaluator for <<service name>> service', 'ofssuser', sysdate, 'ofssuser',
sysdate, 'Y', 1);
In the above query <<task code>> is the task code for the service, <<TargetEvaluator>> is the fully qualified name of the class coded in Step 5. <<service name>> is a descriptive name for the service.
The aforesaid procedure enables limits for a task in OBDX.
Approval Configuration
The below procedure describes the steps required to enable Approvals for a newly developed service. A prequisite to this configuration is that this newly developed service should be registered as a task in OBDX. Refer “Task Registration” section for further details.
To enable approvals for a service, rather for a task mapped to the service to be precise, we need to follow the below mentioned steps:
- Ensure that the APPROVAL_SUPPORTED column of the DIGX_CM_TASK table is updated as 'Y' for your task id.
Note: If the newly created task is of type ADMINISTRATION and the maintenance is not specific to a party then this step is not required. Examples of such transaction are 2 Factor Authentication maintenance, limit maintenance and limit package maintenance. Tasks of type ADMINISTRATION which are specific to a party like Rule management tasks, workflow management tasks etc require this step.Tasks of type FINANCIAL_TRANSACTION,NONFINANCIAL_TRANSACTION,MAINTENANCE,INQUIRY and COMMON require this step.
Code an approval assembler for the new task. An approval assembler is a class that extends AbstractApprovalAssembler.
There are 4 methods in abstract approval assembler out of which the one with the below signature:
public abstract T toDomainObject(D requestDTO) throws Exception;
will encapsulate the logic required to populate Transaction domain which is used by approvals framework.
Rest of the methods need to be overridden with empty or null implementations. As evident from the signature quoted above this method accepts a requestDTO(an object that IS A DataTransferObject) and a transaction(an object that IS A Transaction). requestDTO is the same DataTransferObject that was passed to your newly created service. For instance consider the service to open a termed deposit. Signature of the service is as shown below.
public TermDepositAccountResponseDTO create(SessionContext sessionContext,
TermDepositAccountDTO termDepositAccountDTO) throws Exception
In this case when the ApprovalAssembler coded for open term deposit task i.e. TD_F_OTD is invoked by the OBDX framework, the requestDTO argument of toDomainObject method will be the same as termDepositAccountDTO.
This method populates the transaction object on the basis of the requestDTO and returns the transaction domain. The guidelines to override this method are as follows:-
- Instantiation : The transaction object passed will be null and needs to be instantiated. If the task type of the newly created service is FINANCIAL_TRANSACTION then the transaction needs to be instantiated as an object of AmountAccountTransaction.
transaction = new AmountAccountTransaction();
If the task type of the newly created service is NONFINANCIAL_TRANSACTION then the transaction needs to be instantiated as an object of AccountTransaction.
transaction = new AccountTransaction();
If the task type of the newly created service is MAINTENANCE then the transaction needs to be instantiated as an object of PartyTransaction.
transaction = new PartyTransaction();
If the task is of type ADMINISTRATION and the maintenance is specific to a party then the transaction needs to be instantiated as an object of PartyTransaction.
transaction = new PartyTransaction();
If the task is of type ADMINISTRATION and the maintenance is not specific to a party then the transaction needs to be instantiated as an object of Transaction.
transaction = new Transaction();
- Call to AbstractApprovalAssembler :
Call
transaction = super.toDomainObject(requestDTO, transaction);
This populates the generic state of transaction domain which does not change with the task for which approvals is being configured.
c. Populate the state of the transaction domain which is specific to the task for which approvals is being configured. Cast the
requestDTO to the type being accepted by the service. For example cast it to TermDepositAccountDTO as per the aforesaid example.
Use this DTO to populate the service specific state of the transaction domain like amount, account etc.
Step 3. Register an approval assembler for your service or task.
To register an approval assembler for your service an entry needs to be made in the database table DIGX_FW_CONFIG_ALL_B with the value of column CATEGORY_ID as 'approval_assembler'.
If the newly created task is of type ADMINISTRATION and the maintenance is not specific to a party then the approval assembler to be registered against your service is om.ofss.digx.framework.domain.transaction.assembler.GenericDTOTransactionAssembler
2 Factor Authentication Maintenance is a fine example of such transactions. The service id for this transaction is com.ofss.digx.app.security.service.authentication.maintenance. AuthenticationMaintenance.
create
The below query fulfills the requirement of this step:
Insert into DIGX_FW_CONFIG_ALL_B
(PROP_ID,
CATEGORY_ID,
PROP_VALUE,
FACTORY_SHIPPED_FLAG,
PROP_COMMENTS,
SUMMARY_TEXT,
CREATED_BY,
CREATION_DATE,
LAST_UPDATED_BY,
LAST_UPDATED_DATE,
OBJECT_STATUS,
OBJECT_VERSION_NUMBER)
values
('com.ofss.digx.app.security.service.authentication.maintenance.AuthenticationMaintenance.create','approval_assembler',
'com.ofss.digx.framework.domain.transaction.assembler.GenericDTOTransactionAssembler',
'N',
'assembler class for conversion from UserSegmentTFAMaintenanceDTO to Transaction domain',
'assembler class for conversion from UserSegmentTFAMaintenanceDTO to Transaction domain',
'ofssuser',
sysdate,
'ofssuser',
sysdate,
'A',
1);
In all other cases where you have implemented a custom approval assembler as per the guidelines in step 2, the fully qualified class name of that approval assembler will be registered against your service. The below query fulfills the requirement of this step:
Insert into DIGX_FW_CONFIG_ALL_B
(PROP_ID,
CATEGORY_ID,
PROP_VALUE,
FACTORY_SHIPPED_FLAG,
PROP_COMMENTS,
SUMMARY_TEXT,
CREATED_BY,
CREATION_DATE,
LAST_UPDATED_BY,
LAST_UPDATED_DATE,
OBJECT_STATUS,
OBJECT_VERSION_NUMBER)
values
(<<service id>>,
'approval_assembler',
<<ApprovalAssembler>>,
'N',
'assembler class for conversion from DataTransferObject to Transaction domain',
'assembler class for conversion from DataTransferObject to Transaction domain',
'ofssuser',
sysdate,
'ofssuser',
sysdate,
'A',
1);
In the above query <<service id>> is the fully qualified name of the class appended by the dot character (.) and the method name. <<ApprovalAssembler>> denotes the fully qualified class name of the approval assembler coded in Step 2.
The aforesaid procedure enables approvals for a task in OBDX.