LDAP INSTALLATION AND CONFIGURATION
The LDAP Installation and Configuration consists of following topics:
- Using Oracle Unified Directory
- Creating Weblogic Domain for Oracle Unified Directory
- Creating the Attributes, Object Class, Users, Groups and Adding Optional Attributes on LDAP Server
This chapter describes the different ways of installing the Lightweight Directory Access Protocol (LDAP) server in the following sections respectively:
- Using Oracle Unified Directory
- Creating Weblogic Domain for Oracle Unified Directory
- Creating Attributes, Object Class, Users, Groups and Adding Optional Attributes on LDAP Server
Using Oracle Unified Directory
Oracle Unified Directory is a comprehensive next generation directory service. It is designed to address large deployments and to provide high performance, and is highly extensive. Oracle Unified Directory is easy to deploy, manage, and monitor.
This chapter describes the installation tasks which contains the following sections:
- Installing and Configuring Oracle Unified Directory
- Verifying the Installation
Installing and Configuring Oracle Unified Directory
- Obtain OUD from the Oracle Fusion Middleware Downloads. Download OUD.zip file to a directory, and unpack the downloaded archive that contains the installer. By default, this directory is named OUD.
- Now to start the installer, go to the directory where you unpacked the archive file and switch to the Disk1 directory.
Start the installer from the Disk1 directory (On UNIX)
./runInstaller –jreLoc Java_Home/jdk
Note: You must enter the absolute path of the JRE folder located in this JDK when launching the installer.
- If you are installing on a UNIX system, and if this is the first time any Oracle product is being installed on your system with the Oracle Universal Installer, you will are asked to provide the location of an inventory directory. This is where the installer sets up subdirectories and maintains inventory data for each Oracle product that is installed on this system.
- Follow the instructions in the below table to configure the inventory directory information. For more help, click on the screen name in the table below, or click the Help button in the GUI.
Inventory Directory and Group Screens
|
Screen |
Description and Action Required |
|---|---|
|
Specify Inventory Directory Screen (UNIX Only) |
Specify the Oracle inventory directory and group permissions for that directory. The group must have write permissions to the Oracle inventory directory. Click OK to continue. |
|
Inventory Location Confirmation Screen (UNIX Only) |
Run the createCentralInventory.sh script as root. Click OK to continue. |
Now, perform the steps as shown below to install and configure OUD after you start the OUD installer.
Welcome Screen
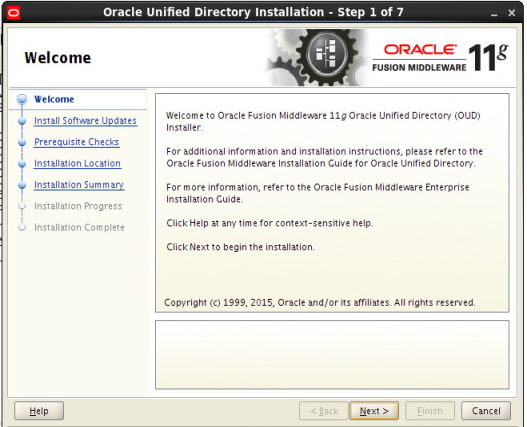
The Welcome screen is displayed each time you start the installer.
Click Next to continue.
Install Software Updates Screen
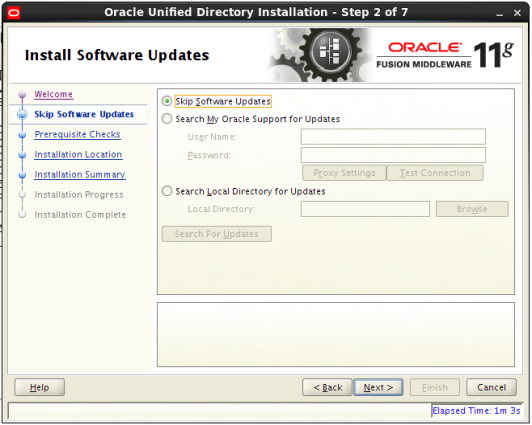
If you want to search for and download software updates from My Oracle Support, then do the following:
Select Search My Oracle Support for Updates.
Enter User name and Password.
Click Test Connection.
If you want to search your local directory for updates, then do the following:
Select Search Local Directory for Updates.
Click Search For Updates.
If you want to skip software updates, then select Skip Software Updates. (Kindly follow recommended practices regarding updates depending on the setup requirements or usage.)
Click Next to continue.
Prerequisite Checks Screen
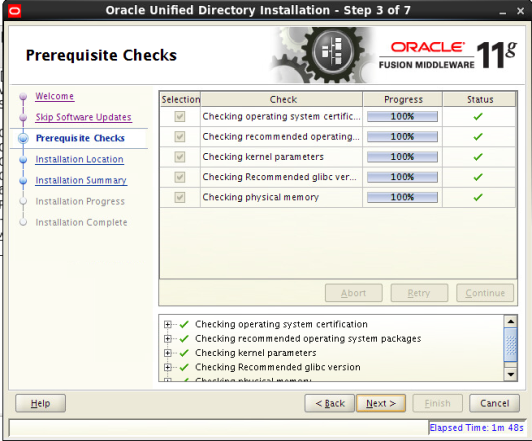
This screen shows whether the system requirements are met in order to install the software.
If there is a problem, a short error message appears in the bottom portion of the screen. Fix the error, and click Retry to try again.
If you want to ignore the error or warning messages and continue with the installation, click Continue.
To stop prerequisite checking for all components, click Abort.
Click Next to continue.
Specify Installation Location Screen
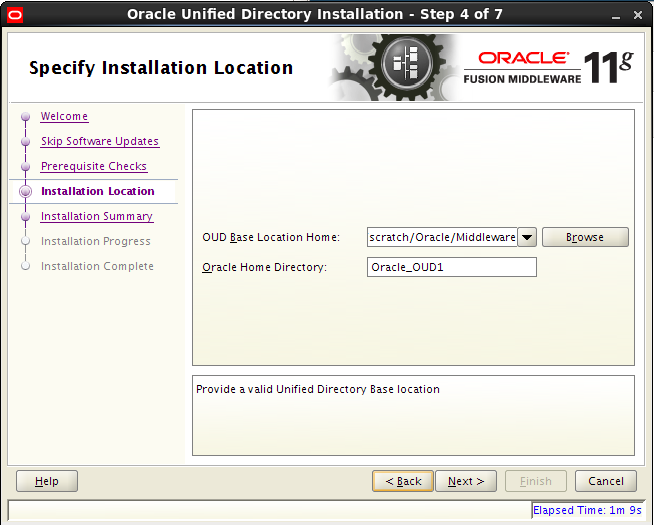
Specify the following installation locations:
- Oracle Middleware Home
The absolute path to the directory where WebLogic Server was installed.
- Oracle Home Directory
The directory name for your Oracle home:
- You can specify a pre-existing directory that you want to use as the Oracle home; the directory must be an empty directory.
- You can specify the name of a new directory that will be created for you inside the Middleware home.
Oracle Home directory is where your products will be installed. All software binaries will reside in this directory, and no runtime process can write to this directory.
Note: This installation directory will be referred to as OUD_ORACLE_HOME throughout the remainder of this document.
If you are performing an installation on a Windows operating system, be sure that your directory paths are valid, and do not contain double backslashes (\\).
Click Next to continue.
Installation Summary Screen
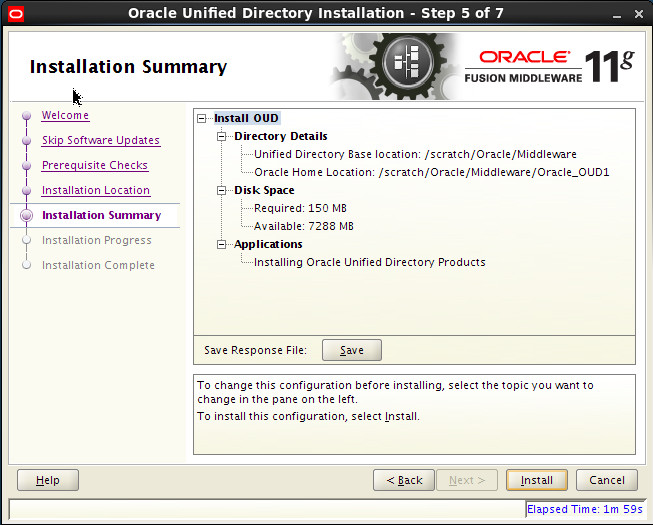
Review the information on this screen. The operations summarized on this page will be performed when you click Install.
If you want to make any changes to the configuration before starting the installation, use the navigation pane, and select the topic you want to edit.
If you want to save this configuration to a text file (called a response file), click Save. You will be prompted for the location of name of the file you want to create (for example, silent_install.rsp). This file can be used later if you choose to perform the same installation from the command line.
Click Install.
Then screen shows the progress of the installation.
Installation Progress Screen
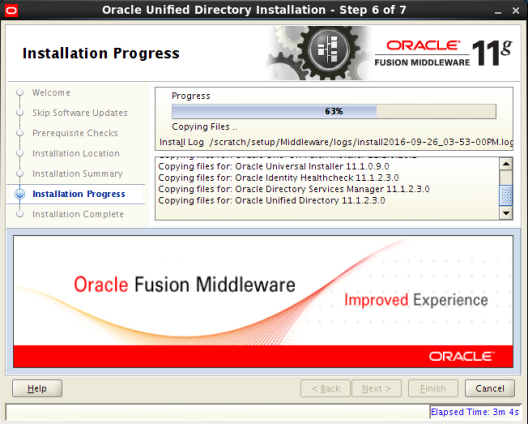
This screen shows the progress of the installation.
If you want to quit before the installation is completed, click Cancel. Doing so will result in a partial installation; the portion of the software that was installed on your system before you click Cancel will remain on your system, and you will have to remove it manually.
Installation Complete Screen
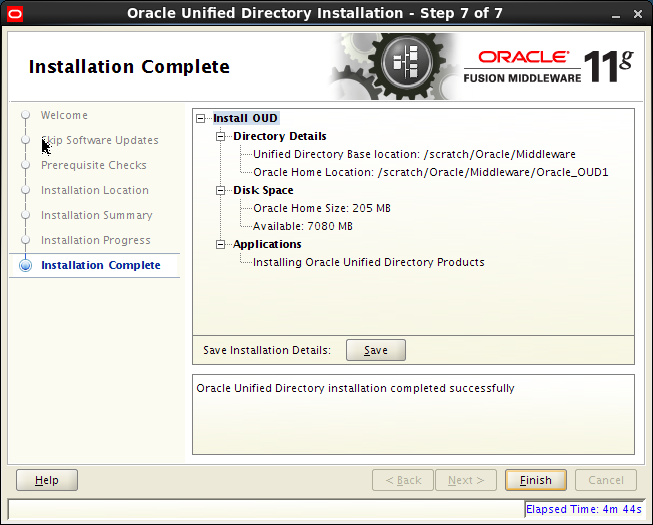
This screen summarizes the installation that was just completed.
You can also save this summary information to a file for future reference by clicking Save. You will be prompted to specify a name and location for your summary file.
Click Finish to dismiss the screen.
- After the installation of OUD, go to the OUD_Oracle_Home directory and start the oud-setup.sh as follows,
cd /ORACLE_HOME/Oracle_OUD1/
./oud-setup
- After starting the oud-setup, follow the steps as shown below:
Welcome Screen
The Welcome screen is displayed each time you start the installer.
Server Settings Screen
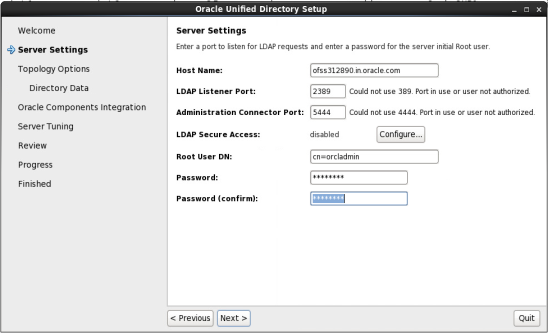
Enter the details as shown in the figure below:Host Name: Enter the directory server's host name or IP address.
LDAP Listener Port: Enter the LDAP port for the directory server.
Administration Connector Port: Enter the port that will be used for administration traffic.
The default administration port is 4444.
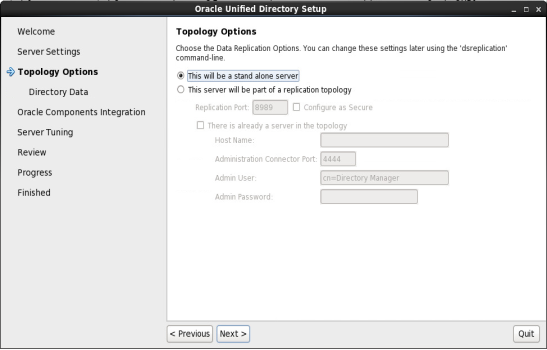
Topology Options Screen
Select This will be a stand alone server.
Click Next.
Directory Data Screen
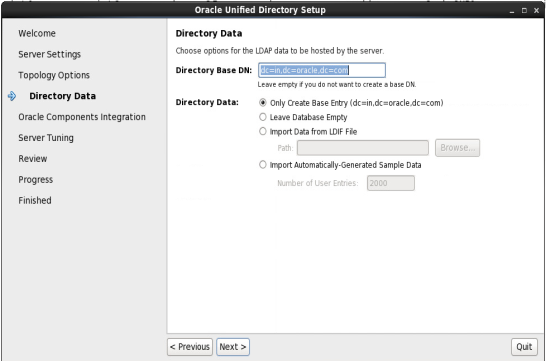
Specify how to load data into your directory
Directory Base DN: Enter the base DN for your directory.
dc=in,dc=oracle,dc=com
Directory Data: Select the following data option: Only Create Base Entry: Creates an entry with the base DN specified previously.
Click Next.
Oracle Components Integration Screen
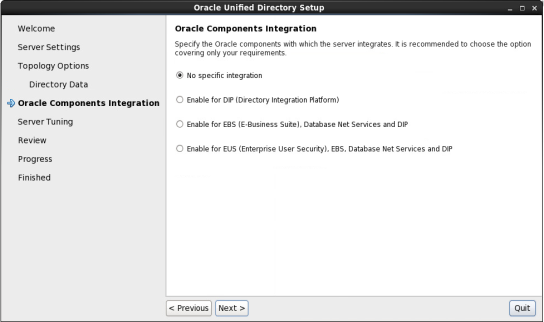
Select No specific integration as we want a standard installation. This is the default option.
Click Next.
Server Tuning Screen
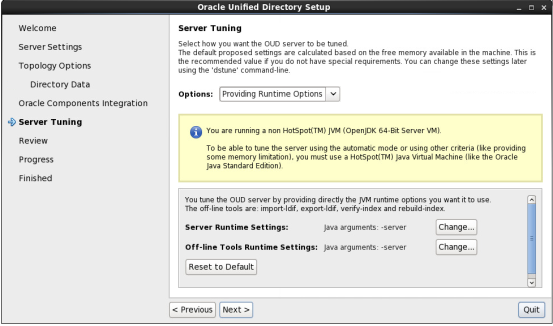
The Server Tuning screen enables you to tune Oracle Unified Directory server by selecting one of these options: Providing the specific memory to be dedicated to the server.
Explicitly providing the run-time settings (JVM arguments) to be used by the server and the off-line tools (import-ldif, export-ldif, verify-index, and rebuild-index).
To reset any changes to the default values, click Reset to Default.
Click Next.
Review Screen
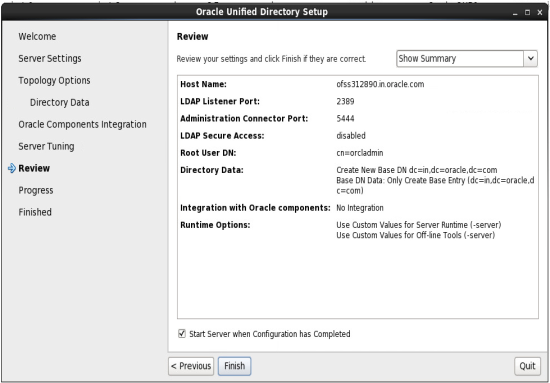
Review your configuration and Select Start Server when Configuration has Completed to start the server after the directory server has been configured.
Click Finish.
Configuration Done Screen
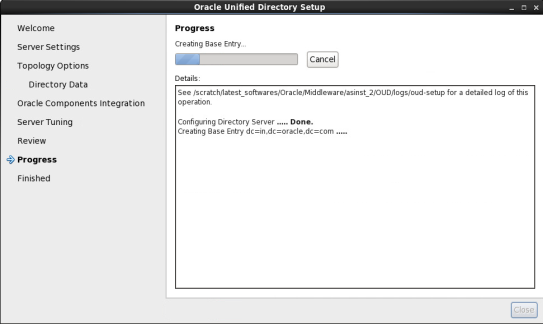
After the processing is done i.e.,after creating directory server is done and starting directory Is done click close.
Verifying the Installation
You can perform any combination of the following tasks to verify that your installation was successful:
- Verifying the Installation Logs
Check for the presence of installation log files in logs directory inside your Oracle Inventory directory. On UNIX systems, if you do not know the location of your Oracle Inventory directory, you can find it in the OUD_ORACLE_HOME/oraInst.loc file.
- Checking the Browser URLs
Use the port numbers of OUD provided during configuration, by default UserDN port is 1389 and Admin Connector Port is 4444. Check if there is any process running on the port. Use the following command:
netstat –tulpn | grep <port_number>
In-case there is no process bind to respective port number, kindly check your Server process.
- To check the URLs, use the format:
http://system_name:port_number/odsm
Creating Weblogic Domain for Oracle Unified Directory
- Start the Weblogic Configuration Wizard, by executing the below command:
<Oracle_Home>/wlserver_10.3/common/bin/config.sh
Note: Oracle_Home is the Middleware Home, which is the absolute path where Weblogic Server is installed.
- Follow the instructions as shown below for installation:
Welcome Screen
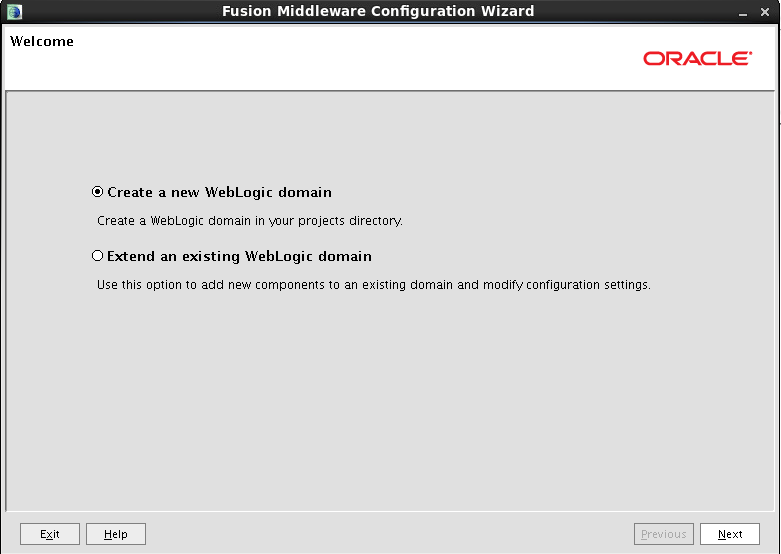
The Welcome screen is displayed each time you start the installer.
Click Next to continue.
Select Domain Source Screen
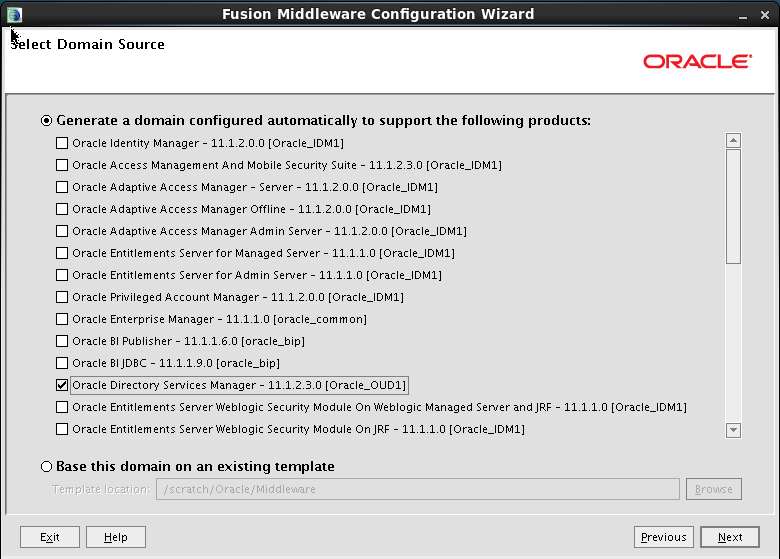
Use this screen to select the components that you want to configure.
For Oracle Access Manager, select the Oracle Directory Services Manager - 11.1.2.3.0 [OUD_HOME]
Click Next to continue.
Note: On selecting Oracle Entitlement Server option, Oracle JRF option gets selected by-default.
Specify Domain Name and Location Screen
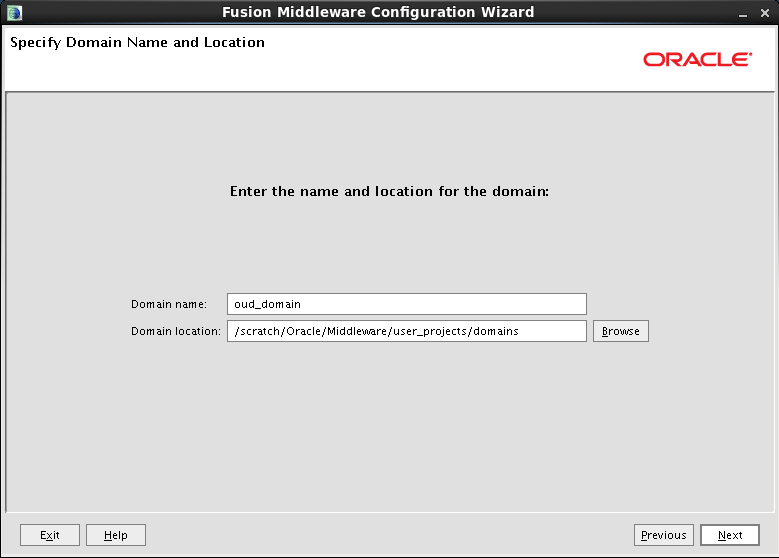
Specify the following locations:
- Domain name
Specify the name of the domain.
- Domain location
The default locations for the domain home is
<Oracle_HOME>/user_projects/domains
However, the domain home directory can also be created outside of Oracle home.
Here, Oracle Home directory is where the Weblogic Server is installed.
Click on Next.
Configure Administrator![]() Administrator is a set of individuals that administer the applicant/Affiliate entity. For example, Accountants, Authorized Signatories for organizations, Power of Attorney for individuals. User Name and Password Screen
Administrator is a set of individuals that administer the applicant/Affiliate entity. For example, Accountants, Authorized Signatories for organizations, Power of Attorney for individuals. User Name and Password Screen
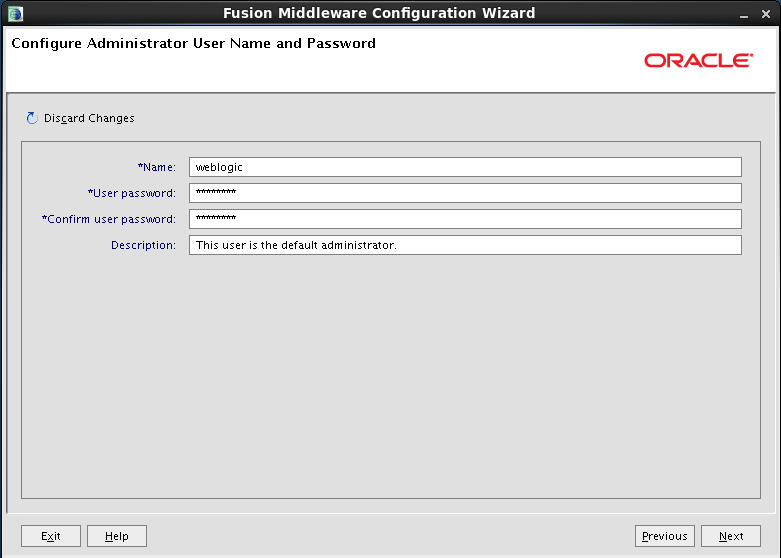
This screen is to provide the username and password for the Weblogic Administrator.
The default username is weblogic. The user can provide a different username.
Then, Click on Next.
Configure Server Start Mode and JDK Screen
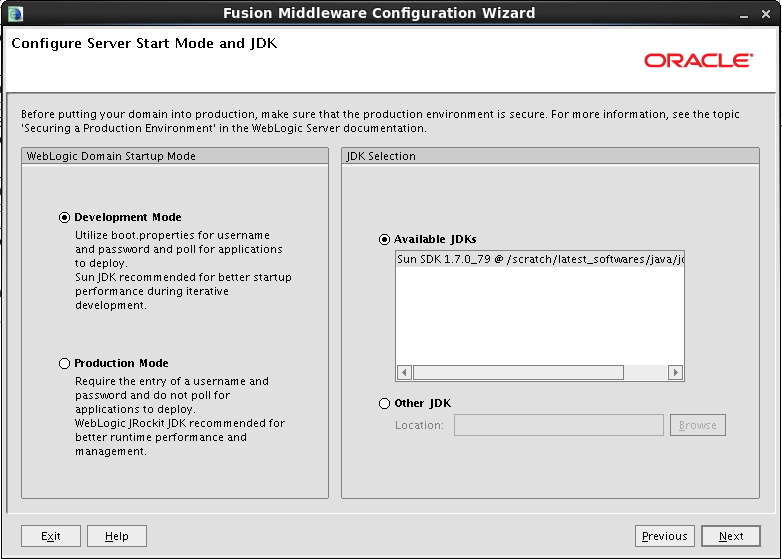
Choose a JDK from the Available JDKs.
Select a mode under the Weblogic Domain Startup Mode.
Click Next.
Select Optional Configuration Screen
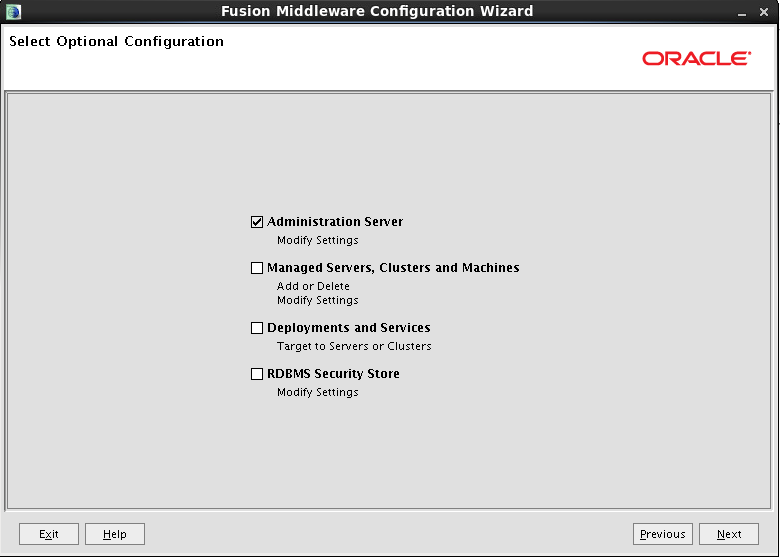
Choose the options to configure from the following list:
- Administration Server
- Managed Servers, Clusters and Machines
- Deployments and Services
- RDBMS Security Store
Select Administration Server and Click on Next.
Configure the Administrator Server Screen
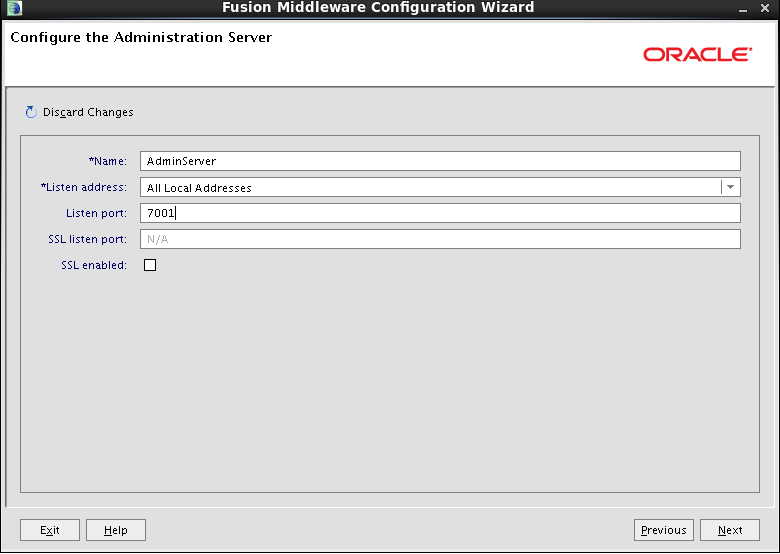
Specify the following details of the Administration Server in this screen:
- Name
- Listen address
- Listen port
- SSL listen port (Only if SSL is enabled)
- SSL enabled
After entering the details, click on Next.
Configuration Summary Screen
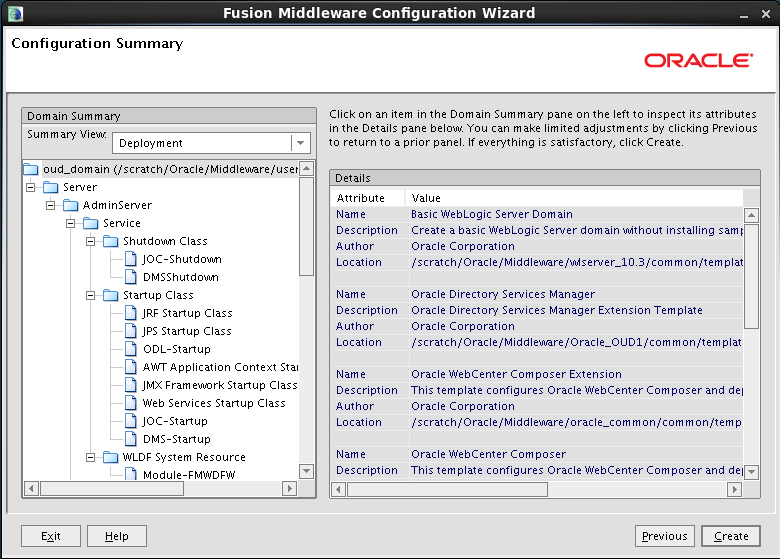
Review the domain configuration on this screen.
If you want to make any changes to the configuration before creating the domain, click Previous to navigate to the selected screen where you want to edit the details.
Click Create to start creating the domain.
By default, a new Weblogic Domain to support Oracle Unified Directory is created in the <Oracle_Home>/user_projects/domains directory.
Creating Domain Screen
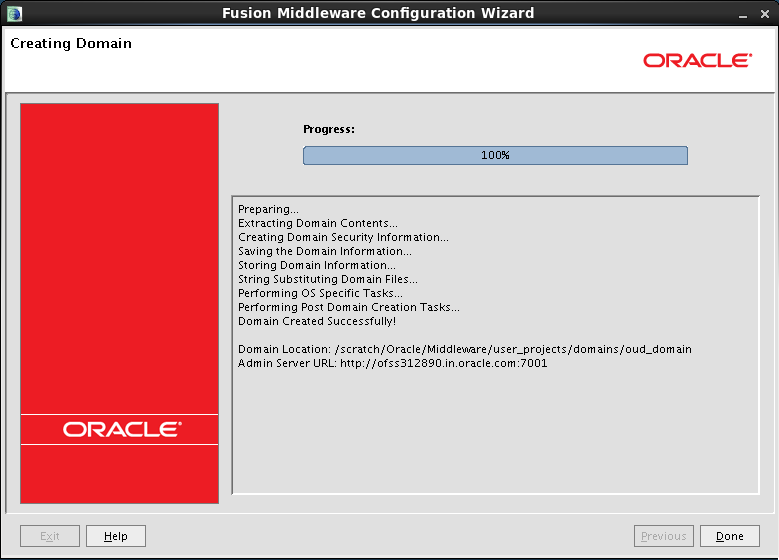
This screen summarizes the domain creation information that was just completed.
Click Done to dismiss the screen.
After configuring Oracle Unified Directory in a Weblogic Administration Domain, the Admin Server should be started to access the Directory Service on browser using the URL http://<ldap_hostname>:<ldap_port>/odsm
Creating the Attributes, Object Class, Users, Groups and Adding Optional Attributes on LDAP Server
To create Attributes
- Copy the “attributes.ldif” file from <OBDX BASE Installer zip>/installables/oud directory to a location on the server where OUD is installed and switch to the following directory:
cd <Oracle_Home>/Oracle_OUD1/bin
- Now, execute the below command:
./ldapmodify -h localhost -p <ldap_port> -D "ldap_user" -w <ldap_password> -a -f
<file_location>/attributes.ldif
OR (using SSL)
./ldapmodify -h localhost -p <ldap_port> -D "ldap_user" -w <ldap_password> -a -f
<file_location>/attributes.ldif --useSSL
- Login to ODSM Console. E.g. http://<hostname>:<port>/odsm and under the Schema tab check if the following attributes are created:
- accountType
- businessUnit
- deviceuuid
- fbId
- fcManager
- fcRoleId
- fcUserType
- homeBranch
- otpseed
- partyId
- partyName
- targetUnit
To create a Object Class
- Copy the “objectclass.ldif” file from <OBDX BASE Installer zip>installables/oud directory to a location on the server where OUD is installed and switch to the following directory:
cd <Oracle_Home>/Oracle_OUD1/bin
- Now, execute the below command:
./ldapmodify -h localhost -p <ldap_port> -D "ldap_user" -w <ldap_password> -a -f
<file_location>/objectclass.ldif
OR (using SSL)
./ldapmodify -h localhost -p <ldap_port> -D "ldap_user" -w <ldap_password> -a -f
<file_location>/objectclass.ldif --useSSL
- Login to ODSM Console. E.g. http://<hostname>:<port>/odsm and under the Schema tab check if the ‘fcPerson’ and ‘fcRole’ object class is created.
To create Groups
- Copy the “usergroup.ldif” file from <OBDX BASE Installer zip>installables/oud directory to a location on the server where OUD is installed and switch to the following directory:
cd <Oracle_Home>/Oracle_OUD1/bin
- Now, execute the below command:
./ldapmodify -h localhost -p <ldap_port> -D "ldap_user" -w <ldap_password> -a -f
<file_location>/usergroup.ldif
OR (using SSL)
./ldapmodify -h localhost -p <ldap_port> -D "ldap_user" -w <ldap_password> -a -f
<file_location>/usergroup.ldif --useSSL
- Login to ODSM Console. E.g. http://<hostname>:<port>/odsm and under the Data Browser tab check if the groups are created.
To create User and mapping it to the Group
- Login to ODSM Console. using required credentials. Post login you should see below screen. E.g. http://<hostname>:<port>/odsm.
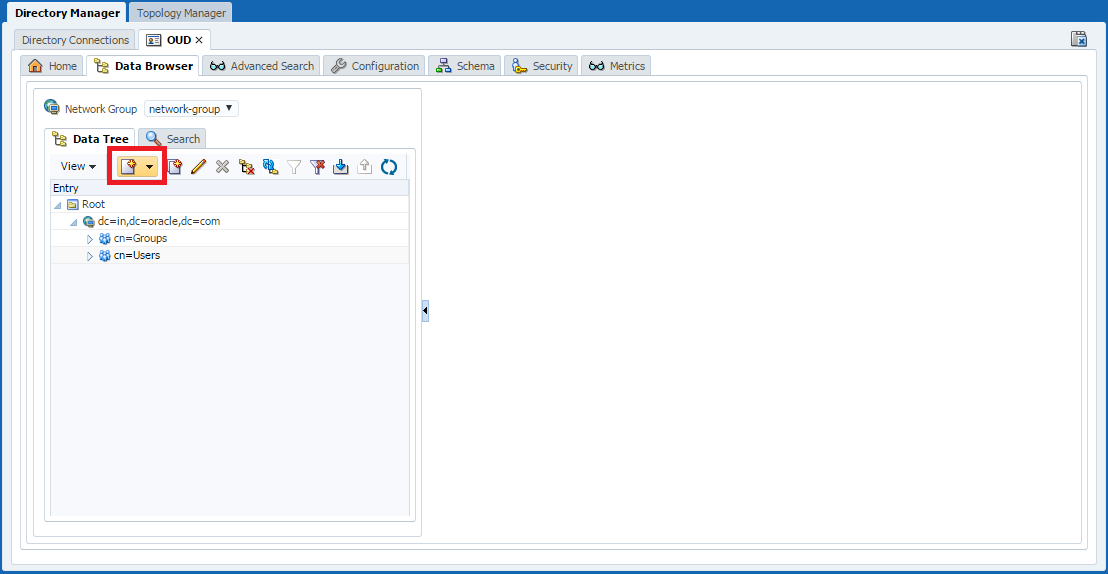
- Under the Data Browser tab, click on the Add icon
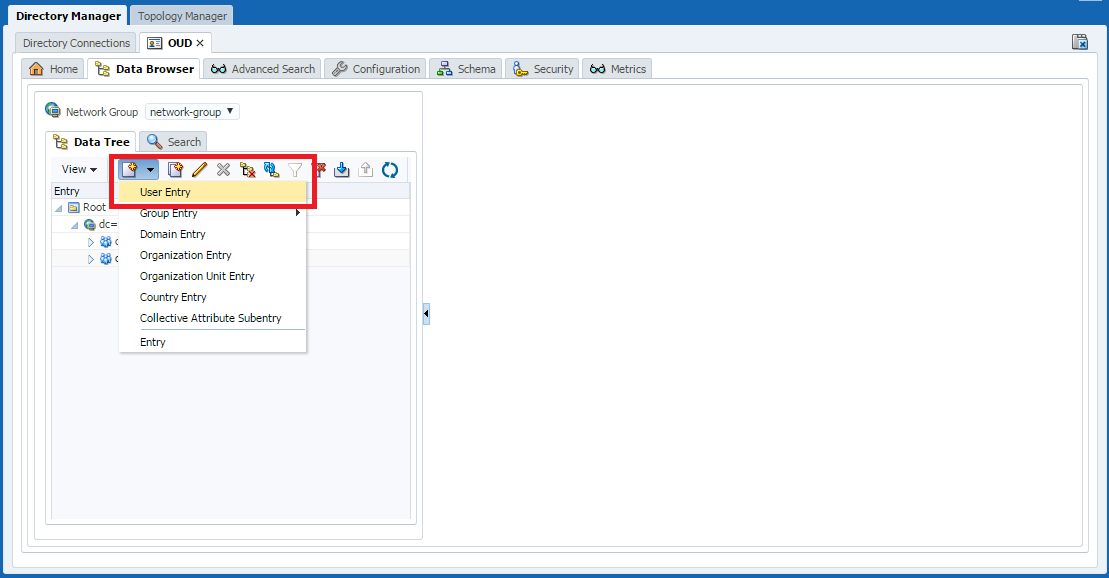
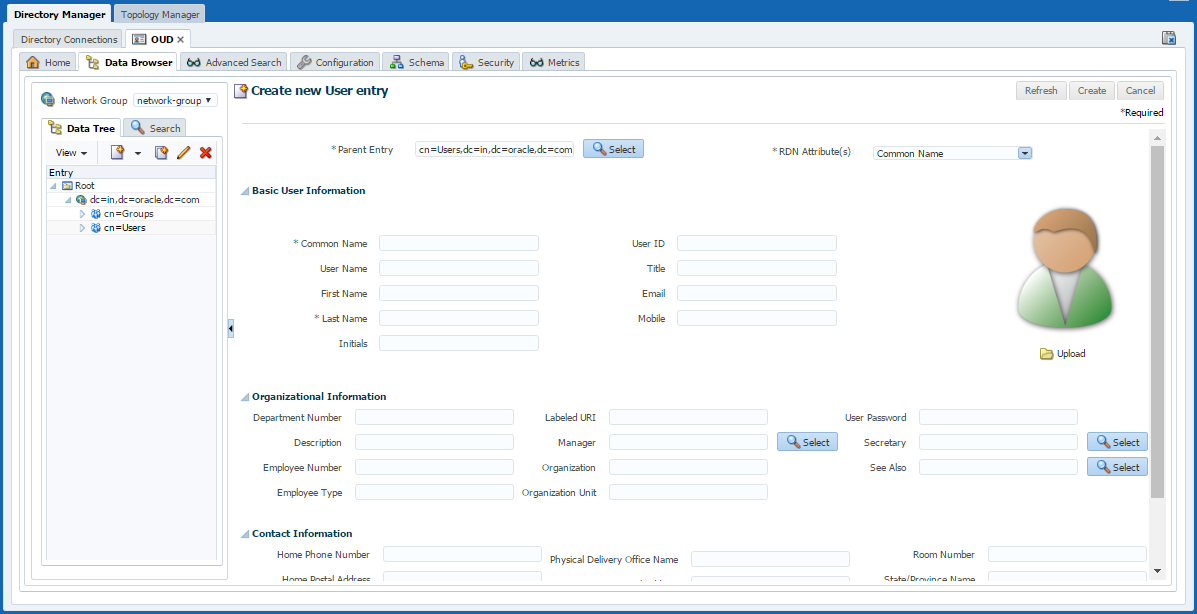
- Select User Entry from the list.
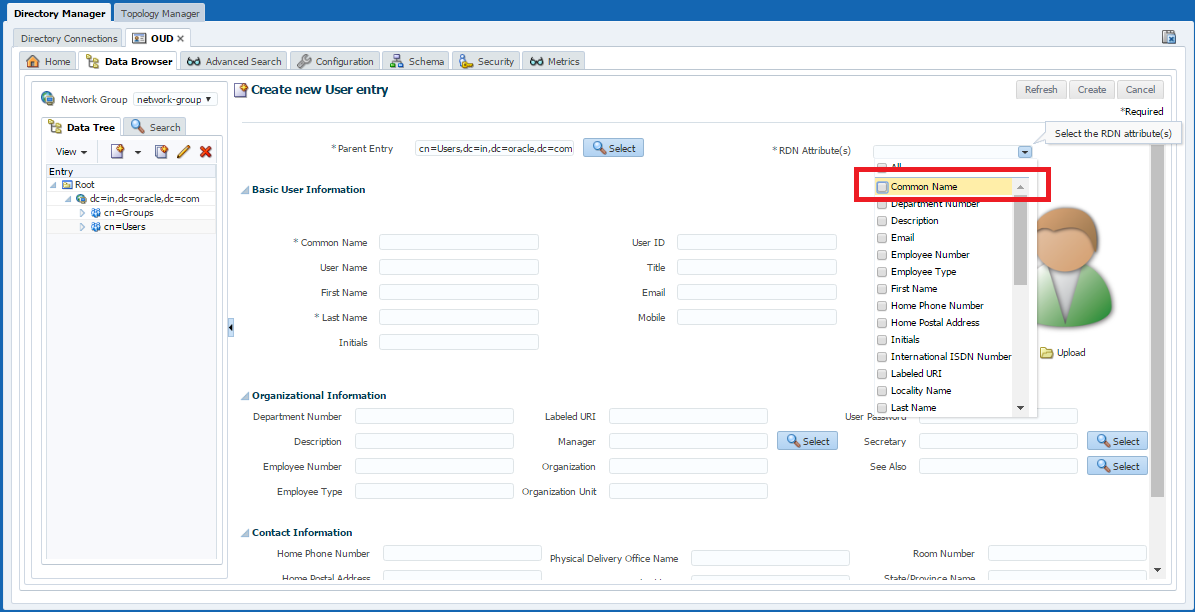
- Now, uncheck Common Name from the RDN Attributes dropdown list.
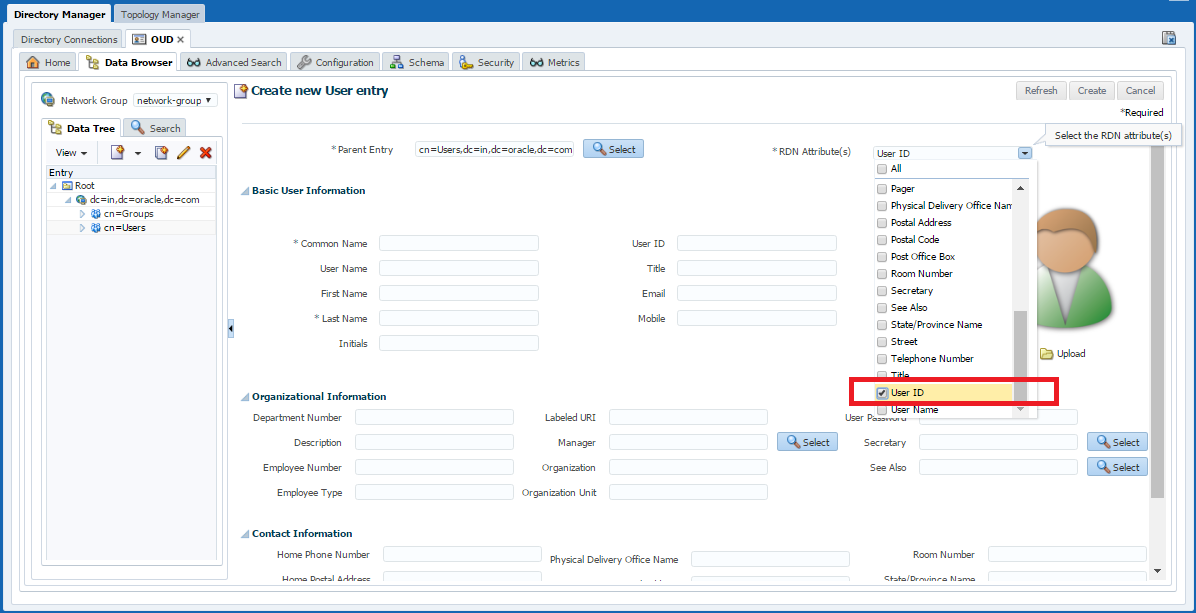
- And, Check the User ID Attribute checkbox.
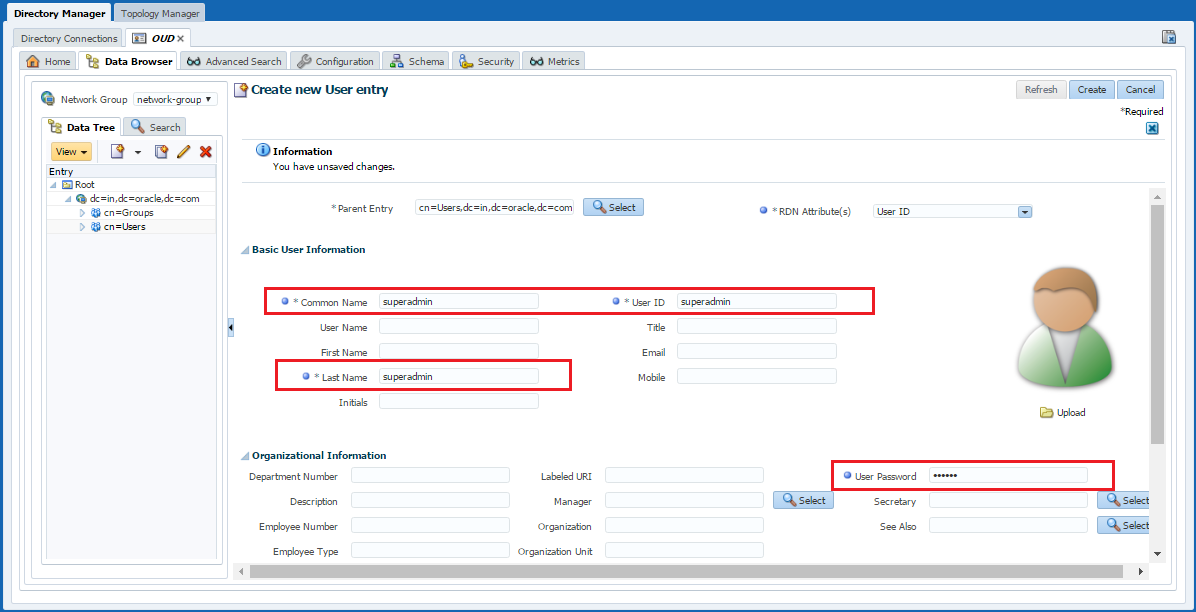
- Add the values in the mandatory fields Common Name, Last Name, User ID and User Password.
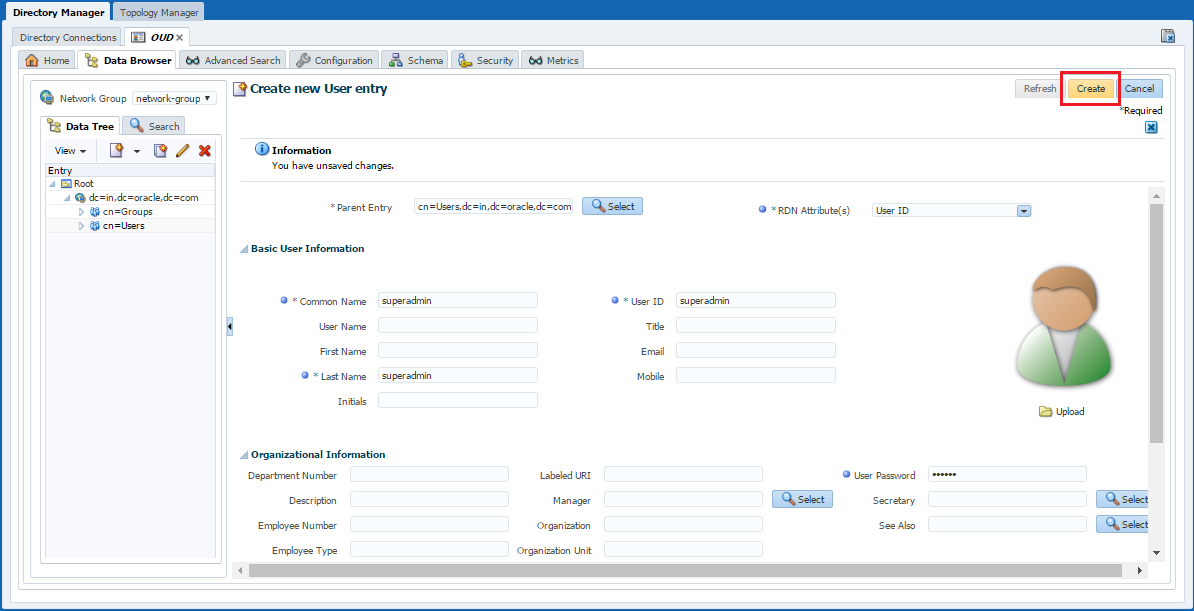
- Click on Create and the user entry will be created.
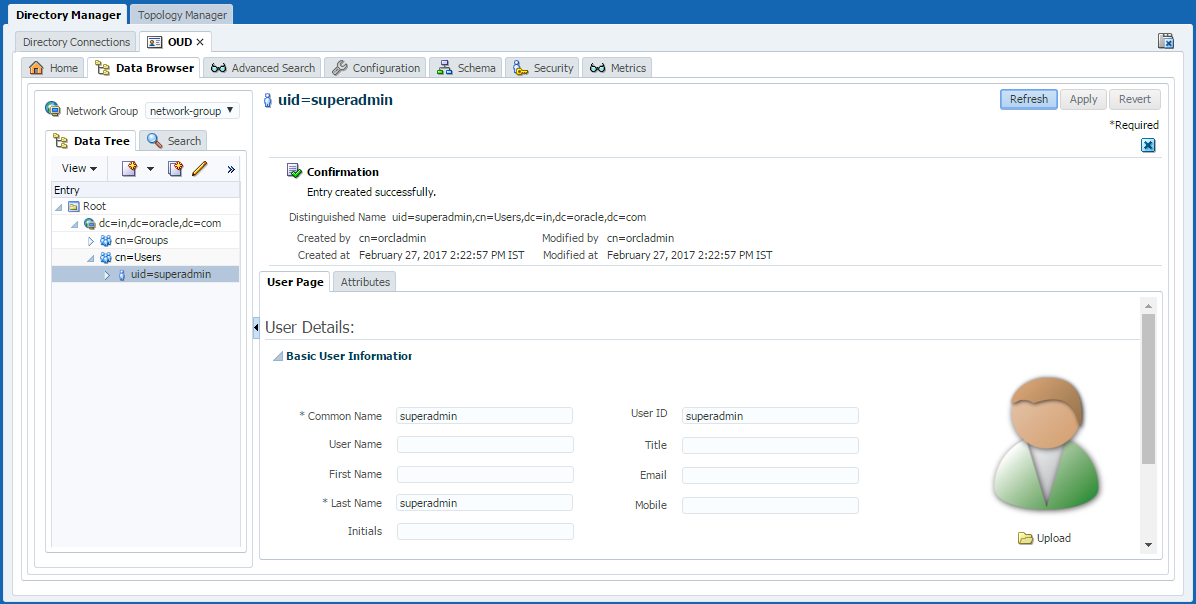
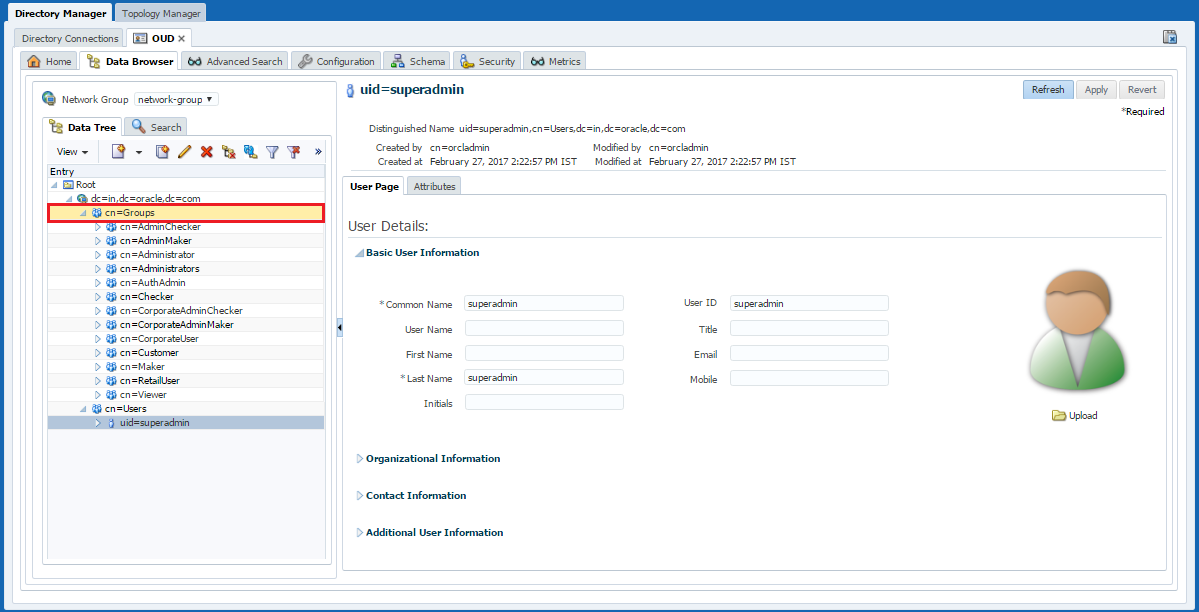
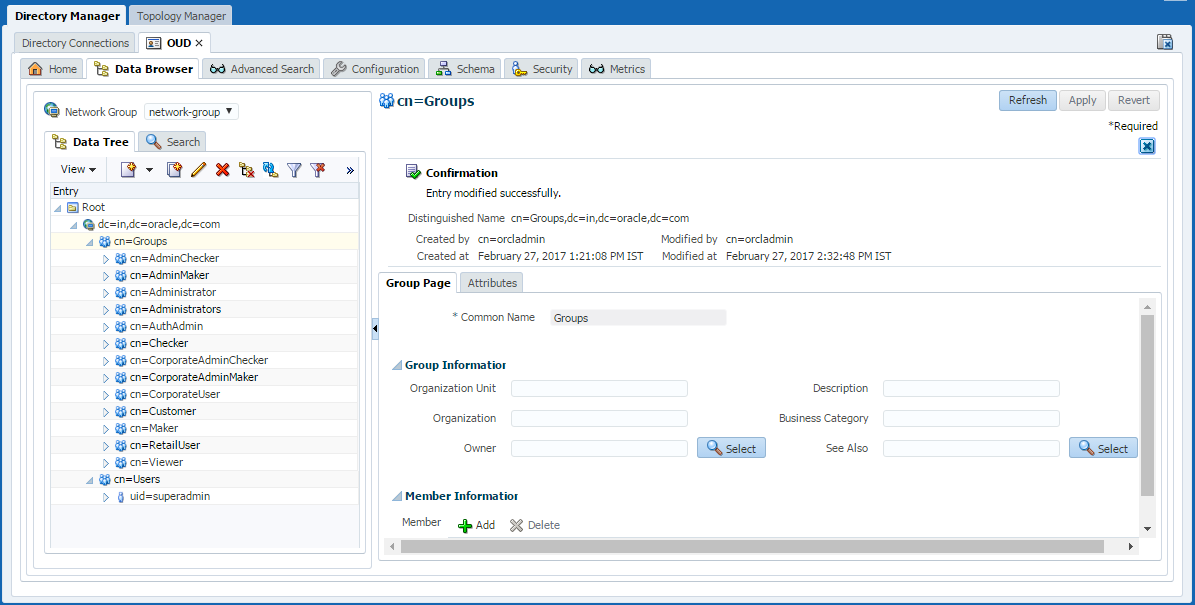
- Now, expand the Groups tab.
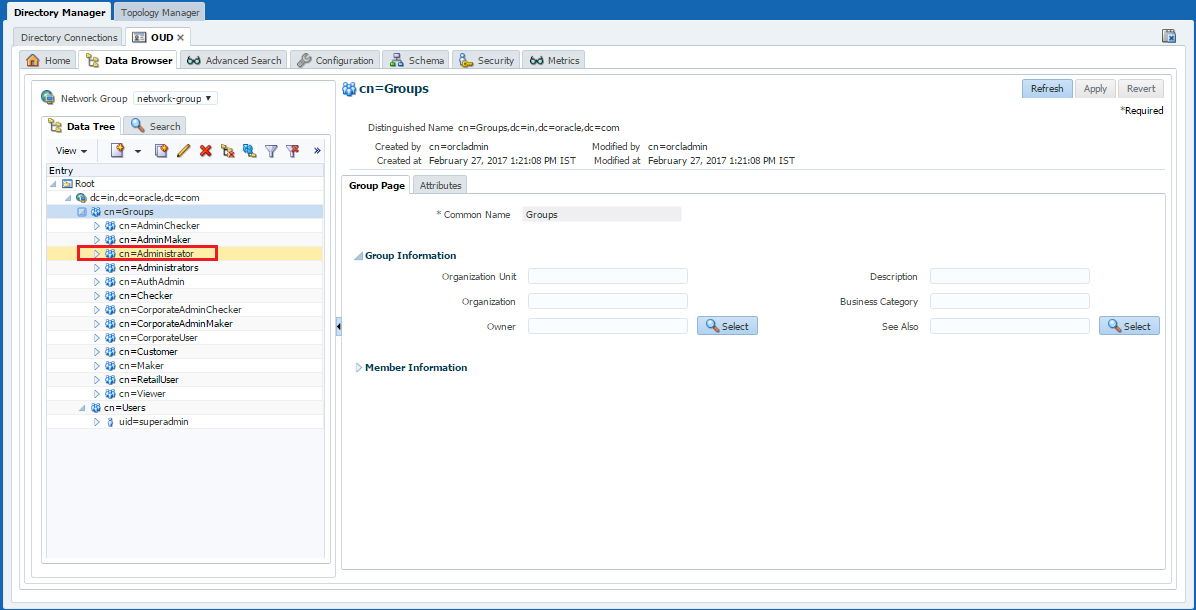
- Select Administrator Group.
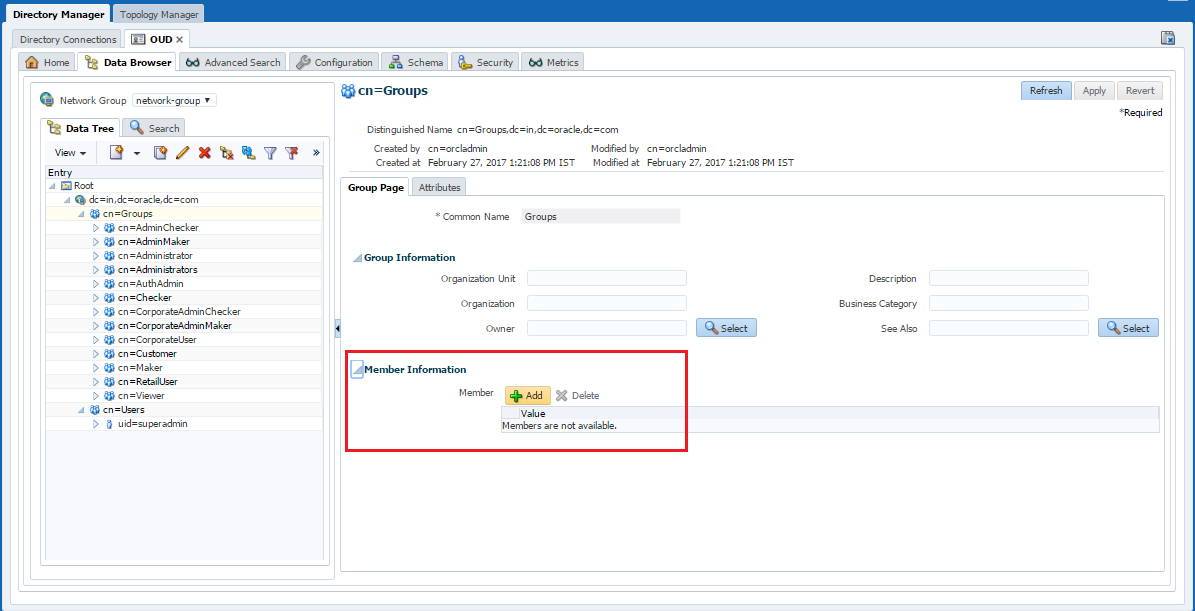
- Expand Member Information and click on Add button.
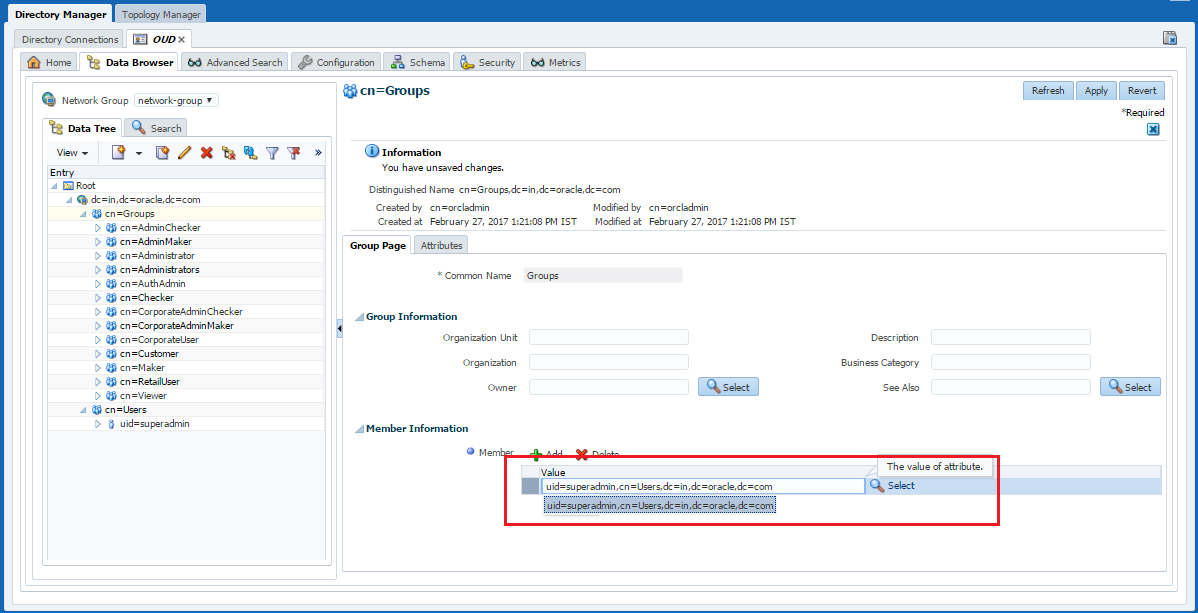
- Enter the entry of the user created in the previous steps.
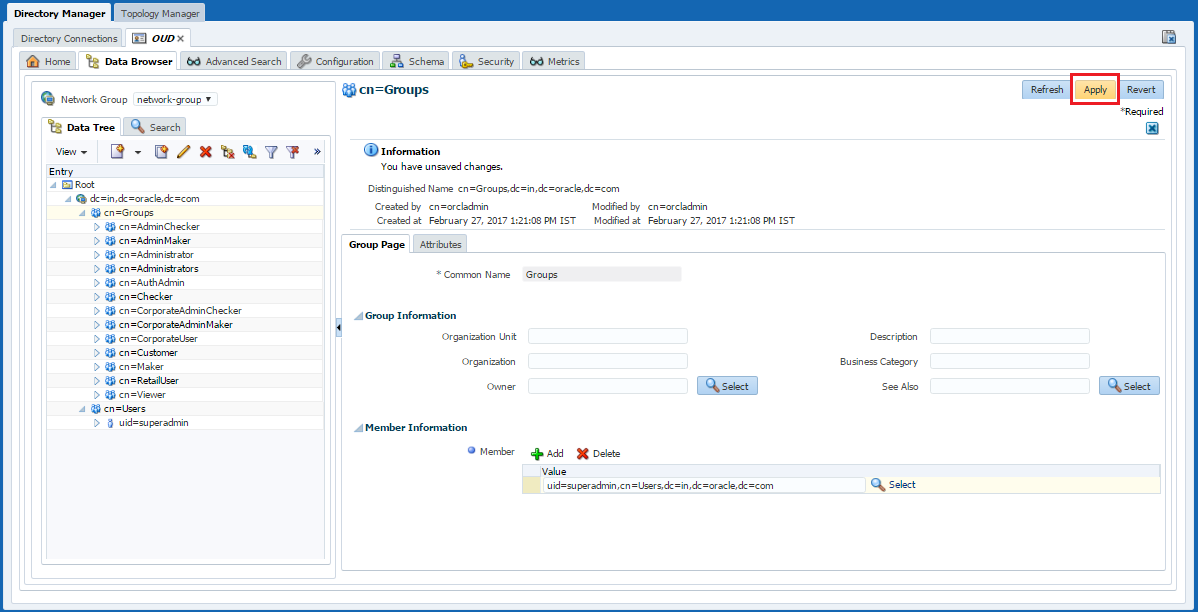
- Click on Apply to save the changes.
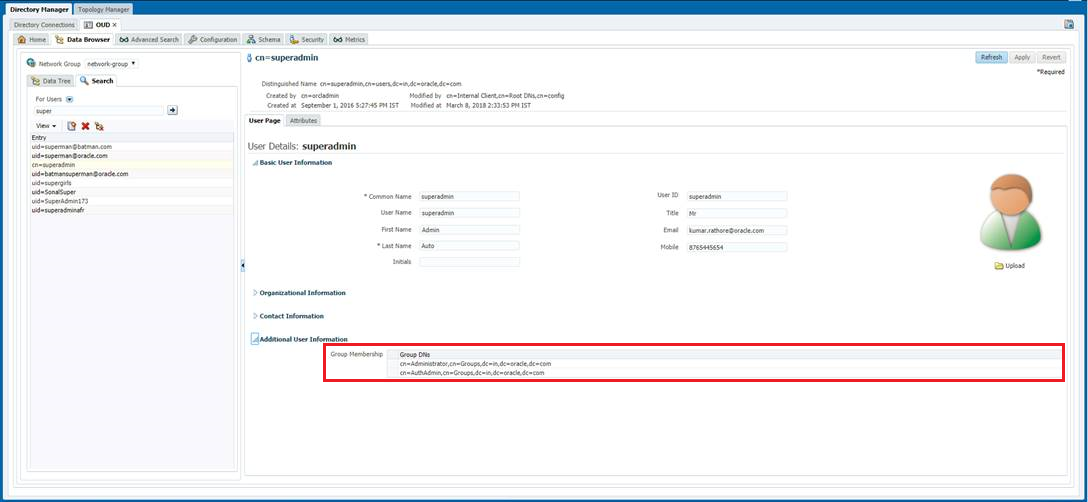
- Repeat the same steps and add the user to the group named AuthAdmin. The user's group membership should look similar to the following screenshot.
Adding Optional Attributes
- Login to ODSM Console. E.g. http://<hostname>:<port>/odsm.
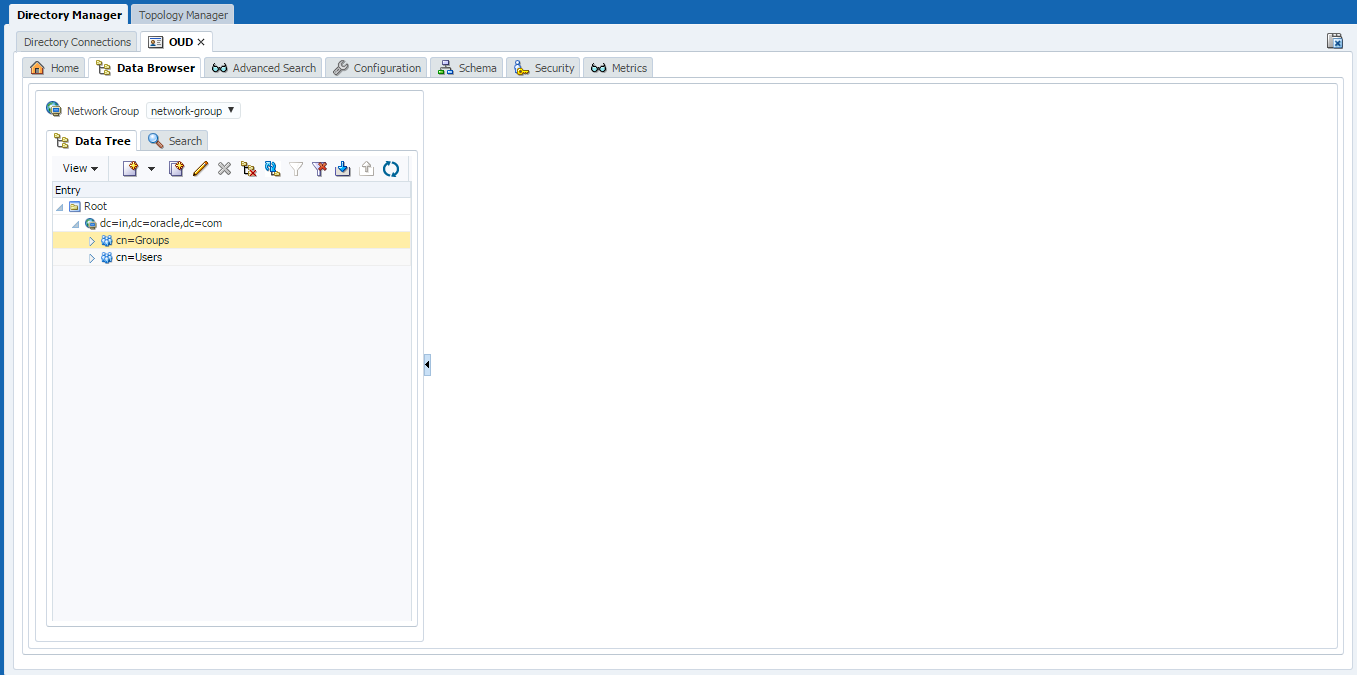
- Under the Data Browser tab, expand the Groups
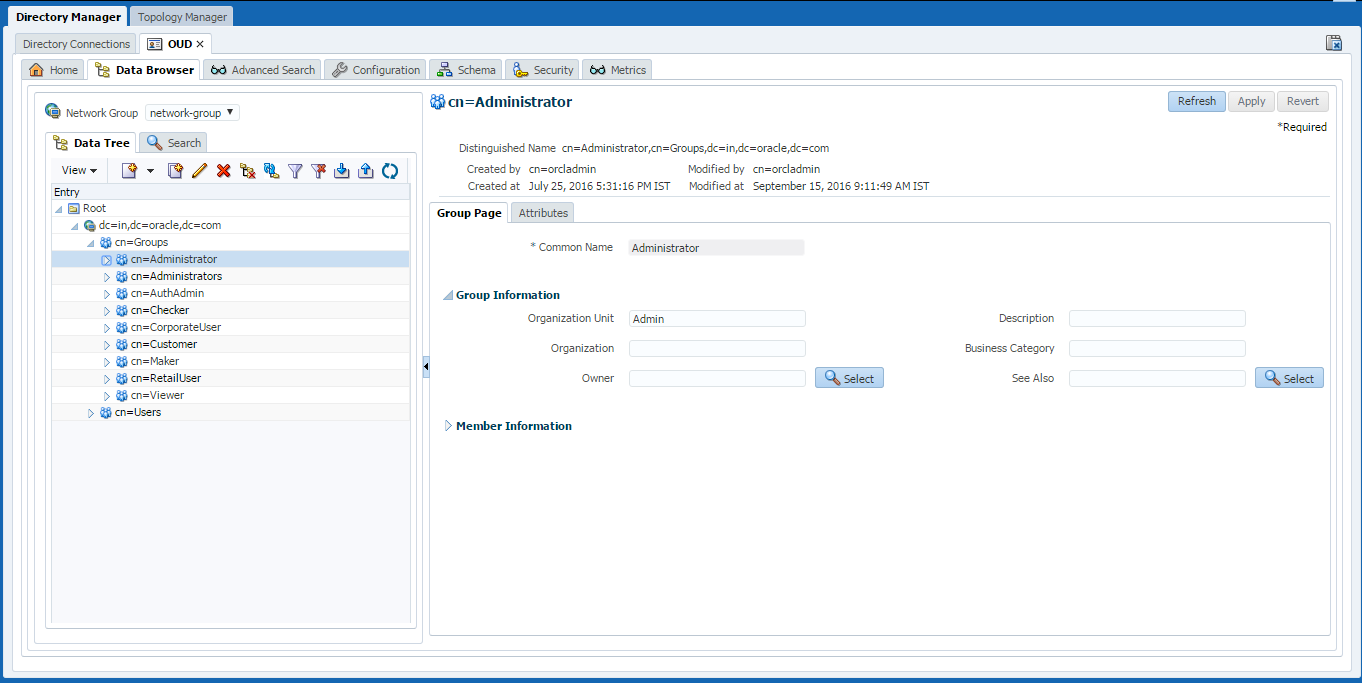
- Select a particular group, e.g. cn=Administrator.
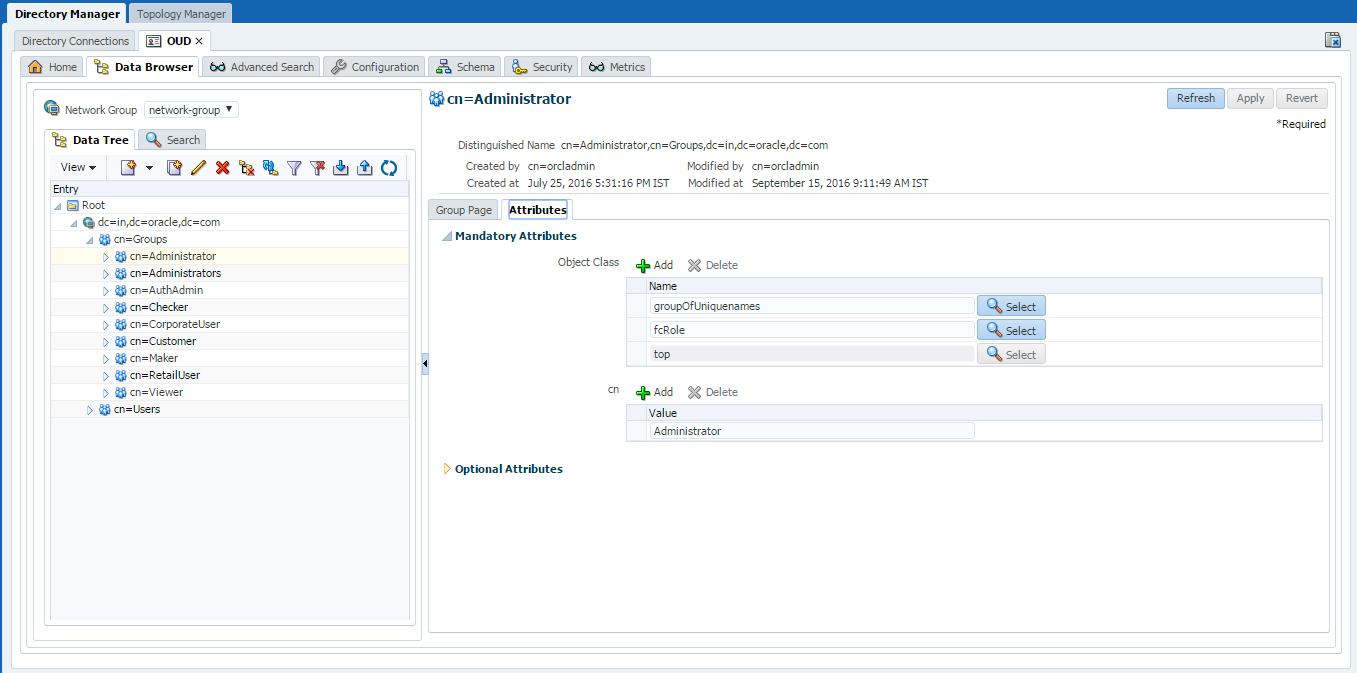
- Now, under the Attributes tab, expand the Optional Attributes.
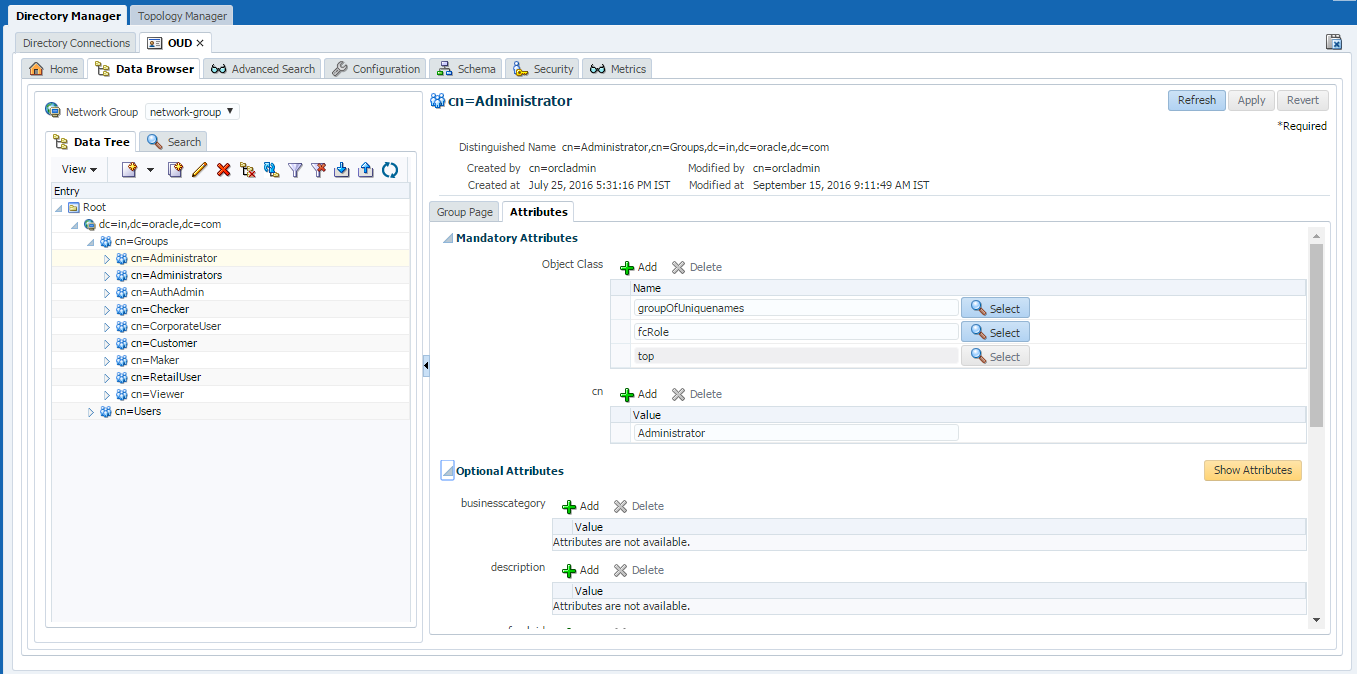
- Click on Show Attributes button.
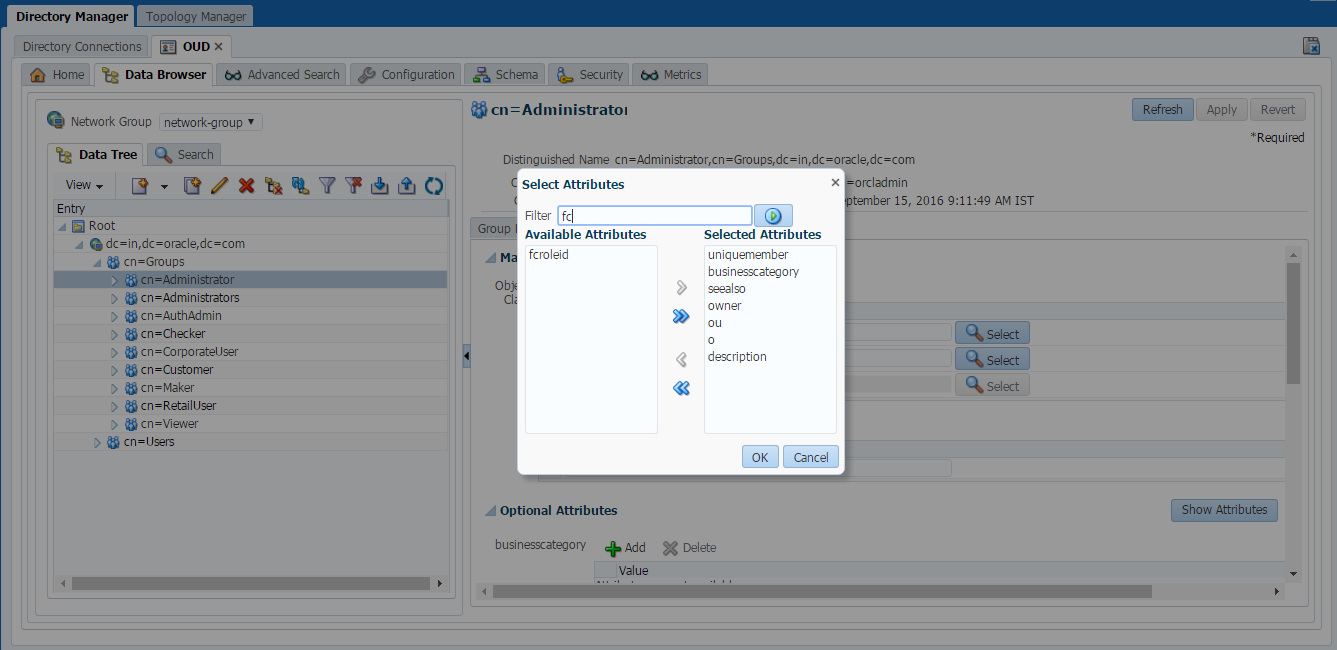
- In the Filter type “fc” and click on Search button. It will show a entry for “fcroleid”.
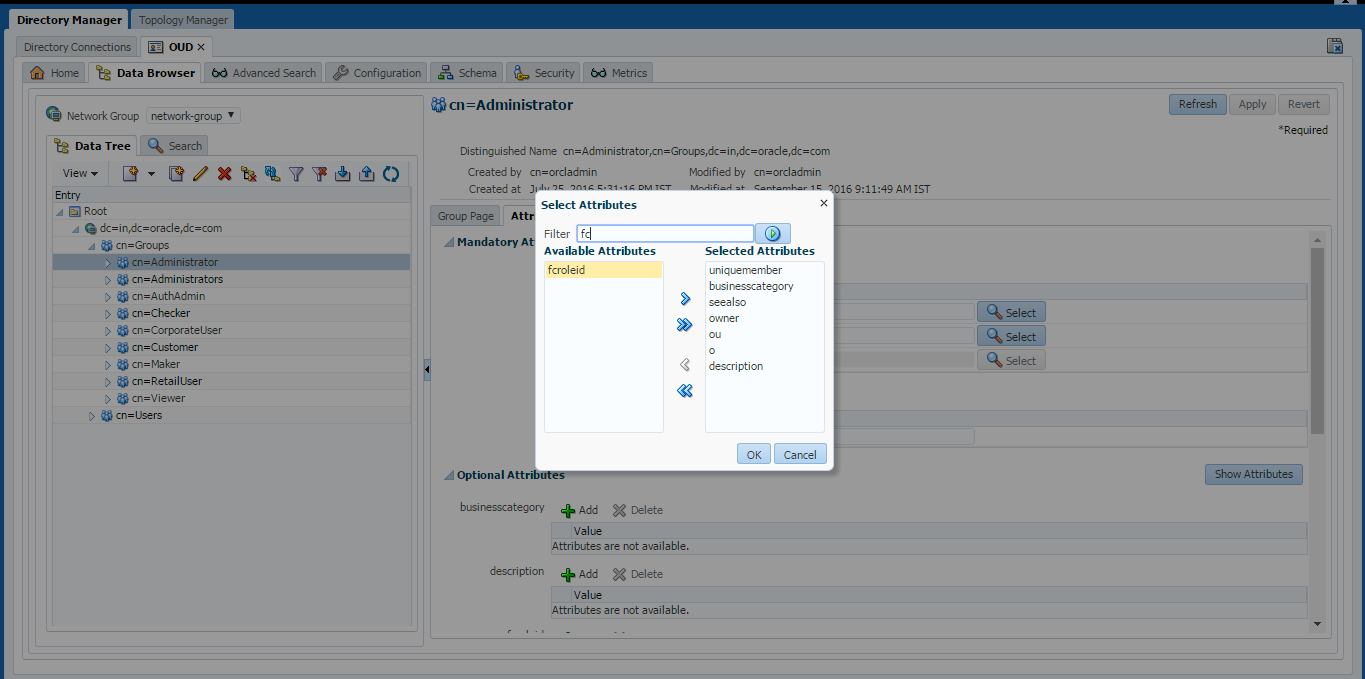
- Select the entry “fcroleid”.
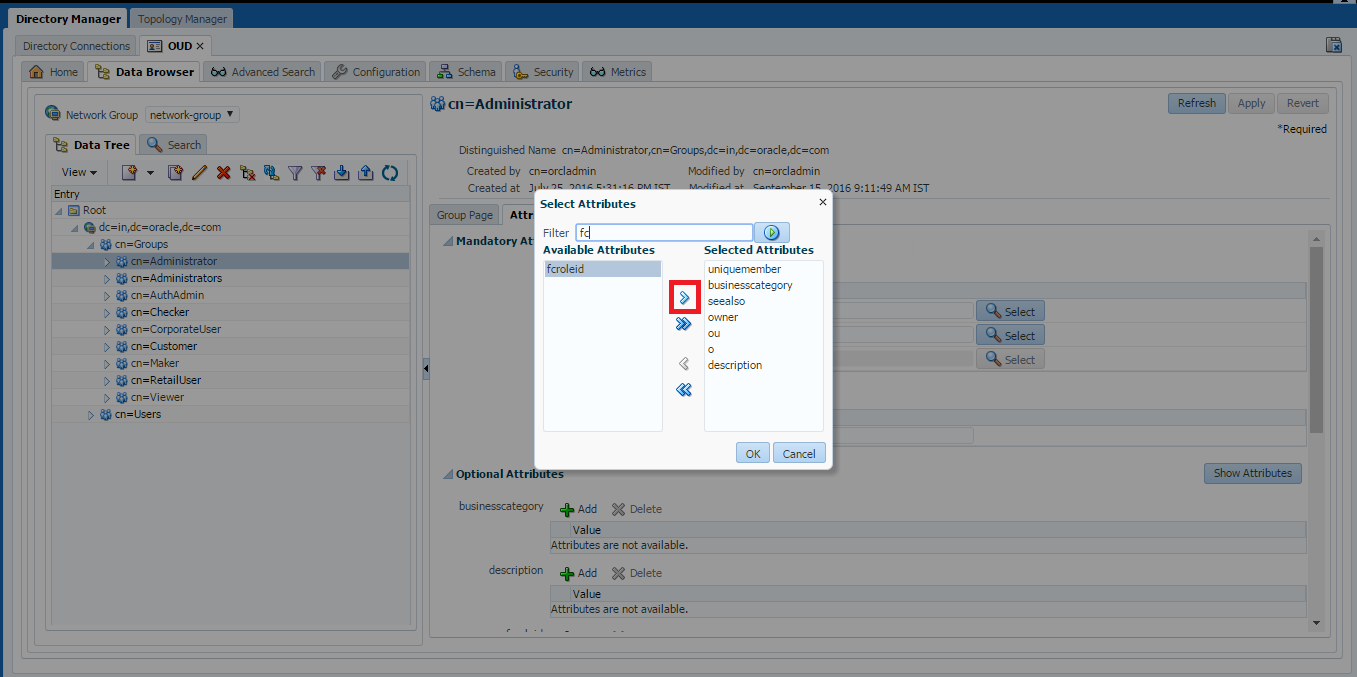
- Click on the arrow to move the entry on right side.
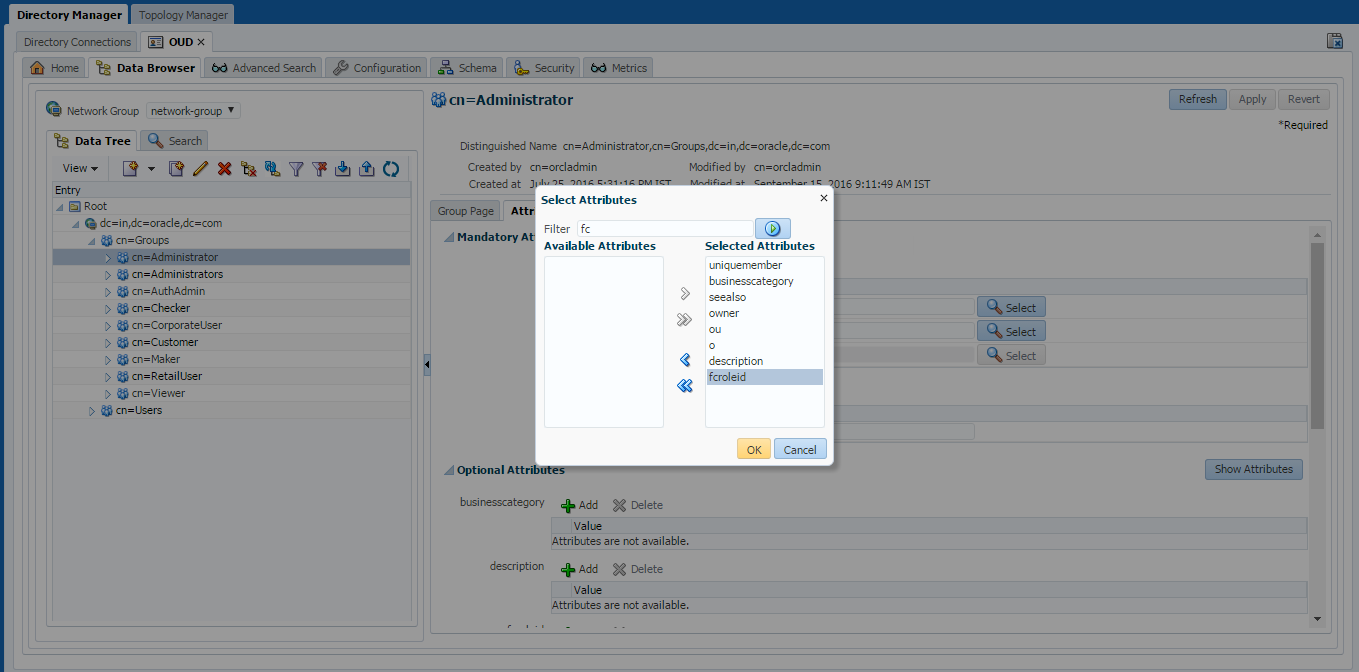
- Click Ok and the attribute will be added to the Optional Attribute list.
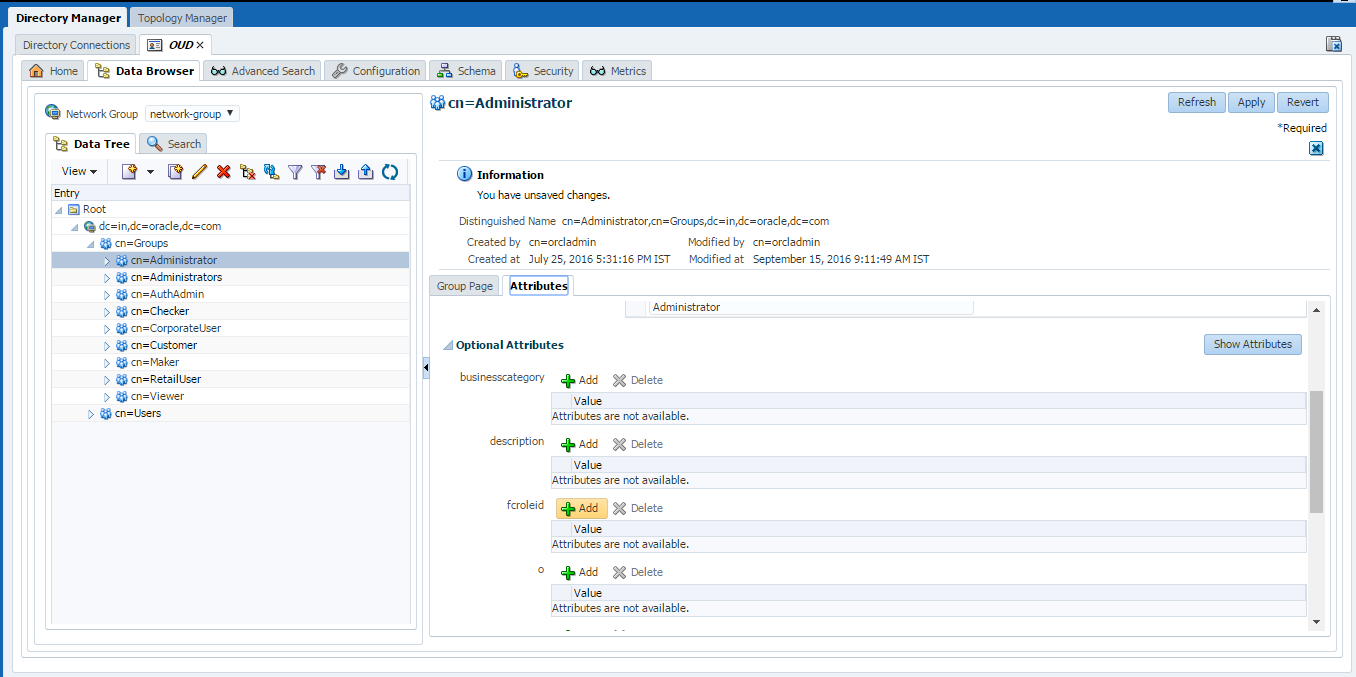
- Now, Click on the ‘+ Add’ button of “fcroleid” attribute.
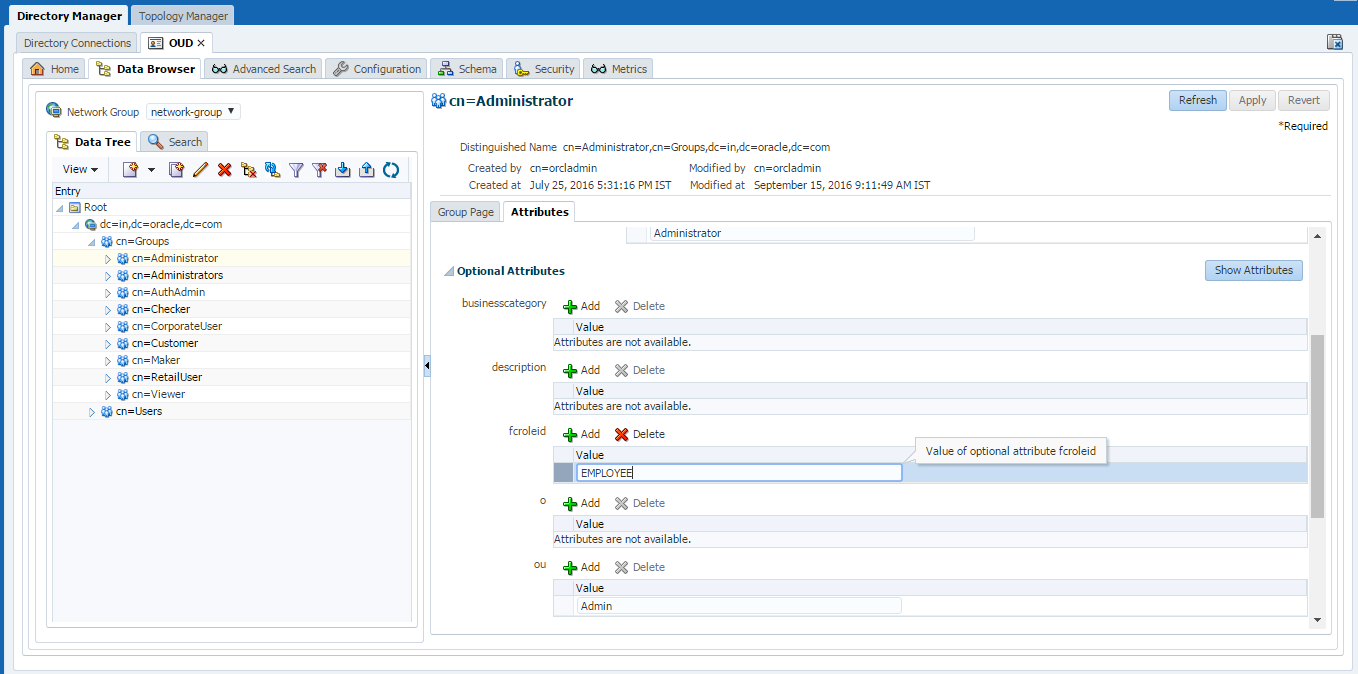
- Refer to the table below and enter the value mentioned for the respective Group which is being modified. E.g. for “cn=Administrator” group the value is “EMPLOYEE”.
|
Groups |
Value for ‘fcroleid’ Attribute |
|---|---|
|
cn=Administartor |
EMPLOYEE |
|
cn=AuthAdmin |
EMPLOYEE |
|
cn=Checker |
CORPORATE |
|
cn=CorporateUser |
CORPORATE |
|
cn=Customer |
RETAIL |
|
cn=Maker |
CORPORATE |
|
cn=RetailUser |
RETAIL |
|
cn=Viewer |
CORPORATE |
|
cn=AdminChecker |
EMPLOYEE |
|
cn=AdminMaker |
EMPLOYEE |
|
cn=CorporateAdminChecker |
CORPORATE |
|
cn=CorporateAdminMaker |
CORPORATE |
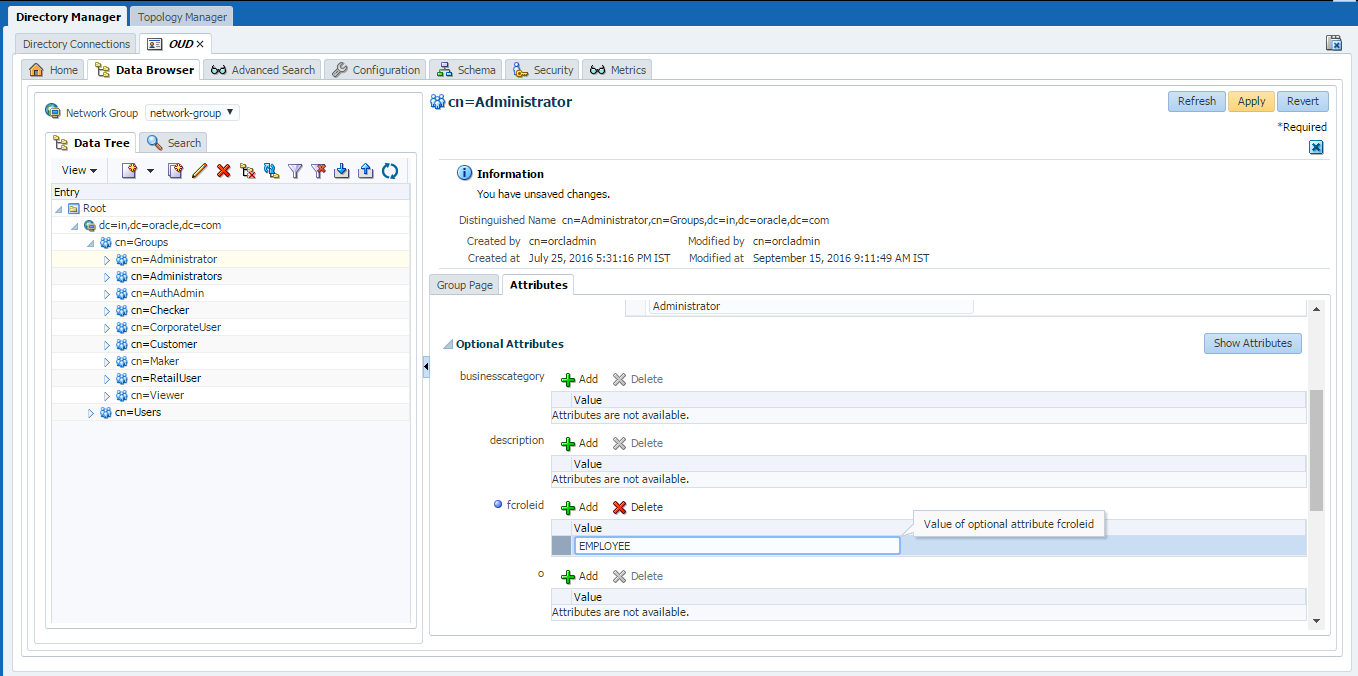
- Click on Apply to save the changes.
Oracle Business Intelligence Publisher Installation
To install Oracle Business Intelligence Installation click here.