USER GROUP - SUBJECT MAPPING
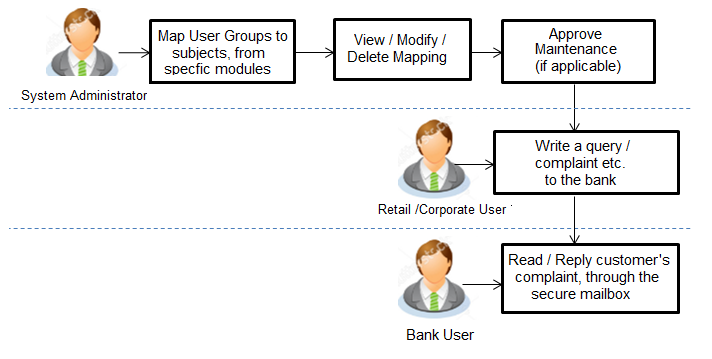
This maintenance facilitates mapping of subjects, to user groups in the bank, to streamline communication between the bank’s users and its end customers.
Once User Groups are mapped to certain transactions or modules, users, in that group can reply to communication pertaining to the specific subject. The communication channel used is the bank’s secure mailbox. For instance, employees in the Credit Card![]() A credit card is a payment card issued to users (cardholders) as a method of payment. department of the bank will be able to reply to / address queries raised by customers who are overdue on their payments or who want to seek clarification on their monthly statement.
A credit card is a payment card issued to users (cardholders) as a method of payment. department of the bank will be able to reply to / address queries raised by customers who are overdue on their payments or who want to seek clarification on their monthly statement.
Pre-Requisites
- Transaction access is provided to System Administrator.
- Approval rule set up for System Administrator to perform the actions.
- Administrator user groups are maintained.
Workflow
Features Supported In Application
- Search User Group - Subject Mapping
- Create User Group - Subject Mapping
- Modify User Group - Subject Mapping
![]() How to reach here:
How to reach here:
Administration Dashboard > Communications > User Group - Subject Mapping
User Group - Subject Mapping - Search
User Group – subject mapping search option allows System Administrator![]() Administrator is a set of individuals that administer the applicant/Affiliate entity. For example, Accountants, Authorized Signatories for organizations, Power of Attorney for individuals. to view the existing User Group - Subject Mapping.
Administrator is a set of individuals that administer the applicant/Affiliate entity. For example, Accountants, Authorized Signatories for organizations, Power of Attorney for individuals. to view the existing User Group - Subject Mapping.
To view User Group - Subject Mapping:
- In the Mapping Code field, enter the user group - subject mapping code whose details you want to view.
OR
In the Description field, enter the user group - subject mapping description whose details you want to view.
OR
From the Group Code list, select the group code to enquire about user group subject mapping, already maintained. - Click Search , display results based on search criteria.
OR
Click to reset the details.
OR
Click to cancel the transaction.
|
Field Name |
Description |
|---|---|
|
Mapping Code |
The user group - subject mapping code. |
|
Description |
The user group - subject mapping description. |
|
Group Code |
The group code to enquire about user group subject mapping, already maintained. |
- Click the Mapping Code for which you want to view the mapping details. The User Group - Subject Mapping - View screen displays the mapping of subject to the user group.
|
Field Name |
Description |
|---|---|
|
Mapping Code |
The user group - subject mapping code. |
|
Description |
The user group - subject mapping description. |
|
Mapping Details |
|
|
Group Code |
The group code assigned to user group subject mapping. |
|
Subjects |
The list of all subjects maintained. Note:
|
- Click Edit to edit the subject mapping details.
OR
Click to cancel the transaction.
OR
Click to navigate to previous screen.
User Group - Subject Mapping - Create
Using User Group – Subject mapping - Create option, System Administrator can create the user group - subject mapping.
To create User Group - Subject Mapping:
- Click Create .
The User Group - Subject Mapping - Create screen appears.
OR
Click to navigate to previous screen.
OR
Click to cancel the transaction.
|
Field Name |
Description |
|---|---|
|
Mapping Code |
The user group - subject mapping code. |
|
Description |
The user group - subject mapping description. |
|
Mapping Details |
|
|
Group Code |
The group code to create user group subject mapping. |
|
Subjects |
The list of all subjects maintained. Note:
|
- In the Mapping Code field, enter the user group - subject mapping code.
- In the Description field, enter the user group - subject mapping description.
- From the Group Code list, select the appropriate option.
- Select the respective check boxes preceding the subject to be mapped.
OR
Select All Subjects check box, if you want to map all subjects. - Update the required details.
- Click to save the modified details.
OR
Click to navigate to previous screen.
OR
Click to cancel the transaction. - The Review screen appears. Verify the details, and click .
OR
Click to modify the details.
OR
Click to cancel the transaction. - The success message of creation of user group - subject mapping along with the transaction reference number appears.
Click to complete the transaction.
Note:
1) If the mapping setup requires an approval workflow, the maintenance will be initiated. Once approved by the required number of approvers, the mapping will be effected.
2) If the setup does not require an approval workflow or is self / auto approved, then the mapping will be effected immediately.
User Group - Subject Mapping - Modify
Using User Group – Subject Mapping - Modify option; System Administrator can edit the user group - subject mapping.
To edit the User Group - Subject Mapping:
- In the Mapping Code field, enter the user group - subject mapping code whose details you want to view.
OR
In the Description field, enter the user group - subject mapping description whose details you want to view.
OR
From the Group Code list, select the group code to enquire about user group subject mapping, already maintained. - Click Search to display results based on search criteria.
- Click the Mapping Code for which you want to view the mapping details. The User Group - Subject Mapping - View screen displays the mapping of subject to the user group.
|
Field Name |
Description |
|---|---|
|
Mapping Code |
The user group - subject mapping code. |
|
Description |
The user group - subject mapping description. |
|
Mapping Details |
|
|
Group Code |
The group code assigned to user group subject mapping. |
|
Subjects |
The list of all subjects maintained. Note:
|
- Select the respective check boxes preceding the subject to be mapped.
OR
Select All Subjects check box, if you want to map all subjects. - Update the required details.
- Click to save the modified details.
OR
Click to navigate to previous screen.
OR
Click to cancel the transaction. - The Review screen appears. Verify the details, and click .
OR
Click to modify the details.
OR
Click to cancel the transaction. - The success message of update along with the transaction reference number appears.
Click to complete the transaction.
Note:
1) If the mapping setup requires an approval workflow, the maintenance will be initiated. Once approved by the required number of approvers, the mapping will be effected.
2) If the setup does not require an approval workflow or is self / auto approved, then the mapping will be effected immediately.
FAQs
![]() i If a user has been mapped to all subjects in the CASA module, what does it mean?
i If a user has been mapped to all subjects in the CASA module, what does it mean?