
This section details the instructions to merge two data models. To merge the two data models:
1. Open the erwin model.
2. Navigate to the Actions menu and click the Complete Compare option.
3. The Complete Compare dialog opens, which consists of seven input forms.
4. To access any of the seven input forms, in the left panel of the Complete Compare dialog, click the required form title. The seven input forms are:
§ Overview
§ Left Model
§ Right Model
§ Left Object Selection
§ Right Object Selection
§ Type Selection
§ Advanced Options
5. Overview: This form provides a brief description of the Complete Compare function
6. Left Model: Using the Left Model input form, you can select data model for the left side of the comparison in the Complete Compare dialog.
To select the required model for the left side of comparison, click Load. The file Open dialog appears. Search for the required data model file, select it and click Open. The selected data model loads into the Complete Compare dialog. You can see the selected data model in the Open Models in Memory list box.
Alternatively, you can locate the required data model file on your computer and double-click to open it. The selected data model opens by default in the erwin model. Alternatively, if available, you can select required data model in the Open Models in Memory list box.
If the default selection of the data model for the left side of the comparison is not correct, follow step 4 to select the required data model. Else, click Next to go to the Right Model input form.
|
NOTE |
When you launch the Complete Compare function with one data model, that data model loads into the Right Model form of the Complete Compare dialog. When you open the second data model for comparison, existing data model in the Right Model form moves to the Left Model form, and the second data model loads into the Right Model form. |
7. Right Model: Using the Right Model input form, you can select the data model for the right side of the comparison in the Complete Compare dialog. The Right Model input form is identical to the Left Model input form.
To select the required model for the right side of comparison, click Load. The file Open dialog appears. Search for the required data model file, select it and click Open. The selected data model loads into the Complete Compare dialog. You can see the selected data model in the Open Models in Memory list box. Click Next to go to the Type Selection input form.
|
NOTE |
When you launch the Complete Compare function with one data model, that data model loads into the Right Model form of the Complete Compare dialog. When you open the second data model for comparison, existing data model in the Right Model form moves to the Left Model form, and the second data model loads into the Right Model form. |

8. Type Selection: This form is critical in the entire Complete Compare process. Using this form, you can customize the layout for the merged output data model based on the existing layout of the input data models. This form restricts the comparison to specific object types and properties of the data models.
a. In the Type Selection input form, expand Model. In the list box, select the required options using checkbox.
|
NOTE |
· If the Type Resolution dialog does not appear, go to the next form. Therefore, click Next. · When you select Type Selection form, it may prompt the display of the Type Resolution dialog to equalize the UDPs across the left and right models. This is GDM-46 error. |
b. You can select the following type of multiple options in the Type Selection form:
— Subject Areas
— UDP
— Physical Table and Physical Column
— Logical Entity and Logical Attribute
— Subtype and Supertype
c. Below are the prompted values for Subtype (child table) set and Subtype items (child table elements) selection. To select all values from the Subtype Symbol, select the Subtype Symbol checkbox. Or to select individual Subtype items, expand Subtype Symbol, and select checkboxes against required Subtype items.
d.
|
NOTE |
When the EAC-3033 error occurs, upload the merged model using the slice model and ignore the error. |
e.

f. Then click Next to go to the Left Object Selection form.
9. Left Object Selection: Using the Left Object Selection input form, you can select which objects (table properties) can be included from the Left Model form in the comparison process.
As shown in the image below, to choose the required Object Sets in the Choose Objects Using Sets list box, select the checkboxes against the Object Set names. The selected Object Sets appear in the Selected Objects list box on the right side.
|
NOTE |
You can select individual item in each Object set. For example, expand Subject Areas object set, then select the individual checkboxes against required Subject Area item. |
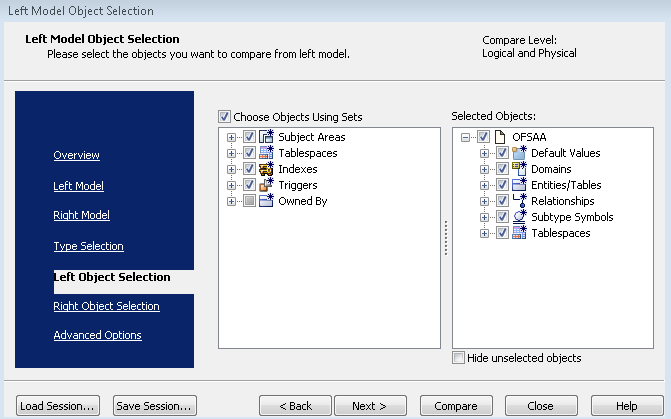
To include tables in the comparison process, you must select table Properties in the Type Selection form. Then the tables will appear in the Left Object Selection input form.

10. Right Object Selection: Using the Right Object Selection input form, you can select which objects (table properties) can be included from the Right Model form in the comparison process.
To choose the required Object Sets from the Choose Objects Using Sets list box, select the checkboxes against the Object Set names (you can select Object Sets like Subject Areas, Tablespaces, Indexes, Triggers). The selected Object Sets appear in the Selected Objects list box on the right side. Click Next to go to the Advanced Options form.
|
NOTE |
· You can select individual item in each Object set. For example, if you are performing Subject Areas-wise Complete Compare, expand Subject Areas object set, then select the individual checkboxes against required Subject Area item. In the image below, based on apps requirement, we have selected all the Subject Areas. · If there are very less number of tables to merge with a very huge model, then you can create a Dummy Subject Area in a small model and move the tables into Dummy Subject Area. To Complete Compare under the Left Object Selection form or the Right Object Selection form, select the Dummy Subject Area and perform Complete Compare. |

11. Advanced Options: This section consists of the functional Options. In the image below, the selected options are mandatory. As per your requirement, select further options.

12. To initiate the comparison process, click Next and then click Compare. The Resolve Differences window opens.
13. In the Resolve Differences window, there are the three methods to merge data models:
§ In the first method, you can merge two data models at the data model level. To merge a data model (Left Model) with another data model (Right Model), expand Model, then click  arrow symbol. Or, to merge Right Model with Left Model, click
  arrow symbol.

§ In the second method, you can merge two data models at the table level. To merge two data models at the table level, expand Model, expand Tables, select  from the menu bar. Then to merge the Right Model with the Left Model at table level, click the required table and click the arrow symbol, and repeat the same for each table. Or, to merge the Left Model with the Right Model at the table level, click the required table and click the arrow symbol, and repeat the same for each table.

§ In the third method, you can merge two data models at the Subtype and Supertype table level To merge two data models at Subtype and Supertype level:
During an ongoing Supertype Subtype model complete comparison process, you cannot move the Supertype table directly from the Left Model or the Right Model. You must find all the relationships between the Supertype table (parent table) and Subtype tables (child tables). Then you can move the Subtype table and after that, move the Supertype table.
How to find the Supertype or Subtype table relationship?
i. Open the model where you are unable to move the table from left to right or from right to left. For illustration, we are considering BSP and ALM data models along with Supertype and Subtype.
ii. In Subject Areas, create a Dummy Subject Area with any name. Right-click Dummy Subject Area name, click Properties. The Dummy Subject Area ‘[name]’ Editor window opens.

iii.  In the Members tab, select the required Table Name and click symbol. This action moves selected object and the objects mapped to it from Available Objects list box to the Included Objects list box. In this example, in the Included Objects list box, BSP_LEAF_COLUMNS is the Supertype (parent table) and the remaining are Subtype (child tables).

iv. The Spanning Neighborhood window opens. In the Ancestors and Descendants sections, in Level, select value 1 to search for one-to-one parent-child table relationship. The list of the Subtype tables mapped to the Supertype table appears. In this example, the list of Subtype tables mapped to the Supertype table BSP_LEAF_COLUMNS appears.
v. To include the required Subtype tables (for this Dummy Subject Area) in the comparison process, select them and click Add. Close the Spanning Neighborhood window.
vi. In the Subject Area ‘[name]’ Editor window, in the Included Objects list box, you can see the Supertype table (in this example, BSP_LEAF_COLUMNS) and its Subtype tables.

vii. Close the Subject Area ‘[name]’ Editor window. In the data model window, click Save
viii. to save the changes made in the model.
ix. Repeat all the steps for data model merge until the Left Object Selection form (that is, repeat steps from 1 to 8).
x. In the Left Objection Selection form, in the Choose Objects Using Sets list box, select all the Subject Areas along with the newly created Dummy Subject Area. Into this Dummy Subject Area, you moved the Subtype and Supertype tables in previous steps. Click Next.
xi. Repeat steps 10 and 11.
xii. To initiate the comparison process, click Next and then click Compare. The Resolve Differences window opens.
xiii. In the Resolve Differences window, to merge two data models at table level, expand Model, expand Tables, select from the menu bar. Select the Supertype table (BSP_LEAF_COLUMN in this example), and move it to left (to merge Right Model with Left Model, click arrow symbol) or right (to merge Left Model with Right Model, click arrow symbol) side of the comparison as required.
In the considered illustration, BSP_LEAF_COLUMN is the parent table (Supertype) from the source table and its respective child tables (Subtype) are named as FSI_ACCID_HEALTH_INS_CO_CD, FSI_ACCID_HEALTH_INS_CO_MLS,
DIM_ACCOUNT_CLASSIFICATION and so forth. First, we moved the child table names (Subtype table names) from the source model to the target model, and then we moved the Supertype table name BSP_LEAF_COLUMN to the target model.
14. Click Finish to complete the data model merging, and then click Save to save the output-merged model with Merged data model as a part of the output model name.