3. Maintaining Messaging Branch Preferences
3.1 Introduction
The messaging preferences that you indicate for your branch will govern the workflow aspects of the messaging system module. You can specify messaging preferences for your branch in the Messaging Branch Preferences screen. In this screen you can indicate:
- The number of days for which outgoing messages should be kept in the browser
- Whether a test word is required for Telex messages and
- The activities on a message that require authorization
Note
You can specify preferences only for the branch from which you logged onto Oracle Lending.
This section contains the following topics:
- Section 3.1.1, "Invoking the Messaging Branch Preferences Screen"
- Section 3.1.2, "Features of the Messaging Branch Preferences Screen"
3.1.1 Invoking the Messaging Branch Preferences Screen
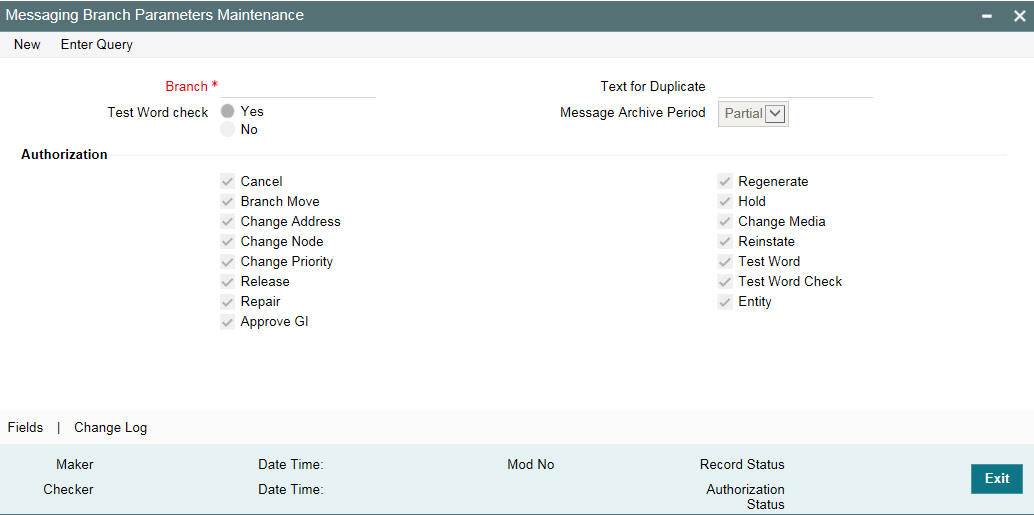
To invoke the ‘Messaging Branch Parameters Maintenance’ screen, type ‘OLDPREFN’ in the field at the top right corner of the Application tool bar and click the adjoining arrow button.If you are maintaining preferences for a new branch of your bank, click ‘New’ from the Application Toolbar. The ‘Messaging Branch Preferences’ screen is displayed without any details.
If you are calling a branch preference record that has already been defined, double-click a record of your choice from summary screen. In the ‘Summary’ screen, all the branch preference records that you have entered are displayed in a tabular form.
3.1.2 Features of the Messaging Branch Preferences Screen
Branch
Specify the branch for which you are maintaining the preferences.
Indicating the Period for which a Message Should be in the Browser
Archival is the process of storing old messages for future retrieval. You can specify the number of days for which an outgoing message should be kept in the Outgoing Message Browser.
A message will be automatically archived after the number of days that you specify. You can unarchive the details of outgoing message that has been archived by invoking the Unarchive Outgoing Messages screen. After you unarchive an outgoing message you can process it just as you would any other outgoing message.
The Unarchive Outgoing Messages screen can be accessed from the History Retrieval option under Messaging Processes in the Application Browser.
Note
It is recommended that you indicate ‘one’ in this field. In this case, only those messages that have been triggered for generation today, will be displayed in the Outgoing Message Browser.
Specifying that the Entry of a Testword is Required for a Telex Message
You can indicate whether a testword needs to be entered before a telex message is generated from and received at your branch. You can state your preference from the yes/no option that is available.
Capturing the Text for the Duplicate Message
You have to indicate the text, which has to be sent as part of the duplicate message.
Indicating the Activities that Require Authorization
You can perform several activities on a message that is to be generated from your branch and on those that have come in for your branch. For example, from the outgoing or incoming browser, you can change the address to which a message should be sent.
In the branch preferences screen, you can indicate the activities which when performed on an incoming or outgoing message should be authorized. Several activities have been listed on this screen, check against an activity to indicate that when it is performed on a message it should also be authorized. Leave it unchecked to indicate otherwise.
The activities that you can choose from are:
- Cancel
- Hold
- Change Node
- Regenerate
- Change Address
- Reinstate
- Release
- Branch Move
- Change Media
- Change Priority
- Testword Check
A message on which you perform an activity that requires authorization will be available for further processing only after it is authorized.
Specifying the Method for Archiving Messages
You have to indicate the method for archiving the messages. The options available are ‘Full’ or ‘Partial’. In case of partial archival, the data pertaining to the message will be archived. During full archival the data pertaining to the messages as well as the message gets archived.
Saving the Record
After you have made the mandatory entries, save the record. A user, bearing a different Login Id should authorize a branch preference record that you have created, before the End of day process (EOD) is run.
Click ‘Exit’ or ‘Cancel’ to return to the Application Browser.