7. Processing Outgoing Messages
7.1 Introduction
Here, the procedure involved in generating an outgoing message is explained. To recall, you have already maintained:
- The type of messages that can be generated at your bank
- Formats for the various messages
- The media through which messages should be transmitted
- A media control system to receive and transmit messages for a given media
- The addresses for a customer for a given media
In each module of Oracle Lending, you can define products. While defining products you also indicate the messages that should be associated with an event in the life cycle of a contract involving the product.
A contract goes through several events during its lifecycle. A message for an event is triggered for generation when the event is authorized.
Example
You have defined a product to cater to short-term loans. You have indicated that the following messages should be generated when events take place:
Event |
Message |
INITIATION |
Initiation Advice |
LIQUIDATION |
Liquidation Advice |
When you initiate a short-term loan involving the product an Initiation Advice will be triggered for generation. Similarly, if you make a repayment on the loan, the liquidation advice defined for the event will be triggered for generation.
Note
In this context advices and messages are commonly referred to as messages.
Depending on the product - message - customer details that you have set up, Oracle Lending determines the address and the media through which the message should be transmitted.
If a message is to be transmitted through mail, it has to be printed. If the message is to be transmitted through Telex, you will have to enter the testword (if it is required for the message). The messages that are to be transmitted through media like Telex and S.W.I.F.T. will be sent by the Media Control System (MCS), which is connected to the node in which the database of your branch is installed.
A message that is triggered for generation can be sent in the background or can be generated on-line. An outgoing message will be processed based on the preference that you state.
Note
The messages that are triggered by an automatic event like the generation of a tracer for an LC, billing notice and delinquency notice for a loan, etc., will be put in the Outgoing Browser by the automatic function itself. This is because events triggered by an automatic function do not require authorization.
This section contains the following topics:
- Section 7.1.1, "Manual Generation of Outgoing Messages"
- Section 7.1.2, "Features of Outgoing Message Browser"
- Section 7.1.3, "Viewing messages with different authorization status"
- Section 7.1.4, "Operations you can perform on an outgoing message"
7.1.1 Manual Generation of Outgoing Messages
If the background message process is not running, all the messages that are triggered for generation will be displayed in the Outgoing Message Browser from where you can generate the message.
You can generate messages from the Outgoing Browser at any time in the day.
You can invoke the ‘Outgoing Message Browser Summary’ screen by typing ‘OLSOUTBR’ in the field at the top right corner of the Application tool bar and clicking on the adjoining arrow button.
7.1.2 Features of Outgoing Message Browser
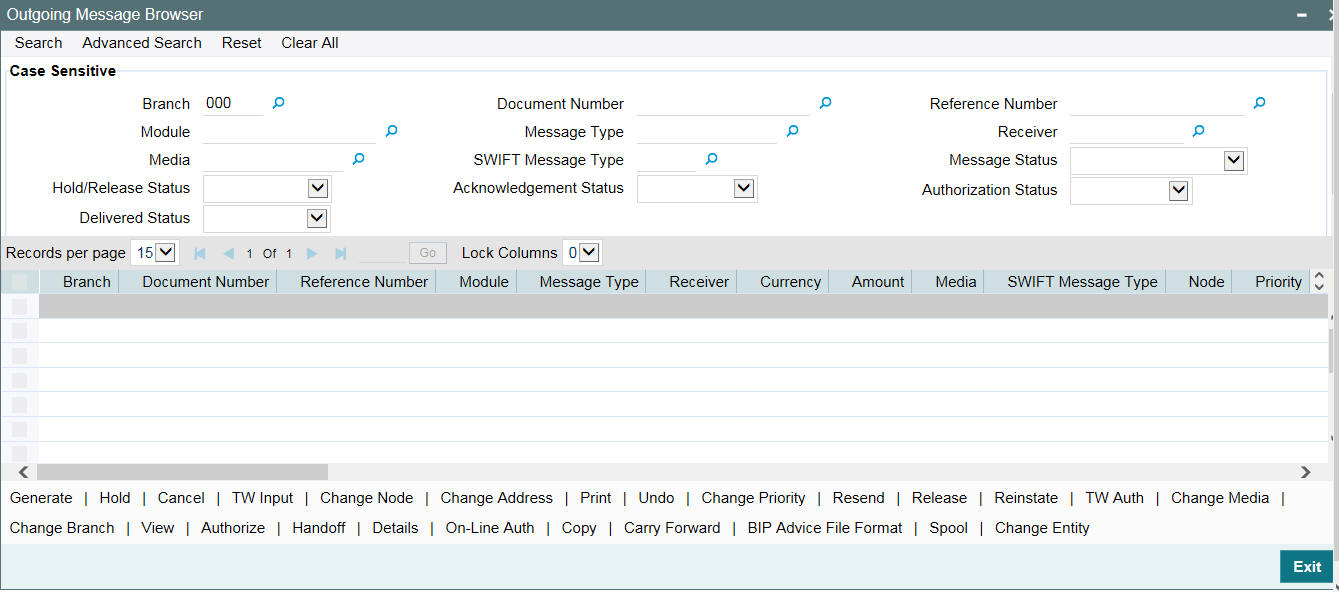
The following details of a message will be displayed in the Outgoing Message Browser:
- The reference number of the contract for which the message belongs (for an account statement it will be the account number.)
- The module to which the contract belongs (Loans and Deposits, Bills and Collections, and so on.)
- The type of message that is to be generated (e.g., debit advice, credit advice, and so on.)
- The recipient of the message
- The amount that is contained in the message. For example, if the message is a loan initiation advice, it is the loan amount, if it is a liquidation advice, it is the liquidation amount, and so on. Messages that do not involve an amount, like an acknowledgment tracer, will not have an amount.
- The currency in which the amount or account is expressed
- The status of a message
- The value date for payment messages. This enables you to query messages using the Value Date.
- The Customer Entity of the Recipient to whom the message is sent. This field is specific to Loan syndication Module. You can query messages using the Customer Entity field. If you select $$$ as the Entity, all messages related to the recipient will be displayed.
- The status of the message - whether generated, un-generated or in repair.
- The authorization status
- The Hold status - whether the message is on hold or not
- The Interdict status, which is the status of the Global Interdict check. This cannot be modified.
- The OFAC Status, if OFAC validation is required. This cannot be modified.
- The Custom Reference Number of the contract related to the message
- The Swift Message Type corresponding to the message
- The Counterparty for the contract related to the message
- The Account Number related to the message
- The Primary Address, indicating whether the receiver’s address in the message is a primary address or not
A message that is displayed on the Outgoing Message Browser can bear one of the following statuses:
- Held
- Released
- Canceled
- Reinstated
- Repair
- Generated
- Ungenerated
- Sent
For a message that was put into the repair status, the exception that occurred while the message was being processed will be shown. The following details of the message will also be displayed, and you have an option to change them. They are:
- The address to which a message should be sent
- The media through which the message is transmitted
- The priority with which a message should be sent and
- The branch from where the message should be sent
- The node from which the message is generated
7.1.3 Viewing messages with different authorization status
You can choose to view the details of the outgoing messages on this Browser based on the status of a message. Oracle Lending offers you several options to choose from.
The options available are:
- All -- indicating that you can choose to view details of all outgoing messages in any status whether authorized or unauthorized.
- Authorized -- indicating that you can view details of only the authorized messages bearing a specific status.
- Unauthorized -- indicating that you can view details of only the unauthorized messages bearing a specific status.
After indicating your preference, you can indicate the status for which you want to view message details. You can choose from these options:
- Cancelled
- Reinstated
- Repair
- Sent
- Ungenerated
- Generated
- Handoff
- Processed
- Confirmation Pending
Select the option(s) for which you would like to obtain details. You can choose to view details of the messages under one or all the options that are available.
Example
Case 1
You have specified that you want to view details of the ‘authorized’ messages. You have also ticked against ungenerated.
In this case, all the messages that are authorized and yet to be generated will be displayed.
Case 2
You have specified that you want to view details of the ‘unauthorized’ messages. You have also ticked against ‘Reinstated’ and ‘Canceled’ the details of all the unauthorized messages that have been reinstated will be displayed in a particular color and the unauthorized messages that were canceled will be displayed in a different color.
7.1.4 Operations you can perform on an outgoing message
The operations that you can perform on an outgoing message are determined by the rights that you have been assigned in the Security Management System (SMS) module of Oracle Lending. If a function in the Outgoing Browser is disabled, it means that the function is not allowed for the record.
Generate button |
Click to generate an outgoing message. You can generate un-generated and repaired messages. When you click ‘Generate’, the system checks the contract status for which the message is generated and will not generate a message in the following condition:
|
Hold button |
Click if you need to temporarily stop generating an outgoing message. Authorizing Supervisor can view details and then release the messages or change their status to Carry Forward, which in turn can be released on further authorization. Note: Messages with Hold status must either be carried forward or released, before you execute the EOD processes at the branch; else the system displays an error message. However, if the message is cancelled, then the system will not display error message, though the status is ‘Hold’. |
Release button |
Click if you need to release a message which is on hold. |
Cancel button |
Click if you need to cancel an outgoing message. You can cancel messages with ‘Ungenerated’ and ‘Hold’ status. |
Reinstate button |
Click if you need to reinstate cancelled outgoing messages. |
Testword Input button |
Telex messages for which a testword is required will be put into the repair status. To enter the testword in order to remove a message from the repair status, Highlight the message(s) then Click the Test word Input button The complete telex message will be displayed on the screen and you will be prompted to enter the testword. Note: The test word entry for a telex message will have to be authorized if you have indicated so in the Messaging Branch Preferences screen. If the testword entry requires authorization then on successfully entering the testword, the message will move from the repair status to an unauthorized status. In this case, the message can be generated only after the testword entry is authorized. |
Authorize Test Word button |
Click if you are provided rights to authorize testword entered for a Telex message. While authorizing you have to reenter the testword. |
Change Priority button |
Click if you need to change the priority, for sending a payment message which is yet to be generated. Note: In the Background, Oracle Lending generates messages on the priority basis. |
Change Media button |
Click if you need to change the media through which a message is transmitted, before it would be generated. Media of transmission of a message is changed if there is a failure of the medium at the recipient’s end. Note: The selected media through which a message is transmitted should be available to the recipient. |
Print Button |
Click if you need to print an outgoing message. When you click ‘Print’, option will be provided to select spool or print on-line. Messages that are transmitted through mail and those cancelled should be printed. You can also choose to print the details of messages transmitted through other media types. The system provides an option to spool the advices in PDF format. When you click the ‘Print/Spool’ button, you can view the selected advice in PDF file. You can also view the SWIFT tag description. |
Resend button |
Click if you need to regenerate and resend a message which was generated and sent. |
View button |
Click if you need to view the contents of a generated outgoing message. Viewing multiple messages is not supported. |
Change Branch |
Click if you need to send an outgoing message from another branch. Select the branch to which the message needs to be moved from the adjoining option list. You change the branch of a message for the following reasons:
|
Change address button |
Click if you need to change the address to which an outgoing message has to be sent. Enter the new address to which the message should be sent and click ’OK’ to save. Note: Change of address can be done only before a message is generated. |
Change Node button |
Click if you need to change the node from which an outgoing message is generated. In a distributed environment, the database of one or more branches of your bank will be located at a node or a server. Hence a Media Control System will be installed and defined specifying the node at which it is installed. When you click ‘Node’, the system displays the details of the individual message providing an option to change the ‘Node’. Select the node you need to change from the adjoining option list. Note: MCS status at the node in which the database of your bank is installed should be passive. |
Handoff button |
Click if you need to hand-off a generated message to MCS to save the date in an ASCII format. |
Undo button |
Click if you need to reverse the last action you performed on an outgoing message at ‘Outgoing Messages Browser’ level |
Authorize button |
Click to authorize, if you are provided authorization rights for an operation at the Messaging Branch Preferences level. Messages should be authorized before sending them. |
On-Line Auth button |
Click to authorize online, if you are provided online authorization rights for an operation at the Messaging Branch Preferences level. Messages should be authorized before sending them. |
Copy Button |
Click if you need to send a copy of an outgoing message to another customer involved in a contract. You will provide the following to options:
|
7.2 Generating Ad-hoc FpML Messages
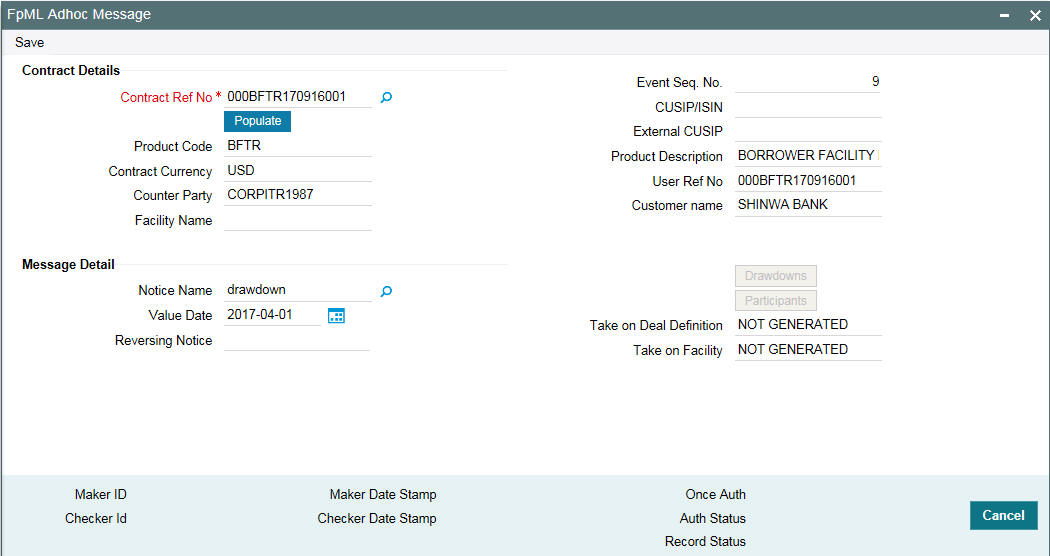
FpML messages can be generated by the system when the event to which the messages are attached is triggered or on an ad-hoc basis manually. You can perform the latter operation for certain messages from the ‘Fpml Adhoc Message’ screen.
You can invoke the ‘FpML Adhoc Message’ screen by typing ‘LBDFPMLM’ in the field at the top right corner of the Application tool bar and clicking on the adjoining arrow button.
You can generate the following messages from this screen:
- Take on Deal
- Take on Facility
- Position Update of Position Statement type
- Drawdown notice
- Cancel notice
Each time any of the message specified above is generated for a tranche or a drawdown, the system will fire the event ‘ZAMG’.
This section contains the following topics:
In this screen, specify the following:
Contract Reference No.
Select the contract reference number for the contract for which you wish to generate messages from the adjoining option list. The list contains the reference numbers of all active and authorized tranche and drawdown contracts.
The system will display the following details:
- Event Sequence number
- Contract Currency
- User reference number
- Product Code and Description
- Customer Name and Description
- Facility Name
- Whether the ‘Take on Deal Definition’ message for the tranche has been handed off
- Whether the ‘Take on Facility’ message for the tranche has been handed off
CUSIP/ISIN
System displays the CUSIP/ISIN for the tranche. However, you can query the tranche details based on the ‘CUSIP/ISIN’.
External CUSIP
System displays the external CUSIP for the tranche. However, you can query the tranche details based on the ‘External CUSIP’.
Value Date
System defaults the ‘Value Date’ as the current application date. However, you can edit the ‘Value Date’ only when you select the ‘Notice Name’ as ‘positionUpdate’. Also, the value date cannot be a holiday and it should be less than or equal to the current application date.
Notice Name
Select the name of the message that you wish to generate from the adjoining option list. The list contains the messages that you can generate from this screen.
Note
- If you select the ‘Position Update’ message, the system will validate if you have already handed off the ‘Take on Deal Definition’ and ‘Take on Facility’ messages. You can generate the ‘Position Update’ message only if you have handed-off these two messages.
- If you have generated the ‘Take on Deal Definition’ and ‘Take on Facility’ messages, you are required to generate the ‘Position Update’ message.
- To generate the ‘Drawdown’ or ‘Cancel’ notice, you need to have handed-off the ‘Take on Deal Definition’, ‘Take on Facility’ and the ‘Position Update’ messages for the tranche.
7.2.1 Selecting Drawdowns
You can select the drawdowns corresponding to the tranche using ‘Drawdown Selection’ screen. You can invoke this screen by clicking the ‘Drawdown’ button in the ‘Fpml Adhoc Message’ screen.
System displays the following details from the main screen:
- Tranche Ref no
- Facility Name
Drawdowns under Tranche
System displays the drawdowns corresponding to the tranche or CUSIP/ISIN only if the drowdown notice has been generated for the drawdown.
Drawdowns for Fpml Message
Select all or specific drawdowns from ‘Drawdowns under Tranche’ that are required in the ‘Position Update’ message of ‘Statement’ type by using the right arrow button (>) in the screen.
7.2.2 Selecting Participants
You can select the participants corresponding to the tranche or CUSIP/ISIN selected using ‘Participant Selection’ screen. You can invoke this screen by clicking the ‘Participant’ button in the ‘Fpml Adhoc Message’ screen.
System displays the following details from the main screen:
- Tranche Ref no
- Facility Name
Display By
Indicate the tranche participant mode of display. You can select one of the following options:
- Participant Code
- Participant Name
Tranche Participants
System displays the participants corresponding to the tranche or CUSIP/ISIN only if the UDF ‘MEICODE’ is maintained at the customer level.
Participants for Fpml Message
Select all or specific participants from the list of participants displayed in ‘Tranche Participants’ that are required in the ‘Position Update’ message of ‘Statement’ type by using the right arrow button (>) in the screen.
Note
- Only the selected drawdowns and participants are included in the Notice.
- System enables the ‘Drawdowns’ and ‘Participants’ buttons in the ‘Fpml Adhoc Message’ screen only when you select the ‘Position Update’ message. Also, the value date should be less than the application date.
- If you try to change the ‘Notice Name’ after selecting the drawdowns and participants, then system displays the following override message:
‘Drawdown and/or Participant selection is already done for Position update notice, changing Notice name will delete these details’
- On save of the back valued Adhoc message for a Tranche, positionUpdate FpML message of ‘Statement’ type is generated for selected drawdowns and participants with the positions as of the value date provided in the ‘Fpml Adhoc Message’ screen.
7.3 Forward Processing of Events
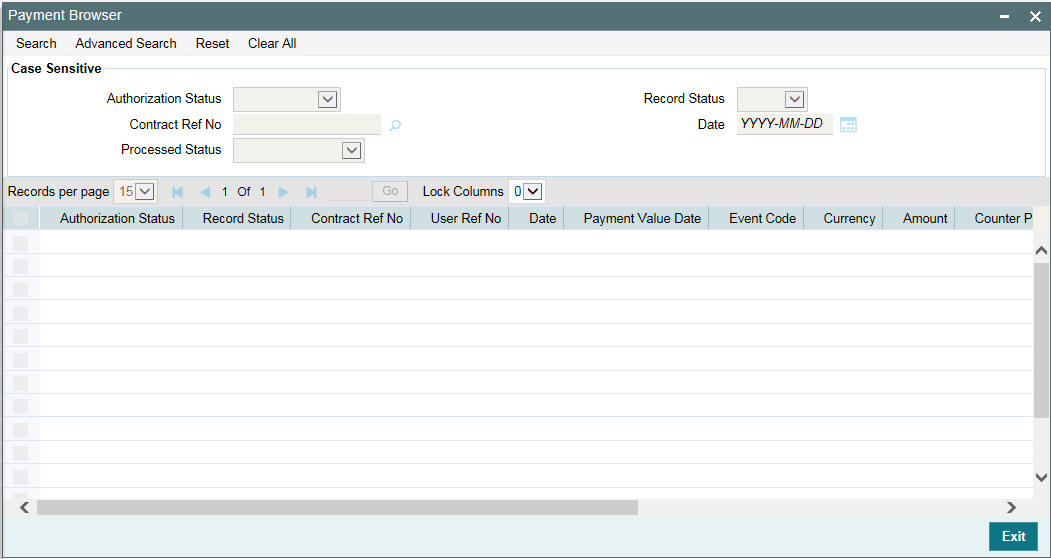
You can view the details of contracts marked for forward processing through the ‘Payment Browser’ screen.
You can invoke the ‘Payment Browser’ screen by typing ‘LBSFWDPR’ in the field at the top right corner of the Application tool bar and clicking on the adjoining arrow button.
Note
To carry out forward processing on an event, you will have to select the Rollover Mode, Liquidation Mode and Initiation Mode as ‘Semi-Auto’ for tranche and drawdown. Similarly, for forward processing of fee components, the fee liquidation mode should be ‘Semi-Auto’ (in the ‘Fee Components’ sub-screen of the ‘LS Tranche Contract Online’ screen and the ‘Drawdown Contract Online’ screen). The processing for the events ROLL, LIQD, INIT and FLIQ will be processed semi-automatically. LD rollover should have rollover mode as semi auto to reflect the payment messages in the forward processing browser.
This section contains the following topics:
- Section 7.3.1, "Fetching the Contracts for Forward Processing"
- Section 7.3.2, "Confirming the Generation of Messages for an Event"
7.3.1 Fetching the Contracts for Forward Processing
In this screen, you can filter the contracts required for forward processing based on the following parameters:
Date Range
The ‘From and ‘To’ dates consider Archive days and Limit days for forward processing. These dates will be automatically calculated by the system based on the application date considering the ‘Limit Days’ and ‘Archive Days’ maintained as part of branch parameters (in the ‘Syndication Loans and Commitments – Branch Parameters’ screen).
For more details on maintaining branch parameters, refer the heading titled ‘Indicating branch parameters for loan syndication’ in the ‘Reference Information for Loan Syndication’ chapter of this User Manual.
Processed Status
You can also filter the required contracts based on a processing status of the contracts. The available options are:
- All: If you select this option, system will filter all the contracts, irrespective of the processing status.
- Processed: This option will filter only those contracts that are already processed. For such contracts, the messages are released into the ‘Outgoing Message Browser’.
- Partial Processed: Applicable if there are pending components for the contract (not all the components of a specific type – eg. fee, interest, tax - are processed). For instance, a contract may have four fee components associated with it and only two of them may be processed. In this case, the contract is said to be partially processed.
- Not Processed: This option will display only those contracts that are yet to be processed.
After specifying the filter criteria, click the ‘Refresh’ button to fetch the contracts. The following
details will be displayed in the screen:
- Name of the borrower
- Description of the event to be processed
- User Reference Number of the contract
- Contract Currency
- Amount and Value Date
- Payment Value Date
- Contract Reference Number
- Counterparty
- Event Code
- Process Status: Not, Partial, Full
You need to check the ‘Hold Transaction’ option after the message generation and before the fee liquidation (FLIQ) of payment, if the payment has to be stopped.
During the batch, the system will verify if the payment is on hold. If so, it will not pass the accounting entry and the schedule will not get liquidated. If you check the ‘Hold Transaction’ box, the system will uncheck and disable the ‘Confirmed to Auto’ check box. It will also disable the ‘D’ button.
If the ‘Hold Transaction’ option is unchecked for the payment on/before the schedule date of the payment, then the FLIQ event will be triggered during the EOD batch of the payment schedule date and the new payment message will be generated with new payment value date. There will not be any change in participant ratio/SSI if there is no back valued activity impacting the schedule amount.
If the payment is closed manually, then the fee liquidation entries will be passed using the suspense GL and SSI propagation for amount tags till the next hold date/ latest SSI based on the components in next schedule is on hold on or before the current application date.
The ‘Sanction Checked’ box will be checked automatically once Sanction Check system confirms all the payment messages in detail block with value -1 (COMPLETE). If any of the payment messages in the detail block is not -1 (COMPLETE), then the system will not check the ‘Sanction Checked’ box.
The SC N/A box is checked systematically if sanction check is not applicable for a payment.
Depending on the module and payment type, the payments for which SC is not applicable will be handed off as soon as they are generated, or manual intervention will be required to release the payments
The system will display the payment messages for the below payments in the ‘Payment Browser’ screen:
- Loan Disbursement from LD module when INIT mode is ‘Semi-Auto’ at the contract level
- Outgoing Payments from FT module when the ‘Populate FT to Payment Browser’ box is checked at the ‘Loans Parameters’ screen
- Adhoc Fee Payment from LS and LD module where fee liquidation mode is Manual and the ‘Populate Adhoc Fee(LD/LS) to Payment Browser’ box is checked at the ‘Loans Parameters’ screen
The system will do sanction screening process for LS, LD, SLT, Adhoc Fee and FT modules, if the ‘Sanction Check Required’ box in Loans Parameter screen is checked. This will be done once the payment message is generated and displayed in the ‘Payment Browser’ screen with status code as ‘0 - TRANSMITTED TO SANCTIONS’.
If the status code received from Sanction Check system is ‘-1’, then:
- You will be allowed to confirm and manually release the payment messages for LS and SLT payments
- If the message is on ‘Hold’, It will not be possible to confirm and manually release the payment messages even if the status code received is ‘-1’ (COMPLETE)
- On ‘UnHold’, again system will not allow to confirm and manually release the payment messages if the status code received from Sanction is not ‘-1’ (COMPLETE)
- Oracle Lending will systematically release the payment messages for LD, FT and Adhoc Fee payments and there is no user intervention required. Audit trail details will be updated with Maker and Checker as ‘SYSTEM’ along with ‘Entry Time’ and ‘Auth Time’ for such systematic release of payment
- Once the status is updated to -1 in forward processing browser, further amendment to the status will not be allowed. Also, the only future action expected will be to confirm and release the payment message from Oracle Lending
If the status code received from Sanction Check is not ‘-1’, then system will not allow to confirm and manually release the payment messages for LS and SLT payments.
If the status code received from Sanction Check system is ‘03’ (Terminate), then the payment message can neither be released manually / systematically nor be resent to SC
If the status code received from Sanction Check system is 04, 05 or 06, then:
- You will be allowed to confirm and release the payment messages for LS and SLT payments after confirming the override message.
- Oracle Lending will not systematically release the payment messages for LD, FT and Adhoc Fee payments
- You will be allowed to select and resend such message to Sanction Check system for confirmation. On click of OK button, staging table will be populated with the status and Java adapter will resend those messages for sanction screening
- Payment messages once marked for ‘Resend to SC’, system will update back the status code to ‘0 - TRANSMITTED TO SANCTIONS’ and will not allow to Release/Confirm/Resend till return message is received from sanction check .
If the status code is 0, -1, 01, 02, 03 then you will not be allowed to resend the message for Sanction Check processing.
Payment cannot be released manually or systematically when the status is 0.The status can be systematically re-updated more than once for the payment messages that are re-sent from Oracle Lending. For example,
- If the current status of a payment message is 04, you will be allowed to resend the message to SC and the status is received as -1, then system will re-update the status from 04 to -1
- If the current status of a particular message is already -1 or message is confirmed and released, then no modification of the status will be allowed
If the status code is 01, 02, 04, 05, 06, then you will be allowed to confirm and manually release the message with maker/checker process for payments across LS, SLT, LD, Adhoc Fee and FT modules. However, the status code will remain same and there will not be any change in the status codes even after releasing the payment messages.
You can view the payments based on status code:
- Payments with status code 01, 02, 03, 04, 05 or 06 will be displayed at the top highlighted in Red color (Only the display text will be in Red color with the existing background color)
- Payments having status code -1 will be displayed at the end
During end of day batch processing, the payment messages cannot be released from forward processing browser, though the status code received from Sanction Check system is -1. Once the batch is completed and online jobs are started, status code in the forward processing browser will get updated which was received during the batch.
The payment messages for FT and LD modules including Adhoc Fee will be systematically released if the status code is -1. However, the payment messages for LS and SLT modules will be allowed to be released manually through maker/checker process when the status code is -1
7.3.2 Confirming the Generation of Messages for an Event
From the filtered contracts, you have to select the contracts that need to be processed. To do this, check the ‘Confirmed to Auto’ option against the respective events. This will confirm that the messages for the selected events under the contract should be generated on the schedule date. However, the system will not automatically generate the messages on the schedule date. You have to manually confirm the events to generate the messages in the ‘Outgoing Message Browser’.
You can view the status code and the description of the status code received from Sanction Check.
When you click the double-click the
record ‘Message Generated for the Event’ will be displayed.
Click ‘Save’ to confirm that the messages should be generated. When you save the details, the ‘Confirm’ option (in the screen above) is automatically checked.
After selecting one or more messages and checking the ‘Resend to SC?’ box, click ’OK’. The selected messages with status code 04, 05 and 06 that are unconfirmed by Sanction Check will be resent to sanction check for confirmation.
The following are the various statuses that will be received from Sanction Check system. The status code will be automatically displayed in the status column once the acknowledgement is received from Sanction Check System.
Code |
Status |
Description |
0 |
TRANSMITTED TO SANCTIONS |
Message has been sent from Oracle Lending to SC and awaiting a response from Sanction Screening |
-1 |
COMPLETE |
0 hit from Global Interdict, Compliance officer approves the status |
01 |
PENDING-COMPLIANCE |
1 or more hits from Global Interdict |
02 |
CONFIRMED-HIT |
Compliance officer has confirmed the hit. The status will only be available after maker approves the status |
03 |
TERMINATE |
Compliance officer terminates the transaction |
04 |
SC APPLICATION ERROR |
This is an error status if something goes wrong on sanctions check side |
05 |
GI APPLICATION ERROR |
This is an error status if something goes wrong on GI application side |
06 |
OTHER ERROR |
This is an error status for errors other than SC, GI |
Click on the ‘OK’ to proceed. The messages associated with the event will be released into the ‘Outgoing Message Browser’ and the ‘Hold’ status will be set to ‘N’ (No). This indicates that the messages have been released successfully and are no longer on hold.
Click the “View’ button to view the message that will be sent out.
The system will send out a message depending on when the confirmation received from you. This is explained in the example given below:
Example
The following are the details of a contract booked:
Booking Date - 1st July 2005
Value Date – 5th July 2005
Currency – USD
Settlement Days – 2 days
If you confirm on the 1st or 2nd of July that the message needs to be generated, the message will be sent on the 3rd of July (BOD).
If you confirm on the 3rd, 4th or 5th of July that the message needs to be generated, the message will be released from the ‘Outgoing Message Browser’ immediately.
If you do not confirm before the 5th of July EOD that the message needs to be generated, the accounting entries will be passed for the event, and the message will be held in the Outgoing Message Browser.
7.3.2.1 Viewing separate fee liquidation entries in Forward Processing Browser
The system supports fee payment messages in modules LS, LD and SLT where the messages are released from ‘Forward Processing browser’. Firstly, the system populates the ADHOC Fee and derived fee payments into Forward Processing browser if the ‘forward processing required’ flag is checked and if fee liquidation mode at the product level is set to the following criteria’s:
- ‘Semi-Auto’ / ‘Auto’ / ‘Manual’ for ADHOC Fee
- ‘Semi-Auto’ / ‘Auto’ for derived Fee