2. Corporate Loan Origination
2.1 Introduction
The process of loan origination gets initiated when a prospective customer approaches the bank, with a loan account opening request or when the bank approaches a prospective customer, taking lead from its database. In case of a bank–initiated request, the process moves forward only if the prospective customer is interested. The entire process is carried out in multiple stages and on successful completion of each stage, it moves automatically to the next stage.
When the customer approaches the bank for its products and offers, before initiating the loan origination process, the bank can create a mock-proposal which would have the personal details of the customer, the loan offers the customer is interested in as well as the schedules associated with the loan offer. This can be stored as reference in the system to be retrieved when the actual loan process flow is initiated.
Corporate lending process flow uses Oracle BPMN framework with multiple human tasks for workflow stages. The capture and enrichment of information in multiple steps can be dynamically assigned to different user roles, so that multiple users can take part in the transaction. Oracle Business rules are used for dynamic creation of multiple approval stages.
The following details need to be maintained for originating a Corporate Loan:
- Credit rating rules
- Credit ratios
- Override details
- Document checklist and advices
- Application category details
The Corporate Loan origination process flow is composed of following stages:
- Application Entry
- Application Verification
- Underwriting
- Loan Approval
- Document Verification
- Manual Retry
The features, maintenances, and the different stages in the process flow are explained in detail in the following sections.
This chapter contains the following sections:
- Section 2.2, "Defining Bank Level Parameters for Lead ID"
- Section 2.3, "Maintaining Credit Rating Rules"
- Section 2.4, "Credit Ratios"
- Section 2.5, "Maintaining Ratio Details"
- Section 2.6, "Pricing Details"
- Section 2.7, "Stages in Corporate Loan Origination"
- Section 2.8, "Application Entry"
- Section 2.9, "Application Verification"
- Section 2.10, "Underwriting"
- Section 2.11, "Loan Approval"
- Section 2.12, "Document Verification"
- Section 2.13, "Manual Retry"
2.2 Defining Bank Level Parameters for Lead ID
You can maintain bank level parameters for lead ID generation and auto closure of leads in the Bank Parameters Maintenance screen. To invoke this screen type ’OCDBKPMT’ in the field at the top right corner of the Application tool bar and click the adjoining arrow button.
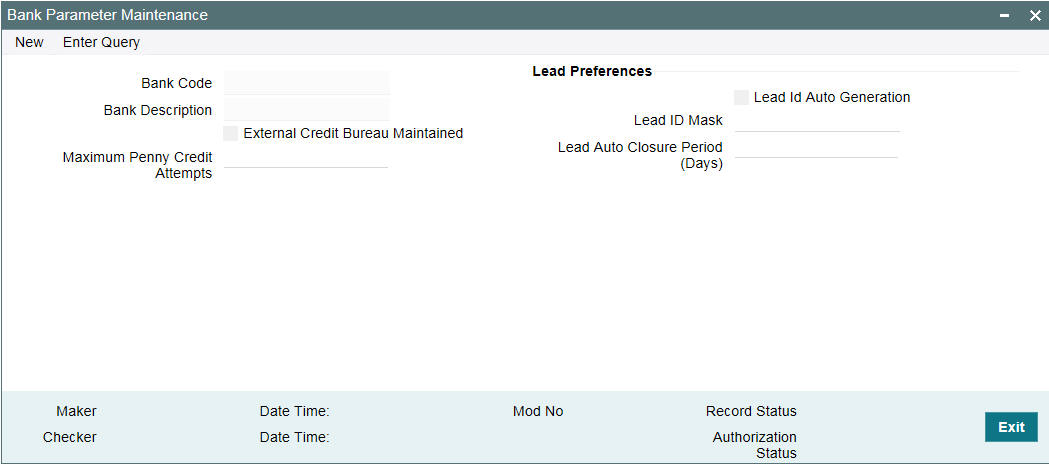
You can specify the following here:
Bank Code
Select the bank code from the adjoining option list.
Bank Description
Give a brief description on the bank.
External Credit Bureau Maintained
Select this check box if external credit bureau is maintained.
Maximum Penny Credit Attempts
Specify the number of attempts made for penny credit.
Lead Preferences
Lead Id Auto Generation
Select this check box to indicate that the lead ID should be auto generated. Lead ID should be less than or equal to 16 characters.
Lead mask criteria:
@(BRN): Branch Code, 3 digits
@(CCY): Currency, 3 digits
@(DATE:'): Date, YYDDD, 5 digits
@(SEQ:'): sequence number, 4 digits
@(PRCD):' Process code for lead screen, 4 digits, hard-coded as 'LEAD'
Lead ID Mask
Specify the criteria for the lead ID generation.
Lead Auto Closure Period (Days)
Specify the lead auto closure period in days.
All leads in any status other than the following are auto closed if they meet the configured closure period:
- ‘Application Under Process’ (i.e. loan leads already in origination work flow)
- ‘Converted’ or ‘Account Opening in progress’
- ‘Origination in Progress’ (i.e. for CASA leads in origination)
The auto closure period is decided by the bank based on the turnaround time of all other linked processes with the lead and hence it is managed and decided accordingly by the bank.
2.3 Maintaining Credit Rating Rules
You can maintain a set of questions along with a possible set of answers with associated scores, to assess the credit rating of a prospective loan customer. You can also calculate the risk factor associated with the loan and arrive at a credit grade based on the scores obtained.
This section contains the following topics:
- Section 2.3.1, "Main Tab"
- Section 2.3.2, "Risk Factor Tab"
- Section 2.3.3, "Specifying Credit Grades"
- Section 2.3.4, "Specifying Auto Decision"
- Section 2.3.5, "Viewing Credit Rule Summary"
You can maintain these details in ‘Rule Details’ screen. You can invoke this screen by typing ’OCDRULMT’ in the field at the top right corner of the Application tool bar and clicking the adjoining arrow button.’

You can specify the following details in this screen:
Rule ID
Specify a unique identification for the credit rating rule.
Description
Specify a suitable description for the credit rating rule.
Type
Select the type of the loan from the following options available:
- Corporate
2.3.1 Main Tab
You can maintain the following details in this tab:
Question Details
Question ID
The question ID is automatically generated by the system.
Category
Select the category to which the question belongs from the option list provided.
Question
Specify the question to be asked to the prospective customer to derive the credit rating score.
Answer Details
Sequence Number
The sequence number is automatically generated by the system.
Possible Answer
Specify a set of possible answers to be associated with a question.
Score
Specify the score associated with an answer.
2.3.2 Risk Factor Tab
You can specify the risk details associated with the loan and also indicate the formula for calculating the credit score in this tab.

You can specify the following details here:
Risk ID
Specify a unique identifier for the credit risk being maintained.
Description
Specify a suitable description for the credit risk.
2.3.2.1 Specifying Formula Details
You can specify the formula to calculate the credit score by clicking the ‘Formula’ button corresponding to a credit risk entry in Risk Factor tab. In the ‘Formula’ screen you can specify the condition for calculating the credit score associated with a risk condition.
You can specify the following details here:
Sequence Number
The sequence number is automatically generated by the system.
Condition
The condition specified using the Elements, Functions, Operators, and so on. gets displayed here.
Result
Specify the result to be associated with the condition specified.
Elements
Specify the data elements to be used to define the formula for credit score calculation or select the element from the option list provided.
Functions
Select the mathematical function to be used to define the formula from the drop-down list provided.
Braces
Select the opening or the closing brace from the drop-down list provided, to define the credit score calculation formula.
Operators
Select the mathematical operator to be used to define the credit score calculation formula. You can select ‘+’, ‘-‘, ‘*’, or ‘/’.
Logical Operators
Select the logical operator to be used to define the credit score calculation formula. You can select ‘<’, ‘>‘, ‘=’, ‘<>’, ‘>=‘, ‘<=’, ‘AND’ or ‘OR’.
2.3.3 Specifying Credit Grades
You can maintain different credit grades based on the credit scores obtained. Click ‘Rating’ button in Rule Details screens to invoke the ‘Rating’ screen, where you can maintain these details.
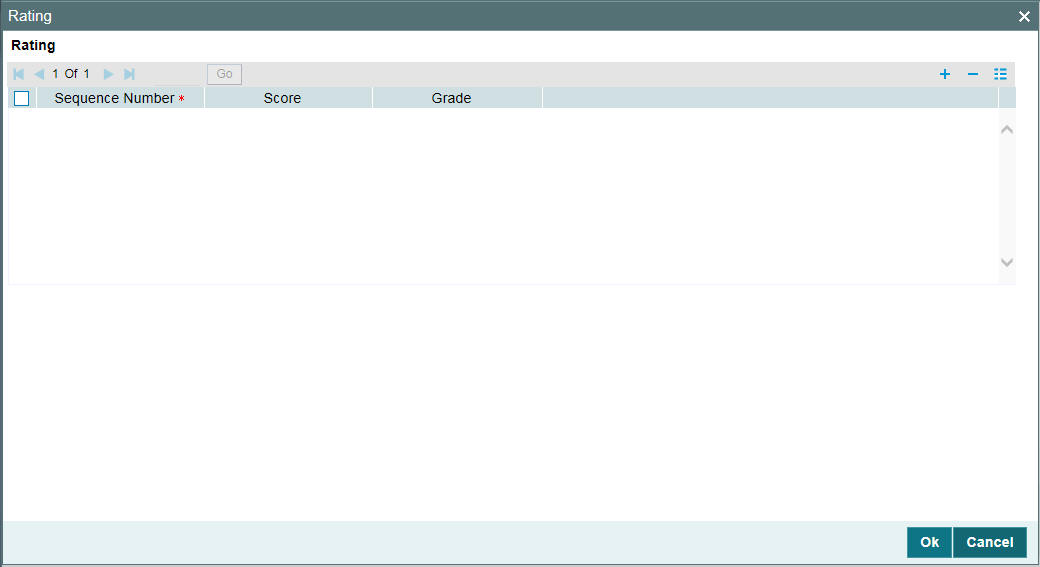
You can specify the following details here:
Sequence Number
The sequence number is automatically generated by the system.
Score
Specify the score associated with a credit risk.
Grade
Specify the credit grade based on the score obtained.
2.3.4 Specifying Auto Decision
You can maintain decisions based on the credit scores obtained to decide applicants eligibility for loan. Click ‘Auto Decision’ button in Rule Details screens to invoke the ‘Auto Decision’ screen, where you can maintain these details.

Serial Number
System generates the unique serial number for each auto decision status.
Score
Specify the maximum credit score for the applicant based on the auto decision.
Credit Decision
Specify the credit decision for the applicant based on the auto decision. You can select any of the following options from the drop-down list provided:
- AUTO APPROVED – Applications proceed to ‘Document Verification’ stage from ‘Underwriting’ stage. If this option is selected, ‘Loan Approval’ stage is skipped.
- RECOMMEND-APPROVAL – Applications need to be approved manually in ‘Loan Approval’ stage after the ‘Underwriting Stage’.
- RECOMMEND-REJECT – Applications need to be approved manually in ‘Loan Approval’ stage after the ‘Underwriting Stage’.
- AUTO REJECTED – Applications proceed to the ‘Application entry’ stage from ‘Application verification’ stage again.
2.3.5 Viewing Credit Rule Summary
You can view a summary of the credit rules in ‘Rule Maintenance’ screen. You can also query for a particular record based on desired search criteria.
You can invoke this screen by typing ‘OCSRULMT’ in the field at the top right corner of the Application tool bar and clicking the adjoining arrow button.
You can specify any of the following details to search for a record:
- Authorization Status
- Record Status
- Rule ID
Click ‘Search’ button to search for a record based on the search criteria specified. You can double click a desired record to view the detailed screen.
2.4 Credit Ratios
This section contains the following topics:
- Section 2.4.1, "Maintaining Credit Ratios"
- Section 2.4.2, "Specifying Formula Details"
- Section 2.4.3, "Viewing Credit Ratio Summary"
2.4.1 Maintaining Credit Ratios
You can maintain the rules to calculate the credit ratios in ‘Credit Ratio Maintenance’ screen. You can invoke this screen by typing ‘OCDRATMT’ in the field at the top right corner of the Application tool bar and clicking the adjoining arrow button.

You can specify the following details in this screen:
Group ID
Specify a unique identification code for the ratio group.
Description
Specify a suitable description for the ratio group.
Type
Select the type of the loan from the following options available:
- Corporate
Ratio ID
Specify a unique identification for the credit ratio being maintained.
Description
Specify a suitable description for the credit ratio.
2.4.2 Specifying Formula Details
You can specify the formula to calculate the credit ratio by clicking the ‘Formula’ button corresponding to a ratio ID. The ‘Formula’ screen is displayed where you can specify the condition for calculating the credit ratio associated with a ratio ID.

You can specify the following details here:
Ratio Type
Select the type of the ratio being maintained, from the drop down list provided. The following options are available:
- Stated Before
- Stated After
- Actual Before
- Actual After
Condition
The condition specified using the Elements, Functions, Operators, and so on. gets displayed here.
Elements
Specify the data elements to be used to define the formula for credit ratio calculation or select the element from the option list provided.
Functions
Select the mathematical function to be used to define the formula from the drop-down list provided.
Braces
Select the opening or the closing brace from the drop-down list provided, to define the credit ratio calculation formula.
Operators
Select the mathematical operator to be used to define the credit ratio calculation formula. You can select ‘+’, ‘-‘, ‘*’, or ‘/’.
2.4.3 Viewing Credit Ratio Summary
You can view a summary of the credit ratios in ‘Credit Ratio Maintenance’ screen. You can also query for a particular record based on desired search criteria.
You can invoke this screen by typing ‘OCSRATMT’ in the field at the top right corner of the Application tool bar and clicking the adjoining arrow button.

You can specify any of the following details to search for a record:
- Authorization Status
- Record Status
- Group ID
Click ‘Search’ button to search for a record based on the search criteria specified. You can double click a desired record to view the detailed screen.
2.5 Maintaining Ratio Details
You can define templates for calculating financial ratios taken from the balance sheet, income statement, statement of cash flows or statement of retained earnings within the product. You can capture the template related details through the ‘Ratio Template Definition’ screen.
You can invoke this screen by typing ‘’OCDRATMT’ in the field at the top-right corner of the Application tool bar and clicking the adjoining arrow button.
Specify the following details:
Group Id
Specify the group id here.
Description
Specify a brief description of the group id you are maintaining.
Type
Select the credit ratio type from the adjoining drop-down list. This list displays the following values:
- Corporate
Ratio Id
Specify the ratio id here.
Description
Specify a brief description for the ratio id you are maintaining.
Click the ‘Formula’ button to build the ratio formula.
Specify the following details
Formula
Ratio Type
Select the ratio type from the adjoining drop-down list. This list displays the following values:
- Stated Before
- Stated After
- Actual Before
- Actual After
Condition
Specify the condition here. You can also maintain the condition in the ‘Condition Builder’ screen which is invoked by clicking the ‘Condition Builder’ button.

Specify the following details:
Condition
Specify the condition for the rule here.
Business Rule
Braces
Select the braces from the adjoining drop-down list.
Functions
Select the functions from the adjoining drop-down list.
Elements
Select the elements from the adjoining option list. This list displays all valid elements maintained in the system.
Operators
Select the mathematical operators from the adjoining drop-down list. This list displays the following values:
- Equal To
- Greater Than
- Greater Than or Equal To
- Less Than
- Less Than or Equal To
- Like
- Not Like
- Not Equal To
Logical Operators
Select the logical operators from the adjoining drop down list. This list displays the following values:
- And: Use ‘And’
- Or: Use ‘OR’
Value
Specify the value of the SDE to define the condition. The value may be numeric or alphanumeric, as required for the condition.
After building the condition, click the ‘Insert’ button to insert the same. To remove a condition, click the ‘Clear’ button in the screen.
2.6 Pricing Details
This section contains the following topics:
- Section 2.6.1, "Maintaining Pricing Details"
- Section 2.6.2, "Maintaining Pricing Formula"
- Section 2.6.3, "Maintaining Pricing Offer"
- Section 2.6.4, "Viewing Pricing Details Summary"
2.6.1 Maintaining Pricing Details
Oracle FLEXCUBE allows you to maintain pricing groups and apply a suitable pricing rule to an application category during corporate loan origination. The pricing rule automatically selects the best matched loan offer for the loan application from the available offers for the application category.
You need to maintain pricing groups and define the price IDs and formulae for the group using ‘Pricing Details’ screen. To invoke the screen, type ‘OCDPRCMT’ in the field at the top right corner of the application toolbar and click the adjoining arrow button.
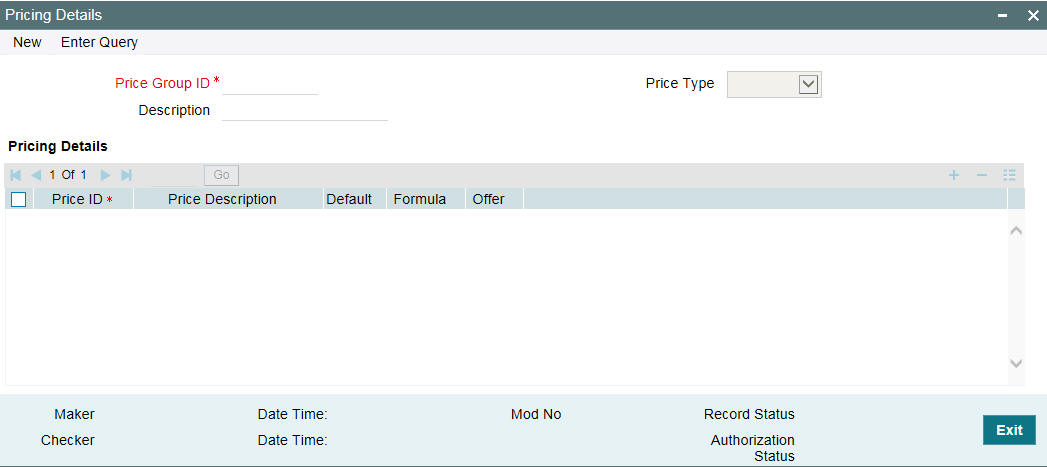
Specify the following details:
Pricing Group ID
Specify a unique name to identify the price group.
Description
Specify a brief description of the price group.
Price Type
Specify the price type associated with the price group. You can choose one of the following price types:
- Corporate
Pricing Details
Specify the following details.
Price ID
Specify a unique price ID.
This price ID can be applied to a loan at underwriting stage.
Price Description
Specify a brief description of the price ID.
Default
Select this check box to set this as the default price ID for the price group that you maintain.
2.6.2 Maintaining Pricing Formula
Click ‘Formula’ button to define the pricing rule for each price ID. You can define the formula using origination system elements in Oracle FLEXCUBE.

Sequence Number
Specify the sequence number.
Condition
Specify the possible data or the data limits here. The supported operators are:
Operator |
Description |
= |
Equals To |
> |
Greater Than |
>= |
Greater Than (or) Equals To |
< |
Less Than |
<= |
Less Than (or) Equals To |
Score
Specify the score for each condition.
Elements
Select the element from the adjoining option list.
If the loan requested details satisfies the condition specified in the pricing maintenance then the corresponding score gets added. If the details do not satisfy the condition then zero is considered as default score.
Functions
Select the mathematical function to be used to define the formula from the drop-down list provided.
Braces
Select the opening or the closing brace from the drop-down list provided, to define the credit score calculation formula.
Operators
Select the mathematical operator to be used to define the credit score calculation formula. You can select ‘+’, ‘-‘, ‘*’, or ‘/’.
Logical Operators
Select the logical operator to be used to define the credit score calculation formula. You can select ‘<’, ‘>‘, ‘=’, ‘<>’, ‘>=‘, ‘<=’, ‘AND’ or ‘OR’.
Based on the formula and the loan application category, the system automatically applies a price ID to the application. You can apply a different price ID that matches the application only at the Underwriting Stage.
If you change a price ID selected by the system and reapply a different price ID, the system changes the score of the pricing rule. The score determines the price ID to be automatically applied.
2.6.3 Maintaining Pricing Offer
Click ‘Offer’ button to define the pricing rule for each price ID for the user to pick up the offer for the loan.

You can specify the following details here:
Sequence Number
System generates the sequence number.
Score From
Specify the start credit score to pick the offer for the loan.
Score Up To
Specify the end credit score to pick the offer for the loan.
Rate
Specify the rate to be picked up for the score.
No of Instalments
Specify the number of instalments for the offer.
Frequency
Specify the frequency of the offer.
Units
Select the frequency unit from the adjoining drop-down list. You can select one of the following:
- Daily
- Weekly
- Monthly
- Quarterly
- Half Yearly
- Yearly
- Bullet
2.6.4 Viewing Pricing Details Summary
You can view the pricing details maintained in the ‘Pricing Details’ screen. To invoke the screen, type ’OCSPRCMT’ in the field at the top right corner of the application toolbar and click the adjoining arrow button.

In this screen, you can base your queries by providing any or all of the following criteria:
- Application Status
- Price Group ID
- Price Type
- Record Status
- Description
Based on the details provided, system displays the following details:
- Authorization Status
- Record Status
- Price Group ID
- Description
- Price Type
2.7 Stages in Corporate Loan Origination
The different stages in corporate lending process flow are designed using Oracle BPEL framework. The process of loan origination consists of several manual as well as system tasks, carried out in a sequential manner. Many users can be involved in the completion of a transaction and at each stage of the process, a user or a group of users, assigned with a task, acquire and work on the relevant transaction.
Oracle Business rules that are embedded help the dynamic creation of multiple approval stages. The different stages and sub-stages in the process flow can be summarized as follows:
- Application Entry
- Information captured in this stage include
- Applicant Information
- Corporate Information
- Directors Information
- Application details
- Requested Loan Details
- Facility Information
- Checklist
- Documents
- Application Verification
- Underwriting
- Collateral Valuation Information
- Applicant Financial Ratios
- Applicant Credit Score
- Applicant Bureau Report
- Loan Offers
- Loan Schedules
- Loan Charges
- Field Investigation
- Document Capture
- Advice Generation
- Loan Approval
- Document Verification
- Information captured during Previous stages are verified
- All documents obtained are verified against checklist
This section contains the following details:
2.7.1 Process Flow Diagram
The process flow diagram given below illustrates the activities carried out during the different stages of the workflow.
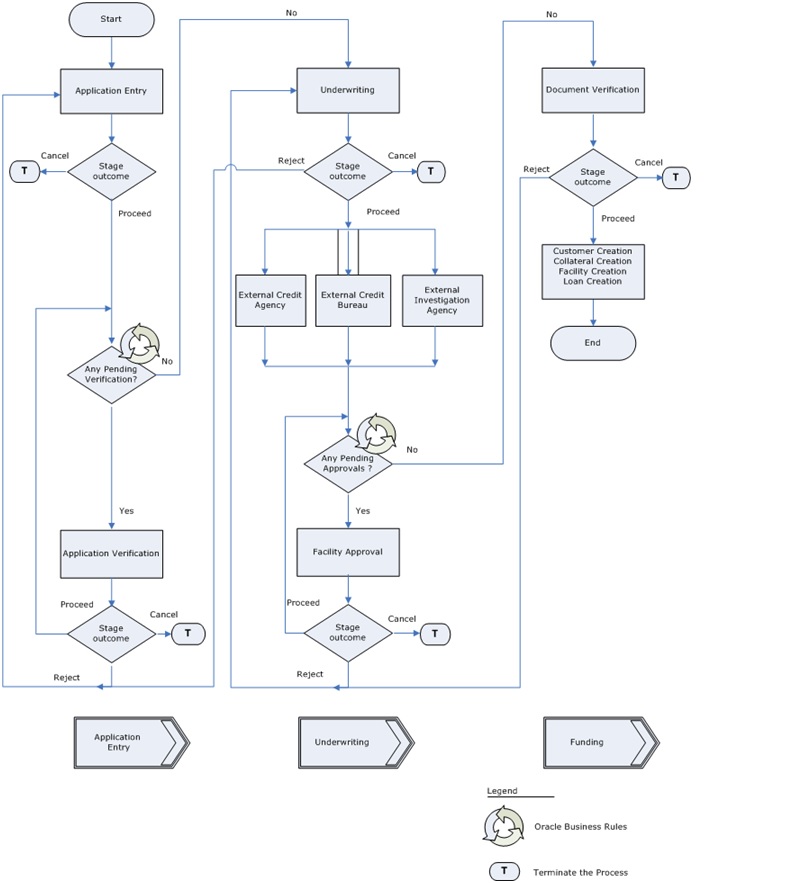
The various tasks carried out in these stages are explained in detail in the subsequent sections.
2.7.2 Process Matrix
The process matrix given below lists out the different stages, the user role handling each stage, the function Ids involved and the exit points for each stage.
Stage |
Stage Title |
Description |
Function ID |
Exit point |
1 |
Application Entry |
The following details are captured as part of this stage Application Details Applicant Details Requested Lending Details Collateral Details Check List User Defined Fields and Comments Document Capture Advice Generation |
OCDCLAPP |
PROCEED, CANCEL |
2 |
Application Verification |
The details captured as part of ‘Application Entry’ stage is verified |
OCDCLVER |
PROCEED, RETURN, CANCEL |
3 |
Underwriting |
The following details are captured as part of this stage. Collateral Valuation Information Applicant Financial Ratios Applicant Credit Score Applicant Bureau Report Loan Offers Loan Schedules Loan Charges Field Investigation Document Capture Advice Generation |
OCDCLUND |
VERIFY PROCEED, RETURN, CANCEL |
4 |
Loan Approval |
Facility Approval |
OCDCLAPR |
PROCEED, RETURN, CANCEL |
5 |
Document Verification |
Document Verification Final Verification Customer Creation Loan Account Creation Advice Generation |
OCDCLDVR |
PROCEED, RETURN, CANCEL |
6 |
Manual Retry |
This stage is optional. Task is moved to this stage only when the system is unable to create Customer/ Customer Account/ Liability/ Facility/ Collateral/ pool/ Loan. You can make the necessary changes & retry. |
OCDCLMCU |
PROCEED |
The stages are explained in detail in the sections that follow.
2.8 Application Entry
In this stage, the bank receives an application requesting for the creation of a facility from a prospective borrower/customer. The relevant documents and financial statements are also provided by the customer. If the applicant/borrower does not have an account but intends to open one, the bank also obtains the account opening form and related documents as part of this activity.
The following details are captured in this stage:
- Applicant information
- Applicant contact information
- Director’s information
- Corporate information
- Facility
- Loan details
Documents obtained from the applicant are also uploaded during this stage.
This section contains the following details:
- Section 2.8.1, "Making Corporate Loan Application Entry"
- Section 2.8.2, "Main Tab"
- Section 2.8.3, "Details Tab"
- Section 2.8.4, "Financials Tab"
- Section 2.8.5, "Limits Tab"
- Section 2.8.6, "Requested Tab"
- Section 2.8.7, "Comments Tab"
- Section 2.8.8, "Capturing Document Details"
- Section 2.8.9, "Capturing Trade In Details"
- Section 2.8.10, "Customer Channel Button"
- Section 2.8.11, "Account Channel Button"
- Section 2.8.12, "Capturing Customer MIS"
- Section 2.8.13, "Capturing Customer Account MIS"
- Section 2.8.14, "Specifying Customer/Account Fields"
2.8.1 Making Corporate Loan Application Entry
You can key-in the loan application details required in ‘Corporate Loan Application Entry’ screen. You can also invoke this screen by typing ‘OCDCLAPP’ in the field at the top right corner of the Application tool bar and clicking the adjoining arrow button.

The Application Number is automatically generated by the system. You can capture the following details in the main screen:
Application Category
Specify the loan application category to be used or select the application category from the option list.
Product Code
Select the product from the adjacent option list. The list displays only the corporate CL products created in Oracle FLEXCUBE.
Description
System displays the description of the selected product code.
Application Branch
System displays the current branch code.
Application Date
System displays the application date.
Lead ID
Specify a unique identification for the prospective loan customer.
Enquiry ID
Specify an enquiry Id, if you want to retrieve information on the loan offer selected by the customer. You can also select the ID from the adjoining option list. The list contains all the Enquiry IDs created for the customer as part of the loan simulation process.
Application Number
System displays the application number.
User Reference
Specify the user reference number for the loan application. If you do not specify the reference number, system generates it when you click on the ‘Default’ button.
Priority
Select the priority for the creating export LC from the adjoining drop-down list. This list displays the following options:
- Low
- Medium
- High
Status
The status of the application gets displayed here.
Click ‘Default’ button to default the details related corresponding to the prospective loan customer.
2.8.2 Main Tab
In ‘Main’ tab, you can capture the details associated with the loan applicant. The customer details corresponding to the Application Category specified are displayed here. You can modify these details, if required.
Channel
Specify the channel ID of the originating channel.
Auto Decision Required
Select this check box to enable auto decision on loan application. If you select this check box, based on the applicant credit score – auto decision mapping maintained in ‘Auto Decision’ screen, the system decides whether to approve, reject, recommend approval or recommend rejection of the application.
External Credit Check Required
Select this check box to enable external credit bureau service for credit evaluation of the loan applicant.
If you select this check box, the system automatically initiates external credit check. The credit check initiation happens before underwriting stage.
Applicant Details
Existing Customer
Select this check box to indicate if the customer applying for the loan is an existing customer of the bank.
Local Branch
Specify the applicant’s home branch.
Account branch
Specify the applicant’s account branch.
Customer No
For existing customers you need to select the customer number from the option list provided.
National ID
Specify the national ID.
Click ‘Default’ button to default the details of existing customers.
Note
For more details on capturing Customer details, refer the chapter titled ‘Maintaining Customer Information Files’ in Core Entities user manual.
2.8.2.1 Fields
You can capture the user defined field details for the customer, if any by clicking ‘Customer/Account Fields’ button. The ‘User Defined Fields’ screen gets displayed where you can maintain the UDF details.
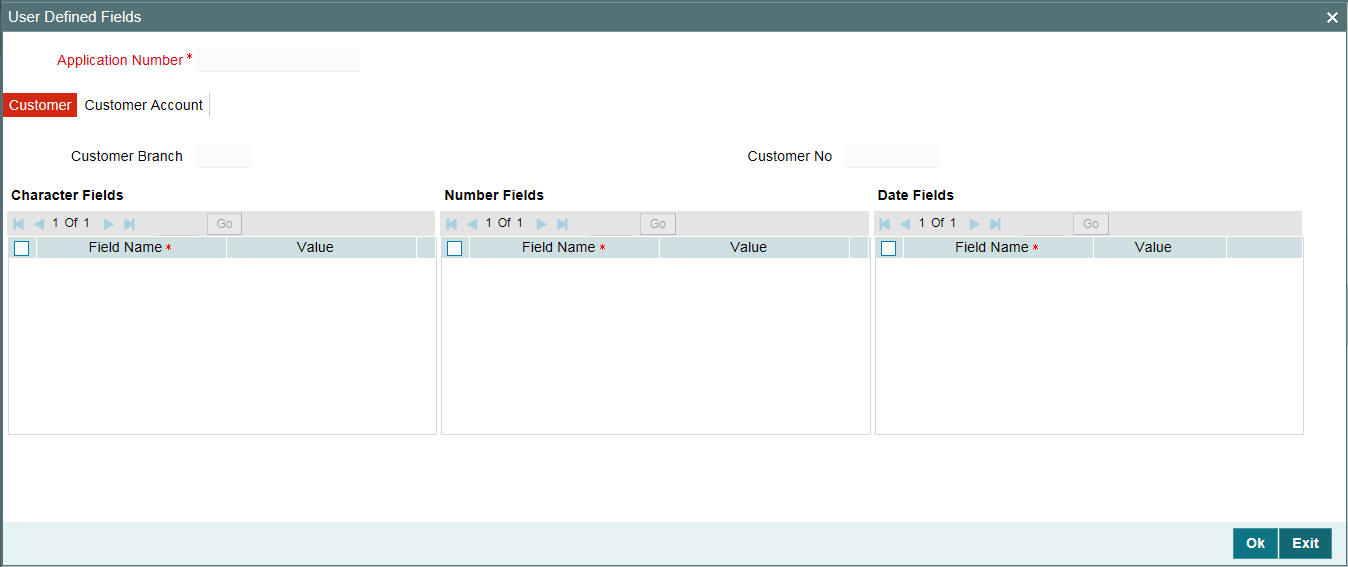
You can specify the following details in this screen:
Name
Specify the name of the UDF being created for the customer.
Value
Specify the value associated with the UDF being created for the customer.
2.8.3 Details Tab
Note
This tab is enabled only if OBCL is deployed with ROFC and disabled if OBCL is standalone
The address and employment related details of the customer corresponding to the Application Category selected are displayed in this tab. You can modify these details if required.
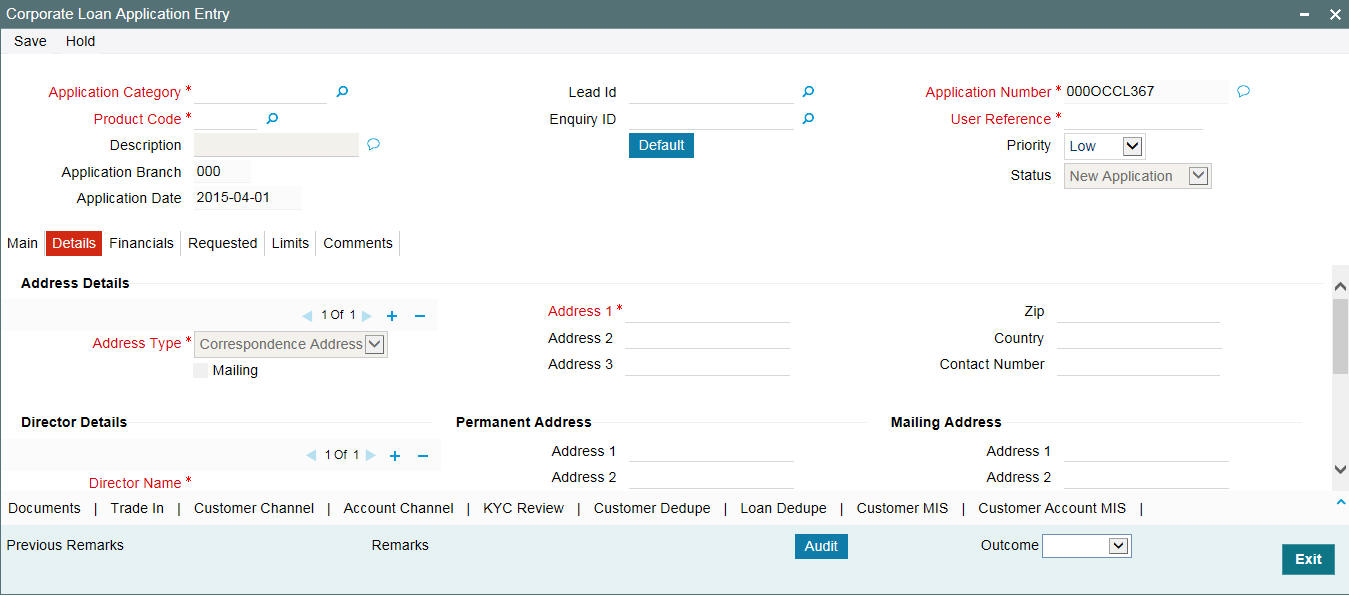
In this screen, you can capture multiple address and employment details, if required.
Note
For more details on capturing address details, refer the chapter titled ‘Maintaining Customer Information Files’ in Core Entities user manual.
You can capture the following additional details related to the Director in this tab:
Director Name
Specify the name of the director of the corporate customer.
Tax ID
Specify the tax identification of the director.
Specify the e-mail ID of the director.
Nationality
Specify the nationality of the director.
Share Percentage
Specify the percentage of share for the key person.
Telephone ISD Code +
Specify the international dialling code for the telephone number of the director. The adjoining option list displays valid ISD codes maintained in the system. Select the appropriate one.
Telephone
Specify the telephone number of the director.
Mobile ISD Code +
Specify the international dialling code for the mobile number of the director. The adjoining option list displays valid ISD codes maintained in the system. Select the appropriate one.
Mobile Number
Specify the mobile number of the director.
Permanent Address
Address
Specify the permanent address of the director.
Country
Specify the country associated with the address specified.
Permanent US Resident Status
Select this check box to indicate that the corresponding director is a permanent US resident.
Mailing
Line 1 – 4
Specify the mailing address of the customer in Line 1 to Line 4 provided.
2.8.4 Financials Tab
You can capture the financial details corresponding to the customer in this screen.
You can capture the following details here:
- Assets Details
- Capital details
- Reserves Details
- Surplus Details
- Liabilities Details
- Cash Flows
- Credit Application
Assets
You can capture the following details corresponding to the loan applicant’s assets:
Fixed Assets
Specify the value associated with the fixed assets of the customer.
Intangible Assets
Specify the value associated with the intangible assets of the customer.
Non Current Assets
Specify the value associated with the non current assets of the customer.
Current Assets
Specify the value associated with the current assets of the customer.
Capital
You can capture the following details corresponding to the loan applicant’s capital:
Issued Capital
Specify the value associated with the issued capital of the customer.
Paid-Up Capital
Specify the value associated with the paid-up capital of the customer.
Reserves
You can capture the following details corresponding to the loan applicant’s cash reserves:
Subsidy from Govt
Specify the value of any subsidies the customer has obtained from the government.
General Reserves
Specify the value associated with any general reserves of the customer.
Surplus
You can capture the following details corresponding to the loan applicant’s surplus income:
Credit Balance in PL
Specify the surplus credit balance, if any, associated with the customer.
Liabilities
You can capture the following details corresponding to the loan applicant’s liabilities:
Term Liabilities
Specify the value associated with the long term liabilities associated with the customer.
Current Liabilities
Specify the value associated with the current liabilities associated with the customer.
Cash Flows
You can capture the following details corresponding to the loan applicant’s cash flows:
Operations Activities
Specify the cash flow value associated with the operation activities of the corporate customer.
Investing Activities
Specify the cash flow value associated with the investing activities of the corporate customer.
Loan Activities
Specify the cash flow value associated with the loan activities of the corporate customer.
Credit Application
The details associated with how the corporate customer has deployed his assets need to be captured as part of assessing the risk associated with the loan proposed. You can capture the following details related to the credit application:
Borrower Profile
Specify the details corresponding to the profile of the corporate customer’s customer.
Financial Performance
Specify the details corresponding to the financial performance of the corporate customer’s customer.
Borrower Market Position
Specify the details corresponding to the market position of the corporate customer’s customer.
Risk and Mitigants
Specify the details corresponding to the risk and mitigants associated with the corporate customer’s customer.
Risk Department Mitigants
Specify the inputs from risk department related to the risk mitigants associated with the corporate customer’s customer.
Risk Department Assessment
Specify the risk department’s assessment corresponding the corporate customer’s customer.
Facilities Proposed
Specify the details corresponding to the facilities that have been proposed by the corporate customer.
Approved Facilities
Specify the details corresponding to the facilities that have been approved by the corporate customer.
Recommended
Specify the details corresponding to the facilities that have been recommended by the corporate customer.
Terms and Conditions
Specify the terms and conditions associated with the credit application.
2.8.5 Limits Tab
You can capture the Facility Information in ‘Limits’ tab.
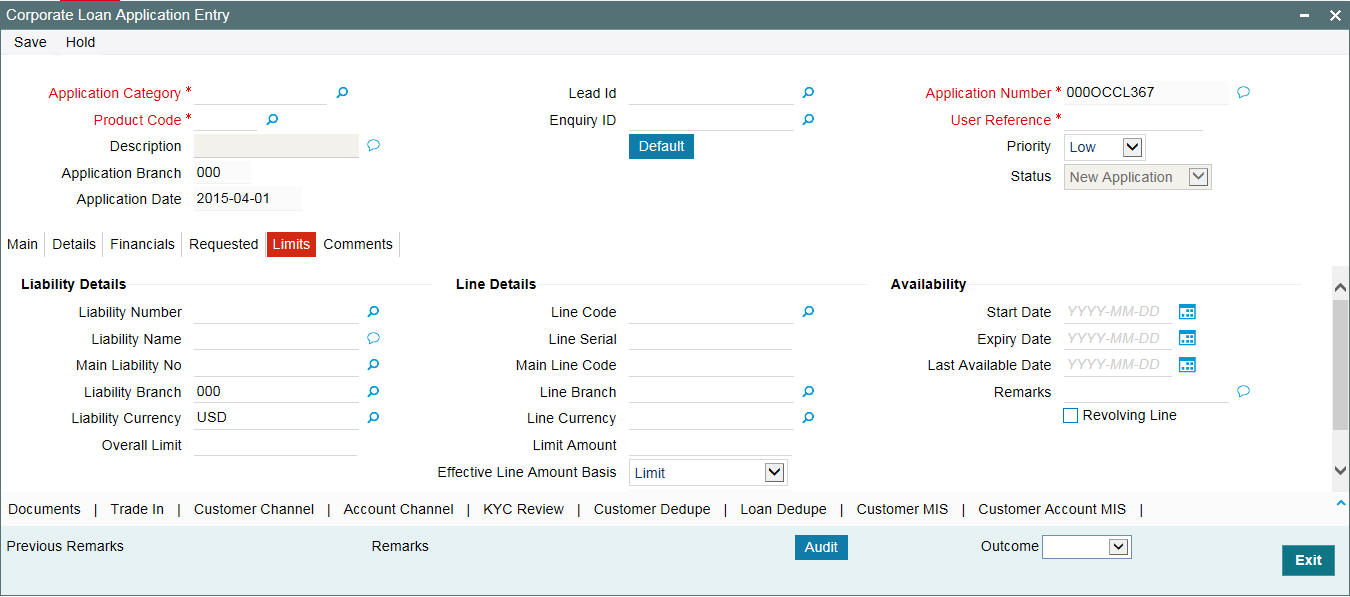
In this screen, specify the following details:
Liability Details
Liability Number
Select the liability number. The adjoining option list displays all valid liability numbers maintained in the system. Select the appropriate one.
Liability Name
Select the liability name. The adjoining option list displays all valid liability names maintained in the system. Select the appropriate one.
Main Liability No
Select the parent liability number. The adjoining option list displays all valid main liability numbers maintained in the system. Select the appropriate one.
Liability Branch
Select the liability branch. The adjoining option list displays all valid liability branch maintained in the system. Select the appropriate one.
Liability Currency
Select the liability currency. The adjoining option list displays all valid liability currency maintained in the system. Select the appropriate one.
Overall Limit
Specify the overall limit.
Line Details
Line Code
Select the line code. The adjoining option list displays all valid liability numbers maintained in the system. Select the appropriate one.
Line Serial
Specify the line serial number.
Main Line Code
Select the main line code. The adjoining option list displays all valid main line codes maintained in the system. Select the appropriate one.
Line Branch
Select the line branch code. The adjoining option list displays all valid branch codes maintained in the system. Select the appropriate one.
Line Currency
Select the line currency code. The adjoining option list displays all valid line currency codes maintained in the system. Select the appropriate one.
Line Amount
Specify the line amount.
Limit Amount
Specify the limit amount.
Collateral Amount
If the collateral is maintained, system displays the collateral amount when you click on ‘Default’ button. Otherwise, system displays the value as ‘zero’.
Effective Line Amount Basis
Select the basis on which the effective line amount is calculated.
Effective Line Amount
System displays the effective line amount based on the specified effective line amount basis,
Availability
Start Date
Specify the start date of the line from the adjoining calendar.
Expiry Date
Specify the expiry date of the line from the adjoining calendar.
Last Available Date
Specify the last availability date for the line from the adjoining calendar.
Remarks
Specify the remarks for the line.
Revolving Line
Select this check box to indicate that the revolving line is required.
2.8.6 Requested Tab
The details related to the requested loan can be captured in this tab. If you have selected an ‘Enquiry ID’ for the customer, then the requested details that have been stored for the corresponding loan proposal are displayed here.
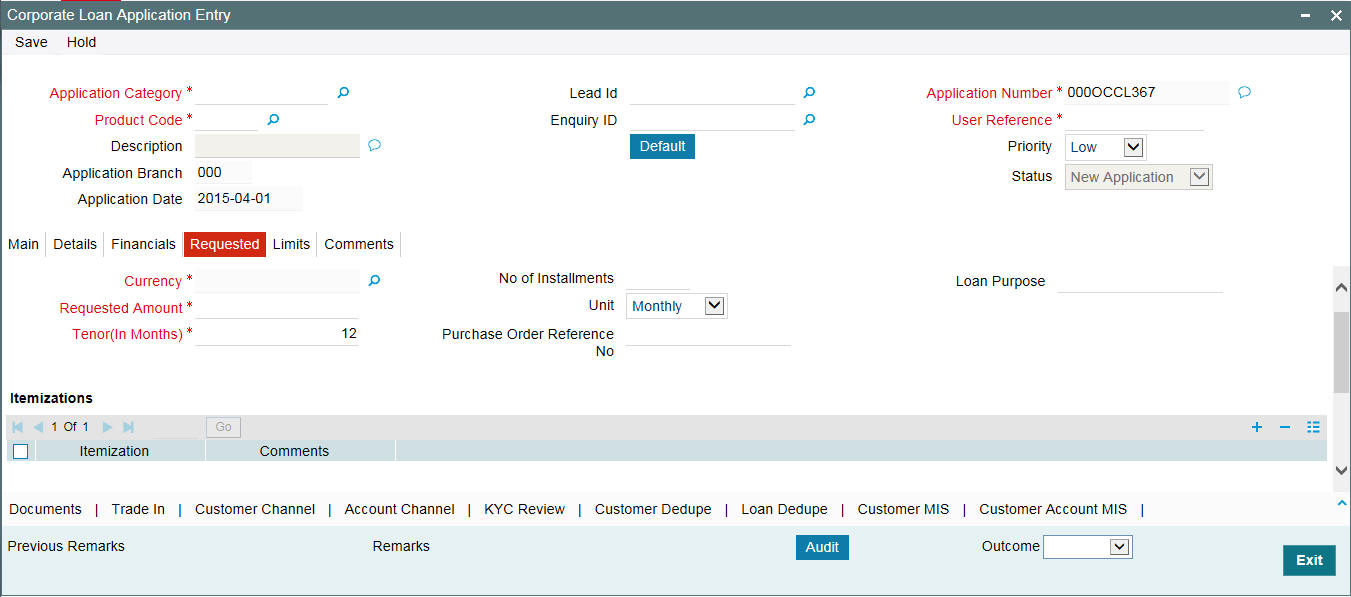
You can capture the following details here:
Currency
Specify the loan currency preference of the customer or select the currency from the option list.
Requested Amount
Specify the loan amount requested by the prospective customer.
Tenor (in months)
Specify the preferred loan tenor (in months) of the prospective customer.
No of Installments
Specify the requested Number of Loan Instalments/Schedules.
Unit
Specify the requested Loan Schedule Frequency Unit/Basis.
Purchase Order Reference No
Specify the reference number of the trade instrument.
Loan Purpose
Specify the purpose of the loan.
Itemization
Specify the tenor itemization that is required. For example, you can specify the itemizations like ‘Booking Amount’, ‘Payment’, ‘Interiors’, and so on.
Comments
Specify comments, if any, corresponding to the itemization.
2.8.7 Comments Tab
In this tab, you can specify comments, if any, related to the loan application.

You can specify the following details here:
Sequence Number
The sequence number is automatically generated by the system.
Comments
Specify comments, if any, to be associated with the loan application.
Comment By
System displays the name of the commenter.
Comment Date
The system displays the date on which the comment was added.
2.8.8 Capturing Document Details
You can capture the customer related documents in central content management repository through the ‘Documents’ screen. Click ‘Documents’ button to invoke this screen.

Here, you need to specify the following details:
Document Category
Specify the category of the document to be uploaded.
Document Reference
The system generates and displays a unique identifier for the document.
Document Type
Specify the type of document that is to be uploaded.
Ratio Upload
Select this check to view the calculated financial ratios, which is obtained by uploading the excel sheet (balance sheet, income statement, statement of cash flows, and so on.).
On clicking the ‘Vertical Analysis’ button, system displays the calculated ratios in ratio tab of underwriting stage.
Upload
Click ‘Upload’ button to open the ‘Document Upload’ sub-screen.
In the ‘Document Upload’ sub-screen, specify the corresponding document path and click the ‘Submit’ button. Once the document is uploaded through the upload button, the system displays the document reference number.
View
Click ‘View’ to view the document uploaded.
In ‘Corporate Loan Origination’ process, ‘Document Upload’ feature is not available in all the stages. Its availability in this process is given below:
Stage Title |
Function Id |
Doc Callform Exists |
Upload(Available/Not Available) |
View(Available/Not Available) |
Application Entry |
OCDCLAPP |
Available |
Available |
Available |
Application Verification |
OCDCLVER |
Available |
Available |
Available |
Underwriting |
OCDCLUND |
Available |
Available |
Available |
Facility Approval |
OCDCLAPR |
Available |
Available |
Available |
Document Verification |
OCDCLDVR |
Available |
Available |
Available |
Customer / Account / Facility / Loan / Collateral Creation |
|
|
|
|
2.8.9 Capturing Trade In Details
You can capture the trade-in details related to the loan application in ‘Trade In’ sub screen. To invoke this screen, click ‘Trade In’ button in Corporate Loan Application Entry screen.

You can capture the asset details and the valuation details of the asset in this screen.
Note
For more details on Capturing Asset Valuation details, refer the section titled ‘Account Asset Valuation’ in Retail Lending user manual.
2.8.10 Customer Channel Button
You can capture the information of channels like Internet Banking, Interactive Voice Response, Mobile, ATM, and Credit Card at customer level. Click ‘Customer Channels’ button to specify the details relating to channels.

Specify the following details:
Banking Channels
Specify the banking channels code. Alternatively, you can select the list of channels from the option list. The list displays the channels maintained in the system.
Banking Channel Name
The system displays the name of the banking channel.
Remarks
Specify remarks for the banking channel subscription.
2.8.11 Account Channel Button
You can capture the information of channels like Internet Banking, Interactive Voice Response, Mobile, ATM, and Credit Card at customer level. Click ‘Account Channels’ button to specify the details relating to channels.
Specify the following details:
Banking Channels
Specify the banking channels code. Alternatively, you can select the list of channels from the option list. The list displays the channels maintained in the system.
Banking Channel Name
The system displays the name of the banking channel.
Remarks
Specify remarks for the banking channel subscription.
2.8.12 Capturing Customer MIS
You can capture the MIS details for the customer, click ‘Customer MIS’ button. System displays the ‘Customer MIS’ screen where you can maintain the MIS details.

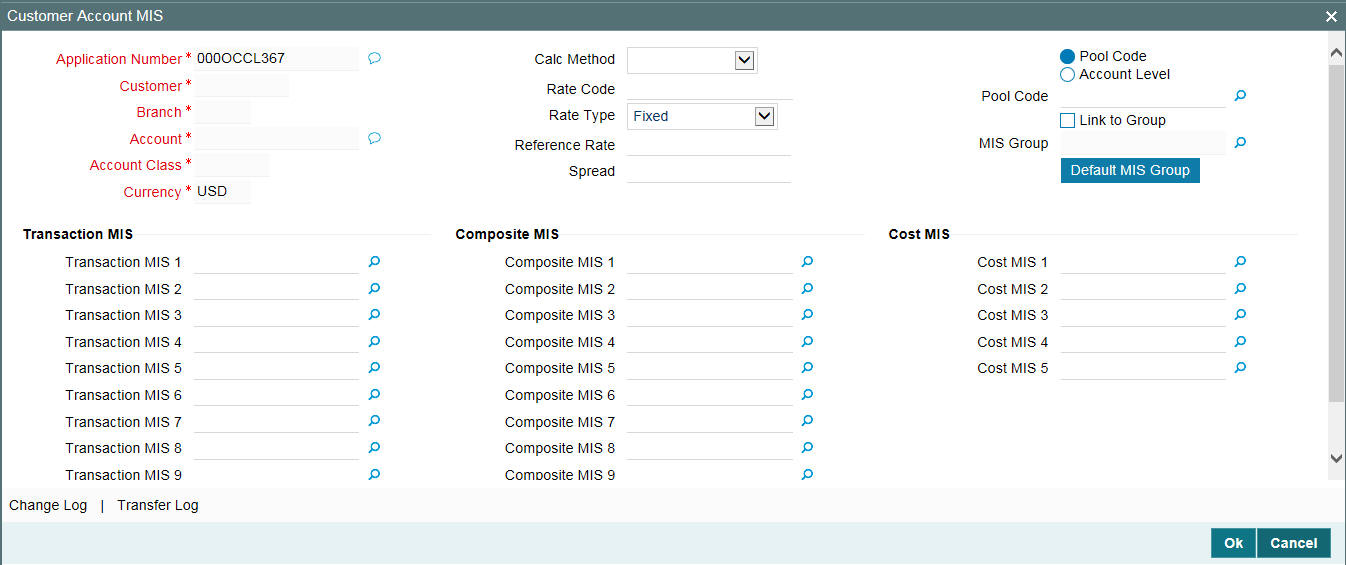
2.8.13 Capturing Customer Account MIS
You can capture the MIS details for the Customer Accounts in Customer Account MIS Screen. System displays the ‘Customer Account MIS’ screen where you can maintain the MIS details.
2.8.14 Specifying Customer/Account Fields
You can capture the user defined field details for the customer and customer account, if any by clicking ‘Customer/Account Fields’ button. System displays the ‘User Defined Field’ screen where you can maintain the UDF details.
You can specify the following user defined field details for the customer in Customer Tab:
Name
Specify the name of the UDF being created for the customer.
Value
Specify the value associated with the UDF being created for the customer.

You can specify the following user defined field details for the customer account, in Customer Account Tab.
Name
Specify the name of the UDF being created for the customer account.
Value
Specify the value associated with the UDF being created for the customer account.
2.9 Application Verification
The information captured in the previous stage is verified in the Application Verification stage.

The details related to the loan application entry are displayed in this screen, which can be verified by the verifier. The details cannot be modified in this stage, but comments can be added appropriately. On completion of this stage, the advices that are maintained for the stage are generated.
The verifier can either send the application back to the previous stage if the information provided is not adequate or can cancel it if the information captured is not satisfactory.
If the application details are verified successfully, the verifier can proceed with the processing of the application by selecting ‘PROCEED’ as the Outcome. The verifier can select ‘REJECT’ to return the process to previous stage for data correction or ‘CANCEL’ to terminate the process.
On successful verification a message, stating that the task is successfully completed, gets displayed.
To acquire the next stage, you need to go to the ‘Task’ menu and select ‘Assigned’ under ‘Standard’ option. All tasks that have been successfully completed are listed in the right side of the screen. Select the check box against your ‘Workflow Ref No’ and click ‘Acquire’ button at the top of the screen to acquire the next stage of the task.
The system displays the system message as “Acquire Successful” on successful acquisition of the task.
Click ‘Ok’ to proceed to the next stage. To select the acquired task for the next stage, select ‘Acquired’ under ‘Standard’ option in the ‘Task’ menu. All the tasks that have been successfully acquired are displayed in the right side of the screen. Search for your workflow reference number and click the ‘Workflow Ref No’ to open ‘Corporate Loan Underwriting’ screen.
2.10 Underwriting
In this stage, the bank assesses the eligibility of the borrower for the requested loan offer, based on the analysis of the borrower’s financial ratios and credit scores. The bank also obtains credit details from external agencies and field investigation agencies.
After ascertaining the eligibility of the customer, the bank provides a facility offer to the borrower and generates payment schedule and schedule details. The advices that are maintained for the stage are generated on completion of the stage.
In this stage, the bank also conducts vehicle evaluation based on the details that have been captured at the ‘Application Entry’ stage. This evaluation can be done with details from an external agency in the collateral tab.
This section contains the following topics:
- Section 2.10.1, "Credit Score Tab"
- Section 2.10.2, "Ratio Tab"
- Section 2.10.3, "Bureau Tab"
- Section 2.10.4, "Investigation Tab"
- Section 2.10.5, "Loan Tab"
- Section 2.10.6, "Schedules tab"
- Section 2.10.7, "Charges Tab"
- Section 2.10.8, "Comments Tab"
2.10.1 Credit Score Tab
The credit score tab is used to calculate the credit score details of the customer. You can also interface with external Credit engines and display recommendations and report.
Internal Credit engine obtains information from customer and calculates credit score and displays system recommendation.
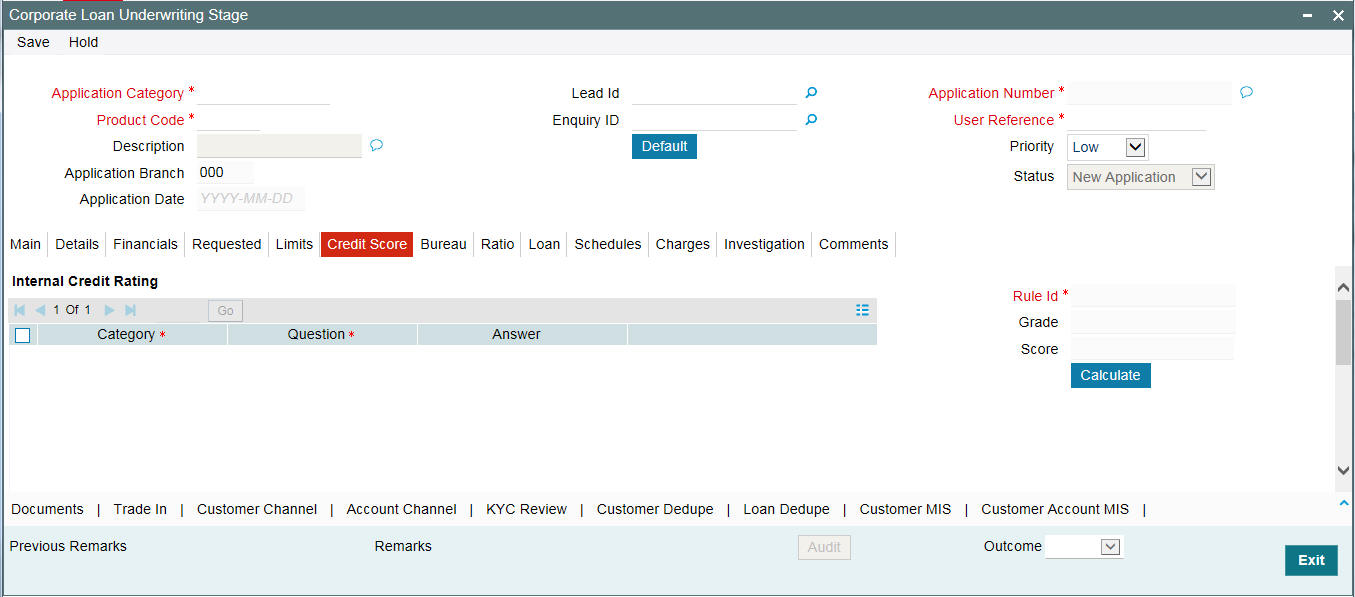
The set of questions used to assess the credit rating of a prospective loan customer, associated Rule Id are displayed in this screen. You can specify the following details here:
Answer
Specify the answer to be associated with the question used for calculating the credit score.
Risk Factor
Specify the risk factor associated with the loan, if any.
Description
Specify a suitable description for the risk factor associated with the loan.
Click ‘Calculate’ button to calculate the credit score and the grade, based on the formula maintained for calculating the credit score. The ‘Grade’ and the ‘Score’ are displayed based on this calculation.
2.10.2 Ratio Tab
In the ‘Ratio’ tab, the system calculates the stated and actual income/debt ratios and also calculates the ratio based on ‘What if payment amount’.

The stated income and debt of the customer are displayed here You can capture the following additional details here.
Actual
Monthly Income
Specify the actual monthly income of the customer based on documentary proof provided.
Monthly Debt
Specify the actual monthly debt of the customer based on documentary proof provided.
Click ‘Calculate Ratios’ button to calculate the asset/ liability ratios for the customer.
What if Pmt Amt
Specify the EMI amount that the customer is ready to pay.
Click on the ‘Calculate’ button to calculate the ratio has to be specified
2.10.3 Bureau Tab
You can interface with external credit bureaus and view report obtained from them in ‘Bureau’ tab.
The credit agencies and the bureaus maintained for the Application Category are displayed in this screen: You can capture the remarks and recommendations from these agencies in this tab. You can also view the credit report obtained from the agencies and bureaus.
External Credit Rating
Request ID
System displays the request ID.
External Agency
The external credit agencies maintained for the Application Category in ‘Application Category Maintenance’ are displayed here.
Score
Specify the score associated with the rating.
Recommended
Select the recommendation of the credit agency for the loan requested from the following options provided in the drop-down list:
- Recommended
- Not Recommended
Remarks
Specify remarks, if any, associated with the loan application.
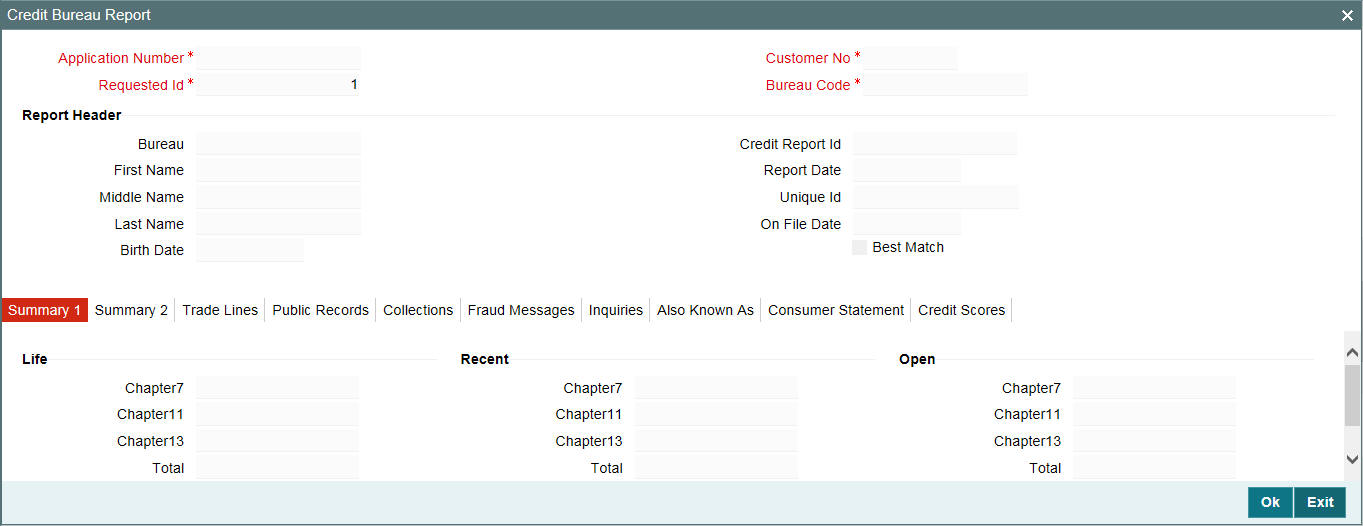
2.10.3.1 Viewing Credit Bureau Report
You can view the credit bureau report by the external agency by clicking ‘Bureau Report’ button in ‘Corporate Loan Underwriting’ screen.
System displays the ‘Credit Bureau Report’ screen where you can view the details.
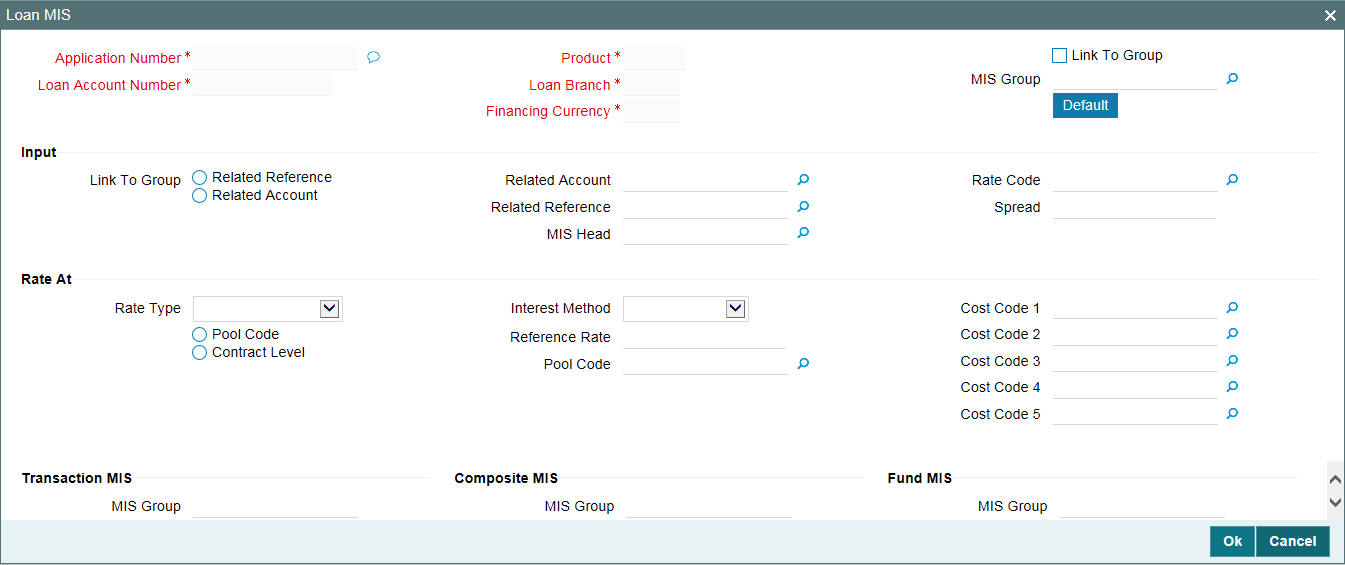
2.10.3.2 Capturing Loan MIS Details
You can capture the Loan MIS details by clicking ‘Loan MIS’ button in ‘Corporate Loan Underwriting Stage’ screen. System displays the ‘Loan MIS’ screen where you can capture the details.
2.10.3.3 Capturing Loan UDF Details
You can capture the Loan UDF details by clicking ‘Loan Fields’ button in ‘Corporate Loan Underwriting Stage’ screen. System displays the ‘Loan UDF’ screen where you can capture the details.

2.10.4 Investigation Tab
In this tab, the system captures the field investigation details associated with the customer.
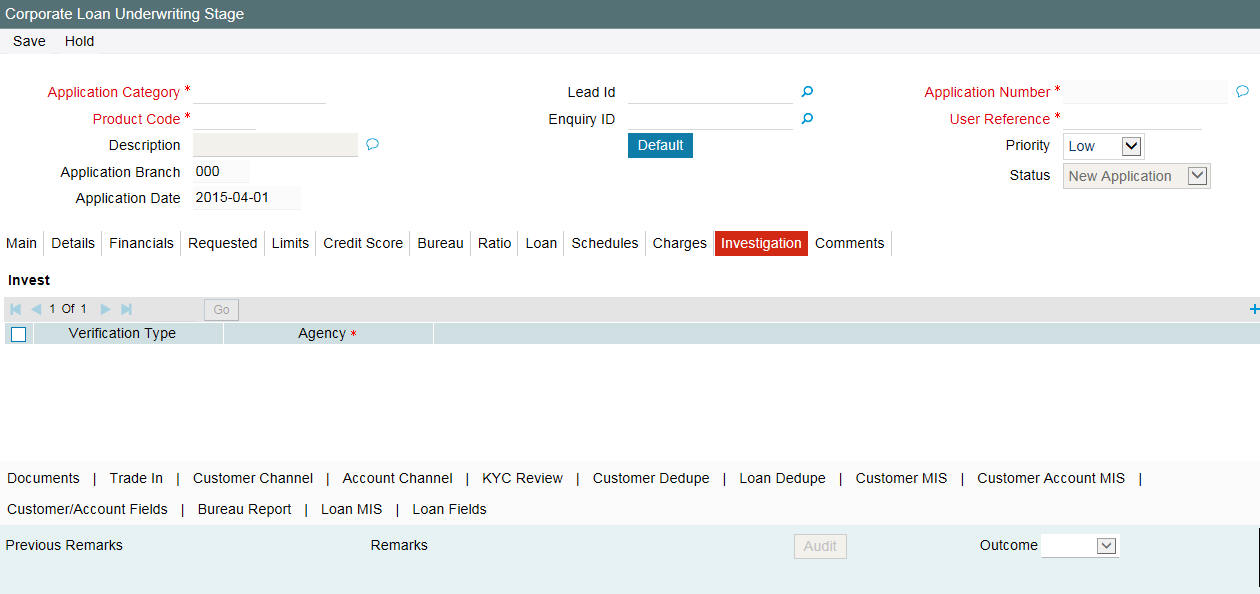
The following details related to the customer can be captured here:
- Verification Type
- Verification agency
You can view the investigation report associated with the customer by clicking the ‘Report’ button.
2.10.5 Loan Tab
In the ‘Loans’ tab, the system displays the list of the multiple loan offers that are attached to the application category specified. If you have selected an ‘Enquiry ID’ for the customer, then the loan details that have been stored for the corresponding loan proposal are displayed here. You can modify these details, if required.

Specify the following details:
Pricing
Pricing ID
You can select & apply any one of the Pricing rule available under a pricing group linked to Application category. Each pricing rule auto selects the best matched Loan Proposal for the requested loan application among the available offers for the application category. You can either proceed with the system selected offer or can select any other offer for the loan based on the requirement.
If the pricing is not maintained for the application category, then on clicking the ’Apply’ button, the pricing and the offer will not apply for the loan.
Multiple Offers
Offer ID
Specify the offer ID.
Number of Instalments
Specify the number of instalments for the loan.
Unit
Select the unit of the instalment from the adjoining drop-down list.
- Daily
- Weekly
- Monthly
- Quarterly
- Half Yearly
- Yearly
Check
System displays this option as checked if this option is selected at application category level. If this check box is not selected, you can select this check box to apply for the new offer.
Click ‘Apply’ button to apply the specified information.
Loan Details
Loan Account Number
Specify the loan account number.
Loan Branch
Specify the loan branch.
Loan Currency
Specify the loan currency.
Loan Amount
Specify the loan account.
Down Payment
Specify the down payment done for the loan.
Value Date
Specify the value date for the loan.
Maturity Date
Specify the maturity date of the loan.
Instalment Start Date
Specify the instalment start date of the loan from the adjoining calendar.
No of Instalments
Specify the number of instalments for the loan.
Unit
Select the unit of the instalment from the adjoining drop-down list.
- Daily
- Weekly
- Monthly
- Quarterly
- Half Yearly
- Yearly
Click ‘Apply’ button to apply the specified information.
The details related to the loan offer like the number of installments, unit, interest rate, and so on are displayed here. Select the required offer by clicking the ‘Check’ option and click then click the ‘Apply’ button to apply the selected loan offer. The details corresponding to the selected loan offer are displayed in ‘Loan Details’ section. You can modify these details, if required, and click ‘Apply’ button to calculate the schedule details.
The payment schedules are derived based on the offer selected.
Note
You can select only one loan offer in this screen.
2.10.6 Schedules tab
In this tab, the system calculates payment schedules and schedule details.
- The system calculates and displays Component name, Schedule type, first due date, number, frequency, units and amount.
- For each component the system calculates and displays due date, amount
due, EMI amount, amortized principal.

2.10.7 Charges Tab
In ‘Charges’ tab, the system calculates and displays charges, if any applicable
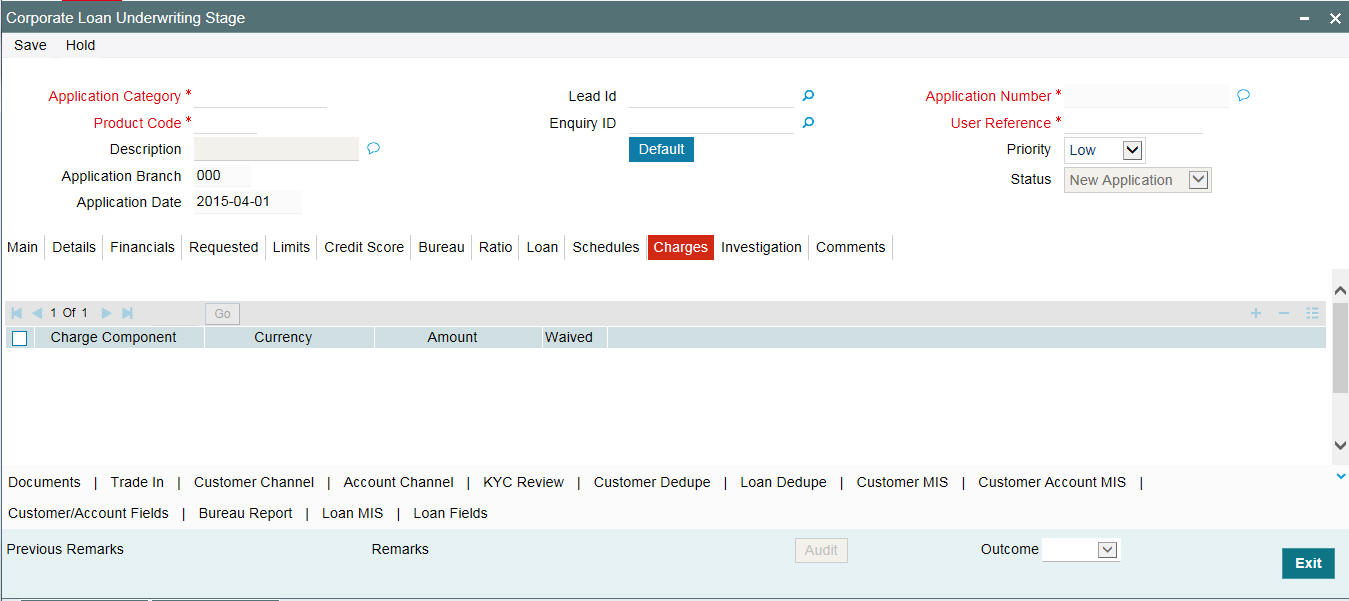
The system calculates and displays the charge details associated with the loan.
The following details are displayed:
- Component Name
- Component Currency
- Amount
Waive
Select this check box to waive the charges associated with the loan.
2.10.8 Comments Tab
In this tab, you can capture the comments by the users.

You can capture the following details:
Serial No
Specify the serial number of the comment.
Comments
Specify comments, if any, to be associated with the loan application.
Comments By
The system displays the commenter’s ID.
Comment Date
Specify the date on which the comment was given or select the date by clicking the ‘Calendar’ icon.
If the underwriting stage is successfully completed, the underwriter can proceed with the processing of the application by selecting ‘PROCEED’ as the Outcome. The underwriter can select ‘REJECT’ to return the process to previous stage for data correction or ‘CANCEL’ to terminate the process. The underwriter can choose the outcome as VERIFY if the credit bureau or vehicle evaluator details are included.
On successful completion a message, stating that the task is successfully completed, gets displayed.
To acquire the next stage, you need to go to the ‘Task’ menu and select ‘Assigned’ under ‘Standard’ option. All tasks that have been successfully completed are listed in the right side of the screen. Select the check box against your ‘Workflow Ref No’ and click ‘Acquire’ button at the top of the screen to acquire the next stage of the task.
The system displays the system message as “Acquire Successful”.
Click ‘Ok’ to proceed to the next stage. To select the acquired task for the next stage, select ‘Acquired’ under ‘Standard’ option in the ‘Task’ menu. All the tasks that have been successfully acquired are displayed in the right side of the screen. Search for your workflow reference number and click the ‘Workflow Ref No’ to open ‘Corporate Loan Approval’ screen.
2.11 Loan Approval
In the Loan Approval stage, the approver verifies the loan application, analyzes the applicant’s financial status, credit rating and field investigation reports and based on the credit worthiness of the customer approves the loan offered to the customer.

The approver can send the application back to the previous stage if the information provided is not adequate or choose to cancel it if the information captured is not satisfactory.
If the application details are verified successfully, the approver can proceed with the processing of the application by selecting ‘PROCEED’ as the Outcome. The approver can select ‘RETURN’ to return the process to previous stage for data correction or ‘CANCEL’ to terminate the process.
On successful completion, a message stating that the task is successfully completed gets displayed.
To acquire the next stage, you need to go to the ‘Task’ menu and select ‘Assigned’ under ‘Standard’ option. All tasks that have been successfully completed are listed in the right side of the screen. Select the check box against your ‘Workflow Ref No’ and click ‘Acquire’ button at the top of the screen to acquire the next stage of the task.
The system displays the system message as “Acquire Successful”on successful acquisition of the task.
Click ‘Ok’ to proceed to the next stage. To select the acquired task for the next stage, select ‘Acquired’ under ‘Standard’ option in the ‘Task’ menu. All the tasks that have been successfully acquired are displayed in the right side of the screen. Search for your workflow reference number and click the ‘Workflow Ref No’ to open ‘Corporate Loan Document Verification’ screen.
Any advices maintained for this stage are generated after the completion of the stage.
2.12 Document Verification
In the Document Verification stage, the documents captured in the previous stages are verified. It is ensured that all documents in the checklist maintained are obtained from the customer. In this stage, the application and applicant information captured as part of the previous stages undergoes a final verification.

The verifier can choose to send the application back to the previous
stage if the information provided is not adequate or choose to cancel it if the information captured is not satisfactory.
If the applicant, application and document details are verified successfully, the verifier can proceed with the processing of the application by selecting ‘PROCEED’ as the Outcome. The verifier can select ‘RETURN’ to return the process to underwriting stage for data correction or ‘CANCEL’ to terminate the process.
On successful completion, a message stating that the task is successfully completed gets displayed. The customer, customer account, collateral, facility, and so on are created in the system on completion of the Document verification stage.
2.13 Manual Retry
This stage is optional. Task is moved to this stage only when the system is unable to create Customer/ Customer Account/ Liability/ Facility/ Collateral/ pool/ Loan. You can make the necessary changes and retry. You can select the outcome as ‘PROCEED’.