Mask Editor
The Mask editor is located in the Admin Explorer in the Administration folder. It is used to create the input and output values for the mask. A security level can also be assigned to the mask.
Steps to Create a Mask
-
Navigate to Admin Explorer | Administration | Masks.
-
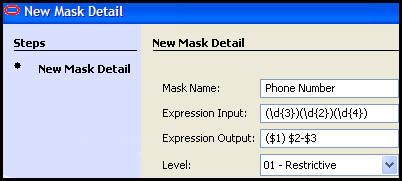
Right-click on the Masks folder and click New Mask Detail. The Mask Editor will display.
-
Type a mask name.
-
Type an input value. The input must be a regular expression. The regular expression will validate the type of characters and the number of characters entered in OIPA. The regular expression also defines how the input characters are grouped. Refer to the Mask Formats section for additional information.
-
Type an output value. This tells OIPA how to display the input by the defined groups and supplied characters such as hyphens, parenthesis, etc. Refer to the Mask Formats section for additional information.
-
Select a security level for the mask. Security levels are defined in AsCodeMaskSecurityLevel. Use the AsCode editor to update these levels.
-
Click Finish and check-in the file to save the changes to the database.

New Mask Detail Wizard
| Important | Once a mask has been created, its name cannot be edited. |
Create Multiple Security Levels for a Mask
Once a mask is created, multiple levels of security can be assigned. For example, a phone number mask may have several security levels, according to the input/output value. To add additional security levels, right-click on the mask name and select New mask level for Mask Name. All mask levels will display below the Mask name in the Mask editor folder.

New Mask Level Right-Click Option
Delete a Mask or Mask Security Level
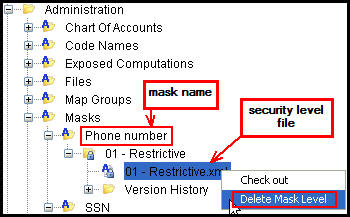
A mask security level may be deleted when a user opens the security level folder under the Mask name and right-clicks on the security level file and selects Delete Mask Level. If all mask levels are deleted, then the Mask name folder will be removed from the parent Mask folder.
Delete Mask Right-Click Option

