9. Monitors and Batches
9.1 Introduction
This chapter deals with the various monitors and batches provided by the Application and contains the following sections:
Monitor Screens
- Section 9.2, "Sweep Monitor"
- Section 9.3, "BVT Monitor"
- Section 9.4, "Reverse Sweep Monitor"
- Section 9.5, "MBCC Monitor"
- Section 9.6, "Interface Monitor"
- Section 9.7, "Job Scheduler"
Batch Screens
- Section 9.8, "Sweep Batch"
- Section 9.9, "Pool Batch "
- Section 9.10, "EOD Batch "
- Section 9.11, "Manual Customer Purge"
- Section 9.12, "Manual User Purge"
9.2 Sweep Monitor
This Monitor enables user to view the Sweep details.To invoke this screen, click ‘Monitor’ tab on the application and select ‘Sweep Monitor’.
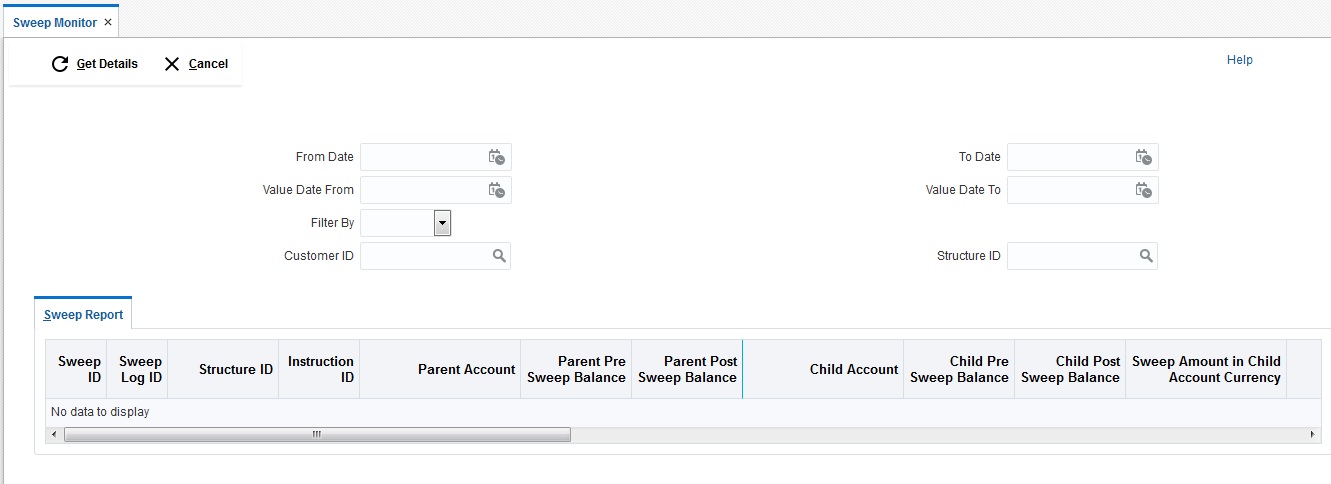
You can enter the following details:
From Date
Specify the start date from which to view the batches.
To Date
Specify the end date till which to view the batches.
Value Date From
Specify the value date from which to view the batches.
Value Date To
Specify the value date to till which to view the batches.
Filter By
Select the filtering criteria of the output from the drop down menu. The options are:
- All
- Exceptions
- Pending
- Success
Customer ID
Specify the customer ID for which the batches are to be viewed. You can select the customer ID from the option list.
Structure ID
Specify the structure ID for which the batches are to be viewed. You can select the structure
ID from the option list. The list displays all the structure IDs maintained in the system. Click ‘Get Details’ button to view the result below.
The report generated displays the following
Column |
Description |
Sweep ID |
Displays the sweep ID used to query transaction details and account information |
Sweep Log ID |
Displays the Sweep Log ID |
Structure ID |
Displays the structure ID of the executed structure |
Sweep Instruction ID |
Displays the sweep instruction ID that was executed |
Parent Account |
Displays the parent account number |
Parent Pre Sweep Balance |
Displays the balance in the parent account before the execution of the sweep |
Parent Post Sweep Balance |
Displays the balance in the parent account after the execution of the sweep |
Child Account |
Displays the child account number |
Child Pre Sweep Balance |
Displays the balance in the child account before the execution of the sweep |
Child Post Sweep Balance |
Displays the balance in the child account after the execution of the sweep |
Sweep Amount in Child Account CCY |
Displays the sweep amount in child account currency |
Value Date |
Displays the value date of the execution |
Two Way |
Displays if the sweep is a two way sweep. The values displayed are ‘Y’ or ‘N’ |
Status |
Displays the status of the sweep. The values displayed can be ‘S’, ‘P’ or ‘E’ representing Success, Pending and Exception respectively. |
Message |
Displays any exception message generated |
Log Time Stamp |
Displays the system time of the sweep execution |
Mode |
Displays the mode of the sweep execution |
Payment Initiated Time- stamp |
Displays the Payment Initiated Timestamp |
Payment Acknowledgment Time- stamp |
Displays the Payment Acknowledgment Timestamp |
Payment Message |
Displays the Payment Message |
9.3 BVT Monitor
This enables user to view the back value dated transactions executed. To invoke this screen, click ‘Monitor tab on the application and select ‘ BVT Sweep Monitor’.
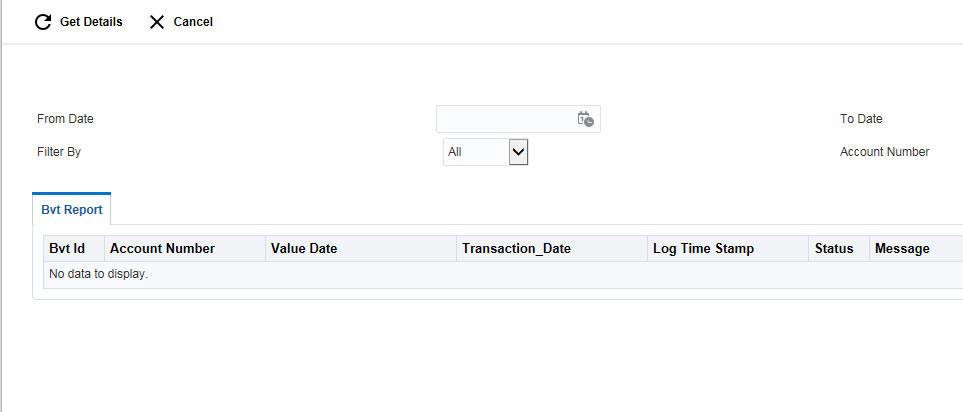
You can enter the following details:
From Date
Specify the start date from which to view the batches.
To Date
Specify the end date till which to view the batches.
Filter By
Select the filtering criteria of the output from the drop down menu. The options are:
- All
- New
- Exceptions
- Pending
- Success
Account Number
Specify the account number for which the BVT details need to be viewed.
9.3.1 BVT Report
You can view the following details in this section:
Column |
Description |
BVT ID |
Displays the BVT ID Account |
Number |
Displays the account number |
Value Date |
Displays the value date of the transaction |
Transaction Date |
Displays the execution date of the transaction |
Log Time Stamp |
Displays the time at which the transaction executed |
Status |
Displays the status of the BVT. The values can be SUCCESS, PENDING or EXCEPTION |
Message |
Displays the exception message |
Amount |
Displays the amount in the transaction |
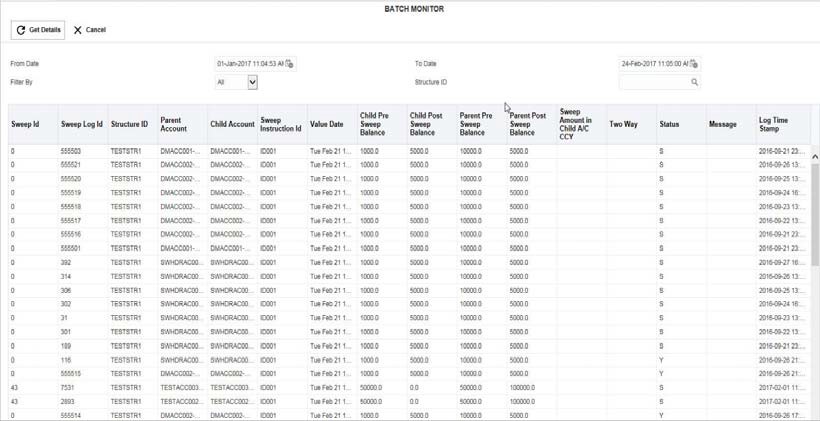
9.4 Reverse Sweep Monitor
This Monitor enables user to view the Reverse Sweep executed in the system for a particular date. To invoke this screen, click ‘Monitor’ tab on the application and select ‘Reverse Sweep Monitor’.

You can enter the following details:
From Date
Specify the start date from which to view the batches.
To Date
Specify the end date till which to view the batches.
Filter By
Select the filtering criteria of the output from the drop down menu. The options are:
- All
- New
- Exceptions
- Pending
- Success
Structure ID
Specify the structure ID for which the batches are to be viewed. You can select the structure ID from the option list.
You can view the following details in this section:
Column |
Description |
Structure ID |
Specify the structure ID for which the batches are to be viewed. You can select the structure ID from the option list. |
Reverse Sweep Log Id |
Displays the Reverse Sweep Log ID |
Structure ID |
Displays the structure ID of the executed structure |
From Account |
Displays the From account number |
To Account |
Displays the To account number |
Amount |
Displays the amount. |
Value Date |
Displays the value date of the execution |
9.5 MBCC Monitor
This Monitor enables user to view the MBCC transaction for a Customer for a structure ID for a selected date range.
To invoke this screen, click ‘Monitor’ tab on the application and select ‘MBCC Monitor’.

You can enter the following details:
Customer ID
Enter the customer ID to view the MBCC.
Structure ID
Specify the structure related to selected Customer ID.
Origin Account Number
Specify the Origin account number
Destination Account Number
Specify the Destination account number
From Date
Specify the start date from which to view the MBCC.
To Date
Specify the end date till which to view the MBCC. You can view the following details in this section:
Column |
Description |
Structure ID |
Displays the Structure ID |
Structure Description |
Displays the Structure Description |
Origin Account Number |
Displays the Origin Account Number |
Origin Account Description |
Displays the Origin Account Description |
Origin Branch Code |
Displays the Origin Branch Code |
Origin Branch Name |
Displays the Origin Branch Name |
Origin Currency Code |
Displays the Origin Currency Code |
Sweep Concentration |
Displays the Sweep Concentration Method |
Destination Account Number |
Displays the Destination Account Number |
Destination Account |
Displays the Destination Account Description |
BIC Code |
Displays the BIC Code |
Destination Branch Name |
Displays the Destination Branch Name |
Destination Currency |
Displays the Destination Currency |
Event Code |
Displays the Event Code |
Event Description |
Displays the Event Description |
Direction |
Displays the Direction |
Event Date |
Displays the Event Date |
Status |
Displays the Status |
Exception Message |
Displays the Exception Message |
9.6 Interface Monitor
This Monitor enables user to view the external system wise Interface details for the given dates. To invoke this screen, click ‘Monitor’ tab on the application and select ‘Interface Monitor’.
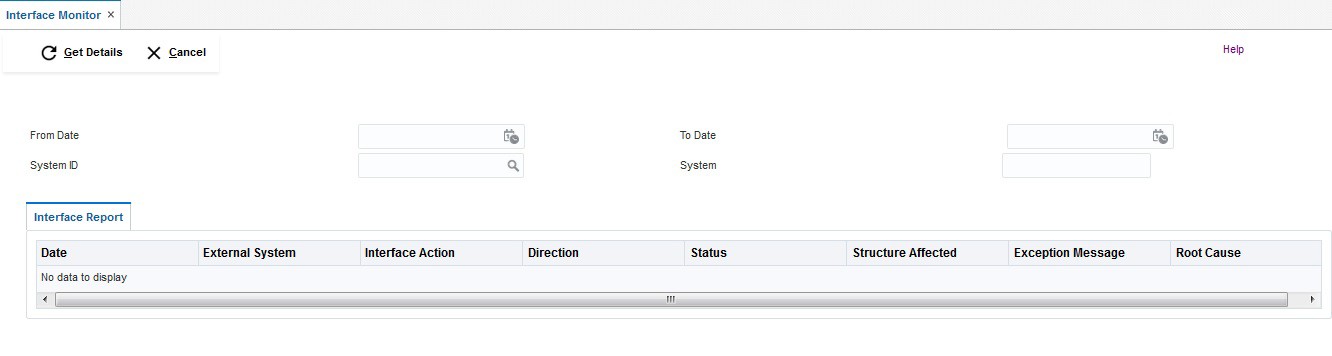
From Date
Specify the start date from which to view the MBCC.
To Date
Specify the end date till which to view the MBCC.
System ID
Specify the unique system ID
System
System name populates on selection of System ID.
9.7 Job Scheduler
Column |
Description |
Date |
Displays the date |
External System |
It displays the External System of the interface |
Interface Action |
It displays the Interface Action |
Direction |
It displays the Direction |
Status |
It displays the Status of Interface Structure |
Affected |
It displays the Which Structure Affected |
Exception Message |
It displays the if any Exception Message is there |
Root Cause |
It displays the Root Cause |
Job Scheduler is a view screen which displays the scheduled Job frequency. .To invoke this screen, click ‘Monitor’ tab on the application and select ‘Job Scheduler.’.

You can enter the following details here:
Job Code
Specify the job code for which the scheduler is to run.You can select the job code from the option list. The list displays all the job codes maintained in the system
Job Name
The system displays the name of the job selected.
Job Description
The system displays the description for the selected job.
9.7.1 Service Parameters
Click ‘Get Details’ button to view the parameters details in this section.
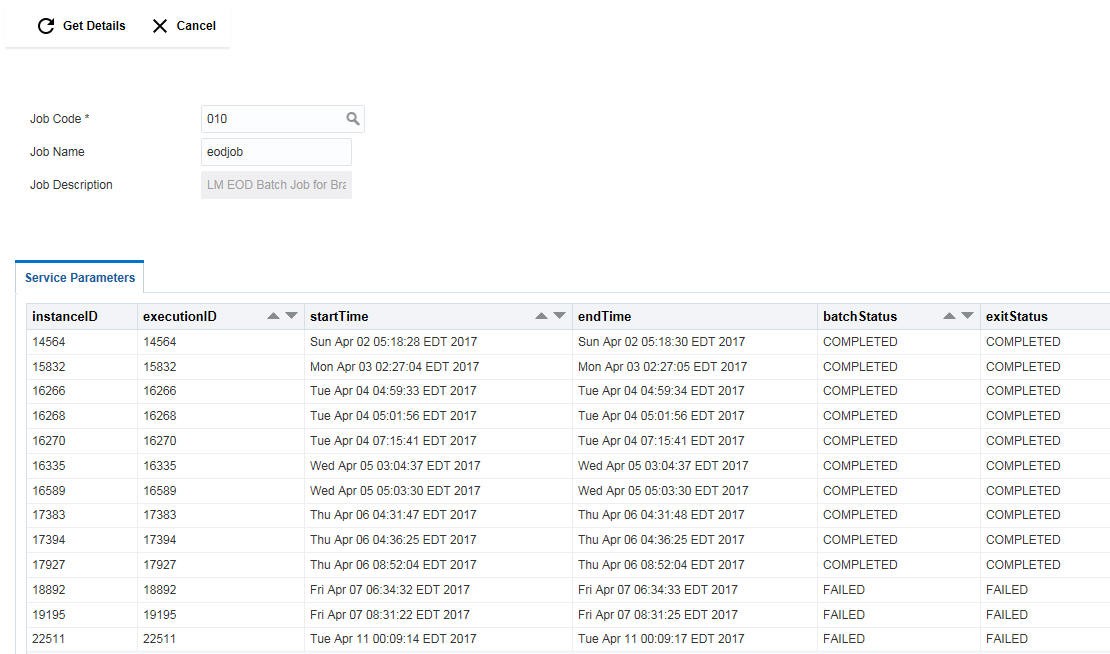
You can view the following details:
Column |
Description |
Instance ID |
Displays the Instance ID |
Execution ID |
Displays the Execution ID |
Start Time |
Displays the start time of the batch |
End Time |
Displays the end time of the batch |
Batch Status |
Displays the status of the batch execution. The values displayed can be ‘RUNNING’, ‘FAILED’ or ‘COMPLETED’. |
Exit Status |
Displays the exit status of the batch. The values displayed can be ‘FAILED’ or ‘COMPLETED’. |
Click ‘Cancel’ to close the page.
9.8 Sweep Batch
This screen is used to invoke a sweep batch manually. To invoke this screen, click ‘Batch’ tab on the application and select ‘Sweep Batch.’.
You can enter the following details here:
Customer ID
Specify the customer ID for which manual batches are to be run.You can select the customer
ID from the option list. The list displays all the customer IDs maintained in the system
Customer Name
The system displays the name of the selected customer.
Structure ID
Specify the structure ID for which manual batches are to be run.
Override Pending Sweep
Select this if user wants to override the pending sweep.
Click ‘Get Details’ button to view the structures linked to the customer ID and accounts linked to each structure.

Structures
You can view the following details in this section:
Column |
Description |
Structure ID |
Displays the structure ID Structure |
Description |
Displays the description for the structure |
Effective Date |
Displays the date from which the structure is effective |
Version Number |
Displays the version number of the structure |
Accounts
Click on a Structure ID row to view the details of accounts linked to the structure. You can view the following details in this section:
Column |
Description |
Account Number |
Displays the account number |
Branch |
Displays the branch to which the account belongs |
Currency |
Displays the currency of the account |
Available Balance |
Displays the available balance in the account |
Click ‘Select’ check box to select the structure IDs and click ‘Run’ button to execute the selected structures.
9.9 Pool Batch
This screen is used to invoke a Pool batch manually. To invoke this screen, click ‘Batch’ tab on the application and select ‘Pool Batch.’.
To invoke Pool Batch Status screen, click ‘Batch’ tab on the application and select ‘Pool Batch
Note:- If the Pool batch is invoked manually for a Structure, the End of the day Auto-Pool Batch will ignore the Structure for the day and will not process the pool transaction.

9.9.1 Initiating Pool for Branch
To invoke or reset pool for a branch, click ‘Initiate Pool For Branch’ button.
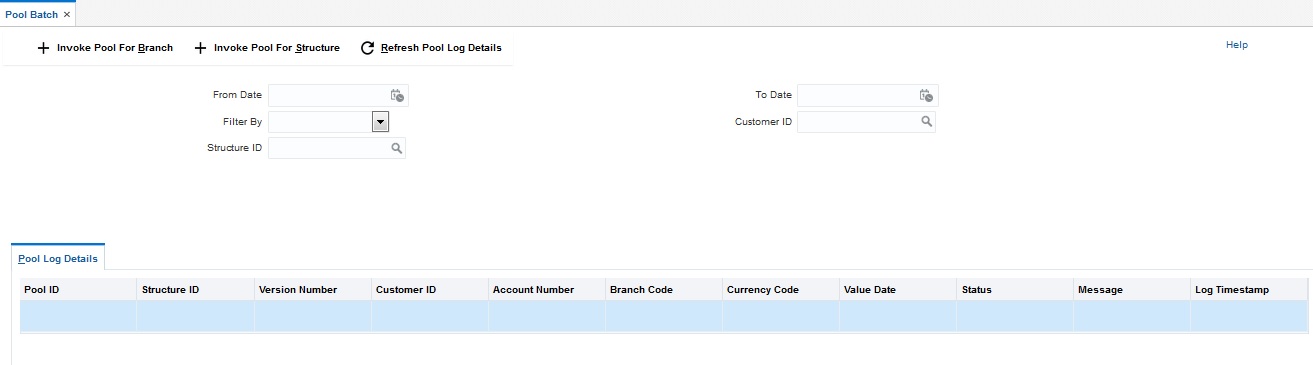
Branch Identifier
Specify the branch for which the pool has to be executed or reset. You can also select the branch code from the option list.The list displays all the branch codes maintained in the system.
Branch Description
The system displays the description for the selected branch.
From Date
Specify the start date from which to view the batches.
To Date
Specify the end date till which to view the batches.
Filter
Select the filtering criteria of the output from the drop down menu. The options are:
- Success
- Failure
Structure ID
select the Structure ID for which the structure has to be executed.
Customer ID
Displays Customer ID.
9.9.1.1 Invoke Pool Batch
Click on ‘Invoke Pool Batch’ button to start the pool batch for the selected branch.You get a message saying ‘Pool Batch for the selected branch has started’. Click ‘OK’.
9.9.1.2 Reset Pool Batch
Click on ‘Reset Pool Batch’ button to reset the pool batch for the selected branch.You get a message saying ‘Pool Batch for the selected branch is reset’. Click ‘OK’.
Click ‘Cancel’ to cancel the page and go back to the home page.
9.9.2 Initiating Pool for Structure
To invoke or reset pool for a structure, click ‘Initiate Pool For Structure’ button.

Structure ID
Specify the structure for which the pool has to be executed or reset. You can also select the structure ID from the option list.The list displays all the structure IDs maintained in the system.
Structure Description
The system displays the description for the selected structure.
Customer ID
The system displays the customer ID associated with the selected structure.
Version No
The system displays the version number of the selected structure.
9.9.2.1 Invoke Pool Batch
Click on ‘Invoke Pool For Structure’ button to start the pool batch for the selected structure.You get a message saying ‘Pool Batch for the selected structure has started’. Click ‘OK’.
9.9.2.2 Reset Pool Batch
Click on ‘Reset For Structure’ button to reset the pool batch for the selected structure.You get a message saying ‘Pool Batch for the selected structure is reset’. Click ‘OK’.
Click ‘Cancel’ to cancel the page and go back to the home page.
9.9.3 Refreshing Pool Log Details
Click on ‘Refresh Pool Log Details’ button to view the pool log details.
9.9.4 Pool Log Details
You can view the following details under the Pool Log Details section:
Column |
Description |
Pool ID |
Displays the pool ID |
Log Time |
Displays the log time |
Structure ID |
Displays the ID of the structure being executed |
Version |
Displays the version of the structure |
Customer |
Displays the name of the customer |
Parent Account |
Displays the parent account number |
Parent Branch |
Displays the branch to which the parent account belong to |
Parent Currency |
Displays the currency of the parent account |
Status |
Displays the status of the execution |
Status Message |
Displays the status message |
Value Date |
Displays the value date of execution |
9.9.5 Pool Contributions
You can view the following details under the Pool Contributions section:
Column |
Description |
Child Account |
Displays the child account number |
Child Branch |
Displays the branch of the child account |
Child Currency |
Displays the currency of the child account |
Forex Rate |
Displays the Forex rate fixed |
Contribution |
Displays the amount contributed by the child account |
Value Date |
Displays the value date of the execution |
9.10 EOD Batch
LM system allows you to perform EOD operations manually using the EOD batch screen. The EOD tasks are performed in a given order for a given branch. The order of jobs invoked during the EOD is as below:
- BVT Sweep
- EOD Sweep of Account Pairs
- EOD Sweep of Structures
- EOD Pool
- EOD IC
- EOD Date Flip
To invoke EOD Batch Status screen, click ‘Batch’ tab on the application and select ‘EOD Batch ’ ;
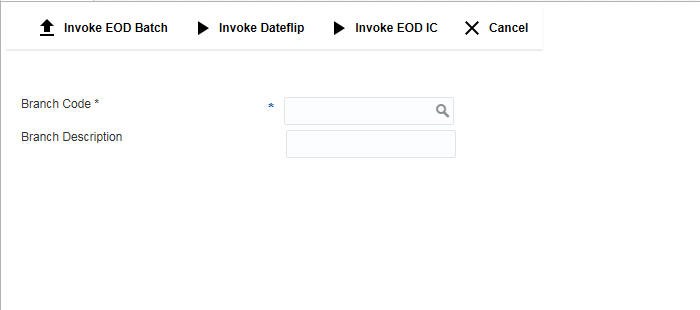
9.10.1 Invoking EOD Batch
Enter the following details:
Branch Code
Specify the branch for which the EOD is to be initiated. You can also select the branch code from the option list.The list displays all the branch codes maintained in the system.
Branch Description
The system displays the description for the selected branch code.
Click ‘Invoke EOD Batch’ button to initiate EOD batch. System displays a message saying
‘EOD batch for selected branch has started.’
9.10.2 Invoking Date Flip
Select the branch for which the date flip has to be done from the option list.
Click on ‘Invoke Date Flip’ button to move the application to the next working date. Click ‘Cancel’ button to close the current page and view the home page.
9.10.3 Invoking EOD IC
Select the branch for which the EOD IC has to be done from the option list. Click on ‘Invoke EOD IC’ button to start the EOD IC for the selected branch Click ‘Cancel’ button to close the current page and view the home page.
9.10.4 Viewing EOD Status
To view the status of the EOD jobs executed, you can fetch the details using Job Scheduler.
For more information on ‘Job Scheduler’ refer to the section ‘““Job Scheduler” on page 7’ in this User Manual.
9.11 Manual Customer Purge
Manual Customer Purge screen is invoked to purge the closed customer data, User can select the list of closed customers to be processed under this Operation.
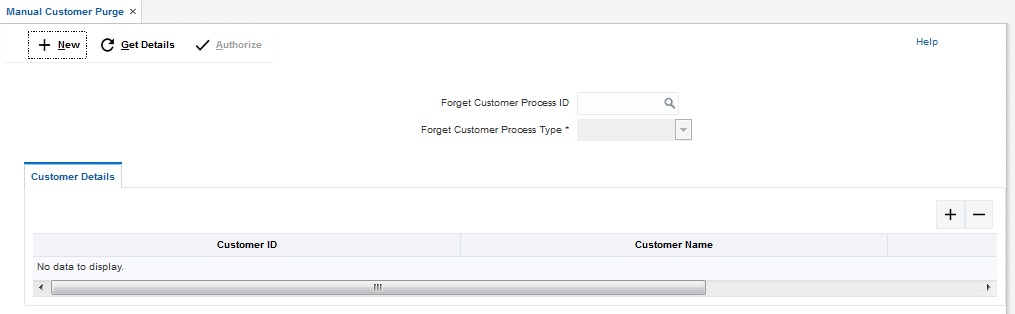
Forget Customer Process ID
Specify a unique Forget Customer Process ID.
Forget Customer Process Type
Select the Forget Customer Process Type from the drop down list.
Customer No
Specify additional parameters if any. Click '+' to add a row and select the Customer Number, Value of the same. Click '-' to remove a row.
Customer Name
Specify the name of Customer.
Status
Specify the record status of customer.
9.12 Manual User Purge
Manual User Purge screen is invoked to purge the closed User data, Operation Manager can select the list of closed User to be processed under this Operation.
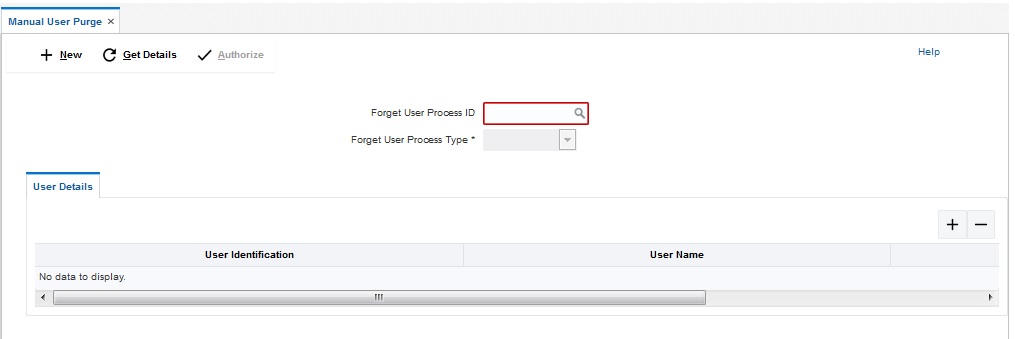
Forget User Process ID
Specify a unique Forget User Process ID.
Forget User Process Type
Select the Forget User Process Type from the drop down list.
User ID
Specify additional parameters if any. Click '+' to add a row and select the User Number, Value of the same. Click '-' to remove a row.
User Name
Specify the name of User.
Status
Specify the record status of User.