3. Maintaining Reference Information
This chapter contains the following sections:
- Section 3.1, "Maintaining Information"
- Section 3.2, "Defining Sectors"
- Section 3.2, "Defining Sectors"
- Section 3.3, "Clearing Bank Codes Maintenance"
- Section 3.4, "Clearing Branch Parameters"
- Section 3.5, "Clearing Cut-off Time Maintenance"
- Section 3.6, "Inward Clearing Scan Pass/Reject Cut-off"
- Section 3.7, "Inward Clearing Scan Pass/Reject Branch Cut off Maintenance"
- Section 3.8, "Clearing House Maintenance"
- Section 3.9, "Clearing House Holiday Maintenance"
- Section 3.10, "Clearing House End Point Maintenance"
3.1 Maintaining Information
This section contains the following topics:
- Section 3.1.1, "Processing Clearing Transactions"
- Section 3.1.2, "Maintaining Clearing Details of your Bank"
3.1.1 Processing Clearing Transactions
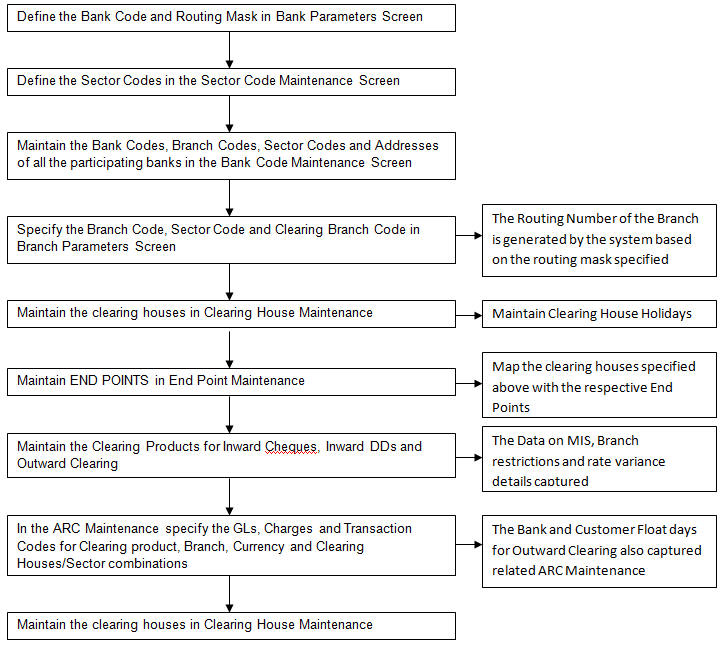
In order to process clearing transactions automatically, you need to maintain some information in Oracle FLEXCUBE:
- Specify the code by which your bank is identified in the Clearing House and define a Routing Mask for generation of routing numbers (as part of Bank-wide Parameters)
- Maintain Sectors
- Maintain details of banks participating in the Clearing House
- Maintain clearing information for the branches of your bank (Branch Parameters)
- Maintain Clearing Houses and Clearing House Holidays
- Identify End Points and map them to the clearing houses maintained
- Setup Outward and Inward Clearing Products
- Specify account, rates, and charge details (ARC Maintenance)
Once you set up this information, the appropriate customer and clearing accounts maintained in your bank will automatically be credited or debited, depending on the nature of the transaction.
The sequence is represented diagrammatically as follows:
3.1.2 Maintaining Clearing Details of your Bank
For Oracle FLEXCUBE to handle clearing transactions, you have to capture clearing information at the Head Office of your bank. This information would apply to all the branches of your bank. You can maintain clearing-related information for your bank in the ‘Bank-wide Parameters’ screen, invoked from the Application Browser.
In the Clearing Bank Code field, specify the code by which your bank is identified in the Clearing Network you participate in. The code you specify for your bank in this screen has to the same as that specified for your bank in the Clearing Bank Code Maintenance screen. In addition to specifying the clearing code that identifies your bank, you have to specify a “Routing Mask” for your bank. A mask defines the manner in which a Routing Number is generated for your bank. It is on the basis of the routing number that Oracle FLEXCUBE processes inward clearing transactions.
The following is a typical mask format: ‘BBBbbbSSS’, wherein, ‘BBB’ indicates the bank code, ‘bbb’ indicates the branch, and ‘SSS’ indicates the sector to which the branch belongs. On the basis of the routing number, inward clearing transactions are routed to the appropriate branch of your bank.
For more details about the Bank-wide Parameters screen, refer the Core Services user manual.
3.2 Defining Sectors
This section contains the following topic:
3.2.1 Invoking Sector Code Maintenance Screen
In Oracle FLEXCUBE, you can identify specific geographical areas as ‘sectors’. A sector encompasses the branches of the various banks in the geographical area.
As part of the maintenance required to process clearing transactions in Oracle FLEXCUBE, you need to identify various sectors. You can do this in the ‘Sector Code Maintenance’ screen. You can invoke this screen by typing ‘STDSECMN’ in the field at the top right corner of the Application tool bar and clicking on the adjoining arrow button.
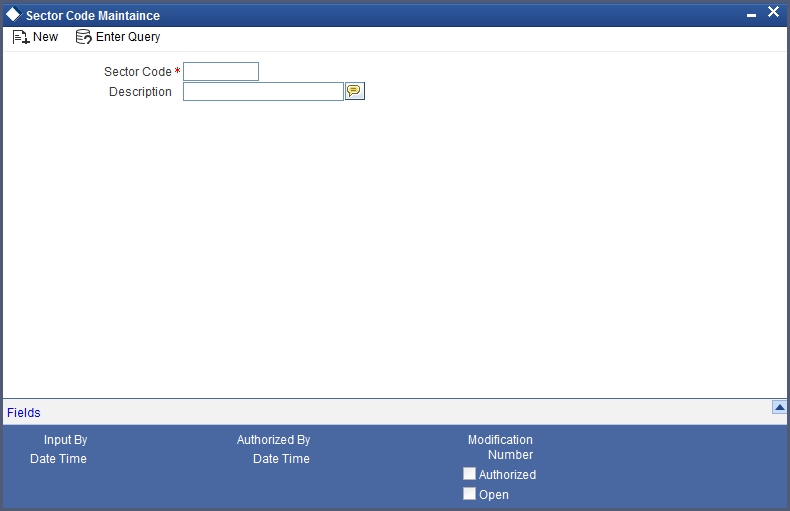
Identify a sector with a unique code. In the Description field, briefly describe the sector that you are maintaining. With the sector code and description that you enter, you should be able to identify the sector.
Note
The sectors are typically maintained at the Head Office.
3.3 Clearing Bank Codes Maintenance
This section contains the following topic:
3.3.1 Invoking Bank Code Maintenance Screen
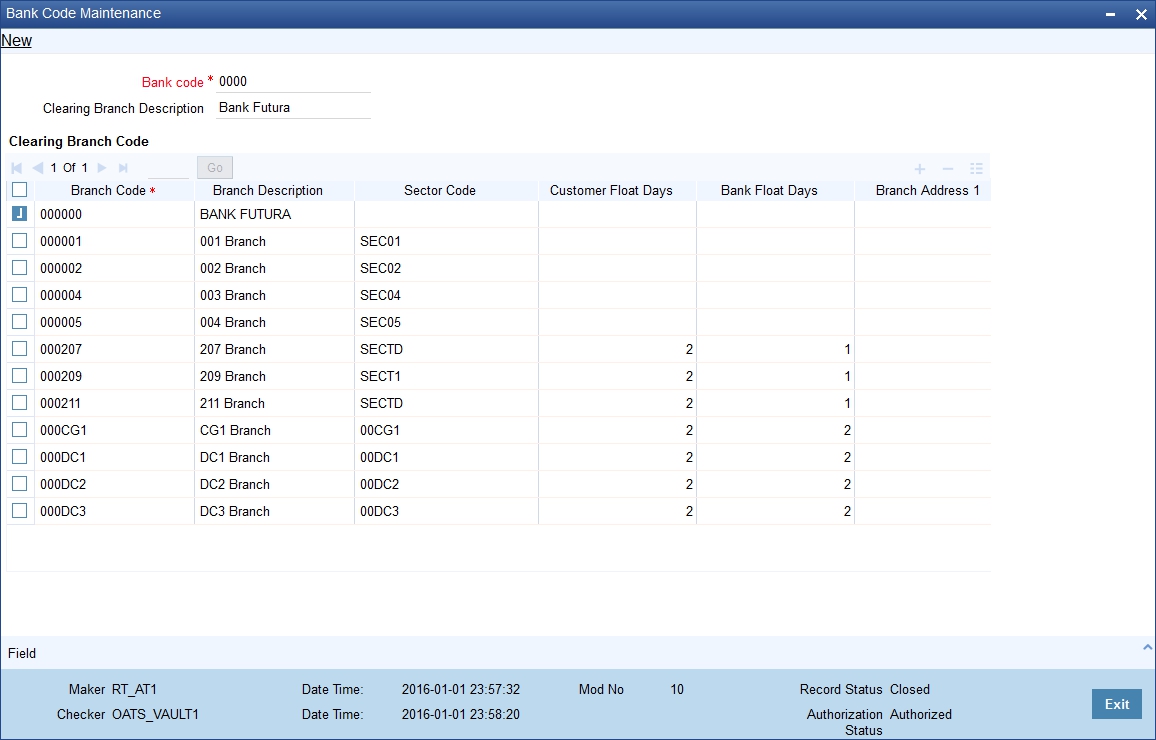
You have to capture clearing details of every bank participating in the Clearing Network in the ‘Clearing Bank Codes Maintenance’ screen. You can invoke this screen by typing ‘DEDBNKCD’ in the field at the top right corner of the Application tool bar and clicking on the adjoining arrow button.
The information you capture in this screen is required to route outward clearing transactions to the appropriate clearing house.
In-house cheque deposit having exceptions or having float days maintained for high value can be initiated using the outward clearing transaction screens.
Every bank participating in the Clearing network is identified with a unique code. In this screen, capture the code of the participating bank, and enter a brief description that will help you easily identify the bank. You also have to capture the following information for every branch of a participating bank:
- The Branch Code (as identified in the network)
- A brief description of the branch
- The sector to which it belongs
- The customer float days
- The float days for bank and sector code combination
- The branch address
Country
Specify the country of the bank code. This adjoining option list displays all valid country codes maintained in the system. You can choose the appropriate one.
Note
The country information is captured to enable Mantas to analyze the transactions for possible money laundering activities.
For more details on Mantas, refer 'Mantas' interface document.
You can maintain different Float days for each bank and sector code combination. Subsequently, you can also maintain float days for customers of each bank and sector combination. The float days you define here will be defaulted in the Customer Float Days maintenances screen.
Refer to the Core Entities user manual under section Maintaining Float Days for Outward Clearing Customer Transactions for further details.
The system calculates the value date for the clearing transaction in the following manner:
- Firstly, the system checks for the branch code for the clearing transaction, clearing product, sector code, currency of the instrument and the float days for bank and customer maintained in ARC maintenance.
- Secondly, the system checks the maintenance for clearing bank, and if the details for the destination sector code, bank code and branch code and float days (for both customer and bank) is maintained, these values take precedence over the details in ARC maintenance.
- Finally, system verifies the details maintained in the Customer level float maintenance for the clearing transaction, branch code, currency, sector code, clearing product code and the customer group to which the customer belongs to and arrives at the float days to calculate the value date.
After you maintain the above details for a branch, click ‘Add’ button to capture the details of the next branch.
3.3.1.1 Maintaining Details of Branches of Your Bank
In this screen, in addition to capturing information relating to other banks, you have to maintain clearing information for your bank and the branches of your bank.Capture the code that identifies your bank in the Clearing Network. To every branch of your bank (the Branch Codes maintained in Oracle FLEXCUBE), assign the code that identifies it at the Clearing Network.
Note
The clearing bank code that identifies your bank at the Clearing Network should be the same as that specified in the Bank Wide Parameters screen. Also, the branch code and sector that identifies a branch at the Clearing Network should be the same as that specified for the branch in the Branch Parameters screen.
3.3.1.2 Maintaining Clearing Details of Branch
To facilitate automatic clearing of instruments that involve your branch, you need to specify clearing-related options for your branch. To do this, you can invoke the ‘Branch Parameters’ screen from the Application Browser.
In the Branch Code for Clearing field, indicate the code that identifies your branch in the Clearing Network. The code you specify for your branch should be the same as that defined in the Clearing Bank Code Maintenance screen. For your branch, you must also specify the Sector Code, as specified in the Clearing Bank Code Maintenance screen. Finally, if clearing transactions involving your branch must be routed through another branch, specify the Oracle FLEXCUBE branch code of that branch in the Clearing through Branch field.
On the basis of the Routing Number Mask defined for your bank, and your specifications in this screen, Oracle FLEXCUBE automatically generates the Routing Number for clearing transactions involving your branch in the Routing Number field. This routing number is used to resolve outward clearing transactions.
For example, if you (Westside Bank, Seattle branch) issue a Demand Draft (DD) that is payable at an outstation branch of, say, Friendly Neighborhood Bank, Nashville, based on the routing number, the DD, if presented at any other bank in Nashville, will be sent to Friendly Neighborhood Bank for clearing and not your bank and branch.
For more details about the Branch Parameters screen, refer the Core Services user manual.
3.4 Clearing Branch Parameters
This section contains the following topic:
3.4.1 Invoking Clearing Branch Parameters
You can maintain the clearing cut-off time for the branch using the ‘Clearing Branch Parameters Maintenance’ screen. You can invoke this screen by typing ‘CGDBRNPM’ in the field at the top right corner of the application tool bar and clicking on the adjoining arrow button.
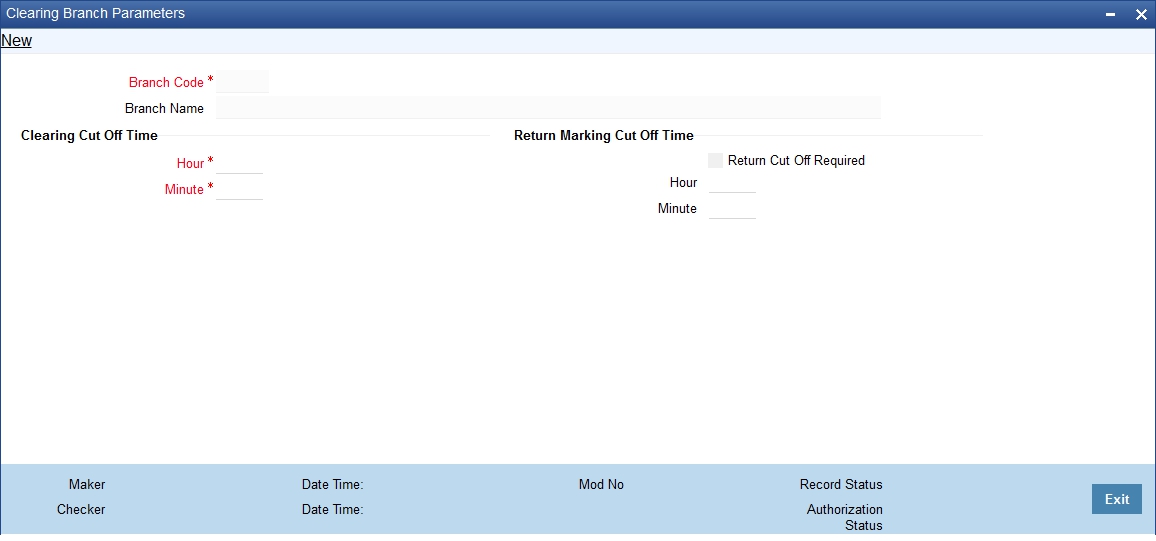
Branch Code
System displays the current branch code here; however, you can select the branch code from the adjoining option list.
Branch Name
System displays the selected branch name here.
Clearing Cut Off Time
Hour
Specify the clearing hour for the cut-off time in 24 hours clock.
Return Marking Cut-Off time hour is captured in 24 hour format.
Min
Specify the clearing minutes for the cut-off time.
Note
Time specified here will be the daily cut off time for the clearing transactions in the branch.
Transactions input after the specified time, will not be processed on the same day and will take one additional day to arrive at the credit value date; however, you can manually reverse the transaction to process it on the same day.
Return Marking Cut Off Time
Hour
Specify hours for the cut-off time of return marking of outward cheque in 24 hours clock.
Minute
Specify minutes for the cut-off time of return marking of outward cheque.
Note
Return marking is allowed in non-clearing branches until the return marking cut-off time before the value date of the outward clearing transaction.
3.5 Clearing Cut-off Time Maintenance
This section contains the following topic:
3.5.1 Invoking Clearing Cut-off Time Maintenance Screen
You can maintain the clearing cut-off time for the current day of the branch using the ‘Clearing cut-off time Maintenance’ screen. You can invoke this screen by typing ‘CGDLTCLG’ in the field at the top right corner of the application tool bar and clicking on the adjoining arrow button.

Branch Code
System displays the current branch code here. You can select the branch code from the adjoining option list.
Branch Name
System displays the selected branch name here.
Current Date
System displays the current date here.
Click ‘P’ button to populates the clearing cut off time maintained in the ‘Clearing Branch Parameter’ screen.
Clearing Cut Off time
Hour
Specify the clearing hour for the cut-off time in 24 hours clock.
Min
Specify the clearing minutes for the cut-off time.
Note
Time specified here will be applicable only for the current day cut off time for the clearing transactions in the branch.
Click ‘P’ button to populate current date, clearing cut-off hour, and Minute maintained in the ‘Clearing Branch Parameters’ screen. If the cut off time has been advanced or extended for the specific day, system will take the cut off time maintained here. If the cut off time is not maintained here, then system considers the cut off time maintained at the branch level.
Return Marking Cut Off Time
Hour
Specify hours for the cut-off time of return marking of outward cheque in 24 hours clock.
Minute
Specify minutes for the cut-off time of return marking of outward cheque.
Note
- Return marking is not allowed after the cut off time maintained.
- If Return marking is maintained in Clearing Branch parameters and Late Clearing is maintained for specific day, then the system takes the cut off time maintained for the specific day.
- If Return marking is not maintained in Late Clearing and is maintained for specific day, then the system takes the cut off time from Clearing Branch parameters.
In non clearing branches return marking is allowed, until the return marking cut-off time and before the value date of the outward clearing transaction.
3.5.1.1 Reversal of Cut-off time for Outward Clearing
The outward clearing transactions posted before and on the original cut-off time for the day are processed as normal clearing transactions, while those posted after the original cut-off time for the day would be processed as late clearing transactions.
Value Date of the Clearing Transactions Posted before the Original Cut-Off Time
The customer value date = Current date + customer float days arrived
The bank value date = current date + bank float days arrived
Value Date of the Clearing Transactions Posted after the Original Cut-Off Time
current date + customer float days arrived + bank float days arrived+ additional float day
However; if the cut-off time of any outward clearing transaction is extended or changed, you can execute the clearing cut-off time revision batch, CGBCTREV, which is maintained as Intraday Batch to process the reversal of cut-off time on existing transactions.
Note
The system will not prompt you to execute the batch
When the cut-off time for the day is changed at ‘Cut-off Time Maintenance’ level, the system logs and stores the cut-off time change. CGBCTREV batch is run after the revision of the cut-off time for the day.
Note
Clearing cut-off time revision batch should be run before the new cut-off time. If the cut-off revision batch is run after the new cut-off time, System would not reverse the cut-off for the transactions.
In the CGBCTREV batch, the system will pick up all the late clearing transactions which are processed between original cut-off time and the current cut-off time and reverse the cut-off time for the clearing transaction.
The system will reverse the accounting entries for the original value date and book new accounting entries with new value date.
Note
Cut-off time revision batch would not reverse cut-off time on the transactions which are posted with late clearing product. i.e., with the clearing product with ‘late clearing’ option set. Cut-off time can only be extended and it cannot be set to expired time.
The accounting entries for the original entry with the original value date would be reversed. There would be a new accounting entry with the new value date.
3.6 Inward Clearing Scan Pass/Reject Cut-off
This section contains the following topics:
- Section 3.6.1, "Invoking Inward Clearing Scan Pass/ Reject Cur Off Maintenance Screen"
- Section 3.6.2, "Viewing Inward Clearing Scan Pass Reject Cut off"
3.6.1 Invoking Inward Clearing Scan Pass/ Reject Cur Off Maintenance Screen
The cut off time for inward clearing can be maintained in the Inward Clearing Scan Pass/Reject cut-off Maintenance screen. You can invoke the ‘Inward Clearing Scan Pass/Reject Cut-off’ screen by typing ‘CGDINWCT’ in the field at the top right corner of the Application tool bar and clicking the adjoining arrow button.
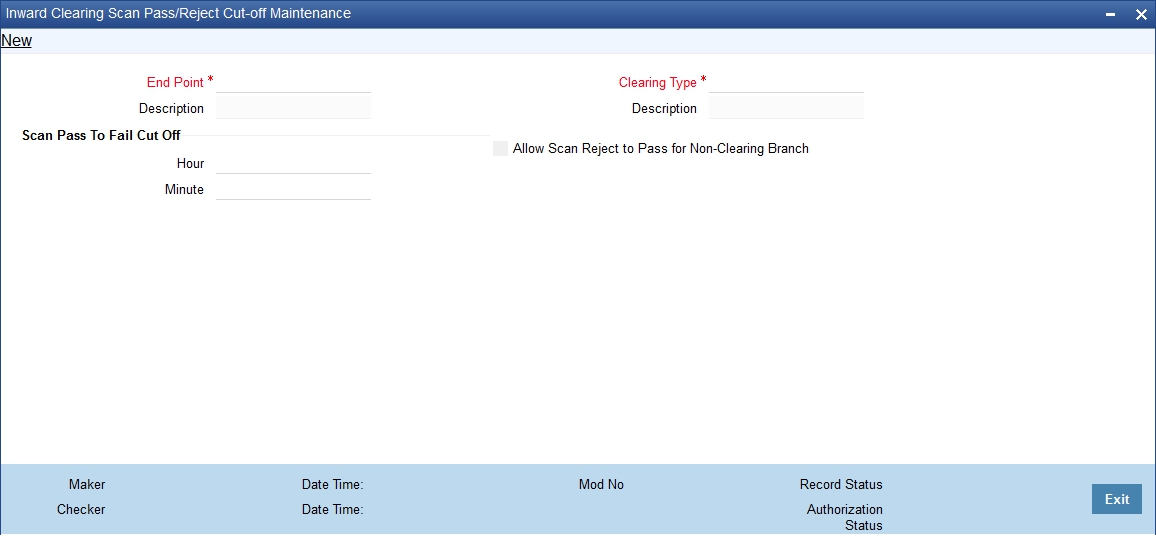
Specify the following here:
End Point
Select the end points from the adjoining option list.
Description
The system defaults the description of the end point chosen.
Clearing Type
Select the inward clearing product type from the adjoining option list.
Description
The system displays the clearing product description.
Scan Pass to Fall Cutoff
Hour
Specify the hours of the cutoff time for the scan pass to reject.
Minutes
Specify the minutes of the cutoff time for the scan pass to reject.
Allow Scan reject to pass for Non-Clearing Branch
Check ‘Allow Scan Reject to Pass for Non-Clearing Branch’ to enable the scan reject to pass option (Error/override to success) for non-clearing branches.
Note
- If the cut off time is exceeded then the pass to reject will not be allowed for any branch.
- Cut off time can be overridden for a specific day through the Branch cut-off time for Inward Clearing Maintenance screen.
3.6.2 Viewing Inward Clearing Scan Pass Reject Cut off
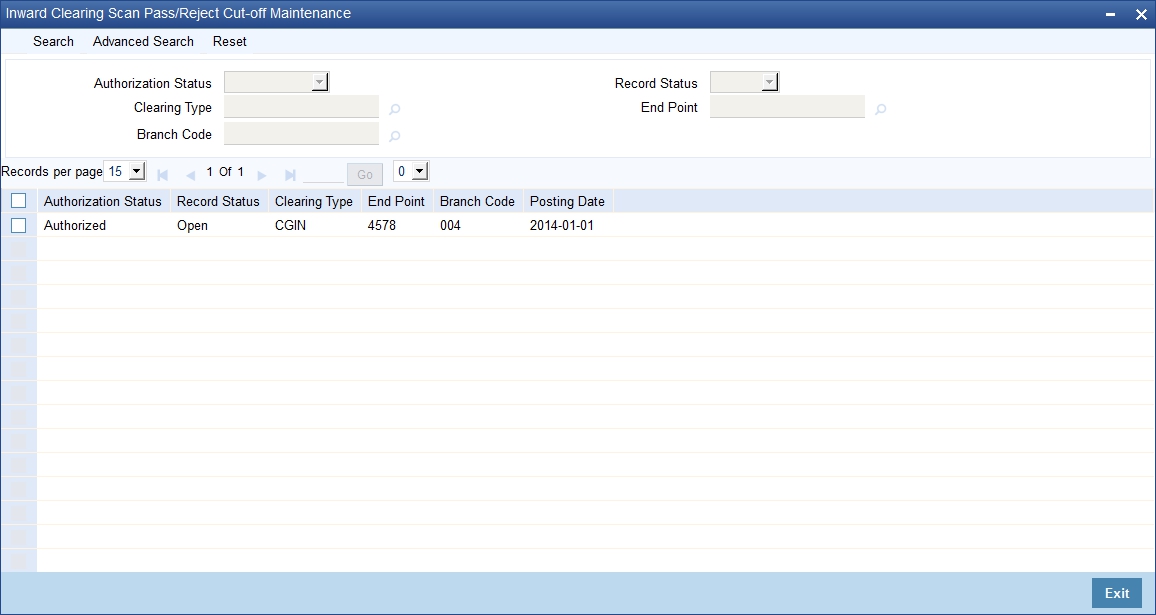
You can view the clearing cutoff scan pass /reject cut off time details in the Inward clearing Scan Pass/Reject cutoff Summary screen. You can invoke this screen by typing ‘CGSINWCT’ in the field at the top right corner of the Application tool bar and clicking the adjoining arrow button.

In the above screen, you can base your queries on any or all of the following parameters and fetch records:
- Authorization Status
- Clearing Type
- Record Status
- End Point
Select any or all of the above parameters for a query and click ‘Search’ button. The records meeting the selected criteria are displayed.
The system displays the following details pertaining to the fetched records:
- Authorization Status
- Record Status
- Clearing type
- End Point
- Hours
- Minutes
3.7 Inward Clearing Scan Pass/Reject Branch Cut off Maintenance
This section contains the following topics:
- Section 3.7.1, "Invoking Inward Clearing Scan Pass/Reject Branch Cut off Maintenance Screen"
- Section 3.7.2, "Viewing Branch Cutoff for Inward Clearing Scan Pass/Reject"
3.7.1 Invoking Inward Clearing Scan Pass/Reject Branch Cut off Maintenance Screen
You can override the cutoff time maintained for the end point and clearing type in the Branch cutoff time for Inward clearing screen. You can invoke this screen by typing ‘CGDBRNCT’ in the field at the top right corner of the Application tool bar and clicking the adjoining arrow button.
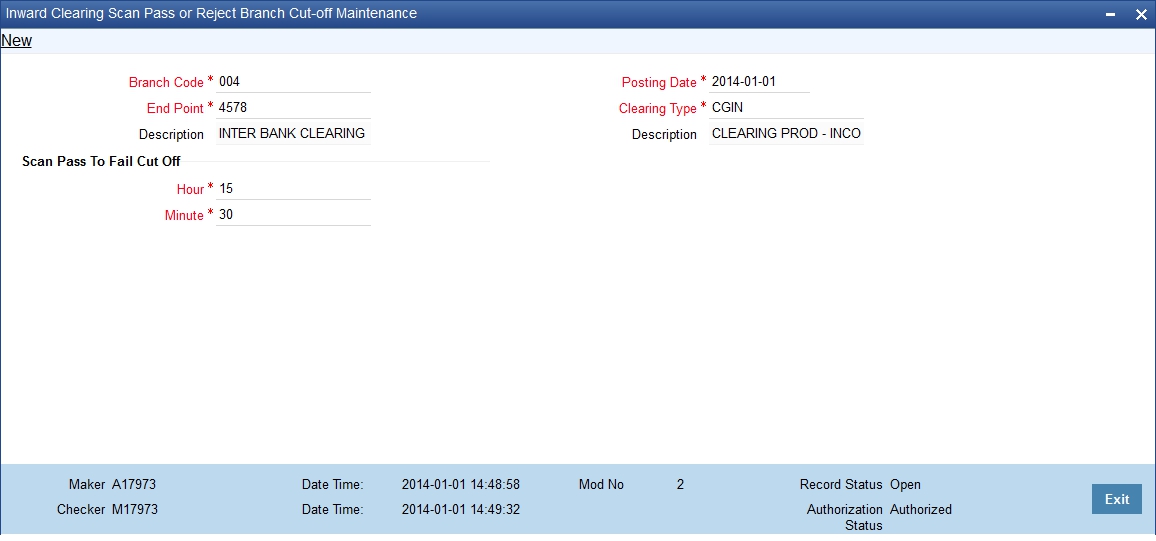
Specify the following here:
Branch code
Select the branch code from the adjoining option list.
End Point
Select the end point from the adjoining option list.
Description
The system displays the description of the end point chosen.
Posting Date
The system displays the current date of the branch.
Clearing Type
Select the clearing type from the adjoining option list.
Description
The system displays the clearing product description.
Scan Pass to Fall Cutoff
Hour
Specify the hours of the cutoff time for the scan pass to reject.
Minutes
Specify the minutes of the cutoff time for the scan pass to reject.
3.7.2 Viewing Branch Cutoff for Inward Clearing Scan Pass/Reject
You can view the branch cutoff for inward clearing scan pass /reject in the Inward Clearing Scan Pass/Reject Branch Cutoff Summary screen. You can invoke this screen by typing ‘CGSBRNCT’ in the field at the top right corner of the Application tool bar and clicking the adjoining arrow button.
In the above screen, you can base your queries on any or all of the following parameters and fetch records:
- Authorization Status
- Clearing Type
- Branch Code
- Record Status
- End Point
Select any or all of the above parameters for a query and click ‘Search’ button. The records meeting the selected criteria are displayed.
The system displays the following details pertaining to the fetched records:
- Authorization Status
- Record Status
- Clearing type
- End Point
- Hours
- Minutes
- Branch Code
Note
- If the current time of the transaction is greater than the cut-off time maintained for the clearing type and end point then the system displays an error message as “Scan Pass to Reject of the transaction cannot be performed for the day”.
- In order to process pass to reject status should be chosen to dishonour return and the reject code should be provided. This operation is supported in Cheque return (6560), Query Clearing Upload (CGDCLGDT) & Interface Clearing Details (IFDCLGDT) screens.
- Cutoff time for the validation is in the below order:
- Scan Pass to Reject cut-off time maintained at the Branch Cut-off time (CGDBRNCT) for Scan Pass/Reject of Inward Clearing for the clearing type and end point of the transaction being processed.
- Scan Pass to Reject cut-off time maintained at the Cut-off time for Scan Pass/Reject of Inward Clearing (CGINWCT) for the clearing type and end point of the transaction being processed.
- In order to process Reject to Pass status should be chosen from error/override to success. The Query Clearing Upload (CGDCLGDT) and Interface Clearing Details (IFDCLGDT) are supported for this operation.
- If the processing branch is non-clearing branch and if ‘Allow Scan Reject to Pass’ is not chosen for the clearing type and end point of the clearing transaction then the system displays an error as message “Scan Reject to Pass not allowed for the branch.”
3.8 Clearing House Maintenance
This section contains the following topic:
3.8.1 Invoking Clearing House Maintenance Screen
In the ‘Clearing House Maintenance’ screen, invoked from the Application Browser, you have to maintain the clearing houses your bank participates in. You can invoke this screen by typing ‘STDCLDMT’ in the field at the top right corner of the Application tool bar and clicking on the adjoining arrow button.
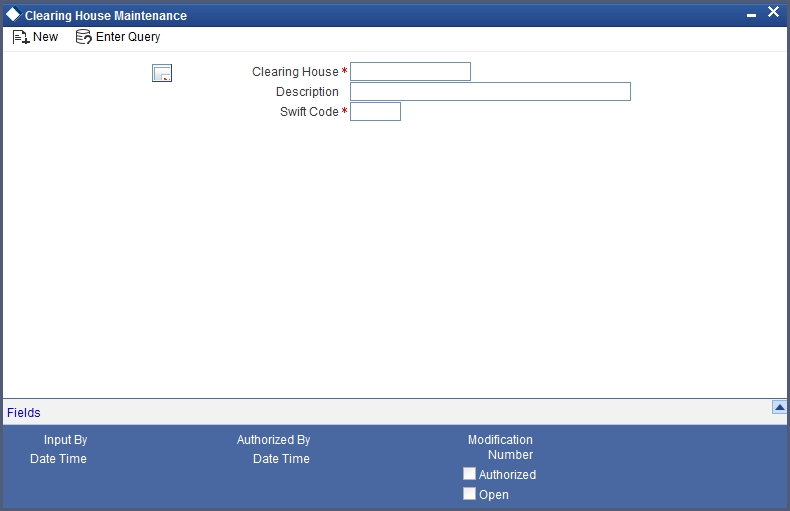
Identify every Clearing House you participate in with a unique code. In the Description field, briefly capture the details of the Clearing House. The Clearing House Code and Description you enter should help you easily identify a clearing house. Additionally, specify a SWIFT code for the clearing house. In order to process MT306, MT340, MT 360 and MT361 you need to maintain the following codes as SWIFT Codes for the field 29H, 29E and 22B:
- EUTA - Target
- LKCO – Colombo
- PKKA - Karachi
- ROBU - Bucharest
- TRIS - Istanbul
- VNHA - Hanoi
3.9 Clearing House Holiday Maintenance
This section contains the following topics:
3.9.1 Invoking Clearing Holiday Maintenance Screen
In the Clearing House Holidays Calendar Maintenance screen, invoked from the Application Browser, you can identify the holidays for the various clearing houses maintained at your bank. You can invoke this screen by typing ‘STDCLHOL’ in the field at the top right corner of the Application tool bar and clicking on the adjoining arrow button.
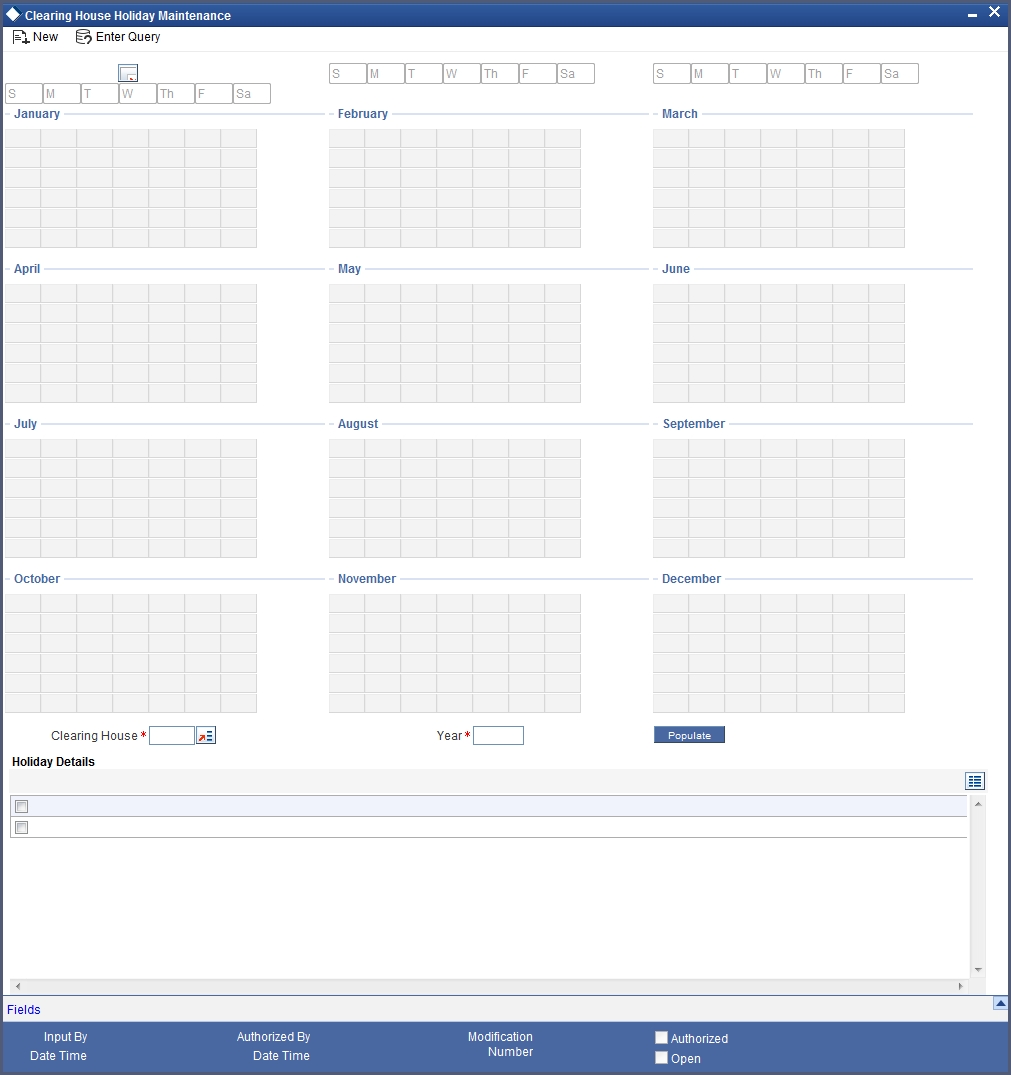
In the Clearing House field, specify the clearing house for which you are maintaining holiday details.
The dates on the calendar are marked in black and red. The dates you mark in black are “working days” and dates you mark in red are “holidays”. Click on a date to change its color.
Note
Clearing Houses and Clearing House Holidays are typically maintained at the Head Office.
Refer the chapter ‘Maintaining Clearing Holidays ‘ in the Core Services User Manual for details about this screen.
3.10 Clearing House End Point Maintenance
This section contains the following topic:
3.10.1 Invoking Clearing House End Point Maintenance Screen
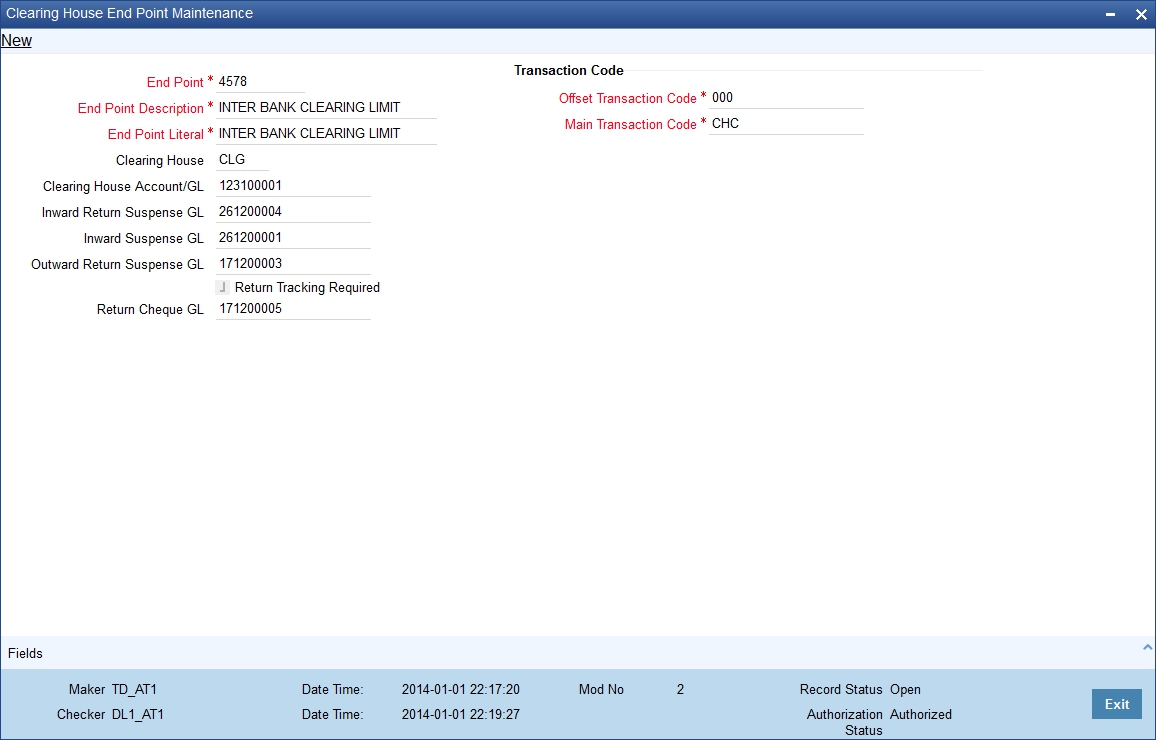
In Oracle FLEXCUBE, clearing houses are also referred to as end points. To facilitate error-free processing of clearing transactions, you need to maintain end point details and map an end point to a clearing house. Invoke the End Point Details screen from the Application Browser to maintain end point details.
You can invoke this screen by typing ‘STDENDMT’ in the field at the top right corner of the Application tool bar and clicking on the adjoining arrow button.
You can specify the following details:
End Point
Specify the end point.
End Point Description
Specify the description for the end point.
End Point Literal
Specify the end point literal.
Clearing House
Specify the clearing house ID. Alternatively, you can select the clearing house ID from the option list. The list displays all valid clearing house ID maintained in the system.
Clearing House Account/GL
Specify the clearing house account number. Alternatively you can select the clearing house account number from the option list. The list displays all valid clearing house account number maintained in the system.
Inward Return Suspense GL
Specify Inward Return Suspense GL number. Alternatively you can select the inward return suspense GL from the option list. The list displays all valid inward return suspense GL number maintained in the system.
Credit entries are recorded in this GL when outward clearing cheque gets rejected. The balance in this GL represents the amount returned to the clearing house due to outward clearing returned.
Inward Suspense GL
Specify Inward Suspense GL number. Alternatively you can select the inward suspense GL from the option list. The list displays all valid inward suspense GL number maintained in the system.
Credit entries are passed in this GL during inward clearing. The balance in this GL represents the amount owed by the bank to the clearing house due to inward clearing instruments.
Outward Return Suspense GL
Specify Outward Return Suspense GL number. Alternatively you can select the outward return suspense GL from the option list. The list displays all valid outward return suspense GL number maintained in the system.
Debit entries are recorded in this GL when inward clearing cheque gets rejected. The balance in this GL represents the amount owed by the bank to the clearing house due to inward clearing return instruments.
Return Tracking Required
Check this box if return tracking is required at the account branch/clearing branch when Account found/not found respectively
Return Cheque GL
Specify return cheque GL. Alternatively, you can select return cheque GL from the option list. The list displays all valid return cheque GL maintained in the system.
Note
You can track a returned or rejected cheque in the account branch or the Clearing Branch level. The rejected cheque is reversed and the cheque status is marked as rejected in the Cheque Return screen (6560).
If the above details are maintained in case of returns from inward clearing, the system will define a predefined logic for all Inward clearing screens to trigger the corresponding accounting entries. This is applicable for all the inward clearing transactions booked from one of the following screens:
- Inward Clearing Data Entry (5555)
- Query Clearing Upload (CGDIWCGD)
- Interface Clearing Details (IFDIWCGD)
The same process is followed in handling the returns from Inward clearing (Outward Returns) . In case of Outward returns handling, Outward Return suspense GL and return cheque GL will be used and existing REVR event will be triggered to post the following accounting entries.
Transaction Code
Offset Transaction Code
Specify the offset transaction code. Alternatively, you can select offset transaction code from the option list. The list displays all valid offset transaction code maintained in the system.
Main Transaction Code
Specify the main transaction code. Alternatively, you can select main transaction code from the option list. The list displays all valid main transaction code maintained in the system.
Note
In Oracle FLEXCUBE, a nine-digit number identifies end points and a three-digit number identifies clearing houses. By mapping an end point to a clearing house, you identify the end point captured at the branch as a valid clearing house maintained in Oracle FLEXCUBE.
3.10.1.1 Processing Inward Return
Inward Return Suspense GL is maintained at endpoint level to trigger accounting entries in case of Outward returns. The system will use RETN event to handle the inward returns processing. This event is triggered in case of returns from ‘6560’ screen or during the upload of the inward return transactions in the ‘CGDCLGDT’ screen, when the CGREJECT batch is run. The system will maintain the corresponding accounting entries for this event using ‘Our_Charge’ amount tag and ‘Inward Return Susp GL’ accounting role.
- In case of operational errors when reversals are triggered due to
‘CANCEL’ or ‘REVERSE’ operations, the REVR event
gets triggered.
- REVR event has no maintained accounting entries, but just reverses the contingent entries passed earlier as part of the INIT.
- This is currently triggered in instances such as reversal initiated due to operational errors such as cheque deposit by mistake or wrong input etc
- In case of returns done through the 6560 screen or upload of the inward returns, when the CGREJECT batch is triggered, the system will check the original transaction amount which was already credited to the customer and debit the customer for the total amount by triggering the RETN event.
- As part of the RETN event, during the debit to customer account, the system will internally remove the uncollected funds to the extent of cheque amount (Similar to the REVR event )
Outward clearing can be of two types:
- If Defer liquidation is specified as ‘Yes’ for the Outward clearing Product, then:
- The RETN event gets triggered
- The contingent entries which got triggered earlier as part of the INIT event gets reversed.
- No accounting entries are passed as part of the RETN event in this case.
- Contract is updated as ‘REJECTED’
- If Defer liquidation is specified as ‘No’ for the Outward clearing Product, then:
- In case of return from 6560 screen or upload of inward returns from the clearing house in the CGDCLGDT screen, when the CGREJECT batch is run, the system triggers the new event RETN to handle the Inward returns.
- As part of the RETN event the following accounting entries are passed:
- When the CGREJECT batch is run, the system will process the return of outward clearing transactions at individual contract level as follows:
For Return of Outward Clearing Transaction 1 (Reject code say 014 with charges applicable), the system will pass the following entries:
Event |
Account |
Dr/Cr |
Amount tag |
Transaction Code |
Branch Code |
RETN |
Customer |
Dr |
Cheque Amount |
Main Transaction code |
Account Branch |
|
|
|
(Cheque_Retn_ amt + Charge amount) |
|
|
RETN |
Income GL |
Cr |
Our Charge Amount |
Offset Transaction code |
Transaction Branch |
RETN |
Inward Return Suspense GL |
Cr |
Cheque_Retn_ amt |
Offset Transaction code |
Transaction Branch |
The system will calculate ‘Our Charge Amount’ as follows:
Our Charge Amount = Cheque amount – Cheque Return amount
During Inward handling if charges are applicable for the reject code, the system will validate the computed ‘Our Charge Amount’ when original parent contract is found.
For Return of Outward Clearing Transaction 2 (Reject code say 024 with charges not applicable), the system will pass the following entries:
Event |
Account |
Dr/Cr |
Amount tag |
Transaction Code |
Branch Code |
RETN |
Customer |
Dr |
Cheque Amount |
Main Transaction code |
Account Branch |
RETN |
Inward Return Suspense GL |
Cr |
Cheque_Retn_ amt |
Offset Transaction code |
Transaction Branch |
The system will update the contract status as ‘REJECTED’.
Note
In case of Inward Returns, when Deferred Liquidation is maintained as No :
- For Reversals/Returns from 6560, the system will validate if the consolidation status is ‘No’. in such case, the system should trigger only the REVR event and not the RETN event.
- In case of reversal/returns from 6560, when the consolidation status is maintained as ‘Yes’, i.e the consolidation batch has been initiated and contracts have been dispatched to clearing house, then the system should trigger the RETN event to handle the Inward Returns received from clearing house.
- This has to be operationally handled. Any deviations from the above would be considered to be an operational error.
- In case of an inward return handling from 6560 screen (outward contract with consolidation status as Y) during RETN process, if the system computed charge amount and difference between cheque amount and cheque return amount is not matching, then the system will display an error message.