4. Common Operations
4.1 Introduction
This chapter details the common procedures and operations that should be followed while processing transactions in Savings.
This chapter contains the following sections:
- Section 4.2, "Workflow Task List"
- Section 4.3, "Clearing a User"
- Section 4.4, "Authorizing a Transaction"
- Section 4.5, "Initiate a Customer Session"
- Section 4.6, "Opening the Branch"
- Section 4.7, "Opening a Vault/Till"
- Section 4.8, "Balance and Close a Till"
- Section 4.9, "Teller Totals"
4.2 Workflow Task List
When you click on ‘Workflow’ in the Application Browser, the following details are displayed on the right pane:
- Number of pending transactions
- Number of transactions that are assigned to the logged in users
- Number of transactions that are yet to be assigned
- Number of transactions that have failed
- Number of transactions that are complete
- Number of transactions that are reversed
4.3 Clearing a User
Sometimes you may require to force-logout a user from Savings. You can do this if you are a supervisor with the necessary rights to logout a user from the branch. The supervisor also has the facility to force log off all the users at any given point of time. Typically, the force-logout right is given to only one administrator role user in the branch.
You can invoke the ‘Clear User’ screen by typing ‘CLRU’ in the field at the top right corner of the Application tool bar and clicking the adjoining arrow button. The following screen will be displayed:
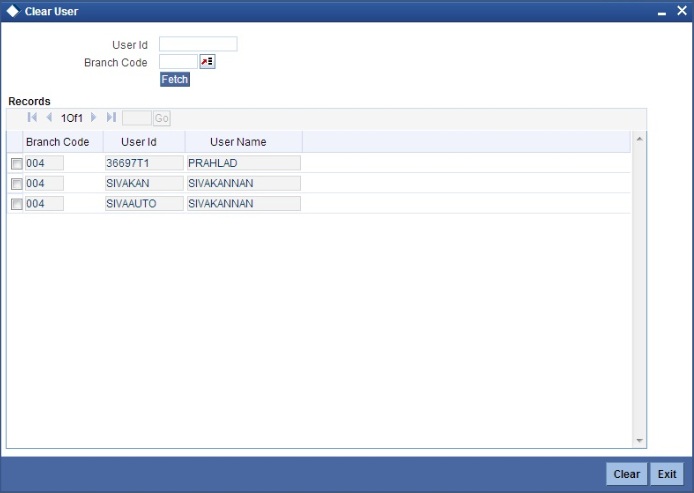
You can search for the users based on the following parameters:
- User ID
- Branch Code
Once you have specified the parameters click 'Fetch' button. The system lists the following details of the users who have logged into the application:
- Branch Code
- User ID
- User Name
To force log out a user, check the box against the relevant user record and click 'Clear' button. The system will display a message to confirm the clear operation. To force log out all the users in a page, check the box against the header row, which will select all the users in the page. Further click the 'Clear' button. The selected users are logged off from the application.
4.4 Authorizing a Transaction
Authorization can happen in two ways based on the Workflow defined for the transaction – Manual and Auto.
This section contains the following topics:
- Section 4.4.1, "Manual Assignment"
- Section 4.4.2, "Auto Assignment"
- Section 4.4.3, "Displaying Overrides and Errors"
- Section 4.4.4, "Reversing a Transaction"
4.4.1 Manual Assignment
The maker can opt for either the local authorization or the remote authorization for the transaction that is submitted with one or more overrides.
Local Authorization
The supervisor can authorize the transactions from the teller screen by entering the ID and password. In case of local authorization, the authorizer can allow or cancel the transaction. The following screen is used for local authorization:
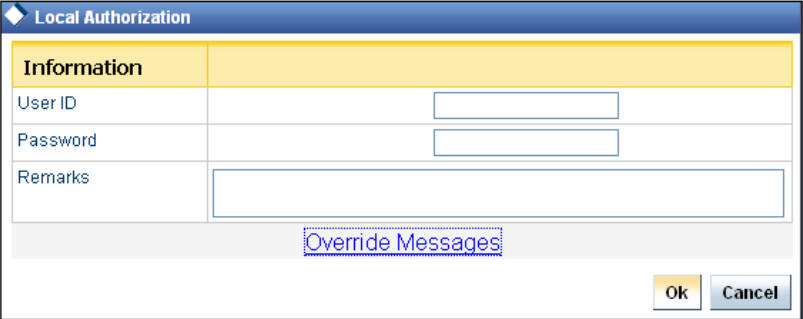
The authorizer can only view the transaction details here. He or she will have to enter the following details:
Userid
Specify the user ID of the authorizer.
Password
Enter the password to authorize or reject the transaction.
Remarks
Specify some remarks pertaining to the transaction.
Click ‘OK’ button to authorize the transaction. On successful validation of the User ID and password, the transaction will proceed to the next stage as per workflow. The validations for User ID will be same as in Remote Auth. The user credential validation includes ‘Holiday Maintenance’ check also. However, if you click ‘Cancel’ button, the transaction will move to unassigned queue.
You can view the override messages by clicking ‘Override Messages’.
Note
Local Authorization option is not available when user authentication is via Single Sign On (SSO).
Remote Auth
In this type, the Maker will assign the transaction to an authorizer using theRemote Authorization screen. This screen will appear during the appropriate stage as per the Workflow definition.
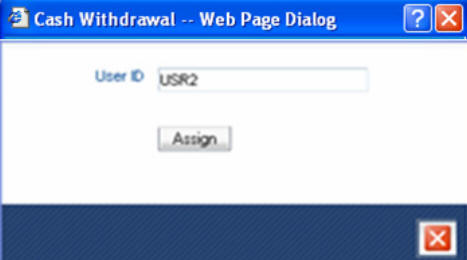
In this screen, the Maker has to specify the name of the authorizer and then click the ‘Assign’ button. Upon successful assignment, a confirmation message “Successfully assigned to OFFICER” with the name of the assignee is displayed.
The authorizer, to whom the Maker assigns the transaction, will see the same in the pending Tasks List from where he/she can fetch the transaction for approval or rejection, as the case may be.
Irrespective of whether the supervisor approves or rejects, the transaction will be re-assigned to the Maker. If the supervisor approves, the Maker can fetch and see the response from his/her Task List.
4.4.2 Auto Assignment
If the Workflow for the transaction is configured for ‘Auto Assign’ at this stage, it will assign the transaction to all the eligible authorizers as per the assignment criteria. All the eligible supervisors will be able to see the transactions in their pending Tasks List. The transaction will be locked by the first supervisor who fetches it from the Task List. The supervisor will then have to Approve/Reject the transaction. This is similar to remote authorization in case of manual assignment.
4.4.3 Displaying Overrides and Errors
In case of any errors or overrides, the same will be displayed on the main screen in separate window.
The overrides have to be authorized by the supervisor and depending on the Workflow structure, will be ‘Manual – Local/Remote’ or ‘Auto’. By default, remote authorization will be selected. However, you can select local authorization. When you click ‘Local Auth’ button, the ‘Local Authorization’ screen is displayed. The Maker is required to take appropriate action on the main transaction screen.
You can also reject the override for certain transactions like cheque withdrawal and inhouse cheque deposit. If you click ‘Reject’ button, the screen will remain in the enrichment stage for you to make changes to charge elements. Then if you click ‘Save’, the system will initiate reversal of the transaction albeit without reversing charges.
Note
Reject option will be applicable only for functions 1013 (Cheque Withdrawal) and LOCH (In-House Cheque Deposit). If you reject an override, the process will remain in Enrich stage.
During advice printing, the system will print reject advice if the ‘Reject Processing Required’ option and the ‘Reject’ option are set to ‘Y’ at the branch function definition level. The advice will be printed using a factory shipped reject advice template.
4.4.4 Reversing a Transaction
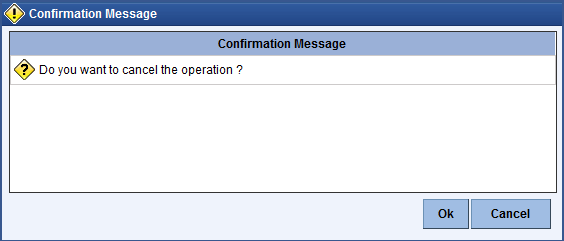
You can reverse a completed transaction by clicking the reverse icon. When you click the reverse icon, a confirmation message will appear before reversing the transaction asking whether you want to reverse the transaction or not. If you have clicked the reverse icon by mistake, then you can cancel it by clicking the ‘NO’ button on the confirmation window. You can proceed with reversal of transaction by clicking ‘YES’ button.
4.5 Initiate a Customer Session
This section contains the following topics:
4.5.1 Initiating a Customer Session
In Savings, you have the facility to process multiple transactions for the same customer without having to key in the customer and account details every time. You can achieve this by starting a Customer Session after logging into the Savings.
To start a Customer Session, go the Customer Search frame and search for a customer.
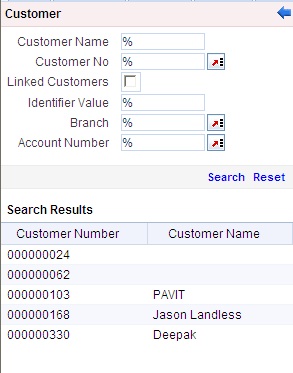
In this screen, you have to enter any search criteria for whom multiple transactions have to be processed and then click on the ‘Search’ button. The system will display the details of the selected customer in a format as shown above.
When you click on the hyperlink provided for ‘Customer Name’ in the screen above, the account details of the customer will be displayed in a separate screen, as shown below also the following customer details are displayed:
- Customer Number
- Branch Code
- Customer Name
- Customer Address
- Birth Date
- Unique Value, if any
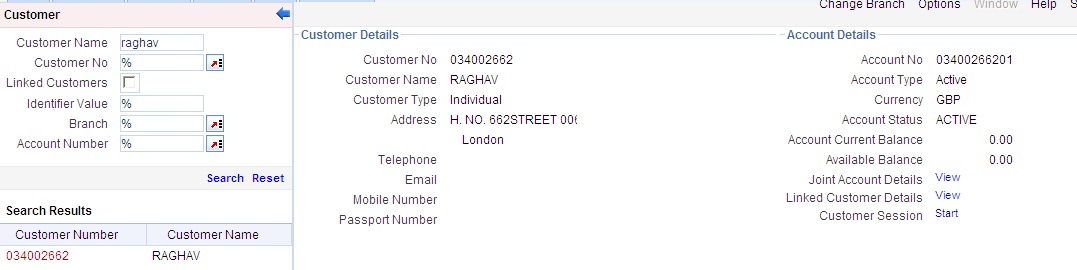
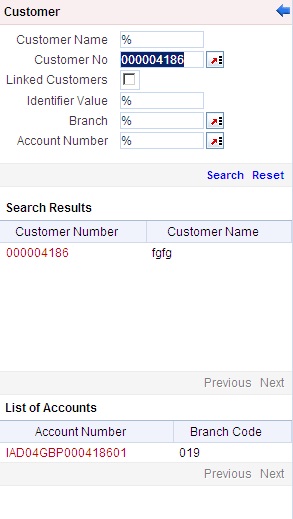
The system will list all the accounts created for the selected customer. The following account details are displayed on click of any Account no:
- Account Number
- Branch
- Product Name – the type of account
- Status – the date since when the current account status is effective
- Available Balance
- Current Balance
On selecting a loan account, the following summary details of the loan account will be displayed:
- Loan Product
- Loan Account Currency
- Loan Account status
- Total Amount Financed
- Total Amount Disbursed
To set a customer for a session, click ‘Start Session’ button.The message “Do you want to set this Account Number and Details to the Session?” is displayed.
Click ‘OK’ if you wish to process multiple transactions for the account. The system will display “Customer session is opened for Account Number 100000001, Customer Number: DMP003IND” message to confirm the same.
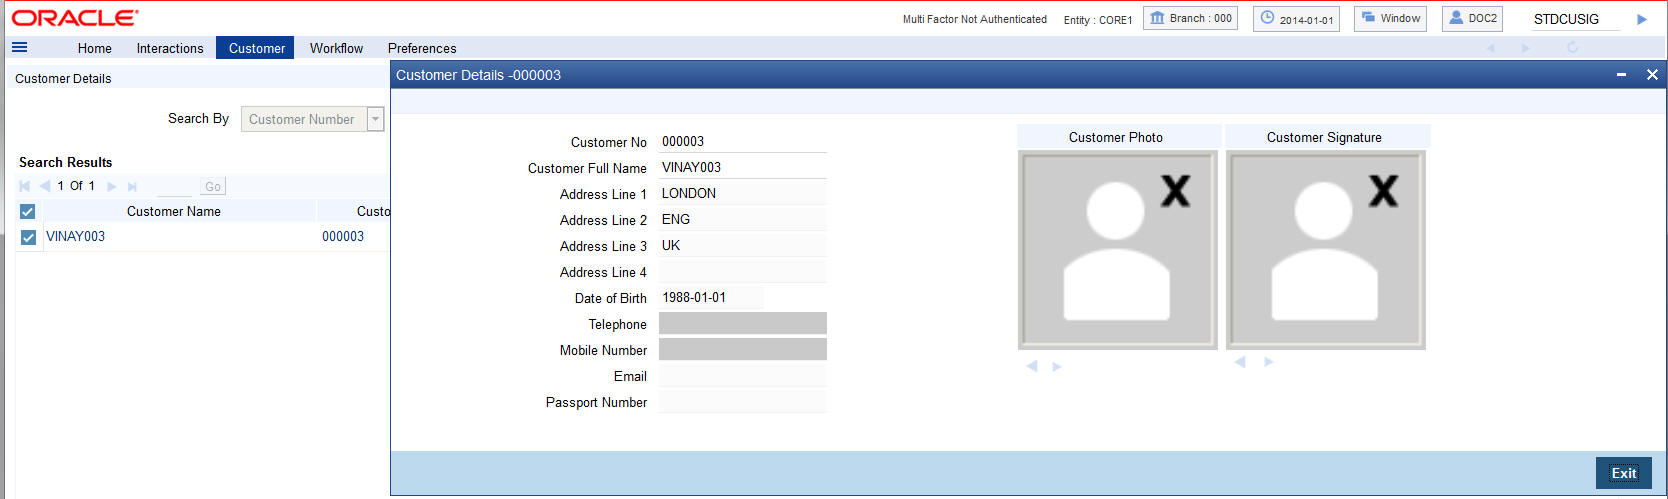
The page also contains the customer’s Image (including those of other signatories of the account), if available, and the Operating Instructions etc. will be displayed, as shown below:
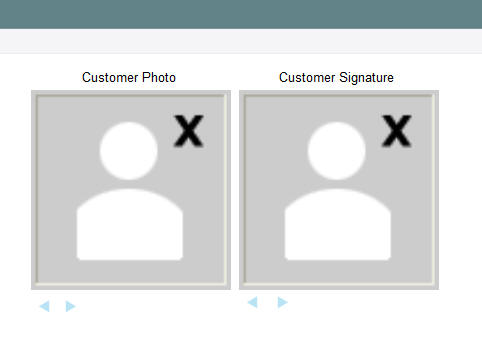
You can go through the signatory details and view all customer Photos and customer signature images using the Links ’Prev‘and ’Next’.
If you set an account number and customer details for a session, you need not enter the Customer ID, Account and related fields for any transaction processed during the session. However, you can override the defaulted details by selecting a different Customer ID and/or Account for any transaction, at any point of time.
4.5.2 Ending a Customer Session
To end a customer session, click ‘End Session’ button in the customer search frame of the screen which will be displayed in place of ‘Start Session’ button. The system displays a message to confirm the action. Click on ‘OK’ to proceed or ‘Cancel’ to continue with the same session.
4.6 Opening the Branch
As soon as the EOD (End of Day) activities for the day are completed, the branch automatically moves to the next working/posting date and is ready for Transaction Input (TI stage).
Note
Opening of Branch will have no processing or operational implications.
4.7 Opening a Vault/Till
You can open a Vault or a Till for the branches you have access for through the ‘Open Teller Batch/Till’ screen. You can invoke this screen by typing ‘9001’ in the field at the top right corner of the Application tool bar and clicking the adjoining arrow button.
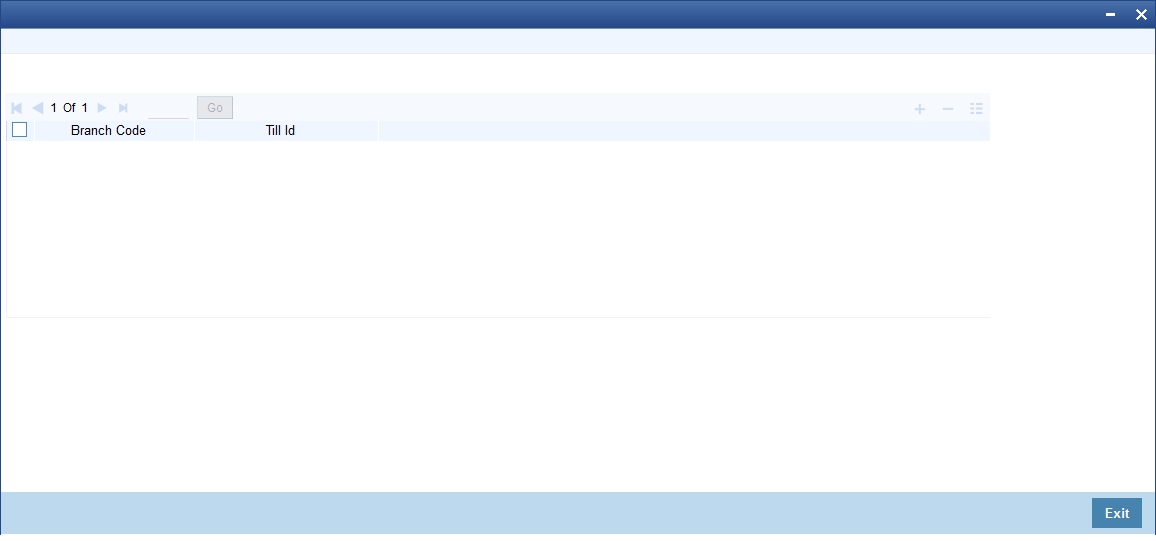
The option list will display the available Tills (i.e. the Tills that are yet to be used). When you select a Till, the same will be linked to your name and locked in the system.
After selecting the Till Id, click the close icon to continue. The system will display the message “Transaction Completed Successfully” to indicate that the Till has been marked against your user id:
The system will also update the Till status as ‘Locked’. The entries for all the transactions that you initiate will be posted into the Till that is marked for you. Only the user who has opened the Till can use the Till.
The system will display an error message if you do not open a Till for transactions that require an open Till when an event is triggered.
Note
Opening a Till is a one time activity and should typically be done at the beginning of the day.
Similarly, you can perform Vault related transactions ONLY after you have opened a Vault. The system does not perform any validations for opening a Vault. However, you can open a vault only if you have the requisite rights.
4.8 Balance and Close a Till
This section contains the following topics:
- Section 4.8.1, "Balancing and Closing a Till"
- Section 4.8.2, "Specifying Cash Details"
- Section 4.8.3, "TC Details"
4.8.1 Balancing and Closing a Till
For closing a Till, you (Teller) should ensure that the Till has zero balance at end of day. The balance in the Till should be same as the system count. You will be allowed to close the Till only if both the values match.
In the Till and Vault Parameter Maintenance (DEDTVSET) screen, if you select the ‘Carry Forward Allowed’ check box, the system allows Till balancing with balance in the Till or Vault and closure of Till or Vault with TC and cash Balance.
If you do not select the ‘Carry Forward Allowed’ check box, the system checks for the error code maintenance and performs the following:
- If you maintain error codes as 'Ignore', the system allows you to close the Till or Vault with balance and does not display any error or override message
- If you maintain error codes as 'Override', the system displays an override message at the time of Till and Vault balancing if closed with cash and TC balance
- If you maintain error codes as 'Error', the system displays an error at the time of Till and Vault balancing, if closed with cash and TC balance
The system displays the following error messages:
- For Cash Balance: The system displays, “Cash balance carry forward is not allowed”
- For TC Balance: The system displays, “TC balance carry forward is not allowed”
In this case, you have to transfer the cash balance to other Till or Vault and proceed to Till Batch Closure.
You can balance and close a Till through the ‘Till Balancing and Closure’ screen. You can launch the ‘Till Balancing and Closure’ screen by typing ‘TVCL’ in the field at the top right corner of the Application tool bar and clicking the adjoining arrow button.
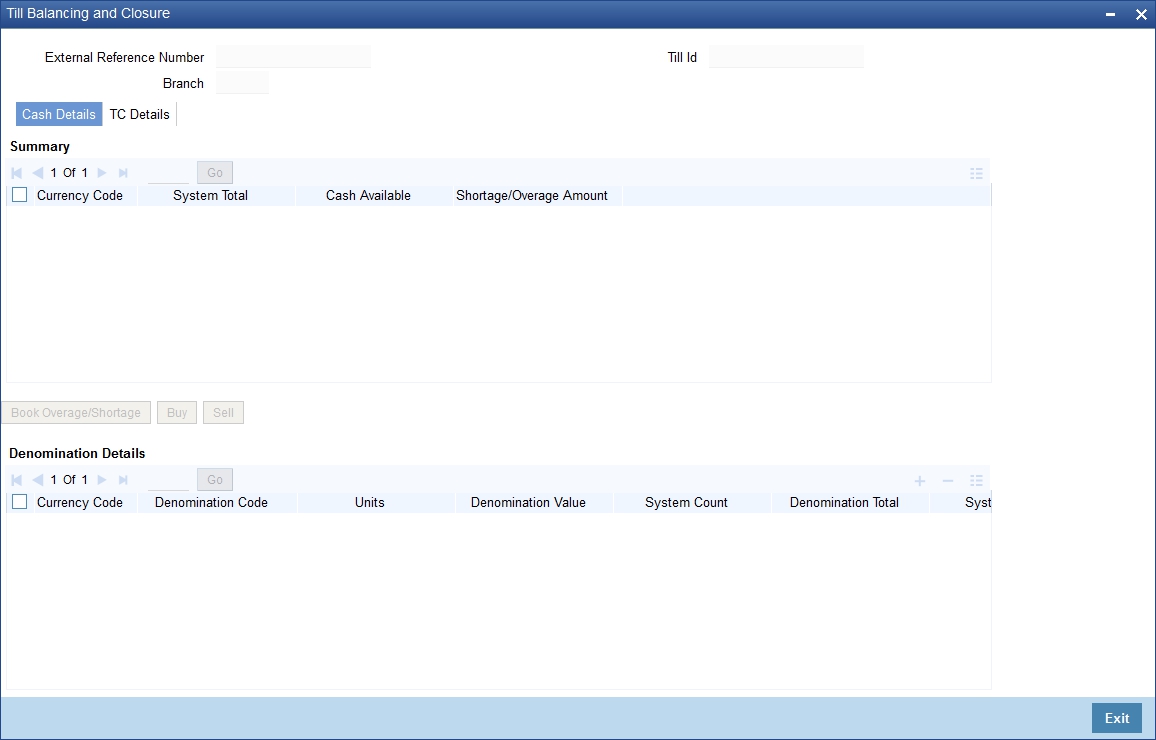
The following information is available in this screen:
External Reference
This is a system generated sequence number for the transaction.
Till Id
The identification code assigned to the corresponding teller’s Till.
Branch Code
The system specifies the code of the corresponding branch.
4.8.2 Specifying Cash Details
The following information is specified in ‘Cash Details’ tab:
Currency Code
The system displays the currency code.
System Total
The system displays the total value of individual currencies used by the corresponding teller.
Cash Available
The system displays the current balance of the Till.
Shortage/Overage Amount
If the number of units for the individual currencies and the corresponding system count does not match with the denomination details, the system will display the corresponding Shortage or Overage Amount.
Book Overage/Shortage
To book the Overage/Shortage Amount, select the corresponding currency and click on the ‘Book Overage/Shortage’ button. In case of Shortage amount, it will launch the 7551 screen and in case of Overage amount, it will launch the 7552 screen.
Buy
Select the corresponding currency and click on the Buy button to invoke the ‘Buy Cash From Central Bank’ screen with the selected currency as the default currency. The function id of this screen is 9009.
Sell
Select the corresponding currency and click on the Sell button to invoke the ‘Sell Cash To Central Bank’ screen with the selected currency as the default currency. The function id of this screen is 9010.
Denomination Details
Denomination Details provides the following information:
- Currency Code
- Denomination Code
- Units
- Denomination Value
- System Count
- System Total
- Shortage/Overage Units
- Shortage/Overage Amount
Update Overall Position
After booking the shortage/overage units, click the ‘Update Overall Position’ button to update the system count with the latest shortage/overage units.
4.8.3 TC Details
TC Denomination details are available in ‘TC Details’ tab. The field values are defaulted with the currency values handled by the corresponding teller.
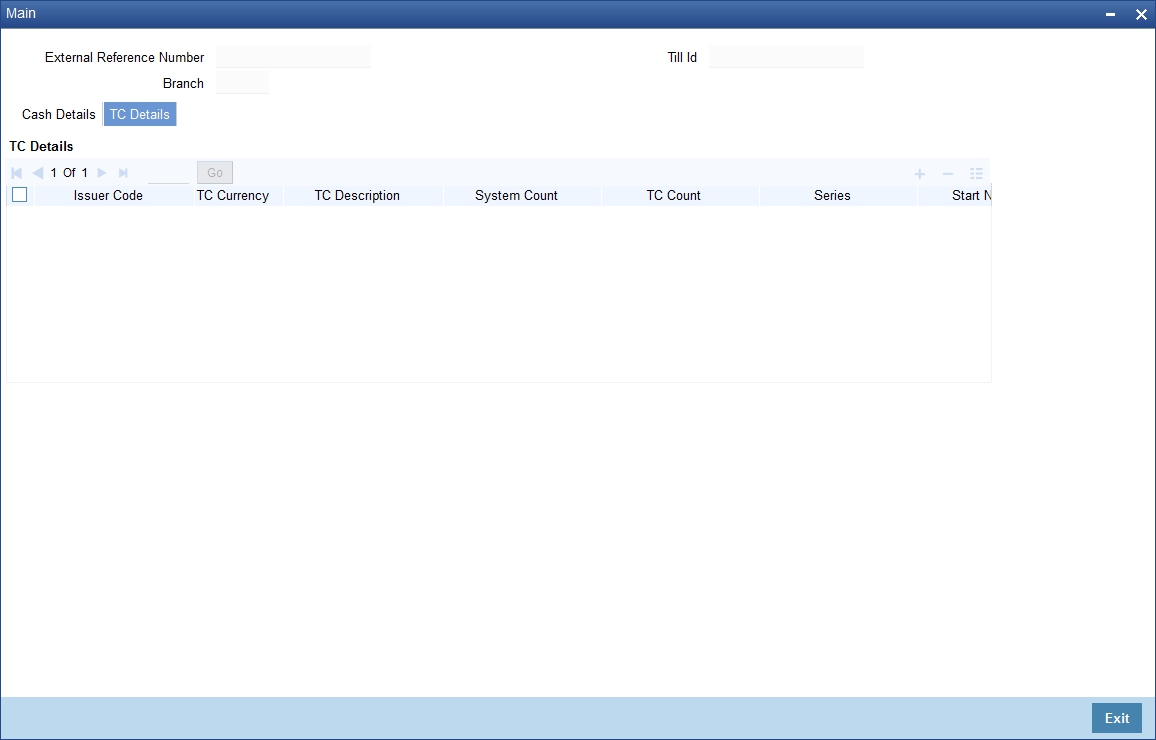
The system displays the following information:
- Issuer Code
- TC Currency
- TC Description
- System Count
- TC Count
- Series
- Start Number
- End Number
After capturing the required details, click the ‘OK’ button to continue. If the balancing is correct, the Till closure is initiated. The system will confirm with the message “Transaction Completed Successfully”.
The till closure has to be authorized by another user having sufficient privileges. This feature can be enabled by checking ‘Default Authorization’ checkbox at Workflow for the function ID ’TVCL’.
For more detail on processing Traveller’s Cheque (TC) transactions, refer the ‘Instrument Transactions’ chapter of this User Manual.
4.9 Teller Totals
You can view the cash and transfer details from the ‘Teller Totals’ screen. The system will display the vault’s cash details for a customer in the corresponding branch. You can invoke the ‘Teller totals’ screen by typing ‘TLTT’ in the field at the top right corner of the Application tool bar and clicking the adjoining arrow button.
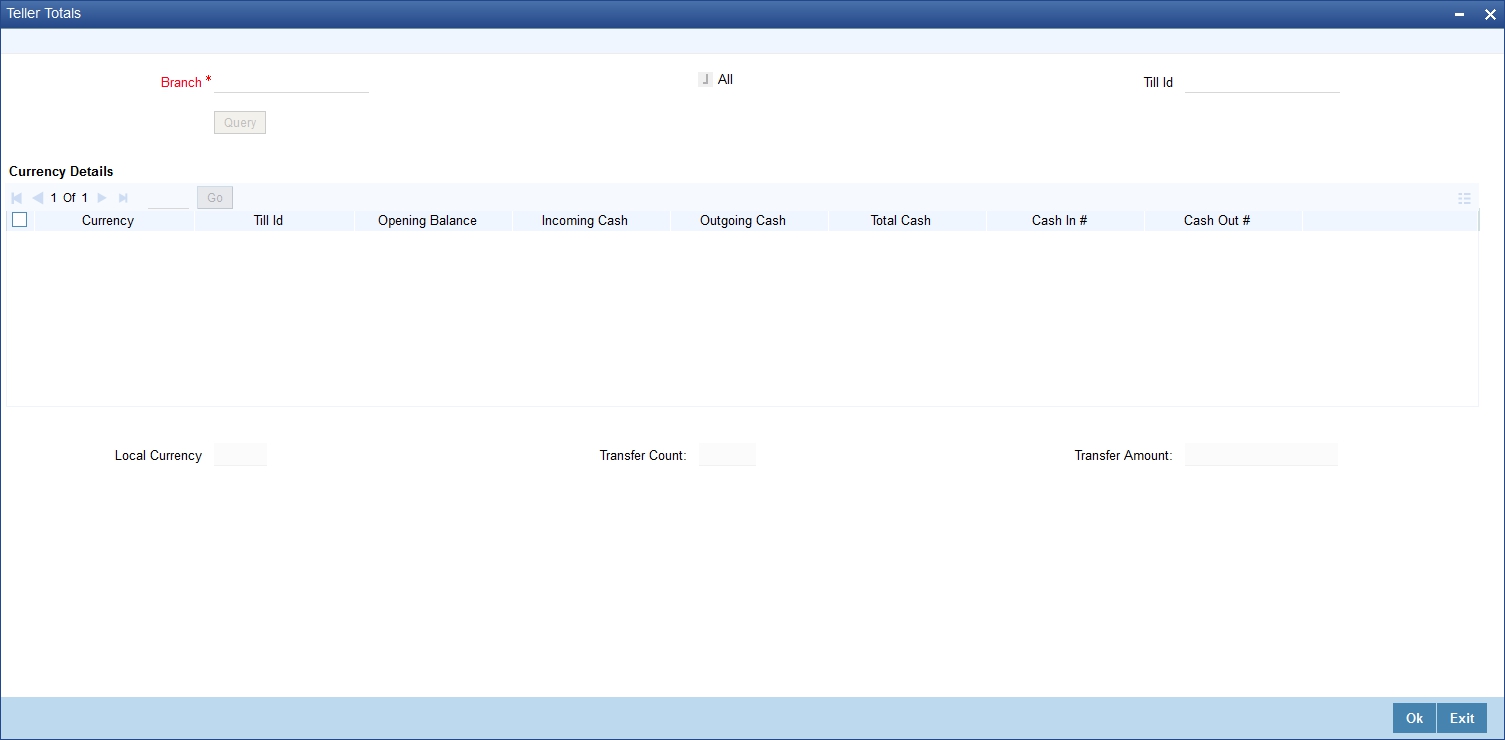
The screen consists of the following fields:
Branch Code
The system defaults the Branch Code of the corresponding branch. However, you can modify the branch code as per the requirement.
All
The system checks the ‘All’ check box, by default. It displays the details of all the Till Ids in the corresponding branch.
Till Id
If you specify a Till Id, you will be able to query the details of the corresponding Till Id.
Currency Details
Currency
The system displays the currency of the cash transaction.
Till Id
The system displays the Till Id of the corresponding Till.
Opening Balance
The system specifies the opening balance of the Till id.
Incoming Cash
The system specifies the incoming cash for the corresponding currency.
Outgoing Cash
The system specifies the outgoing cash for the corresponding currency
Total Cash
The system specifies the total amount available in the corresponding account. The total amount is calculated with the following equation:
Total Cash = Opening balance + (Incoming cash – Outgoing cash)
Cash in#
The system specifies the count of the cash deposits for the corresponding Till.
Cash Out#
The system specifies the count of the cash withdrawals for the corresponding Till.
Local Currency
The system displays the local currency of the logged-in account.
Transfer Count
The system displays the total count of the cheque and transfer transactions.
Transfer Amount
The system displays the total amount of the cheque and transfer transactions.
Clicking ‘Query’ button, the system validates if all the mandatory details are specified. This button will be disabled after the first click.