13. Balancing Operations
This chapter details the various balancing operations that can be performed using this module.
This chapter contains the following sections:
- Section 13.1, "Book Shortage"
- Section 13.2, "Booking Overage"
- Section 13.3, "Transfer Cash from Teller"
- Section 13.4, "Sell Cash to Teller"
- Section 13.5, "Inter Branch Transaction"
13.1 Book Shortage
This section contains the following topics:
- Section 13.1.1, "Invoke ‘Book Shortage’ screen"
- Section 13.1.2, "Specifying denomination details"
- Section 13.1.3, "Specifying the MIS details"
- Section 13.1.4, "Specifying the UDF details"
13.1.1 Invoke ‘Book Shortage’ screen
You can book shortage of a currency using the ‘Book Shortage’ screen. You can invoke this screen by typing ‘7551’ in the field at the top right corner of the Application tool bar and clicking on the adjoining arrow button.
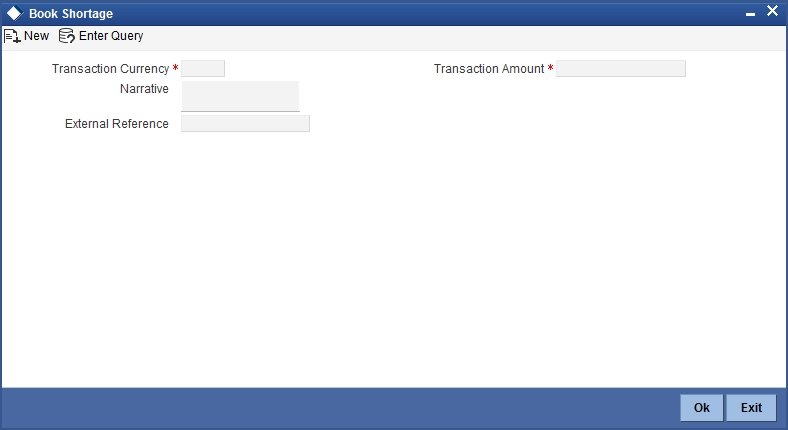
Here, you can capture the following details:
Transaction Currency
Select the currency to be booked for shortage.
Transaction Amount
Specify the total amount to be booked for shortage.
Narrative
Enter description of the transaction.
The screen has two tabs which are as follows:
- Denom
- MIS
- UDF
External Reference
This is system generated reference number for the branch, which is the unique identifier for a branch transaction.
In the single stage flow, if there is an transaction level override or error during approval then the transaction will be moved to the pending queue. Without save action being initiated, the transaction will not be in pending queue.
Clicking ‘Pickup’ button, the system validates if Transaction Amount and Exchange Rate details are specified. This button will be disabled after the first click.
Once you click ‘Pickup’ button once, then on amendment of xrate, amount, charge, pickup will be mandatory before save. On pick up, the fields that are currently enabled in the enrich stage will alone be retained as enabled fields.
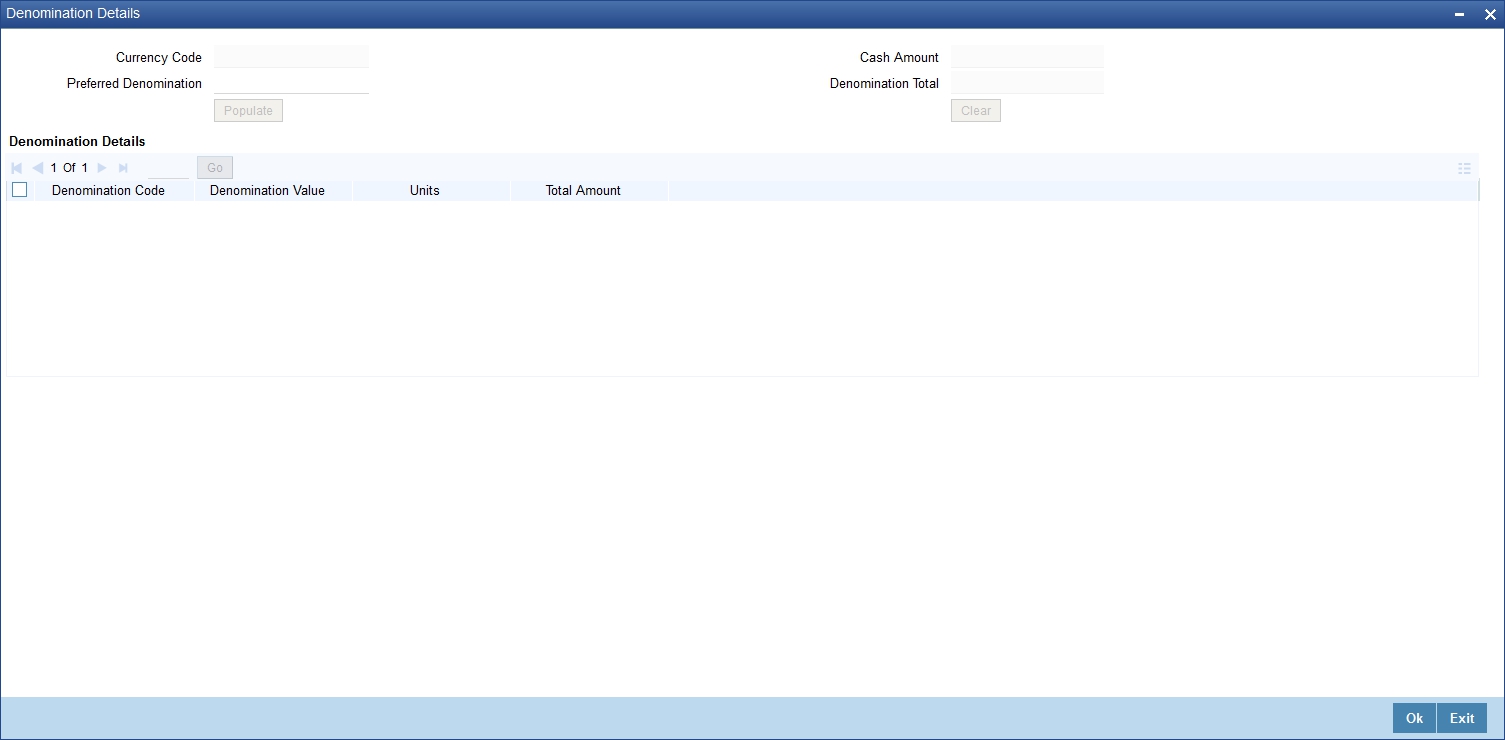
13.1.2 Specifying denomination details
The following details have to be captured in this section:
Currency Code
The currency in which the transaction is being performed is displayed here.
Denomination Code
Specify the denomination of the currency used in the transaction. For every currency, the various denominations are assigned separate denomination codes. These codes are displayed in the adjoining option list. Choose the appropriate one.
Denomination Value
The system computes the face value of the denomination and displays it. For instance if the denomination code represents a USD 100, the value will be displayed as ‘100’.
Units
Indicate the number of units of the specified denomination. Till contents are incremented as a result of inflow transactions like cash deposit and decremented for outflows. To reverse this default behaviour, you can specify units in negative.
Total Amount
The system computes the denomination value by multiplying the denomination value with the number of units. For instance, if the denomination code represents a USD 100 and the number of units is 10, the denomination amount will be ‘1000’.
13.1.3 Specifying the MIS details
You can capture these details in the ‘MIS’ tab of the screen.
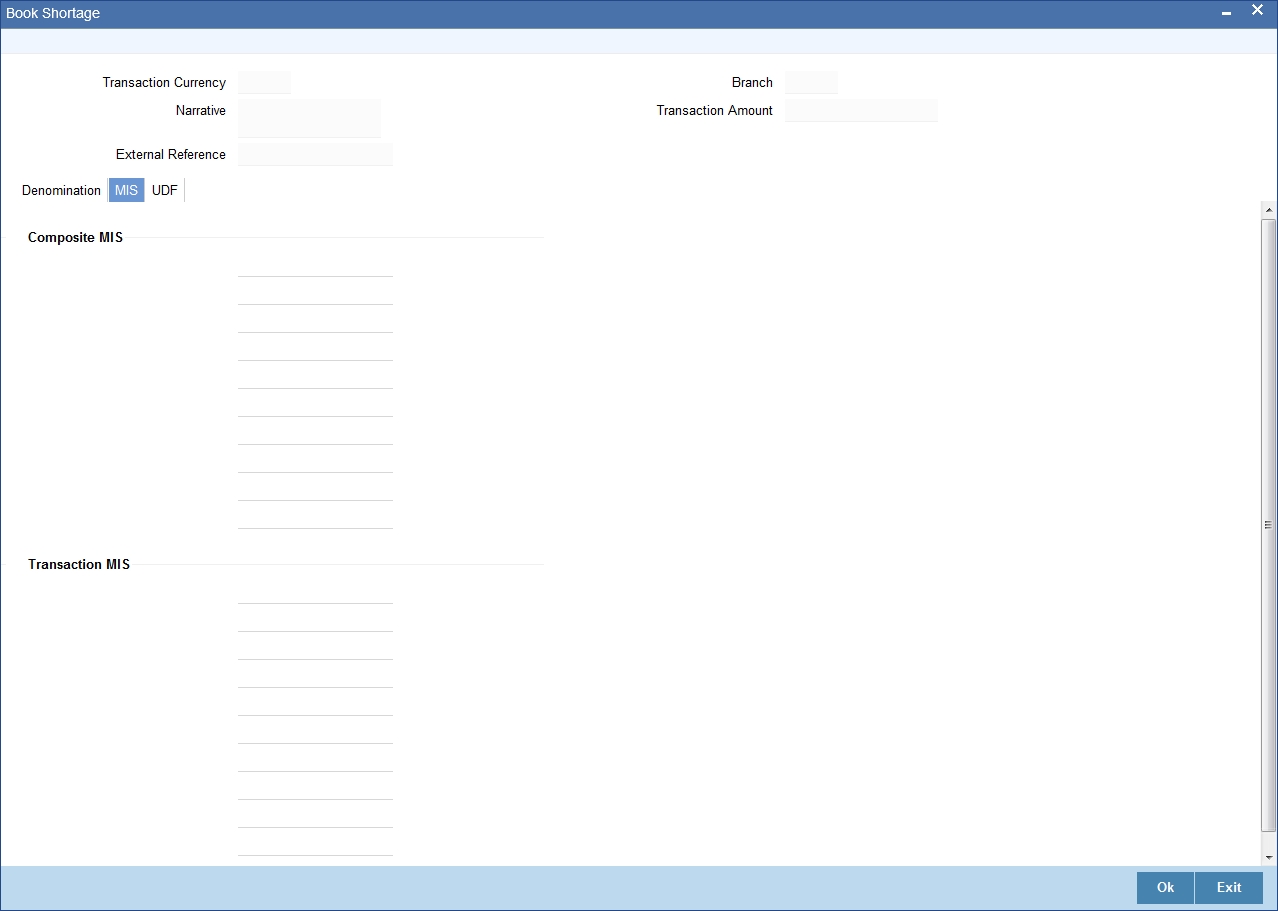
MIS is user definable and is configured at the host. Refer to the Oracle FLEXCUBE host user manual for details.
As an example, the following details may be captured in this screen:
Cost Center
Specify the MIS code assigned to the cost center related to the account involved in the transaction.
Account Officer
Specify the MIS code assigned to the account officer in-charge of executing this transaction.
Standard Industrial Code
Specify the MIS code assigned to the industry to which your customer.
Contracts In Various Currencies
Specify the MIS code assigned to contracts in various currencies.
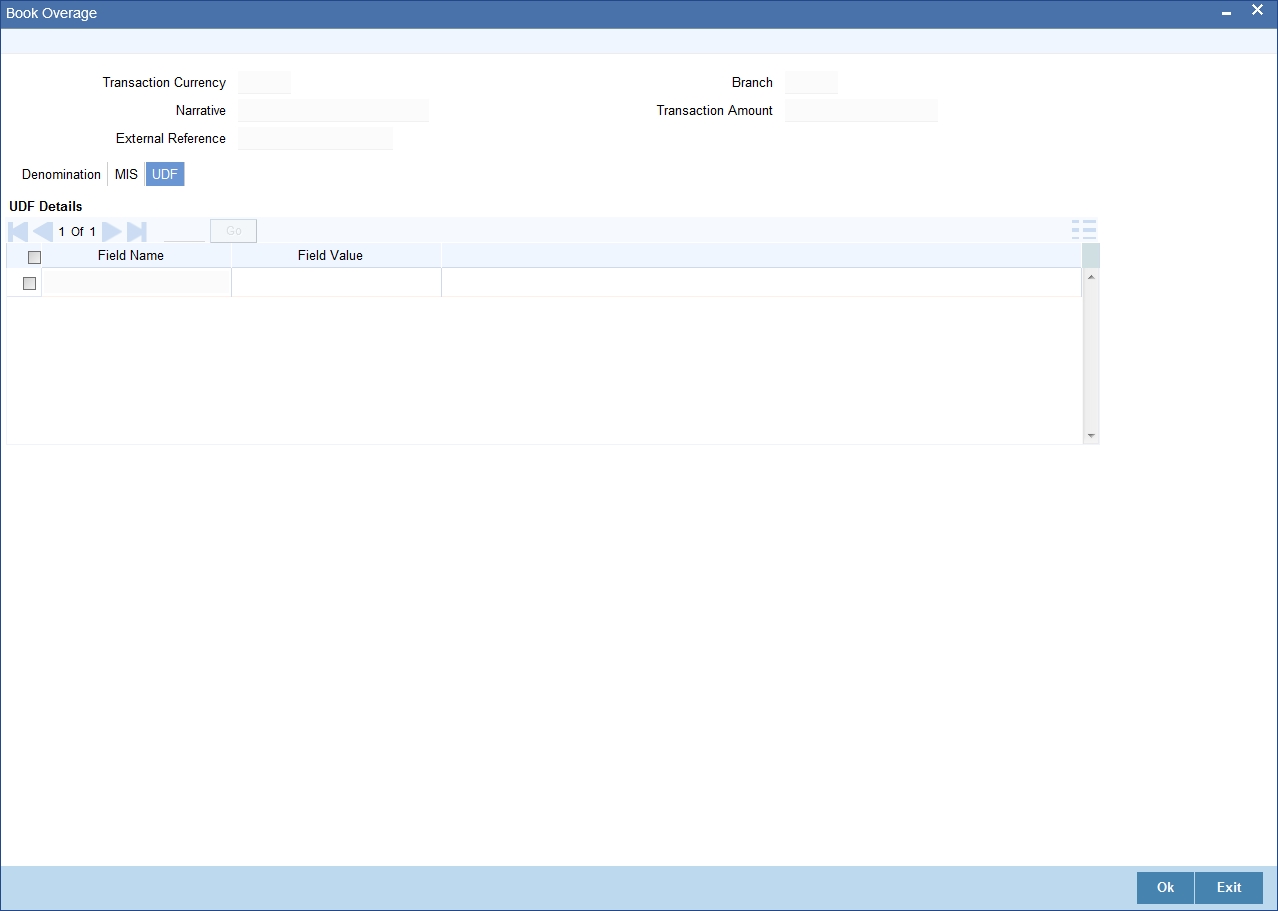
13.1.4 Specifying the UDF details
You can capture these details in the ‘UDF’ tab of the screen.
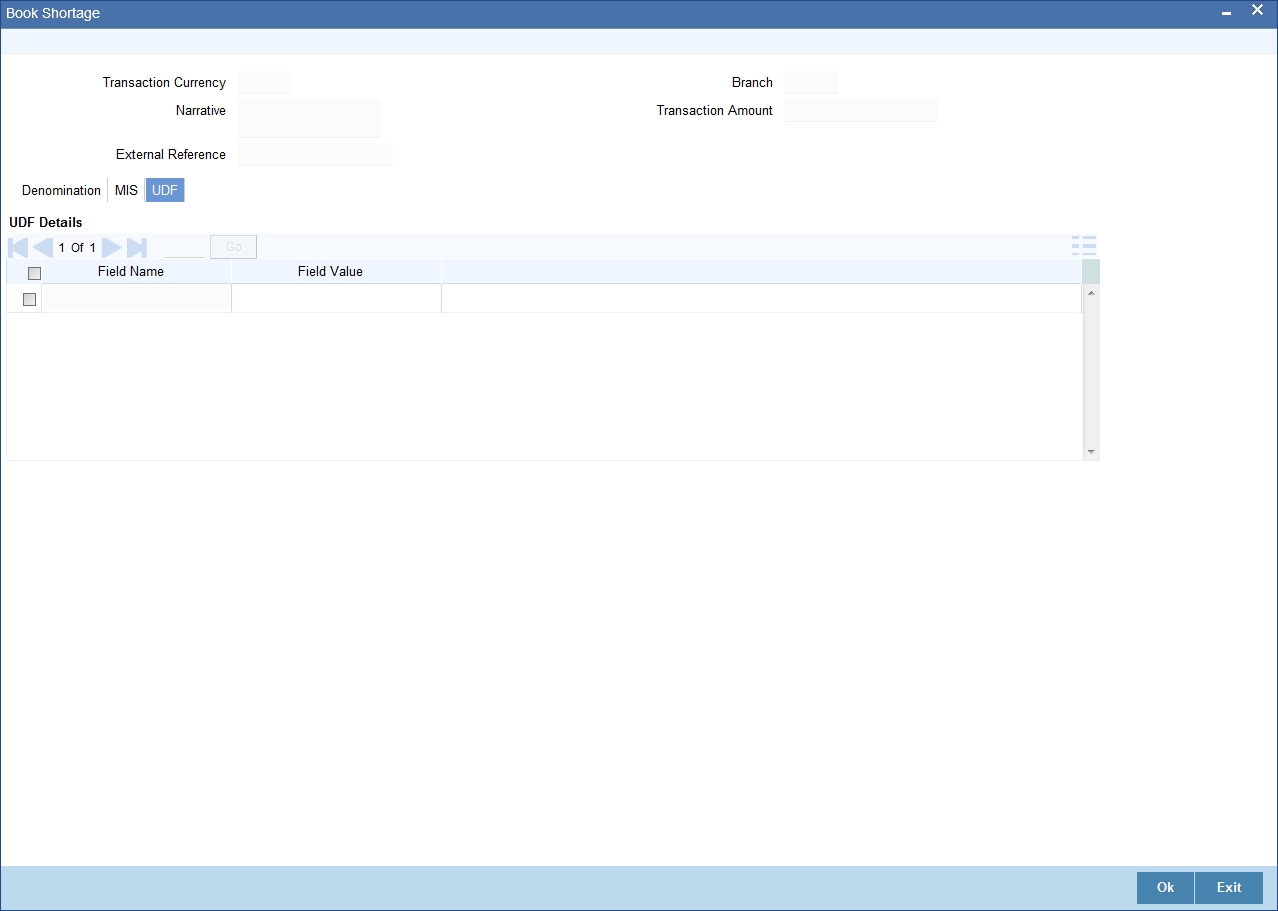
UDF Name
The system will display all the User-Defined Fields (UDF) maintained for the product in the Host.
UDF Value
Specify the value for the required UDFs.
Click save icon to save the transaction. The approver can fetch this transaction for his/her task list and authorize it.
Refer the chapters titled ‘Transaction Workflow’ and ‘Common Operations’ in this User Manual for details on the authorization process.
13.2 Booking Overage
This section contains the following topics:
- Section 13.2.1, "Invoke ‘Booking Overage’ screen"
- Section 13.2.2, "Specifying Denomination Details"
- Section 13.2.3, "Specifying the MIS details"
- Section 13.2.4, "Specifying the UDF Details"
13.2.1 Invoke ‘Booking Overage’ screen
You can book overage of a currency using the ‘Book Overage’ screen. You can invoke this screen by typing ‘7552’ in the field at the top right corner of the Application tool bar and clicking on the adjoining arrow button.
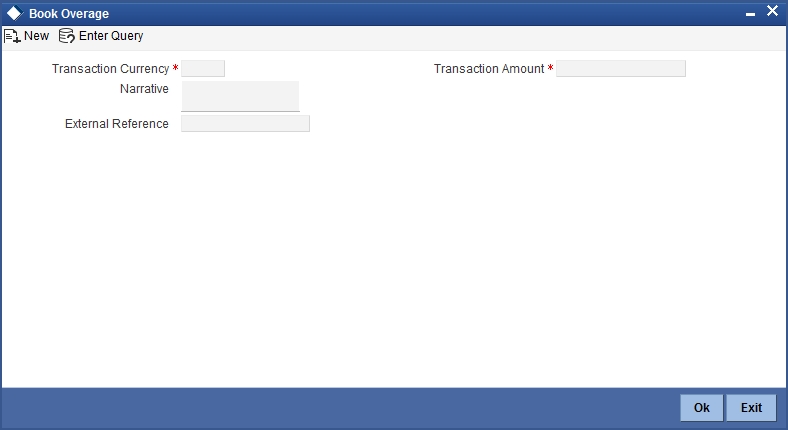
Here, you can capture the following details:
Transaction Currency
Select the currency to be booked for overage.
Transaction Amount
Specify the total amount to be booked for overage.
Narrative
Enter description of the transaction.
The screen has two tabs which are as follows:
- Denom
- MIS
- UDF
External Reference
This is system generated reference number for the branch, which is the unique identifier for a branch transaction.
13.2.2 Specifying Denomination Details
You can specify denomination details in the ‘Denomination’ tab of the ‘Book Overage’ screen.
The following details have to be captured in this section:
Currency Code
The system displays the currency of the account.
Denomination Code
Specify the denomination of the currency used in the transaction. For every currency, the various denominations are assigned separate denomination codes. These codes are displayed in the adjoining option list. Choose the appropriate one.
Denomination Value
The system computes the face value of the denomination and displays it. For instance if the denomination code represents a USD 100, the value will be displayed as ‘100’.
Units
Indicate the number of units of the specified denomination. Till contents are incremented as a result of inflow transactions like cash deposit and decremented for outflows. To reverse this default behaviour, you can specify units in negative.
Total Amount
The system computes the denomination value by multiplying the denomination value with the number of units. For instance, if the denomination code represents a USD 100 and the number of units is 10, the denomination amount will be ‘1000’.
13.2.3 Specifying the MIS details
You can capture the details in the ‘MIS’ tab of the screen:

MIS is user definable and is configured at the host.
Refer to the Oracle FLEXCUBE host user manual for details.
As an example, the following details may be captured in this screen:
Cost Center
Specify the MIS code assigned to the cost center related to the account involved in the transaction.
Account Officer
Specify the MIS code assigned to the account officer in-charge of executing this transaction.
Standard Industrial Code
Specify the MIS code assigned to the industry to which your customer belongs.
13.2.4 Specifying the UDF Details
You can capture these details in the ‘UDF’ tab of the screen.
Specify the following details.
Field Description
The system will display all the User-Defined Fields (UDF) maintained for the product.
Field Value
Specify the value for the required UDFs.
In the single stage flow, if there is an transaction level override or error during approval then the transaction will be moved to the pending queue. Without save action being initiated, the transaction will not be in pending queue.
On clicking Pickup button, the system populates the values in all the callforms of the screen and clicking pickup button is mandatory if you make any changes to the Transaction amount and exchange rate after first pickup.
Once you click ‘Pickup’ button once, then on amendment of xrate, amount, charge, pickup will be mandatory before save. On pick up, the fields that are currently enabled in the enrich stage will alone be retained as enabled fields.
The approver can fetch this transaction for his/her task list and authorize it.
Refer the chapters titled ‘Transaction Workflow’ and ‘Common Operations’ in this User Manual for details on the authorization process.
13.3 Transfer Cash from Teller
You can transfer cash from teller using the ‘Transfer cash from Teller screen. You can invoke this screen by typing ‘BCFT’ in the field at the top right corner of the Application tool bar and clicking on the adjoining arrow button.
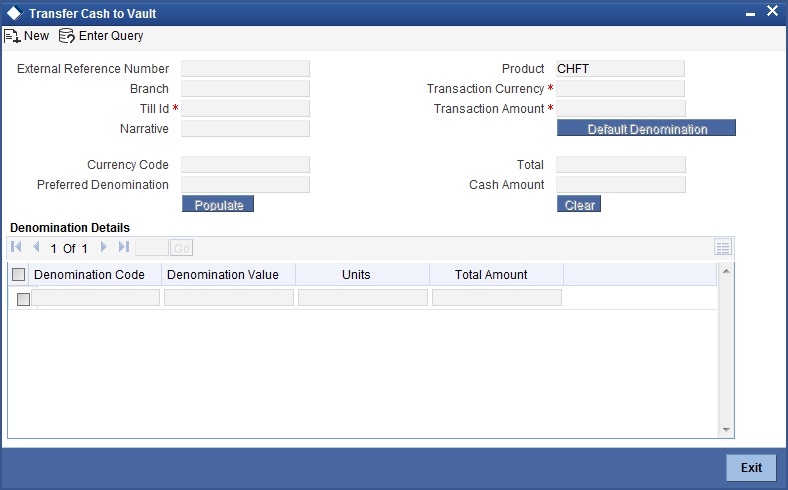
Here, you can capture the following details:
External Reference Number
This is system generated reference number for the branch, which is the unique identifier for a branch transaction.
Branch Code
The current branch is defaulted here.
Till ID
Select the till from which the cash has to be transferred.
Transaction Currency
Select the currency to be transferred from teller.
Transaction Amount
Specify the total amount to be transferred.
Narrative
You may enter remarks about the transaction here. This is a free format text field.
Denomination Details
Specify the following details.
Currency Code
The system displays the currency of the account.
Denomination Code
Specify the denomination of the currency used in the transaction. For every currency, the various denominations are assigned separate denomination codes. These codes are displayed in the adjoining option list. Choose the appropriate one.
Denomination Value
The system computes the face value of the denomination and displays it. For instance if the denomination code represents a USD 100, the value will be displayed as ‘100’.
Units
Indicate the number of units of the specified denomination. Till contents are incremented as a result of inflow transactions like cash deposit and decremented for outflows. To reverse this default behaviour, you can specify units in negative..
Total Amount
The system computes the denomination value by multiplying the denomination value with the number of units. For instance, if the denomination code represents a USD 100 and the number of units is 10, the denomination amount will be ‘1000’.
The completed transaction can be viewed in the ‘Completed Transaction’ list. The approver can fetch this transaction for his/her task list and authorize it.
In the single stage flow, if there is an transaction level override or error during approval then the transaction will be moved to the pending queue. Without save action being initiated, the transaction will not be in pending queue.
On clicking Pickup button, the system populates the values in all the callforms of the screen and clicking pickup button is mandatory if you make any changes to the Transaction amount and exchange rate after first pickup.
Once you click ‘Pickup’ button once, then on amendment of xrate, amount, charge, pickup will be mandatory before save. On pick up, the fields that are currently enabled in the enrich stage will alone be retained as enabled fields.
Refer the chapters titled ‘Transaction Workflow’ and ‘Common Operations’ in this User Manual for details on the authorization process.
13.4 Sell Cash to Teller
You can perform cash transfer between Tellers within a branch in the ‘Sell Cash to Teller’ screen.
The Remitting Teller initiates the cash transfer within the same branch and specifies the Till to which the amount has to be transferred. The Receiving Teller can either save the transaction or discard it and cannot modify the transaction. The Receiving Teller manually verifies the transaction and clicks the ‘Save’ button confirming the transaction. After saving the transaction, the respective Till balances gets updated.
During authorization, the system triggers accounting entries and actual Till transfer takes place. After authorization, you cannot perform reversal of the transaction.
Note
If there are any ‘Transfer Cash to Till’ transaction initiated by Remitting Teller, which is incomplete, you cannot close the Till of both the Remitting Teller and the Receiving Teller.
You can invoke the screen by typing SCTT in the field at the top right corner of the Application tool bar and clicking on the adjoining arrow button.
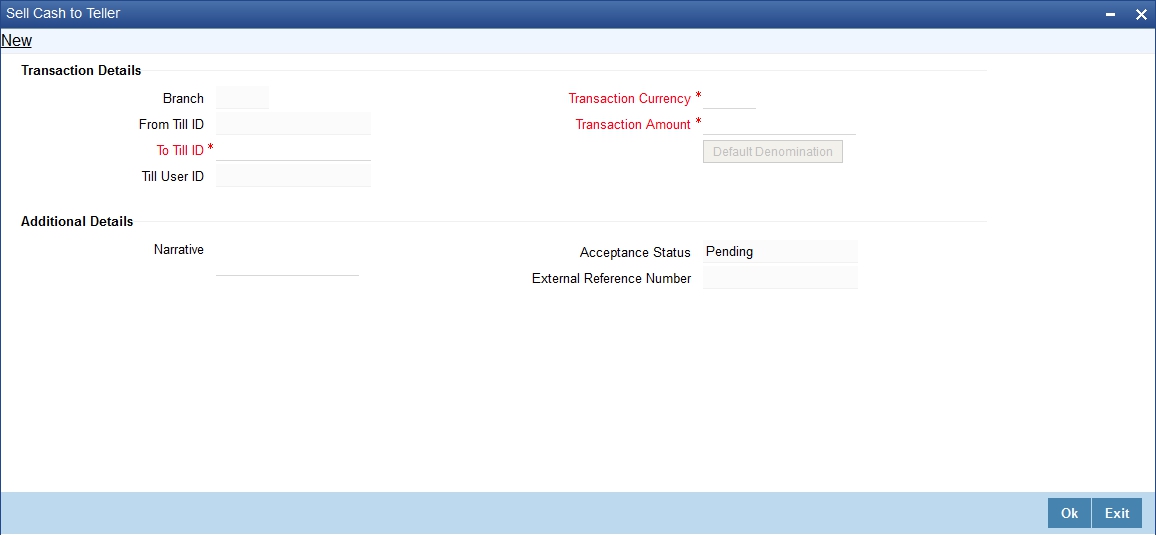
You can specify the following details.
Transaction Details
Branch
The system displays the branch code maintained in the system.
From Till ID
The system displays the till from where the cash is transferred.
To Till ID
Specify the Till Id where the cash has to be transferred. Alternatively, you can select Till Id from the option list. The list displays all the Till IDs maintained in the system.
Till User ID
The system displays the respective Till User ID maintained in the system.
Transaction Currency
Specify the currency code for the transaction. Alternatively, you can select the currency code from the option list.The list displays all the transaction currency maintained in the system.
Transaction Amount
Specify the total amount to be transferred.
Additional Details
Narrative
Specify the remarks if any while performing cash transfer between Tellers within a branch.
Currency Code
The system displays the currency code of the transaction currency maintained in the system.
Preferred Denomination
Specify the preferred currency denomination for the transaction.
External Reference Number
The system displays the external reference number for the branch, which is the unique identifier for a branch transaction.
Cash Amount
The system displays the total cash amount in denominations block maintained in the system.
Denomination Total
The system displays the denomination total maintained in the system.
Denomination Details
Denomination Code
Specify the denomination code of the currency used in the transaction. Alternatively, you can select the denomination code from the option list. For every currency, various denominations are assigned to separate the denomination codes.
Denomination Value
The system displays the face value of the denomination maintained in the system.
Units
Specify the number of units of the denomination. Till contents are incremented as a result of inflow transactions like cash deposit and decremented for outflows. To reverse this default behavior, you can specify units in negative.
Total Amount
The system displays the denomination value by multiplying the denomination value with the number of units.
Acceptance Status
The system displays the appropriate acceptance status maintained in the system. The system displays the following values:
- Pending - Status on transaction initiation.
- Completed - Status on receiving teller accepts.
- Discarded - Status on receiving teller discards.
13.5 Inter Branch Transaction
This section contains the following topics:
- Section 13.5.1, "Inter Branch Transaction Input"
- Section 13.5.2, "Inter Branch Transaction Request"
- Section 13.5.3, "Previewing Messages"
- Section 13.5.4, "Viewing Inter Branch Transaction Request Summary"
- Section 13.5.5, "Liquidating Inter Branch Transaction"
13.5.1 Inter Branch Transaction Input
You can transfer cash from source branch to destination branch in the ‘Interbranch Transaction Input’ screen. You can enter vault details to which the cash will be received in this screen.
During Cash Pickup or Cash Delivery, the remitting bank can book an input transaction in the ‘Inter Branch Transaction Input’ screen. You can save the denomination details and print an advice for the same. Simultaneously, the system updates the request status of the record to ‘Initiated’ for the Request Reference Number.
You can invoke this screen by typing ‘1410’ in the field at the top right corner of the Application tool bar and clicking on the adjoining arrow button.
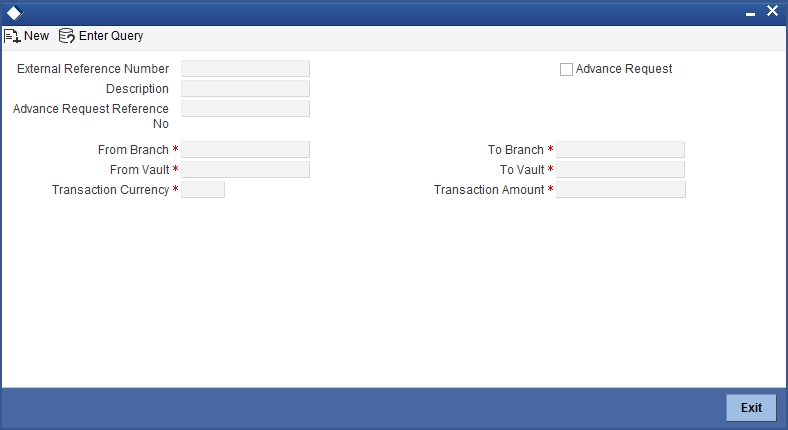
You can specify the following here:
External Reference
The system displays the external reference number.
Description
You can enter any remark about the cash transfer.
From Branch
The system displays the current active branch office from where the cash will be sent.
From Branch Name
The system displays the name of the branch from which the request is initiated.
To Branch
Specify the destination branch where the cash will be received.
To Branch Name
The system displays the name of the branch to which the request is initiated.
From Vault
The system displays the vault based on the ‘From Branch’ field.
To vault
Specify the destination vault.
Transaction Currency
Specify the transaction currency. The adjoining option lists all the currencies maintained in the system. You can choose the appropriate one.
Transaction Amount
Specify the transaction amount.
Advance Request Reference No
Check this box to allow the current branch to create an advance request to another branch for cash.
Note
When ‘Advance Request’ box is checked, the system does the following:
- The from Branch/Vault can be selected
- The to vault (receiver) will be defaulted to current Branch/Vault
- The From vault will be defaulted based on sender branch
- No accounting entries or updates will be available for this transaction
In the single stage flow, if there is an transaction level override or error during approval then the transaction will be moved to the pending queue. Without save action being initiated, the transaction will not be in pending queue.
On clicking Pickup button, the system populates the values in all the callforms of the screen and clicking pickup button is mandatory if you make any changes to the Transaction amount and exchange rate after first pickup.
Once you click ‘Pickup’ button once, then on amendment of xrate, amount, charge, pickup will be mandatory before save. On pick up, the fields that are currently enabled in the enrich stage will alone be retained as enabled fields.
Enrichment stage
On clicking save icon, the system validates and ensures for minimum mandatory data entry. If the data entry is found alright, it will calculate the charge based on the transaction type.
In addition to the details, captured in the previous stage, the system defaults the following details:
Denomination Code
Specify the denomination of cash that has to be transferred.
Denomination Value
The system displays the value of the denomination.
Units
Specify the number of units of selected denomination.
Total Amount
The system displays the total amount.
Note
- The system validates whether the vault has sufficient cash balance. The system also checks whether the operation with sending cash is allowed for the receiving branch. For such transactions, you cannot change the transit account information. On saving the transaction, necessary accounting entries will be posted and the vault value will be updated. Thus the ‘Send’ operation will be completed. However, you can reverse the contract after authorization and the already posted accounting entries is reversed via the ‘REVR’ event.
- If Denomination Tracking setup is maintained as 'None', then denomination tracking is not applicable.
After authorization, if a record is reversed, which is linked to Inter Branch Transaction Request, the system updates the request status of the record to ‘Cancelled’ in the ‘Inter Branch Transaction Request’ screen. You cannot reuse a cancelled record.
13.5.2 Inter Branch Transaction Request
Oracle FLEXCUBE facilitates inter branch transaction request. A ‘Pickup of Cash’ or ‘Delivery of Cash’ request can be raised by a branch with the central cash depository, which is another branch in Oracle FLEXCUBE.
A branch raises the request in the following scenarios:
- Pick up of Cash request - If the branch has cash in excess
- Delivery of Cash request - If there is a shortage of cash, for a future date
The branch to which the request is raised, acknowledges the request and generates advices for inter branch cash transfer request. Every request is identified by a unique ‘Request Reference Number’, which is automatically generated on save for a new request.
You can query the record through the ‘Inter Branch Transaction Request’ screen. You can invoke this screen by typing ‘RTDBRTRX’ in the field at the top right corner of the Application tool bar and clicking on the adjoining arrow button.
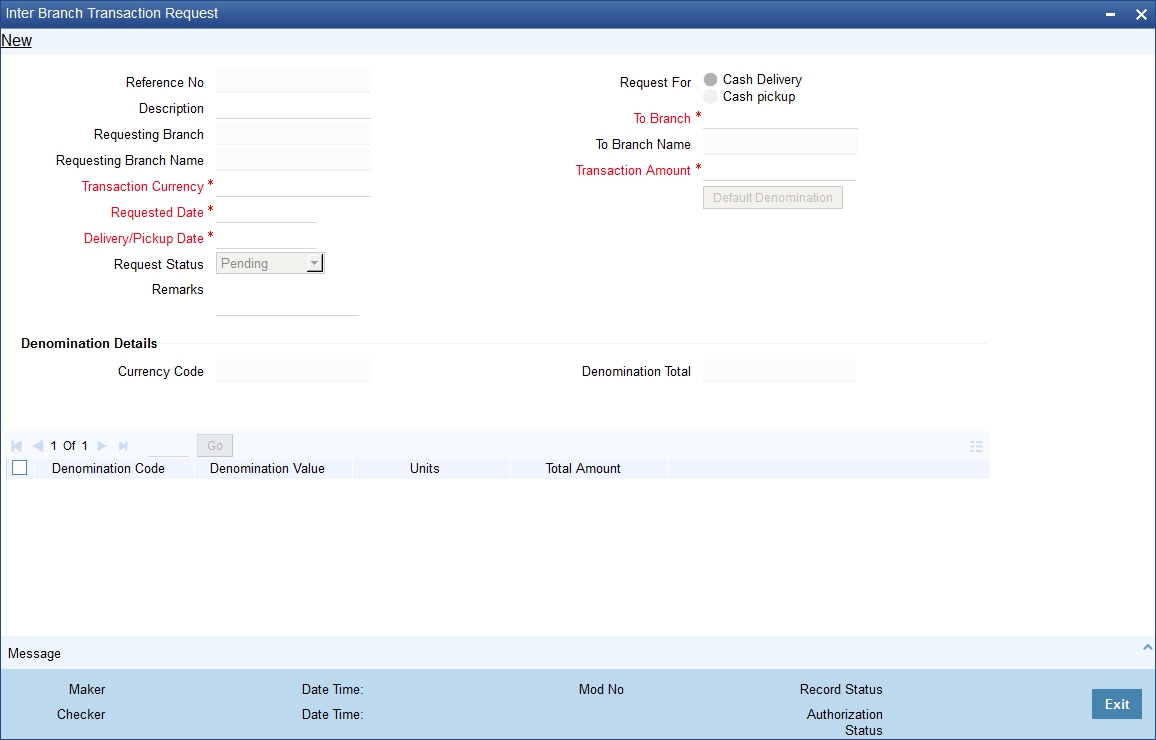
You can specify the following details:
Request Reference Number
The system displays a unique system generated request reference number.
Description
Specify the description of the request.
Request for
Select the request for type for the inter branch transaction request. The options are as follows:
- Cash Pickup - If the branch has cash in excess
- Cash Delivery - If there is a shortage of cash, for a future date
Requesting Branch
The system defaults the current branch code.
Requesting Branch Name
The system defaults the current branch name.
To Branch
Specify the branch code of the branch to which the request is raised. Alternatively, you can select the branch code from the option list. The list displays all the branch code maintained in the system.
To Branch Name
The system defaults the branch name based on the ‘Request To Branch Code’ selected.
Transaction currency
Specify the transaction currency. Alternatively, you can select the currency from the option list. The list displays all the currency code maintained in the system.
Note
While saving the transaction, the system performs validation to check whether the transaction currency is allowed for both ‘From Vault’ and ‘To Vault’.
Transaction Amount
Specify the transaction amount which has to be transferred.
Request Date
The system defaults the application date as the request date. You are allowed to edit it as a current system date only.
Delivery/ Pickup Date
Select the delivery or pickup date from the adjoining calendar. This date should not be lesser than the ‘Request Date’.
The system displays an override message, if the Delivery/ Pickup Date is a holiday for the 'To Branch'.
Note
If an Inter Branch Transaction is liquidated on a later date and not on the Delivery Date, then post liquidation, the system updates the actual delivery date as Delivery / pickup date in RTDBRTRX.
Request Status
Select the request status from the drop-down list. The list displays the following values:
- Accept
- Reject
- Pending
- Initiated
- Liquidated
- Cancelled
Note
The following are system defined statuses:
- Pending
- Initiated
- Liquidated
- Cancelled
You cannot select these statuses during inter branch transaction request. On click of ‘New’ button, the system defaults the Request Status as ‘Pending’. You cannot edit it.
Remarks
Specify remarks against a particular status. It is mandatory to specify remark, if a request is rejected.
Denomination Details
The system displays the following details:
- Currency Code
- Denomination Total
- Denomination Code
- Denomination Value
- Units
- Total Amount
When the record is accepted, the system generates the advices/messages for both Pickup/Delivery Request.
Note
- The system updates the status of the request to ‘Initiated’, if the request is initiated through ‘Inter Branch Transaction Input’ (1410) screen.
- The system updates the status of the request to ‘Liquidated’, if the request is liquidated through ‘Inter Branch Transaction Liquidation’ (1411) screen.
- You can close a request only if the status of the request is ‘Pending’.
- You can only select the record status to ‘Accept’ or ‘Reject’.
- You can select the record status to ‘Accept’ or ‘Reject’ only when the logged in branch matches with the 'To Branch' of the request. If the record fetched is in any other branch other than ‘To branch’, this field is not enabled.
- You cannot modify the status of a request, if the system updates the request status to ‘Liquidated’ or ‘Initiated’.
- You cannot modify the status of a rejected request. Once a request is rejected, it cannot be reused. You should provide a remark stating a reason for rejection.
- You can modify the request record post authorization, only if the record is in ‘Pending’ status.
- While raising a request, it is not mandatory to specify the denominations. If you click ‘Default Denomination’, then it is mandatory to specify the ‘Units’ under the denomination details.
13.5.3 Previewing Messages
You can preview the advice/message generated for the Inter-Branch Transaction Request using ‘Message’ screen. To invoke this screen, click ‘Message’ button.
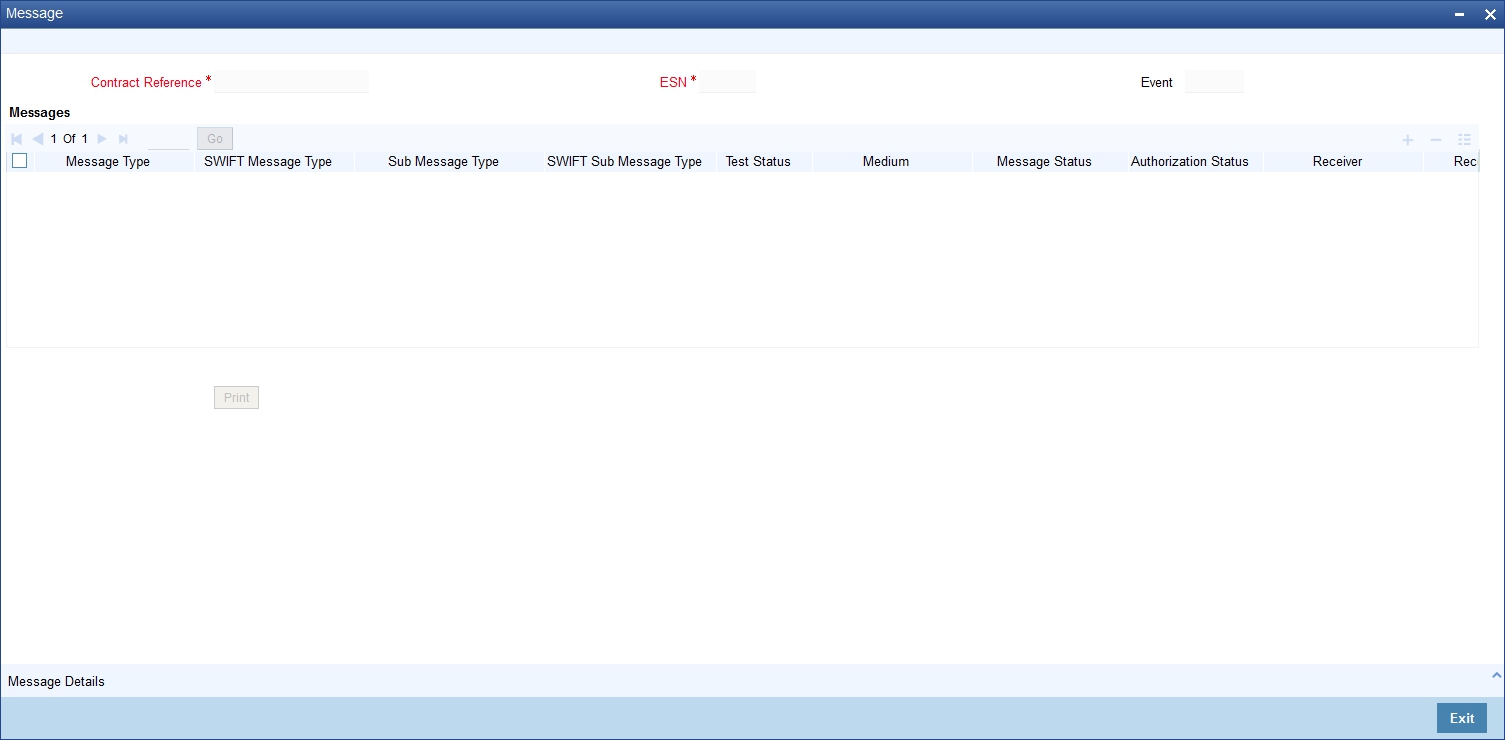
You can specify the following details:
Contract Reference
Specify the contract reference number of the inter-branch transaction request.
The system displays the following details:
- ESN
- Event
- Message Type
- SWIFT Message Type
- Medium
- Message Status
- Authorization Status
- Receiver
- Receiver Name
- DCN
When a request status is accepted, saved and auto authorized, the system generates the advices/message, which are available for print. To print the generated advice/message, select a message and click ‘Print’ button.
The system generated two type of messages, they are:
- Accept Advice - This advice is generated if the request raised is accepted
- Reject Advice - This advice is generated if the request raised is rejected
13.5.3.1 Viewing Message Details
To view a message details, click ‘Message Details’ button to view the complete message.
You can view the following details of the message:
- Reference number
- Document number
- ESN/Version Number
- Receiver/Sender
- Message Type
- SWIFT Message Type
- Message - Text of the message
- Remarks
- Reject Reason
- Message Trailers
13.5.4 Viewing Inter Branch Transaction Request Summary
You can view the details of the request raised by the current branch or the request received for the current branch in the ‘Inter Branch Transaction Request Summary’ screen. You can invoke this screen by typing ‘RTSBRTRX’ in the field at the top right corner of the Application tool bar and clicking on the adjoining arrow button.
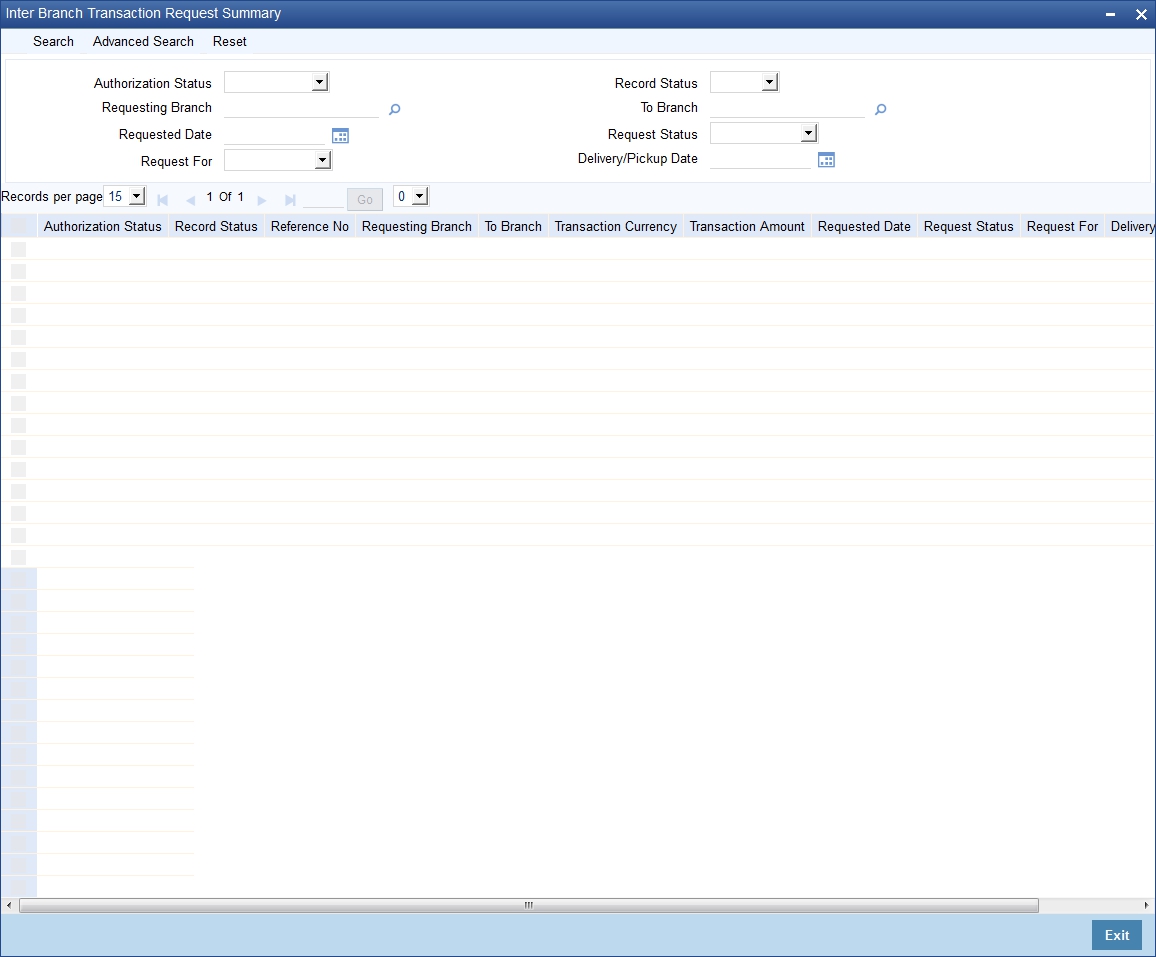
In the above screen, you can base your queries on any or all of the following parameters and fetch records:
- Authorization Status
- Requesting Branch
- Requested Date
- Request For
- Record Status
- To Branch
- Request Status
- Delivery/Pickup Date
Click ‘Search’ button. The system identifies all records satisfying the specified criteria and displays the following details for each one of them:
- Authorization Status
- Record Status
- Reference No
- Requesting Branch
- To Branch
- Transaction Currency
- Transaction Amount
- Requested Date
- Request Status
- Request For
- Delivery/Pickup Date
13.5.5 Liquidating Inter Branch Transaction
You can liquidate interbranch transaction initiated by the sending branch cash from source branch to destination branch in the ‘Interbranch Transaction Liquidation’ screen. You can invoke this screen by typing ‘1411’ in the field at the top right corner of the Application tool bar and clicking on the adjoining arrow button.
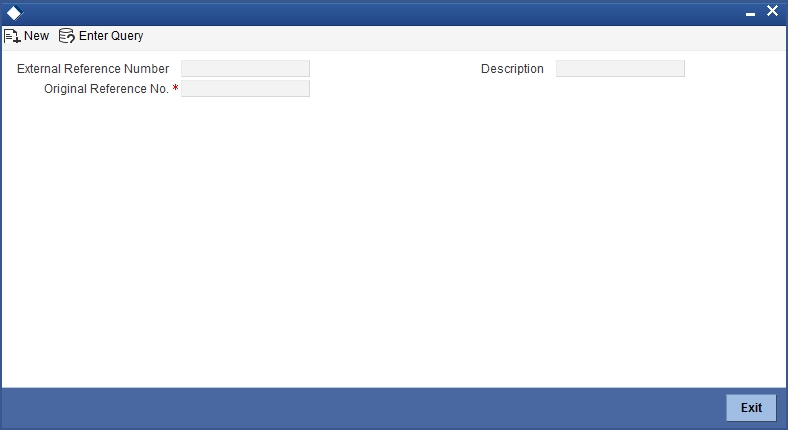
Query Details
The system displays the following:
Original reference no
Specify the original reference number. Alternatively, you can select the original reference number from the option list. The list displays all the valid original reference number maintained in the system.
From Branch
The system displays the current active branch office from where the cash will be sent.
From Branch Name
The system displays the name of the branch from which the request is initiated.
On click of ‘Query’ button, the system defaults following fields:
- To Branch
- From Vault
- To Vault
- Transaction Currency
- Transaction Amount.
To Branch Name
The system displays the name of the branch to which the request is initiated.
Additional Details
External Reference Number
The system displays the external reference number.
Denomination Details
Denomination Code
The system defaults the denomination code maintained during the initiation stage.
Denomination Value
The system displays the value of the denomination.
Units
The system displays the units entered by the initiator.
Total Amount
The system displays the total amount.
Clicking ‘Query’ button, the system validates if all the mandatory details are specified. This button will be disabled after the first click.
Note
- If an Inter Branch Transaction is liquidated on a later date and not on the Delivery Date, then post liquidation, the system updates the actual delivery date as Delivery / pickup date in RTDBRTRX.
- If Denomination Tracking setup is maintained as 'None', then denomination tracking is not applicable.
In the single stage flow, if there is an transaction level override or error during approval then the transaction will be moved to the pending queue. Without save action being initiated, the transaction will not be in pending queue.
On clicking Pickup button, the system populates the values in all the callforms of the screen and clicking pickup button is mandatory if you make any changes to the Transaction amount and exchange rate after first pickup.
Once you click ‘Pickup’ button once, then on amendment of xrate, amount, charge, pickup will be mandatory before save. On pick up, the fields that are currently enabled in the enrich stage will alone be retained as enabled fields.