15. Batches
15.1 Introduction
This chapter details the various batch operations that are done in this module.
This chapter contains the following sections:
- Section 15.2, "Clearing Inward Cheque Data Entry"
- Section 15.3, "Clearing Inward Data Entry"
- Section 15.4, "Consolidated Cheques Data Entry"
- Section 15.5, "Clearing Outward Data Entry"
- Section 15.6, "Running EOD"
- Section 15.7, "Querying Tellers Status"
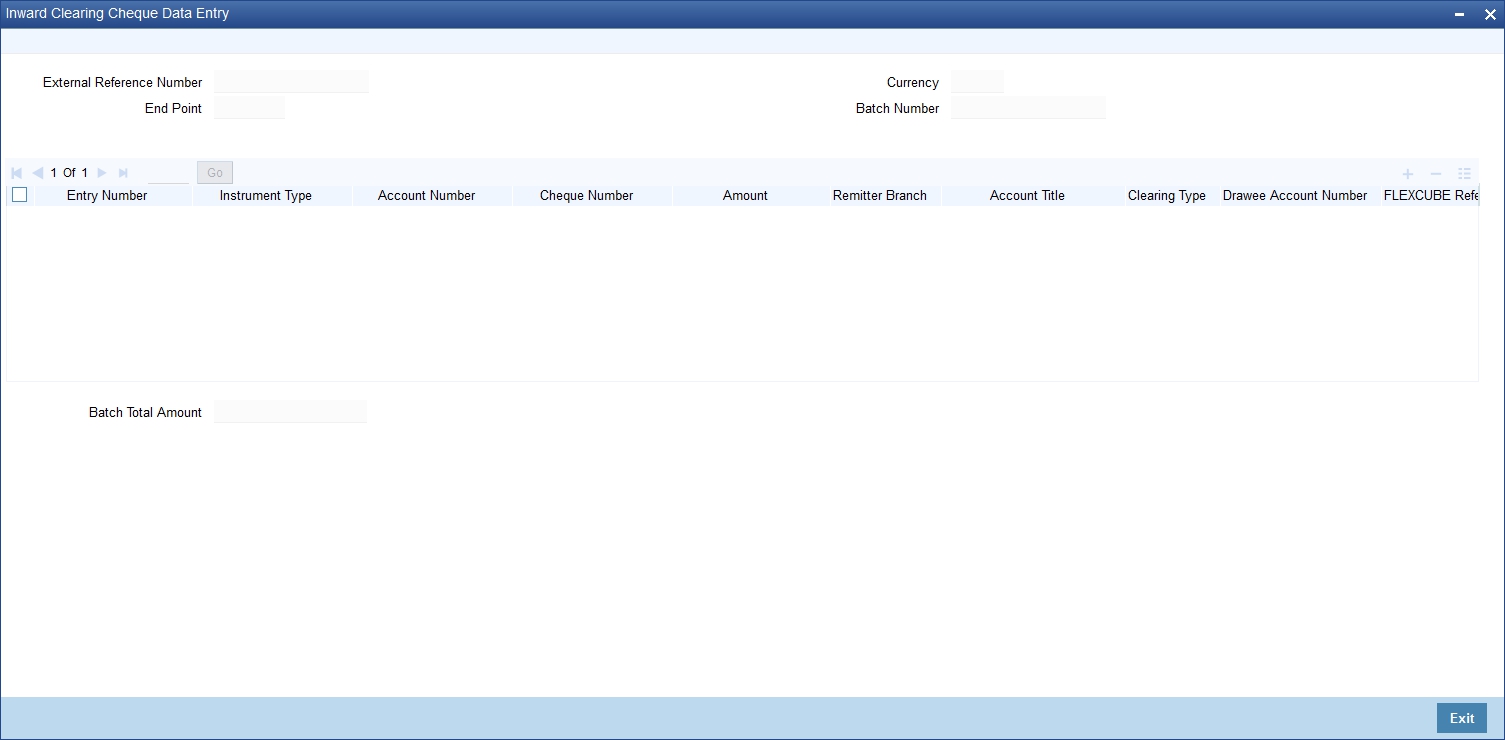
15.2 Clearing Inward Cheque Data Entry
You can do an Inward clearing cheque data entry using the ‘Inward Cheque Clearing Data Entry’ screen. You can invoke this screen by typing ‘5521’ in the field at the top right corner of the Application tool bar and clicking the adjoining arrow button.
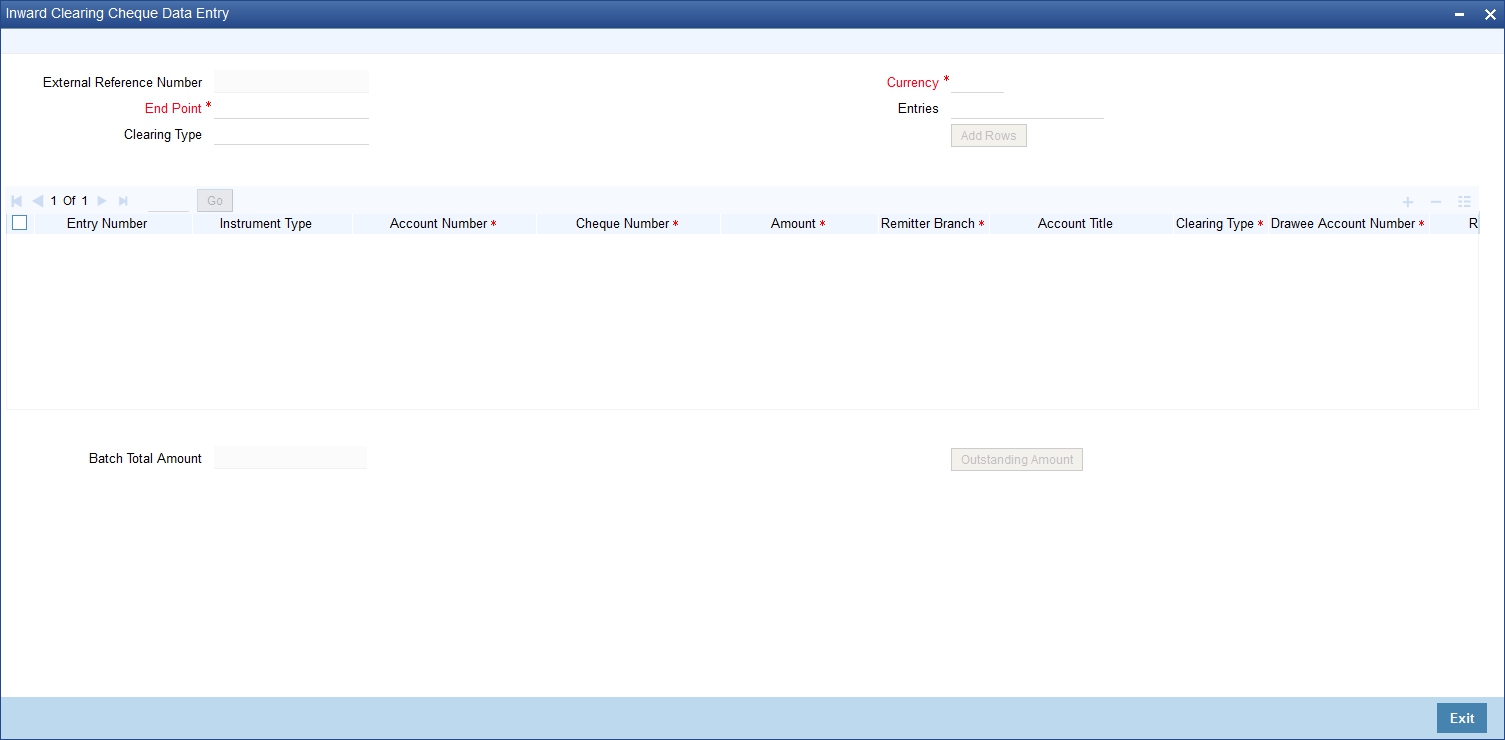
Here, you can capture the following details:
External Reference Number
The system generated reference number is displayed here.
End Point
Select the end point from the option list available.
Batch Number
The system generates the batch number and displays it only on Enrich.
Currency
Select the currency from the option list available.
Entries
Enter the number of rows to be displayed.
On clicking ‘Add Rows’ button, the system displays the number of rows mentioned in the Entries Field and defaults the clearing type and added rows.
Entry Number
The system generates an unique sequence number for each Instrument Type.
Instrument Type
The system displays the default value ‘cheque’ for instrument type.
Account Number
Select the account number from the option list available.
To view the joint holder’s details of an account and the mode of operation maintained at the account level, place the cursor on the Account Number field and press Ctrl+J. The system displays the ‘Joint Holder’ screen.
For more information on the ‘Joint Holder’ screen refer to the section ‘Joint Holder Maintenance’ in the Core User Manual.
Cheque Number
Specify the number of the cheque for inward clearing.
Amount
Specify the amount for inward clearing.
Remitter Branch
The branch where the remitter account is maintained is displayed here. However you can modify it.
Account Title
The system defaults the account title when you select the account.
Clearing Type
Specify the clearing type of the instrument to be cleared. The option list displays all valid clearing types maintained in the system. Choose the appropriate one.
Drawee Account Number
Specify the drawee account number.
Routing Number
Specify the routing number for cheque clearing. The adjoining option list displays all routing numbers along with the Branch codes. You can select the appropriate one.
Narrative
The system defaults the narrative as 'Cheque Paid - Cheque no - Cheque Number - Payee
A/c Number- Account Number'. Once you specify the 'Cheque Number' and 'Payee Account Number', the system replaces the field values respectively on tabbing out from the field.
Instrument Date
Specify the instrument date.
Beneficiary Routing Number
Specify the routing number of the beneficiary bank. The adjoining option list displays Banks’
routing numbers, excluding the current bank. You can select the appropriate one.
Instrument Issue Date
Specify the instrument issue date. You can click on the adjoining calendar icon and select the appropriate date.
Note
If the difference between the ‘Instrument Issue date’ and the ‘Instrument Date’ is greater than the ‘Cheque Stale Days’ maintained at the ‘Branch Parameters Maintenance’ screen, an error message stating that the cheque is a stale one will be displayed. However, stale cheque validation would not be done if the field ‘Cheque Stale days’ is not maintained at the ‘Branch Parameters Maintenance’ screen.
After entering these details click save icon move to the enrichment stage.
Enrichment Stage
In this stage you can also modify the details you have entered in the input stage if required.
Click save icon to save the transaction. The system displays the message as “Transaction Completed Successfully”.
15.3 Clearing Inward Data Entry
You can do an Inward clearing data entry using the ‘Inward Clearing Data Entry’ screen. You can invoke this screen by typing ‘5555’ in the field at the top right corner of the Application tool bar and clicking the adjoining arrow button.
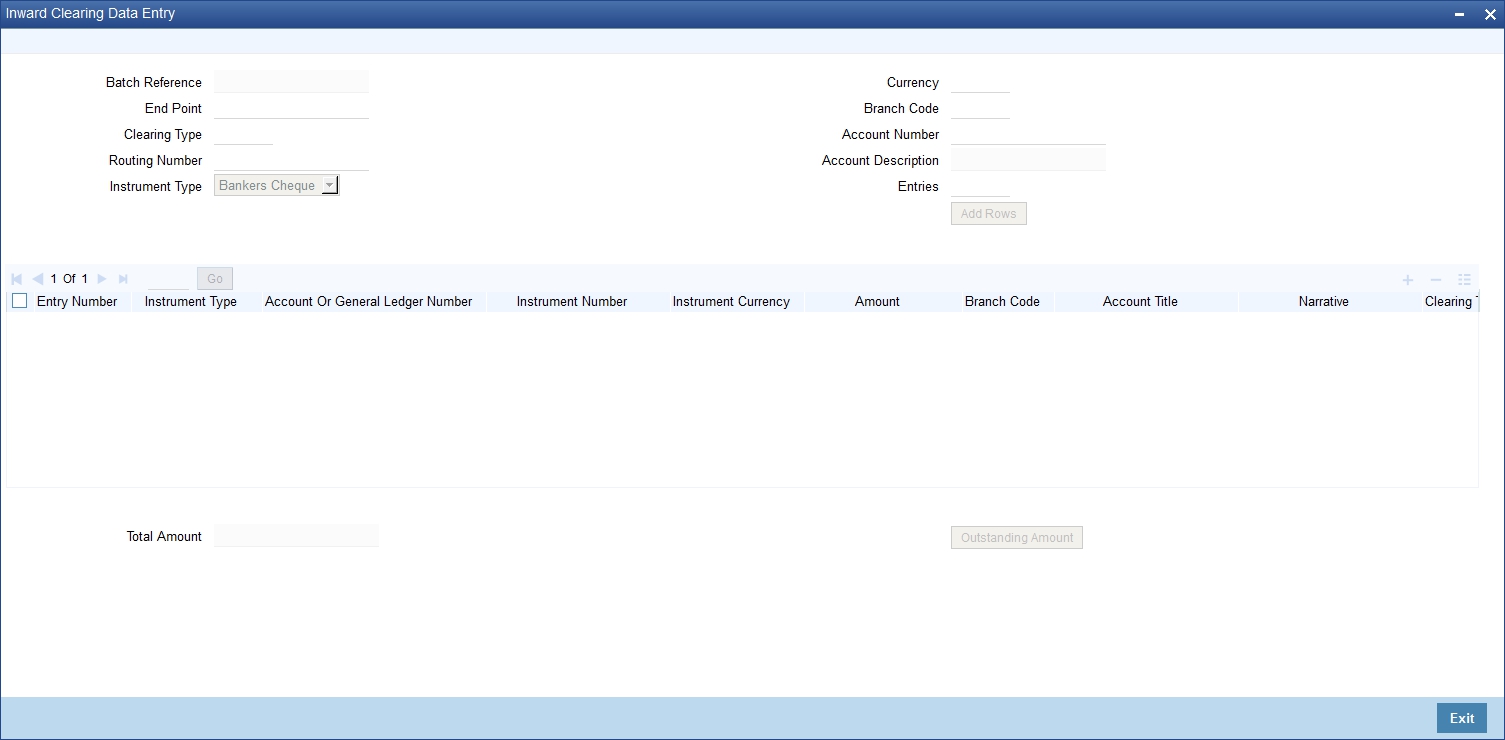
Here, you can capture the following details:
Batch Reference
The system generated reference number is displayed here.
End Point
Select the end point. The option list displays all valid end points maintained in the system. Choose the appropriate one.
Clearing Type
Specify the clearing type of the instrument to be cleared. The option list displays all valid clearing types maintained in the system. Choose the appropriate one.
Routing Number
Specify the routing number for clearing. The adjoining option list displays all routing numbers along with the Branch codes. You can select the appropriate one.
Beneficiary Routing Number
Specify the routing number of the beneficiary bank. The adjoining option list displays Banks’ routing numbers, excluding the current bank. You can select the appropriate one.
Instrument Type
Select the instrument type from the drop-down list. The following are the options available in the drop-down list:
- Bankers Cheque
- Demand draft
- Cheque
Currency
Select the currency. The adjoining option list displays all valid currencies maintained in the system. You can select the appropriate one.
Branch Code
Select the branch code. The adjoining option list displays all valid branch codes maintained in the system. You can select the appropriate one.
Account Number
Select the account number. The adjoining option list displays all valid account numbers maintained in the system. You can select the appropriate one.
To view the joint holder’s details of an account and the mode of operation maintained at the account level, place the cursor on the Account Number field and press Ctrl+J. The system displays the ‘Joint Holder’ screen.
For more information on the ‘Joint Holder’ screen refer to the section ‘Joint Holder Maintenance’ in the Core User Manual.
Entries
Enter the number of rows to be displayed.
On clicking ’Add Rows’ button, the system displays the number rows that you have entered in the Entries field.
Entry Number
The system generates an unique sequence number for each Instrument Type.
Instrument Type
The system displays the instrument type. However you can modify it by selecting one of the following options available in the drop-down list:
- Bankers Cheque
- Demand draft
- Cheque
Account or General Ledger Number
Select the account number from the option list available.
Instrument Number
Specify the instrument number for inward clearing. The option list displays all valid instrument currencies maintained in the system. Choose the appropriate one.
Instrument Amount
Enter the amount for which the instrument is being drawn.
Branch code
The system displays the branch code here.
Account Title
The account title will be defaulted from the account list of value.
Narrative
The system defaults the narrative as 'Cheque Paid - Cheque no - Cheque Number - Payee
A/c Number - Account Number'. Once you specify the 'Cheque Number' and 'Payee Account Number', the system replaces the field values respectively on tabbing out from the field.
Clearing Type
Specify the clearing type of the instrument to be cleared. The option list displays all valid clearing types maintained in the system. Choose the appropriate one.
Issuing Branch
The branch where the issuer account is maintained is displayed here. However you can modify it.
Instrument Currency
Specify the currency of the instrument. The option list displays all valid instrument currencies maintained in the system. Choose the appropriate one.
Instrument Date
Specify the instrument date from the adjoining calendar.
Routing Number
Specify the routing number for inward clearing. The adjoining option list displays all routing numbers along with the Branch codes and Bank Codes. You can select the appropriate one.
End Point
Select the end point. The option list displays all valid end points maintained in the system. Choose the appropriate one.
Batch Number
The system generates the batch number and displays it on saving the transaction.
Drawee Account Number
Specify the account from which money is drawn.
Beneficiary Routing Number
Select the beneficiary routing number from the adjoining option list.
Narrative
Enter remarks about the transaction.
Total Amount
On clicking ‘Outstanding Amount’ button, the system displays the total amount of the transaction.
In the single stage flow, if there is an transaction level override or error during approval then the transaction will be moved to the pending queue. Without save action being initiated, the transaction will not be in pending queue.
On clicking Pickup button, the system populates the values in all the callforms of the screen and clicking pickup button is mandatory if you make any changes to the Transaction amount and exchange rate after first pickup.
Once you click ‘Pickup’ button once, then on amendment of xrate, amount, charge, pickup will be mandatory before save. On pick up, the fields that are currently enabled in the enrich stage will alone be retained as enabled fields.
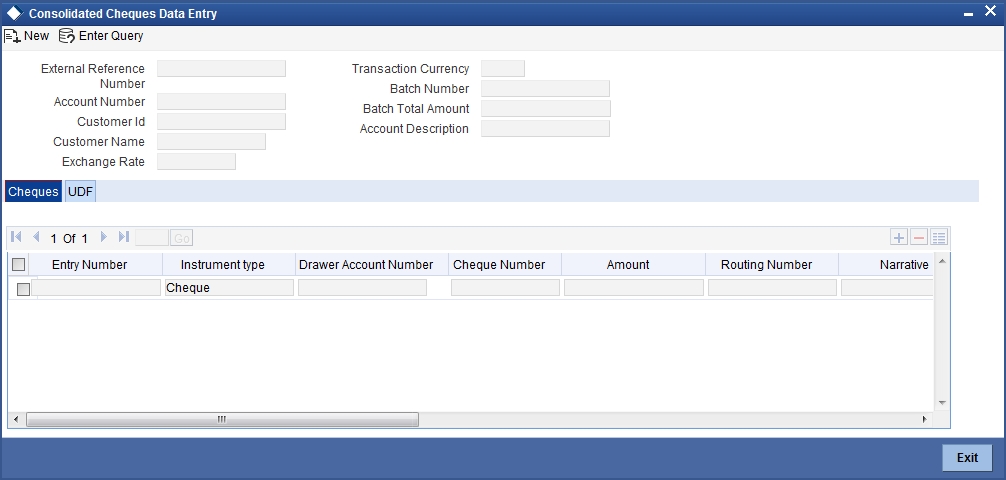
15.4 Consolidated Cheques Data Entry
You can do a consolidated cheque data entry using the ‘Consolidated Cheque Data Entry’ screen. You can invoke this screen by typing ‘6512’ in the field at the top right corner of the Application tool bar and clicking on the adjoining arrow button.
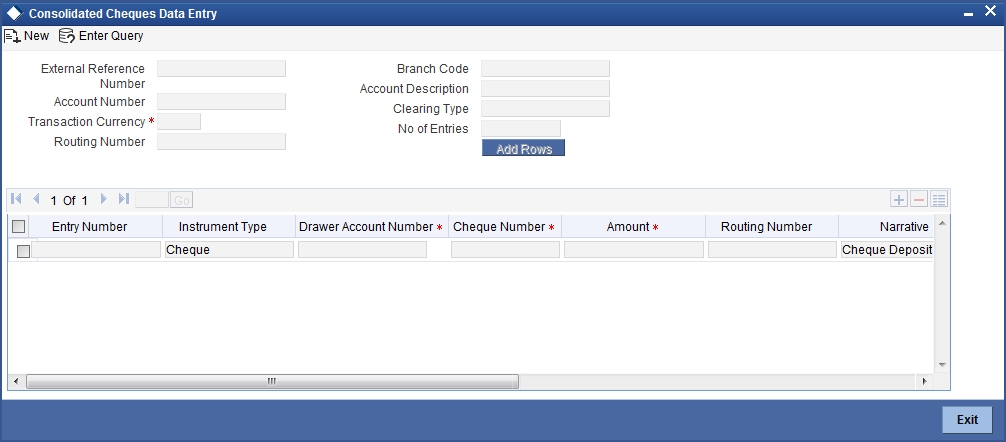
Here, you can capture the following details:
External Reference Number
The system generated reference number is displayed here.
Account Number
Select the account number from the option list available.
To view the joint holder’s details of an account and the mode of operation maintained at the account level, place the cursor on the Account Number field and press Ctrl+J. The system displays the ‘Joint Holder’ screen.
For more information on the ‘Joint Holder’ screen refer to the section ‘Joint Holder Maintenance’ in the Core User Manual.
Transaction Currency
Select the currency for the transaction the option list available.
Routing Number
Specify the routing number for cheque clearing. The adjoining option list displays all routing numbers along with the Branch codes and Bank Codes. You can select the appropriate one.
Branch Code
The system displays the branch code.
Account Description
The system displays the account description here.
Clearing Type
Specify the clearing type of the instrument to be cleared. The option list displays all valid clearing types maintained in the system. Choose the appropriate one.
No of Entries
Specify the number of rows you want to add when ‘Add Rows’ button is clicked. When you click on ‘Add Rows’ button, the system adds the rows based on the specified value and defaults ‘Clearing Type’ in all added rows.
Batch Number
The system generates the batch number and displays it on saving the transaction.
Entry Number
This is a system generated sequence number.
Instrument type
The system defaults the instrument type as cheque for consolidated cheque data entry.
Drawee Account Number
Specify the account from which money is drawn.
Cheque Number
Specify the number of the cheque for data entry.
Amount
Specify the amount mentioned in the cheque.
Routing Number
Specify the routing number for cheque clearing. The adjoining option list displays all routing numbers along with the Branch codes and Bank Codes. You can select the appropriate one.
Narrative
The system defaults the narrative as 'Cheque Deposit - Cheque no - Cheque Number - Drawer A/c Number - Account Number'. Once you specify the 'Cheque Number' and 'Drawer Account Number', the system replaces the field values respectively on tabbing out from the field.
Clearing Type
Specify the clearing type of the instrument to be cleared. The option list displays all valid clearing types maintained in the system. Choose the appropriate one.
Cheque Date
Specify the date of the cheque.
Project Name
Specify the developer project name for which payment is being made. The adjoining option list displays all valid projects maintained in the system. You can select the appropriate one. Input to this field is mandatory.
If you specify the Unit ID, the system will display the corresponding project name here.
Unit Payment
Indicate whether the transaction is a unit payment or not by choosing the appropriate value from the adjoining drop-down list. The following values are available:
- Yes
- No
Unit ID
Specify the unit ID of the project. This field will be enabled only if you have selected ‘Yes’ against ‘Unit Payment’. The adjoining option list displays all unit IDs along with the unit holder names corresponding to the project name chosen. You can select the appropriate one.
Deposit Slip Number
Specify the deposit slip number for the payment.
Cheque Issue Date
Specify the issue date of the cheque. You can click on the adjoining calendar icon and select the appropriate date.
Note
If the difference between the ‘Cheque Issue Date’ and the ‘Cheque Date’ is greater than the ‘Cheque Stale Days’ maintained at the ‘Branch Parameters Maintenance’ screen, an error message stating that the cheque is a stale one will be displayed. However, stale cheque validation would not be done if the field ‘Cheque Stale days’ is not maintained at the ‘Branch Parameters Maintenance’ screen.
Click save icon to go to the next stage.
Enrichment stage
In this stage you are allowed to modify any data that you have entered in the Input stage.
Click save icon to save the transaction. After the transaction is successfully saved the message is displayed as “Transaction Completed Successfully”.
The approver can fetch this transaction for his/her task list and authorize it. The authorization process is similar to that of cash deposit.
Refer the corresponding section under ‘Depositing Cash’ in the chapter ‘Cash Transactions’ of this User Manual for further details.
15.5 Clearing Outward Data Entry
The In-house cheques will deposit using the existing Outward Clearing Data Entry screens if Customer float days are greater than zero for the product or if sufficient funds are not available during cheque deposited from existing LOCH screen. If the in-house cheques are initiated using Outward Clearing Data Entry screen, the system will follow the regular life cycle of inward clearing contract creation and return handling like other normal clearing cheques.
You can do an Outward clearing data entry using the ‘Outward Clearing Data Entry’ screen. You can invoke this screen by typing ‘6514’ in the field at the top right corner of the Application tool bar and clicking the adjoining arrow button.
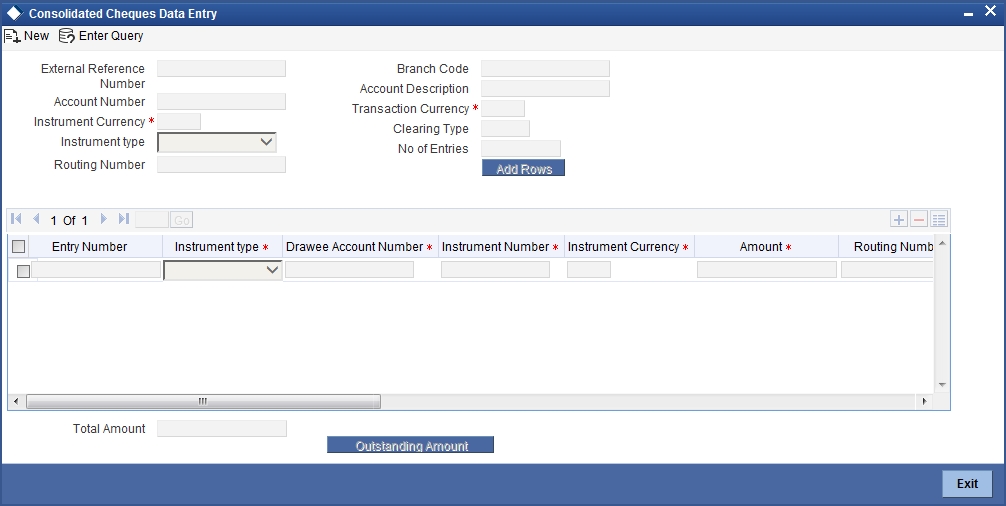
Here, you can capture the following details:
External Reference Number
The system generated reference number is displayed here.
Account Number
Select the account number. The adjoining option list displays all valid account numbers maintained in the system. You can select the appropriate one.
To view the joint holder’s details of an account and the mode of operation maintained at the account level, place the cursor on the Account Number field and press Ctrl+J. The system displays the ‘Joint Holder’ screen.
For more information on the ‘Joint Holder’ screen refer to the section ‘Joint Holder Maintenance’ in the Core User Manual.
Instrument Currency
Select the instrument currency. The adjoining option list displays all valid instrument currencies maintained in the system. You can select the appropriate one.
Instrument Type
Select the instrument type from the drop-down list. The following are the options available in the drop-down list:
- Banker’s Cheque
- Demand draft
- Cheque
Routing Number
Specify the routing number for outward clearing. The adjoining option list displays all routing numbers along with the Branch codes and Bank Codes. You can select the appropriate one.
Batch Number
The system generates the batch number and displays it on saving the transaction.
Branch Code
The system displays the branch code here.
Account Description
The system displays the account description here.
Transaction Currency
Specify the currency of the transaction. The option list displays all valid transaction currencies maintained in the system. Choose the appropriate one.
Clearing Type
Specify the clearing type of the instrument to be cleared. The option list displays all valid clearing types maintained in the system. Choose the appropriate one.
No of Entries
Enter the number of rows to be displayed.
On clicking ‘Add Rows’ button, the system displays the number rows that you have entered in the No of Entries field.
Entry Number
The entry number is displayed here.
Instrument Type
The system displays the instrument type. However you can modify it by selecting one of the following options available in the drop-down list:
- Banker’s Cheque
- Demand draft
- Cheque
Drawee Account Number
Specify the account from which money is drawn.
Instrument Number
Specify the instrument number for outward clearing.
Amount
Specify the amount mentioned in the instrument.
Routing Number
The system displays the routing number here. However you can modify it by specifying the routing number for inward clearing. The adjoining option list displays all routing numbers along with the Branch codes and Bank Codes. You can select the appropriate one.
For Outward clearing transactions, system defaults the beneficiary routing number as the clearing branch or processing branch’s routing number.
Note
For Outward clearing transactions, system defaults the beneficiary routing number as the clearing branch or processing branch’s routing number.
Branch
The system defaults the current branch code here.
Account Title
Specify the account title.
Narrative
The system defaults the narrative as 'Cheque Deposit - Cheque no - Cheque Number – Drawer A/c Number - Account Number'. Once you specify the ‘Cheque Number’ and ‘Drawer Account Number’, the system replaces the field values respectively on tabbing out from the field..
Clearing Type
The system defaults the clearing type specified in the main screen, when you click ‘Add Rows’ button; however, you can modify, if needed.
Drawer Account Number
Specify the drawer account number.
Account Title
Specify the account title.
Transaction Currency
The system displays the transaction currency here. However you can modify it by specifying the currency of the transaction. The option list displays all valid transaction currencies maintained in the system. Choose the appropriate one.
Instrument Currency
The system displays the instrument currency here. However you can modify it by specifying the currency of the instrument. The option list displays all valid instrument currencies maintained in the system. Choose the appropriate one.
Cheque Date
Specify the date of the cheque. You can click on the adjoining calendar icon and select the appropriate date.
Project Name
Specify the developer project name for which payment is being made. The adjoining option list displays all valid projects maintained in the system. You can select the appropriate one. Input to this field is mandatory.
If you specify the Unit ID, the system will display the corresponding project name here.
Unit Payment
Indicate whether the transaction is a unit payment or not by choosing the appropriate value from the adjoining drop-down list. The following values are available:
- Yes
- No
Unit ID
Specify the unit ID of the project. This field will be enabled only if you have selected ‘Yes’ against ‘Unit Payment’. The adjoining option list displays all unit IDs along with the unit holder names corresponding to the project name chosen. You can select the appropriate one.
Deposit Slip Number
Specify the deposit slip number for the payment.
In the single stage flow, if there is an transaction level override or error during approval then the transaction will be moved to the pending queue. Without save action being initiated, the transaction will not be in pending queue.
On clicking Pickup button, the system populates the values in all the callforms of the screen and clicking pickup button is mandatory if you make any changes to the Transaction amount and exchange rate after first pickup.
Once you click ‘Pickup’ button once, then on amendment of xrate, amount, charge, pickup will be mandatory before save. On pick up, the fields that are currently enabled in the enrich stage will alone be retained as enabled fields.
15.6 Running EOD
You can run the branch EOD using the EOD Maintenance screen. You can invoke this screen by typing ‘EODM’ in the field at the top right corner of the Application tool bar and clicking the adjoining arrow button.
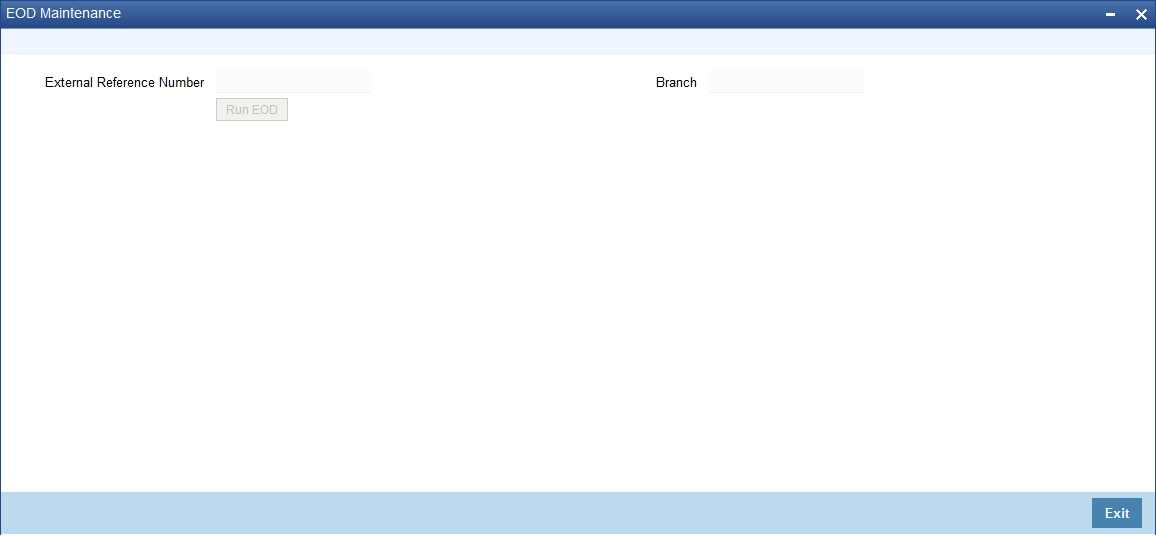
The system displays the following details:
- External reference number
- Branch code
Click ‘Run EOD’ button to run the EOD for the branch.
The following validations are done before running EOD:
- Only the user who runs the EOD should be logged into the branch.
- There must be Holiday maintenance to get the Next working day.
- Balancing and closure processes for Till and Vault should be completed. There should not be any transaction in ‘Pending’ or ‘Assigned’ stage for a user
Once these have been successfully validated, EOD proceeds with the system date change by moving the Branch posting date to the next date. The Branch transaction sequence will also get reset as a consequence of the execution of Branch EOD. This signifies the Beginning of Day (BOD) for the Branch for the next working day and the Branch is ready for Transaction Input.
15.7 Querying Tellers Status
You can view the current operational status and other details of the tellers in a branch using the ‘Teller Platform Status Query Screen’ screen. This screen will display all the details that will be validated during EODM (End of Day of Savings module) You can invoke this screen by typing ‘9012’ in the field at the top right corner of the Application tool bar and clicking the adjoining arrow button. The screen is displayed below:
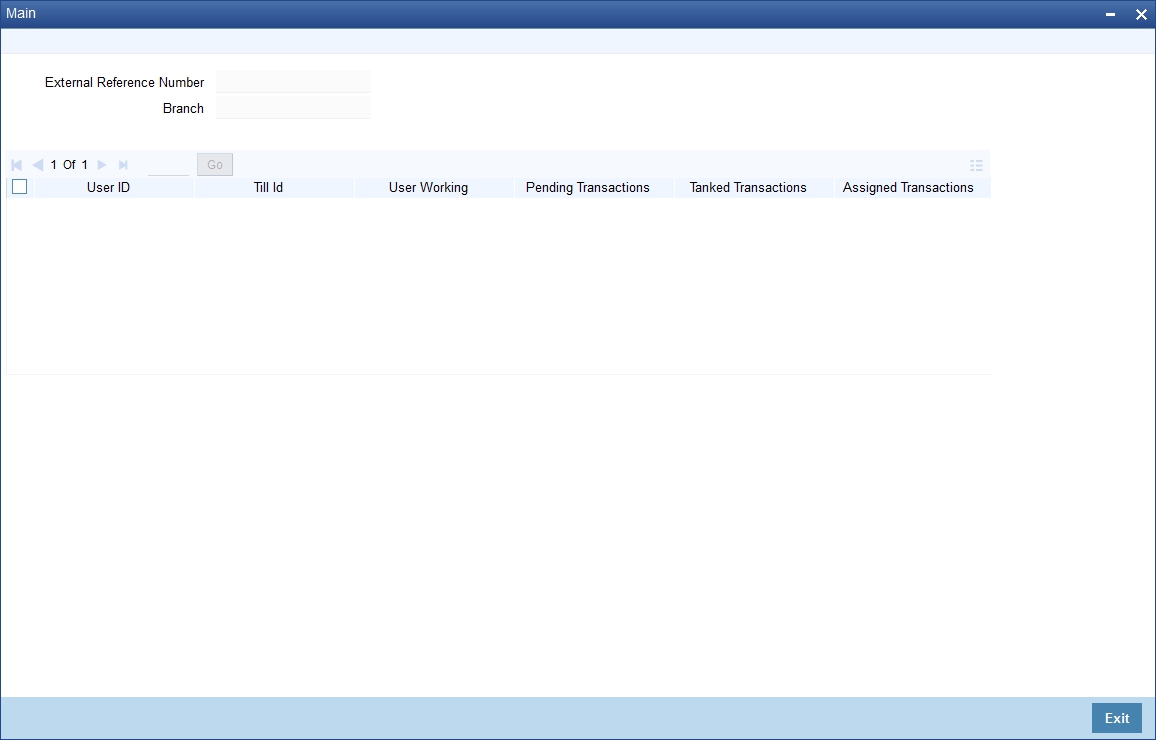
External Reference Number
The system displays a unique number.
Branch Code
The system defaults the current logged in branch code.
The following details of the current branch are displayed for all the tellers:
- User ID – the teller user ID
- User Working – current log in status of the user
- Pending Transactions - number of transactions in the Pending Queue for the user
- Tanked Transactions - number of transactions in the Tanked Queue for the user
- Assigned Transactions - number of transactions in the Assigned Queue for the user
- Unassigned Transactions - number of transactions in the Unassigned Queue for the user
- Auto Reversal Pending - number of transaction pending to be auto reversed for the user