5. TD Additional Details
5.1 Introduction
This chapter contains the following sections:
- Section 5.2, "Capturing Additional Details"
- Section 5.3, "Specifying Interest Details"
- Section 5.4, "Specifying Charge Details"
- Section 5.5, "Specifying Linked Entities"
- Section 5.6, "Specifying Restrictions"
- Section 5.7, "MIS Details"
- Section 5.8, "Specifying Statement Details"
- Section 5.9, "Specifying Joint Holder Details"
- Section 5.10, "Capturing User Defined Fields"
- Section 5.11, "Specifying Account Signatory Details"
- Section 5.12, "TD Payout Details"
- Section 5.13, "Deposit Tab (Deposit Preferences for Child TD)"
- Section 5.14, "Viewing Change Log"
- Section 5.15, "Interest Payout Details for Banker’s Cheque / DD and PC"
- Section 5.16, "Viewing Rollover History Details"
- Section 5.17, "Specifying Document Details"
- Section 5.18, "Specifying Denominated Deposit Details"
- Section 5.19, "Rollover Details"
- Section 5.20, "Maintaining Amount Blocks"
- Section 5.21, "Deposit Instructions"
- Section 5.22, "Input and Authorization Limit Validation for TD and RD"
5.2 Capturing Additional Details
You can capture additional details for the account by clicking the following buttons in the ‘Deposit Account Booking’ screen:
Button |
Function |
Interest |
This invokes the ‘IC Special Conditions Maintenance’ screen. |
Charges |
This invokes the ‘Account level charges conditions’ screen. |
Linked Entities |
This invokes the ‘Linked Entities’ screen. |
Restrictions |
This invokes the ‘Products and Transaction Codes Restriction’ screen. |
MIS |
This invokes the ‘Management Information System’ screen. |
Statement |
This invokes the ‘Statement Details’ screen. |
Joint Holders |
This invokes the ‘Linked Entities’ screen |
Fields |
This invokes the ‘User Defined Fields’ screen. |
Account Signatory |
This invokes the ‘Signatory Details’ screen. |
TD Payout Details |
This invokes the ‘Term Deposit Payout Details’ screen. |
Change Log |
This invokes the ‘Customer Address Change Log’ screen. |
Interest Payout Details |
This invokes the ‘Term Deposit Interest Payout Details’ screen. |
Rollover History |
This invokes the ‘rollover History’ screen. |
Denominated Deposit |
This invokes the ‘Denominated Deposit’ screen. |
Rollover Details |
This invokes the ‘TD Rollover Details’ screen. |
5.3 Specifying Interest Details
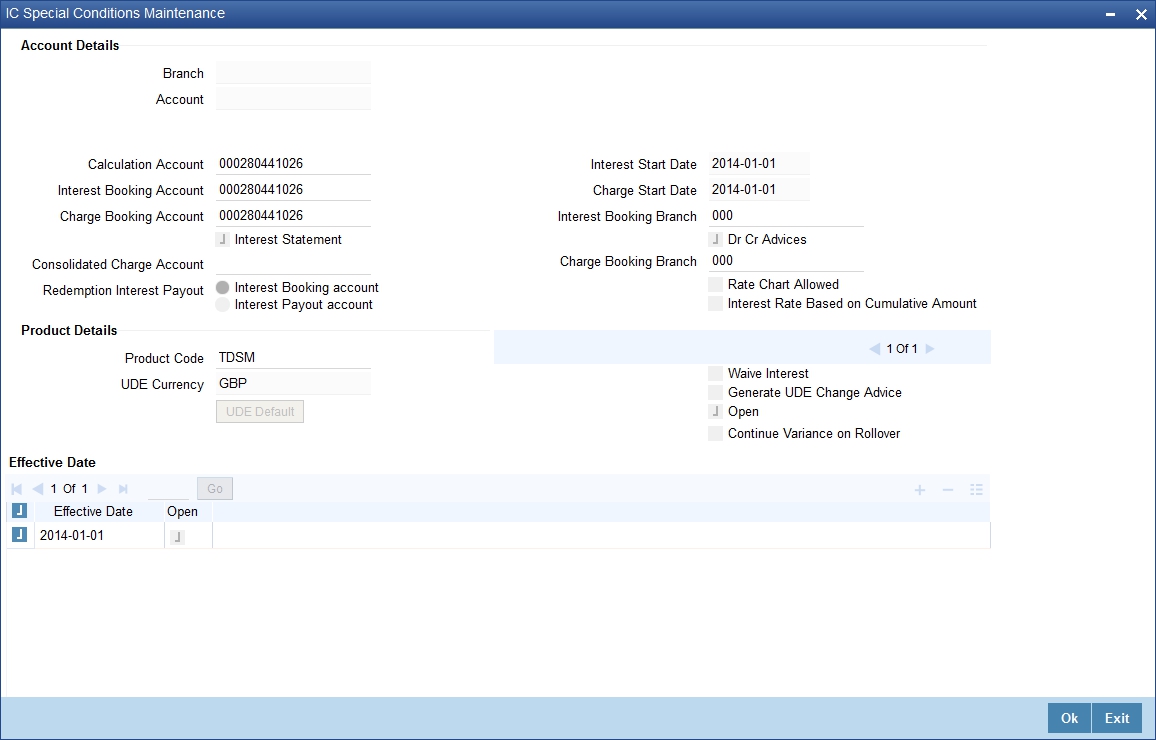
Click ‘Interest’ button on the ‘Deposit Account Booking’ screen and invoke the ‘IC Special Conditions Maintenance’ screen.
You can specify the following details:
Branch Code
The Branch Code to which the account belongs (for which you are defining special conditions) is displayed in this field.
Account
The account number of customer (for which you are defining special conditions) is displayed in this field.
Calculation Account
Specify the account for which interest will be calculated. The TD account populated will be the calculation account.By default, it will be same as the customer account. However you can change it.
Interest Booking Account
You can select the account for booking interests on transaction processed at your bank.
At the time of creating an IC product, if you have maintained the booking account type as Interest (in the ‘Interest and Charges – Product Definition’ screen), the Interest will be liquidated into the Interest Booking account. By default, the TD account is defaulted as the interest booking account. However, you have the option of booking interest to a different account belonging to another branch also. The accounts maintained in the selected Booking Branch will be available in the adjoining option list. You can select the appropriate account. Interest will then be liquidated into the selected account.
Charge Booking Account
You can select the account for booking charges on transactions processed at your bank
At the time of creating an IC product, if you have maintained the booking account type as Charge (in the ‘Interest and Charges – Product Definition’ screen), the charge will be liquidated into the Charge Booking account. By default, the customer’s account in the current branch will be displayed in this screen (in the ‘Charge Booking Account’ field). However, you have the option of booking charge to a different account belonging to another branch also. The accounts maintained in the selected Booking Branch will be available in the adjoining option list. You can select the appropriate account. Charges will then be liquidated into the selected account.
Interest Statement
Check this box to indicate that you would like to generate an interest statement for the account. The Interest Statement will furnish the values of the SDEs and UDEs and the interest rule that applies on the account.
Interest Start Date
Specify the date from which the interest accruals of TD account begins. You can specify the date as of booking the TD or any date in the future. If you specify a date in future, the system will post entries for account opening (DEBK event) on the account opening date with the value date as interest start date. It will start interest accrual calculation on the date specified in this field and post entries for IACR event.
Charge Start Date
For the account for which you are defining special conditions, you must specify the date from which you would like to apply charges. Charges for this account will be calculated according to the special conditions that you define subsequently.
By default, charges on an account would be applied when the free banking period (if any) elapses. This means that the Charge Start Date is arrived at by the System by adding the Free Banking Period days (if any, specified for the Term Deposit used by the account) to the Account Opening Date. If no Free Period has been indicated for the account class used by the account, the Charge Start Date is defaulted to the Account Opening Date (that is, charges on the account would be applied right from the account opening date) and displayed in the Special Conditions Maintenance screen.
You can override the default Charge Start Date and specify the desired start date for charge application.
Interest Booking Branch
By default, the customer’s account in the current branch will be displayed in this screen (in the Interest/Charge Booking Account and Interest/Charge Booking Branch fields). However, you have the option of booking interest/charge to a different account belonging to another branch also. You can select the Interest/Charge Booking Branch from the option-list available. The accounts maintained in the selected Booking Branch will be available in the option-list provided for Interest/Charge Booking Account. You can select the account from this list. Interest/Charge will be liquidated into the selected account.
Interest booking account will be validated with the interest booking branch on save. If interest book account branch and interest booking branch are different, then the system displays an error, ”Booking account not valid for branch.”
Dr Cr Advices
You can indicate whether you want to generate an interest liquidation advice for a customer account. Check this box to indicate that the system must generate payment advices when interest liquidation happens on an account. The advices are generated in the existing SWIFT or/and MAIL format. No advices will be generated if you leave this box unchecked.
Charge Booking Branch
By default, the customer’s account in the current branch will be displayed. However, you have the option of booking charge to a different account belonging to another branch also. You can select the Charge Booking Branch from the option-list available. The accounts maintained in the selected Booking Branch will be available in the option-list provided for Charge Booking Account. Charge will be liquidated into the selected account.
Rate Chart Allowed
The system defaults this preference from account class and it indicates that the system should calculate TD interest based on the LDMM float rate maintained in the ‘LD MM Floating Rate input’ screen (CFDFLTRI), If it is checked, the system will pick interest rates based on different tenors, amount slab, currency and effective date for a TD. The system does not allow you to amend it.
Note
During account creation for TDs, if ‘Rate Chart Allowed’ is checked, the system does not allow IC rate code. During IC calculation, if the rate code is maintained for the UDE then the system derives the interest rate from the Rate Maintenance done in ‘LD MM Floating Rate input’ screen (CFDFLTRI).
Continue Variance on Rollover
This is defaulted based on the Interest and Charges product. However, you can modify this. If you have modified this, then during save, the system will prompt that ‘Continue variance on Rollover Flag is modified’. You can proceed.
Check this box to enable continued variance on rollover. If you check this, then the system will default account variance as current value to the rollover deposit for the next cycle.
If you do not check this, then the account variance will not be carried forward to next rollover cycle.
Interest Rate Based on Cumulative Amount
Check this box to indicate that the system should arrive at the interest rate of a new deposit using the deposit amount/principal balance of other active deposits, under the same account class, customer and currency.
The cumulation of the amount for arriving at the interest rate is done at the account level during the save of the below events:
- Deposit account opening
- Any interest rate change to the deposit - floating rate deposits, rate change on interest liquidation, and rate change on rollover.
Note
- When cumulating the amount of the deposits system considers the current deposit balance of all the deposits along with the new deposit amount.
- TD accounts opened after the interest start date will not be considered for arriving at the cumulation amount.
- For backdated deposit opening, all the active deposits as of the current system date are considered to arrive at the cumulative amount, if the ‘Interest Rate Based on Cumulative Amount’ box is checked.
- The interest rate derived is applied only to the new deposit to be opened and there will be no changes done to the deposits which are used for arriving at the interest rate.
- The interest rate based on cumulative amount is defaulted from account class level. However the same can be modified at TD account. If the flag is modified at TD account level, an override "Change in account class defaulted value for interest rate based on cumulative amount" will be displayed. The interest rate based on cumulative amount cannot be modified after authorization.
- The interest rate is picked during TD opening considering the active TDs for a customer under same account class and Ccy combination.
- If a TD is rolled over, the interest start date of the TD will be considered and TDs opened before the interest start date will be considered for cumulation. Facility is available to opt/opt out cumulation during rollover.
- If a deposit participating in cumulation is closed, then no change will be done to existing TDs. For further rate pick-up, the closed TD will not be considered for cumulation.
- Cumulation feature is not supported for recurring deposits. And if checked at account level, an error message "Interest rate based on cumulative amount feature is not supported for recurring deposits" will be displayed.
- If child TD account has to be considered for cumulation then this box needs to be selected. Cumulation is applicable only for rate chart allowed TDs.
Refer the section ‘Calculating Interest Rate Based on Base Amount’ in this User Manual for details about arriving at interest rate based on cumulative amount.
Consolidated Charge Account
Specify the account for posting consolidated charges. The adjoining option list displays all valid accounts maintained in the system. You can select the appropriate one.
Currency
Specify the term deposit currency.
Product Details
Specify the following details:
Product Code
Specify an interest product in order to allow calculation of interest. When you apply an interest product on the account, interest for the account will be calculated according to the interest rule attached to the product.
Multiple interest products can be attached to TD account class. But, a TD can be created with one interest product attached. Charge product is not supported for TD accounts.
UDE Currency
Specify the UDE currency for the product that you apply on the account. UDE values that you specify for the account subsequently will be taken to be in this currency.
Waive Interest
This box is unchecked by default. However, you cannot waive interest on a TD. Leave this box unchecked.
Generate UDE Change Advice
Check this box to indicate that interest rate change advice has to be generated for the account at EOD. The system generates interest rate change advices for accounts when the interest rate changes as part of EOD. For those accounts, when interest rate changes the details are handed off for rate change advice generation and the same is generated in the pre determined SWIFT format as per MT 935.
If the advice format is maintained in MAIL / FAX formats, then message type UDECA will be used
The advice tag used for interest rate change is ‘RTCHG_ADVICE’. The advice format for interest rate change as per MT935 is given below:
Status |
Tag |
Field Name |
Content/Options |
No. |
M |
20 |
Transaction Reference Number |
16x |
1 |
O |
23 |
Further Identification |
16x |
2 |
O |
25 |
Account Identification |
35x |
3 |
M |
30 |
Effective Date of New Rate |
6!n |
4 |
M |
37H |
New Interest Rate |
1!a12d |
5 |
O |
72 |
Sender to Receiver Information |
6*35x |
6 |
M = Mandatory, O = Optional |
||||
Open
You can temporarily stop applying an IC product on a TD by un-checking this box. The product will cease to be applied on the term deposit. You can make the product applicable again by checking this box.
Effective Date
Indicate the following details:
Effective Date
The ‘Effective Date’ of a record is the date from which a record takes effect. You can maintain different values for a UDE, for different effective dates, for an account. When interest is calculated on a particular day for an account with special conditions applicable, the value of the UDE corresponding to the date will be picked up.
Typically, you would want to open records with different Effective Dates if the values of UDEs vary within the same liquidation period.
Open
Typically, you would want to open records with different effective dates if the values of UDEs vary within the same liquidation period.
If this box is unchecked, then on save system displays the error message "Special condition not maintained for the account”.
UDE Values
Specify the following details.
User Defined Element ID
Specify the UDE for which value is given. The adjoining option list lists all UDEs maintained for the Interest Rule. You can select the appropriate one.
UDE Value
Specify the value of the UDE. For a fixed interest rate, you can specify a numeric value.
Note
UDE ID/variance and UDE value/variance of previous rollover dates cannot be modified..
Rate Code
If you want to use a floating rate instead of a fixed rate, you should specify a valid IC rate code. The system will pick up the applicable rate based on the branch, currency and effective date combination maintained for the rate code in the ‘Interest & Charges Rate Input’ screen (ICDRATMA). For a given tenor, the system picks up the applicable rate as per the effective dates defined for the rate code. If a floating rate has to be used instead of fixed rate, IC rate code defined in the screen ‘ICDUDVAL’ will be defaulted to the TD account. On every rate change for the effective dates, the system will apply new rate to TD account effective from that date.
In the corresponding IC rule, you need to ensure that UDE Type is maintained as ‘Rate’ for interest rate pick-up for this account.If at the IC Rule, the UDE Type is maintained as "Rate as Rate Code”, then the rate for IC rate code will be resolved and defaulted to TD account and rate pick-up will happen only during events (Book / Liqd / Roll).
TD Rate Code
Specify the rate code to be used for TD calculation. The adjoining option list displays all rate codes maintained using the ‘LD MM Floating Rate Input’ screen (CFDFLTRI). You can select the appropriate one. You can use TD rate code only when you have checked ‘Rate Chart Allowed’ option for the account class that is linked to the IC product.
In the corresponding IC rule, you need to ensure that UDE Type is maintained as ‘Rate as Rate Code’ for interest rate pick-up for this account.
Refer the chapter ‘Annexure B – IC Rule Set-up’ in this User Manual for further details about IC rules.
Variance
Specify the variance in the interest rate. This is the variance alone. The effective rate will be the sum of the TD rate code and the variance that you specify here. You can modify it anytime.
Note
- If you specify the UDE value and also a rate code (rate code or TD rate code), the system will add the UDE value to the specified rate code value and apply that interest rate on the deposit.
- You can define either the rate code or the TD rate code, but not both.
5.4 Specifying Charge Details
Click ‘Charges’ button on the ‘Deposit Account Booking’ screen and invoke the ‘Account level charges conditions’ screen. This screen is not applicable for Term Deposits.
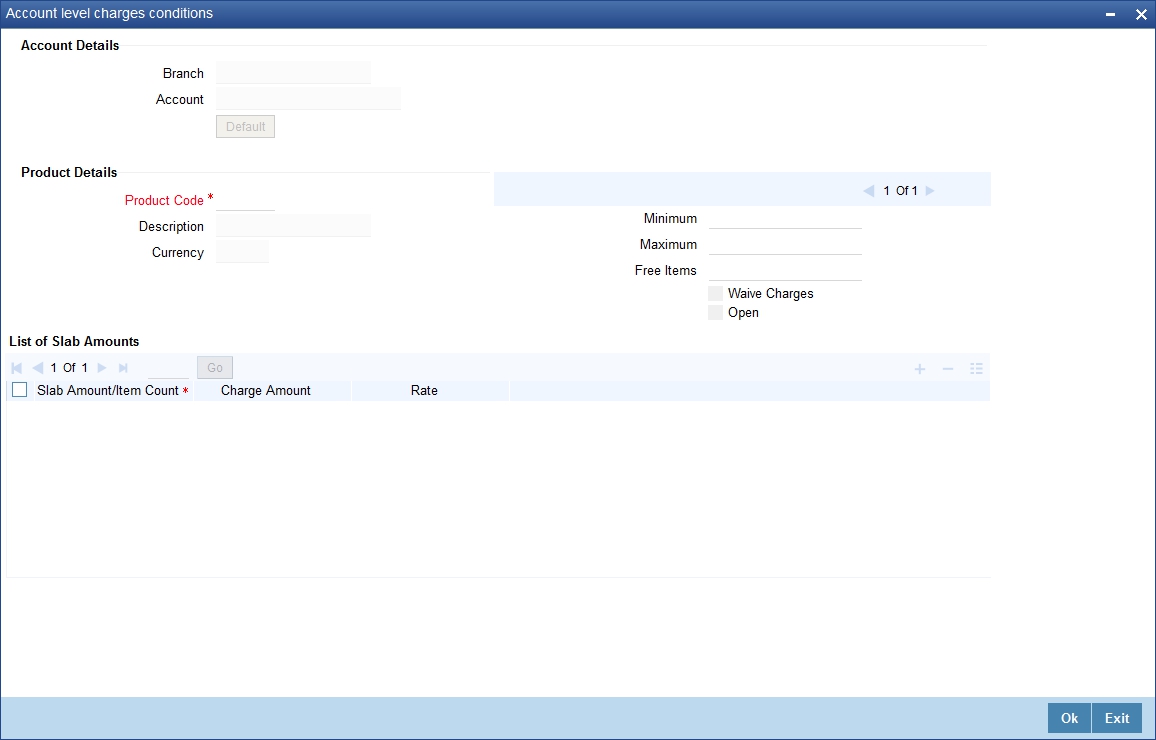
You can specify the following details:
Branch Code
The Branch Code to which the account belongs (for which you are defining special conditions) is displayed in this field.
Account
The Account number of customer (for which you are defining special conditions) is displayed in this field.
You can click the ‘Default’ button to default the Charge Products and the corresponding details applicable for the account. You can then modify these values to define the special conditions.
5.4.1 Specifying Product Details
Specify the following details:
Product Code
The system defaults a product when you click the ‘Default’ button at the time of account creation. You must modify it to identify the Charge product using which the applicable charges would be collected.
Currency
The charges would be collected in the currency defined for the selected charge product, and this currency is displayed on the screen.
Minimum and Maximum
You must indicate the charge amount range, representing the minimum and maximum charge that can be applied for the account.
Free Items
You must indicate the number of free items for which the customer will not be charged.
Open
By default, each charge consolidation charge setup that you set up is enabled and active. You can also disable the setup by checking the ‘Open’ box.
Waive Charges
You can choose to waive charges for an account.
5.5 Specifying Linked Entities
Click ‘Linked Entities’ button on the ‘Deposit Account Booking’ screen and invoke the ‘Linked Entities’ screen.
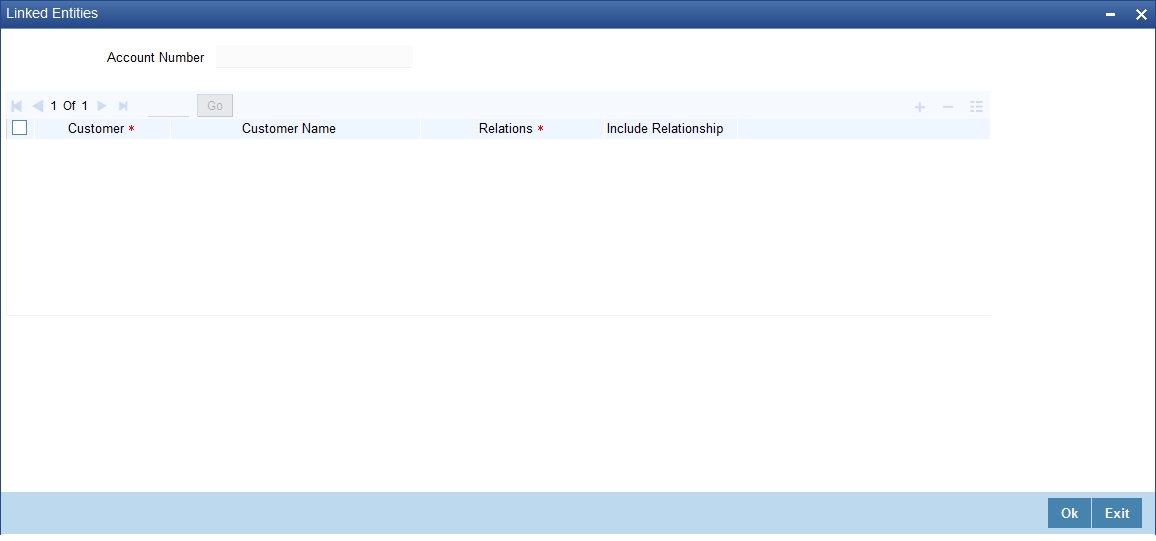
Specify the following details:
Customer
Select the customer from the option list with whom you want to establish the relationship with the account that you are maintaining.
Description
In this field, the system displays the name of customer that you have selected in the previous field. You cannot change the description.
Relations
By default, the system will select the customer of the account as the Primary Holder. This is a pre-shipped relationship and you will not be allowed to change the relationship.
Include Relationship
Check this box to indicate that relationship should be inherited for all transactions.
5.6 Specifying Restrictions
Click ‘Restrictions’ button on the ‘Deposit Account Booking’ screen and invoke the ‘Products and Transaction Codes Restriction’ screen.
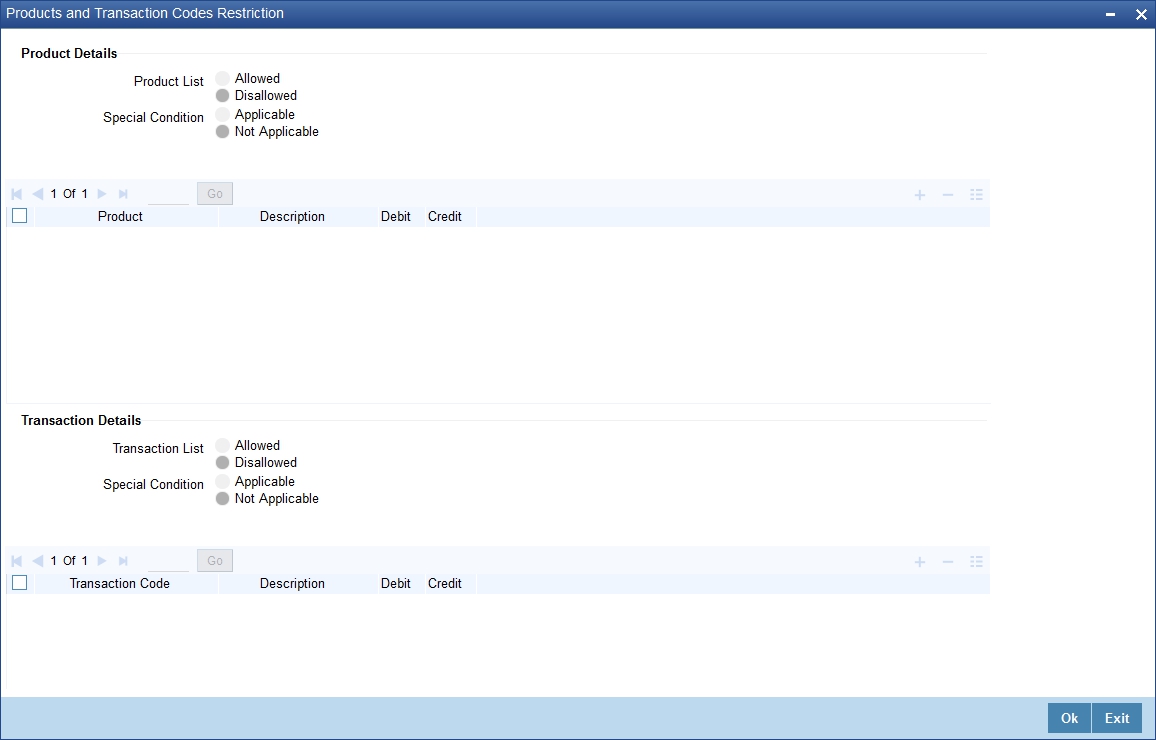
Specify the following details:
Product Details
Indicate the following preferences.
Special Condition
By default, the restrictions maintained at the account class level will be displayed here. When you define product restriction attributes for an account itself, rather than for the account class to which it belongs, it is referred to as a Special Condition. You can apply special conditions by selecting the option ‘Applicable’. If you opt to define special conditions for an account the ‘restrictions’ defined for the Account Class, to which the account belongs, will NOT apply to this account. If you wish to continue with the account class restrictions, opt for ‘Not Applicable’.
Product List
Specify the restriction type here. The options available are:
- Allowed – If you select this, the products entered in the multi-entry block will be allowed for that account.
- Disallowed – If you select this option, the products entered in the multi-entry block will be disallowed.
Product
You can select the products and specify the type of transaction (Dr, Cr or both) that you would like to allow/disallow for each product. In contracts involving the selected products, the accounts would be used for processing the selected type of transaction. For instance, assume that for the account A1, you have allowed ‘Dr’ for the product ABCD. This would mean that if a Dr entry for the product ABCD is passed to the account, A1, it would go through but in case a Cr entry is passed for this product, then the system will display a message indicating that the transaction is restricted for the account.
Description
The system displays the description for the product code that which you have specified
Debit
During transaction processing, the system will validate whether any restrictions are placed on the account based on the product code. If you have indicated to allow ‘Dr’ Transactions for the product ABCD, and attempt to post a debit entry, the system will seek an override. If the message has been configured as an ‘override’ instead of an ‘error’, you will be able to continue the transaction, despite the restrictions, by providing appropriate reasons for the same. Otherwise you cannot continue with the transaction.
During maintenance or online operations, in the respective contract screens for the restricted transactions, when you specify the customer account, the system checks whether the account is restricted for the product that has been selected, or the debit/credit transaction type. If so, an override is sought when such contracts are saved.
Credit
During transaction processing, the system will validate whether any restrictions are placed on the account based on the product code. If you have indicated to allow ‘Cr’ transactions for the product ABCD, and attempt to post a credit entry, the system will seek an override. If the message has been configured as an ‘override’ instead of an ‘error’, you will be able to continue the transaction, despite the restrictions, by providing appropriate reasons for the same. Otherwise you cannot continue with the transaction.
During maintenance or online operations, in the respective contract screens for the restricted transactions, when you specify the customer account, the system checks whether the account is restricted for the product that has been selected, or the debit/credit transaction type. If so, an override is sought when such contracts are saved.
Transaction Details
Indicate the following preferences.
Special Condition
By default, the restrictions maintained at the account class level will be displayed here. When you define transaction code restriction attributes for an account itself, rather than for the account class to which it belongs, it is referred to as a Special Condition. You can apply special conditions by selecting the option ‘Applicable’ at the account level. If you opt to define special conditions for an account the ‘restrictions’ defined for the Account Class, to which the account belongs, will NOT apply to this account. If you wish to continue with the account class restrictions, opt for ‘Not Applicable’.
Transaction List
Specify the restriction type here. The options available are:
- Allowed – If you select this, the transaction codes entered in the multi-entry block will be allowed for that account.
- Disallowed – If you select this option, the transaction codes entered in the multi-entry block will be disallowed.
Transaction Code
Likewise, you can maintain restrictions for transaction codes as well. Transaction code based restrictions are allowed only for entries initiated from the Data Entry module. Otherwise you should use product code based restriction.
Description
The system displays the description for the transaction code that you have specified
Debit
During transaction processing, the system will validate whether any restrictions are placed on the account based on the transaction code. If you have indicated to allow ‘Dr’ transactions for a particular transaction code, and attempt to post a credit entry, the system will seek an override. If the message has been configured as an ‘override’ instead of an ‘error’, you will be able to continue the transaction, despite the restrictions, by providing appropriate reasons for the same. Otherwise you cannot continue with the transaction.
During maintenance or online operations, in the respective contract screens for the restricted transactions, when you specify the customer account, the system checks whether the account is restricted for the product that has been selected, or the debit/credit transaction type. If so, an override is sought when such contracts are saved.
Credit
During transaction processing, the system will validate whether any restrictions are placed on the account based on the transaction code. If you have indicated to allow ‘Cr’ transactions for a particular transaction code, and attempt to post a debit entry, the system will seek an override. If the message has been configured as an ‘override’ instead of an ‘error’, you will be able to continue the transaction, despite the restrictions, by providing appropriate reasons for the same. Otherwise you cannot continue with the transaction.
During maintenance or online operations, in the respective contract screens for the restricted transactions, when you specify the customer account, the system checks whether the account is restricted for the product that has been selected, or the debit/credit transaction type. If so, an override is sought when such contracts are saved.
5.7 MIS Details
This section contains the following topics:
- Section 5.7.1, "Specifying MIS Details"
- Section 5.7.2, "Viewing Change Log"
- Section 5.7.3, "Viewing Transfer Log"
5.7.1 Specifying MIS Details
Click ‘MIS’ button on the ‘Deposit Account Booking’ screen and invoke the ‘Management Information System’ screen.
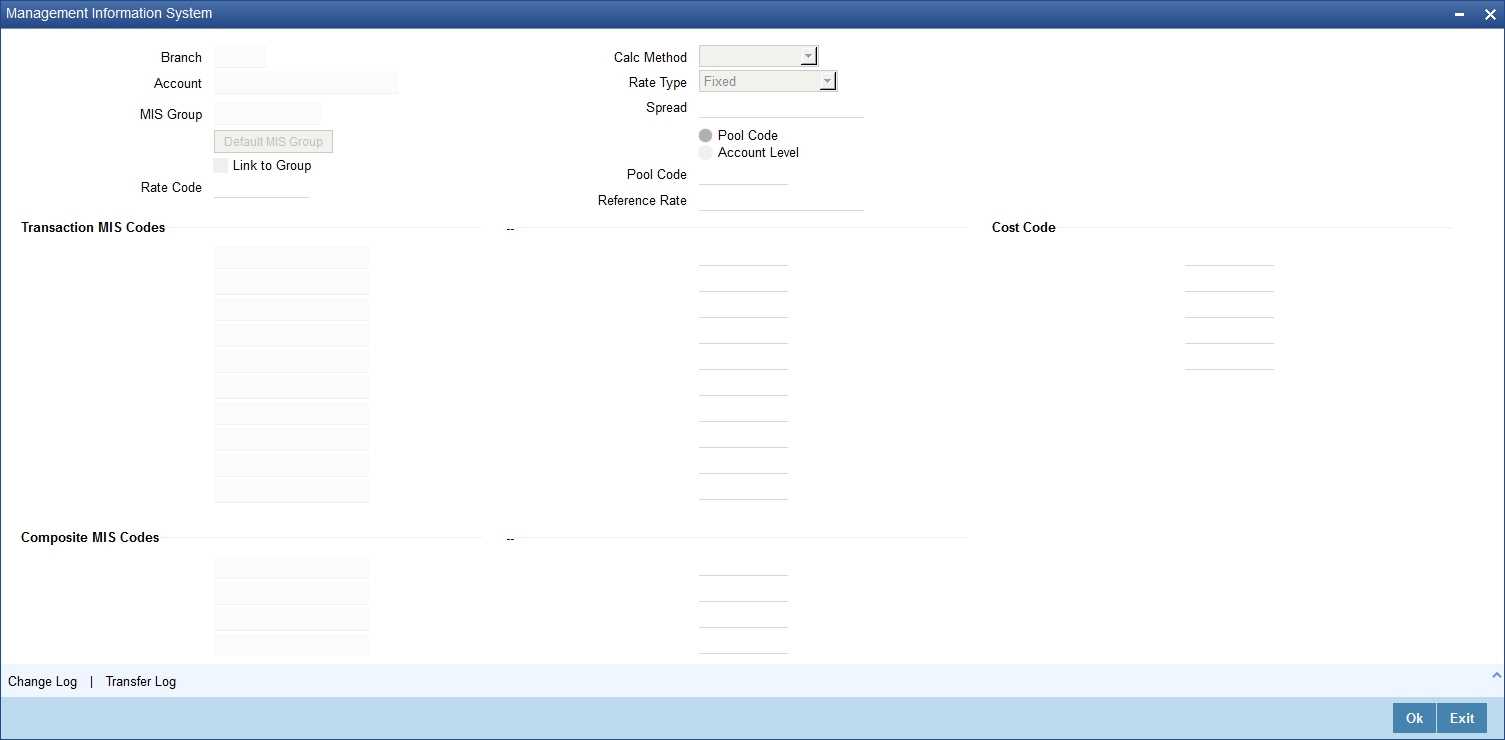
Specify the following details:
Branch Code
The current logged-in branch code is displayed here
Account
The TD account number is displayed here.
MIS Group
For an account, the transaction type of MIS class will be picked up from the account class.
Rate Code
Specify the rate code. You can also select the appropriate one from the adjoining option list, which displays all valid rate codes maintained in the system.
Calc Method
Specify the method to be considered for MIS related component computation.
Rate Type
If you have indicated that rates maintained for the individual account should be picked up for MIS refinancing you have to specify the Rate Type that is to be used. The options available are:
- Fixed
- Floating – Automatic – indicating that the system should pick up the refinancing rate associated with the account. Since the account number is linked to a Rate Code the system picks up the rate code associated with the account when the EOD processes are run to refresh the various rates.
Spread
Specify the spread that should be applied if rate type is selected as ‘floating’ type.
Pool Code/Account Level
Define the Pool Code/Account Level to which the account class or product belongs.
Pool Code
For an account, the pool code will be picked up from the account class.
Transaction MIS Group
For an account, the transaction type of MIS class will be picked up from the account class.
Composite MIS Group
The composite type of MIS class will be defaulted from those defined for the customer.
Cost Code
For an account, the cost codes will be picked up from the account class.
5.7.2 Viewing Change Log
Click ‘Change Log’ button on the ‘Management Information System’ screen and invoke the ‘Change Log’ screen. If MIS reclassification occurs, through changing of the MIS codes for the ‘Customer Type’ of MIS classes, the system will store the changes made, in the Customer MIS ‘Change Log’ screen.
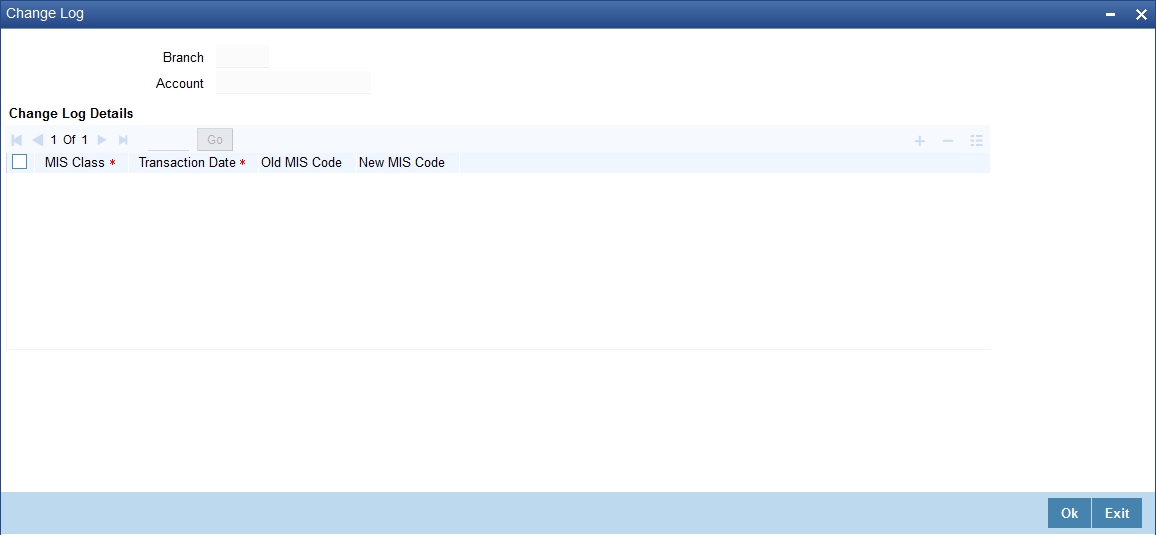
Here you can view the following details:
Branch Code
The current logged-in branch code is displayed here.
Account
The system displays the TD account number.
Change Log Details
You can view the following details:
- MIS Class
- Transaction Date
- Old MIS Code
- New MIS Code
5.7.3 Viewing Transfer Log
Click ‘Transfer Log’ button on the ‘Management Information System’ screen and invoke the ‘Balance Transfer Log’ screen. When MIS reclassification occurs with respect to a customer, account or contract, the balances in a GL associated with the old MIS code in each case are transferred to the GL for the new MIS code, if the option of transferring MIS balances upon reclassification has been set in the ‘Chart of Accounts’ screen for the GL.
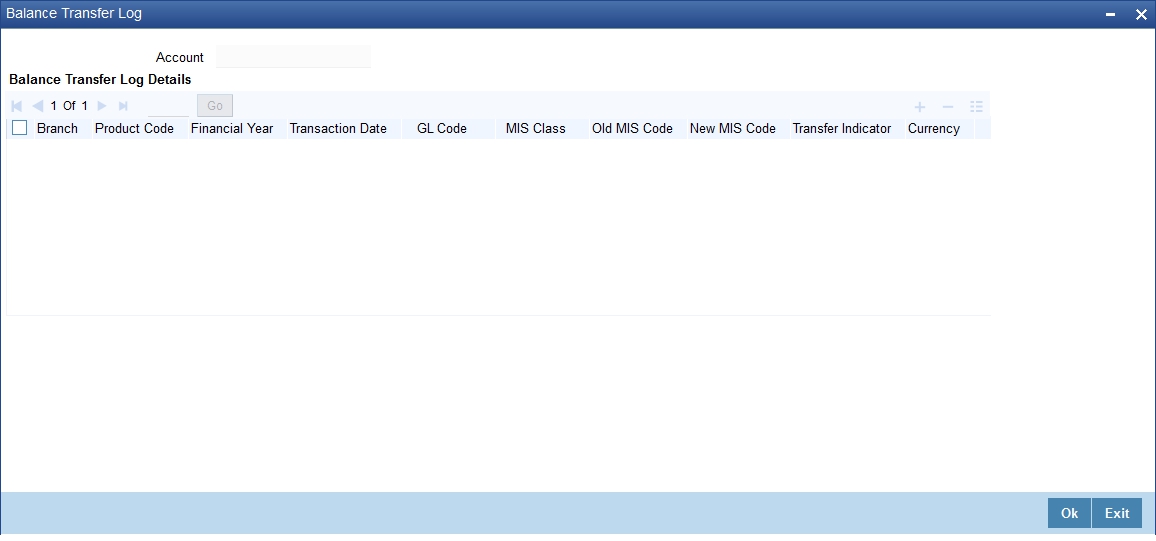
Here you can view the following details:
Account
The system displays the TD account number.
Balance Transfer Log Details
You can view the following details:
- Branch Code
- Product Code
- Fin Year
- Transaction Date
- GL Code
- MIS Class
- Old MIS Code
- New MIS Code
- TRF Ind
- Currency
- Ex rate
- Amount
5.8 Specifying Statement Details
Click ‘Statement’ button on the ‘Deposit Account Booking’ screen and invoke the ‘Statement Details’ screen.
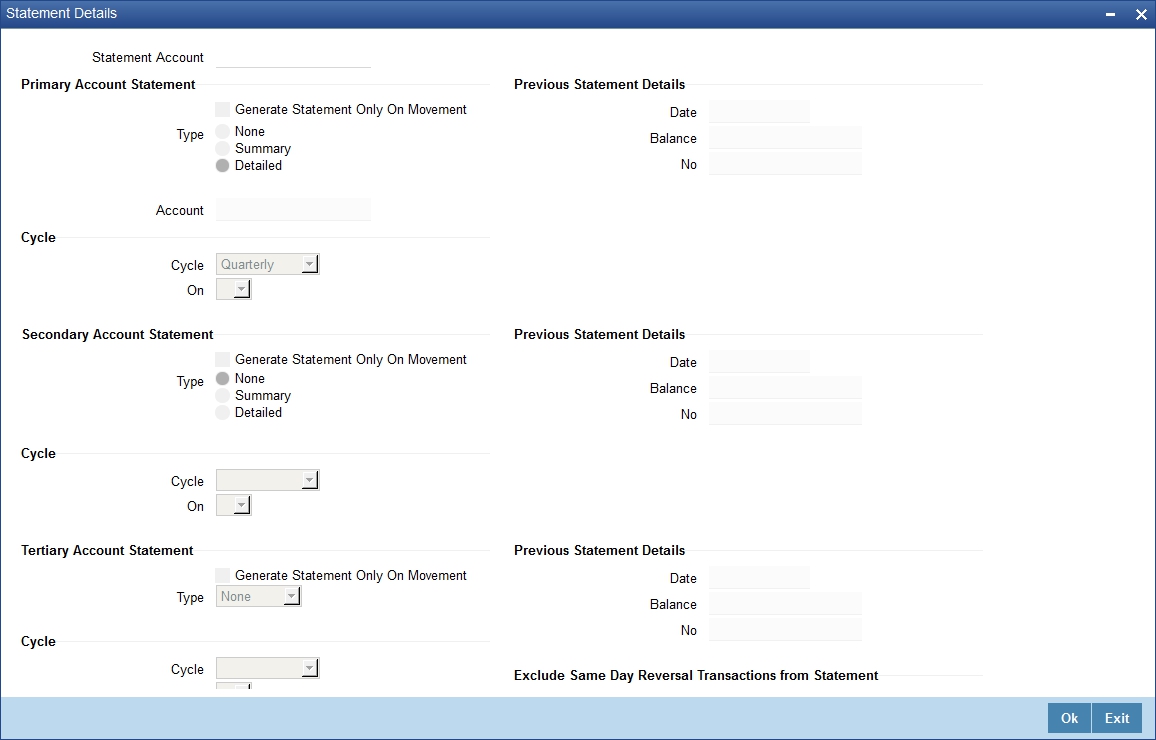
You can specify the following details:
Primary A/C Statement
This refers to the type of statement to be generated periodically by the system, for this account. You can specify whether you want a detailed or summary statement or if you do not want a statement for this account at all.
Generate Stat. Only On Movement
Check this box to indicate that an account statement should be generated for the account only when there has been a movement of funds into the account or when funds have been transferred out of the account.
For instance, let us assume that on the August 21, 2001, you have set the account statement generation frequency as Daily for the account LI020804. On the September 5, 2001, there has been no movement of funds in the particular account. If you have opted for the Generate Only on Movement option, the system will not generate a statement message for September 5, 2001.
If you choose not to enable this option, account statements will be generated regardless of whether there has been a movement of funds or not.
Type
You can specify whether you want a detailed or summary statement or if you do not want a statement for this account at all.
Account
The system displays the account number for which you are setting the statement details.
Cycle
You can specify the frequency for generating the account statements. To specify the frequency of the statements, click on the adjoining drop-down list. The following list is displayed:
- Annual
- Semi-annual
- Quarterly
- Monthly
- Fortnightly
- Weekly
- Daily
On
For a weekly statement you specify the day of the week on which account statements should be generated and for fortnightly and monthly statements the dates of the month. To specify for weekly statements, click on the adjoining drop-down list. The following list of days will be displayed:
- Monday
- Tuesday
- Wednesday
- Thursday
- Friday
- Saturday
- Sunday
To specify for monthly statements enter a number between 1 and 31 (corresponding to the system date).
If you set the statement date to 30, then account statements will be generated on:
- The last working day for months with < 30 days
- For months with 30 days on the 30th; if 30th is a holiday on the next working day
If you set the statement date to 31, then account statements will be generated on:
- The 31st for month with 31 days; if 31st is a holiday on the next working day
- The last working day for months < 31 days
For a fortnightly statement, you could specify 1 and 15
For all other cycles, account statement will be generated on the last day of that cycle.
Secondary A/C Statement
This refers to the type of statement to be generated periodically by the system, for this account. You can specify whether you want a detailed or summary statement or if you do not want a statement for this account at all.
Tertiary A/c Statement
This refers to the type of statement to be generated periodically by the system, for this account. You can specify whether you want a detailed or summary statement or if you do not want a statement for this account at all.
Statement Account
Specify the account for which the statement has to be generated. The adjoining option list displays all valid accounts maintained in the system. You can select the appropriate one.
Exclude Same Day Reversal trns from Stmt
If you do not wish transactions booked and reversed on the same day to be reflected in the account statement, you can specify the preference here. This feature is applicable only for the customer account legs and not for the related GL legs. Also, reversals made through the DE module will not be considered for exclusion.
This specification is defaulted from the account class linked to the account. You can change it for a specific account.
5.9 Specifying Joint Holder Details
Click ‘Joint Holders’ button on the ‘Deposit Account Booking’ screen and invoke the ‘Joint Holders’ screen.
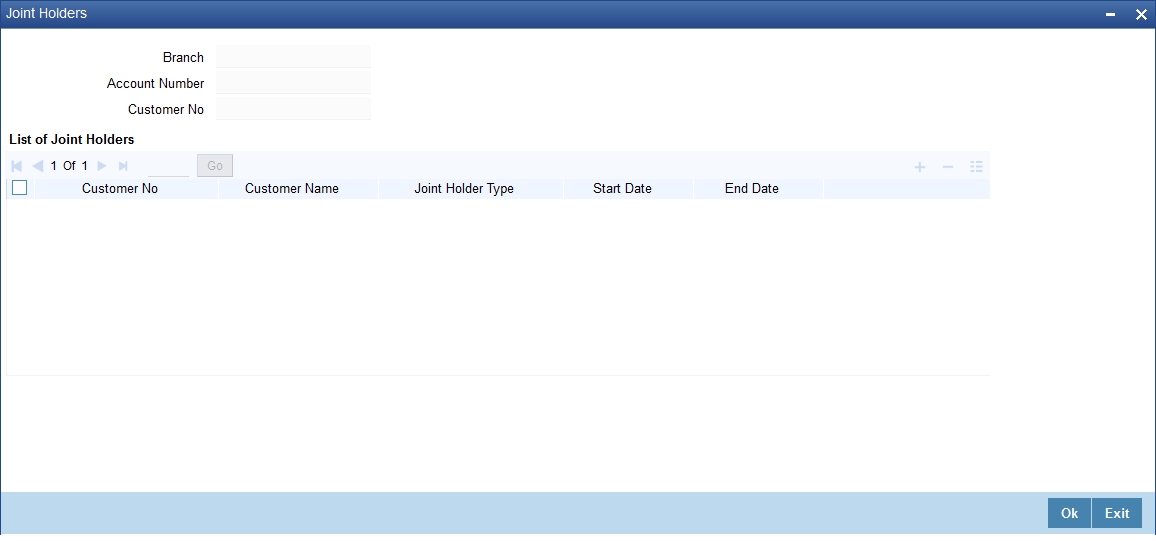
Specify the following details:
Account Number
The system displays the account number here.
Customer No
The system displays the customer account number.
Branch Code
The system displays the branch code of the current branch.
List of Joint Holders
You can add the joint holder details in this section if the selected account type is ‘Joint’. Maintain the following details:
Customer Number
Specify the customer Id for the joint holder. The adjoining option list displays the list of all valid customer numbers. Select the appropriate one.
Customer Name
The system displays the customer name based on the selected customer number.
Joint Holder Type
Indicate the type of authority. Select the appropriate one from the drop-down menu. The options are:
- Authorized Signatory
- Customer Contact Person
- Guardian
- Custodian
- Developer
- Guarantor
- Joint and First
- Joint and Other
- Joint or First
- Joint or Other
- Nominee
- Related for Enquiry
- Solicitor
- Sole Owner
- Third Party
- Trustee
- Valuer
Start Date
Specify the date from which the joint holding of the account begins.
End date
Specify the date on which the joint holding of the account ends.
Note
- If the end date expires, the system does not allow you to save the customer account in case of amendment in the joint holder details. The system will display an error message if you attempt to save the amendment.
- You can enter the joint holder details only if 'Account Type' is 'Joint'. If the account type is ‘Joint’ then it is mandatory to specify the details of at least one joint holder.
5.10 Capturing User Defined Fields
All User Defined Fields (UDFs) linked to the function ID ‘STDCUSTD’ are displayed in the ‘User Defined Fields’ screen.
Invoke this screen by clicking ‘Fields’ button on the ‘Deposit Account Booking’ screen.
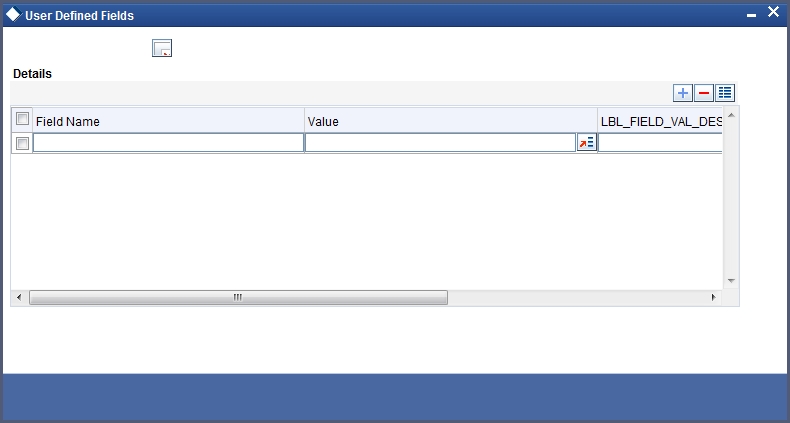
Here you can specify values for each UDF.
Refer the User Manual titled ‘User Defined Field’ for details about defining UDFs.Click ‘Fields’ button on the ‘Deposit Account Booking’ screen and invoke the ‘User Defined Fields’ screen.
5.11 Specifying Account Signatory Details
Click ‘Signatory’ button on the ‘Deposit Account Booking’ screen and invoke the ‘Signatory Details’ screen.
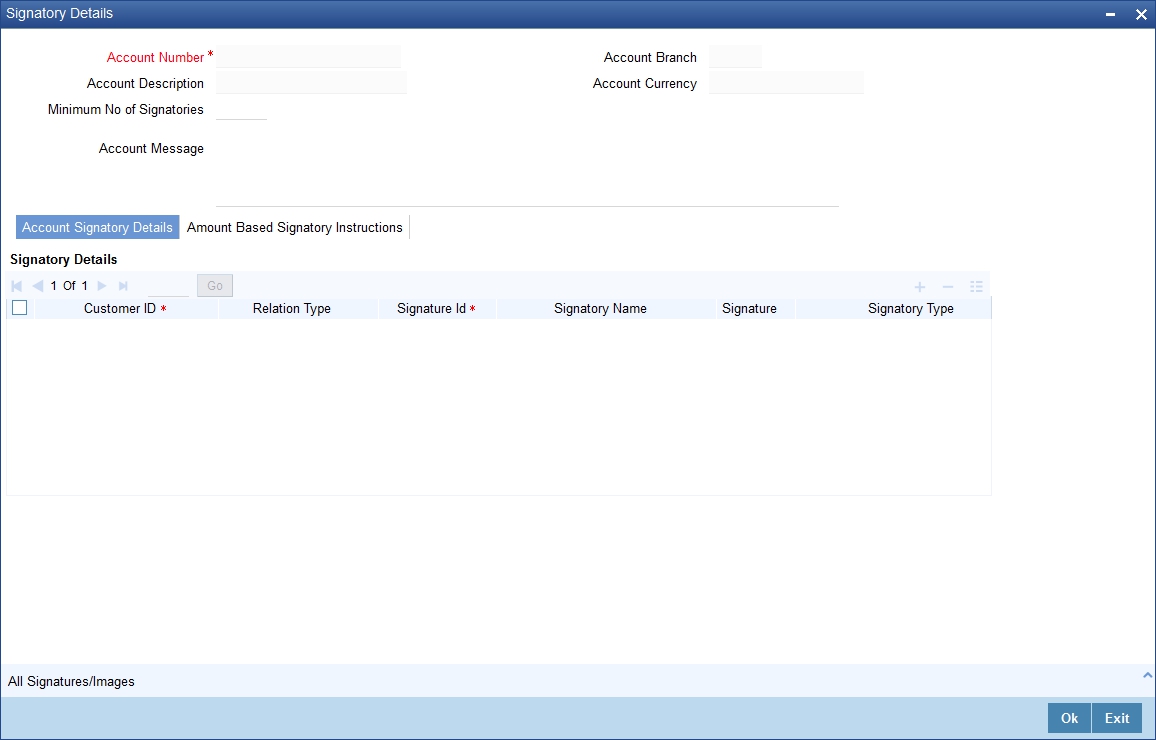
Here you can capture the following details:
Account Branch
The system defaults the current branch here.
Account Number
This is the account number to which signatories are to being linked.
Account description
The system displays the description for the account you have selected.
Account Currency
The system displays the account currency.
Minimum Number of Signatories
Specify the minimum number of signatories necessary to endorse an instrument involving the account.
Note
If the linked or replicated signatories are less than the specified minimum number, system will display an error message.
Account Message
Specify a brief description about particular signatories. It can be related to the name, number and the type of signatory your customer is. You can specify a maximum of 4000 characters as account message length.
For instance you can capture a message like - "This signatory is a joint account holder with rights to sign instruments only up US 8000".
5.11.0.1 Account Signatory Details Tab
Customer ID
Enter the customer ID you want to link to the account
You can link a customer signatory to an account either by:
- Click on the option list next to the Signatory Number. A list of customer signatory numbers, whose details have been captured will be displayed, along with their names. Pick up the signatory whom you want to make an account signatory for the account
- Keying-in the customer Signatory Number and Name directly, if the signatory number has not been maintained through the Customer Signatory details screen
Note
If the signatory ID that you specify has not been maintained, the System displays an override. On confirming the override, you will be allowed to save the signatory details. An error message is displayed if you enter a duplicate Signatory ID. Each time you capture a new Signatory ID at the account level you must identify the relationship of the signatory with the customer.
Relation Type
The relation of the customer to the signature.Signature ID
Specify the signatory identification number.
Signatory Name
The system displays the corresponding name of the signatory ID specified.
Signature
The details of the signature. Click the Signature button to fetch the signature.
Signatory Type
Specify the signatory type.
Approval Limit
Specify the amount up to which the account signatory can approve for debits.
Signatory Message
The system displays the message corresponding to the signatory.
5.11.0.2 Amount Based Signatory Instruction Tab
You can maintain account signatory instructions for different amount slabs in this tab.Click on ‘Amount Based Signatory Instruction, tab to invoke the following screen:
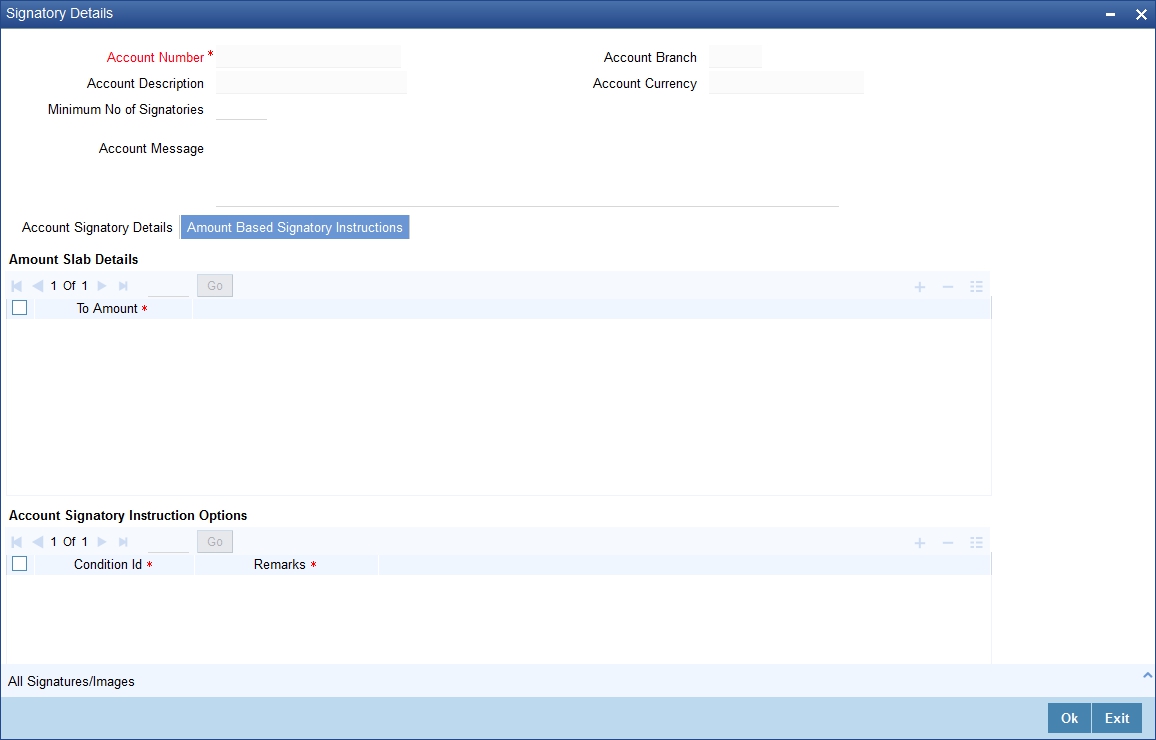
Amount Slab Details
To Amount
Specify the slabs by setting a ‘To Amount’. The amount slab will start from zero and the first value entered will set the slab from zero to that amount. The amounts will be arranged in ascending order.For next slab, an amount above the previous ‘To Amount’ will be considered as the ‘From’ value.
For example, If the ‘To Amount’ entered are as below
To Amount |
10,000 |
100,000 |
1,000,000 |
Then the maintenance will indicate the below amount slabs:
From Amount |
To Amount |
0 |
10,000 |
Above 10,000 |
100,000 |
Above 100,000 |
1,000,000 |
Account Signatory Instruction Options
For each amount slab, you can define different conditions in this section.
Condition Id
Specify a unique Id for condition to be set.
Remarks
Give a brief description for the condition id.
Required Signatories
You can define different conditions for the amount slabs in this section.
Signature Type
Select the signature type required from the option list.The list displays the signature types as maintained in static type maintenance screen.
Note
The signature type cannot be repeated for a condition.
Required No. of Signatories
Specify the number of signatories for each signatory type.This number should be less than or equal to the total number of signatories maintained under the signatory type.
Note
The Amount Based Signatory Instructions tab will be enabled in the following RT screens only if the value of param ‘AMOUNT_BASED_SV’ is Y in CSTM_BRANCH_LOC_PARAMS.
- Cash Withdrawal (1001)
- Account to Account Transfer (1006)
- Miscellaneous Customer Debit (1008)
- TC Sale against Account (1009)
- BC Issue against Account (1010)
- Cheque Withdrawal (1013)
- DD Issue against Account (1014)
- Bill Payment Against account (1075)
- Account Close Out Withdrawal by BC (1300)
- Close Out Withdrawal (1301)
- Multimode Deposit Redemption
- Account Close Out Withdrawal (1320)
- Account Close Out Withdrawal by Multi Mode (1350)
- Cash Transfer (1405)
- Inward Clearing Data Entry (5555)
- FX Sale Against Account (8206)
- TT Issue against Account (8318)
- DD Issue against Cheque (8330)
- BC Issue against Cheque (8335)
- In House Cheque Deposit (LOCH)
- Payment by in house cheque (1045)
5.11.0.3 All Signatures/Images button
Click on ‘All Signatures/Images’ button to view ‘Customer Signature/Image Consolidated View’ screen.
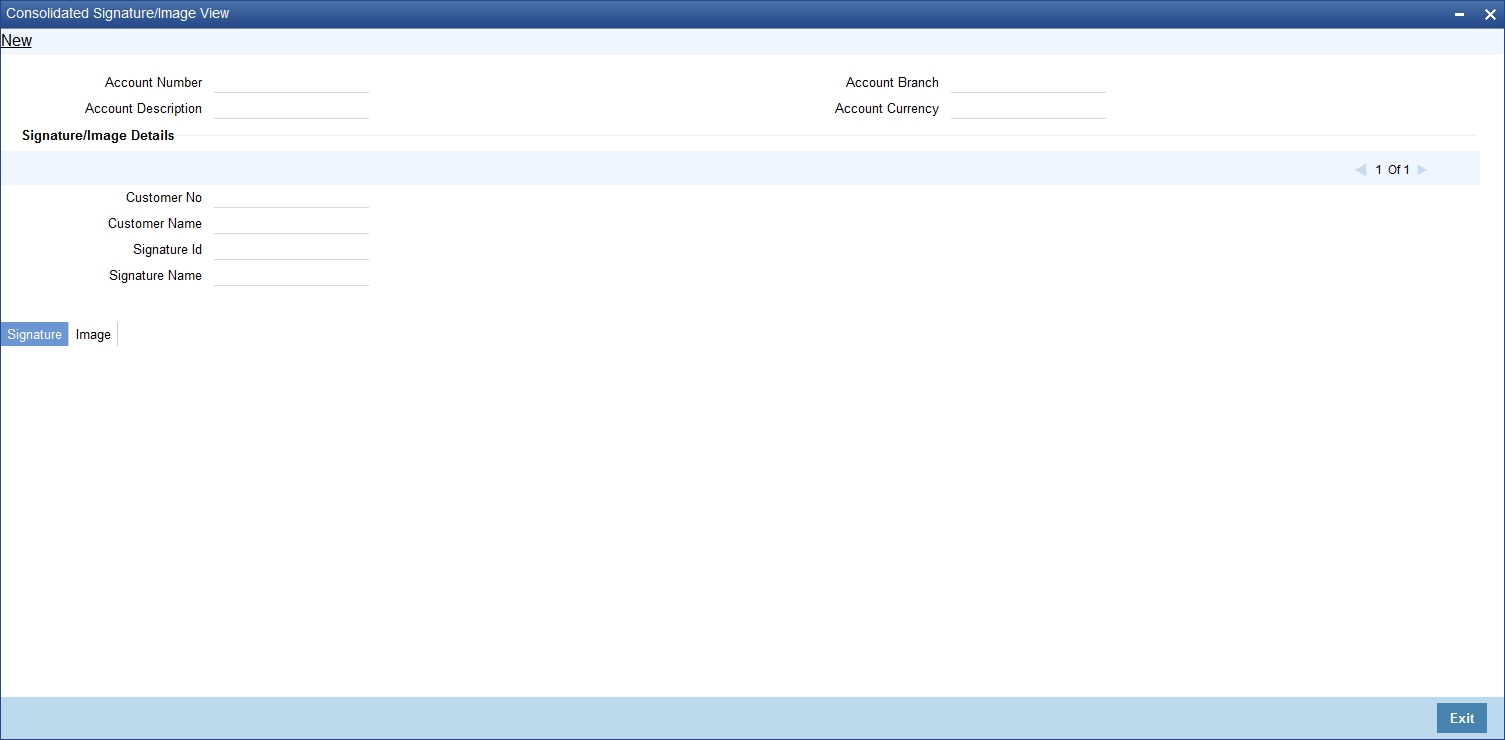
The following details will be displayed in the above screen
- Account Number
- Account Branch
- Account Description
- Account Currency
- Customer Number
- Signature Id
- Signature Name
The ‘Signature/Image’ tab displays nine signatures/Images for a signature id in a single pane with three signatures/Images in a row.
If there is more than one signature id linked to a customer account, then they would be displayed in different pages.
Each image is provided with the following buttons:
- Zoom In
- Zoom Out
- Rotate Clockwise
- Rotate Anticlockwise
- Flip Horizontal
- Flip Vertical
5.12 TD Payout Details
This section contains the following topics:
- Section 5.12.1, "Indicating TD Payout Details"
- Section 5.12.2, "Term deposit Tab"
- Section 5.12.3, "Bankers Cheque/DD Tab"
- Section 5.12.4, "Specifying PC Details"
- Section 5.12.5, "Capturing Payout Interest Details for Child TD"
- Section 5.12.6, "Interest Tab (interest preferences for Child TD)"
5.12.1 Indicating TD Payout Details
Click ‘TD Payout Details’ button on the ‘Deposit Account Booking’ screen and invoke the ‘Term Deposit Payout Details’ screen to capture the parameters for automatic pay-out.
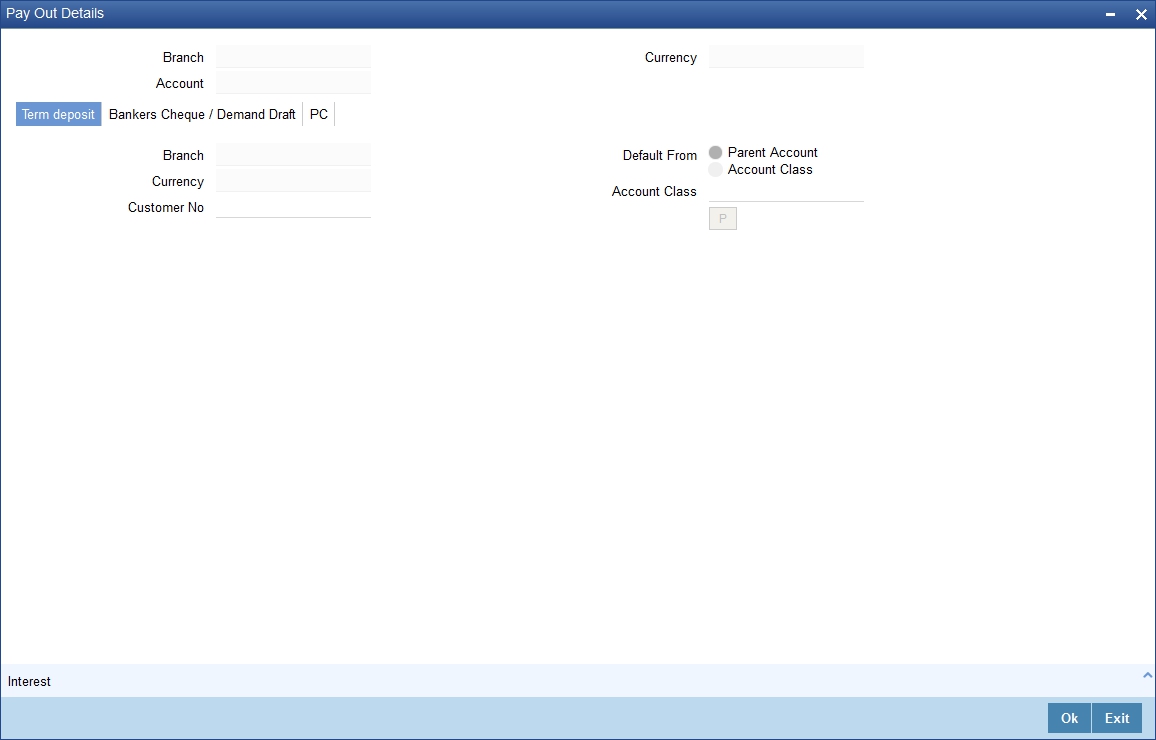
Here you can capture the following details:
Branch code
The system defaults the current branch here.
Account
This is the parent TD account number.
Currency
The system defaults the TD currency.
5.12.2 Term deposit Tab
This tab is displayed by default on invoking the screen. Here you can capture details for creation of a child TD as part of pay-out of the parent TD.
Customer No
The system defaults the customer number. However, the customer no can be changed and a different customer can be provided for child TD creation.
Branch code
The system defaults the current branch here.
Currency
The system defaults the TD currency.
Default From
Indicate whether the details should be picked up from the parent TD account or the account class, by choosing one of the following options:
- Account
- Account Class
Account Class
Specify the account class, if you have selected the ‘Default From’ as Account Class.
If you select the ‘Default From’ as Account, then on clicking of ‘P’ button, the system will default the interest and deposit details from the parent TD account. Or if you select the ‘Default From’ as Account Class, then on clicking ‘P’ button, the system will default the interest and deposit details from the account class selected. For the child TD, you will have to capture interest calculation and pay-out preferences. You can do this by clicking ‘Interest’ button on the screen.
Refer the section ‘Capturing Payout Interest Details for Child TD’ in this chapter for details about capturing interest preferences for Child TD in case auto pay-out by rollover option is selected.
5.12.3 Bankers Cheque/DD Tab
Click ‘Banker’s Cheque/DD’ tab to capture cheque related details if you have opted for TD pay-out through a banker’s cheque.

Here you can capture the following details:
Cheque Details
Specify the following details.
Bank Code
Specify the bank code of the Bankers cheque.
Currency
The system displays the TD currency. You cannot modify it.
Payable Branch
Specify the payable branch for the cheque. The adjoining option list displays all branch codes linked to the specified bank code. You can select the appropriate one.
Instrument Type
Instrument type of the TD will be defaulted here based on the payout type value selected in the main screen, if you have selected ‘Payout Type’ as ‘Demand Draft’ or ‘Bankers Cheque’.
Beneficiary Details
Specify the following details.
Beneficiary Name
Specify the name of the beneficiary for the pay-out.
Passport/IC Number
Specify the passport number or identification card number of the beneficiary for the pay-out.
Narrative
Specify the description for the pay-out.
Beneficiary Address
Specify the address of the beneficiary for the pay-out.
5.12.4 Specifying PC Details
Click ‘PC’ tab to capture pay-out details if you have opted for TD pay-out through PC transfer to another account.
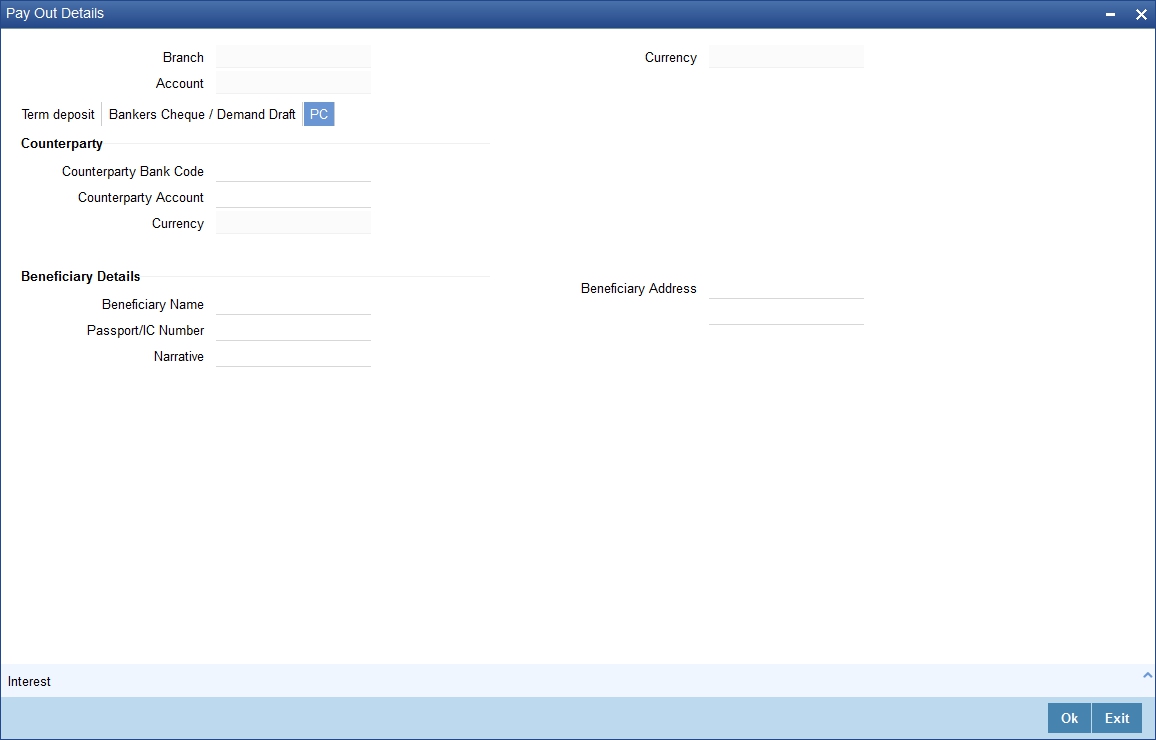
The following details are captured here:
Counterparty
Specify the following details.
Counterparty Bank Code
Specify the bank code of the counter party for the pay-out.
Counterparty Account
Specify the account name of the counter party for the pay-out.
Currency
Specify the currency of the counter party for the pay-out.
Beneficiary Details
Specify the following details.
Beneficiary Name
Specify the name of the beneficiary for the pay-out.
Beneficiary Address
Specify the address of the beneficiary for the pay-out.
Passport/IC Number
Specify the passport or identification card number of the beneficiary for the pay-out.
Narrative
Specify the description for the pay-out.
The system will process TD payout through PC transfer using a bridge GL that is specified for the account class in the ‘Deposit Account Details’ screen.
Refer the section ‘Maintaining Deposit Details’ in the chapter Term Deposit Maintenance’ for details about the bridge GL
5.12.5 Capturing Payout Interest Details for Child TD
As mentioned before, if you have opted for creation of a child TD on maturity of the parent TD, you need to specify interest details of the child TD. Click ‘Interest’ button on the ‘Term Deposit Payout Details’ screen and invoke the ‘Term Deposit Interest’ screen.
In this screen, the system defaults all the parameters maintained for the parent TD. However, you can modify them.
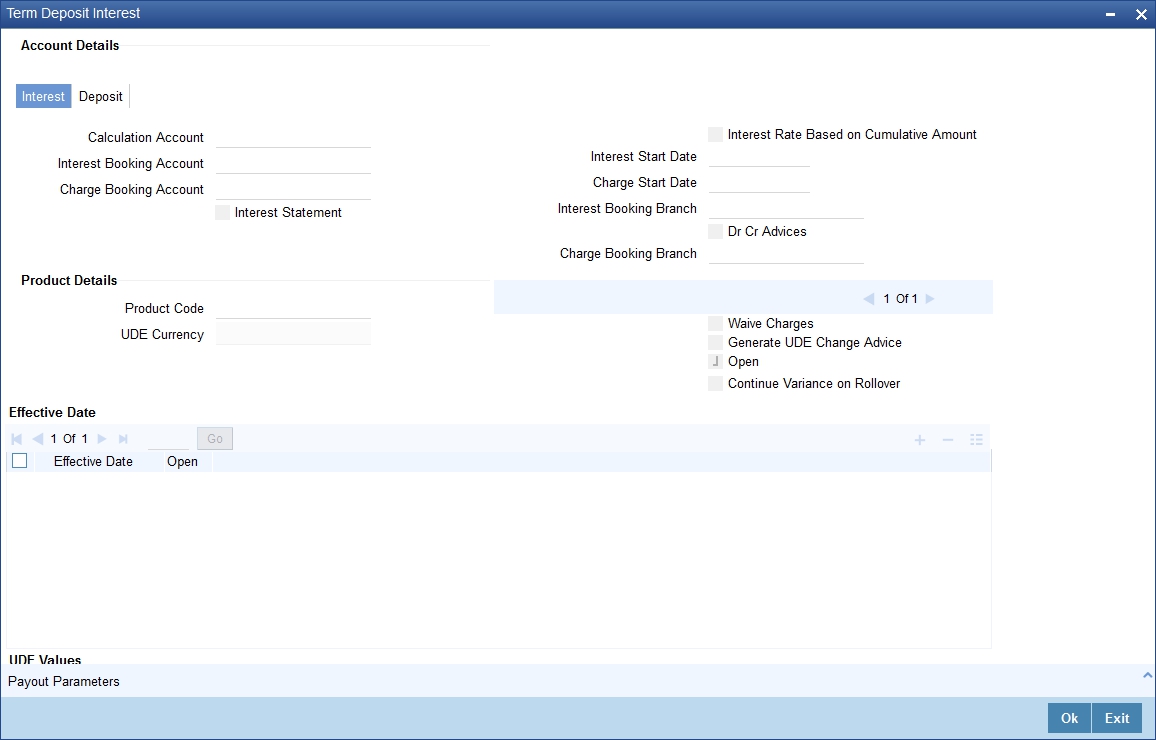
This screen comprises two tabs viz:
- Interest
- Deposit
5.12.6 Interest Tab (interest preferences for Child TD)
You need to capture the following details here:
Interest Tab
You can capture the following interest-related details.
Calculation Account
Select the calculation account of the child term deposit from the option list. All the CASA accounts and the current TD account for which child TD is to be created will be available for selection in the option list.
Interest Booking Account
You can select the accounts for booking interests on transactions processed at your bank.
Charge Booking Account
You can select the accounts for booking charges on transactions processed at your bank.
Interest Statement
You can also indicate if you would like to generate an interest statement for the account. The Interest Statement will furnish the values of the SDEs and UDEs and the interest rule that applies on the account.
Consolidated Charge Account
Specify the account. The option list consolidated change account
Dr Cr Advices
You can indicate whether you want to generate an interest liquidation advice for a customer account. Check the ‘Debit/Credit Advices’ box to indicate that the system must generate payment advices when interest liquidation happens on an account. The advices are generated in the existing SWIFT or/and MAIL format. No advices will be generated if you leave this box unchecked.
The preference you have made in the Customer Account Class screen will be defaulted here. However, you can choose to change your preference to generate or suppress these Advices.
Interest Start Date
The system displays the Maturity date of the parent TD as the interest start date for the child TD. However, you can modify it. Interest for this account will be calculated according to the special conditions that you define subsequently.
Charge Start Date
For the account for which you are defining special conditions, you must specify the date from which you would like to apply charges. Charges for this account will be calculated according to the special conditions that you define subsequently.
By default, charges on an account would be applied when the free banking period (if any) elapses. This means that the Charge Start Date is arrived at by the System by adding the Free Banking Period days (if any, specified for the account class used by the account) to the Account Opening Date. If no Free Period has been indicated for the account class used by the account, the Charge Start Date is defaulted to the Account Opening Date (that is, charges on the account would be applied right from the account opening date) and displayed in the Special Conditions Maintenance screen.
You can override the default Charge Start Date and specify the desired start date for charge application.
Interest Booking Branch
By default, the customer’s account in the current branch will be displayed in this screen (in the Interest/Charge Booking Account and Interest/Charge Booking Branch fields). However, you have the option of booking interest/charge to a different account belonging to another branch also. You can select the Interest/Charge Booking Branch from the option-list available. The accounts maintained in the selected Booking Branch will be available in the option-list provided for Interest/Charge Booking Account. You can select the account from this list. Interest/Charge will be liquidated into the selected account.
Charge Booking Branch
By default, the customer’s account in the current branch will be displayed in this screen (in the Interest/Charge Booking Account and Interest/Charge Booking Branch fields). However, you have the option of booking interest/charge to a different account belonging to another branch also. You can select the Interest/Charge Booking Branch from the option-list available. The accounts maintained in the selected Booking Branch will be available in the option-list provided for Interest/Charge Booking Account. You can select the account from this list. Interest/Charge will be liquidated into the selected account.
Consolidated Charge Branch
Select the charge booking branch from the option-list available. You have an option of booking interest/charge to a different account belonging to another branch. The accounts maintained in the selected booking branch are available in the option-list provided. The system liquidates the Interest/Charge into the selected account
Product Code
Specify the product code.
UDE Currency
Specify the UDE currency for the product that you apply on the account. UDE values that you specify for the account subsequently will be taken to be in this currency.
Generate UDE Change Advice
Check this box to generate the UDE change advice.
Waive Charge
This box is unchecked by default. However, you cannot waive charge on a TD. Leave this box unchecked.
Open
Check this box to make the product applicable again. More than one product may be applicable on an account class at the same time. You can temporarily stop applying a product on an account class by ‘closing’ it. You can achieve this by un-checking the box ‘Open’. The product will cease to be applied on the account class.
Continue Variance on Rollover
This is defaulted based on the Interest and Charges product. However, you can modify this. If you have modified this, then during save, the system will prompt that ‘Continue variance on Rollover Flag is modified’. You can proceed.
Check this box to enable continued variance on rollover. If you check this, then the system will default account variance as current value to the rollover deposit for the next cycle.
If you do not check this, then the account variance will not be carried forward to next rollover cycle.
Interest rate based on cumulative amount
Check this box if child TD account has to be considered for cumulation. Cumulation is applicable only for rate chart allowed TDs.
Effective Date
Specify the effective date of a record which is the date from which a record takes effect. The system displays the maturity date of the parent TD. However, you can change it.
Open
Specify the open records with different Effective Dates if the values of UDEs vary within the same liquidation period.
UDE ID
Specify the UDE ID for the account.
UDE Value
Specify the values for a UDE, for different effective dates, for an account. When interest is calculated on a particular day for an account with special conditions applicable, the value of the UDE corresponding to the date will be picked up.
Rate Code
Specify the rate code for the account. TD rate code is not applicable for Child TD.
Variance
Specify the variance in the interest rate. This is the variance alone. The effective rate will be the sum of the TD rate code and the variance that you specify here. You can modify it anytime.
5.13 Deposit Tab (Deposit Preferences for Child TD)
Click ‘Deposit’ tab to capture deposit-related details of the child TD, if you have opted for creation of a child TD on maturity of the parent TD.
The system defaults all the parameters maintained for the parent TD in this screen. However, you can modify them.
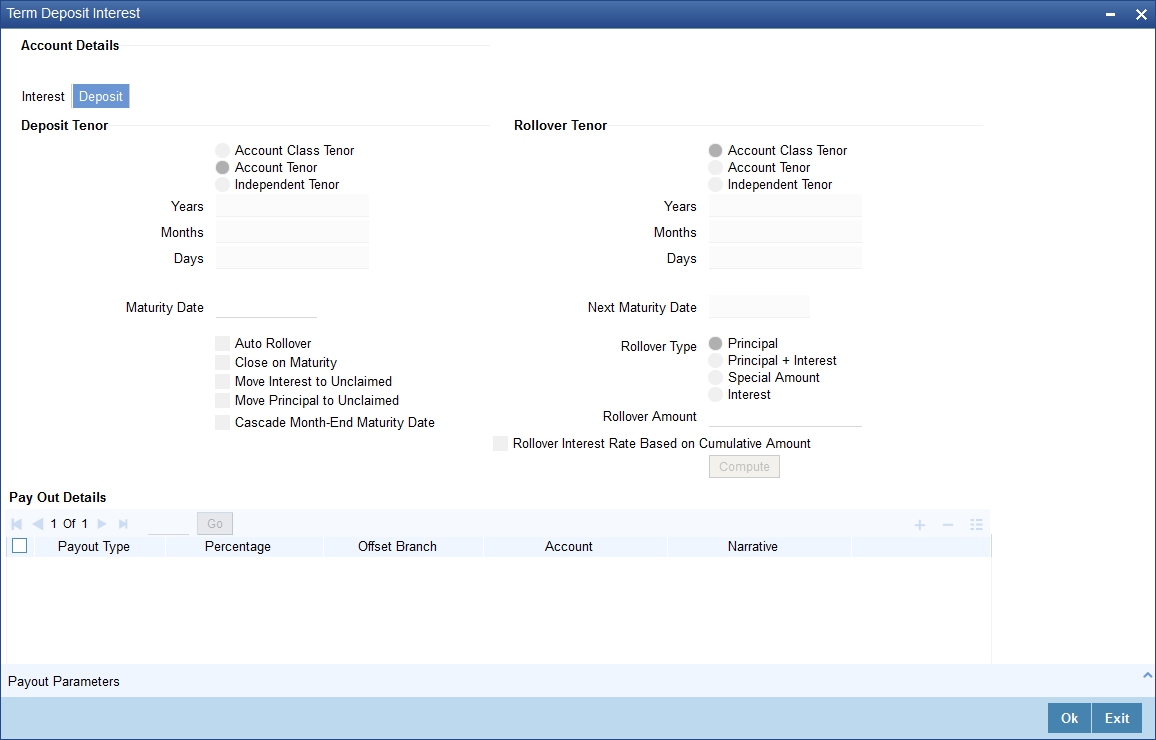
You need to capture the following details here:
Deposit Tenor
Select the deposit tenor type. The following options are available.
- Account class tenor - If you select this, the system will default the default tenor from the account class. This is represented in terms of days, months and years. You cannot edit it. The system will not display the next maturity date, as account class tenor is subject to change.
- Account tenor - If you select this, the system displays the original tenor of the parent TD. The tenor is represented in days, months and years. You cannot change this.
- Independent tenor - If you select this, you can specify the tenor in terms of days, months and years. The default value of the independent tenor will be null.
The tenor should be specified within the minimum and maximum tenor limits maintained at the account class level. The tenor months cannot be greater than 11 months and if tenor months is specified, the tenor days cannot be greater than 30 days.
Years
This indicates the number of years in the original tenor.
Months
This indicates the number of months in the original tenor.
Days
This indicates the number of days in the original tenor.
If the maturity date falls on the holiday, the system adjusts it to next working day.
Rollover Tenor
The deposit tenor has following options as below,
- Account class tenor - If you select this, the system displays the account class tenor in days, months and years. You cannot change this. The system will not display the next maturity date, as account class tenor is subject to change. The default account class tenor at the time of rollover is considered.
- Account tenor - This is the default option. If this is selected, the system populates the original tenor of the parent TD. The tenor is represented in days, months and years. You cannot change this.
- Independent tenor - If you select this, you can enter the rollover tenor in terms of days, months and years. The default value of the independent tenor will be null.
Years
This indicates the number of years in the rollover tenor.
Months
This indicates the number of months in the rollover tenor.
Days
This indicates the number of days in the rollover tenor.
The tenor should be specified within the minimum and maximum tenor limits maintained at the account class level. The tenor months cannot be greater than 11 months and if tenor months is specified, the tenor days cannot be greater than 30 days.
The tenor is represented in terms of years, months and days. For example, if the deposit tenor is 185 days, it should be represented as 0 years, 6 months and 5 days. You need to specify the values in the appropriate fields.
Maturity Date
The system defaults the maturity date from the default tenor from the account class. However, you can modify this date. On this date the term deposit account gets
Auto Rollover
Check this field to automatically rollover the deposit you are maintaining. You have to indicate ‘Rollover Type’ on selecting this option
Close on Maturity
Check this box to close the term deposit account on maturity date and transfer the amount as per the pay-out details maintained for the child TD.
Move Interest to Unclaimed
Check this box to move the interest amount to the unclaimed GL mapped at the IC product in the accounting roles on grace period end date. If you select this option, you will need to check the box ‘Move Principal to Unclaimed’.
Move Principal to Unclaimed
Check this box to move the principal amount to the unclaimed GL mapped at the IC product in the accounting roles and liquidate the interest amount to the interest booking account on grace period end date. If you select this option, the principal liquidation account should be the term deposit account.
Rollover interest rate based on cumulative amount
Check this box to opt for cumulation at the time of rollover.Next Maturity Date
On selecting the rollover for the TD account, the system defaults the next maturity date from the previous tenor of the deposit.
Deposit Tenor
The system calculates the tenor of the deposit account to the difference between Interest start date and Maturity date and displays it. In case of change in maturity date, the system changes the value of this field.
Rollover Type
Indicate the components that should be rolled over by choosing one of the following options:
- Principal
- Principal + Interest
- Special Amount
- Interest
Rollover Amount
If a special amount is to be rolled over, you have to specify the amount (less than the original deposit amount) in this field.
Payout Type
Indicate the method for initial funding during account creation.
Choose one of the following options:
- Account Number
- General Ledger
- Banker’s Cheque
- Payments
Percentage
Specify the percentage of the amount that be rolled over.
Offset Branch
The system populates the branch code of the account from which fund is transferred to TD account.This field returns the branch code if the account is selected and NULL is returned if GL is selected.
Account
Specify the account number/ GL from which the fund is transferred to TD account. If it is Pay-In mode in GL then the system displays only GL’s and if the Pay-In mode is Account then only accounts are displayed in the option list.
Narrative
Specify remarks about the transaction.
5.13.0.1 Specifying Pay-out Parameters for Child TD
Click ‘Payout Parameters’ button on the ‘Term Deposit Interest’ screen and invoke the ‘Payout Parameters’ screen. Here you can specify pay-out preferences for the child TD.
This screen comprises two tab viz:
- Bankers Cheque
- PC
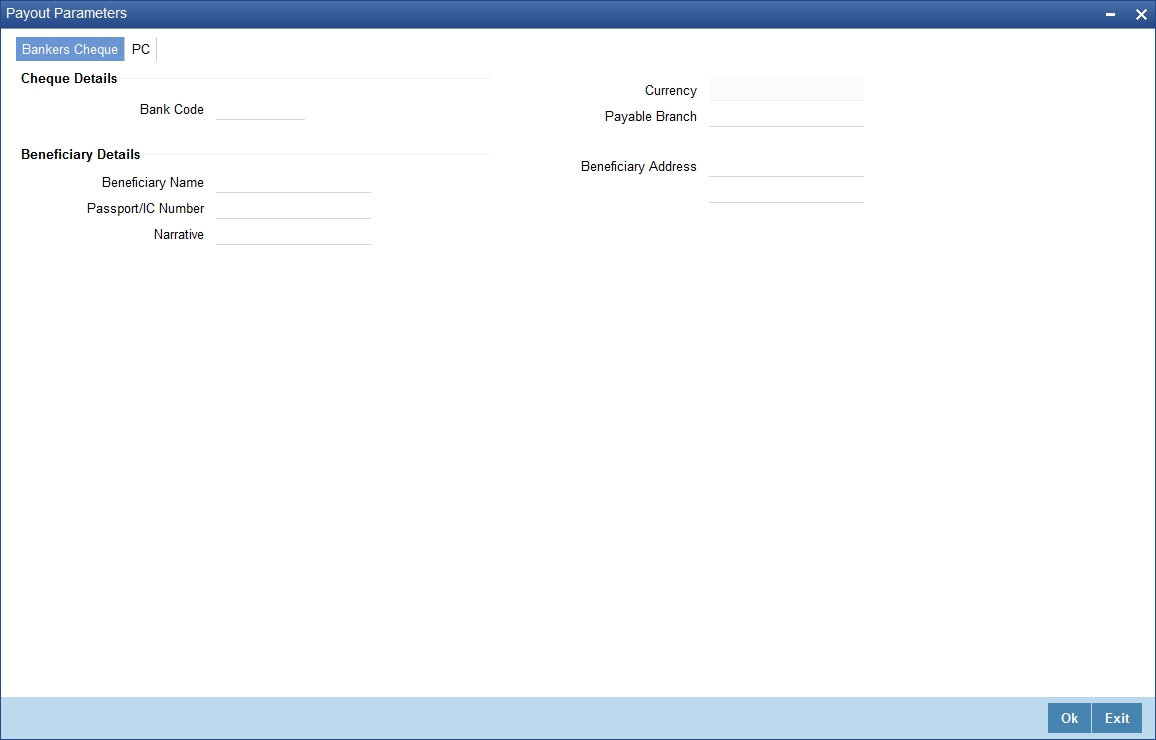
5.13.0.2 Bankers Cheque Tab (for auto pay-out of Child TD)
By default this tab is displayed on invoking the screen. You need to capture the following details in case you want to redeem the child TD using a banker’s cheque.
Cheque Details
Specify the following details.
Bank Code
Specify the bank code of the Bankers cheque.
Currency
Specify the currency in which the cheque is drawn.
Payable Branch
Specify the payable branch for the cheque. The adjoining option list displays all branch codes linked to the specified bank code. You can select the appropriate one.
Beneficiary Details
Specify the following details.
Beneficiary Name
Specify the name of the beneficiary for the pay-out.
Passport/ IC Number
Specify the passport or IC number of the beneficiary for the pay-out.
Narrative
Specify the description for the pay-out.
Beneficiary Address
Specify the address of the beneficiary for the pay-out.
5.13.0.3 PC Tab for Child TD
Click ‘PC’ tab to capture payment details if you want to redeem the child TD through a PC transfer to another account.
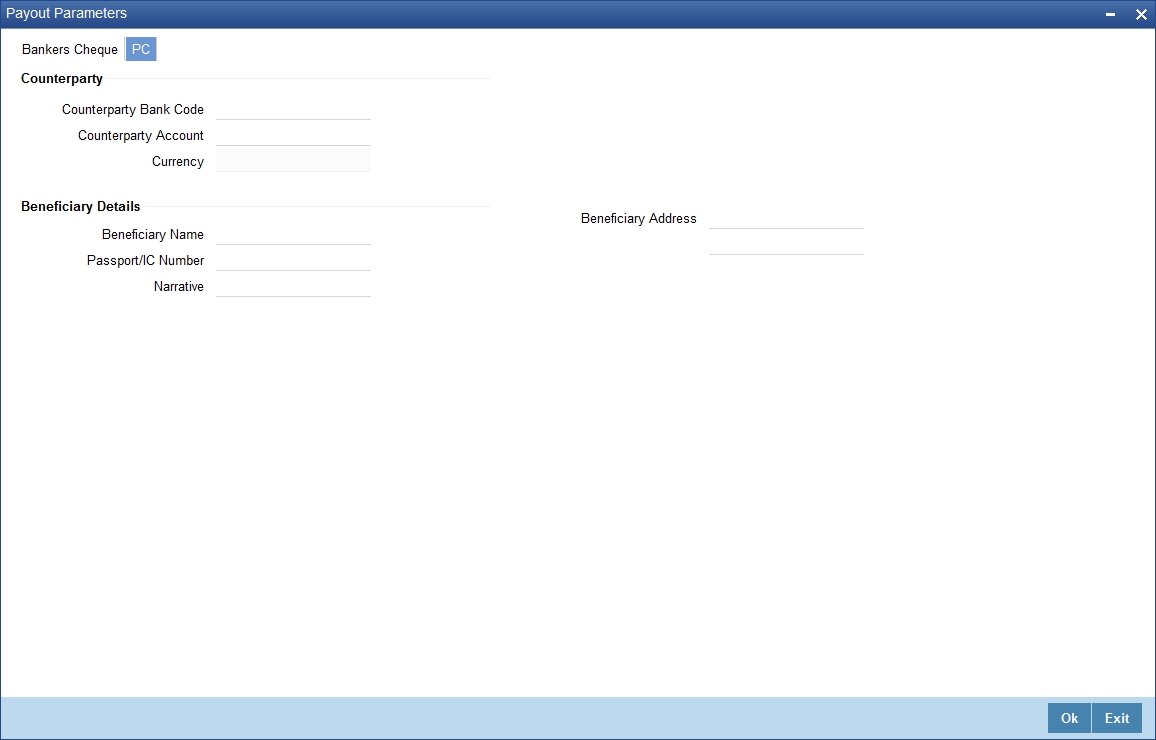
The following details are captured here:
Counterparty
Specify the following details.
Counterparty Bank Code
Specify the bank code of the counter party
Counterparty Account
Specify the account name of the counterparty for the pay-out.
Currency
Specify the currency for the pay-out.
Beneficiary Details
Specify the following details.
Beneficiary Details
Specify the details of the beneficiary
Beneficiary Name
Specify the name of the beneficiary
Passport/IC Number
Specify the Passport/IC Number of the beneficiary
Narrative
Give a brief description for the payout.
Beneficiary Address
Specify the address of the beneficiary.
5.14 Viewing Change Log
Click ‘Change Log’ button on the ‘Deposit Account Booking’ screen and invoke the ‘View’ screen.
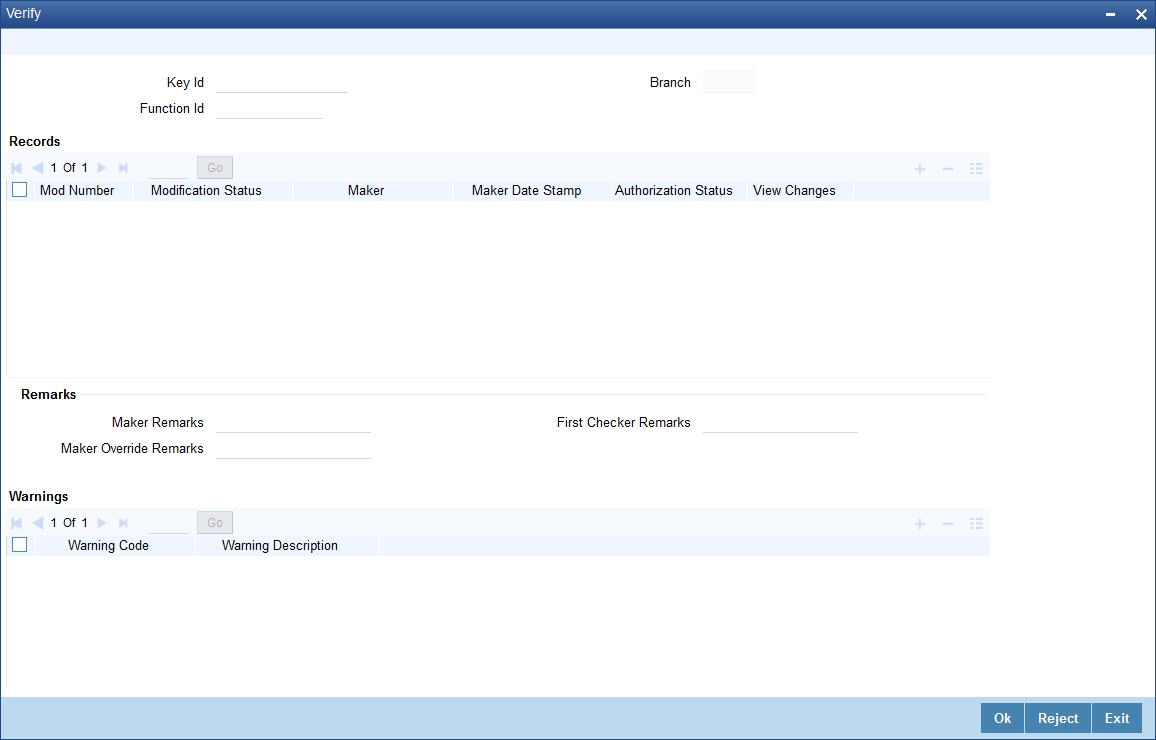
Here you can view the following details:
- Modification Number
- Modification Status
- Maker ID
- Maker Date Stamp
- Authorization Status
- View Changes
- Remarks
- Maker Remarks
- Maker Override remarks
- First Checker Remarks
- Checker Remarks
- Warning Code
- Warning Description
- Field Name
- Old Value
- New Value
5.15 Interest Payout Details for Banker’s Cheque / DD and PC
This section contains the following topics:
- Section 5.15.1, "Capturing Interest Payout Details for Banker’s Cheque / DD and PC"
- Section 5.15.2, "Banker’s Cheque / DD Tab"
- Section 5.15.3, "PC Tab"
5.15.1 Capturing Interest Payout Details for Banker’s Cheque / DD and PC
You can capture interest payout details for Banker’s Cheque / DD and PC in the ‘Term Deposit Interest Payout Details’ screen.
You can capture the following details:
Branch Code
Branch code of the current branch is defaulted here.
Account
Account number of TD is defaulted here from the main tab.
Currency
Currency code of the TD account is defaulted here.
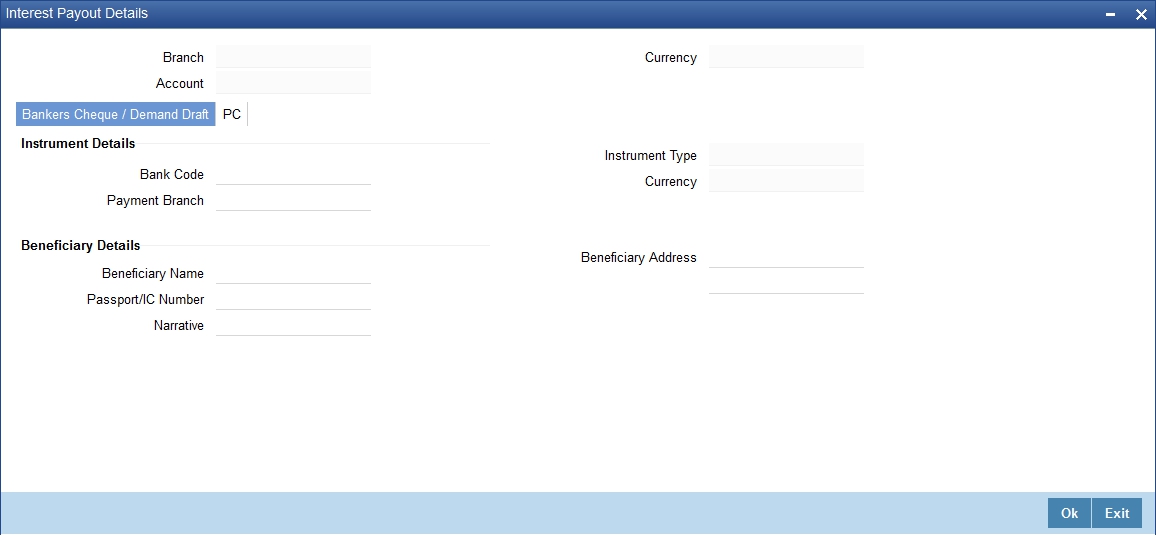
5.15.2 Banker’s Cheque / DD Tab
On invoking the ‘Term Deposit Interest Payout Details’ screen, this tab is displayed by default. You can specify the following details:
Cheque /DD Details
You can specify the following cheque or DD details here:
Bank Code
Specify the bank code. The adjoining option list displays all the bank codes maintained in the system. You can choose the appropriate one.
Payable Branch
Specify the branch from which the interest is payable. The adjoining option list displays all the bank codes maintained in the system. You can choose the appropriate one.
Instrument Type
The system displays the instrument type.
Currency
The system displays the currency.
Beneficiary Details
You can specify the following beneficiary details here:
Beneficiary Name
Specify the beneficiary name.
Passport Number
Specify the passport number of the beneficiary.
Narrative
Enter a brief description of the beneficiary.
Beneficiary Address
Specify the beneficiary address.
5.15.3 PC Tab
Click ‘PC’ tab on the ‘Term Deposit Interest Payout Details’ screen. The following screen will be displayed.
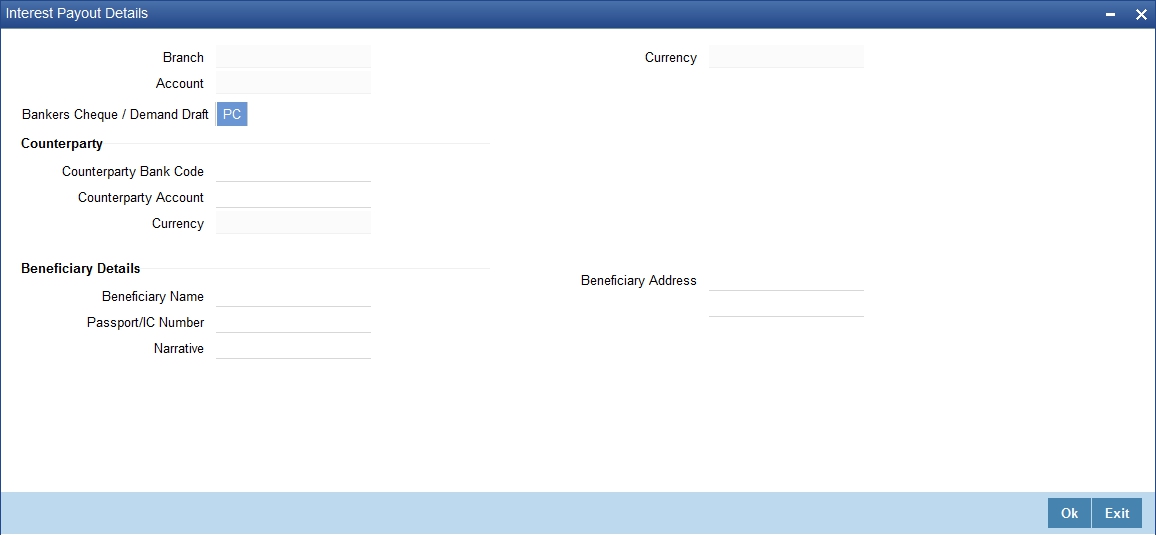
Counterparty
You can specify the following counterparty details here:
Counterparty Bank Code
Specify the counterparty bank code. The adjoining option list displays all the counterparty bank codes maintained in the system. You can choose the appropriate one.
Counterparty Account
Specify the counterparty account. The adjoining option list displays all the counterparty bank codes maintained in the system. You can choose the appropriate one.
Currency
The system displays the instrument currency.
Beneficiary Details
You can specify the following beneficiary details here:
Beneficiary Name
Specify the beneficiary name.
Passport Number
Specify the passport number of the beneficiary.
Narrative
Enter a brief description of the beneficiary.
Beneficiary Address
Specify the beneficiary address.
Note
The system supports the following payout options for interest payout:
- Account
- General Ledger
- Bankers Cheque
- Demand Draft
- Payments and Collections
If payout details are maintained for interest component then interest liquidation happens on the basis of payout details maintained for interest component. However, if payout details are not maintained for interest component then interest liquidation happens on the basis of interest book account specified.
If payout type is chosen as Account or GL for interest component then interest liquidation happens on the basis of offset account mentioned in the ‘Term deposit payout details’ multi grid. If payout type is chosen as Demand Draft /Banker’s Cheque or Payments and Collections for interest component then interest liquidation happens on the basis of payout details maintained in the ‘Interest Payout Details’ sub screen.
Interest payout through as Demand Draft /Banker’s Cheque or Payments and Collections happens through the same bridge GL used for principal payout.
The system does not support payout option as Term Deposit.
Interest payout is not supported if rollover type is interest or principal and interest. For Interest rollover type interest liquidation will be done based on the interest book account.
5.16 Viewing Rollover History Details
You can view Rollover History details in TD Rollover History screen. Click on ‘Rollover History’ to invoke this screen.
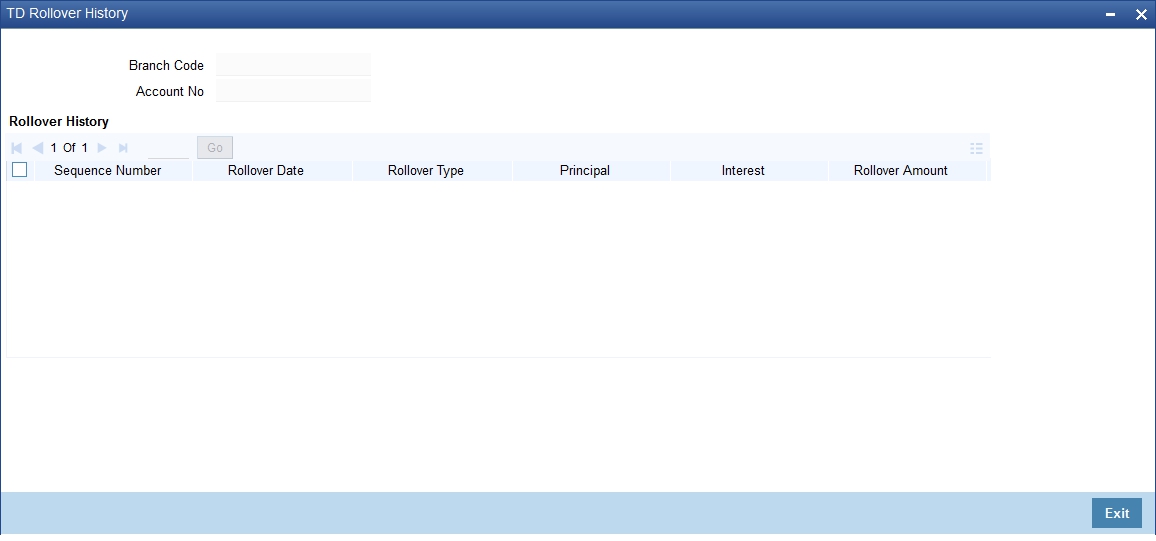
The following details are defaulted in the above screen:
- Sequence Number
- Rollover Date
- Rollover Type
- Principal
- Interest
- Rollover Amount
- Tenor Years
- Tenor Months
- Tenor Days
- Old Maturity Date
- New Maturity Date
- Account Status
For Rollover Type, P = PRINCIPAL, I = PRINCIPAL + INTEREST, T = INTEREST and S = SPECIAL AMOUNT.
Note
On rollover, the adjusted rollover tenor of the TD account is updated in the fields Tenor Years, Tenor Months and Tenor Days.
If the rollover tenor is 1 year, 5 months and 7 days, then the rollover history is updated as
- Tenor Years - 1
- Tenor Months - 5
- Tenor Days - 7
5.17 Specifying Document Details
You can capture the customer related documents in central content management repository through the ‘Document Upload’ screen. Click ‘Documents’ button to invoke this screen.
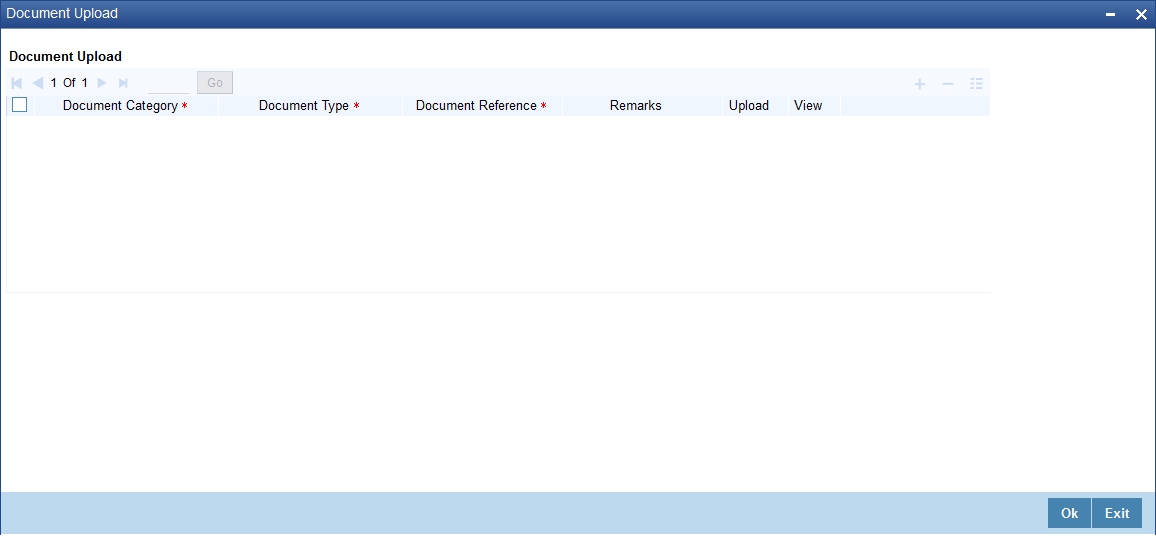
Here, you need to specify the following details:
Document Category
Specify the category of the document to be uploaded.
Document Type
Specify the type of document that is to be uploaded.
Document Reference
The system generates and displays a unique identifier for document reference.
Remarks
Specify the additional information, if any.
Upload
Click ‘Upload’ button to open the ‘Document Upload’ sub-screen. The ‘Document Upload’ sub-screen is displayed below:
In the ‘Document Upload’ sub-screen, specify the corresponding document path and click the ‘Submit’ button. Once the document is uploaded through the upload button, the system displays the document reference number.
View
Click ‘View’ to view the document uploaded.
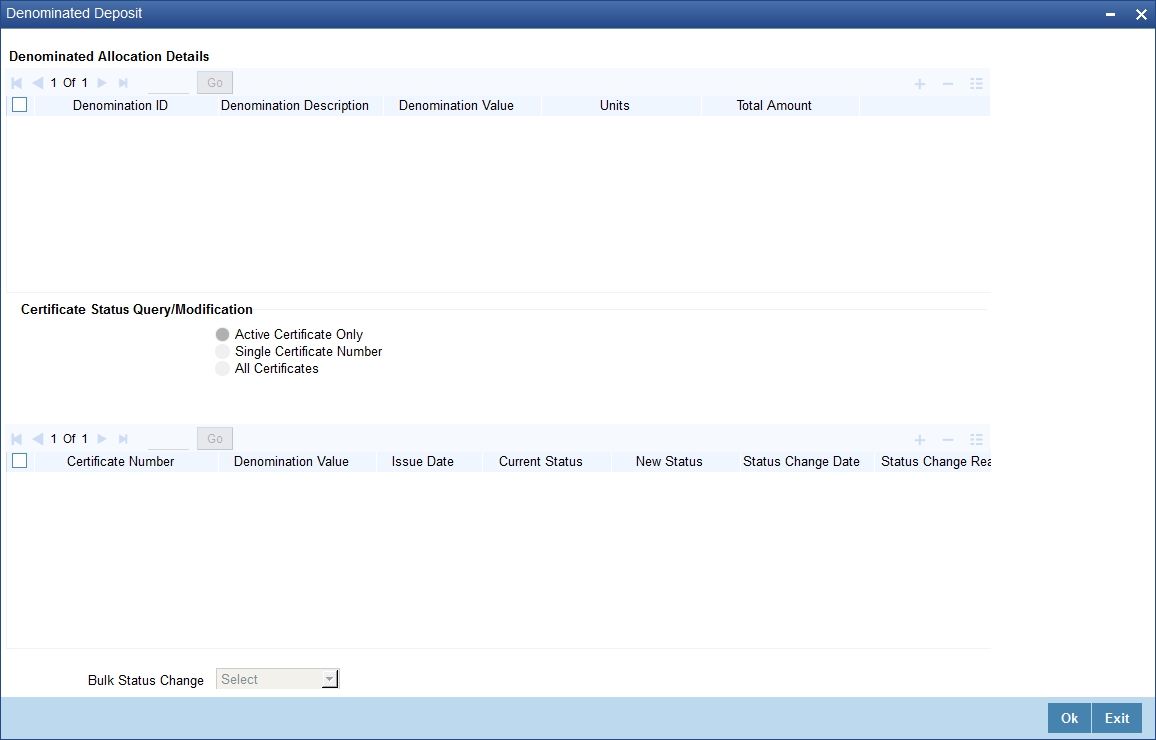
5.18 Specifying Denominated Deposit Details
You can capture denominated deposits details in the ‘Denominated Deposit’ screen. To invoke this screen click the button ‘Denominated Deposit’ on ‘Deposit Account Booking’ screen.
The following details are captured here:
Denomination Allocation Details
The following denomination allocation details are captured here:
Denomination ID
Specify the denomination id here. Alternatively you can also select the denomination ID from the adjoining option list. The list displays all denomination ids allowed at the account class level.
Denomination Description
This is defaulted from the account class level.
Denomination Value
This is defaulted from the account class level.
Units
Specify the required units here.
Total Amount
The Total Amount which is Denomination value x Units is displayed here.
Certificate Status Query/Modification
After a deposit is opened, you can perform a query or modification on the certificate status of a deposit. Select the type of query or modification that you want to perform on the certificates from the following options:
- Active Certificate Only
- Single Certificate Number
- All Certificates
Certificate Number
Select the certificate number from the adjoining option list for which the status has to be changed or queried on.
Denomination Value
This is defaulted from the account level.
Issue Date
The date of issuance of the certificate to the deposit is displayed here.
Current Status
The current status of the certificate is displayed here
New Status
You can select the new status of the certificate from the adjoining drop-down list. The following options are available for selection:
- Issued
- Lost/damaged
- Re-denominated
- Modified
- Duplicate
- Rollover Issue
Note
Only valid certificate status which are allowed to be modified manually will be available in the drop down
Status Change Date
The status change date is defaulted here
Status Change Reason
Specify the reason for status change of the certificate. You can enter up to 225 characters.
Bulk Status Change
Select the appropriate bulk status change option from the drop-down list:
- Modified
- Issued
- Lost/damaged
- Re-denominated
- Duplicate
- Rollover Issue
Note
Only valid certificate status which are allowed to be modified manually will be available in the drop down
Bulk Status Change Reason
Specify the reason for status change of the certificate. You can enter up to 225 characters.
Click ‘Populate’ button. System calculates and displays the following details:
Denomination Allocation Pending Amount
This indicates the amount for which the denomination is yet to be allocated.
Certificate Allocation Pending Amount
This indicates the amount for which the certificate is yet to be allocated.
Term Deposit Amount
This indicates the deposit amount.
Deposit certificate statuses are available for modification as detailed below. Certain status changes are based on occurrence of events on the term deposit account.
Current Certificate Status |
Action |
Status of the existing certificate after the action |
Status of the new certificate |
Issued |
Account not opened due to unsuccessful pay-in transaction |
Cancelled |
|
Amount Block to the deposit certificate |
Amount Blocked |
|
|
Re-denomination of the certificate |
Modified |
Re-denominated |
|
Redemption of the deposit ( partial or full) |
Redeemed |
|
|
Rollover of the deposit |
Cancelled **.In ICDBADHC screen on trying to issue new certificate with ‘Rollover Issuance’ as 'Y' ,then the status of the old certificate will get changed as “Cancelled”. Else the previous status only will be retained. |
Rollover Issue |
|
Certificate lost /damaged |
Lost/Damaged |
Duplicate |
|
Re-denominated |
Amount Block to the deposit |
Amount Blocked |
|
Re-denomination of the certificate |
Modified |
Re-denominated |
|
Redemption of the deposit ( partial or full) |
Redeemed |
|
|
Rollover of the deposit |
Cancelled **.In ICDBADHC screen on trying to issue new certificate with ‘Rollover Issuance’ as 'Y' ,then the status of the old certificate will get changed as “Cancelled”. Else the previous status only will be retained. |
Rollover Issue |
|
Certificate lost |
Lost/Damaged |
Duplicate |
|
Rollover Issue |
Amount Block to the deposit |
Amount Blocked |
|
Re-denomination of the certificate |
Modified |
Re-denominated |
|
Redemption of the deposit ( partial or full) |
Redeemed |
|
|
Rollover of the deposit |
Cancelled **.In ICDBADHC screen on trying to issue new certificate with ‘Rollover Issuance’ as 'Y' ,then the status of the old certificate will get changed as “Cancelled”. Else the previous status only will be retained. |
Rollover Issue |
|
Certificate lost |
Lost/Damaged |
Duplicate |
|
Duplicate |
Amount Block to the deposit |
Amount Blocked |
|
Re-denomination of the certificate |
Modified |
Re-denominated |
|
Redemption of the deposit ( partial or full) |
Redeemed |
|
|
Rollover of the deposit |
Cancelled **.In ICDBADHC screen on trying to issue new certificate with ‘Rollover Issuance’ as 'Y' ,then the status of the old certificate will get changed as “Cancelled”. Else the previous status only will be retained. |
Rollover Issue |
|
Certificate lost |
Lost/Damaged |
Duplicate |
|
Amount Blocked |
Removal of amount block to the deposit |
Issued / Rollover Issue/Duplicate/ Re-denominated |
|
Lost/Damaged |
User marked the certificate Lost/ Damaged by mistake |
Issued / Rollover Issue/Duplicate/ Re-denominated |
|
Modified |
User marked the certificate Modified by mistake |
Issued / Rollover Issue/Duplicate/ Re-denominated |
|
The following table shows the status reasons that are factory shipped for the statuses which are changed automatically.
Automatic Status Change |
Action Due to which the status is changed |
Status Change Reason -Updated Automatically |
Cancelled |
Account not opened due to unsuccessful pay-in transaction |
Pay-in transaction unsuccessful
|
Amount Blocked |
Amount Block to the deposit certificate |
Hold description for the hold code will be displayed.
|
Redeemed |
Redemption of the deposit
|
Deposit Redeemed |
Cancelled |
Rollover of the deposit |
Deposit Rollover |
Issued / Rollover Issue/Duplicate/ Re-denominated |
Cancel |
Amount Block removed
|
For denominated deposits you can do both automatic and manual rollover (including force rollover) only on the entire principal portion.During rollover, there will be no automatic re-issuance of certificates.
In case the certificate is required to be re-issued after rollover the ICDBADHC screen will be used. You can check the ‘Rollover Issue’ box and then the status of the original certificate will be changed automatically to ‘Cancelled’ and the status change reason will be updated as ‘Deposit Rollover’. The status of the new certificate will be ‘Rollover Issue’. You are not allowed to re-denominate the certificate during the rollover issue.
5.18.1 Denomination Allocation
Before allocation of the denominations the ‘denomination allocation pending amount’ and ‘term deposit amount’ will be equal and once the denominations are allocated on click on the ‘Populate’ button, the ‘Denomination Allocation Pending Amount’ field will display the difference between the Term deposit amount and the total of the total amount field (i.e. Term Deposit Amount – Total of the Total Amount field). If you fail to click the ‘Populate’ button, then on ‘Save’ the fields are updated.
There will be a validation for the ‘Denomination Allocation Pending Amount’ to be ‘Zero’ on save of the deposit. If the validation fails then system displays an error message like:
Allocation of Denomination is not done for the full term deposit amount’
You can change the denomination before allocating the certificates from the ‘Term Deposit Certificate’ (ICDBADHC) screen by unlocking the ‘Deposit Account Booking’ (STDCUSTD) screen. But if the denominations are to be changed after allocating the certificates from ‘Term Deposit Certificate’ (ICDBADHC) screen, the process of re-denomination has to be followed.
Note
- The interest rate pickup and the interest calculations are based on the entire deposit amount and not on each certificate denomination.
- TD accounts opened after the interest start date will not be considered for arriving at the cumulation amount.
- The interest rate based on cumulative amount is applicable if 'Interest Rate Based on Cumulative Amount' at the account class is selected.
The settlement account for the interest cannot be the same TD account.
5.19 Rollover Details
You can capture Rollover Details in the ‘TD Rollover Details’ screen. To invoke this screen click the button ‘Rollover Details’ on ‘Deposit Account Booking’ screen.
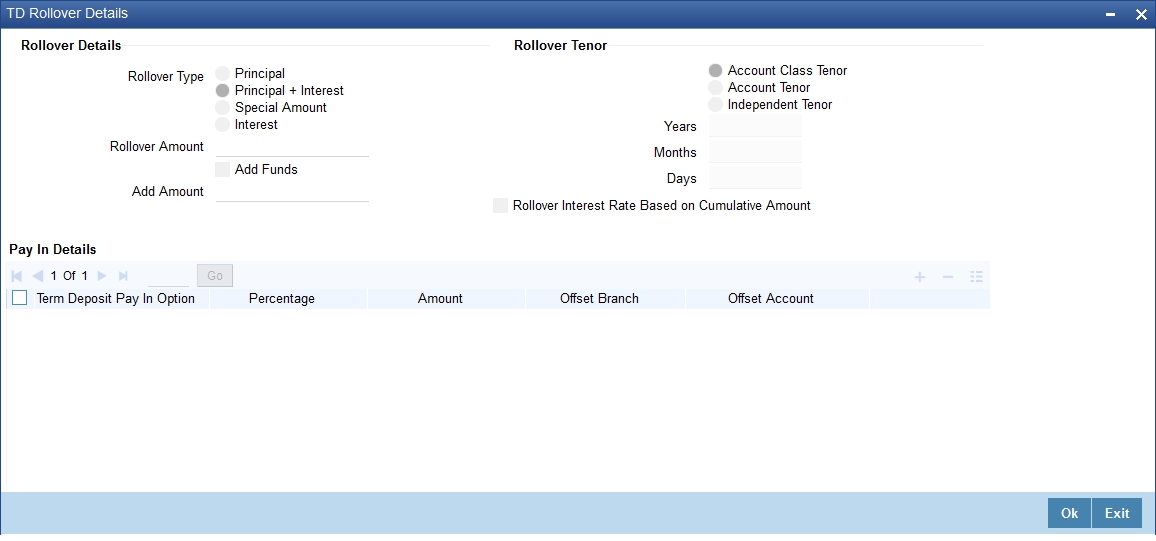
You can specify the following details here:
Rollover Details
Rollover Type
Select the component that should be rolled over. The options are as follows:
- Principal - To roll over the principal amount alone on TD maturity date or end of the grace period. If a CASA account is specified as the interest booking account, interest will be liquidated to that account. However, if the interest booking account is given as TD account, then it is mandatory to specify the interest payout account. On interest liquidation cycle, the interest will be booked on the TD and paid out to the interest payout account. On maturity date, the interest amount will be first liquidated to the TD account and then settled as per the pay-out details maintained for the TD account. Thus the principal alone is rolled over.
- Principal + Interest - To rollover the principal and interest amount on TD maturity date. You can choose this option only if the interest booking account is TD account. Payout details should not be specified.
- Special Amount - To roll over the amount specified in 'Rollover Amount' field, irrespective of the interest booking account. Upon maturity of the rolled over TD, the system will roll over with the same amount special amount and settle the interest amount as per TD pay-out details maintained.
- Interest - To roll over the interest amount on TD maturity date.You can choose this option only if the interest booking account is TD account. You should specify the principal payout account and leave the interest payout account. The principal will be settled as per the pay-out details maintained. This option is not allowed for discounted deposits.
Note
- If the Close on Maturity option is checked then, the system will select the option ‘Principal’ and disable this field.
- Add funds & add amt can be specified any time during lifecycle of TD. TD account can be modified & additional amount can be provided.If due to insufficient funds, the add amount cannot be debited on rollover, then rollover will fail. This will be retried till the funds becomes available and when funds becomes available, the TD Account will be rolled with add funds with maturity date as value date.
- The additonal funds will take effect only at the time of rollover..If rollover is with Principal / Principal+Interest / Interest, then user has to manually check the add funds & specify the additional amount.
- For rollover types Principal / Principal + interest & interest, add funds specified will be directly applied in addition to rollover amount & TD will get rolled with add funds
- If additional amount is specified, then add pay in details are mandatory. If not, error will be thrown on save.
- If rollover is special amount, then based on the rollover amount, the add funds & additional amount will get populated .user should not input add funds & amount for special amnt. If rollover amount is more than the Maturtiy amount (P+I), then Rollover amount -Maturity amnt will be populated as add amount & add funds will gets checked automatically.In this case, rollover amount can be more than the maturity amount.
- Add amount populated once for a special amount rollover TD will not be changed. If TD account is topped up / redeemed, it will be updated only when rollover amount is changed at rollover details subsystem
- If due to Top up, the TD amount becomes more than the rollover amount, then excess of rollover amount less maturity amount will be paid out. For special amount rollover TD, even if rollover amount is more than maturity amount, payout is mandatory.
In case of Discounted Interest, only Principal can be rolled over. The ‘Cumulative’ option is not allowed. The interest computed during deposit booking with discounted option will be paid to the interest booking account. When ‘Amount block’ option is checked at the product level, the amount block will be created on the TD account to the extent of the credited discounted interest. This amount block will use the Hold Code which has ‘Hold Type’ as Discounted TD in the ‘Hold Maintenance’ screen. This is to safeguard the bank from withdrawal of interest by the customer. The amount block created automatically by the system can be manually removed in case of premature closure. Closure is allowed on the amount blocks manually and amendment of these amount blocks is not allowed. TD amount blocks will be available in the ‘Amount Block Input’ screen.
Note
If 'Close on Maturity' option is checked and there is an amount of TD blocked, then the TD will be forcibly rolled over on the maturity date. However, the maturity instruction on the TD account will not be altered.
Rollover Amount
Specify the special amount to be rolled over.
Add Funds
Check this box to add additional funds for rollover.
Add Amount
Specify the additional amount to be considered for rollover in TD account currency.
Note
'For Rollover Type, ‘Special Amount’, ‘Add Funds’ and ‘Add Amount’ fields will be auto populated.
- If the user specifies higher amount, the ‘Add Funds’ gets updated as ‘Yes’ and ‘Add Amount’ will be updated as the difference between special rollover amount and TD maturity amount (P+I) on Save of TD booking. The additional amount field will not be updated on subsequent events in the TD. Any difference amount after rollover will be transferred to the principal payout account.
- If Rollover amount specified is lower than TD amount, the difference will be paid out.In this case, ‘Add Funds’ and ‘Add Amount’ will not be auto populated.
Rollover Tenor
Select the rollover tenor for the TD account. This is mandatory if ‘Auto Rollover’ box is checked. The options are as follows:
- Account Class Tenor - If ‘Re-pick up Account Class Tenor on Rollover’ is set to ‘Yes’ at the account class level, then on selecting rollover, the rollover tenor will be defaulted as account class tenor.
The default account class tenor is displayed as tenor in days, months and years which you cannot change. However, you can change the default option during rollover. When you save it, the system displays an override message ‘Re-pick account class tenor on rollover restrictions exists at account class’.
If ‘Re-pick up Account Class Tenor on Rollover’ is checked at the account class level, then by default, this option is selected. If you select this option, then the following are applicable:
- The value of ‘Default Tenor’ at account class is considered as the ‘Rollover Tenor’ during deposit rollover
- During opening or modification within the term of the deposit, if you change the defaulted value for ‘Rollover Tenor’ from ‘Account Class Tenor’ to ‘Account Tenor’ or ‘Independent Tenor’, then on save system displays an override message.
- On save, Maturity Date’ will not be displayed.
- Account Tenor - If Re-pick up Account Class Tenor on Rollover is set to ‘No’ at the account class level, then on selecting rollover, the rollover tenor will be defaulted as account tenor.
On rollover, the system displays the original tenor of the TD in terms of days, months and years. However, you can change the default option during rollover. When you save it, the system displays an override message ‘Re-pick account class tenor on rollover restrictions exists at account class’. If ‘Re-pick up Account Class Tenor on Rollover’ is unchecked at the account class level, then by default, this option is selected. If you select this option, then the following are applicable:
- The value of ‘Original Tenor’ of the deposit account is considered as the ‘Rollover Tenor’ during deposit rollover.
- During opening or modification within the term of the deposit, if you change the defaulted value for ‘Rollover Tenor’ from ‘Account Tenor’ to ‘Account Class Tenor’, then on save system displays the override message, “Re-pick up Account Class Tenor on Rollover restrictions at account class will be ignored”.
- On save, system updates the ‘Next Maturity Date’ with the sum of maturity date and original tenor of the deposit.
- Independent Tenor - Select this option to provide a different tenor, other than default from account class or account tenor. On selecting this option, you can specify the Rollover Tenor in years, months and days combination.
The tenor should be specified within the minimum and maximum tenor limits maintained at the account class level. If it is not within the minimum and maximum limit, then the system will display an error message "Rollover tenor does not fall in the range of minimum and maximum tenor allowed”. The rollover tenor for independent tenor should not be null.
On save, system updates the ‘Next Maturity Date’ accordingly.
Note
System validates that the rollover tenor is within the minimum and maximum tenor allowed for the account class. If this validation fails, then system displays the error message, “Rollover tenor does not fall in the range of minimum and maximum tenor allowed”.
The next maturity date will be adjusted based on the holiday treatment at account class level. The tenor in ICDREDMN screen will remain the same after holiday adjustment. On query from STDCUSTD after rollover, Deposit tenor will be populated with the holiday adjusted tenor and original tenor with the actual tenor before holiday adjustment.
Years
Specify the number of years in the rollover tenor.
Months
Specify the number of months in the rollover tenor.
Days
Specify the number of days in the rollover tenor.
Rollover Interest Based on Cumulative Amount
Check this box to arrive at the rollover interest rate of a new deposit using the cumulative amount of other active deposits, under the same account class and currency.
Note
- If this box is checked, then the rolled over deposit will earn a cumulative interest rate corresponding to the slab based on all active deposits of the customer.
- This selection can be modified any time during the life cycle of TD. The modification will take effect only on next rollover. The rollover interest rate based on cumulative amount flag will be defaulted on rollover to the 'Interest rate based on Cumulative amount' flag at interest subsystem.
- Rollover interest rate based on cumulative amount can be ‘No’, if interest rate based on cumulative amount is ‘Yes’ and vice-versa.
- Rollover interest rate based on cumulative amount can be checked only for rollover TDs and not for close on maturity and unclaimed TDs.
- Cumulation feature is not supported for recurring deposits, discounted deposits, fixed rate deposits and IC rate code deposits.
Payin Details
Select the Payin Details for debiting the additonal amount for rollover from the drop down list. The list displays the following values:
- GL - In case of pay-in through GL, if the offset GL account is not specified, the list displays the GL maintained at 'TD Payin Parameters' (STDTDPAY) screen and should be specified. If not specified, then GL at STDTDPAY will be defaulted and used on save of TD. The payin mode and Add Funds specified will be debited only on rollover
- Account - In case of pay-in from savings account, it is mandatory
to specify the offset account. If it is not specified, the system displays
an error on saving the TD account. If the pay-in account specified is
disallowed for the TD product, then on saving the account, the system
displays an error message
- If the offset account is not specified then, an error message is displayed as : “Offset account is mandatory.”
- Before rollover, the customer has to manually verify the availability of funds in the offset account. If not the rollover will fail. If the offset account does not have sufficient funds then the system will display an error as ‘Insufficient balance in the account.
If the offset account provided has limits attached, then on save the system will display a mes
sage as “The limits/Collateral attached is used for Payin.”
Percentage
Specify the percentage of payout for each payout option specified.
Amount
Specify the amount to be transferred to TD.
Offset Branch
The system displays the branch code of the account to which fund is transferred from TD account.
Offset Account
Specify the account number/ GL from which the fund is transferred to TD account on rollover. This field will return the branch code if the account is selected and NULL will be returned if GL is selected. If pay-out mode is GL then the system displays only GLs in the option list.
Note
- If amount block exists and TD account is force rolled, then Add Funds will be applicable on rollover.
- Add Funds is allowed only for auto rollover TDs. If it is opted for Close on Maturity or Unclaimed, the system displays an error as ‘Add funds feature is applicable only for rollover TDs’
- Even if one add pay in account does not have funds, then the rollover will fail.
- When TD account is topped up/ Redeemed the Add Amount populated for a special amount rollover TD will not be changed. It will be updated only when rollover amount is changed at rollover details subsystem.
- Add funds and Add amount can be specified at any time during the life-cycle of TD.TD ccount can be modified and additional amount can be provided.,
- When funds are insufficient the Add amount cannot be debited on rollover. and the rollover will fail. And will retire till the funds become available.
- When funds are available, then the TD account will be rolled with add funds with maturity date as value date.
- During Top-up if the TD amount becomes more than the rollover amount then for the excess of rollover amount less maturity amount will be paid out.
5.20 Maintaining Amount Blocks
Oracle FLEXCUBE allows you to facilitate creation of manual amount blocks and closure of the same for TD accounts. You can maintain the amount blocks using ‘Amount Block Input’ screen. To invoke this screen type ‘STDAMBLK’ in the field at the top right corner of the Application tool bar and click the adjoining arrow button.
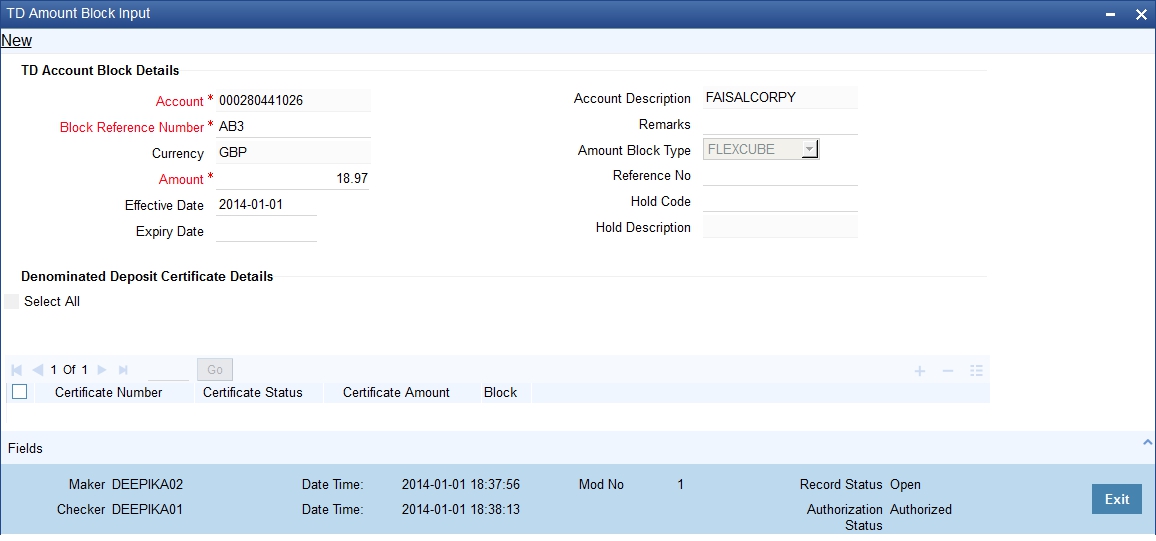
You can specify the following details:
Account
Specify the TD account that needs to be blocked. The adjoining option list displays all active, open and authorized TD accounts that are available for blocking.
To view the joint holder’s details of an account and the mode of operation maintained at the account level, place the cursor on the Account field and press Ctrl+J. The system displays the ‘Joint Holder’ screen.
For more information on the ‘Joint Holder’ screen refer to the section ‘Joint Holder Maintenance’ in the Core User Manual.
Account Description
The system displays the description of the specified account number based on the details maintained at 'Deposit Booking' screen.
Currency
System defaults the currency of the specified account.
Amount
Specify the amount details. The amount to be blocked cannot be greater than the available balance in TD account.
Amount Block Type
Select the type of amount block from the drop-down list. Following are the options available in the drop-down list:
- FLEXCUBE
- Switch
- PreAuth
- Escrow
- System
- Account
- Bulk Salary
- Discounted TD
- Sweep Deposit
- Loan
Note
The amount block type should always be 'FLEXCUBE' for the manually blocked amounts. From front end, the system will not allow you to create, modify or close a record which has 'Amount Block Type' as 'Loan'.
Auto deposits created under the Auto Deposit account class (mapped in CASA account class -> Auto Deposit subsystem -> Account class field) cannot be blocked using this screen. However, deposit created manually under this Auto Deposit account class in STDCUSTD can be blocked.
Amendment of block amount not supported for Discounted Deposits and Mudarabah Sweep Deposit.
Hold Code
Specify the hold code. The hold codes are maintained in the 'Hold Maintenance' screen. Specify the reason for amount block here. In case of discounted TDs, the hold code and description will be automatically defaulted.
Amount Block Number
The system displays the amount block number when the new operation is initiated.
Effective Date
Specify the effective date from when the block becomes effective. The effective date can be current / future dated. If you do not specify the effective date, system defaults the current date here.
Expiry Date
Specify the expiry date. If you do not specify the expiry date, on save, system defaults the current date here. The block will be released on EOTI of the specified expiry date.
The record status will remain as open until the block record is closed. This is irrespective of amount block expiry; however, you cannot modify the amount block after the expiry date.
Reference Number
Specify the reference number.
Hold Description
The system displays the description for the hold code specified.
Remarks
Specify remarks, if any.
Denominated Deposit Certificate Details
Amount blocking of a denominated certificates can be done using ‘TD Amount Block Input’ screen. In case of manual TD amount block, you can designate the denominated certificates supporting the block. Once a certificate is designated for block, the status of the certificate will be modified to 'Amount Blocked' from issued, re-denominated, rollover issue or duplicate status automatically.
Specify the following details for capturing amount block details for denominated deposit certificates:
Select All
Check this box to select all certificates for the account.
Certificate Number
Select the certificate number from the option list. The list displays all active certificates issued for the account.
Certificate Status
This indicates the current status of the certificate selected.
Certificate Amount
This indicates the amount of the certificate.
Block
Check this box to block a certificate.
5.20.1 Viewing TD Summary
You can view a summary of all term deposit accounts in the system, using the ‘Deposit Account Summary’ screen.
To invoke this screen type ‘STSCUSTD’ in the field at the top right corner of the Application tool bar and click the adjoining arrow button.
You can query on records based on any one or all of the following criteria:
- Authorization Status
- Record Status
- Branch Code
- Term Deposit Account Number
- Customer Number
- Term Deposit Currency
- Stock Catalog Code
- Certificate Number
Click ‘Search’ button. The system identifies all records satisfying the specified criteria and displays the following details for each one of them:
- Authorization Status
- Branch Code
- Term Deposit Account Number
- Description
- Customer No
- Term Deposit Currency
Double click on a record to invoke the detailed screen.
5.21 Deposit Instructions
This section contains the following topics:
- Section 5.21.1, "Specifying Deposit Instructions"
- Section 5.21.2, "Specifying UDF Values"
- Section 5.21.3, "Viewing Instruction Summary"
5.21.1 Specifying Deposit Instructions
You can give instructions for processing auto created deposits. The values you specify here will override the parameters you have maintained in the Account Class maintenance.
Invoke the ‘Term Deposits Instruction Maintenance’ screen from the Application Browser to maintain the deposits instructions specifically for the auto created deposits. Type ‘ICDINSMT’ in the field at the top right corner of the Application tool bar and click the adjoining arrow button.
You can set the terms and a condition for a deposit as follows:
Account Number
Specify the account number of the term deposit. The adjoining option list displays all valid TD accounts maintained in the system. You can select the appropriate one.
Account Class
The system defaults account class of the CASA account.
Customer
The system defaults the customer of the CASA account.
Sweep Branch
Specify the branch where the sweep-to account resides. The adjoining option list displays all valid branch codes maintained in the system. You can select the appropriate one.
Sweep to Account
Specify the account to which the sweep is carried out. The adjoining option list displays all valid accounts maintained in the sweep to branch. You can select the appropriate one.
Amount
Specify the amount which to be swept to 'Sweep To Account'.
Minimum Required Balance
Specify the minimum balance required for creation of auto deposit. Only the amount above this limit will be used for auto creating deposits.
Source Code
Specify a code assigned for the sweep.
External Reference Number
The system displays the identification number of the transaction in the source system.
Branch Code
The system displays the branch code of the branch where the TD account resides.
Sequence Number
The system generates a sequence number for the instruction you are maintaining and displays it here.
Account Currency Code
The system defaults the CASA account currency.
Deposit Account Class
The system defaults the Default Auto deposit account class specified in CASA account class. However, you can modify, if needed. The adjoining option list displays all active ,authorized and allowed list of auto deposit account classes specified in CASA account class. Select the appropriate one.
Deposit Currency
Specify the currency in which the auto deposit should be created. The adjoining option list displays all valid currency codes maintained for auto deposit account classes which are active and authorized. You can select the appropriate one. If you want to restrict auto deposit in account level, delete the defaulted AD account class and save the account.
Tenor
The system displays the default tenor maintained for the linked account class in terms of Years, Months, and Days.
Sweep Multiple of
Indicate the number in multiples of which the sweep should be carried out.
Start Date
Indicate the date from which instructions should be valid, using the adjoining calendar.
Retry Till Date
Indicate the date post which the instructions will be rendered invalid. Any failed sweeps after this date will not be picked up for processing the next day.
While saving term deposit instructions;
- If active auto deposit accounts already exist for the Account, the system will display an error message as "Active Auto Deposits are already exist. Cannot modify the Account Class/Currency".
- The system validates if the deposit currency is part of the Interest and Charges Product's account class and currency combination of the Deposit Account class. If not the system will display an error message as “The Auto deposit Currency is not part of the Interest and Charges Product's account class and currency combination".
5.21.2 Specifying UDF Values
All User Defined Fields (UDFs) linked to the function ID ‘ICDINSMT’ are displayed in the ‘User Defined Fields’ screen. Invoke this screen by clicking ‘Fields’ button on the ‘Term Deposits Instruction Maintenance’ screen.
Here you can specify values for each UDF.
Refer the User Manual titled ‘User Defined Field’ for details about defining UDFs.
5.21.3 Viewing Instruction Summary
You can view summary of all instructions using the ‘Term Deposits Instruction Summary’ screen. To invoke this screen, type ‘ICSINSMT’ in the field at the top right corner of the Application tool bar and click the adjoining arrow button.
You can query on records based on any one or all of the following criteria:
- Authorization Status
- Record Status
- Account Number
Click ‘Search’ button. The system identifies all records satisfying the specified criteria and displays the following details for each one of them:
- Authorization Status
- Record Status
- Branch Code
- Account Number
- Sequence Number
- Sweep To Account
- Sweep Branch
Double click on a record to invoke the detailed screen for that record.
5.22 Input and Authorization Limit Validation for TD and RD
The role level limit set up for a user in ‘Role Limits Maintenance’ (SMDRLMNE) screen is applicable for Term Deposit and Recurring Deposit transactions. If the user has auto authorization rights, while saving the transaction, input limit is validated first. If the input amount is within the input limit then subsequently the authorization limit is validated.
At the time of input/authorization of a deposit transaction, if there is a breach of limit then system displays a configurable override message.
Note
- The role level limit set up done in SMDRLMNE screen is not applicable for branch screens.
- You can set up a common limit for each channel and for all the deposit transactions done through a channel validation is done against that limit.
- Limit restrictions will not be validated during deposit amendment.
- Limit validations are applicable for excel upload.
- Limit restrictions are not applicable for all type of simulation screens.
Limit validation is applicable only for the following types of deposits:
- Normal Deposits - including Denominated deposits
- Recurring Deposits
- Discounted Deposit
Limit validation is not be applicable for the following types of deposits:
- Auto Deposit
- Sweep
- Structured Deposit.
Limit validation is applicable for the following types of transactions:
- Term Deposit Opening – Term Deposit amount (Principal amount/Deposit Amount) is considered as the transaction amount.
- Term Deposit Redemption – The redemption amount will be considered
as follows:
- Full Redemption - The deposit account balance as on redemption date will be considered for limit validation. If there is any interest portion as part of the redemption transaction it will not be considered for limit validation.
- Partial Redemption - The redemption amount entered by the user for the partial redemption only be considered for the limit validation. If there is any interest portion as part of the partial redemption transaction it will not be considered for limit validation.
- Recurring Deposit Opening – Installment amount is considered as the transaction amount.
- Recurring Deposit Redemption – The RD account balance as on date of redemption (full) will be considered for validation. If there is any interest portion as part of redemption transaction will not be considered for validation.
- Top up Deposit – For top up deposits only the top up amount is considered for limit validation.
- Manual renewal – In case of manual renewal the total renewal amount is validated against the limit.
The role level limit control is applicable for the Term/Recurring Deposit transactions made through the following screens:
- STDCUSTD - Deposit Account Booking
- ICDREDMN - Term Deposits Redemption Input (Applicable only for Manual redemption and Manual rollover)
- STDTDTOP - Deposit top up screen
- ICDRDPMT- Recurring Deposit Payments Input (Installment Amount is validated for the limit)
- ICDRDREV - Recurring Deposit Payments Reversal (Amount of transaction that needs to be reversed is validated)