2. End of Day Activities
One of the main tasks carried out by the Fund Manager is performing the End of Day (EOD) and Beginning of Day (BOD) activities. These activities perform important functions in the system, and prepare it for the next business day. The system cannot logically close operations at the end of a working day or begin operations on the next business day if the End of Day and Beginning of Day processes are not performed.
Typically, only the following users or groups that are authorized to perform the End of Day activities in the Fund Manager component:
- The Operator or Operator user group
- The Fund Administrator or the Fund Administrator user group
No other user or group will have access to this function.
This chapter contains the following sections:
- Section 2.1, "End of Day Processes – Workflow"
- Section 2.2, "Execution of EOD and BOD Processes"
- Section 2.3, "EOD Activities associated with Interfaces"
- Section 2.4, "System Status"
- Section 2.5, "End of Day Maintenance"
- Section 2.6, "EOD Maintenance Summary"
- Section 2.7, "Mini EOD Execution Screen"
- Section 2.8, "Executing Pre-End of Day Operations"
- Section 2.9, "End of Day Operations"
- Section 2.10, "Beginning of Day Operations"
- Section 2.11, "Branch Sign On/Sign Off"
- Section 2.12, "End of Day Log Report"
- Section 2.13, "Commission Payments for Various Entities"
- Section 2.14, "Extraction Form for Data"
- Section 2.15, "Executing EOD Operations"
- Section 2.16, "Asynchronous Processing"
- Section 2.17, "Batch Processing for Guaranteed Funds"
- Section 2.18, "Fund of Funds Processing"
- Section 2.19, "Master Feeder Funds Processing"
- Section 2.20, "Refresh Rules Maintenance"
- Section 2.21, "US Indicia Check Batch"
- Section 2.22, "FATCA Status Check Batch"
- Section 2.23, "Due Diligence Batch Process"
- Section 2.24, "Interest or Coupon Payment Summary"
- Section 2.25, "Integration Batch Process Screen"
- Section 2.26, "Process Swinging Price"
- Section 2.27, "Unit Holder Balance Handling for US Accounts"
2.1 End of Day Processes – Workflow
Maintaining the Functions to be executed by the End of Day processes
Before you run the End of Day processes at any installation, you must first set up the functions that must be performed by the End of Day processes, through the End of Day Maintenance screen.
The End of Day Processing Sequence
The End of Day processes in the system follow a certain sequence of events, as explained below:
- Pre-End of Day checks
- End of Day processing
- Beginning of Day processing
Pre-End of Day Checks
The Pre-End of Day checks will indicate any activities that are pending, that must be executed and completed by the Fund Manager before the End of Day process can be run. These pending activities can be viewed in the Fund Manager Pre-EOD Processing screen.
The pre-EOD checks could indicate unauthorized transactions, missing fund maintenance or processing information such as fund prices, exchange rates, signing off branches, and so on. The Fund Manager must complete these activities before the End of Day processes can be run.
The End of Day Processing
After all pending activities indicated by the Pre-End of Day processes have been completed, the End of Day processes can be executed, through the Execute End of Day option in the End of Day menu category of the Fund Manager component.
The functions scheduled as part of the End of Day processes are executed according to the sequence defined for them, and the frequency defined for their execution.
If a function whose successful execution is critical for the progress of the EOD process fails to execute, the EOD is aborted.
The End of Day processes perform important processes such as allocation of transactions, updating the unit holder balances, audit trail activities, running of jobs scheduled through the Scheduler Services, execution of interfaces and so on.
Reports scheduled to be generated during the EOD execution are also printed.
The Beginning of Day Process
After successful execution of all the End of Day processes, the Beginning of Day processes can be executed through the Execute BOD screen, that you can access from the End of Day menu category in the Fund Manager main menu.
The Beginning of Day processes set the application date of the system to the next business day.
Reports scheduled to be generated during the EOD execution are also printed.
After the whole EOD cycle (Pre-EOD, EOD and BOD) has been successfully completed, the system is ready for the next business day.
2.2 Execution of EOD and BOD Processes
The End of Day and Beginning of Day processes can be performed manually, as well as automatically, as scheduled jobs through the Scheduler Services. Depending upon this mode of operation, the sequence of activities would be as follows:
Manual execution
- Manual execution of the Pre-End of Day processes through the Fund Manager Pre-EOD Processing screen. Pre-EOD cannot be scheduled to run automatically, but must be performed manually.
- On successful completion of Pre-EOD, manual execution of EOD, through the Execute EOD option in the Fund Manager Batch menu.
- On successful completion of EOD, manual execution of BOD through the Execute BOD option in the Fund Manager Batch menu.
- Alternatively, the BOD process can be executed immediately after the EOD process is completed, Once the EOD process is completed, then you need to manually change the activity and then click ‘Execute BOD’ button.
Automatic execution
- Manual execution of the Pre-End of Day processes through the Fund Manager Pre-EOD Processing screen. Pre-EOD cannot be scheduled to run automatically, but must be performed manually.
- On successful completion of Pre-EOD, automatic execution of EOD through the mandatory EOD task. The execution of EOD can be scheduled as an event-based job that must be run by the Scheduler, when the successful completion of Pre-EOD raises an event in the system.
- On successful completion of EOD, automatic execution of BOD as an event-based job scheduled through the Scheduler Services. The execution of BOD can be scheduled as an event-based job that must be run by the Scheduler, when the successful completion of EOD raises an event in the system.
Therefore, for automatic execution of EOD, you must set up the following event-based jobs through the Scheduler:
- Execution of EOD. This is an event-based job, scheduled to run when the successful completion of Pre-EOD raises an event in the system.
- Execution of BOD. This is an event-based job, scheduled to run when the successful completion of EOD raises an event in the system.
Also, the following pre-defined tasks will be maintained at installation time for the automatic execution of EOD:
- Task for the execution of the EOD and BOD event-based jobs. This task will be a mandatory task. If required, the BOD process can be scheduled to run immediately after the EOD, without manual intervention.
- Task for the execution of report printing during EOD. This task can be scheduled, with the printing of each report forming a job to be executed as part of the task. The reports can be scheduled to be run on EOD or BOD events.
Note
If a report is scheduled to be printed as a job based on the BOD, the job must be manually executed after logging out of the Fund Manager module, so that the data as of the required date is obtained.
During automatic execution of EOD, the progress of the run can be viewed through the Scheduler Monitor. You must refresh the scheduler monitor frequently to view the status of the job.
During EOD, if an event is raised in the system, system extracts a file with the details of the contact person, their phone numbers and the message applicable for the event.
The execution and successful completion of each task and job is logged by the system.
Mini EOD Batch Execution
You can execute the following mini EOD batch for different AMC ID or Agent ID:
- Allot IPO Subscription
- Allot Subscription
- Allot Redemption
- Allot Switch
- Allot Transfer
- Dividend Freeze holdings
- Automatic Instrument Clearing
- Generate Pseudo Switch
- Allot Block
- Allot Unblock
- Allot consolidation
- Allot split
- Allot reissue
- GL Extraction
- Transaction Components Extraction
- Derived Load Processing
Note
For Dividend Freeze holding mini EOD, AMC ID input is considered only for AMC Installation. For Distributor Installation, the Agent Code selected during mini EOD process will be ignored during Dividend Freeze holding mini EOD process. The same applies for GL extract as well.
2.3 EOD Activities associated with Interfaces
The End of Day processes also execute and process any authorized interface that has been defined with an external system, using the Online Execution of Interfaces menu item in the Batch menu category.
For a fuller description of this menu item, refer the ‘Interfaces’ User Manual.
2.4 System Status
This section contains the following topics:
2.4.1 Types of System Status
The status of the Oracle FLEXCUBE Investor Servicing system changes during the course of each business day. At any point during the day, the system may be in one of three possible states:
- O – Online. This indicates that both components (Fund Manager and Agency Branch) are open for unit holder transactions as well as inquires and report printing.
- B – Indicates that the Pre-End of Day processes for the Fund Manager have been successfully completed.
- E – Indicates that the End of Day processes for the Fund Manager have been successfully completed.
The normal sequence of operations during a business day would result in changes of state as explained below:
Start of a Business Day
At the start of a business day, the system is online (status ‘O’), and both the Fund Manager and the Agency Branch are open for the acceptance of unit holder transactions and other operations.
Course of a Business Day
During the course of a business day, the system is still online (status ‘O’), and both the Fund Manager and the Agency Branch are still open for the acceptance of unit holder transactions and other operations.
Agency Branch Pre-EOD
When the Pre-End of Day processes are performed at the Agency Branch, the system is still online (status ‘O’), and both the Fund Manager and the Agency Branch are still open for the acceptance of unit holder transactions and other operations. The pre-EOD checks applicable for the branch alone are performed by the system during this phase. This Pre-EOD check mainly comprises of pending activities like authorization of transactions, etc., at an Agency Branch level.
Agency Branch EOD
When the End of Day process for the Agency Branch is performed, the system is still online (status ‘O’). The Agency Branch is signed off, and only allows inquiries and report printing activities, whereas the Fund Manager is still open for the acceptance of unit holder transactions and other operations.
Fund Manager Pre-EOD
When the Pre-End of Day process is performed for the Fund Manager component, the system is online (status ‘O’) till the successful completion of the pre-EOD. During this phase, the Agency Branch is signed off, and only allows inquiries and report printing activities, whereas the Fund Manager is still open for the acceptance of unit holder transactions and other operations. The pre-EOD checks for the Fund Manager are performed at this time.
Upon successful completion of Pre-EOD, the system status changes to ‘B’ (indicating that Pre-EOD has been successfully completed).
Fund Manager EOD
When the End of Day process is performed for the Fund Manager component, the system status is ‘B’ (indicating that Pre-EOD is successfully completed) till the successful completion of the EOD. During this phase, the Agency Branch is signed off, and only allows inquiries and report printing activities. The Fund Manager also allows only report printing during this phase, and it is not open for the acceptance of unit holder transactions and other operations.
Upon successful completion of EOD, the system status changes to ‘E’ (indicating that EOD has been successfully completed).
Fund Manager BOD
When the Beginning of Day process is started at the Fund Manager component, the system status is ‘E’ (indicating that EOD is successfully completed). The system date is changed to the next business day during this time.
Upon successful completion of EOD, the system status changes to ‘O’, indicating that both the Agency Branch and Fund Manager are now online and open for unit holder transactions and other operations.
2.4.2 Menu Items in End of Day Menu
The menu options for the End of Day processes are found in the Batch menu category of the Browser menu
- Allocation
- EOD Maintenance
- Execute Pre-EOD
- Execute EOD
- Execute BOD
- Branch Sign-on/Sign-off
- Send / Receive Messages
- Process Broker Commission Payments
- Extraction Form for Data
- Online Execution of Interfaces
For a fuller description of all the activities with respect to Validation and Allocation, refer the ‘Confirmation and Allocation’ chapter in this User Manual.
2.5 End of Day Maintenance
This section contains the following topics:
2.5.1 Invoking the EOD Maintenance Detail Screen
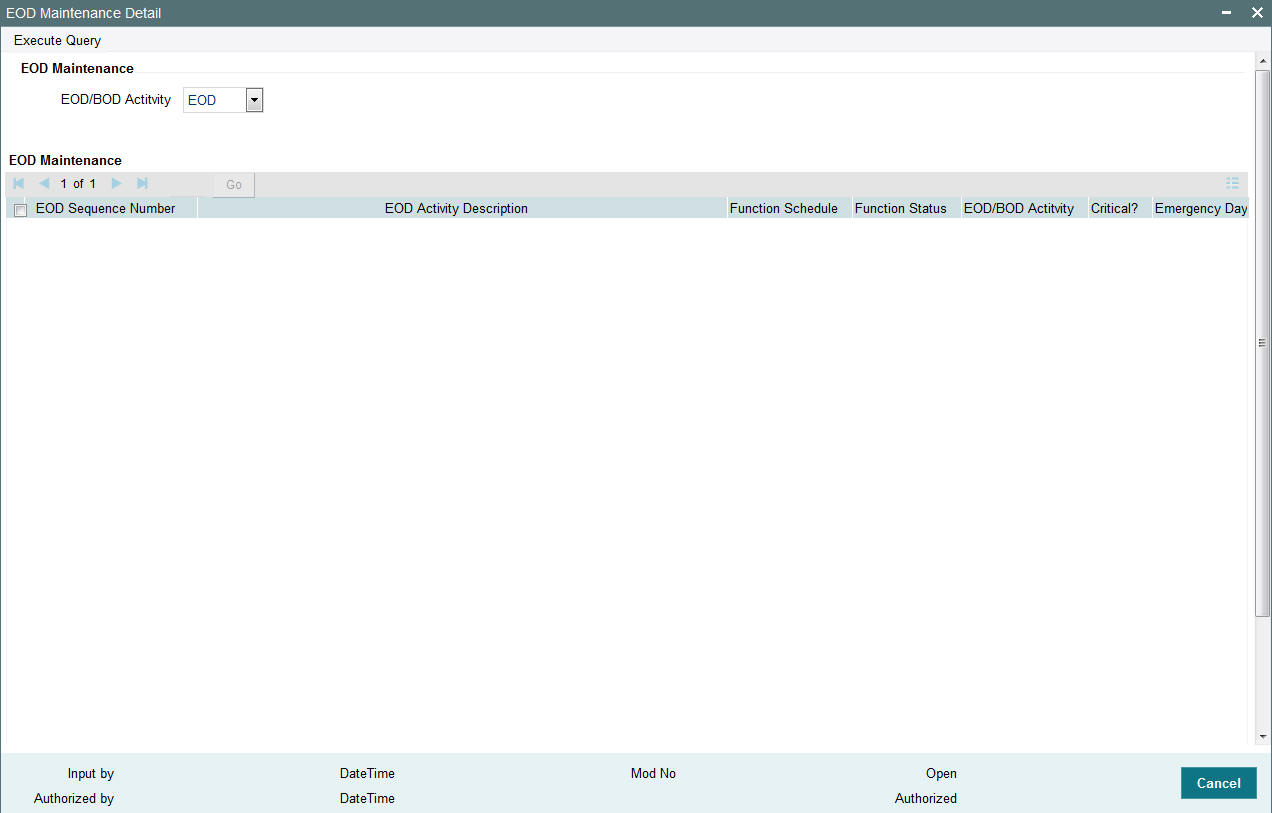
You can use this screen to view and schedule the functions that must be executed during the End of Day process run at the Fund Manager. You can assign a frequency and a critical status to each function.
The functions to be executed by the End of Day Process are set up by the implementers at the time of installation. You cannot add any new functions in this screen or edit any of the functions displayed. You can, however, schedule each function to be executed.
You can invoke the ‘EOD Maintenance Detail’ screen by typing ‘UTDEODMT’ in the field at the top right corner of the Application tool bar and clicking on the adjoining arrow button. You can retrieve the data through F8 function only and make the required changes. Each of the schedules you set up must be authorized to be effective, and can be amended after authorization.
You can perform the following operations can be performed in the EOD Maintenance screen:
- View the existing activities that have been defined
- Edit all unauthorized records
- Amend the Authorized records
- Authorize records
You can specify the following fields in this screen:
EOD/BOD Activity
Optional
Specify the EOD or BOD activity. Choose one of the following options from the drop-down list:
- EOD
- BOD
- Mini EOD
After specifying EOD/ BOD Activity option, click on ‘Enter Query’ button. The system displays the following values:
- EOD Sequence Number
- EOD Activity Description
- Function Schedule
- Function Status
- EOD/BOD Activity
- Critical?
- System Emergency Process
The activities mapped against System Emergency Day Process will be restricted only to System level emergency day’s End of Day/Beginning of Day execution. For other entity level emergency holiday maintenances, the system will execute all the EOD/BOD activities by considering corresponding Fund/ Currency level holidays during this execution.
The system will mark the following EOD activities as default emergency day activities in EOD.
If any of the batch is not applicable for specific installation types, the same can be un-scheduled from emergency day activities.
Batches scheduled and maintained as Emergency day batch only will be executed during emergency day EOD. The system will skip all other batches during emergency day EOD execution even though they are scheduled in EOD.
Sl.No |
Activity Description |
1 |
UH Category change activities for Four Fund Class |
2 |
Misc. Activities for Online/Parallel Allocation |
3 |
Modify Ageing |
4 |
LEP - Update Product Fiscal year |
5 |
Update Transaction Enabled status |
6 |
Reset Unit holder Counter |
7 |
Derived Load Processing |
8 |
External Derived Load Processing |
9 |
Broker Migration |
10 |
Accrual data extraction |
11 |
Cancelled Transactions Settlement Amount Update |
12 |
Trailing Commission Accrual |
13 |
LEP - Update Plan Transaction Allotted Status |
14 |
Entity Commission Tracking Process |
15 |
Trading Box position adjustment process |
16 |
Unit holder account closure |
17 |
LEP - Plan Annuity 5/20 Validation Process |
18 |
Population of Gross Annualized Amount for Annuity Tax |
19 |
Year End Capital Gain Tax Calculation |
20 |
Daily CGT Calculation for Four Fund Class |
21 |
UH Stop Account release date Information Change |
22 |
Mark Unit holders for Dormancy |
23 |
Broker Status Change |
24 |
Process Transaction Components |
25 |
SI Cancellation Re-Activation |
26 |
Post Allocation Minimum holdings check |
27 |
Swift Transaction Allocation Status Updation |
28 |
UH-Automatic Closure of Inactive Accounts |
29 |
GL Extraction |
30 |
Accounting Export Flat File Generation Batch |
31 |
120 Rule Validation |
32 |
FATCA Entity US Indicia Status Updation |
33 |
LEP - Policy PIGS status Updation |
34 |
LEP - PIGS compliance batch check |
35 |
Policy - Reg28 Auto-Switch Generation |
36 |
Broker Commission Processing |
The EOD/ BOD activities applicable for Pension Administration module are as follows:
EODSEQUENCE |
Activity |
EOD/BOD |
5100 |
Migrate Party Role |
End of Day |
5101 |
Investment Account Closure |
End of Day |
5102 |
Data Merge |
End of Day |
5103 |
Balance update for locked-in accounts |
End of Day |
6001 |
Set latest rule for instrument |
Begining of Day |
6002 |
Update Instrument Fiscal |
Begining of Day |
6015 |
System date changes |
Begining of Day |
2.6 EOD Maintenance Summary
This section contains the following topics:
- Section 2.6.1, "Retrieving a Record in EOD Maintenance Summary Screen"
- Section 2.6.2, "Editing EOD Maintenance Record"
- Section 2.6.3, "Viewing EOD Maintenance Record"
- Section 2.6.4, "Deleting EOD Maintenance Record"
- Section 2.6.5, "Authorizing EOD Maintenance Record"
- Section 2.6.6, "Amending EOD Maintenance Record"
- Section 2.6.7, "Authorizing Amended EOD Maintenance Record"
2.6.1 Retrieving a Record in EOD Maintenance Summary Screen
You can retrieve a previously entered record in the Summary screen, as follows:
Invoke the ‘EOD Maintenance Summary’ screen by typing ‘UTSEODMT’ in the field at the top right corner of the Application tool bar and clicking on the adjoining arrow button and specify any or all of the following details in the corresponding details.

- The status of the record in the Authorization Status field. If you choose the ‘Blank Space’ option, then all the records are retrieved.
- The status of the record in the Record Status field. If you choose the ‘Blank Space’ option, then all records are retrieved
- EOD Sequence Number
- Function Status
- EOD/BOD Activity
- Function Schedule
- Critical?
- System Emergency Process
Click ‘Search’ button to view the records. All the records with the specified details are retrieved and displayed in the lower portion of the screen.
Note
You can also retrieve the individual record detail from the detail screen by querying in the following manner:
- Press F7
- Input the Function Status
- Press F8
You can perform Edit, Delete, Amend, Authorize, operations by selecting the operation from the Action list. You can also search a record by using a combination of % and alphanumeric value.
Note
TA to PAS module handoff can be scheduled using EOD Batch 2200 to hand off the allocated transaction to PA system.
2.6.2 Editing EOD Maintenance Record
You can modify the details of EOD Maintenance record that you have already entered into the system, provided it has not subsequently authorized. You can perform this operation as follows:
- Invoke the EOD Maintenance Summary screen from the Browser.
- Select the status of the record that you want to retrieve for modification in the Authorization Status field. You can only modify records that are unauthorized. Accordingly, choose the Unauthorized option.
- Specify any or all of the details in the corresponding fields to retrieve the record that is to be modified.
- Click ‘Search’ button. All unauthorized records with the specified details are retrieved and displayed in the lower portion of the screen.
- Double click the record that you want to modify in the list of displayed records. The EOD Maintenance Detail screen is displayed.
- Select Unlock Operation from the Action list to modify the record. Modify the necessary information.
Click Save to save your changes. The EOD Maintenance Detail screen is closed and the changes made are reflected in the EOD Maintenance Summary screen.
2.6.3 Viewing EOD Maintenance Record
To view a record that you have previously input, you must retrieve the same in the EOD Maintenance Summary screen as follows:
- Invoke the EOD Maintenance Summary screen from the Browser.
- Select the status of the record that you want to retrieve for viewing in the Authorization Status field. You can also view all records that are either unauthorized or authorized only, by choosing the unauthorized / Authorized option.
- Specify any or all of the details of the record in the corresponding fields on the screen.
- Click ‘Search’ button. All records with the specified fields are retrieved and displayed in the lower portion of the screen.
- Double click the record that you want to view in the list of displayed records. The EOD Maintenance Detail screen is displayed in View mode.
2.6.4 Deleting EOD Maintenance Record
You can delete only unauthorized records in the system. To delete a record that you have previously entered:
- Invoke the EOD Maintenance Summary screen from the Browser.
- Select the status of the record that you want to retrieve for deletion.
- Specify any or all of the details in the corresponding fields on the screen.
- Click ‘Search’ button. All records with the specified fields are retrieved and displayed in the lower portion of the screen.
- Double click the record that you want to delete in the list of displayed records. The EOD Maintenance Detail screen is displayed.
- Select Delete Operation from the Action list. The system prompts you to confirm the deletion and the record is physically deleted from the system database.
2.6.5 Authorizing EOD Maintenance Record
An unauthorized EOD Maintenance record must be authorized in the system for it to be processed. To authorize a record:
- Invoke the EOD Maintenance Summary screen from the Browser.
- Select the status of the record that you want to retrieve for authorization. Typically, choose the unauthorized option.
- Specify any or all of the details in the corresponding fields on the screen.
- Click ‘Search’ button. All records with the specified details that are pending authorization are retrieved and displayed in the lower portion of the screen.
- Double click the record that you wish to authorize. The EOD Maintenance Detail screen is displayed. Select Authorize operation from the Action List.
When a checker authorizes a record, details of validation, if any, that were overridden by the maker of the record during the Save operation are displayed. If any of these overrides results in an error, the checker must reject the record.
2.6.6 Amending EOD Maintenance Record
After a EOD Maintenance record is authorized, it can be modified using the Unlock operation from the Action List. To make changes to a record after authorization:
- Invoke the EOD Maintenance Summary screen from the Browser.
- Select the status of the record that you want to retrieve for authorization. You can only amend authorized records.
- Specify any or all of the details in the corresponding fields on the screen.
- Click ‘Search’ button. All records with the specified details that are pending authorization are retrieved and displayed in the lower portion of the screen.
- Double click the record that you wish to authorize. The EOD Maintenance Detail screen is displayed in amendment mode. Select Unlock operation from the Action List to amend the record.
- Amend the necessary information and click on Save to save the changes
2.6.7 Authorizing Amended EOD Maintenance Record
An amended EOD Maintenance record must be authorized for the amendment to be made effective in the system. The authorization of amended records can be done only from Fund Manager Module and Agency Branch module.
The subsequent process of authorization is the same as that for normal transactions.
2.7 Mini EOD Execution Screen
This section contains the following topics:
2.7.1 Invoking Mini EOD Execution Screen
You can invoke the ‘Mini EOD Execution’ screen by typing ‘UTDEODMI’ in the field at the top right corner of the Application tool bar and clicking on the adjoining arrow button.

You can specify the following details:
AMC / Agent Code
Alphanumeric; 12 Characters; Optional
Specify the AMC or the agent code. Alternatively, you can select the AMC or the agent code from the option list. The list displays all valid AMC or agent codes maintained in the system.
AMC / Agent Name
Display
The system displays the AMC or the agent name of the selected AMC or agent code.
Fund ID
Alphanumeric; 6 Characters; Optional
Specify the fund ID. Alternatively, you can select the fund ID from the option list. The list displays all valid fund ID maintained in the system.
Fund Name
Display
The system displays the name of the selected fund ID.
Click ‘Execute’ button to execute mini EOD transactions.
Click ‘View Activity Status’ button to view the following details:
- Activity Description
- Scheduled?
- Status
- Critical?
- Dynamic Procedure Name
- EOD/BOD Activity
Click ‘View Log’ button to view the following details:
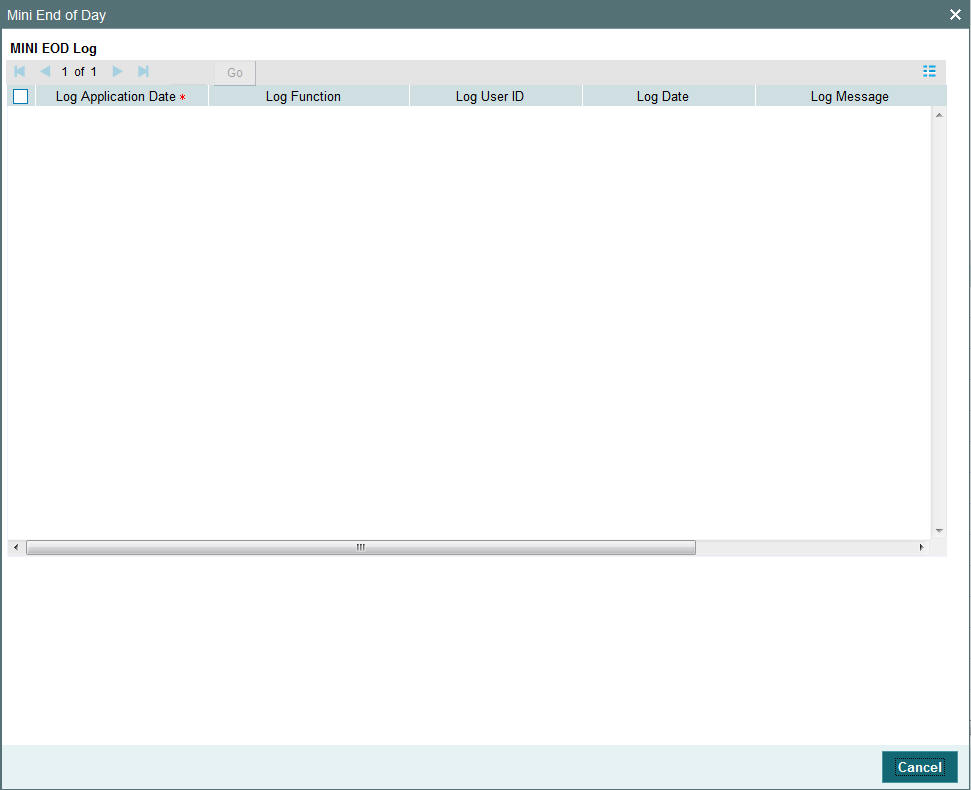
The system displays the following details:
- Log Application Date
- Log Function
- Log User ID
- Log Date
- Log Message
- Error Log Message
Click ‘View Pre Mini EOD Results’ button to view the following details:
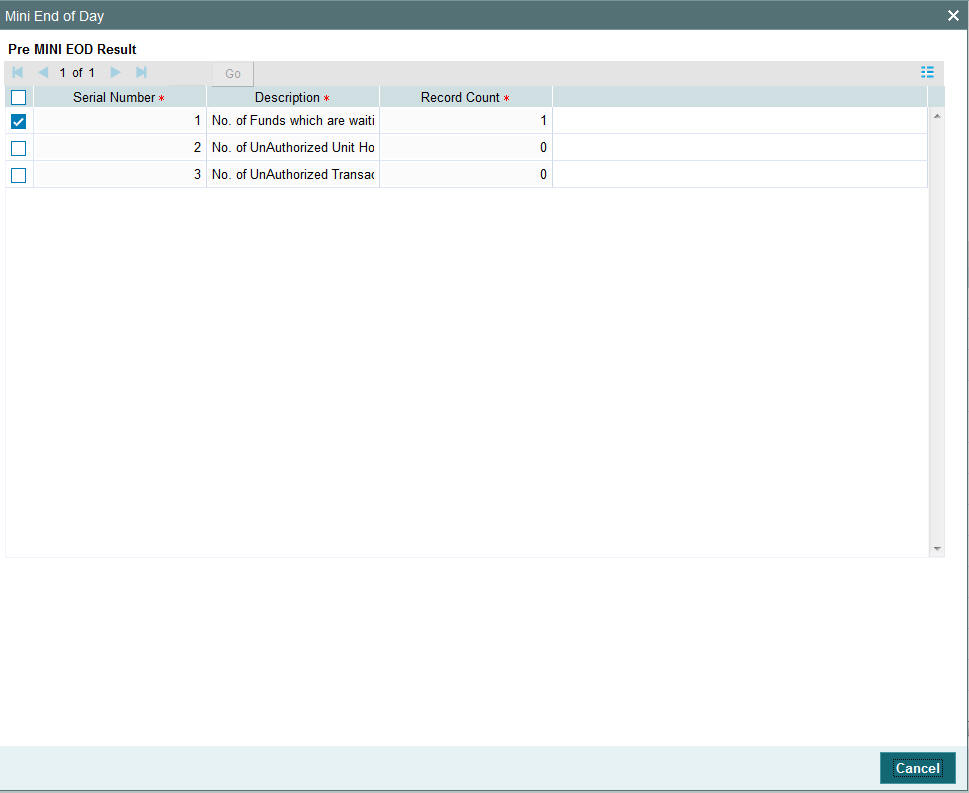
The system displays the following values:
- Serial Number
- Description
- Record Count
On Emergency day, in mini-EOD the Emergency Day Processing activity should be scheduled and executed. This activity will be do the following:
Processing Emergency Holiday
The system runs mini-EOD to identify transactions which are impacted due to emergency holiday and other pending activities.
After declaring emergency holiday and subsequent system holiday, if any, the system executes mini EOD to log the transactions which are impacted. All system generated transactions (like Standing Instruction, Reinvestments etc.) will also be considered for emergency holiday processing.
The system will re-compute and log new transaction date, settlement due date, dealing date, payment date and price date. For unsettled allotted transactions, the system will re-compute settlement due date and payment date.
Activities involved in Emergency Day Processing
The activities involved in emergency day processing are as follows:
- LEP transaction date changes
- Dividend Date changes
- Entity Commission Payment due date changes
- Broker commission payment date changes
- GO Cancellation
LEP Transaction Date Changes
The LEP transaction date changes are as follows:
- All LEP transactions date will be moved to next business day
- Policy Start Date of policy will be moved to next business day
Example
Policy Number |
Rule Effective Date |
Policy Start Date |
HSPOLICY01 |
10-Oct-16 |
10-Oct-16 |
If emergency holiday declared on 10-Oct-2016 then policy start date will be moved to next business day as follows:
Policy Number |
Rule Effective Date |
Policy Start Date |
HSPOLICY01 |
10-Oct-16 |
11-Oct-16 |
Dividend Date Changes
If freeze holding is completed, then the system will not move freeze holding date to next business date. The system will move the unprocessed dividends declared for the date to next business day.
Payment Date and Reinvestment Date will be moved to next business day. Dividend Declare Date and Freeze Holdings Date will be moved for non MMF funds.
Example 1: Non MMF Fund
Fund ID |
Dividend No |
Dividend Declare Date |
Freeze Holding Date |
Payment Date |
Reinvestment Date |
AFUND1 |
5 |
31-Oct-16 |
31-Oct-16 |
31-Oct-16 |
31-Oct-16
|
If emergency holiday declared on 31-Oct-2016, then the system will move dividend attributes to next business day as follows:
Fund ID |
Dividend No |
Dividend Declare Date |
Freeze Holding Date |
Payment Date |
Reinvestment Date |
AFUND1 |
5 |
1-Nov-16 |
1-Nov-16 |
1-Nov-16 |
1-Nov-16 |
Example 2:
Fund ID |
Dividend No |
Dividend Declare Date |
Freeze Holding Date |
Payment Date |
Reinvestment Date |
MMFFND |
575 |
31-Oct-16 |
31-Oct-16 |
31-Oct-16 |
31-Oct-16 |
If emergency holiday declared on 31-Oct-2016 then reinvestment date will be moved to next business day as follows:
Fund ID |
Dividend No |
Dividend Declare Date |
Freeze Holding Date |
Payment Date |
Reinvestment Date |
MMFFND |
575 |
31-Oct-16 |
31-Oct-16 |
1-Nov-16 |
1-Nov-16 |
Entity Commission Payment due date changes
If entity commission payment is due today, the same will be processed in next business day.
Broker commission payment date changes
Broker commission payment date will be moved to next business day
GO Cancellation
If Global Order is already generated on emergency day and if the same is not confirmed, then the system will reverse that global order.
Display
The system will display the status of the Function. The Function can be Running, Not Started, Aborted or Completed.
If the status is displayed as Aborted, you can change the status to Skip to allow the EOD to proceed with the rest of the functions.
2.8 Executing Pre-End of Day Operations
This section contains the following topics:
2.8.1 Invoking Pre-End of Day Check – Execute Pre EOD Screen
To recall, the Pre-End of Day checks will indicate any activities that are pending, that must be executed and completed by the Fund Manager before the End of Day process can be run. These pending activities can be viewed in the Fund Manager Pre-EOD Processing screen.
The pre-EOD checks could indicate unauthorized transactions, missing fund maintenance or processing information such as fund prices, exchange rates, signing off branches, and so on. The Fund Manager must complete these activities before the End of Day processes can be run.
The list of Pre-EOD checks applicable for Pension Administration are as follows:
Serial Number |
Pre-EOD checks |
4000 |
Number of Unauthorised Maintenance Record |
4001 |
Number of Unauthorised Investment orders |
4002 |
Number of unauthorised withdrawal orders |
4003 |
Number of unauthorised Switch orders |
4004 |
Number of unauthorised payment clearing |
4005 |
Number of Currency Pairs for which Exchange Rates have not been maintained |
4006 |
Number of Users Logged In. |
4007 |
Number of orders due for hand off |
4008 |
Number of Future Dated Orders falling on holiday |
4009 |
Number of unauthorized Currency Records |
4010 |
Number of Unauthorized Holiday Records |
4011 |
Number of accounts with holdings beyond preservation age |
4012 |
Number of private investment accounts without bank details |
4013 |
List of parties with all address details expired |
4014 |
List of parties with no valid ID details |
4015 |
Parties with no role attached |
4016 |
Number of investors with no active investment accounts |
4017 |
Number of employees with no pension accounts attached |
4018 |
Number of uncleared payment instructions |
4019 |
Number of Uncleared Employer Payments |
You can use the ‘Pre-End of Day Check – Execute Pre EOD’ screen to perform the pre-EOD checks. You can invoke this screen by typing ‘UTDPREOD’ in the field at the top right corner of the Application tool bar and clicking on the adjoining arrow button.

In this screen click ‘Fetch Pre-EOD Count’ button and an information message will be displayed.
Click OK to return to the following screen in which the ‘View Pre-EOD Results’ and ‘Execute Pre-EOD’ button will be enabled..
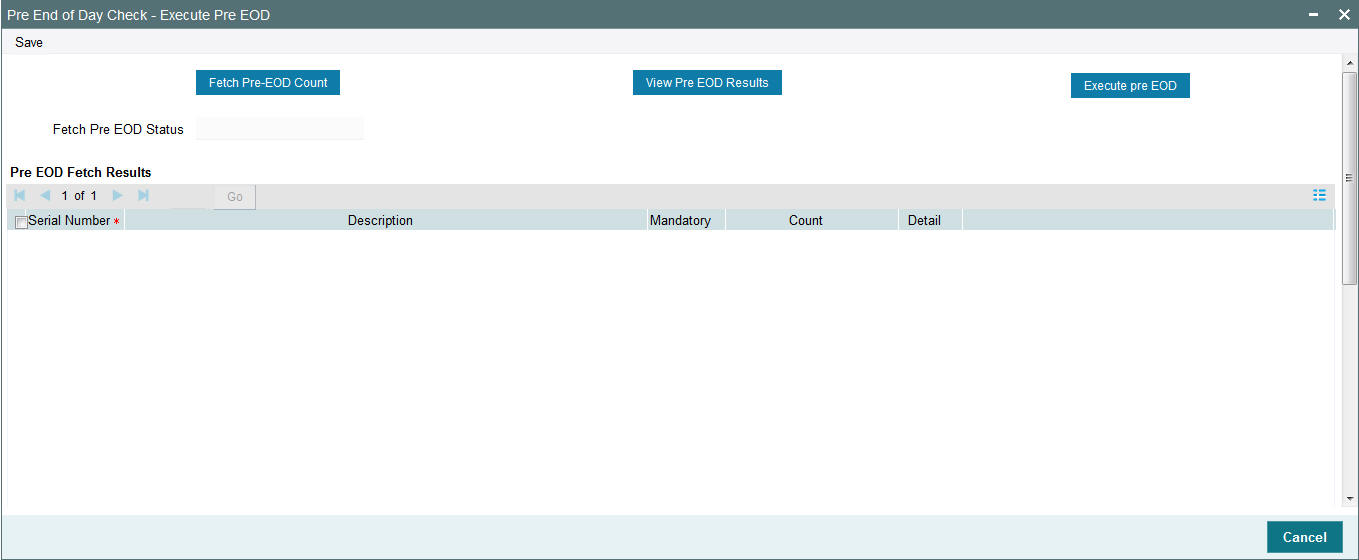
In this screen, click ‘View Pre EOD Results’ button to display the activities that are pending completion before the end of day operations can be executed.

Click Ok to view the results in the Pre-End of Day Check – Execute Pre EOD screen:.
The system displays the following activities in this screen, which must be competed prior to the End of Day Operations:
- The Branches not signed-off for the day
- The number of Fund Rules not authorized
- The number of Fund Prices not entered authorized
- The number of unauthorized Loads
- The number of unit holder related changes that have not been authorized.
- The number of IPO/ Subscriptions that have not been allotted after check clearing.
- The Redemption transactions not confirmed
- The number of checks that have not been cleared
- The number of SI related details
- The number of backdated transactions that have not been allotted
To sign-off branches, use the Branch Sign Off option.
To authorize fund rules, use the Fund Rule Summary option.
To enter fund prices, use the Fund Price Maintenance option to enter the fund price, and use the Fund Price Summary option to authorize the same.
To authorize loads, use the Load Maintenance (Summary) option.
To authorize unit holder related Information, use the UH New Account (Summary) option.
To confirm redemption transactions, use the Confirm Redemption Transactions option.
To check unit holder related information, use the UH New Account (Summary) option.
To allocate IPO / subscription transactions, use the Allocation option.
To authorize/verify SI related details, use the SI related verify/authorization (Summary) option. For authorization/allocation use the corresponding transaction allocation for which the SI has been generated.
The system can proceed with End of Day Operations even if the redemption transactions are not confirmed.
The Branch Sign-Off and Fund Prices must be completed.
To execute the Pre-End of Day processes, click ‘Execute Pre EOD’ button. The system prompts you to back up the database before the process can run.
Note
If, for a broker, you have specified that payment should be held back, by checking the box ‘Hold Back Payment’ in the Broker Maintenance screen, a count of such brokers will be displayed in the Execute Pre-EOD screen.
If the emergency holiday details are maintained, system executes the mini-EOD batch ‘Emergency Day Processing’ before running the EOD.
However, EOD run is performed only after verifying that mini-EOD is executed and after all the entity level emergency holiday maintenances are done for a particular day.
You can view the following fields in this screen:
Serial Number
This is a number that indicates the particular activity. No two Activities can have the same Serial Number.
Description
Describes the various activities scheduled for EOD.
Mandatory
Indicates whether the activity is mandatory or can be skipped.
Note
The count of the mandatory activity shall be brought to zero before executing Pre-EOD or else system will throw up an error message at the time of EOD execution.
Count
Indicates the number of records for which the activity is pending completion. For instance, if Number of Unauthorized Fund Rules has the Count ‘1’, it indicates that there is one fund rule that needs to be authorized.
You can check against one of the programs in Pre-EOD check results grid and then click on the ‘Detail’ button to view the Pre-EOD details of the selected activity in the PRE-EOD Details screen:

The system displays the following details of the chosen activity in this screen:
- Description of the selected activity
- Name of the selected activity.
- Code of the selected activity
- Additional Description of the selected activity
2.9 End of Day Operations
This section contains the following topics:
2.9.1 Executing End of Day Operations
You can use the End of Day Process screen to monitor the End of Day Activities (EOD) at Fund Manager.
Note
The End of Day process can be executed only if the Pre-End of Day processes at the Fund Manager have been successfully completed.
You can configure the BOD process to be executed immediately after the EOD process is completed, without manual intervention, by selecting the Include BOD Activities Also option, in this screen.
Use the End of Day Process menu option to monitor the EOD activities at the Fund Manager Branch. You can access this option by clicking the End of Day Process option under the End of Day Process menu item in the Batch Tab in Fund Manager.
To Run / Monitor EOD, follow the steps given below:
- Click the New record button and then the Execute button to execute the EOD functions defined for the FMG in EOD Maintenance.
- The system will initiate all the EOD activities in the sequence set up for Fund Manager.
- The system will display the status of the Function as Not Started, Running, Aborted or Completed.
- If a critical function fails to complete successfully, the EOD process will abort.
- If a non-critical function fails to complete successfully, the EOD process will continue.
If EOD aborts, you can use the EOD Maintenance screen to change the status to Skip or Aborted and then continue with the EOD process.
2.9.2 EOD Functions
Transaction Allocations
All the transactions that have been authorized and not yet allocated will be done by these functions.
For a fuller description of all the activities with respect to validation and allocation, refer the ‘Confirmation and Allocation’ chapter in the Fund Manager User Manual.
Summary Reports
All the summary reports that have been scheduled for the day are printed.
For further details on summary reports, refer to respective summary report generation in the ‘Reports’ chapter in this User Manual.
Contract Notes
The End of Day processes on a given business day execute an EOD job that prints contract notes in respect of transactions allocated on a given business day. The job checks to see if the contract notes have already been printed from the menu. If so, duplicates will be printed only if the ‘Duplicates Required’ option in the task parameters static information for the job has been enabled and set to ‘Yes’. If the Duplicates Required option has been set to ‘No’, duplicate contract notes are not printed by the EOD job. The Duplicates Required option is configured by the implementers at your installation, according to your requirement in respect of printing of duplicate contract notes.
If the contract notes have not been printed through the Confirmation Reports menu, the EOD job prints the contract notes.
Also, if allowed, as explained above, the EOD job prints transaction contract notes for transactions involving only those unit holders for whom the ‘File’ option has not been set as the preferred mailing mode in the unit holder account details. For transactions involving any unit holders for which the ‘File’ option has been set in the account details, the EOD job suppresses the printing of contract notes.
Fiscal Year Updating
The system checks for the Fiscal year period according the Fund Rules and resets the Fiscal year as the previous year is completed.
Transaction Enabled Status Updating
Check for the Transaction start and end period as per the Fund rule set up and enables or disables a given transaction for a given fund as and when required.
Unit Holder Counter Updating
Updates the unit holder Free Counter and Limit Counter for the given transaction of the fund. The unit holder is further allowed the same transaction for the fund as per the latest available Free Counter and Limit Counter details.
Audit Trail Report
Prints the Audit trail report for the day. The report is printed for the entire Audit trail Ids that are maintained through the Audit Trail Format Maintenance.
Generation of SI Reminders
Generates reminders for all the standing instructions that have been generated and not yet processed. The reminders are generated if the option is set in the SI setup. They are generated both before and after the SI. The period is as per the SI set up.
Purge Activities
The data that is to be purged is checked up with Purge Frequency and once the period is reached, the corresponding data is purged. The purge check is done for the following frequencies - Daily, Monthly and Yearly. Once the data is purged, the last purged date for the given detail is set to the Application date.
Auto Redemption Intimation
This will print intimation to all such unit holders whose unit holder balance is below the minimum balance specified for the fund. The unit holders will be given some time to increase their balance failing which their Units will be automatically redeemed.
2.10 Beginning of Day Operations
This section contains the following topics:
2.10.1 Executing Beginning of Day Operations
You can use the Execute BOD screen to set up the system for the next day. The BOD functions can be executed along with the EOD functions, or separately, from the EOD / BOD Execute screen.
- Check the Setup Box to continue with the Beginning of Day operations for the Dates displayed.
- The system will initialize the System Parameters (setting the application date and resetting the transaction serial number)
- Click the Branch Sign-On Check Box to allow all the Agency Branches to Login to the system for the next working day.
To configure the BOD process to be executed immediately after the EOD process is completed, without manual intervention, from the EOD /BOD Execution screen, by selecting the Include BOD Activities Also option in the Execute BOD screen.
2.11 Branch Sign On/Sign Off
This section contains the following topics:
2.11.1 Invoking Branch Sign Off/On Summary Screen
You can use this screen for Branch Sign-On/Sign-Off. The system will display a list of Branches that have not signed-off for the day. Invoke the ‘Branch Sign Off/On Summary’ screen by typing ‘UTDBSNOF’ in the field at the top right corner of the Application tool bar and clicking on the adjoining arrow button.
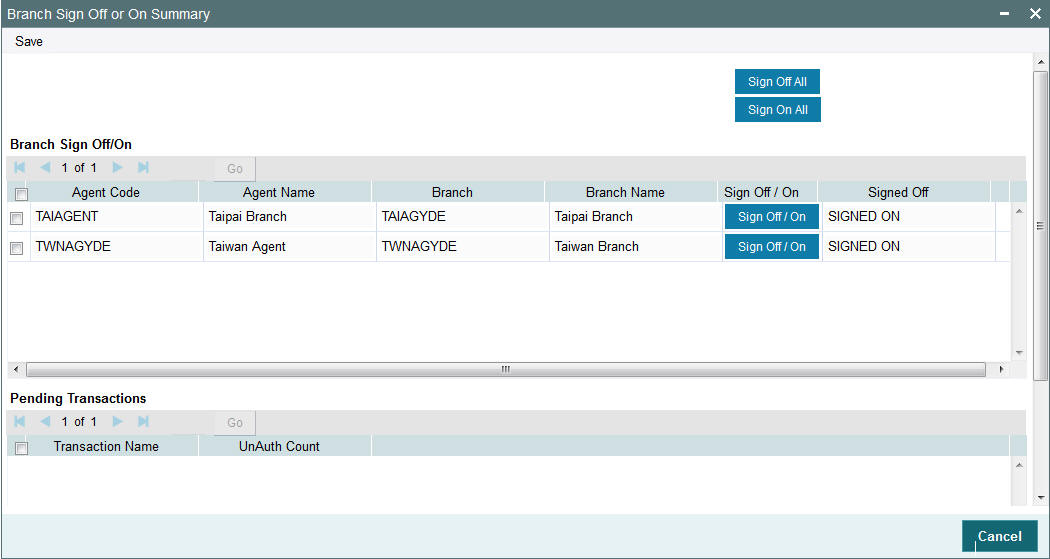
The buttons indicates the sign-on / off status of a Branch.
Click on respective button to sign-on / off the branch. For an online branch, the system will display the list of unauthorized transactions as follows:
- Branch Sign Off/On
- Agent Code
- Agent Name
- Branch
- Branch Name
- Sign Off / On
- Signed Off
- Pending Transactions
- Transaction Name
- UnAuth Count
To proceed further with the End of Day activities, the following has to be done:
- Sign Off the branches. This has to be done regularly for the offline branches and for online branches that haven’t yet signed off for the day.
- Use the Authorization screens for the individual transaction authorization
- Use the Authorization screens for the individual unit holder transaction authorization.
2.12 End of Day Log Report
This section contains the following topics:
- Section 2.12.1, "End of Day Log Report Description"
- Section 2.12.2, "Tax on Commissions"
- Section 2.12.3, "Clearing of Payment Instruments"
2.12.1 End of Day Log Report Description
The End of Day Log Report will print a Log of the EOD functions’ status.
Refer the ‘Reports’ user manual for information about generating and printing a report.
2.12.2 Tax on Commissions
When you initiate commissions processing in the Broker Comm Payment screen, the commission that is due to each broker is computed as on the current date. For each individual broker, any applicable tax (as defined for the broker category in the WHT Details or the overridden tax percentage specified in the Broker Maintenance) is deducted from the accrued commissions, to arrive at the actual commissions that would be paid out.
Tax is computed based on the commissions earned in the current tax year, which you have defined in the Defaults Maintenance. It is also deducted individually for each broker, independent of the broker hierarchy.
For brokers for whom payments are to be held back (as designated in the Broker Maintenance), commissions earned are paid out only if the commission amounts exceed the tax liability for that period, and the ‘hold back’ option has been revoked.
2.12.3 Clearing of Payment Instruments
The payment of the commission accruing from a specific transaction is deferred till the payment instrument for the transaction is cleared. In the event of non-clearance of the payment instrument before the next commission payment date, the commission is processed and accrued, but the payment is deferred till the instrument is cleared. The accrued commission is paid out on the next commission payment date, provided the instrument is cleared.
2.13 Commission Payments for Various Entities
This section contains the following topics:
2.13.1 Processing Commission Payments for Various Entities
The Entity Commission Payment process consolidates the accrued commission for each entity at a fund-level and the payment is processed based on the IDS options defined for each entity in the Entity IDS, with payment being made in the base currency of the fund. If no IDS options have been maintained, the default mode of payment for the entity is used for processing.
The Entity Commission Payment process can be executed either as a batch process as part of EOD. Invoke the ‘Entity Commission’ screen by typing ‘UTDECPYP’ in the field at the top right corner of the Application tool bar and clicking on the adjoining arrow button. Select the type of entity for which commission payment needs to be processed, and then select the ID of the entity.

Enter the details of the entity for which you wish to process the commission payments. Entity commission payments are processed only for those entities for which the Entity Payment Details have been maintained, even if entity commission has been accrued.
Entity Type
Alphanumeric; 1 Character; Mandatory
Specify the entity type.
Description
Display
The system displays the description for the selected entity type.
Entity ID
Alphanumeric; 12 Characters; Mandatory
Specify the entity ID.
Entity Name
Display
The system displays the entity name for the selected entity ID.
2.14 Extraction Form for Data
This section contains the following topics:
2.14.1 Invoking the FIC Extraction Screen
FC-IS provides a facility that enables you to extract data to FLEXCUBE Information Centre or FIC.
In order to extract data, you must set up the parameters that will govern the extraction of this data in the system. Use the FIC Setup screen in the Authorization Menu of the Fund Manager component to perform this task.
Once you have set up the parameters, you can use the Extraction Form to execute the extraction. To invoke the Extraction screen, click FIC Extraction under the FIC Extraction menu item in the Maintenance menu of the Browser.
You can specify the following fields in this screen:
Segment Name
Alphanumeric, Mandatory
Select the segment to which the source table belongs, from the options in the drop-down list. The source table is the table in which the data to be extracted must reside.
MIS Date
Date Format, Mandatory
The application date is displayed here by default, and all the tables that are pending extraction as on this date according to their frequency of extraction, are displayed in the Extraction Details section.
If you chose another date here, click the Show button to view all the tables that are pending extraction as on this date according to their frequency of extraction.
The MIS date can be changed to a value prior to the system application date. The date cannot be changed to a future date.
Extraction Details
When the MIS Date is specified, all the destination tables that are pending extraction are displayed in this section along with the following details:
- The Extraction Routine that is to be executed
- The Loading Type where ‘I’ represents incremental loading and ‘T’ represents total loading.
- The Output Area where the extracted data is to reside
- The most previous date on which data was extracted from this table (the Last Extract Date)
- If the loading type of the extract is Incremental, the From and To dates are displayed
This information is picked up by the system from the Destination Table Details Maintenance record for each of the destination tables, and displayed here.
If the extraction is to proceed, you must click the Extract button, and the data will be extracted to the output area. As and when a destination table is fully extracted, the table row will disappear from the list in the Extraction Details section. The system displays a confirmation message upon successful completion of the extraction.
2.15 Executing EOD Operations
Use the End of Day Process menu option to monitor the EOD activities at the Fund Manager Branch. You can access this option by clicking the End of Day Process option under the End of Day Process menu item in the Batch Tab in Fund Manager.
To run/ monitor EOD, follow the steps given below:
- Click the New record button and then the Execute button to execute the EOD functions defined for the FMG in EOD Maintenance.
- The system will initiate all the EOD activities in the sequence set up for Fund Manager.
- The system will display the status of the function as Not Started, Running, Aborted or Completed.
- If a critical function fails to complete successfully, the EOD process will abort.
- If a non-critical function fails to complete successfully, the EOD process will continue.
If EOD aborts, you can use the EOD Maintenance screen to change the status to Skip or Aborted and then continue with the EOD process.
In EOD Execution screen, on emergency day EOD/ BOD, the system will display the activities which are scheduled on emergency day process as ‘Yes’.
You can invoke this screen by typing ‘UTDEODEX’ in the field at the top right corner of the Application tool bar and clicking on the adjoining arrow button.

You can specify the following details:
EOD/BOD Execution
EOD/BOD Activity
Optional
Select the EOD/ BOD activity from the drop-down list. The list displays the following values:
- End of Day
- Beginning of Day
- Both
Click ‘View Activity Status’ button to view the following details:
- EOD/ BOD Status
- Activity Description
- Scheduled
- Status
- EOD/ BOD Activity
- Critical
- Object to Run
Click ‘View Log’ button to view the following details:
- Log Application Date
- Log Function
- Log User ID
- Log Date
- Log Message
- Error Log Message
Click ‘Execute’ button to execute EOD execution details.
Note
During the EOD execution, if emergency holiday has been declared on that day then the processes which are marked as Function Status as ‘Scheduled’ and Emergency Day Process as ‘Yes’ the system will execute only those processes on Emergency Day EOD execution.
On non-Emergency day, the system will execute all the processes which are marked as Function Status as ‘Scheduled’.
2.15.1 Campaign BOD Batch
You can close the campaign code after expiry using ‘Campaign Closure’ BOD batch. During BOD, the system checks if any of the campaign whose campaign end date is greater than or equal to application date, then system will mark the campaign as closed.
Campaign Batch will archive campaign data as well for the campaign code.
2.16 Asynchronous Processing
This section contains the following topics:
2.16.1 Monitoring Asynchronous Processing
The system provides a facility to monitor processes that are being run in the background during a current session. Such processes could typically be scheduled jobs or tasks, being run by the Scheduler Services. They are called asynchronous processes.
A typical example of an asynchronous process is the processing of dividend payment for many funds during one session.
To monitor the progress of asynchronous processes, the batch operator user can use the 'Process Status’ screen.
You can invoke this screen by typing ‘UTDPROST’ in the field at the top right corner of the Application tool bar and clicking on the adjoining arrow button.

You can specify the following details:
Module ID
Alphanumeric; 50 Characters; Optional
Specify the module ID in which the job was submitted.
User ID
Alphanumeric; 25 Characters; Optional
Specify the ID of the user that submitted the job.
From Date
Date Format; Optional
Specify the date range when the job was submitted.
To Date
Date Format; Optional
Specify the date range when the job was submitted.
Job Type
Alphanumeric; 50 Characters; Optional
Specify the ID of the job for which you want to view the progress status.
All jobs retrieved by the search operation are displayed in the lower grid portion, with their type, status, description and the name of the procedure being run.
The system displays the following details:
- Job Type
- Error Code
- Description
- Dynamic Procedure Name
- View
To view the details of the job, such as descriptions of errors, click the View button. The job details are displayed in the Asynchronous Processing Details screen.
To clear all asynchronous processing jobs, click the Clear All link in the Asynchronous Processing main screen.
2.17 Batch Processing for Guaranteed Funds
This section contains the following topics:
2.17.1 Invoking the Guaranteed Funds Screen
You need to update the revised fund prices to process adjustments. The Guaranteed Funds batch process will process the adjustments due to price revisions for a period. This is done in the ‘Guaranteed Funds’ screen. You can invoke this screen by typing ‘UTDUFUND’ in the field at the top right corner of the Application tool bar and clicking on the adjoining arrow button.
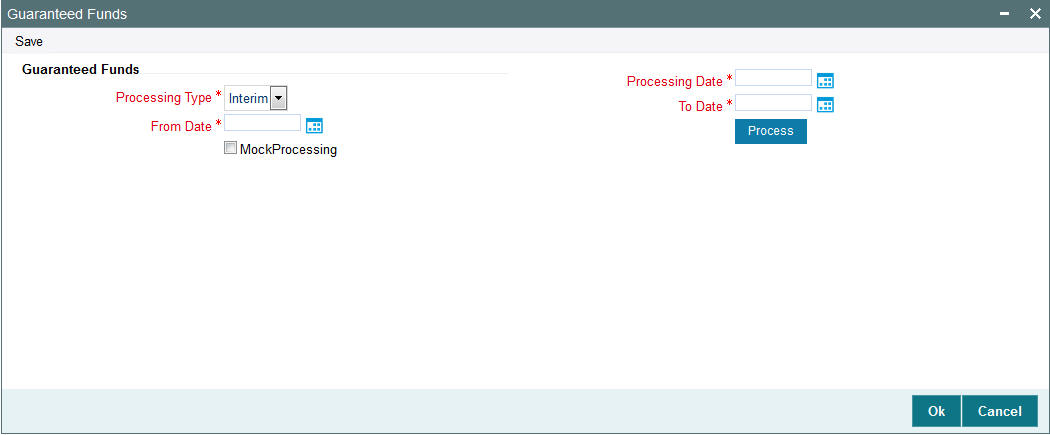
You can specify the following fields in this screen:
Processing Type
Mandatory
Select whether the batch processing is Interim or Year End Processing from the drop-down list. The list displays the following values:
- Interim
- Final
Processing Date
Date Format; Mandatory
Select the processing date from the adjoining calendar.
From Date and To Dates
Date Format, Mandatory
Enter the period for which the price revision is applicable.
Mock Processing
Optional
Check this box if you require the system to carry out a Simulation (Mock GF correction) run. The Simulation run is possible on an Interim as well as Year End basis.
The system uses the Mock GF Fund Price for its calculations during these runs. After the successful completion of a Simulation run, the system generates a 16- digit Batch number that you can use for reporting purposes. If you leave the box unchecked, the system treats the run as an Actual run and uses the Actual GF Fund Price.
Note
- The system does not generate the policy related transaction for a policy holder, if you have checked the ‘Mock Processing’ option.
- In the case of investors who have left before the final run occurs, the system does not create any adjustment entries during the Mock GF final run. It indicates the number of units that is to be shared proportionately among existing investors only at the time of the actual final run.
- The bulk fund price upload for Mock (simulation) run and actual run has to be done separately and two separate interfaces should be maintained for the same.
Click ‘Process’ button to execute the batch process. Consequently, the system will consider all transactions recorded during the mentioned period for Unit Holder – Policy- Fund combination. The system will store the following information from the impacted transactions:
- Batch Processing Type
- Processing Date
- From Date
- To Date
- UnitholderID
- Policy Number
- Transaction Number
- Transaction Type
- Transaction Mode
- Amount Applied
- Units Applied
- Unit Price
- Units Allotted
- Settlement Amount
- Revised Unit Price
- Revised Units Allotted
- Revised Settlement Amount
- Difference Units
- Adjusted Units
- Action (Subscribe or Redeem)
- Status
- Remarks
The system then re-calculates and stores the units allotted, settlement account and unit price for all the relevant transactions.
Note
The system ignores adjustment subscriptions and adjustment redemptions done in the current fiscal year and balance transfer in transactions.
The formula used to compute difference in units for Subscriptions with transaction mode as amount is as follows:
- Difference Units = Revised Units Allotted – Actual Units Allotted
- Adjusted Units = Difference Units – Adjusted Units (Units adjusted in previous interim run if any)
- If sign of “Adjusted Units” is negative (-) then “Action” for this record needs to be updated as R – Redeem else “Action” would be S – Subscribe.
The formula used to compute difference in units for Redemptions with transaction mode as amount is as follows:
- Difference Units = Actual Units Allotted - Revised Units Allotted
- Adjusted Units = Difference Units – Adjusted Units (Units adjusted in previous interim run if any)
- If sign of “Adjusted Units” is negative (-) then “Action” for this record needs to be updated as R – Redeem else “Action” would be S – Subscribe.
The formula used to compute difference in units for Redemptions with transaction mode as Unit is as follows:
- ‘Difference in Settlement Amount’ = Revised Settlement Amount – Actual Settlement Amount
- Difference Units = ‘Difference in Settlement Amount’ / Revised Unit Price
- Adjusted Units = Difference Units – Adjusted Units (Units adjusted in previous interim run if any)
- If sign of ‘Adjusted Units’ is negative (-) then ‘Action’ for this record needs to be updated as R – Redeem else “Action” would be S – Subscribe.
Depending on whether the batch processing is Interim/Year End, the system will generate the allotted subscriptions/redemptions as follows:
- If the type of Batch processing is Interim, the system will generate allotted subscriptions/redemptions for UnitholderID – Policy – Fund combinations wherever fund balance already exists and mark the status as P – Processed. This interim processing can be more than once per period in such a case we need to eliminate these adjustment trade while correction and readjust the trade accordingly.
- If “Type of Batch Processing” is Year End, system would generate subscriptions/redemptions for UnitholderID – Policy – Fund combinations wherever fund balance already exists and mark the status as P – Processed. Also system would sum up “Diff Units” (Net of +ve and –ve values) for UnitholderID – Policy – Fund combinations having no balances and distribute these units proportionately to existing policies having balances in this fund.
Example:
22nd Jan 2007 - S1 - UH1 - F1 - 1000 ZAR – 100 Units @ 10ZAR
First Interim: On 30th Mar 2007 the price is revised to 10.10 ZAR the transaction would be 1000/10.10 = 99.01 units. Now, the difference is 0.99 units.
Second Interim: On 29th Jun 2007 the price is revised to 10.15 ZAR the transaction would be 1000/10.15 = 98.52 units. Now, the difference 1.48 units but we have already subscribed for 0.99 units hence redeem only for 1.48 -.99 ➔ 0.49 units.
2.18 Fund of Funds Processing
The EOD batch process ‘Process fund of funds investments’ is used to generate transactions from the main fund to the underlying funds. Reftype ‘FF’ identifies the Fund of Fund transactions generated by the system. The transactions are generated for the unit holder maintained in ‘fund linkage details’ section and the transaction currency will be the fund base currency of the main fund. This is applicable only for Hedge funds module.
For ‘Non-net’ transactions, during EOD, the system finds the sum of inflow amounts and sum of outflow amounts for all transactions allotted on that day, and generates a subscription and redemption transaction in the underlying funds accordingly.
For ‘net’ transactions, the system finds the (sum of inflow amount – sum of outflow amount) and generates either subscription or redemption transaction in the underlying funds.
Inflow amount considers subscriptions, switch ins, reversed redemptions and reversed switch outs that are allotted on the application date for the main fund.
Inflow amount = units allotted across all transactions * NAV as of the application date
Outflow amount considers reversed subscriptions, reversed switch ins, redemptions and switch outs that are allotted on the application date for the main fund.
Outflow amount = units allotted across all transactions * NAV as of the application date
If the transaction generation basis is ‘Non Net/Transaction Mode’, then during EOD the system find the sum of all amount based subscription and sum of amount based redemption transactions allotted on that day, and generates amount based subscription and redemption transaction in the underlying funds.
Units and percentage based transactions will be generated as amount based subscription and redemption transaction in underlying funds, in maintained ratio. The amount of the allotted transactions will be ‘Units allotted * NAV as of application date’.
Example:
Assume that JPMORG is a Fund of Hedge Fund. JFCHNF and JFHKDF are underlying hedge funds having percentages 50 and 40 respectively. Also, assume that 000000000272 and 000000000277 are the unit holder IDs for JFCHNF and JFHKDF respectively.
Transactions allotted on JPMORG as on 01/09/2009 (Assuming TBC is FBC, NAV is 10 and fund has no load)
Transaction Number |
Transaction Mode |
Transaction Value |
Transaction Amount |
SUB1 |
Amount |
1000 |
1000 |
SUB2 |
Amount |
2000 |
2000 |
SUB3 |
Unit |
100 |
1000 |
SUB4 |
Unit |
200 |
2000 |
RED1 |
Amount |
2500 |
2500 |
RED2 |
Unit |
50 |
500 |
Transaction Mode |
Value |
Total Subscription Amount |
6000 |
Total Redemption Amount |
3000 |
Total Unit Subscription |
300 |
Total Unit Redemption |
50 |
Total Amount Subscription |
3000 |
Total Amount Redemption |
2500 |
Net Transaction value |
3000 |
Transaction will be generated as given below
Transaction Generation Basis is ‘NET’
Fund ID |
Unit holder ID |
Txn Type |
Txn Mode |
Txn Value |
JFCHNF |
000000000272 |
SUB |
Amount |
1500 |
JFHKDF |
000000000277 |
SUB |
Amount |
1200 |
Transaction Generation Basis is ‘NON NET’
Fund ID |
Unit holder ID |
Txn Type |
Txn Mode |
Txn Value |
JFCHNF |
000000000272 |
SUB |
Amount |
3000 |
JFCHNF |
000000000272 |
RED |
Amount |
1500 |
JFHKDF |
000000000277 |
SUB |
Amount |
2400 |
JFHKDF |
000000000277 |
RED |
Amount |
1200 |
Transaction Generation Basis is ‘NON NET/TXN MODE’
Fund ID |
Unit holder ID |
Txn Type |
Txn Mode |
Txn Value |
JFCHNF |
000000000272 |
SUB |
Amount |
1500 |
JFCHNF |
000000000272 |
RED |
Amount |
1250 |
JFHKDF |
000000000277 |
SUB |
Amount |
1200 |
JFHKDF |
000000000277 |
RED |
Amount |
1000 |
JFCHNF |
000000000272 |
SUB |
Amount |
1500 |
JFCHNF |
000000000272 |
RED |
Amount |
250 |
JFHKDF |
000000000277 |
SUB |
Amount |
1200 |
JFHKDF |
000000000277 |
RED |
Amount |
200 |
2.19 Master Feeder Funds Processing
The transactions that happen in a feeder fund are fed to the master fund based on the value of ‘Transaction Generation Basis’ (N-Net, O- Non Net) maintained at fund level for the percentage specified in ‘Fund linkage details’ section in ‘Hedge Fund Processing Rules’ screen.
The transactions from the feeder funds to the master fund are generated using the ‘Process master feeder investments’ batch process. Reftype ‘MF’ identifies the master feeder transactions generated in this batch.
If ‘Transaction Generation Basis’ is ‘N-Net’ basis then system posts the transactions as follows:
- Net amount = (Total inflow amount – Total outflow amount)
- If Net Amount is positive, the batch procedure posts a subscription into the master fund
- If Net Amount is negative, the batch procedure posts redemption transaction into the master fund
If ‘Transaction Generation Basis’ is ‘O-Non Net’ basis then system posts the following two transactions during EOD batch:
- Subscription transaction for the total inflow amount
- Redemption transaction for the total outflow amount
Total inflow amount considers subscriptions, switch ins, revered redemptions and reversed switch outs that are allotted on the application date for all the feeder funds.
Inflow amount = units allotted across all transactions * NAV as of the application date converted to master fund FBC using the default exchange rate, if the currency is different
Total outflow amount considers reversed subscriptions, reversed switch ins, redemptions and switch outs that are allotted on the application date for all the feeder funds.
Outflow amount = units allotted across all transactions * NAV as of the application date converted to master fund FBC using the default exchange rate if the currency is different.
A percentage of the inflow and outflow amounts, as maintained in the ‘fund linkage details’, is fed to the master fund.
Example
Assume that JPMorgan Fund (JPMORG) is a master fund. JF Greater China Fund (JFCHNF) is a feeder fund, which invests 89% of its net assets in a unit of JPMorgan Fund (Master fund). JF Hong Kong Fund (JFHKGF) is another feeder fund, which invests 90% of its net assets in a unit of JPMorgan Fund (Master fund).
In the fund rules setup of JPMORG you can capture the split percentage details as follows, in ‘Fund linkage details’ section.
Feeder fund ID |
Fund Name |
Percentage |
JFCHNF |
JF China Fund |
89 |
JFHKGF |
JF Hong Kong Fund |
90 |
If an investment happens in JFCHN fund for 100 units, then an amount 890 (89% of the inflow amount) gets invested in JPMORG fund.
If an investment happen in JFHKGF fund for 100 units, then an amount 900 (90% of the inflow amount) gets invested in JPMORG fund.
Note
The above example assumes that both the master and feeder fund FBCs are same and without any loads at the master and feeder level. It also assumes an NAV of 10 for the funds.
If the feeder and master fund FBCs are different, then the feeder fund investment is converted into master fund FBC.
2.20 Refresh Rules Maintenance
This section contains the following topics:
2.20.1 Invoking the Refresh Rules Screen
In service provider installations, if a new rule is maintained or an existing rule is modified at any of the Line of Business (LOB) schemas available, the same needs to be replicated to all available LOB schemas for that particular installation.
You can replicate the rules maintained in one LOB schema to all available schemas in ‘Refresh Rules’ batch screen.
You can invoke this screen by typing ‘UTDREFRU’ in the field at the top right corner of the Application tool bar and clicking the adjoining arrow button.
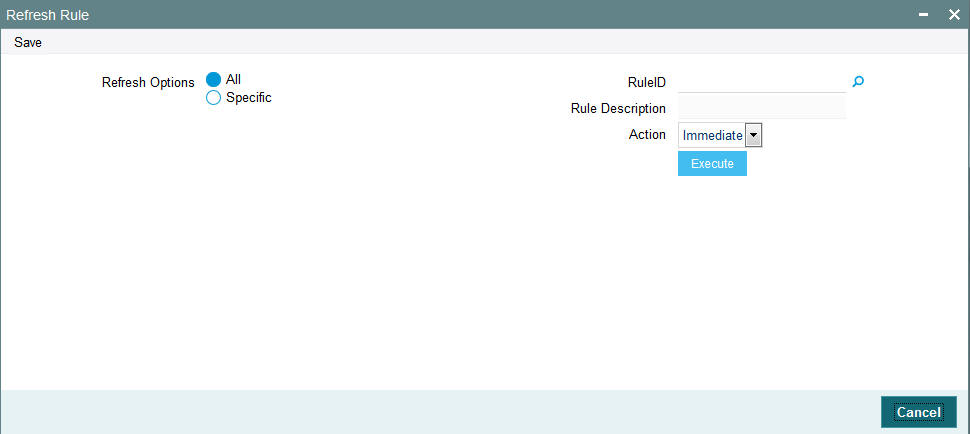
You can specify the following details in this screen:
Refresh Option
Mandatory
Select any of the following refresh options:
- All - the system will replicate all new/modified rules in Service Provider (SP) schema to LOB schema
- Specific - the system will replicate the Rule mentioned in Rule ID field from SP schema to LOB schema
Rule ID
Alphanumeric; 5 Characters; Optional
Specify the rule Id to be replicated to LOB schemas or select the rule Id from the option list provided.
Note
This is applicable only if you have selected ‘Specific’ as the refresh option.
Rule Description
Display
The description associated with the Rule Id selected gets displayed here.
Action
Optional
Select the option to indicate whether the rules should be refreshed during EOD or immediately. The following options are available in the drop-down list:
- Immediate
- EOD
Click ‘Execute’ button to refresh the rules as per the options specified.
You can also use the EOD batch ‘Refresh PF Rules across LOB’ to refresh all available LOB schemas of a given service provider, whenever a new rule is created or existing rule is modified.
For more details on maintaining rules for performance fee calculation, refer the section titled ‘Maintaining Rules for Performance Fee Calculation’ in this user manual.
2.21 US Indicia Check Batch
This section contains the following topics:
2.21.1 Processing US Indicia Check Batch
The US Indicia Check batch verifies the existing unit holder or entity records to check whether the UH or entity is 'US Indicia Available' or not. The batch classifies the UH and entity records based on this check. You can trigger the batch using ‘FATCA US Indicia Check’ screen. You can invoke this screen by typing ‘STDFATCL’ in the field at the top right corner of the Application tool bar and clicking the adjoining arrow button.
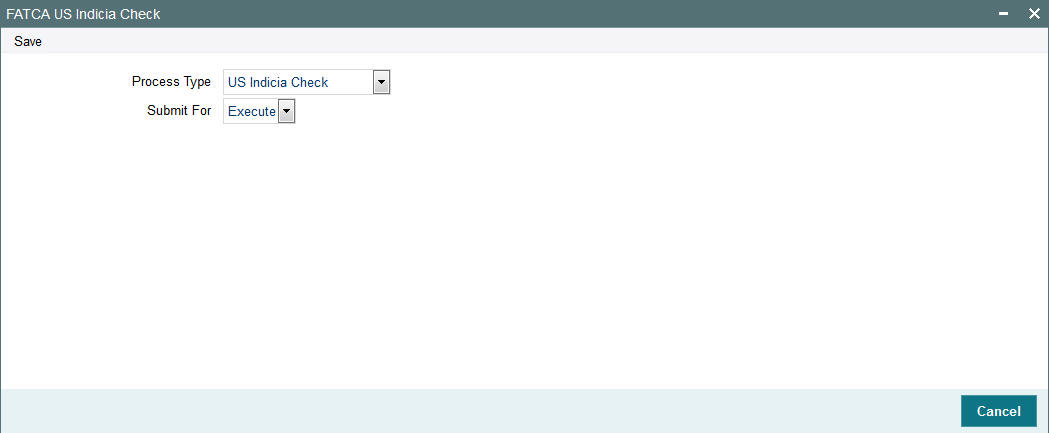
Specify the following details:
Process Type
Optional
Specify the process type from the drop-down list. The list displays the following values:
- US Indicia Check
- De Minimis Check
- De Minimis Yearly Check
Submit For
Optional
Select the submit option from the drop-down list. The list displays the following values:
- Process
- Execute
This batch checks the following records:
- Customer (CIF)
- Unit Holder (UH)
- Auth Rep
- Related Party (Auth Rep, Nominee and Joint Holder)
- Broker
- Agent
- Agency Branch
- Account Officer
- Individual Financial Advisor (IFA)
If one of the following US Indicia is available for an entity, then the record will be marked as “US Indicia Available”.
- Nationality is US
- Dual Nationality is US
- Country of Birth is US
- Country of Domicile is US
- Country of Incorporation is US
- Country of Correspondence or Alternate Address is US
- Substantial stay in US is True
- Country code of Telephone number is 01
- Bank Branch address Country code is US
- Director percentage of holding is more than 10%
- US Indicia available for any of the linked Entities
2.22 FATCA Status Check Batch
FATCA status check batch is a mandatory BOD batch. It checks the existing unit holders, broker, customer, single entity and auth rep and marks them as 'Recalcitrant' or 'Compliant' based on the expiry status of proof documents.
If a standard document for any of the above entities has expired, the system changes the status of such entity from 'Compliant' to ‘Recalcitrant'.
If there are more than one documents maintained, the system checks the expiry status of each document. If any one document is expiring as of that day, the batch marks the entity as recalcitrant.US Indicia entity with status 'Pending Classification' may have 90 days lag maintained as part of system parameter. In case any such entity has not given the required set of document within the 90 days period, then this batch will change the status of the entity as 'Recalcitrant’.
Note
The 90 days lag is calculated based on the US Indicia status ‘Yes’.
2.23 Due Diligence Batch Process
The Due diligence process for pre existing account will be through batch process and the criteria for executing the process will be based on the Tax Compliance type, for instance, Common Reporting Standard, Source Entity ID, Tax Jurisdiction (if any country code is mentioned then the selected country code else all the country code maintained) and date. Following is the sequence batch processes to be followed for pre existing individual and entity accounts:
- Due Diligence Batch
- Diminimis Batch
- Diminimis Yearly Batch
This section contains the following topics:
- Section 2.23.1, "Due Diligence Batch Process"
- Section 2.23.2, "Diminimis Batch Process"
- Section 2.23.3, "Diminimis Yearly Batch"
2.23.1 Due Diligence Batch Process
The due diligence process will scan all accounts opened on/before the effective date for the jurisdiction selected based on the tax compliance type. Once the system identifies indicia for the respective reportable jurisdiction, UH with Indicia is updated as ‘Yes’ and compliance status as Reportable.
For instance, the due diligence batch process will identify accounts opened on/before the execution date and identify indicia for the jurisdiction selected else ‘All’ jurisdiction maintained as part of Tax compliance setup will be applicable. If indicia is found for the jurisdiction/s, then the system updates the UH with indicia as Yes and compliance status as Reportable.
Due Diligence is a one-time process for a jurisdiction and this is operationally controlled process (there will be no system check if the process is executed multiple times in the system for the same input criteria).
If the batch is re- executed for a jurisdiction, then system will display an override message as ‘The batch is already executed for the jurisdiction selected, do you wish to continue’.
The system will identify the accounts with indicia status as Yes for the jurisdiction scanned and the compliance status will be set to Reportable. For instance, if indicia is found for Germany then the Tax jurisdiction will be Germany, with Indicia status as Yes and Compliance status as Reportable.
Before due diligence process if the UH is amended, then the system will trigger indicia check for such accounts while saving the amendment. Such account will be picked by due diligence batch but the batch will not make any change to such accounts as indicia are already identified for the account. If there are new indicia (single or multiple) identified for a new jurisdiction/s then a new record/s will be inserted.
If you classify such accounts through the Tax Compliance classification maintenance for a jurisdiction or set of jurisdiction before the batch execution then there will be no changes made to such accounts. If there are new indicia (single or multiple) identified for a new jurisdiction/s then a new record/s will be inserted.
If a new reportable country is added, then due diligence process will identify indicia for the new jurisdiction and insert a new row for the jurisdiction for which the indicia is identified.
2.23.2 Diminimis Batch Process
The Diminimis batch process scan all accounts with Indicia status set to ‘Yes’ and Batch execution date (application date) should be greater than or equal to Diligence Date. The system will check the individual and corporate account limit will be checked maintained at Tax compliance setup.
For high value accounts, the system will mark Account value as High and Compliance status as Reportable. For low value accounts, the system will mark Account value as Low, and compliance status as Non Reportable. The Diminimis Yearly Check will be set to ‘Yes’.
Note
This is applicable only for low value accounts.
The system will scan all accounts with indicia status as ‘Yes’ for the reportable jurisdiction/s. Based on the due diligence date at Tax rule maintenance, this process checks for the account value with indicia set to Yes based on the date input. The date input parameter is operationally controlled.
The batch process will fetch output based on due diligence date, Indicia set to Yes and the individual and entity account value.
If the process date ≠ or < Due diligence date then the system will display an error message as ‘Batch process date to be = or > due diligence date’.
This process to be executed post the due diligence process which is again operationally controlled and there will be no system check on the sequence of execution.
If the batch is re-executed, then the system will display an override message as ‘The batch is already executed for the jurisdiction selected, do you wish to continue’.
The system will mark the accounts as high value if no limits are maintained. The account with indicia as yes and value greater than the defined value for the individual/corporate will continue to remain reportable until you make any changes at tax compliance classification maintenance or if there is any change in circumstance that trigger change in indicia, for instance, change in address etc before classification.
The input criteria to execute the ‘DIMINIMIS’ batch when a new reportable country is added (no change on batch sequence) and this process will not make any change to the account value which is already identified as part of the earlier ‘DIMINIMIS’ process. This will only change the compliance status.
2.23.3 Diminimis Yearly Batch
The Diminimis Yearly batch scans for account with diminimus yearly status set to Yes. For the accounts identified with high value, the system will set Indicia to Yes, Compliancde Status to Reportable, Account value as High and diminimis yearly field will be unchecked.
The systme will re-scan the accounts marked with Di minimis yearly check for any change in account value (high /low) and accordingly will be marked reportable with value as high else the diminimis yearly check will continue with no change on account value. If the account becomes high value then the yearly check is removed.
This process should be executed post the ‘Diminimis batch’ which is operationally controlled and there will be no system check on the sequence of execution.
For the accounts where the value is less than the value for Individual and corporate, then Diminimis Yearly check will continue and next time the diminimis yearly batch is processed, the system will pick these accounts for processing.
The business logic sequence to run the process is as follows:
- Execute Due diligence process
- Diminimis Check
- Diminimis Yearly
If you post the account marked with ‘Diminimis Yearly’ as Yes and post that the account is classified and if you re-execute the ‘Diminimis Yearly’ batch, the batch will remove the ‘Diminimis Yearly’ check and make changes to the account value. Any user classified values will be overridden by the batch.
There will be no change if a new reportable country is added for ‘DIMINIMIS Yearly’ process.
Validations
The system classifies the Unit holder as Indicia and is marked as reportable and the account value is’ High’ as identified by system. The Tax Compliance sub screen in UTDUH screen is updated with the indicia details and Tax jurisdiction details.
If you classify the account as non reportable at Tax Compliance Document Classification maintenance, then the over ridden details are updated back at UH level in the Tax Compliance sub screen in UTDUH screen.
The accounts which are identified with no indicia details through the Due Diligence batch undergoes modification then amendment of such Unit holder will trigger indicia. If indicia is found, then while saving, the details are updated for the UH, provided the UH is not classified through UTDCOMCL.
Batch process will always take precedence over user classified compliance status and not indicia status.
2.24 Interest or Coupon Payment Summary
This section contains the following topics:
2.24.1 Invoking Interest or Coupon Payment Screen
You can invoke Interest or Coupon Payment screen option by typing ‘UTDINPYM’ in the field at the top right corner of the Application tool bar and clicking on the adjoining arrow button.

You can specify the following details:
Process Coupon/Interest Payments
Fund ID
Alphanumeric; 6 Characters; Optional
Specify the fund ID. Alternatively, you can select fund ID from the option list. The list displays all valid fund ID maintained in the system.
Settlement Date
Date Format; Optional
Select the date of settlement from the adjoining calendar.
Reprocess
Optional
Select if the coupon or interest payment has to be reprocessed or not from the drop-down list. The list displays the following values:
- Yes
- No
2.25 Integration Batch Process Screen
This section contains the following topics:
2.25.1 Invoking Integration Batch Process Screen
You can process integration batch using ‘Integration Batch Process Screen’. You can invoke this screen option by typing ‘UTDINTBT’ in the field at the top right corner of the Application tool bar and clicking on the adjoining arrow button.
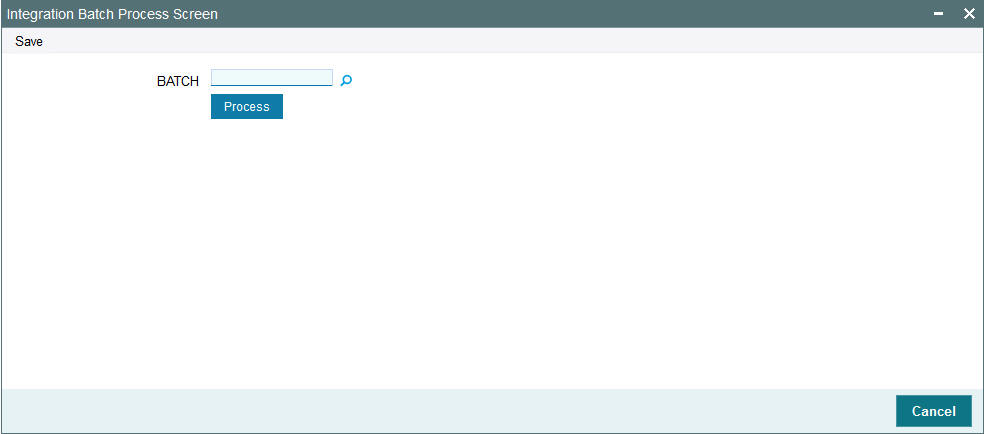
You can specify the following details:
BATCH
Alphanumeric; 8 Characters; Optional
Specify the batch process. Alternatively, you can select batch process from the option list. The list displays all valid batch process maintained in the system.
After specifying the batch details, click ‘Process’ button to process the integration batch.
2.26 Process Swinging Price
This section contains the following topic:
2.26.1 Invoking Process Swinging Price Screen
You can process the swinging price for a fund using ‘Process Swinging Price’ screen. You can invoke this screen by typing ‘UTDSWGPR’ in the field at the top right corner of the Application tool bar and clicking on the adjoining arrow button.
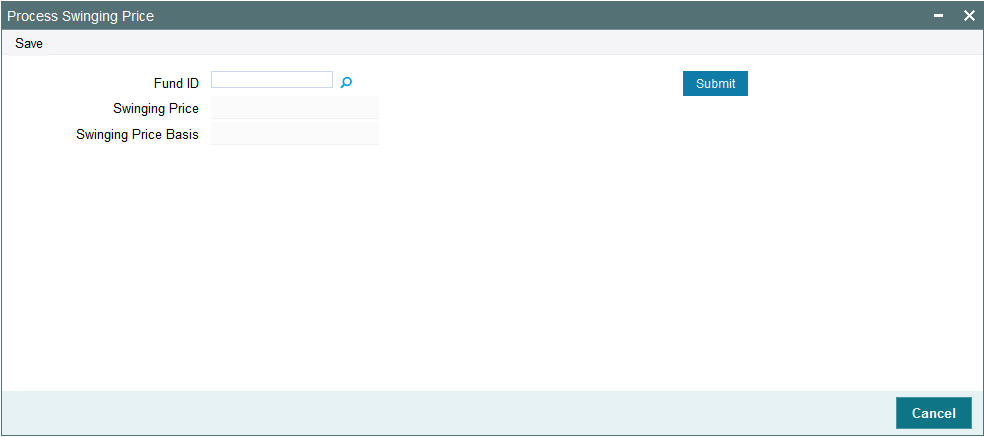
You can specify the following details:
Fund ID
Alphanumeric; 6 Characters; Optional
Specify the fund ID. Alternatively, you can select fund ID from the option list. The list displays all valid fund ID maintained in the system.
After specifying the fund ID, click ‘Submit’ button. The system displays the following values:
- Swinging Price
- Swinging Price Basis
2.27 Unit Holder Balance Handling for US Accounts
This section contains the following topics:
2.27.1 Invoking Unitholder Balance Handling for US Accounts Screen
You can use ‘Unitholder Balance Handling for US Accounts’ screen to process to report the UH balance for FATCA reporting. You can invoke this screen by typing ‘UTDUSBAL’ in the field at the top right corner of the Application tool bar and clicking on the adjoining arrow button.
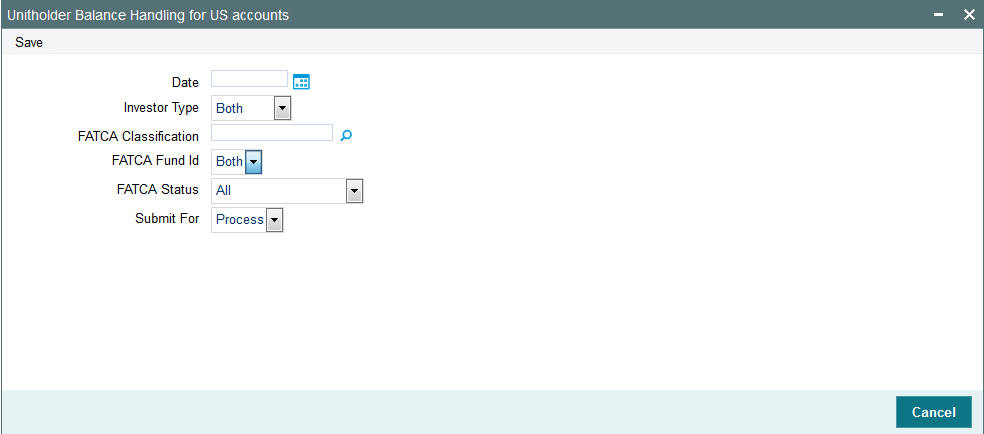
You can specify the following details:
Date
Date Format; Optional
Select the processing date from the adjoining calendar.
Investor Type
Optional
Select the type of investor from the drop-down list. The list displays the following values:
- Individual
- Corporate
FATCA Classification
Alphanumeric; 25 Characters; Optional
Specify the classification for which you want to process the batch. Alternatively, you can select FATCA classification from the option list. The list displays all valid FATCA classifications maintained in the system.
FATCA Fund Id
Optional
Select FATCA fund ID option from the drop-down list. The list displays the following values:
- Both
- Yes
- No
FATCA Status
Optional
Select one of the FATCA statuses from the drop-down list. The list displays the following values:
- Recalcitrant
- Pending Classification
- Compliant
Submit For
Select if the batch needs to be submitted as online process or execute from the drop-down list. The list displays the following values:
- Process
- Execute