2. Maintaining Customer Information
Oracle FLEXCUBE Investor Servicing provides the facility of maintaining information profiles for customers of your bank. The profile consists of personal as well as business information.
A customer may also wish to invest in the funds of the AMC. In such a case, you can create and maintain one or more investor accounts for the customer in the AMC FC-IS database.
This chapter deals with the maintenance of customer profiles and creation of investor accounts for your customers in the AMC FC-IS database.
This chapter contains the following sections:
- Section 2.1, "Customer Maintenance Detail Screen"
- Section 2.2, "Customer Maintenance Summary Screen"
- Section 2.3, "CIF Address Maintenance Screen"
- Section 2.4, "CIF Address Summary Screen"
- Section 2.5, "CIF Address - Fund Maintenance Details"
- Section 2.6, "CIF Address Fund Summary Screen"
- Section 2.7, "CIF-UH Mapping Detail"
- Section 2.8, "CIF-UH Mapping Summary"
- Section 2.9, "CIF Merge Change Hierarchy Detail"
- Section 2.10, "CIF Merge Change Hierarchy Summary"
- Section 2.11, "Customer Find Screen Detail"
- Section 2.12, "Customer Log Details"
2.1 Customer Maintenance Detail Screen
This section contains the following topics:
- Section 2.1.1, "Invoking Customer Maintenance Detail Screen"
- Section 2.1.2, "Individual Dtls Tab"
- Section 2.1.3, "Corporate Dtls Tab"
- Section 2.1.4, "Corr.Address Dtls Tab"
- Section 2.1.5, "Permanent/Registration Address Tab"
- Section 2.1.6, "Client Preferences Tab"
- Section 2.1.7, "Identification Dtls Tab"
- Section 2.1.8, "Alternate Language Dtls Tab"
2.1.1 Invoking Customer Maintenance Detail Screen
When you authorize a CIF profile for a customer in the Customers screen, the following events take place:
- The CIF record is now effective in the database as an authorized record.
- More importantly, a single, initial unit holder account is created for the CIF customer in the FC-IS database. The details of the unit holder account are defaulted from the investment details entered for the CIF profile, as well as from the default information maintained for the FCC Bulk Client Code in the Bulk Clients Defaults Maintenance record in FC-IS. The unit holder account is created as an unauthorized or an authorized account, depending upon the specification for the same in the Bulk Clients Defaults Maintenance.
This initial unit holder account may need to be altered subsequently. If it is created as an unauthorized account, you can edit it through the Unit Holder New Account Summary screen. If it is created as an authorized account, you can perform an information change through the Unit Holder Information Change menu option.
In either case, the Unit Holder record must be authorized after it is edited or changed through an info change, to take effect.
After the creation of the first unit holder account for the CIF profile, you can create as many unit holder accounts as necessary for the same CIF profile, through the UH New Account screen.
You can invoke the ‘Customer Maintenance Detail’ screen by typing ‘UTDCUST’ in the field at the top right corner of the Application tool bar and clicking on the adjoining arrow button.
Select 'New' from the Actions menu in the Application tool bar or click new icon to enter the details of the Customer Maintenance Screen.
Customer Maintenance Section
Customer No
Display Only
The customer number that you specified for the new CIF customer, in the New Customer No screen, is displayed here.
Customer Category
Alphanumeric; 10 Characters; Mandatory
Specify the investor tax category corresponding to the CIF customer. Use the option list to make your choice.
Description
Display
The system displays the description for the selected customer category.
Customer Type
Optional
Indicate whether the customer is an individual, corporate or bank customer from the drop-down list.
Fee Category
Alphanumeric; 3 Characters; Optional
From the list provided, select the fee category to be deemed applicable for the customer whose account you are creating.
Fee Sub Category
Alphanumeric; 6 Characters; Optional
From the list provided, select the fee subcategory to be deemed applicable for the customer whose account you are creating.
Joint Account
Mandatory
Select ‘Yes’ to indicate that the customer is a joint account holder. If you select ‘Yes’, you must indicate whether the customer is a Primary or Secondary joint account holder.
Joint Holder Type
Optional
From the drop-down list, select whether Primary or Secondary joint account holder.
Note
After authorization, the Identification Details (Identification Type, Identification Number and Place of Issue) of a Joint-Secondary customer alone can be modified in the Customer Information Screen.
Protected Investor Level
Optional
Select protected investor level from the drop-down list. The list displays the following values:
- Classified
- Unclassified
With Right to Access Classified Information, you can create CIF with Classified and Unclassified protection level.
With No Right to Access Classified Information, you can create CIF only with Unclassified protection level.
Note
If the CIF is created through FCUBS-FCIS integration, the system will default ‘Protected Investor Level’ depending upon the user mapped in the maintenance. If user mapped has Right to Access Classified Information then the system will default it to Classified else it will be defaulted to Unclassified.
Protected Investor Level field can be modified till record is authorized once. Once authorized, Protected Investor Level is not amendable.
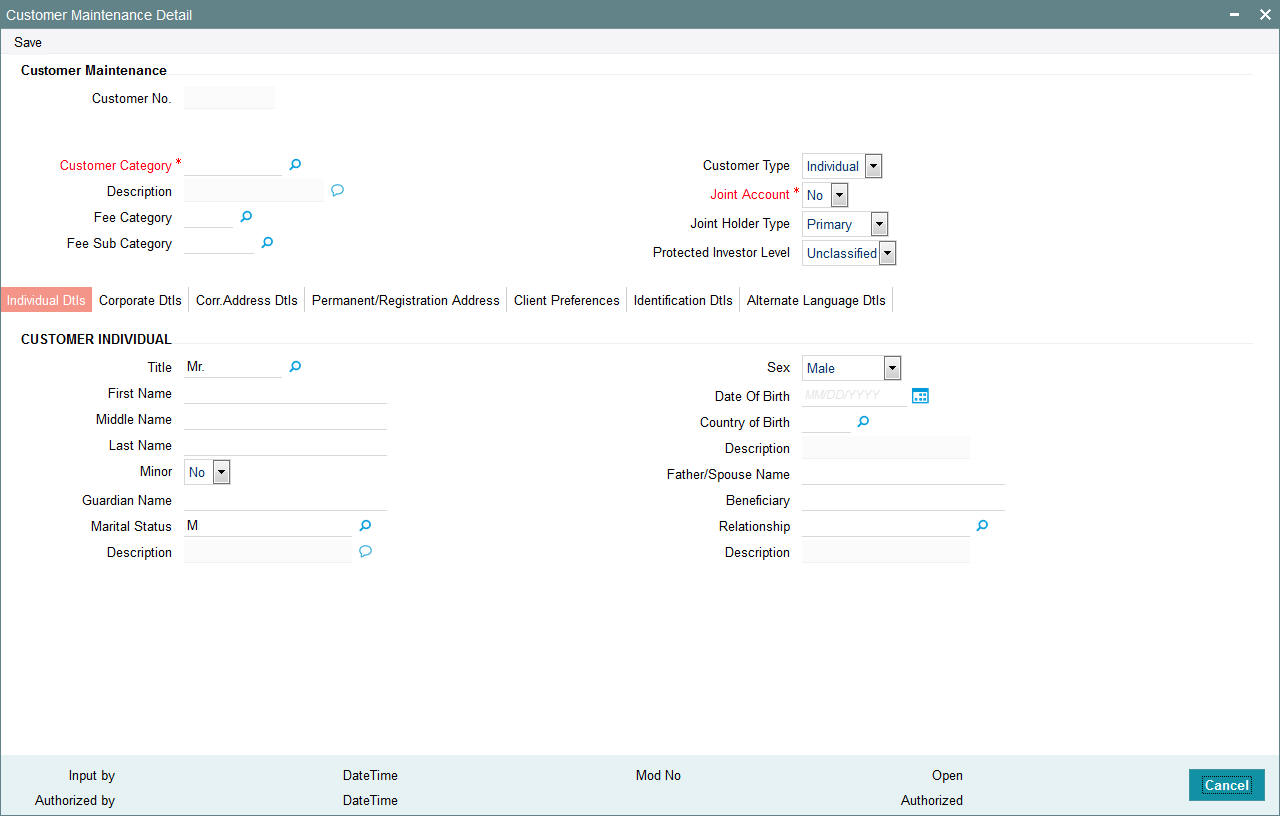
2.1.2 Individual Dtls Tab
Click ‘Individual Dtls’ tab to enter the details.
Title
Alphanumeric; 10 Characters; Optional
Select the title of the customer.
First Name
Alphanumeric; 105 Characters; Optional
Specify the first name of the customer.
Middle Name and Last Name
Alphanumeric; 105 Characters; Optional
Specify the middle and last names of the customer.
Minor
Optional
Select ‘Yes’ from drop-down list to indicate that the customer is a minor. Else select ‘No’.
Guardian Name
Alphanumeric; 105 Characters; Mandatory for minor customers
Specify the name of the guardian for the minor customer.
Marital Status
Alphanumeric; 1 Character; Optional
Specify the marital status of the customer.
Description
Display
The system displays the description for the selected marital status.
Sex
Optional
Select the sex of the customer from the drop-down list
Date of Birth
Date format; Mandatory only for minor customers
Specify the date of birth of the customer.
Country of Birth
Alphanumeric; 3 Characters; Optional
Select the country of birth from the adjoining option list.
Father/ Spouse Name
Alphanumeric; 105 Characters; Optional
Enter the name of the customer's father or spouse.
Beneficiary
Alphanumeric; 105 Characters; Optional
Specify the name of the preferred beneficiary of the individual customer.
Relationship
Alphanumeric; 20 Characters; Optional
Specify the relationship between the beneficiary and the customer.
Description
Display
The system displays the description for the selected relationship status.
2.1.3 Corporate Dtls Tab
Click Corporate Details Tab in the Customer Maintenance Detail screen:
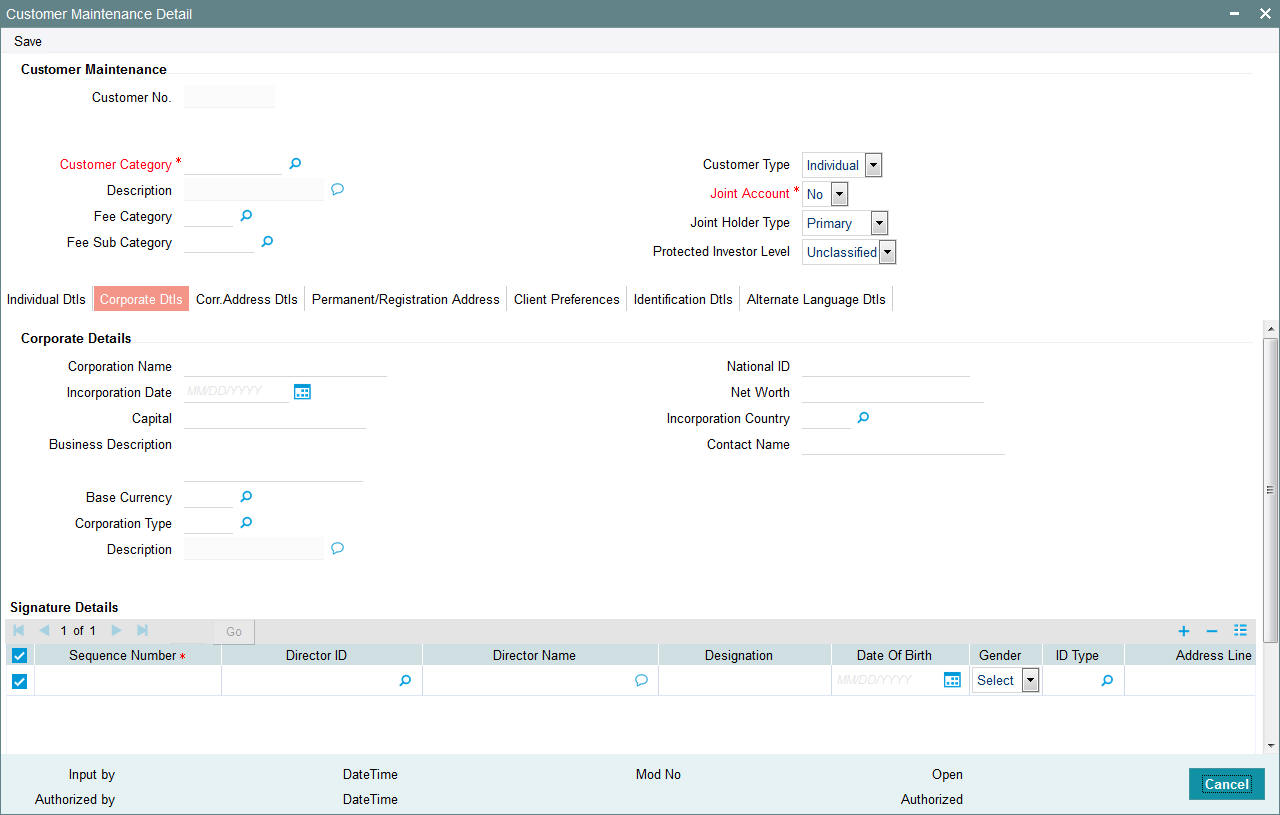
This section is enabled only for 'Corporate' type of customer. The following are the fields in this section:
Corporate Details
Corporate Name
Alphanumeric; 105 Characters; Optional
Specify the name of the corporation here.
Incorporation Date
Date Format; Optional
Specify the date on which the company was incorporated.
Capital
Numeric; 22 Characters; Optional
Enter the Capital (amount) of the corporation.
Business Description
Alphanumeric; 255 Characters; Optional
Specify the business description.
National ID
Alphanumeric; 20 Characters; Optional
Specify the National ID of the customer.
Net Worth
Numeric; 22 Characters; Optional
Specify the Net Worth of the corporation.
Incorporation Country
Alphanumeric; 3 Characters; Optional
Specify the country of incorporation for the customer.
Contact Name
Alphanumeric; 105 Characters; Optional
Specify the name of the contact person for the corporation.
Base Currency
Alphanumeric; 3 Characters; Optional
Specify the base currency of operation for the customer.
Corporation Type
Alphanumeric; 3 Characters; Optional
Indicate the corporate type for the customer. The system displays the description.
Description
Display
The system displays the description for the selection corporation type.
Signature Details
Sequence Number
Alphanumeric; 3 Characters; Mandatory
Specify the order of sequence.
Director ID
Alphanumeric; 12 Characters; Optional
Specify the director identification from the adjoining option list.
Director Name
Display
The system displays the name of the corresponding director.
Designation
Alphanumeric; 100 Characters; Mandatory
Specify the designation.
Date of Birth
Date Format; Optional
Specify the date of birth.
Gender
Optional
Select the gender from the adjoining drop-down list.
ID Type
Alphanumeric; 3 Characters; Optional
Select the identification type from the adjoining option list.
Address Line 1
Alphanumeric; 255 Characters; Optional
Specify the contact address.
Address Line2
Alphanumeric; 255 Characters; Optional
Specify the contact address.
City
Alphanumeric; 105 Characters; Optional
Select the city from the adjoining option list.
State
Alphanumeric; 105 Characters; Optional
Select the state from the adjoining option list.
Country
Alphanumeric; 3 Characters; Optional
Select the country from the adjoining option list.
Zip Code
Alphanumeric; 10 Characters; Optional
Specify the zip code.
Alphanumeric; 255 Characters; Optional
Specify the email ID.
Contact Person
Alphanumeric; 160 Characters; Optional
Specify the contact person.
Bank
Alphanumeric; 12 Characters; Optional
Select the bank from the adjoining option list.
Branch
Alphanumeric; 12 Characters; Optional
Select the branch from the adjoining option list.
Account Type
Alphanumeric; 1 Character; Optional
Select the account type from the adjoining option list.
Account Currency
Alphanumeric; 3 Characters; Optional
Select the currency of the account from the adjoining option list.
Account Number
Alphanumeric; 20 Characters; Optional
Specify the account number.
Account Name
Alphanumeric; 100 Characters; Optional
Specify the name in the account.
IBAN
Alphanumeric; 40 Characters; Optional
Specify the IBAN number.
Percentage Holding
Numeric; 5 Characters; Optional
Specify the percentage of holding.
FATCA Classification
Display
The system displays the FATCA classification type.
US Indicia
Display
On saving the record, the system defaults ‘US Indicia Available’ as Yes or No depending on the following values:
- The nationality is US
- The dual nationality is US
- The substantial stay is in US
- The country of birth is US
- The country of domicile is US
- The country of incorporation is US
- The country of correspondence or alternate address is US
- The country code of the telephone number is 01
FATCA Status
Display
The system defaults the FATCA Status as Compliant/ Recalcitrant/ Pending Classification/ Not Applicable based on the FATCA maintenance.
2.1.4 Corr.Address Dtls Tab
Click ‘Corr.Address Dtls’ tab to enter the details.
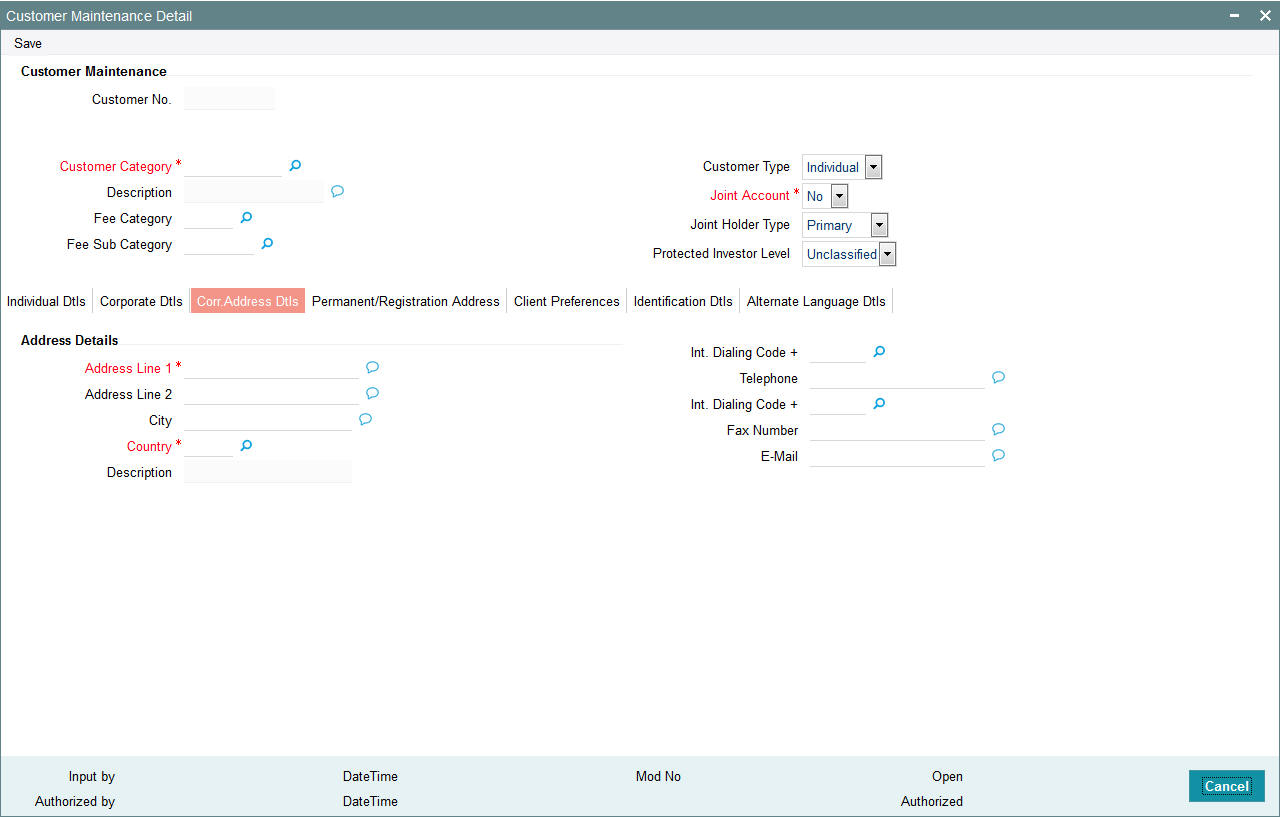
Address Details Section
Address Line 1
Alphanumeric; 105 Characters; Mandatory
Enter the address details of the customer.
Address Line 2
Alphanumeric; 105 Characters; Optional
Specify the address details.
City
Alphanumeric; 105 Characters; Optional
You can select the city name. The available options depend on the values defined at the params maintenance. If the city is not available in the list, you can specify the city in the field provided alongside.
Country
Alphanumeric; 3 Characters; Mandatory
Specify the country code.
Description
Display
The system displays the description of the selected country code.
Int. Dialing Code +
Alphanumeric; 10 Characters; Optional
Specify the international dialling code for telephone.
Telephone
Numeric; 60 Characters; Optional
Enter the telephone number of the customer.
Int. Dialing Code +
Alphanumeric; 10 Characters; Optional
Specify the international dialling code for faxing.
Fax Number
Numeric; 60 Characters; Optional
Enter the fax number of the customer.
Alphanumeric; 255 Characters; Optional
Enter the E-mail ID of the customer.
2.1.5 Permanent/Registration Address Tab
Click ‘Permanent/Registration Address’ tab to enter the details.
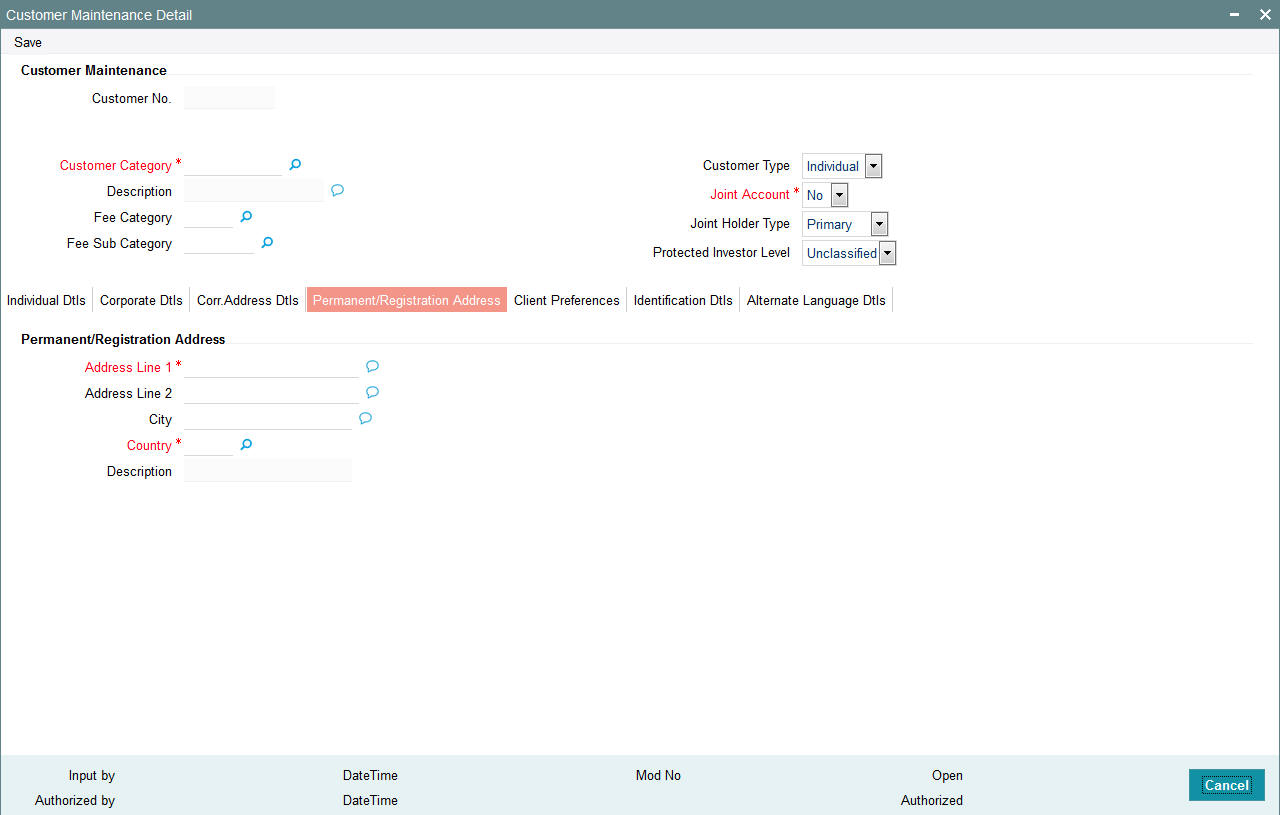
Permanent/Registration Address
Address Line 1 and 2
Alphanumeric; 105 Characters; Mandatory
Enter the address details of the customer. You can select the city from the drop down list provided. The available options depend on the values defined at the params maintenance. If the city is not available in the list, you can specify the city in the field provided alongside.
City
Alphanumeric; 105 Characters; Optional
Specify the city details of the customer.
Country
Alphanumeric; 3 Characters; Mandatory
Specify the country details of the customer.
Description
Display
The system displays the description for the selected country code.
2.1.6 Client Preferences Tab
Click ‘Client Preferences’ tab to enter the details.
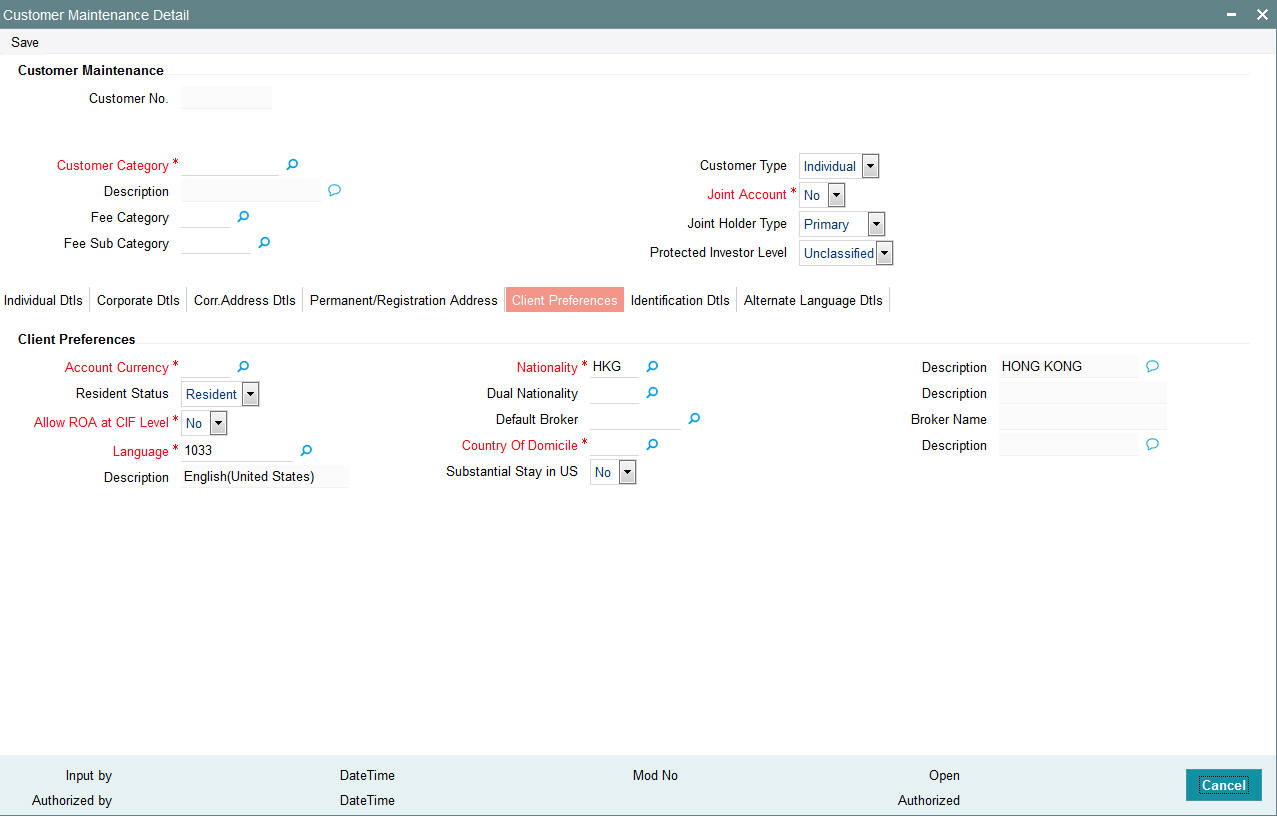
Client Preferences
Account Currency
Alphanumeric; 3 Characters; Mandatory
From the option list, select the default account currency for the CIF customer.
Resident Status
Optional
Specify whether the customer is a resident or a foreigner from the drop-down list.
Allow ROA at CIF Level
Mandatory
Select if Rights of Accumulation must be made applicable to all unit holders that will have an account under this CIF customer record.
Language
Alphanumeric; 12 Characters; Mandatory
Specify the preferred language of the customer.
Description
Display
The system displays the description for the selected language code.
Nationality
Alphanumeric; 3 Characters; Mandatory
From the option list, select the nationality of the customer.
Description
Display
The system displays the description for the selected nationality code.
Dual Nationality
Alphanumeric; 3 Characters; Optional
Select the dual nationality from the adjoining option list.
Description
Display
The system displays the description for the selected dual nationality code.
Default Broker
Alphanumeric; 9 Characters; Optional
From the option list, select the default broker for the CIF customer.
Broker Name
Display
The system displays the broker name for the selected default broker.
Country of Domicile
Alphanumeric; 3 Characters; Optional
Select the country of domicile of the customer.
Description
Display
The system displays the description for the selected country of domicile.
Substantial Stay in US
Optional
Indicate your substantial stay in US from the adjoining drop-down list. the options available are:
- Yes
- No
2.1.7 Identification Dtls Tab
Click ‘Identification Dtls’ tab to enter the details.
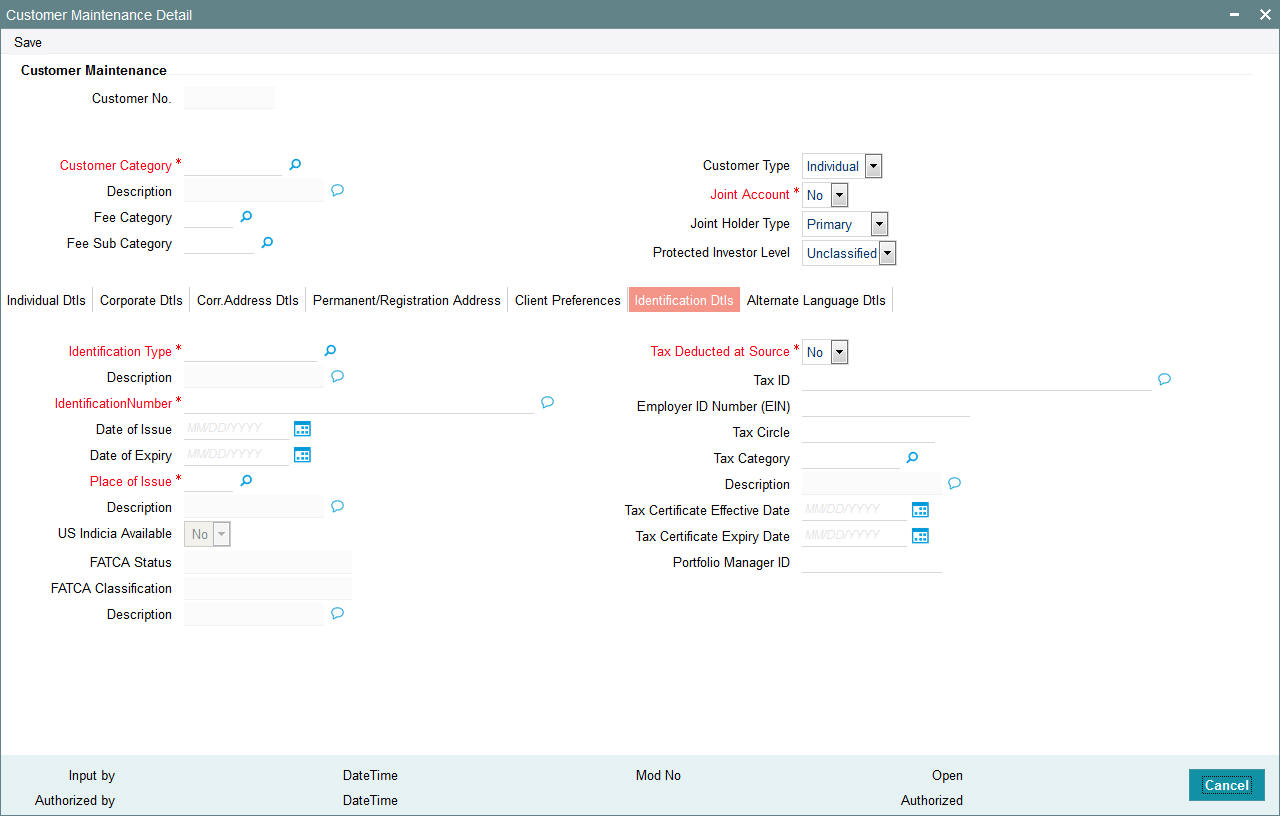
Identification Type
Alphanumeric; 15 Characters; Mandatory
From the list, select the type of identification that is being provided by the customer. The identification type is the mode in which the unit holder will furnish an identification document or proof, and could be a Personnel ID, License, Birth Certificate, etc. This is used for identifying the unit holder during all subsequent transactions.
Description
Display
The system displays the description for the selected identification type.
Identification Number
Alphanumeric; 50 Characters; Mandatory
Specify the number or ID of the identification document or proof that is furnished by the unit holder.
Date of Issue
Date Format; Optional
Specify the date of issue of the identification document or proof that is furnished by the unit holder.
The date of issue that you specify here must not be later than the date of opening the account.
Date of Expiry
Date Format; Optional
Specify the date of expiry of the identification document or proof. It must be later than the date of issue and the application date.
Place of Issue
Alphanumeric; 3 Characters; Mandatory
From the option list, select the place of issue of the identification type. Once authorized, this field cannot be modified.
Description
Display
The system displays the description for the selected place of issue.
US Indicia Available
Display
The system defaults US Indicia Available as Yes or No depending on the following:
- The nationality is US
- The dual nationality is US
- The substantial stay in US
- The country of birth is US
- The country of domicile is US
- The country of incorporation is US
- The country of correspondence or alternate address is US
- The country code of the telephone number is 01
FATCA Status
Display
The system displays the FATCA Status based on the FATCA maintenance.
FATCA Classification
Display
The system displays the FATCA classification type.
Tax Deducted at Source
Mandatory
Select ‘Yes’ if tax has to be deducted at source for the customer.
If you select ‘Yes’, you can specify the following information:
- The tax ID of the customer, in the Tax ID field
- The tax circle that corresponds to the customer, in the Tax Circle field
- The tax category that corresponds to the customer, in the Category field
Tax ID
Alphanumeric; 50 Characters; Optional
Specify the tax identification number or tax ID for the customer.
Employer ID Number (EIN)
Alphanumeric; 50 Characters; Optional
Specify the employer identification number.
Tax Circle
Alphanumeric; 15 Characters; Optional
Specify the tax circle to which the unit holder belongs.
Tax Category
Alphanumeric; 10 Characters; Optional
Select the tax category under which the customer will be placed in the system.
Description
Display
The system displays the description for the selected tax category.
Tax Certificate Effective Date
Date Format; Optional
Specify the date from which the tax certificate is effective.
Tax Certificate Expiry Date
Date Format; Optional
Specify the expiry date of the tax certificate.
Portfolio Manager ID
Alphanumeric; 16 Characters; Optional
Specify the portfolio manager’s ID here.
2.1.8 Alternate Language Dtls Tab
Click ‘Alternate Language Dtls’ tab to enter the details:
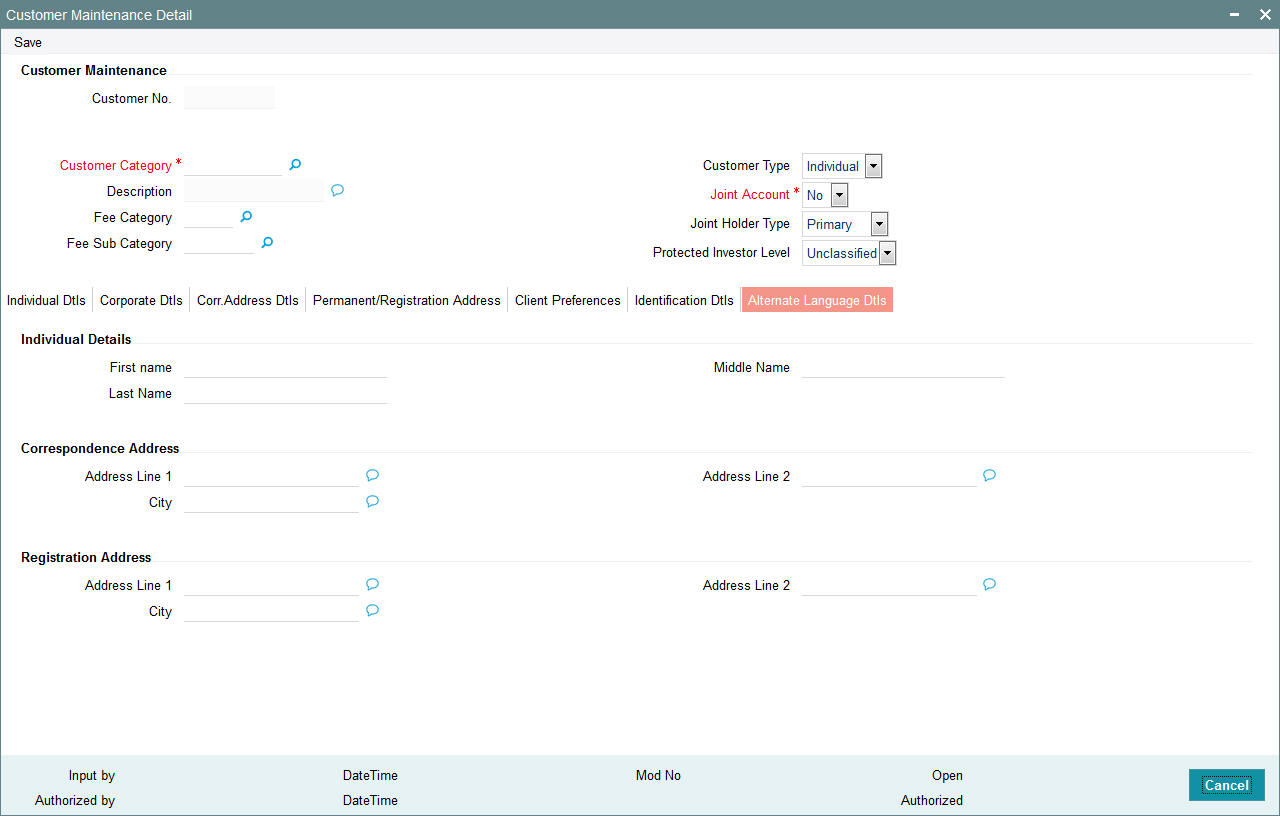
Individual Details
First Name
Alphanumeric; 105 Characters; Optional
Specify the first name of the customer in the desired alternate language if the customer is an individual. If the customer is a corporate, then specify the corporate name.
Middle Name
Alphanumeric; 105 Characters; Optional
Specify the middle name of the customer if the customer is an individual in the desired alternate language.
Last Name
Alphanumeric; 105 Characters; Optional
Specify the last name of the customer if the customer is an individual in the desired alternate language.
Correspondence Address
Address Line 1 & 2
Alphanumeric; 105 Characters; Optional
Enter the correspondence address details of the customer in the alternate language.
City
Alphanumeric; 105 Characters; Optional
Specify the city details.
Registration Address
Address Line 1 & 2
Alphanumeric; 105 Characters; Optional
Enter the permanent address details of the customer if the customer is an individual. In case of corporate customer, enter the registration address details in the alternate language.
City
Alphanumeric; 105 Characters; Optional
Specify the city details.
2.2 Customer Maintenance Summary Screen
This section contains the following topics:
- Section 2.2.1, "Retrieving CIF Profile in Customers Maintenance Summary Screen"
- Section 2.2.2, "Editing CIF Profile before Authorization "
- Section 2.2.3, "Viewing CIF Profile before Authorization"
- Section 2.2.4, "Deleting CIF Profile before Authorization"
- Section 2.2.5, "Authorizing CIF Profile for Customer"
- Section 2.2.6, "Amending CIF Profile for Customer"
- Section 2.2.7, "Authorizing Amended CIF Profile for Customer"
- Section 2.2.8, "Saving CIF profile in Customers Screen"
2.2.1 Retrieving CIF Profile in Customers Maintenance Summary Screen
You can retrieve a previously entered record in the Customer Maintenance Summary screen, as follows:
- Invoke the ‘Customer Maintenance Summary’ screen by typing ‘UTSCUST’ in the field at the top right corner of the Application tool bar and clicking on the adjoining arrow button. Specify any or all of the following details in the corresponding fields:
- The status of the record in the Authorized field. If you choose the “Blank Space” option, then all the transactions that involve the specified unit holder are retrieved.
- The status of the record in the Open field. If you choose the “Blank Space” option, then all the records that involve the specified unit holder are retrieved.
- Customer No.
- Customer Name
- Customer Type
- Customer Category
- Identification Number
- Identification Type
- Country of Domicile
Click ‘Search’ button to view the records. All records with the specified details are retrieved and displayed in the lower portion of the screen.
Note
You can also retrieve the individual record detail from the Customer Maintenance detail screen by doing query in the following manner:
- Press F7
- Input the Identification Number
- Press F8
You can perform Edit, Delete, Amend, Authorize, Reverse, Confirm operation by selecting from the Action list.
You can also search the record by using combination of % and alphanumeric value.
Example
You can search the record for Identification Number by using the combination of % and alphanumeric value as follows:
- Search by A%: System will fetch all the records whose Identification Number starts from Alphabet ‘A’. For Example: AGC17, AGVO6, AGC74 and so forth.
- Search by %7: System will fetch all the records whose Identification Number ends by numeric value’ 7’. For Example: AGC17, GSD267, AGC77 and so forth.
- Search by %17%: System will fetch all the records whose Identification
Number contains the numeric value 17. For Example: GSD217, GSD172, AGC17
and so forth.

2.2.2 Editing CIF Profile before Authorization
You can modify the details of customer maintenance parameters that you have already entered into the system, provided it has not been subsequently authorized. You can perform this operation as follows:
- Invoke the Customer Maintenance Summary screen from the Browser.
- Select the status of the record that you want to retrieve for modification in the Authorized field. You can only modify records that are unauthorized. Accordingly, choose the Unauthorized option.
- Specify any or all of the details in the corresponding fields to retrieve the record that is to be modified. All unauthorized records with the specified details are retrieved and displayed in the lower portion of the screen.
- Double click the record that you want to modify in the list of displayed records. The Customer Maintenance Detail screen is displayed.
- Select Unlock Operation from Action list to modify the record. Modify the necessary information.
- Click Save to save your changes. Customer Maintenance Detail screen is closed and the changes made are reflected in the Customer Maintenance Summary screen.
2.2.3 Viewing CIF Profile before Authorization
To view a record that you have previously entered, you must retrieve the same in the Customer Maintenance Summary screen, as follows:
- Invoke the Customer Maintenance Summary Screen from the Browser.
- Select the status of the record that you want to retrieve for viewing in the Authorized field. You can also view all records that are either unauthorized or authorized only, by choosing the Unauthorized / Authorized option.
- Specify any or all of the details of the record in the corresponding fields on the screen, and click ‘Search’ button. All records with the specified details are retrieved and displayed in the lower portion of the screen.
- Double click the record that you want to view in the list of displayed records. The Customer Maintenance Detail screen is displayed in View mode.
2.2.4 Deleting CIF Profile before Authorization
You can delete only unauthorized records in the system. To delete a record that you have previously entered:
- Invoke the Customer Maintenance Summary screen from the Browser.
- Select the status of the record that you want to retrieve for deletion.
- Specify any or all of the details and click ‘Search’ button. All records with the specified details are retrieved and displayed in the lower portion of the screen.
- Double click the record that you want to delete. The Customer Maintenance Detail screen is displayed.
- Select Delete operation from the Action list. The system prompts you to confirm the deletion, and the record is deleted physically from the system database.
2.2.5 Authorizing CIF Profile for Customer
An unauthorized Customer Maintenance must be authorized in the system for it to be processed. To authorize a record:
- Invoke the Customer Maintenance Summary screen from the Browser.
- Retrieve the record so that it is displayed in the lower portion of the screen.
- Click the ‘Authorize’ button. The Maintenance Authorization Details screen is displayed. The detail of each modification that was made to the record, in the sequence of occurrence is shown in this screen. For each modification, the following details are displayed:
- The sequence number for the modification, in the Modification Number field.
- The record status of the modification, in the Open field.
- The user that effected the modification, in the Maker ID field.
- The date at which the modification occurred, in the Maker Date Stamp field.
In the Field Details in the lower grid portion, the changed values for each modification are displayed.
You can authorize any of the modified records, or all of them.
When you have marked the required modifications for authorization, click the OK button to effect the authorization. The Maintenance Authorization Details screen is closed, and you are returned to the Customers main screen.
2.2.6 Amending CIF Profile for Customer
After a Customer Maintenance is authorized, it can be modified using the Unlock operation from Action list. To make changes to a record after authorization:
- Invoke the Customer Maintenance Summary screen from the Browser.
- Select the status of the record that you wish to retrieve for amendment. You can only amend only authorized records.
- Specify any or all of the details of the Customer Maintenance in the screen. All records with the specified details are retrieved and displayed in the lower portion of the screen.
- Double click the record that you want to amend. The Customer Maintenance Detail screen is displayed in Amendment mode. Click the Unlock operation from the Action list to amend the record.
- Amend the necessary information. Click the Save button to save the changes.
2.2.7 Authorizing Amended CIF Profile for Customer
An amended Customer Maintenance record must be authorized for the amendment to be made effective in the system. The authorization of amended records can only be done from Fund Manager Module and Agency branch Module.
The process of authorization is subsequently the same as that for normal transactions.
The Customers screen consists of the following parts:
The Result section
A list of customer records retrieved by the most recent search operation is displayed in this section. To view the details of any record in this list, double click on the record, where a new screen will be opened with the details of the record.
The Button Row
The row of buttons on the right side of the screen is as follows:
- Advanced
- Reset
- Query
- Refresh
The Advanced section
This section is a row in the middle of the screen, with the ‘Advanced Search’ button at the right -hand side of the screen. Click ‘Advanced Search’ button for advanced level of query where records can be retrieved based on specific fields.
The Reset section
This section is a row in the middle of the screen, with the Reset button at the right -hand side of the screen. Click ‘Reset’ button, so that the entire search criteria will be cleared for a new level of search
The Query section
This section is a row in the middle of the screen, with the Query button at the right -hand side of the screen. Click ‘Search’ button to retrieve a record for viewing, use this section.
The Refresh section
This section is a row in the middle of the screen, with the Refresh button at the right -hand side of the screen. Click ‘Advanced Search’ button, so that the search criteria will be refreshed based on existing criteria.
The view section
Any record that you select for viewing is displayed in the lowest portion of the screen, below the button row.
2.2.8 Saving CIF profile in Customers Screen
To set up a CIF customer and enable the creation of a mutual fund investor account in the Customers screen,
- Click the Add button. The New Customer No. screen is opened. Specify a unique identifier in the Customer Code field for the CIF customer for whom you are setting up a profile, and click OK.
- The basic details screen is displayed, in readiness for you to enter the details for a new CIF customer. In this screen, specify the following as mandatory information:
- In the Customer Maintenance section - Indicate whether the customer is an individual customer or corporate customer by choosing the appropriate option in the Customer Type field.
- Indicate the investor tax category corresponding to the CIF customer in the field Customer Category.
- Indicate the fee category and sub category in the respective fields.
- In the Customer Details section specify the following details:
- The name of the customer in the fields First Name, Middle Name and Last Name.
- The title of the customer in the field Title.
- Indicate whether the customer is a minor, in the field Minor. If the customer is a minor, enter the name of the guardian in the field Legal Guardian.
- The marital status of the customer.
- The gender of the customer.
- Indicate the date of birth of the customer. This is mandatory if the customer is a minor.
- Indicate the name of the father or spouse of the customer.
- The name of the beneficiary of the customer and his/her relationship with the customer.
- In the Address Details section, enter the correspondence and permanent address details.
- In the Client Preferences section, specify the following details:
- The account currency of the customer.
- The preferred language of the customer.
- The resident status of the customer, his/her nationality and country of domicile.
- The default broker and whether the customer has rights of accumulation.
- In the Identification Details section, specify the identification type of the customer and the details of the same. Also specify whether tax is to be deducted at source.
- In the Account Operation Details section, specify whether the customer is a joint account holder.
- In the Alternate Language Details section, specify the customer details in the desired alternate language.
- Click the Save button to save the profile of your customer.
2.3 CIF Address Maintenance Screen
This section contains the following topic:
2.3.1 Invoking CIF Address Maintenance Screen
You can maintain as many addresses as required for a given CIF; you are also allowed to specify the media for the address. This can be done through the ‘CIF Address Detail’ screen. You can invoke this screen by typing ‘UTDCADD’ in the field at the top right corner of the Application tool bar and clicking on the adjoining arrow button.
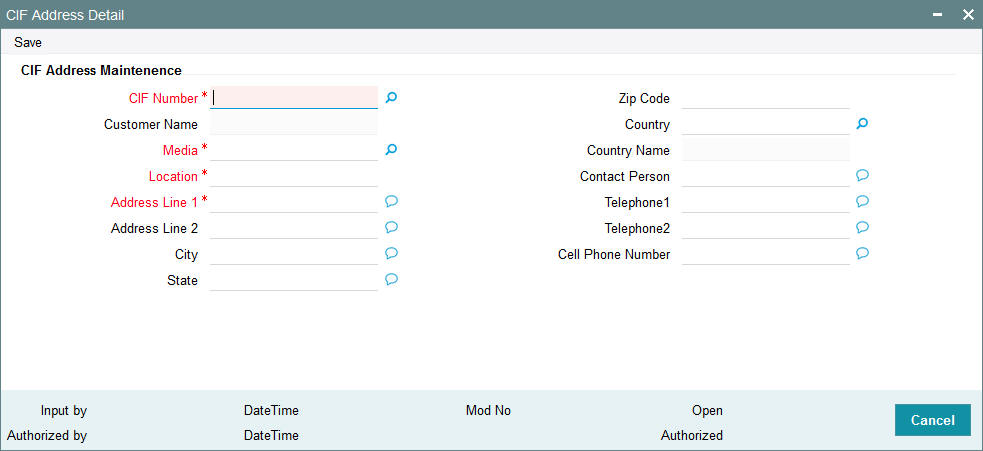
Select 'New' from the Actions menu in the Application tool bar or click new icon to enter the details of the CIF Address screen.
CIF Address Maintenance
CIF Number
Alphanumeric; 12 Characters; Mandatory
Specify the CIF number of the unit holder.
Customer Name
Display
The system displays the name of the customer for the selected CIF number.
Media
Alphanumeric; 15 Characters; Mandatory
Indicate the medium of communication you wish to avail, from the drop-down list. You could choose the Mail media. The List of values in drop down are parameterized in System Parameters under 'CIFMEDIA'.
Location
Alphanumeric; 15 Characters; Mandatory
Specify the location for correspondence with the unit holder.
Address Line 1-2
Alphanumeric; 105 Characters; Mandatory
Specify the postal address that is to be used for correspondence with the unit holder.
City
Alphanumeric; 105 Characters; Optional
Specify the name of the city of residence of the unit holder.
State
Alphanumeric; 105 Characters; Optional
Specify the state in which the city of residence of the unit holder is located.
Zip Code
Alphanumeric; 10 Characters; Optional
Specify the zip code of the specified city of residence of the unit holder.
Country
Alphanumeric; 3 Characters; Optional
Select the country in which the investor is domiciled, from the drop-down list.
Country Name
Display
The system displays the name of the country for the selected country code.
Contact Person
Alphanumeric; 160 Characters; Optional
Specify the name of the contact person at the unit holder’s residence.
Telephone Number 1-2
Alphanumeric; 60 Characters; Optional
Enter the contact telephone numbers of the unit holder.
Cell Phone Number
Alphanumeric; 105 Characters; Optional
Specify the cell phone number of the unit holder.
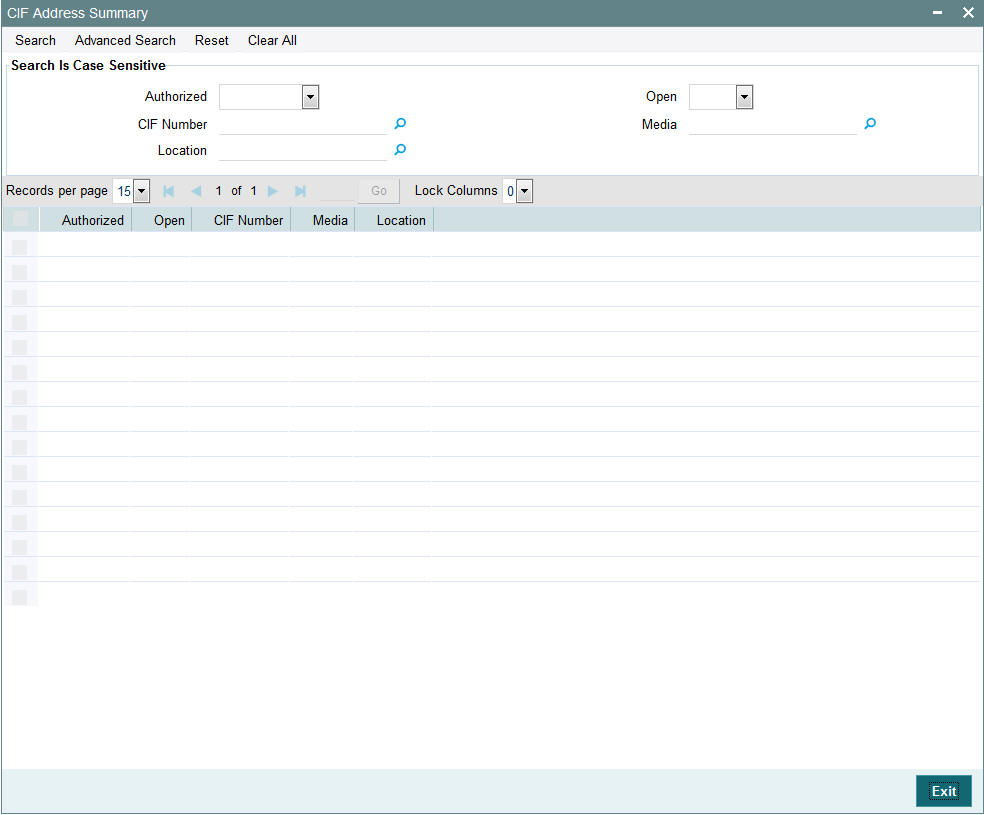
2.4 CIF Address Summary Screen
This section contains the following topics:
- Section 2.4.1, "Retrieving CIF Address Record"
- Section 2.4.2, "Editing CIF Address Record before Authorization "
- Section 2.4.3, "Viewing CIF Address Record before Authorization"
- Section 2.4.4, "Deleting CIF Address Record before Authorization"
- Section 2.4.5, "Authorizing CIF Address Record for Customer"
- Section 2.4.6, "Amending CIF Address Record for Customer"
- Section 2.4.7, "Authorizing Amended CIF Address Record for Customer"
2.4.1 Retrieving CIF Address Record
You can retrieve a previously entered record in the CIF Address Summary screen, as follows:
Invoke the CIF Address Summary screen by typing ‘UTSCADD’ in the field at the top right corner of the Application tool bar and clicking on the adjoining arrow button. Specify any or all of the following details in the corresponding fields:
- The status of the transaction in the Authorized field. If you choose the “Blank Space” option, then all the records that involve the specified unit holder are retrieved.
- The status of the record in the Open field. If you choose the “Blank Space” option, then all the records that involve the specified unit holder are retrieved.
- CIF Number
- Media
- Location
Click ‘Advanced Search’ button for advanced level of query where records can be retrieved based on specific fields. Click ‘Reset’ button, so that the entire search criteria will be cleared for a new level of search. Click ‘Search’ button to view the records. All records with the specified details are retrieved and displayed in the lower portion of the screen. Click ‘Refresh’ button, so that the search criteria will be refreshed based on existing criteria.
Note
You can also retrieve the individual record detail from the CIF Address detail screen by doing query in the following manner:
- Press F7
- Input the CIF Number
- Press F8
You can perform Edit, Delete, Amend, Authorize, Reverse, Confirm operation by selecting from the Action list. To edit and amend a record a user has to click unlock button under Action menu.
You can also search the record by using combination of % and alphanumeric value.
Example
You can search the record for CIF Number by using the combination of % and alphanumeric value as follows:-
- Search by A%: System will fetch all the records whose CIF Number starts from Alphabet ‘A’. For Example: AGC17, AGVO6, AGC74 and so forth.
- Search by %7: System will fetch all the records whose CIF Number ends by numeric value’ 7’. For Example: AGC17, GSD267, AGC77 and so forth.
- Search by %17%: System will fetch all the records whose CIF Number
contains the numeric value 17. For Example: GSD217, GSD172, AGC17 and
so forth.
2.4.2 Editing CIF Address Record before Authorization
You can modify the details of CIF Address parameters that you have already entered into the system, provided it has not been subsequently authorized. You can perform this operation as follows:
- Invoke the CIF Address Summary screen from the Browser.
- Select the status of the record that you want to retrieve for modification in the Authorized field. You can only modify records that are unauthorized. Accordingly, choose the Unauthorized option.
- Specify any or all of the details in the corresponding fields to retrieve the record that is to be modified. All unauthorized records with the specified details are retrieved and displayed in the lower portion of the screen.
- Double click the record that you want to modify in the list of displayed records. The CIF Address Detail screen is displayed.
- Select Unlock Operation from Action list to modify the record. Modify the necessary information.
- Click Save to save your changes. The CIF Address Detail screen is closed and the changes made are reflected in the Customer Maintenance Summary screen.
2.4.3 Viewing CIF Address Record before Authorization
To view a record that you have previously entered, you must retrieve the same in the CIF Address Summary screen, as follows:
- Invoke the CIF Address Summary Screen from the Browser.
- Select the status of the record that you want to retrieve for viewing in the Authorized field. You can also view all records that are either unauthorized or authorized only, by choosing the Unauthorized / Authorized option.
- Specify any or all of the details of the record in the corresponding fields on the screen, and click ‘Search’ button. All records with the specified details are retrieved and displayed in the lower portion of the screen.
- Double click the record that you want to view in the list of displayed records. The CIF Address Detail screen is displayed in View mode.
2.4.4 Deleting CIF Address Record before Authorization
You can delete only unauthorized records in the system. To delete a record that you have previously entered:
- Invoke the CIF Address Summary screen from the Browser.
- Select the status of the record that you want to retrieve for deletion.
- Specify any or all of the details and click ‘Search’ button. All records with the specified details are retrieved and displayed in the lower portion of the screen.
- Double click the record that you want to delete. The CIF Address Detail screen is displayed.
- Select Delete operation from the Action list. The system prompts you to confirm the deletion, and the record is deleted physically from the system database.
2.4.5 Authorizing CIF Address Record for Customer
An unauthorized CIF Address record must be authorized in the system for it to be processed. To authorize a record:
- Invoke the CIF Address Summary screen from the Browser.
- Select the status of the record that you want to retrieve for authorization. Typically, choose the Unauthorized option.
- Specify any or all of the details of the record in the corresponding fields on the screen. Click ‘Search’ button. All records with the specified details that are pending authorization are retrieved and displayed in the lower portion of the screen.
- Double click the transaction that you wish to authorize. The CIF Address Detail screen is displayed. Select Authorize operation from Action.
When the checker authorizes a transaction, details of validations, if any, that were overridden by the maker of the transaction during the Save operation, are displayed. If any of these overrides results in an error, the checker must reject the transaction.
2.4.6 Amending CIF Address Record for Customer
After a CIF Address is authorized, it can be modified using the Unlock operation from Action list. To make changes to a transaction after authorization:
- Invoke the CIF Address Summary screen from the Browser.
- Select the status of the record that you wish to retrieve for amendment. You can only amend only authorized records.
- Specify any or all of the details of the CIF Address in the screen. All records with the specified details are retrieved and displayed in the lower portion of the screen.
- Double click the record that you want to amend. The CIF Address Detail screen is displayed in Amendment mode. Click the Unlock operation from the Action list to amend the record.
- Amend the necessary information. Click the Save button to save the changes.
2.4.7 Authorizing Amended CIF Address Record for Customer
An amended CIF Address record must be authorized for the amendment to be made effective in the system. The authorization of amended records can only be done from Fund Manager Module and Agency branch Module.
The process of authorization is subsequently the same as that for normal transactions.
2.5 CIF Address - Fund Maintenance Details
This section contains the following topic:
2.5.1 Invoking CIF Address - Fund Maintenance Details Screen
You can map the list of funds in which the unit holder has invested to the addresses that have been maintained for a given CIF. Provided the unit holder specifies the valid combination of the CIF Number, Media and Location as already maintained in the CIF Address Maintenance screen, you will allowed to select all or a list of funds for which this combination would be applicable. You can invoke the ‘CIF Address – Fund Maintenance Detail’ screen by typing ‘UTDCFNMP’ in the field at the top right corner of the Application tool bar and clicking on the adjoining arrow button.
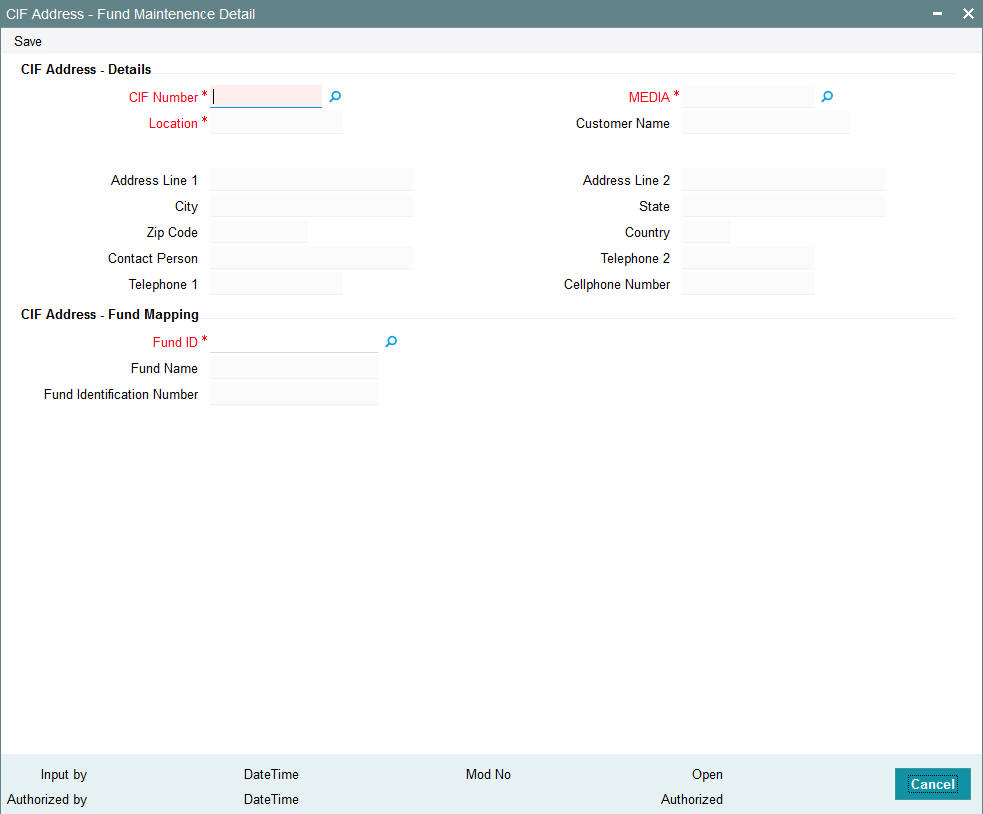
Select 'New' from the Actions menu in the Application tool bar or click new icon to enter the details of the CIF Address – Fund screen.
CIF Address - Details
CIF Number
Alphanumeric; 12 Characters; Mandatory
Select the CIF number of the unit holder for the adjoining list.
All enabled addresses of customer will be listed along with location and Media and maintained from FCC.
Media
Alphanumeric; 15 Characters; Mandatory
Specify the media of communication as maintained in the CIF Address Maintenance screen. Alternatively, you can also select media of communication from the option list.
Location
Display
The system displays the location for correspondence with the unit holder as maintained in the CIF Address Maintenance screen.
Customer Name
Display
The system displays the name of the customer for the selected CIF number.
Address1-2
Display
The system displays the postal address that is to be used for correspondence with the unit holder.
City
Display
The system displays the name of the city of residence of the unit holder.
State
Display
The system displays the state in which the city of residence of the unit holder is located.
Zip Code
Display
The system displays the zip code of the specified city of residence of the unit holder.
Country
Display
The system displays the country in which the investor is domiciled, from the drop-down list.
Contact Person
Display
The system displays the name of the contact person at the unit holder’s residence.
Cell Phone Number
Display
The system displays the cell phone number of the unit holder.
TelephoneNumber1-2
Display
The system displays the contact telephone numbers of the unit holder.
CIF Address – Fund Mapping
You can select the Fund IDs for which you wish the specified address details to be applicable. Once you select the fund ID, the system displays the fund name and the fund identification number.
Fund ID
Alphanumeric; 6 Characters; Mandatory
Specify the fund ID.
Fund Name
Display
The system displays the name of the fund for the selected fund ID.
Fund Identification Number
Display
The system displays the fund identification number.
2.6 CIF Address Fund Summary Screen
This section contains the following topics:
- Section 2.6.1, "Retrieving CIF Address – Fund Record"
- Section 2.6.2, "Editing CIF Address – Fund Record before Authorization "
- Section 2.6.3, "Viewing CIF Address – Fund Record before Authorization"
- Section 2.6.4, "Deleting CIF Address – Fund Record before Authorization"
- Section 2.6.5, "Authorizing CIF Address – Fund Record for Customer"
- Section 2.6.6, "Amending CIF Address – Fund Record for Customer"
- Section 2.6.7, "Authorizing Amended CIF Address – Fund Record for Customer"
2.6.1 Retrieving CIF Address – Fund Record
You can retrieve a previously entered record in the CIF Address – Fund Summary screen, as follows:
- Invoke the CIF Address - Fund Summary screen by typing ‘UTSCFNMP’ in the field at the top right corner of the Application tool bar and clicking on the adjoining arrow button. Specify any or all of the following details in the corresponding fields:
- The status of the transaction in the Authorized field. If you choose the “Blank Space” option, then all the records that involve the specified unit holder are retrieved.
- The status of the record in the Open field. If you choose the “Blank Space” option, then all the records that involve the specified unit holder are retrieved.
- CIF Number
- Media
- Location
- Fund ID
Click ‘Search’ button to view the records. All records with the specified details are retrieved and displayed in the lower portion of the screen.
Note
You can also retrieve the individual transaction detail from the CIF Address detail screen by doing query in the following manner:
- Press F7
- Input the CIF Number
- Press F8
You can perform Edit, Delete, Amend, Authorize, Reverse, Confirm operation by selecting from the Action list.
You can also search the record by using combination of % and alphanumeric value.
Example
You can search the record for CIF Number by using the combination of % and alphanumeric value as follows:-
- Search by A%: System will fetch all the records whose CIF Number starts from Alphabet ‘A’. For Example: AGC17, AGVO6, AGC74 and so forth.
- Search by %7: System will fetch all the records whose CIF Number ends by numeric value’ 7’. For Example: AGC17, GSD267, AGC77 and so forth.
- Search by %17%: System will fetch all the records whose CIF Number
contains the numeric value 17. For Example: GSD217, GSD172, AGC17 and
so forth.

2.6.2 Editing CIF Address – Fund Record before Authorization
You can modify the details of CIF Address – Fund parameters that you have already entered into the system, provided it has not been subsequently authorized. You can perform this operation as follows:
- Invoke the CIF Address – Fund Summary screen from the Browser.
- Select the status of the record that you want to retrieve for modification in the Authorized field. You can only modify records that are unauthorized. Accordingly, choose the Unauthorized option.
- Specify any or all of the details in the corresponding fields to retrieve the record that is to be modified. All unauthorized records with the specified details are retrieved and displayed in the lower portion of the screen.
- Double click the record that you want to modify in the list of displayed records. The CIF Address – Fund Detail screen is displayed.
- Select Unlock Operation from Action list to modify the record. Modify the necessary information.
- Click Save to save your changes. The CIF Address – Fund Detail screen is closed and the changes made are reflected in the CIF Address – Fund Summary screen.
2.6.3 Viewing CIF Address – Fund Record before Authorization
To view a record that you have previously entered, you must retrieve the same in the CIF Address – Fund Summary screen, as follows:
- Invoke the CIF Address – Fund Summary Screen from the Browser.
- Select the status of the record that you want to retrieve for viewing in the Authorized field. You can also view all records that are either unauthorized or authorized only, by choosing the Unauthorized / Authorized option.
- Specify any or all of the details of the record in the corresponding fields on the screen, and click ‘Search’ button. All records with the specified details are retrieved and displayed in the lower portion of the screen.
- Double click the record that you want to view in the list of displayed records. The CIF Address – Fund Detail screen is displayed in View mode.
2.6.4 Deleting CIF Address – Fund Record before Authorization
You can delete only unauthorized records in the system. To delete a record that you have previously entered:
- Invoke the CIF Address – Fund Summary screen from the Browser.
- Select the status of the record that you want to retrieve for deletion.
- Specify any or all of the details and click ‘Search’ button. All records with the specified details are retrieved and displayed in the lower portion of the screen.
- Double click the record that you want to delete. The CIF Address – Fund Detail screen is displayed.
- Select Delete operation from the Action list. The system prompts you to confirm the deletion, and the record is deleted physically from the system database.
2.6.5 Authorizing CIF Address – Fund Record for Customer
An unauthorized CIF Address – Fund record must be authorized in the system for it to be processed. To authorize a record:
- Invoke the CIF Address – Fund Summary screen from the Browser.
- Select the status of the record that you want to retrieve for authorization. Typically, choose the Unauthorized option.
- Specify any or all of the details of the record in the corresponding fields on the screen. Click ‘Search’ button. All records with the specified details that are pending authorization are retrieved and displayed in the lower portion of the screen.
- Double click the transaction that you wish to authorize. The CIF Address – Fund Detail screen is displayed. Select Authorize operation from Action.
When the checker authorizes a transaction, details of validations, if any, that were overridden by the maker of the transaction during the Save operation, are displayed. If any of these overrides results in an error, the checker must reject the transaction.
2.6.6 Amending CIF Address – Fund Record for Customer
After a CIF Address – Fund is authorized, it can be modified using the Unlock operation from Action list. To make changes to a record after authorization:
- Invoke the CIF Address – Fund Summary screen from the Browser.
- Select the status of the record that you wish to retrieve for amendment. You can only amend only authorized records.
- Specify any or all of the details of the CIF Address – Fund in the screen. All records with the specified details are retrieved and displayed in the lower portion of the screen.
- Double click the record that you want to amend. The CIF Address – Fund Detail screen is displayed in Amendment mode. Click the Unlock operation from the Action list to amend the record.
- Amend the necessary information. Click the Save button to save the changes.
2.6.7 Authorizing Amended CIF Address – Fund Record for Customer
An amended CIF Address – Fund record must be authorized for the amendment to be made effective in the system. The authorization of amended records can only be done from Fund Manager Module and Agency branch Module.
The process of authorization is subsequently the same as that for normal transactions.
2.7 CIF-UH Mapping Detail
This section contains the following topics:
2.7.1 Invoking CIF-UH Mapping Detail Screen
You can map customer unit holder using ‘CIF-UH Mapping Detail’ screen. You can invoke this screen by typing ‘UTDCIFUH’ in the field at the top right corner of the Application tool bar and clicking on the adjoining arrow button.
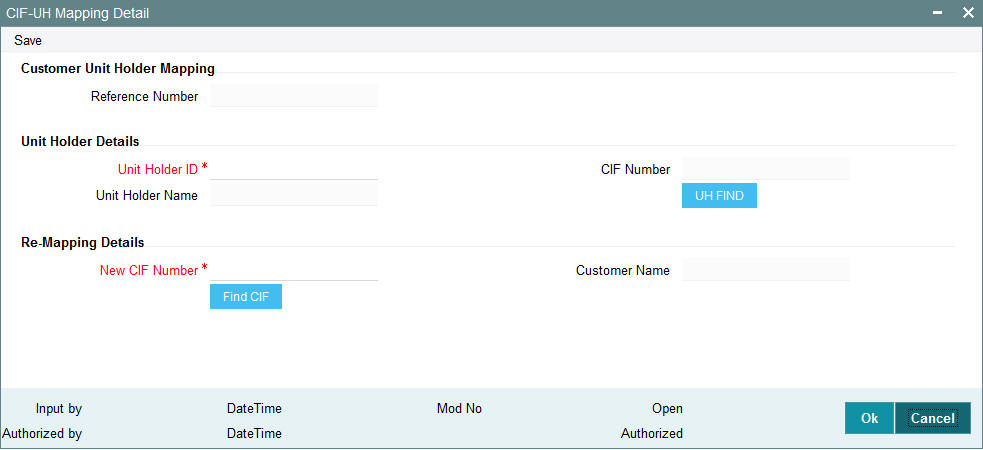
You can specify the following details:
Customer Unit Holder Mapping
Reference Number
Display
The system displays the reference number.
Unit Holder Details
Unit Holder ID
Alphanumeric; 12 Characters; Mandatory
Specify the unit holder ID.
Unit Holder Name
Display
The system displays the name of the specified unit holder ID.
CIF Number
Display
The system displays the CIF number based on the unit holder selected.
You can also search for unit holder by clicking ‘UH Find’ button.
Re-Mapping Details
New CIF Number
Alphanumeric; 12 Characters; Mandatory
Specify the new CIF number that needs to be re-mapped.
Customer Name
Display
The system displays the name of the customer for the selected new CIF number.
You can also search for CIF number by clicking ‘Find CIF’ button.
Note
The system will validate to restrict the UH mapping to new CIF will happen only when the UH Protection level and CIF protection level are same.
2.8 CIF-UH Mapping Summary
This section contains the following topics:
- Section 2.8.1, "Retrieving CIF-UH Mapping Record"
- Section 2.8.2, "Editing CIF-UH Mapping Record"
- Section 2.8.3, "Viewing CIF-UH Mapping Record"
- Section 2.8.4, "Delete CIF-UH Mapping Record"
- Section 2.8.5, "Authorizing CIF-UH Mapping Record"
- Section 2.8.6, "Amending CIF-UH Mapping Record"
- Section 2.8.7, "Authorizing an amended CIF-UH Mapping Record"
2.8.1 Retrieving CIF-UH Mapping Record
You can invoke the ‘CIF-UH Mapping Summary’ screen by typing ‘UTSCIFUH’ in the field at the top right corner of the Application tool bar and clicking on the adjoining arrow button.
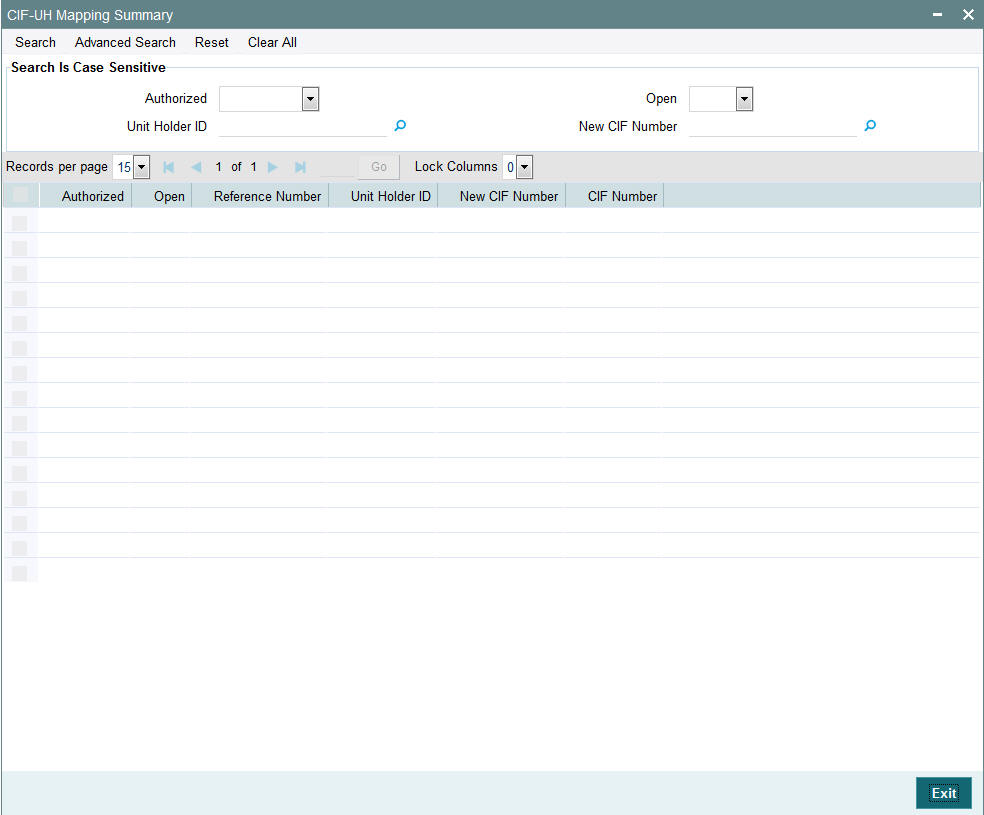
To retrieve a previously entered third party entity record:
- Invoke the CIF-UH Mapping Summary screen and specify the following:
- The authorization status of the CIF-UH Mapping record in the Authorized field. If you choose the “Blank Space” option, then all the records are retrieved.
- The status of the CIF-UH Mapping records in the Open field. If you choose the “Blank Space” option, then all the records are retrieved.
- Unit Holder ID
- New CIF Number
- After you have specified the required details, click 'Search'. All records with the specified details are retrieved and displayed in the lower portion of the screen.
You can also retrieve an CIF-UH Mapping detail from the Detail screen by doing query in the following manner:
- Press F7
- Input the Unit Holder ID
- Press F8
You can perform Edit, Delete, Amend, Authorize, operation by selecting from the Action list.
You can also search the record by using combination of % and alphanumeric value.
2.8.2 Editing CIF-UH Mapping Record
You can modify the details of a CIF-UH mapping record that you have already entered into the system, provided it has not been subsequently authorized. You can perform this operation as follows:
- Invoke the CIF-UH Mapping Summary screen from the Browser.
- Select the authorization status of the records that you want to retrieve for modification in the Authorized field. You can only modify records that are unauthorized. Accordingly, choose the Unauthorized option from the drop-down list.
- Specify any or all of the search parameters for retrieving the records.
- Click 'Search'. All unauthorized CIF-UH mapping records with the specified details are retrieved and displayed in the lower portion of the screen.
- Double click the record that you want to modify. The CIF-UH Mapping Detail screen is displayed.
- Select Unlock Operation from Action list to modify the record. Modify the necessary information.
- Click Save to save the changes. The CIF-UH Mapping Detail screen is closed and the changes made are reflected in the CIF-UH Mapping Summary screen.
2.8.3 Viewing CIF-UH Mapping Record
To view the CIF-UH mapping details that you have previously entered:
- Invoke the CIF-UH Mapping Summary Screen from the Browser.
- Select the authorization status of the CIF-UH mapping records that you want to retrieve for viewing in the Authorized field. You can also view all the CIF-UH mapping records that are either unauthorized or authorized only, by choosing the Unauthorized / Authorized option.
- Specify any or all of the search parameters for retrieving the records.
- Click 'Search'. All records with the specified details are retrieved and displayed in the lower portion of the screen.
- Double click the record that you want to view. The CIF-UH Mapping screen Detail is displayed in view mode.
2.8.4 Delete CIF-UH Mapping Record
You can delete only unauthorized records in the system. To delete CIF-UH mapping record:
- Invoke the CIF-UH Mapping Summary screen from the Browser.
- Select the status of the record that you want to retrieve for deletion.
- Specify any or all of the search parameters in the corresponding fields on the screen.
- Click 'Search'. All records with the specified details are retrieved and displayed in the lower portion of the screen.
- Double click the record that you want to delete. The CIF-UH Mapping Detail screen is displayed.
- Select Delete operation from the Action list. The system prompts you to confirm the deletion, and the record is deleted physically from the system database.
2.8.5 Authorizing CIF-UH Mapping Record
An unauthorized CIF-UH mapping record must be authorized in the system for it to come into effect. To authorize CIF-UH mapping record:
- Invoke the CIF-UH Mapping Summary screen from the Browser.
- Select the status of CIF-UH mapping record that you want to retrieve for authorization. Typically, choose the unauthorized option from the drop-down list.
- Specify any or all of the search parameters in the corresponding fields on the screen.
- Click 'Search'. All records with the specified details that are pending authorization are retrieved and displayed in the lower portion of the screen.
- Double click the record that you wish to authorize. The CIF-UH Mapping screen displayed. Select Authorize operation from Action.
When the checker authorizes CIF-UH mapping details, details of validations, if any, that were overridden by the maker of the CIF-UH mapping details during the Save operation, are displayed. If any of these overrides results in an error, the checker must reject the maintenance.
2.8.6 Amending CIF-UH Mapping Record
After CIF-UH mapping entity record is authorized, it can be modified using the Unlock operation from Action list. To make changes to CIF-UH mapping record after authorization, you must invoke the Unlock operation which is termed as Amend Operation.
- Invoke the CIF-UH Mapping Summary screen from the Browser.
- Select the status of the record that you wish to retrieve for amendment. You can only amend records that are authorized.
- Specify any or all of the search parameters in the corresponding fields on the screen.
- Click 'Search'. All records with the specified details are retrieved and displayed in the lower portion of the screen.
- Double click the record that you want to amend. The CIF-UH Mapping Detail screen is displayed in Amendment mode.
- Click the Unlock operation from the Action list to amend the record.
- Amend the necessary information. Click the Save button to save the changes
2.8.7 Authorizing an amended CIF-UH Mapping Record
An amended CIF-UH mapping record must be authorized for the amendment to be made effective in the system. The process of authorization is the same as the process of normal authorization.
2.9 CIF Merge Change Hierarchy Detail
This section contains the following topics:
2.9.1 Invoking CIF Merge Change Hierarchy Detail Screen
You can maintain CIF Merge or hierarchy change details using ‘CIF Merge Change Hierarchy Detail’ screen. You can invoke this screen by typing ‘UTDCMHCH’ in the field at the top right corner of the Application tool bar and clicking on the adjoining arrow button.
You can specify the following details:
CIF Merge Change Hierarchy
Operation Type
Mandatory
Select the type of operation from the drop-down list. The list displays the following values:
- Hierarchy Change
- CIF Merge
Serial Number
Display
The system displays the serial number by clicking the ‘Populate’ button.
From CIF Number
Alphanumeric; 12 Characters; Mandatory
Specify the From CIF number.
To CIF ID
Alphanumeric; 12 Characters; Mandatory
Specify the To CIF number.
You can also search for ‘From CIF Number’ and ‘To CIF ID’ by clicking ‘Find’ button.
Note
In case of CIF merger, From CIF and To CIF should be of the same protection level.
Level of Hierarchy Change
Optional
Select the level of hierarchy change from the drop-down list. The list displays the following values:
- Agent
- Agent Branch
- Account Officer
- IFA
Close Account Post Merge
Optional
Select if the account has to be closed post merge operation or not from the drop-down list. The list displays the following values:
- Yes
- No
Merge Change/Hierarchy Status
Optional
Select the merge change or hierarchy status from the drop-down list. The list displays the following values:
- Generated
- Reversed
After specifying all the necessary details, click ‘Populate’ button. The system displays the following values:
- Unit Holder ID
- Fund ID
- Unit Balance
- Product ID
- Policy Number
- Agent Code
- Branch
- Account Officer
- IFA
- Merge Or Not?
- To Agent Code
- To Branch Code
- To Account Officer
- To IFA
To UnitHolder ID
Alphanumeric; 16 Characters; Optional
Specify the To unit holder ID. You can also select To Unit Holder ID by selecting ‘Find UH’ button.
Merger or Not
Optional
Check this box if the details has to be merged.
To Agent Code
Alphanumeric; 12 Characters; Optional
Specify the To agent code.
To Branch Code
Alphanumeric; 12 Characters; Optional
Specify the To branch code.
To Account Officer
Alphanumeric; 12 Characters; Optional
Specify the To account officer details.
To IFA
Alphanumeric; 12 Characters; Optional
Specify the To IFA details.
2.10 CIF Merge Change Hierarchy Summary
This section contains the following topics:
- Section 2.10.1, "Retrieving CIF Merge Change Hierarchy Record"
- Section 2.10.2, "Editing CIF Merge Change Hierarchy Record"
- Section 2.10.3, "Viewing CIF Merge Change Hierarchy Record"
- Section 2.10.4, "Delete CIF Merge Change Hierarchy Record"
- Section 2.10.5, "Authorizing CIF Merge Change Hierarchy Record"
- Section 2.10.6, "Amending CIF Merge Change Hierarchy Record"
- Section 2.10.7, "Authorizing an amended CIF Merge Change Hierarchy Record"
2.10.1 Retrieving CIF Merge Change Hierarchy Record
You can invoke the ‘CIF Merge Change Hierarchy Summary’ screen by typing ‘UTSCMHCH’ in the field at the top right corner of the Application tool bar and clicking on the adjoining arrow button.
To retrieve a previously entered third party entity record:
- Invoke the CIF Merge Change Hierarchy Summary screen and specify
the following:
- The authorization status of the CIF Merge Change Hierarchy record in the Authorized field. If you choose the “Blank Space” option, then all the records are retrieved.
- The status of the CIF Merge Change Hierarchy records in the Open field. If you choose the “Blank Space” option, then all the records are retrieved.
- Serial Number
- CIF Number
- Operation Type
- After you have specified the required details, click 'Search'. All records with the specified details are retrieved and displayed in the lower portion of the screen.
You can also retrieve an individual CIF Merge Change Hierarchy detail from the Detail screen by doing query in the following manner:
- Press F7
- Input the CIF Number
- Press F8
You can perform Edit, Delete, Amend, Authorize, operation by selecting from the Action list.
You can also search the record by using combination of % and alphanumeric value.
2.10.2 Editing CIF Merge Change Hierarchy Record
You can modify the details of a CIF Merge Change Hierarchy record that you have already entered into the system, provided it has not been subsequently authorized. You can perform this operation as follows:
- Invoke the CIF Merge Change Hierarchy Summary screen from the Browser.
- Select the authorization status of the records that you want to retrieve for modification in the Authorized field. You can only modify records that are unauthorized. Accordingly, choose the Unauthorized option from the drop-down list.
- Specify any or all of the search parameters for retrieving the records.
- Click 'Search'. All unauthorized CIF Merge Change Hierarchy records with the specified details are retrieved and displayed in the lower portion of the screen.
- Double click the record that you want to modify. The CIF Merge Change Hierarchy Detail screen is displayed.
- Select Unlock Operation from Action list to modify the record. Modify the necessary information.
- Click Save to save the changes. The CIF Merge Change Hierarchy Detail screen is closed and the changes made are reflected in the CIF Merge Change Hierarchy Summary screen.
2.10.3 Viewing CIF Merge Change Hierarchy Record
To view the CIF Merge Change Hierarchy details that you have previously entered:
- Invoke the CIF Merge Change Hierarchy Summary Screen from the Browser.
- Select the authorization status of the CIF Merge Change Hierarchy records that you want to retrieve for viewing in the Authorized field. You can also view all the CIF Merge Change Hierarchy records that are either unauthorized or authorized only, by choosing the Unauthorized / Authorized option.
- Specify any or all of the search parameters for retrieving the records.
- Click 'Search'. All records with the specified details are retrieved and displayed in the lower portion of the screen.
- Double click the record that you want to view. The CIF Merge Change Hierarchy Detail is displayed in view mode.
2.10.4 Delete CIF Merge Change Hierarchy Record
You can delete only unauthorized records in the system. To delete CIF Merge Change Hierarchy record:
- Invoke the CIF Merge Change Hierarchy Summary screen from the Browser.
- Select the status of the record that you want to retrieve for deletion.
- Specify any or all of the search parameters in the corresponding fields on the screen.
- Click 'Search'. All records with the specified details are retrieved and displayed in the lower portion of the screen.
- Double click the record that you want to delete. The CIF Merge Change Hierarchy Detail screen is displayed.
- Select Delete operation from the Action list. The system prompts you to confirm the deletion, and the record is deleted physically from the system database.
2.10.5 Authorizing CIF Merge Change Hierarchy Record
An unauthorized CIF Merge Change Hierarchy record must be authorized in the system for it to come into effect. To authorize CIF Merge Change Hierarchy record:
- Invoke the CIF Merge Change Hierarchy Summary screen from the Browser.
- Select the status of CIF Merge Change Hierarchy record that you want to retrieve for authorization. Typically, choose the unauthorized option from the drop-down list.
- Specify any or all of the search parameters in the corresponding fields on the screen.
- Click 'Search'. All records with the specified details that are pending authorization are retrieved and displayed in the lower portion of the screen.
- Double click the record that you wish to authorize. The CIF Merge Change Hierarchy screen displayed. Select Authorize operation from Action.
When the checker authorizes CIF Merge Change Hierarchy details, details of validations, if any, that were overridden by the maker of the CIF Merge Change Hierarchy details during the Save operation, are displayed. If any of these overrides results in an error, the checker must reject the maintenance.
2.10.6 Amending CIF Merge Change Hierarchy Record
After CIF Merge Change Hierarchy is authorized, it can be modified using the Unlock operation from Action list. To make changes to CIF Merge Change Hierarchy record after authorization, you must invoke the Unlock operation which is termed as Amend Operation.
- Invoke the CIF Merge Change Hierarchy Summary screen from the Browser.
- Select the status of the record that you wish to retrieve for amendment. You can only amend records that are authorized.
- Specify any or all of the search parameters in the corresponding fields on the screen.
- Click 'Search'. All records with the specified details are retrieved and displayed in the lower portion of the screen.
- Double click the record that you want to amend. The CIF Merge Change Hierarchy Detail screen is displayed in Amendment mode.
- Click the Unlock operation from the Action list to amend the record.
- Amend the necessary information. Click the Save button to save the changes
2.10.7 Authorizing an amended CIF Merge Change Hierarchy Record
An amended CIF Merge Change Hierarchy record must be authorized for the amendment to be made effective in the system. The process of authorization is the same as the process of normal authorization.
Note
In case of batch screen or batch activity, there will be no restriction on fetching protected UH/CIF.
Screen or Process where there will be no restriction applicable are as follows:
Batch Activity |
Function ID |
EOD activity |
UTDEODEX |
Mini EOD activity |
UTDEODMI |
Pre EOD check |
UTDPREOD |
Branch Sign Off/On |
UTDBSNOF |
Process Dividend Payment |
UTDDIPMT |
Process Dividend Reinvestments |
UTDPRRIN |
Mock Dividend |
UTDMOCKD |
Mock Dividend Execute |
UTDMCKDV |
Mass Amendment |
UTDMASAM |
Selected UH Dividend Reversal |
UTDSELUH |
Dividend Reversal/Mass Reprocess |
UTDMASRE |
2.11 Customer Find Screen Detail
This section contains the following topics:
2.11.1 Invoking Customer Find Detail Screen
You can query for customer details using ‘Customer Find Screen Detail’ screen. You can invoke this screen by typing ‘UTCCIFND’ in the field at the top right corner of the Application tool bar and clicking on the adjoining arrow button.
You can specify the following details:
Quick Find Options
Investor Type
Optional
Select the type of investor from the drop-down list. The list displays the following values:
- Individual
- Corporate
- Both
First Name
Alphanumeric; 105 Characters; Optional
Specify the first name of the customer.
Last Name
Alphanumeric; 105 Characters; Optional
Specify the last name of the customer.
Middle Name
Alphanumeric; 105 Characters; Optional
Specify the middle name of the customer.
Company Name
Alphanumeric; 105 Characters; Optional
Specify the Company name.
CIF Number
Alphanumeric; 9 Characters; Optional
Specify the CIF number of the customer.
Tax ID
Alphanumeric; 50 Characters; Optional
Specify the Tax ID number.
Identification Number
Alphanumeric; 50 Characters; Optional
Specify the identification number.
Country Of Domicile
Alphanumeric; 3 Characters; Optional
Specify the country of domicile of the customer.
Date Of Birth
Date Format; Optional
Select the date of birth of the customer from the adjoining calendar.
Incorporation Date
Date Format; Optional
Select the date of incorporation from the adjoining calendar.
National ID
Alphanumeric; 3 Characters; Optional
Specify the National ID of the customer.
Advanced Find Options
Address Line 1
Alphanumeric; 35 Characters; Optional
Specify the Address Line 1 of the customer.
Country
Alphanumeric; 3 Characters; Optional
Specify the country name of the customer.
Nationality
Alphanumeric; 3 Characters; Optional
Specify the nationality of the customer.
Employer Identification Number
Alphanumeric; 50 Characters; Optional
Specify the Employer Identification Number of the customer.
Find Results
The system displays the following values
- Investor Type
- First name
- Last Name
- Middle Name
- Company Name
- Customer No.
- Tax ID
- Identification Number
- Country Of Domicile
- Date Of Birth
- Incorporation Date
- National ID
- Address Line 1
- Country
- Nationality
- Employer Identification Number
- Select
2.12 Customer Log Details
This section contains the following topics:
2.12.1 Invoking Customer Log Details Screen
You can view the status of the CIF moving from FCUBS to FCIS when integration is enabled. You can invoke ‘Customer Log Details’ screen by typing ‘UTDCIFLG’ in the field at the top right corner of the Application tool bar and clicking on the adjoining arrow button.
You can specify the following details:
Customer No
Alphanumeric; 11 Characters; Mandatory
Specify the customer number. Alternatively, you can select customer number from the option list. The list displays all valid customer number maintained in the system.
After specifying the customer number, click ‘Search’ button. The system displays the following values:
Error Code
Display
The system displays the error code for the customer number if any error occurs while customer is moving from UBS to IS.
Error Description
Display
The system displays the description of the error code.