5. Interfaces with External Systems
Oracle FLEXCUBE Investor Servicing (FCIS) provides a facility to effect data exchanges and transfers with external systems. You can import exchange rates or NAV from an external system, or export transaction and dividend information to any external accounting system. The external system may be a file system or an application.
The data exchange can be effected through an interface with the external system. This interface consists of the following components:
- An interface definition that will capture all the information that is needed for processing and effecting the data exchange. You can designate all the procedures that need to be called, the internal tables that will be inserted into or read from, the database objects that will be used, the file formats and so on.
- The interface processing module that will actually process the interface, effect the data exchange, and create a log of these activities.
- The file access services that will be utilized by the interface processing module for the purpose of effecting the data exchange.
You can process an interface in one of the following ways:
- As part of the End of Day Procedures, you can trigger the processes specified for the interface through a simple dialogue screen. The system performs the data exchange and flashes a message upon successful completion of the activities.
- You can schedule the interface through the Scheduler Services in
FCIS by specifying the Interface ID as a parameter for a task, and then
schedule the task to be executed as desired, as a job, as follows:
- Define an interface definition from FCIS to the external system or vice versa. The interface definition will be associated with a unique Interface ID.
- Define a task (through the Task Maintenance screen) and indicate the Interface ID as a parameter to the task.
- Schedule the task by associating it with a time-based or event-based frequency and define it as a job, through the Job Maintenance screen.
- Activate the scheduler, and it will call the Interface Processing module at the time specified, and pass the Interface ID as a parameter to the module.
- The Interface Processing module will then execute the defined interface and log any errors that will result.
You can access the interface processing screens from the following menu categories in the Fund Manager component:
- The Interface Maintenance (Detail) screen from the Maintenance menu category
- The Interface Maintenance Summary Screen
- The Online Execution of Interfaces screen from the Batch menu category
This chapter contains the following sections:
- Section 5.1, "Setting up and Maintaining Interfaces"
- Section 5.2, "Interface Maintenance Summary Screen"
- Section 5.3, "Online Execution of Interfaces"
- Section 5.4, "Scheduler Services"
- Section 5.5, "Job Maintenance Summary Screen"
- Section 5.6, "Scheduling Jobs"
- Section 5.7, "Interface with External Asset Management Systems"
- Section 5.8, "Accounting System Component Setup"
- Section 5.9, "Accounting System Component Setup Summary"
- Section 5.10, "Asset Management Import NAV Setup"
- Section 5.11, "Asset Management NAV Summary Screen"
- Section 5.12, "UH NAV Alert Setup Detail"
- Section 5.13, "UH NAV Alert Setup Summary Screen"
- Section 5.14, "General Ledger Setup"
- Section 5.15, "GL Template Summary Screen"
- Section 5.16, "GL Template Mapping to Fund – Investment Account Type Combination"
- Section 5.17, "GL Interface Set-Up Summary"
- Section 5.18, "Accounting System General Ledger Setup"
- Section 5.19, "Accounting System GL Setup Summary"
- Section 5.20, "FCIS - Finware Interface"
- Section 5.21, "EPU Upload"
- Section 5.22, "Tax Aggregation Interface"
- Section 5.23, "Agent Reference File"
- Section 5.24, "Oracle Financial Interface"
- Section 5.25, "Product-Fund- Asset Code Mapping Interface"
- Section 5.26, "Global Order Placement Interface"
- Section 5.27, "Upload Master"
5.1 Setting up and Maintaining Interfaces
This section contains the following topics:
- Section 5.1.1, "Invoking FCIS Interface Maintenance Detail Screen"
- Section 5.1.2, "Fields in Interface Maintenance Screen"
5.1.1 Invoking FCIS Interface Maintenance Detail Screen
To set up an interface definition, use the ‘FCIS Interface Maintenance Detail’ screen. You can invoke this screen by typing ‘UTDIFAC’ in the field at the top right corner of the Application tool bar and clicking on the adjoining arrow button.
Select ‘New’ from the Actions menu in the Application tool bar or click new icon to enter the details of the interface that you wish to maintain.
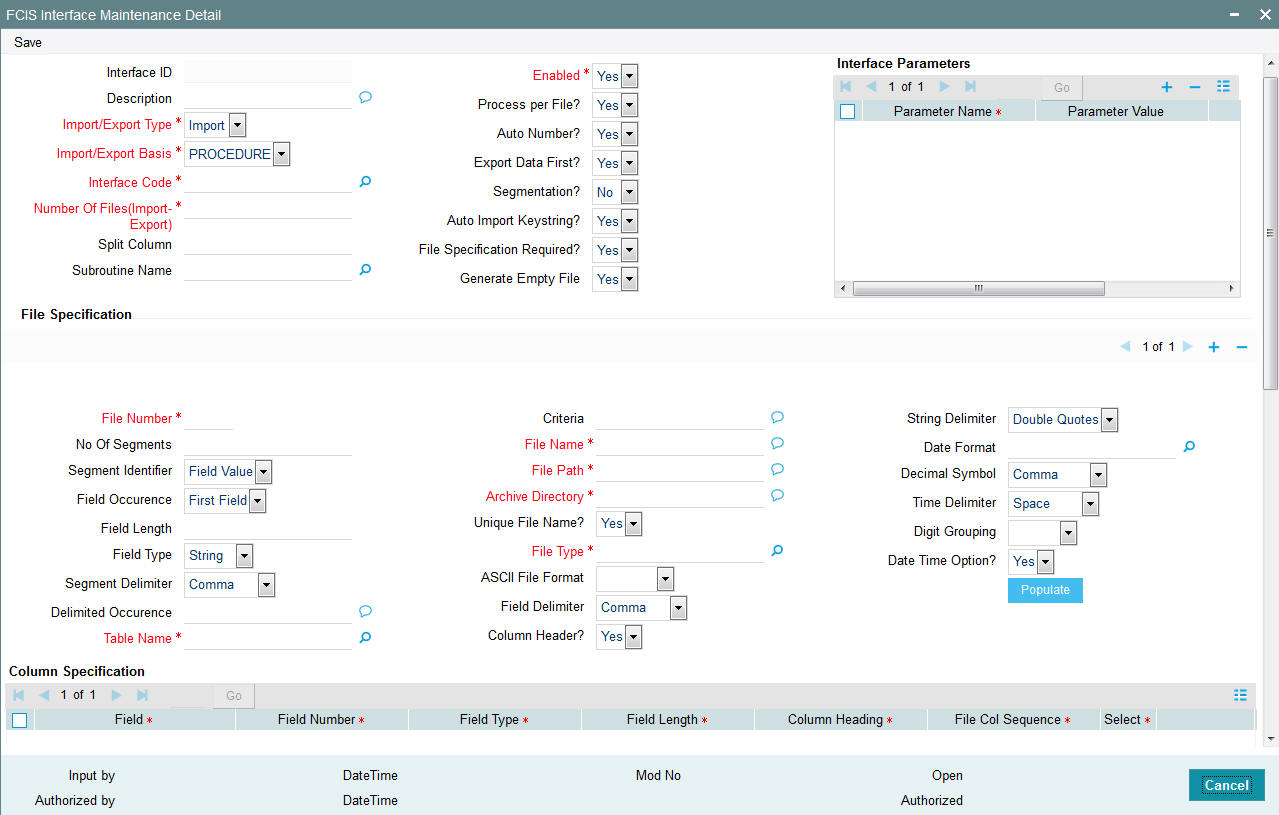
In this screen, you can:
- Define new interfaces
- Enable or disable an interface definition
Interface definitions for exporting the following information will be factory shipped:
- Holiday
- CIF
- Currency
- Broker
- Unit Holder
- Fund
- Transactions
- Allocation
- Product
- Policy
- Policy Transactions
- Dividend/Corporate Actions
- Periodic Load
- System parameters
- Entity Details
5.1.2 Fields in Interface Maintenance Screen
Interface ID
Display
Every interface that you define is assigned a unique identification by the system, known as the Interface ID. This ID is generated by the system when you save a new definition, after you have specified all the information that is mandatory for the interface, in this screen.
When you retrieve an existing interface definition using the Find Screen, the ID of the retrieved interface is displayed in this field.
Description
Alphanumeric; 255 Characters; Optional
Describe the interface in a few words, in this field.
Import/ Export Type
Mandatory
You can define an interface to either import or export data. Choose the desired type from the drop down list.
Import/ Export Basis
Mandatory
You can export data from any of the following database object types:
- Table: You can export the data in all fields from a table, or part of the fields
- Procedure: You can execute a procedure that will return the data that must be exported. This procedure will populate a table or multiple tables with the data results. You can also execute a procedure on the basis of data populated into the tables.
- SQL: You can execute a SQL string with an SQL statement that is associated with manipulation of data.
You can import data into any of the following database object types:
- Table: You can import data from an external specified file into an internal table.
- Procedure: You can import the data from an external file to a temporary internal table, and run a procedure to validate the imported data and populate it into the required internal table.
You can choose the required option from the drop-down list, according to the type of interface.
Interface Code
Alphanumeric; 3 Characters; Mandatory
The interface code identifies the two components or applications that are on either end of any interface definition. Any interface has a sending system that exports data and a receiving system that receives the exported data as an import.
Specify the interface code that identifies the sending and receiving systems for the interface, using the options in the drop-down list. The interface code is captured for information purposes only.
The following table displays the different codes and the sending and receiving systems identified for each:
Interface Code |
Sending System |
Receiving System |
I2F |
FLEXCUBE-Investor Services |
Operating System |
C2I |
FLEXCUBE-Securities |
FLEXCUBE-Investor Services |
I2C |
FLEXCUBE-Investor Services |
FLEXCUBE-Securities |
F2I |
Operating System |
FLEXCUBE-Investor Services |
I2I |
FLEXCUBE -Investor Services |
FLEXCUBE-Investor Services |
Number of Files (Import-Export)
Numeric, 2 Characters; Mandatory
Specify the number of files that must be imported or exported. For procedure based or table based interfaces, if the number of files is greater than zero, then the names of all the tables that will be impacted by the procedure or SQL string are displayed in the File Specifications Tab grid, in the lower portion of the screen.
Split Column
Alphanumeric; 50 Characters; Optional
This captures details of multiple files that are created for unique set of information and can uniquely identify the files. This option is available only if the Segmentation box is unchecked.
Subroutine Name
Alphanumeric; 50 Characters; Optional
Specify the name of the back-end procedure to be called by the system during interface execution. It is applicable only if import / export basis is procedure.
Enabled?
Mandatory
Select ‘Yes’ to enable the interface from the drop-down list. An interface that is not enabled cannot be processed, and all jobs and tasks that are associated with the interface are not executed.
By default, when you define a new interface and save the definition in this screen, the interface is created as an enabled interface.
When you are editing the record of an interface in this screen, the only editing that is possible is enabling or disabling it, by checking or un-checking this box. All other fields in the screen are locked in Edit Mode.
Process per File?
Optional
Select the option to indicate whether the bulk upload file needs to be processed in a sequential manner. You can select either ‘Yes’ or ‘No’.
Auto Number?
Optional
Select the option to indicate whether the system should automatically generate sequence number for bulk import. The sequence number is automatically generated if you select ‘YES’.
Export Data First?
Optional
Select the option to indicate whether the data needs to be exported first. You can select either ‘Yes’ or ‘No’.
Segmentation?
Optional
In cases where the information is spread over several files, select ‘Yes’ from the drop-down list to upload all the files.
Auto Import Keystring?
Optional
Select if keystring has to be auto imported or not from the drop-down list.
All import and export tables have a key string column. The interface system imports the files into these tables with a specific key string. The import wrapper will pick up the records with the same key string and process them. This improves the multi user capability of interface system and also allows us to reuse the same header and trailer tables for most of the imports and exports.
File Specification Required?
Optional
Choose ‘Yes’ if you wish to indicate that file specifications are required. Else choose ‘No’.
Generate Empty File
Optional
Select if empty file has to be generated or not from the drop-down list. The list displays the following values:
- Yes
- No
Interface Parameters
Procedure-based interfaces will need certain parameters that you must specify for their execution.
Parameter Name
Alphanumeric, 50 Characters; Mandatory
Select the name of the parameter that is required for the procedure, from the drop down list. You can specify as many parameters as are necessary.
Parameter Value
Alphanumeric, 50 Characters; Optional
If you have selected a non-standard parameter, specify the value for the same in this field.
Standard
Numeric, 1 Character; Mandatory
Specify the standard specific to the FCIS application. You need not specify a value for standard parameters.
File Specification
Every interface involves a data exchange that could be of any of the following types:
- One which involves file exports or imports
- One which does not involve file exports or imports (i.e from an external table to an internal table)
For a data exchange that involves no file exports or imports, the Number of Files will be zero, and the file specification tab is not applicable for such exchanges. For exchanges that are procedure-based or SQL-based, and involve file exports or imports, the Number of Files is more than zero, and all tables in the FCIS system that are associated with the specified procedure or SQL string are displayed in the File Specifications screen, with each file having a serial File Number. You can edit any details (except the File Number) or add new tables.
Invoke the File Specifications Screen by clicking ‘File Specification’ button in the main Interface Detail screen.
File Number
Numeric; 3 Characters; Mandatory
Specify the serial number for the file that is involved in the data exchange. When you add a new file or table name, it is given a new sequential file number.
No of Segments
Numeric; 2 Characters; Optional
Specify the number of segments to be uploaded.
Segment Identifier
Optional
Select the value associated with the segment identifier to be uploaded from the drop-down list. The list displays the following values:
- Field Value
- Delimited
Field Occurrence
Optional
Select the field corresponding to the segment identifier to be uploaded from the drop-down list. The list displays the following values:
- First Field
- Last Field
Field Length
Numeric; 2 Characters; Optional
Specify the length of the field to be uploaded.
Field Type
Optional
Select the type of the field from the drop-down list. The options available are ‘String’ or ‘Number’.
Segment Delimiter
Optional
Select the delimiter to be used for the different segments from the drop-down list. The list displays the following values:
- Comma
- Colon
- Semi Colon
- Space
- Tab
- Null String
Delimited Occurrence
Alphanumeric, 255 Characters; Optional
Specify the delimited occurrences.
Table Name
Alphanumeric, 30 Characters; Mandatory
Specify the name of the table associated with the specified procedure that will receive imported data or contain the data that is to be exported
The value mentioned here must correspond to a valid database table. You can use the option list to specify a new table name.
Criteria
Alphanumeric, 255 Characters; Optional
Specify a clause that filters the data that is being exported or imported. For example, you can specify an SQL statement such as a Where clause here. The clause will look for and pick up all data that satisfies the Where clause, in the data that is being exported or imported.
File Name
Alphanumeric, 255 Characters; Mandatory
The system displays the name of the file for the selected file ID. However, you can amend this value:
Specify the name of the file that will be involved in the data exchange.
- Import
For example, if the specified file name is nav.xls, and unique file name is 'Yes', only the file nav.xls will be picked up. If not, all files that bear the name nav*.* will be picked up.
- Export
File name generation will be based on the mask value given in the File name of the interface definition.
This feature is enabled if you have selected ‘Unique File Name’ field as ‘No’.
You can maintain the mask values as follows. The system will derive the value from Pkgglobal parameter.
Mask Definition (.txt represents sample file extension) |
Value that will be replaced |
$m$_filename.txt |
moduleid_filename.txt |
$u$_filename.txt |
userid_filename.txt |
$a$_filename.txt |
agentcode_filename.txt |
$b$_filename.txt |
branchcode_filename.txt |
$t$_filename.txt |
<datetime>_filename.txt (date will be the Application date) |
$d$_filename.txt |
<date>_filename.txt (date will be the Application date) |
$c$_filename.txt |
<Customvalue>_filename.txt . Kernel will generate filename and custom should be able to override the file name only if $c$ mask is maintained. |
$v$_filename.txt |
<SplitColumnValue>_filename.txt SplitColumn mentioned in the maintenance will be used. |
Maximum length of the file name will be limited to 100 characters without the extension. If file name length exceeds more than 100, then the system will consider the first 100 characters of file name from the left.
File Path
Alphanumeric, 255 Characters; Mandatory
Specify the path in which the specified file will be found. Click the button alongside this field to browse to the desired location.
Archive Directory
Alphanumeric, 255 Characters; Mandatory
Specify a location where the specified file may be stored or archived for future reference, after the data is either exported or imported. If you do not specify an archive directory, the file is deleted from the specified File Path once the interface is processed and the data exchange is done.
Unique File Name?
Optional
Choose 'Yes' to indicate that, only files that exactly correspond with the specified file name will be imported/exported. If you choose 'No', all the files that resemble the specified file name will be picked up for import. And for export, the file name generation will be based on the mask value given in the file name of the interface definition.
File Type
Alphanumeric, 1 Character; Mandatory
Select the type of file that is being exported or imported.
ASCII File Format
Mandatory for ASCII file types
Select the format for ASCII files, either Fixed or Delimited from the drop-down list.
Field Delimiter
Optional
Select the delimiter to be used for the different fields from the drop-down list. The list displays the following values:
- Comma
- Colon
- Semi Colon
- Space
- Tab
- Null String
Column Header
Optional
Select ‘Yes’ from the drop-down list if column headings must be picked up in the export or import file, typically in an MS Excel Worksheet.
String Delimiter
Optional
Select the delimiter to be used for the different strings from the drop-down list. The list displays the following values:
- Double Quotes
- Single Quotes
Date Format
Alphanumeric; 12 Characters; Optional
Select the date format from the option list.
Decimal Symbol
Optional
Select the decimal symbol from the drop-down list:
- Comma
- Space
- Dot
- Fixed Length
Time Delimiter
Optional
Select the time delimiter from the drop-down list. The list displays the following values:
- Colon
- Semi Colon
- Space
Digit Grouping
Optional
Select the digit grouping from the drop-down list. The list displays the following values:
- Comma
- Space
- Dot
Date Time Option?
Optional
Select the date-time format that is applicable in the data that is being imported or exported.
Click ‘Populate’ button to view the column specification details as follows:
Column Specification
Field
Alphanumeric; 50 Characters; Mandatory
The system displays the field number. However, you can amend this value.
You can specify the actual columns or fields in the file that will be exported or imported or in the specified table, in the Column Specifications Maintenance screen. You can also define a sequence in which the data must be ordered.
File Number
Numeric; 3 Characters; Mandatory
The sequential number for the selected file from the File Specifications Tab grid in the Interface Maintenance screen is displayed here. It represents the file for which you are specifying the column details in this screen. All the columns that are found in the specified table are displayed in the grid in this screen, with their details. Making changes to any of these details will result in a corresponding change in the output data. If you delete a particular row in the grid, then that column will not appear in the output data.
Field Type
Alphanumeric; 30 Characters; Mandatory
The system displays the field type. However, you can amend this value.
Field Length
Numeric; 22 Characters; Mandatory
The system displays the field type. However, you can amend this value.
Column Heading
Alphanumeric; 50 Characters; Mandatory
The heading of the column or field in the table is displayed here. You can alter the heading.
File Col Sequence
Numeric; 3 Characters; Mandatory
The system displays the field type. However, you can amend this value.
The Interface system allows you to maintain the sequence of fields in the export and import tables. This lets you reuse common tables for header and trailers. The import or export file need not be in the same sequence as the fields of the tables created for them
Select
Optional
Select Yes or No from the drop-down list.
You can also indicate any or all of the following format specifications for the file in the File Specifications grid:
- Field and String Delimiters
- Date Format
- Decimal Symbol
- Digit Grouping Symbol
- Date and Time Delimiters
The default values for these specifications are given below:
Format Specification |
Allowable |
Default |
Field Delimiter |
Comma, colon, semi-colon, space, tab, null |
Space |
String Delimiter |
Single and double quotation marks; null |
Null |
Date Format |
DMONY; DMY; MDY; YMD; Registry Setting |
Registry Setting |
Date Delimiter |
Hyphen, comma, space, forward slash, Registry Setting |
Registry Setting |
Decimal Symbol |
Comma, space, null, period, Registry Setting |
Registry Setting |
Digit Grouping Symbol |
Comma, period, space, null, Registry Setting |
Registry Setting |
Time Delimiter |
Colon, semi-colon, space, null, Registry Setting |
Registry Setting |
Segment Specifications
File Number
Display
The system displays the file number.
Table Name
Alphanumeric; 30 Characters; Mandatory
Specify the table name.
Segment Number
Alphanumeric; 3 Characters; Mandatory
Specify the segment number.
Identifier Field Name
Alphanumeric; 30 Characters; Optional
Specify the identifier field name.
Identifier Field Value
Alphanumeric; 30 Characters; Optional
Specify the identifier field value.
First Row/Last Row
Optional
Select if the segment is first row or last row from the drop-down list. The list displays the following values:
- First Row
- Last Row
Click ‘Populate’ button to populate the following details:
Column Specification
Field
Alphanumeric; 50 Characters; Mandatory
The system displays the field number. However, you can amend this value.
You can specify the actual columns or fields in the file that will be exported or imported or in the specified table, in the Column Specifications Maintenance screen. You can also define a sequence in which the data must be ordered.
File Number
Numeric; 3 Characters; Mandatory
The sequential number for the selected file from the File Specifications Tab grid in the Interface Maintenance screen is displayed here. It represents the file for which you are specifying the column details in this screen. All the columns that are found in the specified table are displayed in the grid in this screen, with their details. Making changes to any of these details will result in a corresponding change in the output data. If you delete a particular row in the grid, then that column will not appear in the output data.
Field Type
Alphanumeric; 30 Characters; Mandatory
The system displays the field type. However, you can amend this value.
Field Length
Numeric; 22 Characters; Mandatory
The system displays the field type. However, you can amend this value.
Column Heading
Alphanumeric; 50 Characters; Mandatory
The heading of the column or field in the table is displayed here. You can alter the heading.
File Col Sequence
Numeric; 3 Characters; Mandatory
The system displays the field type. However, you can amend this value.
The Interface system allows you to maintain the sequence of fields in the export and import tables. This lets you reuse common tables for header and trailers. The import or export file need not be in the same sequence as the fields of the tables created for them
Select
Optional
Select Yes or No from the drop-down list.
5.2 Interface Maintenance Summary Screen
This section contains the following topics:
- Section 5.2.1, "Retrieving Record in Interface Maintenance Summary Screen"
- Section 5.2.2, "Editing Interface Maintenance Record "
- Section 5.2.3, "Viewing Interface Maintenance Record"
- Section 5.2.4, "Deleting Interface Maintenance Record"
- Section 5.2.5, "Authorizing Interface Maintenance "
- Section 5.2.6, "Amending Interface Maintenance "
- Section 5.2.7, "Authorizing Amended Interface Maintenance record"
- Section 5.2.8, "Copying Attributes"
5.2.1 Retrieving Record in Interface Maintenance Summary Screen
You can retrieve a previously entered record in the Summary Screen, as follows:
Invoke the ‘FCIS Interface Maintenance Summary’ screen by typing ‘UTSIFAC’ in the field at the top right corner of the Application tool bar and clicking on the adjoining arrow button..
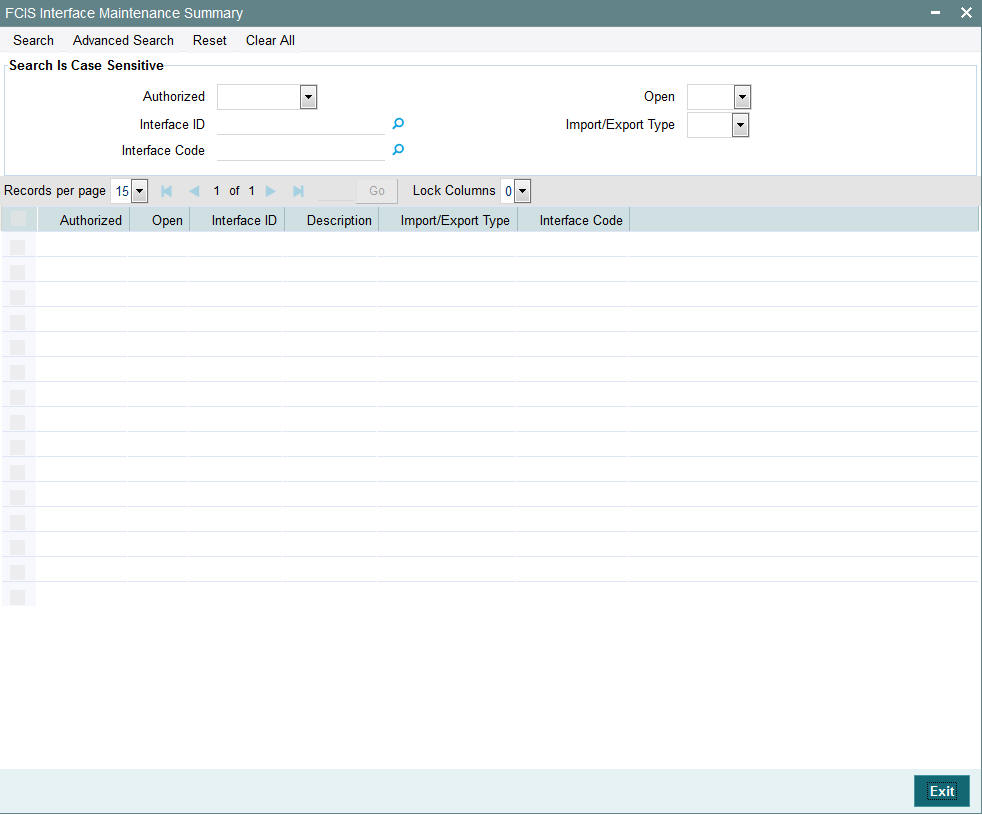
Specify any or all of the following details in the corresponding fields:
- The status of the record in the Authorized field. If you choose the ‘Blank Space’ option, then all the records are retrieved.
- The status of the record in the Open field. If you choose the ‘Blank Space’ option, then all records are retrieved
- Interface ID
- Interface Code
- Import/Export Type
Click ‘Search’ button to view the records. All the records with the specified details are retrieved and displayed in the lower portion of the screen.
Note
You can also retrieve the individual record detail from the detail screen by querying in the following manner:
- Press F7
- Input the Interface ID
- Press F8
You can perform Edit, Delete, Amend, Authorize, Reverse, Confirm operations by selecting the operation from the Action list. You can also search a record by using a combination of % and alphanumeric value.
5.2.2 Editing Interface Maintenance Record
You can modify the details of Interface Maintenance record that you have already entered into the system, provided it has not been subsequently authorized. You can perform this operation as follows:
- Invoke the Interface Maintenance Summary screen from the Browser.
- Select the status of the record that you want to retrieve for modification in the Authorized field. You can only modify records that are unauthorized. Accordingly, choose the unauthorized option.
- Specify any or all of the details in the corresponding fields to retrieve the record that is to be modified.
- Click ‘Search’ button. All unauthorized records with the specified details are retrieved and displayed in the lower portion of the screen.
- Double click the record that you want to modify in the list of displayed records. The Interface Maintenance Detail screen is displayed.
- Select Unlock Operation from the Action list to modify the record. Modify the necessary information.
- Click Save to save your changes. The Interface Maintenance Detail screen is closed and the changes made are reflected in the Interface Maintenance Summary screen.
5.2.3 Viewing Interface Maintenance Record
To view a record that you have previously input, you must retrieve the same in the Interface Maintenance Summary screen as follows:
- Invoke the Interface Maintenance Summary screen from the Browser.
- Select the status of the record that you want to retrieve for viewing in the Authorization Status field. You can also view all records that are either unauthorized or authorized only, by choosing the Unauthorized/ Authorized option.
- Specify any or all of the details of the record in the corresponding fields on the screen.
- Click ‘Search’ button. All records with the specified fields are retrieved and displayed in the lower portion of the screen.
- Double click the record that you want to view in the list of displayed records. The Interface Maintenance Detail screen is displayed in View mode.
5.2.4 Deleting Interface Maintenance Record
You can delete only unauthorized records in the system. To delete a record that you have previously entered:
- Invoke the Interface Maintenance Summary screen from the Browser.
- Select the status of the record that you want to retrieve for deletion.
- Specify any or all of the details in the corresponding fields on the screen.
- Click ‘Search’ button. All records with the specified fields are retrieved and displayed in the lower portion of the screen.
- Double click the record that you want to delete in the list of displayed records. . The Interface Maintenance Detail screen is displayed.
- Select Delete Operation from the Action list. The system prompts you to confirm the deletion and the record is physically deleted from the system database.
5.2.5 Authorizing Interface Maintenance
An unauthorized Interface Maintenance record must be authorized in the system for it to be processed. To authorize a record:
- Invoke the Interface Maintenance Summary screen from the Browser.
- Select the status of the record that you want to retrieve for authorization. Typically, choose the unauthorized option.
- Specify any or all of the details in the corresponding fields on the screen.
- Click ‘Search’ button. All records with the specified details that are pending authorization are retrieved and displayed in the lower portion of the screen.
- Double click the record that you wish to authorize. The Interface Maintenance Detail screen is displayed. Select Authorize operation from the Action List.
When a checker authorizes a record, details of validation, if any, that were overridden by the maker of the record during the Save operation are displayed. If any of these overrides results in an error, the checker must reject the record.
5.2.6 Amending Interface Maintenance
After a Interface Maintenance record is authorized, it can be modified using the Unlock operation from the Action List. To make changes to a record after authorization:
- Invoke the Interface Maintenance Summary screen from the Browser.
- Select the status of the record that you want to retrieve for authorization. You can only amend authorized records.
- Specify any or all of the details in the corresponding fields on the screen.
- Click ‘Search’ button. All records with the specified details that are pending authorization are retrieved and displayed in the lower portion of the screen.
- Double click the record that you wish to authorize. The Interface Maintenance Detail screen is displayed in amendment mode. Select Unlock operation from the Action List to amend the record.
- Amend the necessary information and click on Save to save the changes.
5.2.7 Authorizing Amended Interface Maintenance record
An amended Interface Maintenance must be authorized for the amendment to be made effective in the system. The authorization of amended records can be done only from Fund Manager Module and Agency Branch module.
The subsequent process of authorization is the same as that for normal transactions.
5.2.8 Copying Attributes
If you want to create a new Interface Maintenance with the same attributes of an existing maintenance, you can copy the attributes of an existing Interface Maintenance to a new one.
To copy the attributes:
- Retrieve the record whose attributes the new Interface Maintenance should inherit. You can retrieve the record through the Summary screen or through the F7-F8 operation explained in the previous sections of this chapter.
- Click on Copy.
- Indicate the ID for the new Interface Maintenance. You can, however, change the details of the new maintenance.
5.3 Online Execution of Interfaces
This section contains the following topics:
- Section 5.3.1, "Invoking Online Interface Execution Screen"
- Section 5.3.2, "Setting up Excel Export Parameterization"
- Section 5.3.3, "Invoking Excel Import Screen"
5.3.1 Invoking Online Interface Execution Screen
To execute or process an interface maintenance definition, use the ‘Online Interface Execution’ screen. You can invoke this screen by typing ‘UTSONLIN’ in the field at the top right corner of the Application tool bar and clicking on the adjoining arrow button.
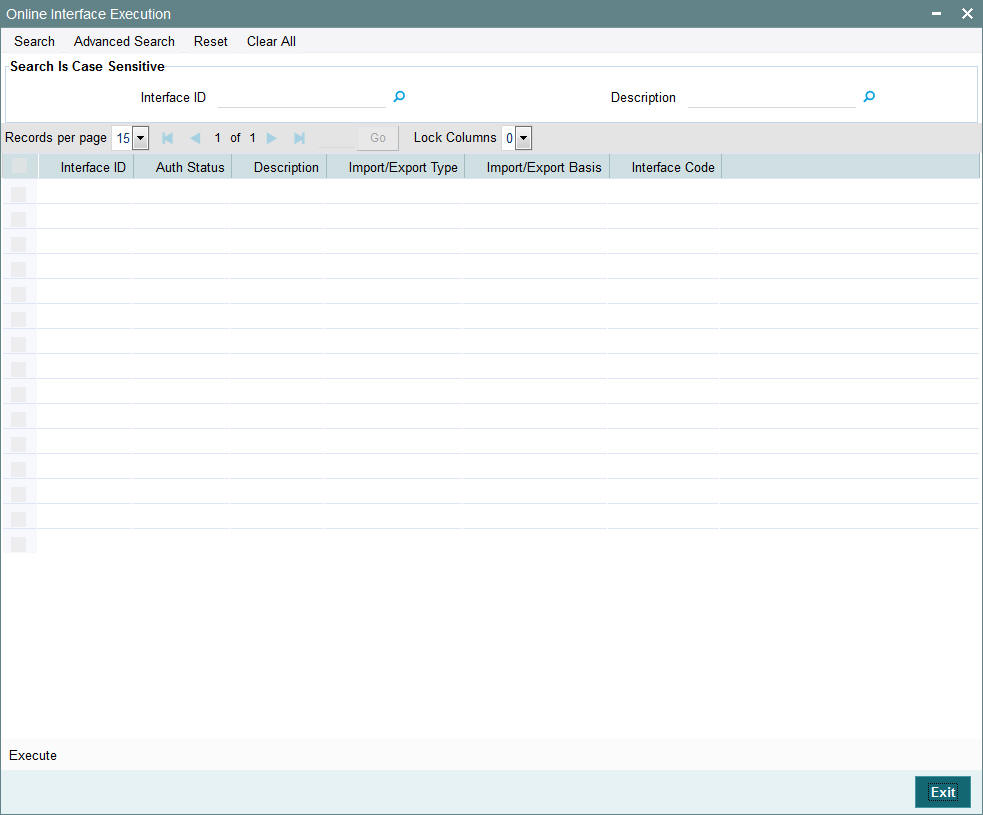
Interface ID
Alphanumeric; 16 Characters; Optional
Specify the interface ID.
Description
Alphanumeric; 255 Characters; Optional
Specify the description of the selected interface ID.
All the interface definitions available for processing are displayed in the Available Interface Definitions box. You can select any or all of these to be executed by highlighting them in the Available box and using the arrow buttons to move them to the Selected Interface Definitions box. After you have made the desired selections, click the Execute button. You must indicate that you want to continue with the processing. The selected interfaces are processed, and the system displays a message to indicate successful completion of the processing. If any errors result, you can view the same using the View Interface Error Log menu item in the Data Entry menu of the Fund Manager component.
Once tanking is enabled, the system will not fetch any record in the summary screen
To exit the screen without processing any selected interface definitions, click the Close button.
Note
The system will not support the processing of multiple files at same time.
5.3.2 Setting up Excel Export Parameterization
You can copy parameterization data from Oracle FLEXCUBE Investor Servicing environment to any other environment and vice versa. The data from Oracle FLEXCUBE Investor Servicing can be exported into an excel sheet or an XML format.
If ‘Excel Export Required’ option is checked for a function id in the ‘Function Description Maintenance’ screen then an ‘Export’ button is enabled in the summary screen of that function id. In the Summary screen you can query records based on the query parameters available and then select the required records to be exported and click ‘Export’ button. On clicking ‘Export’ button, system would export the data into an excel sheet and opens the excel sheet with data populated. You can then save the excel sheet.
Note
The records can be exported either in .XLS or .XLSX format. The format of the export file must be maintained in ‘CSTB_PARAM’ against the parameter ‘EXCEL_FORMAT’.
5.3.3 Invoking Excel Import Screen
You can invoke this screen by typing ‘CSDXLUPD’ in the field at the top right corner of the Application tool bar and clicking on the adjoining arrow button.
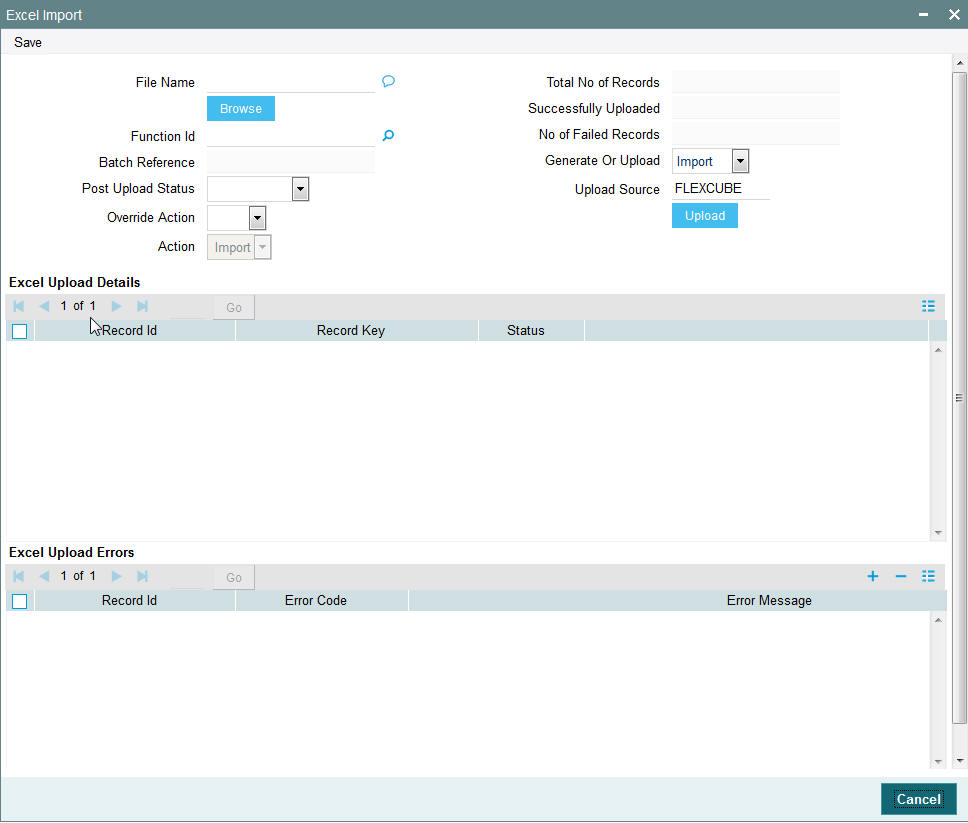
The following details are captured here:
File Name
Alphanumeric; 4000; Optional
Select the excel file to be imported by clicking ‘Browse’ button.
Click ‘Browse’ button to browse the file name.
Total No of Records
Display
The total number of records to be uploaded is displayed here.
Successfully Uploaded
Display
The system displays the number of successfully uploaded record.
No of Failed Records
Display
The total number of records which failed to get uploaded is displayed here.
Function ID
Alphanumeric; 8 Characters; Optional
The function ID mentioned in the excel file chosen is displayed here.
Batch Reference
Display
The unique reference number generated for an upload is displayed here.
Post Upload Status
Optional
Select the status to be set for the file post upload, from the drop-down list. The following statuses are available in the drop-down list:
- Authorized
- Unauthorized
- Hold
Override Action
Optional
Select the action to be taken if an override message is encountered, from the drop-down list. The following options are available:
- Ignore
- Error
Action
Display
The action is displayed here.
Generate or Upload
Optional
Select the action to be taken for importing the file, from the drop-down list. The following options are available for selection:
- Generate – Select this option if an XML has to be generated from the imported file. This will be stored in the path maintained in CSBT_PARAM parameter EXCEL_IMPORT_XML_SPOOL_AREA
- Upload – Select this option if the data has to be uploaded as an excel file itself.
Note
To start the upload process click ‘Upload’ button. Once you click this button system starts importing the data from the excel file.
Upload Source
Alphanumeric; 50 Characters; Optional
Specify the source code of the file to be used for generating the XML file. You need to specify the source if you have chosen ‘Generate’ option in the ‘Generate or Upload’ field.
Click ‘Upload’ button to upload the attached file.
Excel Upload Details
The following details are captured here:
Record Id
Display
The unique number of the record uploaded is displayed here.
Record Key
Display
The record key is displayed here.
Status
Display
The upload status of the record is displayed here.
Excel Upload Errors
Record Id
Alphanumeric; 255 Characters; Optional
Specify the unique number of the record, which encountered error while uploading.
Error Code
Alphanumeric; 40 Characters; Optional
Specify the error code corresponding to the error encountered during upload.
Error Message
Alphanumeric; 4000 Characters; Optional
Specify the error message corresponding to the error code displayed.
Clicking ‘Upload’ button, the system uploads the records maintained.
5.4 Scheduler Services
This section contains the following topics:
- Section 5.4.1, "Scheduler Services Description"
- Section 5.4.2, "Invoking Job Maintenance Screen"
- Section 5.4.3, "Task Details Button"
- Section 5.4.4, "Parameter Button"
5.4.1 Scheduler Services Description
Oracle FLEXCUBE Investor Servicing provides you with the facility of scheduling internal activities and having them executed as pre-programmed proceedings by the system. In the system, the Scheduler component facilitates such proceedings.
Typically, you can schedule any activity through the Scheduler Services. Some of these activities may be frequently occurring or recurrent activities, some activities may need to be initiated on demand, and some may be one-time activities.
To schedule activities using this Scheduler Service, you must
- Designate each activity, process or programmed executable unit that must be run as a task in the system.
- Define the objects that are to be run for the task to be completed, and also specify the required parameters for the object to be run.
- Schedule each defined task to be run at a desired frequency, either a time-based frequency or an event-based frequency.
- Authorize the job.
You may schedule jobs at a time-based frequency (simple or cron), or you may require them to be executed every time a business event occurs in the system. Accordingly, an event is an occurrence of a business proceeding in the system, such as allocation, or dividend declaration, or the End of Day procedures.
All business proceedings in the system that must be designated as events are pre-defined, according to the requirements at each installation, by the implementers. No new definitions of events are possible after this.
At the Security Management component, you can access all the Scheduler Services from the following menu categories:
- The Job Maintenance (Detail and Summary) screens from the Maintenance menu category
- The Jobs (Summary) screens from the Maintenance menu category
5.4.2 Invoking Job Maintenance Screen
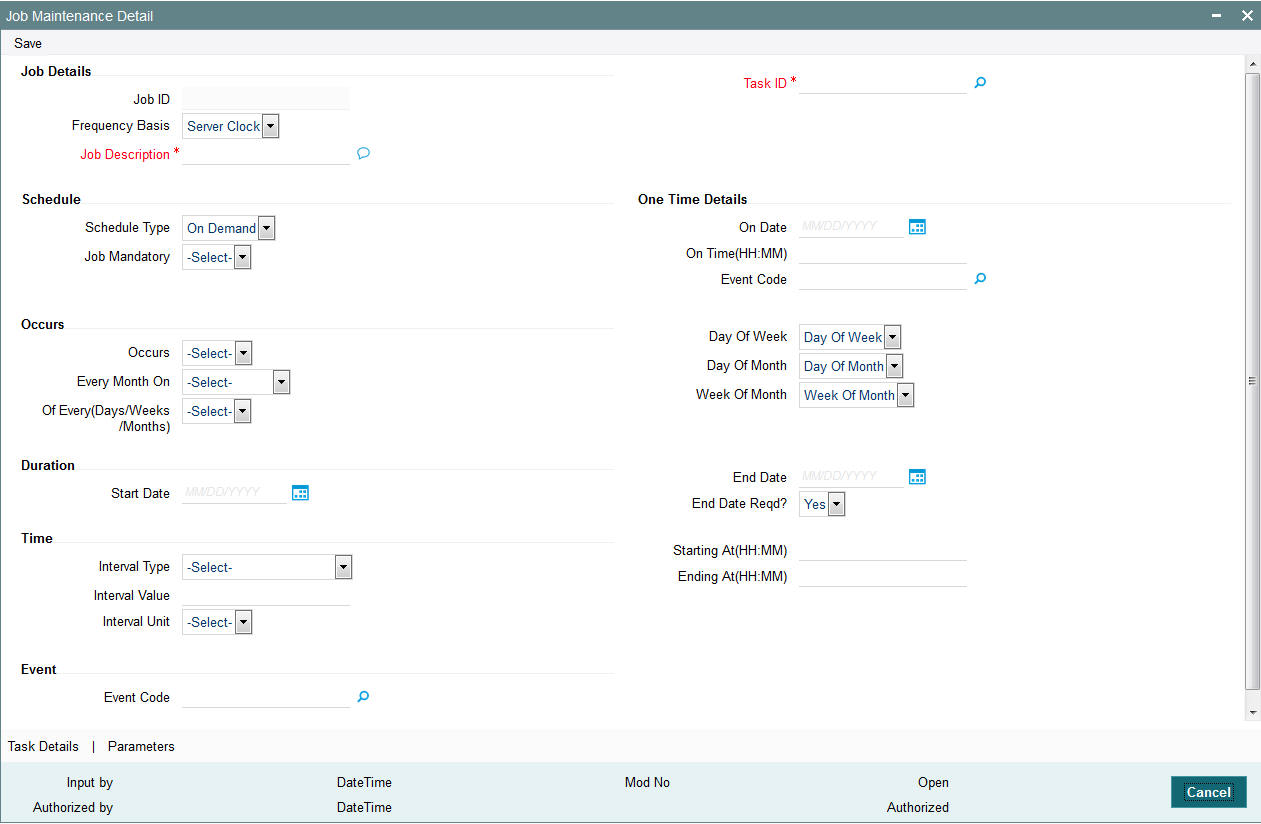
A job is a business activity which the system performs repeatedly on timely basis. Oracle FLEXCUBE enables you to define a job and schedule it using ‘Job Maintenance’ screen. You can invoke this screen by typing ‘UTDJOB’ in the field at the top right corner of the Application tool bar and clicking on the adjoining arrow button.
You can specify the following fields in this screen.
Job Details
Job ID
Display
The system displays the unique code to identify the Job.
Task ID
Alphanumeric; 16 Characters; Mandatory
Specify the task ID.
Frequency Basis
Optional
Select the frequency basis from the drop-down list. The list displays the following options:
- Server Clock
- Client Clock
- Event Based
Job Description
Alphanumeric; 255 Characters; Mandatory
Specify a brief description of what the job is supposed to do.
Schedule
Schedule Type
Optional
Select the type of schedule from the drop-down list. The list displays the following values:
- On Demand
- One Time
- Recurring
Job Mandatory
Optional
Select if job is mandatory or not from the drop-down list. The following options are available for selection:
- Yes
- No
One Time Details
On Date
Date Format; Optional
Select on date from the adjoining calendar.
On Time(HH:MM)
Time Format; Optional
Select the time.
Event Code
Alphanumeric; 50 Characters; Optional
Specify the event code.
Occurs
Occurs
Optional
Select the occurrences from the drop-down list. The list displays the following values:
- Daily
- Weekly
- Monthly
Every Month On
Optional
Select the monthly occurrences from the drop-down list. The list displays the following values:
- Specific Day
- Specific Week
Of Every(Days/Weeks/Months)
Optional
Select the monthly occurrences from the drop-down list. The list displays the following values:
- 1
- 2
- 3
- 4
- 5
- 6
- 7
- 8
- 9
- 10
- 11
- 12
Day Of Week
Optional
Select the day of week from the drop-down list. The list displays the following values:
- Day Of Week
- Sunday
- Monday
- Tuesday
- Wednesday
- Thursday
- Friday
- Saturday
Day Of Month
Optional
Select the day of month from the drop-down list.
Week Of Month
Optional
Select the week of the month from the drop-down list:
Week of Month
- 1
- 2
- 3
- 4
- 5
Duration
Start Date
Date Format; Optional
Specify the start date.
End Date
Date Format; Optional
Specify the end date.
End Date Reqd?
Optional
Select if end date is required or not from the drop-down list.
Time
Interval Type
Optional
Select the interval type from the drop-down list.
- Occurs Once At (HH:MM)
- Occurs Every
Interval Value
Alphanumeric; 4 Characters; Optional
Specify the interval value.
Interval Unit
Optional
Select the interval unit from the drop-down list.
- Hours
- Minutes
Starting At(HH:MM)
Numeric; 5 Characters; Optional
Specify the starting time details.
Ending At(HH:MM)
Numeric; 5 Characters; Optional
Specify the ending time details.
Event
Event Code
Alphanumeric; 50 Characters; Optional
Specify the event code.
5.4.3 Task Details Button
Click ‘Task Details’ button in ‘Job Maintenance Detail’ screen to invoke the following screen:
You can specify the following details:
Task Details
Task ID
Alphanumeric; 16 Characters; Mandatory
Specify the task ID.
Description
Display
The system displays the description for the selected task ID.
Report Burst Details
The system displays the following values:
- Table Name
- Condition
- Burst Field
- Burst Parameter
Click ‘Execute’ button to apply conditions and view parameters.
Click ‘Condition’ button to view the conditions.
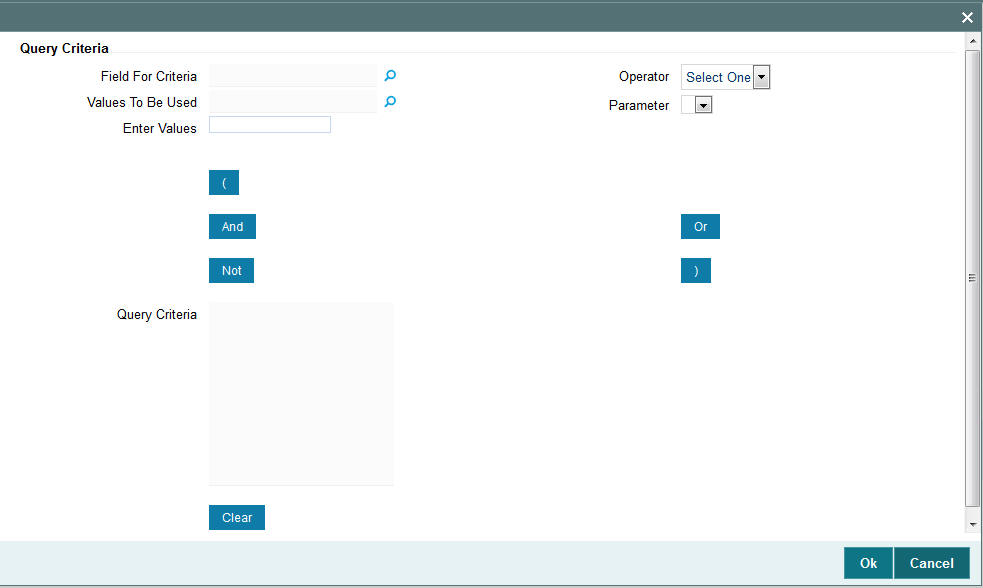
You can specify the following values:
Query Criteria
Field For Criteria
Alphanumeric; Optional
Specify the field for criteria.
Values To Be Used
Alphanumeric; Optional
Specify the values to be used.
Enter Values
Alphanumeric; Optional
Specify the values to be entered.
Operator
Optional
Select the operator from the drop-down list. The list displays the following list:
- =
- <>
- <=
- <
- >=
- >
- Like
- Not Like
Parameter
Optional
Select the parameters.
Query Criteria
Optional
Specify the query criteria by selecting the required parameters such as (, And, Not, Or, )
5.4.4 Parameter Button
You can specify the job specific parameters, which are passed to job class or procedure at runtime. The following details are captured here:
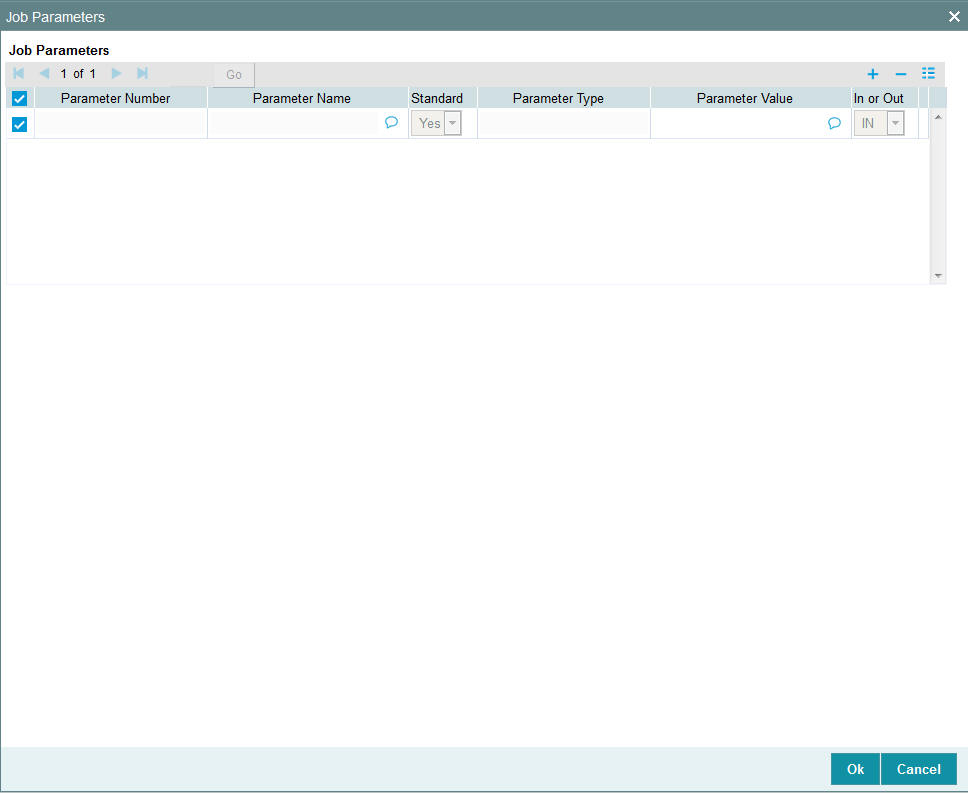
Parameter Number
Display
The system displays the parameter number.
Parameter Name
Alphanumeric; 255 Characters; Optional
Specify the name of the job parameter. The parameter name you specify here is passed to job class or procedure at run time.
Standard
Optional
Select the standard type from the drop-down list.
Parameter Type
Alphanumeric; 20 Characters; Optional
Specify the data type of the parameter.
Parameter Value
Alphanumeric; 255 Characters; Optional
Specify the value of the parameter.
In or Out
Optional
Select if the parameters are in or out from the drop-down list.
5.5 Job Maintenance Summary Screen
This section contains the following topics:
- Section 5.5.1, "Invoking Job Maintenance Summary Screen"
- Section 5.5.2, "Retrieving Record in Job Maintenance Summary Screen"
- Section 5.5.3, "Editing Record in Job Maintenance Summary Screen"
- Section 5.5.4, "Viewing Job Maintenance Record"
- Section 5.5.5, "Deleting Job Maintenance Record"
- Section 5.5.6, "Authorizing Job Maintenance Record"
- Section 5.5.7, "Amending Job Maintenance Record"
- Section 5.5.8, "Authorizing Amended Job Maintenance record"
5.5.1 Invoking Job Maintenance Summary Screen
You can perform the following operations in the Job Maintenance Summary screen:
5.5.2 Retrieving Record in Job Maintenance Summary Screen
You can retrieve a previously entered record in the Summary Screen, as follows:
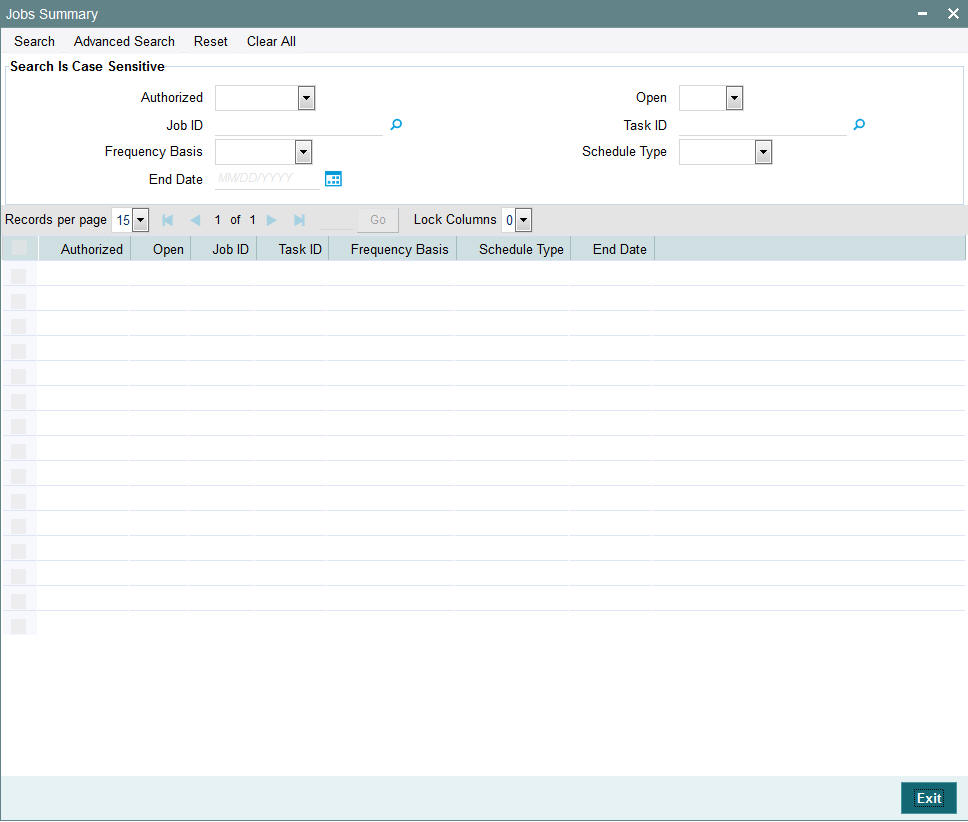
Invoke the ‘Job Maintenance Summary’ screen by typing ‘UTSJOB’ in the field at the top right corner of the Application tool bar and clicking on the adjoining arrow button and specify any or all of the following details in the corresponding fields:
- The status of the record in the Authorized field. If you choose the ‘Blank Space’ option, then all the records are retrieved.
- The status of the record in the Open field. If you choose the ‘Blank Space’ option, then all records are retrieved
- Job ID
- Task ID
- Frequency Basis
- Scheduler Type
- End Date
Click ‘Search’ button to view the records. All the records with the specified details are retrieved and displayed in the lower portion of the screen.
5.5.3 Editing Record in Job Maintenance Summary Screen
You can modify the details of a record in Job Maintenance record that you have already entered into the system, provided it has not been subsequently authorized. You can perform this operation as follows:
- Invoke the Job Maintenance Summary screen from the Browser.
- Select the status of the record that you want to retrieve for modification in the Authorized field. You can only modify records that are unauthorized. Accordingly, choose the unauthorized option.
- Specify any or all of the details in the corresponding fields to retrieve the record that is to be modified.
- Click ‘Search’ button. All unauthorized records with the specified details are retrieved and displayed in the lower portion of the screen.
- Double click the record that you want to modify in the list of displayed records. The Job Maintenance Detail screen is displayed.
- Select Unlock Operation from the Action list to modify the record. Modify the necessary information.
- Click Save to save your changes. The Job Maintenance Detail screen is closed and the changes made are reflected in the Job Maintenance Summary screen.
5.5.4 Viewing Job Maintenance Record
To view a record that you have previously input, you must retrieve the same in the Job Maintenance Summary screen as follows:
- Invoke the Job Maintenance Summary screen from the Browser.
- Select the status of the record that you want to retrieve for modification in the Authorized field.
- Specify any or all of the details in the corresponding fields to retrieve the record that is to be modified.
- Click ‘Search’ button. All records with the specified details are retrieved and displayed in the lower portion of the screen.
- Double click the record that you want to modify in the list of displayed records. The Job Maintenance Detail screen is displayed.
5.5.5 Deleting Job Maintenance Record
You can delete only unauthorized records in the system. To delete a record that you have previously entered:
- Invoke the Job Maintenance Summary screen from the Browser.
- Select the status of the record that you want to retrieve for modification in the Authorized field.
- Specify any or all of the details in the corresponding fields to retrieve the record that is to be modified.
- Click ‘Search’ button. All records with the specified details are retrieved and displayed in the lower portion of the screen.
- Double click the record that you want to modify in the list of displayed records. The Job Maintenance Detail screen is displayed.
- Select Delete Operation from the Action list. The system prompts you to confirm the deletion and the record is physically deleted from the system database.
5.5.6 Authorizing Job Maintenance Record
An unauthorized Job Maintenance record must be authorized in the system for it to be processed. To authorize a record:
- Invoke the Job Maintenance Summary screen from the Browser.
- Select the status of the record that you want to retrieve for modification in the Authorized field. You can only authorize unauthorized records. Accordingly, choose the unauthorized option.
- Specify any or all of the details in the corresponding fields to retrieve the record that is to be modified.
- Click ‘Search’ button. All unauthorized records with the specified details are retrieved and displayed in the lower portion of the screen.
- Double click the record that you want to modify in the list of displayed records. The Job Maintenance Detail screen is displayed.
- Select Authorize operation from the Action List.
When a checker authorizes a record, details of validation, if any, that were overridden by the maker of the record during the Save operation are displayed. If any of these overrides results in an error, the checker must reject the record.
5.5.7 Amending Job Maintenance Record
After a Job Maintenance record is authorized, it can be modified using the Unlock operation from the Action List. To make changes to a record after authorization:
- Invoke the Job Maintenance Summary screen from the Browser.
- Select the status of the record that you want to retrieve for authorization. You can only amend authorized records.
- Specify any or all of the details in the corresponding fields on the screen.
- Click ‘Search’ button. All records with the specified details that are pending authorization are retrieved and displayed in the lower portion of the screen.
- Double click the record that you wish to authorize. The Job Maintenance Detail screen is displayed in amendment mode. Select Unlock operation from the Action List to amend the record.
- Amend the necessary information and click on Save to save the changes.
5.5.8 Authorizing Amended Job Maintenance record
An amended Job Maintenance must be authorized for the amendment to be made effective in the system. The authorization of amended records can be done only from Fund Manager Module and Agency Branch module.
The subsequent process of authorization is the same as that for normal transactions..
5.6 Scheduling Jobs
This section contains the following topics:
5.6.1 Scheduling Jobs
All jobs for scheduling are stored in a static data store and each job is associated with a name indicating where the job has to execute. Jobs are created in the Application Server and are scheduled based on this data.
Note
The job name should be unique across the schedulers available in the system.
When the application server starts, the job details from static data store will get cached. These cached jobs will then be scheduled using either the quartz or flux scheduler.
For example, the notification process can be handled by the job schedulers as follows:
- When a contract is created in Oracle FLEXCUBE, a database level trigger acting on the contract main table inserts details like base table name, primary key fields, primary key values and branch code into a notification log table and sets the process status of the inserted record as ‘U’ (unprocessed).
- The scheduled job polls the notification log table for unprocessed records and validates whether notification is required.
- If notification is not required, then the process status is set to ‘N’ (not required) in notification log table.
- If notification is required then notifications are sent to the respective destination and the process status of the record is changed to ‘P’ (Processed) in notification log table.
5.6.2 Controlling Jobs
The details of jobs that are scheduled can be viewed using the ‘Job Details’ screen. In this screen you can pause or resume a job that has been scheduled. You can invoke the ‘Job Details’ screen by typing ‘SMSJOBBR’ in the field at the top right corner of the Application tool bar and clicking the adjoining arrow button.
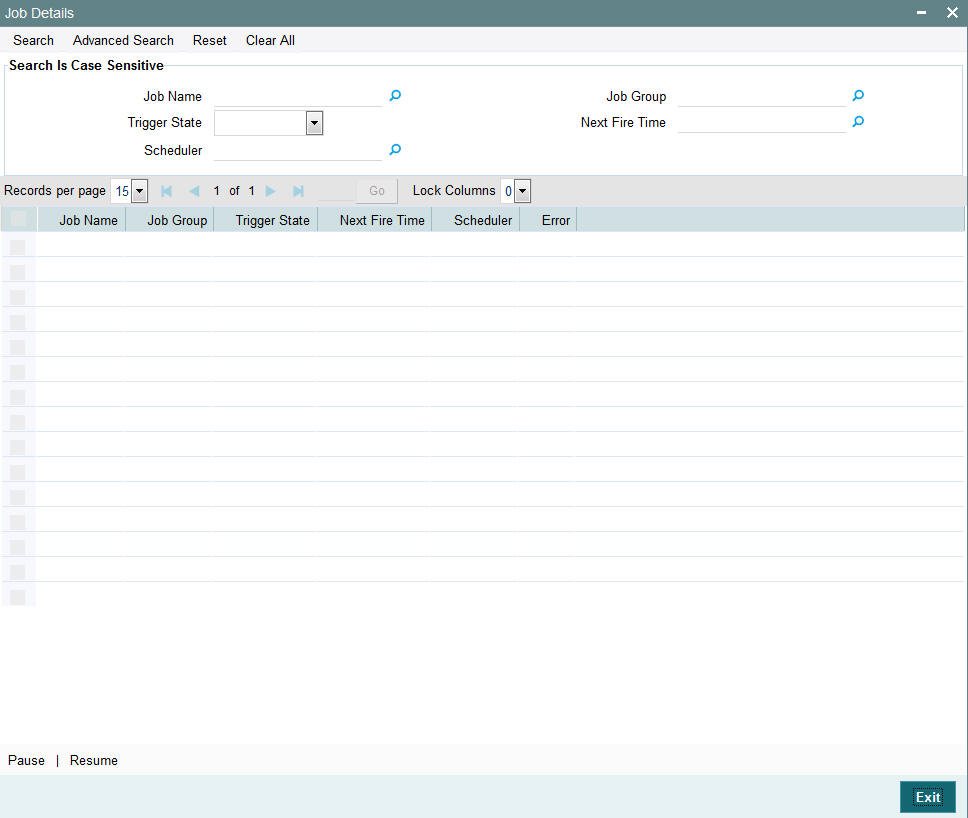
You can a search for a scheduled job by specifying any of the following:
Job Name
Alphanumeric; 100 Characters; Optional
Select the name of the job that you want to search for from the option list provided.
Trigger State
Optional
Select the state of the job you want to search for from the option list provided. The following options are possible for Quartz schedulers:
- Not Scheduled
- Scheduled
- Paused
- Complete
- Error
Scheduler
Alphanumeric; 100 Characters; Optional
Select the scheduler to which the job you want to search for has been assigned.
Job Group
Alphanumeric; 200 Characters; Optional
Select the group to which the job you want to search for belongs, from the option list provided.
Next Fire Time
Numeric; 22 Characters; Optional
Select the time when the job is scheduled to be run next.
Click ‘Search’ button to view the details related to the job. You can pause a job by selecting it and clicking the ‘Pause’ button.
You can resume a paused job by clicking ‘Resume’ button and the job is scheduled for its next fire time.
A job can take any of the following states.
- COMPLETE - This indicates that the trigger does not have remaining fire-times in its schedule.
- NORMAL - This indicates that the trigger is in the "normal" state.
- BLOCKED - A job trigger arrives at the blocked state when the job that it is associated with is a ‘Stateful’ job and it is currently executing.
- PAUSED - This indicates that the job is manually paused from executing.
- ERROR - A job trigger arrives at the error state when the scheduler attempts to fire it, but cannot due to an error creating and executing its related job. Also, a job arrives at ERROR state when the associated class for the job is not present in class path.
5.7 Interface with External Asset Management Systems
Oracle FLEXCUBE Investor Servicing provides a facility that enables you to effect data exchanges with an external accounting system. You can export transaction and dividend information to this accounting system and import the NAV or the NAV per unit from this external system. Typically, the accounting system is Oracle FLEXCUBE Securities.
You must perform the following in order to configure the system to effect the export or import of accounting system information:
- Map the internal FCIS codes with their corresponding codes in Oracle FLEXCUBE Securities system. These codes could be accounting system codes, or load component codes.
- Set up the import options for NAV, for each fund.
To configure the system for the interface with FLEXCUBE Securities or any external accounting system, use the following screens available in the Browser:
- Asset Management NAV Import Setup
- Accounting System General Ledger Setup
- Accounting System Component Setup
5.8 Accounting System Component Setup
This section contains the following topics:
5.8.1 Invoking Accounting System Component Setup
You can use this screen in the Fund Manager Browser.
- Map the codes in the FCIS system to the corresponding accounting system codes in Oracle FLEXCUBE Securities system
- Edit existing mappings
- Delete mappings
- Add new mappings
You can invoke the ‘Accounting System Component Setup Detail’ screen by typing ‘UTDACSYC’ in the field at the top right corner of the Application tool bar and clicking on the adjoining arrow button.

When you open this screen, all the codes that have already been mapped are displayed.
Accounting System Component Mapping
FCIS Code
Mandatory
Select the FCIS code that must be mapped to an accounting system code in FLEXCUBE Securities from the drop down list. The list displays the following values:
- Net Div
- Dic Amt
- Net Reinv
- Tax Amt
- Gross Amt
- Net Amt
- Net Inc
- Net Fee
Account System Component Details
AMC Code
Alphanumeric; 10 Characters; Mandatory
Specify the AMC code.
Transaction Type
Optional
Select the transaction type pertaining to the selected FCIS code, from the drop down list. If you do not select a transaction type in this field, then it is reckoned that the mapping will apply to all transaction types.
Description
Alphanumeric, 255 Characters; Optional
Describe the accounting system code in a few words.
5.9 Accounting System Component Setup Summary
This section contains the following topics:
- Section 5.9.1, "Retrieving a Record in Accounting System Component Setup Summary Screen"
- Section 5.9.2, "Editing Accounting System Component Setup Record"
- Section 5.9.3, "Viewing Accounting System Component Setup Record "
- Section 5.9.4, "Deleting Accounting System Component Setup Record"
- Section 5.9.5, "Authorizing Accounting System Component Setup Record "
- Section 5.9.6, "Amending Accounting System Component Setup Record "
- Section 5.9.7, "Authorizing Amended Accounting System Component Setup Record "
5.9.1 Retrieving a Record in Accounting System Component Setup Summary Screen
You can retrieve a previously entered record in the Summary Screen, as follows:
Invoke the ‘Accounting System Component Setup Summary’ screen by typing ‘UTSACSYC’ in the field at the top right corner of the Application tool bar and clicking on the adjoining arrow button and specify any or all of the following details in the corresponding details
- The status of the record in the Authorization Status field. If you choose the ‘Blank Space’ option, then all the records are retrieved.
- The status of the record in the Record Status field. If you choose the ‘Blank Space’ option, then all records are retrieved
- FCIS Code
- AMC Code
- Transaction Type
Click ‘Search’ button to view the records. All the records with the specified details are retrieved and displayed in the lower portion of the screen.
Note
You can also retrieve the individual record detail from the detail screen by querying in the following manner:
- Press F7
- Input the Transaction Type
- Press F8
You can perform Edit, Delete, Amend, Authorize, Reverse, Confirm operations by selecting the operation from the Action list. You can also search a record by using a combination of % and alphanumeric value
5.9.2 Editing Accounting System Component Setup Record
You can modify the details of Accounting System Component Setup record that you have already entered into the system, provided it has not subsequently authorized. You can perform this operation as follows:
- Invoke the Accounting System Component Setup Summary screen from the Browser.
- Select the status of the record that you want to retrieve for modification in the Authorization Status field. You can only modify records that are unauthorized. Accordingly, choose the Unauthorized option.
- Specify any or all of the details in the corresponding fields to retrieve the record that is to be modified.
- Click ‘Search’ button. All unauthorized records with the specified details are retrieved and displayed in the lower portion of the screen.
- Double click the record that you want to modify in the list of displayed records. The Accounting System Component Setup Detail screen is displayed.
- Select Unlock Operation from the Action list to modify the record. Modify the necessary information.
Click Save to save your changes. The Accounting System Component Setup Detail screen is closed and the changes made are reflected in the Accounting System Component Setup Summary screen.
5.9.3 Viewing Accounting System Component Setup Record
To view a record that you have previously input, you must retrieve the same in the Accounting System Component Setup Summary screen as follows:
- Invoke the Accounting System Component Setup Summary screen from the Browser.
- Select the status of the record that you want to retrieve for viewing in the Authorization Status field. You can also view all records that are either unauthorized or authorized only, by choosing the unauthorized / Authorized option.
- Specify any or all of the details of the record in the corresponding fields on the screen.
- Click ‘Search’ button. All records with the specified fields are retrieved and displayed in the lower portion of the screen.
- Double click the record that you want to view in the list of displayed records. The Accounting System Component Setup Detail screen is displayed in View mode.
5.9.4 Deleting Accounting System Component Setup Record
You can delete only unauthorized records in the system. To delete a record that you have previously entered:
- Invoke the Accounting System Component Setup Summary screen from the Browser.
- Select the status of the record that you want to retrieve for deletion.
- Specify any or all of the details in the corresponding fields on the screen.
- Click ‘Search’ button. All records with the specified fields are retrieved and displayed in the lower portion of the screen.
- Double click the record that you want to delete in the list of displayed records. The Accounting System Component Setup Detail screen is displayed.
- Select Delete Operation from the Action list. The system prompts you to confirm the deletion and the record is physically deleted from the system database.
5.9.5 Authorizing Accounting System Component Setup Record
- An unauthorized Accounting System Component Setup record must be authorized in the system for it to be processed. To authorize a record:
- Invoke the Accounting System Component Setup Summary screen from the Browser.
- Select the status of the record that you want to retrieve for authorization. Typically, choose the unauthorized option.
- Specify any or all of the details in the corresponding fields on the screen.
- Click ‘Search’ button. All records with the specified details that are pending authorization are retrieved and displayed in the lower portion of the screen.
- Double click the record that you wish to authorize. The Accounting System Component Setup Detail screen is displayed. Select Authorize operation from the Action List.
When a checker authorizes a record, details of validation, if any, that were overridden by the maker of the record during the Save operation are displayed. If any of these overrides results in an error, the checker must reject the record.
5.9.6 Amending Accounting System Component Setup Record
After a Accounting System Component Setup record is authorized, it can be modified using the Unlock operation from the Action List. To make changes to a record after authorization:
- Invoke the Accounting System Component Setup Summary screen from the Browser.
- Select the status of the record that you want to retrieve for authorization. You can only amend authorized records.
- Specify any or all of the details in the corresponding fields on the screen.
- Click ‘Search’ button. All records with the specified details that are pending authorization are retrieved and displayed in the lower portion of the screen.
- Double click the record that you wish to authorize. The Accounting System Component Setup Detail screen is displayed in amendment mode. Select Unlock operation from the Action List to amend the record.
- Amend the necessary information and click on Save to save the changes
5.9.7 Authorizing Amended Accounting System Component Setup Record
An amended Accounting System Component Setup record must be authorized for the amendment to be made effective in the system. The authorization of amended records can be done only from Fund Manager Module and Agency Branch module.
The subsequent process of authorization is the same as that for normal transactions.
5.10 Asset Management Import NAV Setup
This section contains the following topics:
5.10.1 Invoking the Asset Management NAV Detail
You can use this screen in the Administration menu category of the Fund Manager component to
- Set up the options that will govern the import of NAV from FLEXCUBE Securities, for any given fund.
- Edit the options that have been set up already for a fund
- Delete the options
Before you import the NAV for a fund, you must specify these import options in this screen.
You can invoke Asset Management NAV Detail screen by typing ‘UTDAMNAV’ in the field at the top right corner of the Application tool bar and click the adjoining arrow.
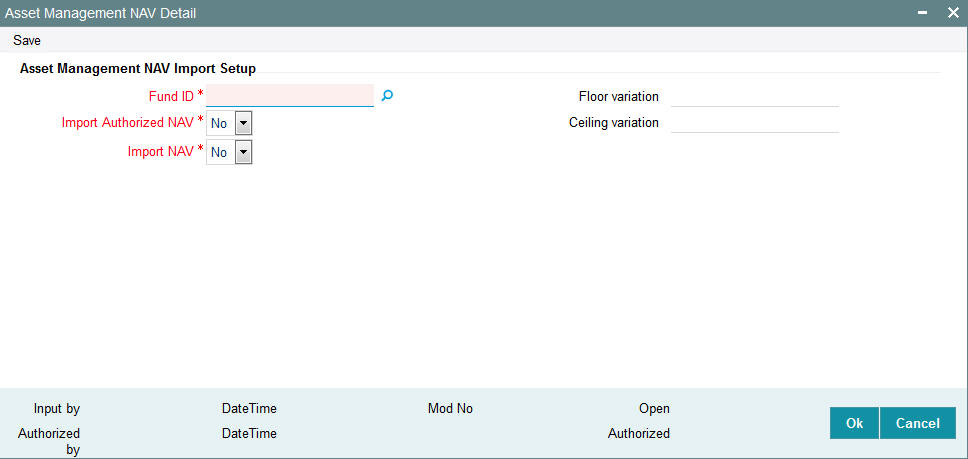
Fund ID
Alphanumeric, 6 Characters; Mandatory
Select the fund for which you are specifying the NAV import options in this record.
Import Authorized NAV
Mandatory
Select whether the NAV is to be imported as authorized information or not from the drop-down list. The list displays the following values:
- Yes
- No
If you specify an import that is unauthorized, the same will have to be authorized normally as part of the authorization of fund prices in the system.
By default, NAV is imported as authorized information.
Import NAV
Mandatory
Select whether the NAV must be imported or not from the drop-down list. The list displays the following values:
- Yes
- No
Floor Variation
Numeric; 7 Characters; Optional
Specify the applicable floor variation (as a percentage) for the imported NAV.
Ceiling Variation
Numeric; 7 Characters; Optional
Specify the applicable ceiling variation (as a percentage) for the imported NAV.
If you do not specify the applicable floor and ceiling variations in this screen, these values are reckoned by the system from the specifications in the Fund Price screen record for the same fund.
5.11 Asset Management NAV Summary Screen
This section contains the following topics:
- Section 5.11.1, "Retrieving a Record in Asset Management NAV Summary Screen"
- Section 5.11.2, "Editing Asset Management NAV Record"
- Section 5.11.3, "Viewing Asset Management NAV Record"
- Section 5.11.4, "Deleting Asset Management NAV Record"
- Section 5.11.5, "Authorizing Asset Management NAV Record"
- Section 5.11.6, "Amending Asset Management NAV Record"
- Section 5.11.7, "Authorizing Amended Asset Management NAV Record"
5.11.1 Retrieving a Record in Asset Management NAV Summary Screen
You can retrieve a previously entered record in the Summary Screen, as follows:
You can invoke ‘Asset Management NAV Summary’ screen by typing ‘UTSAMNAV’ in the field at the top right corner of the Application tool bar and click the adjoining arrow.
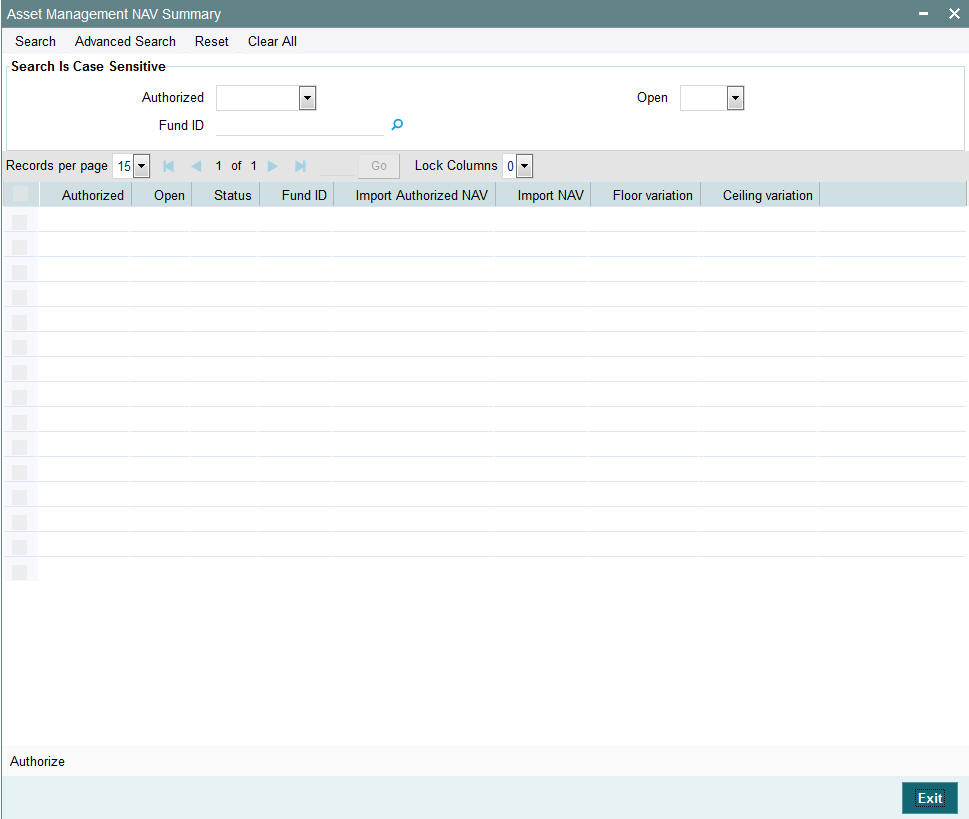
- The status of the record in the Authorized Status field. If you choose the ‘Blank Space’ option, then all the records are retrieved.
- The status of the record in the Open Status field. If you choose the ‘Blank Space’ option, then all records are retrieved
- Fund ID
Click ‘Search’ button to view the records. All the records with the specified details are retrieved and displayed in the lower portion of the screen.
Note
You can also retrieve the individual record detail from the detail screen by querying in the following manner:
- Press F7
- Input the Fund ID
- Press F8
You can perform Edit, Delete, Amend, Authorize, Reverse, Confirm operations by selecting the operation from the Action list. You can also search a record by using a combination of % and alphanumeric value
5.11.2 Editing Asset Management NAV Record
You can modify the details of Asset Management NAV record that you have already entered into the system, provided it has not subsequently authorized. You can perform this operation as follows:
- Invoke the Asset Management NAV Summary screen from the Browser.
- Select the status of the record that you want to retrieve for modification in the Authorization Status field. You can only modify records that are unauthorized. Accordingly, choose the Unauthorized option.
- Specify any or all of the details in the corresponding fields to retrieve the record that is to be modified.
- Click ‘Search’ button. All unauthorized records with the specified details are retrieved and displayed in the lower portion of the screen.
- Double click the record that you want to modify in the list of displayed records. The Asset Management NAV Detail screen is displayed.
- Select Unlock Operation from the Action list to modify the record. Modify the necessary information.
Click Save to save your changes. The Asset Management NAV Detail screen is closed and the changes made are reflected in the Asset Management NAV Summary screen.
5.11.3 Viewing Asset Management NAV Record
To view a record that you have previously input, you must retrieve the same in the Asset Management NAV Summary screen as follows:
- Invoke the Asset Management NAV Summary screen from the Browser.
- Select the status of the record that you want to retrieve for viewing in the Authorization Status field. You can also view all records that are either unauthorized or authorized only, by choosing the unauthorized / Authorized option.
- Specify any or all of the details of the record in the corresponding fields on the screen.
- Click ‘Search’ button. All records with the specified fields are retrieved and displayed in the lower portion of the screen.
- Double click the record that you want to view in the list of displayed records. The Asset Management NAV Detail screen is displayed in View mode.
5.11.4 Deleting Asset Management NAV Record
You can delete only unauthorized records in the system. To delete a record that you have previously entered:
- Invoke the Asset Management NAV Summary screen from the Browser.
- Select the status of the record that you want to retrieve for deletion.
- Specify any or all of the details in the corresponding fields on the screen.
- Click ‘Search’ button. All records with the specified fields are retrieved and displayed in the lower portion of the screen.
- Double click the record that you want to delete in the list of displayed records. The Asset Management NAV Detail screen is displayed.
- Select Delete Operation from the Action list. The system prompts you to confirm the deletion and the record is physically deleted from the system database.
5.11.5 Authorizing Asset Management NAV Record
- An unauthorized Asset Management NAV record must be authorized in the system for it to be processed. To authorize a record:
- Invoke the Asset Management NAV Summary screen from the Browser.
- Select the status of the record that you want to retrieve for authorization. Typically, choose the unauthorized option.
- Specify any or all of the details in the corresponding fields on the screen.
- Click ‘Search’ button. All records with the specified details that are pending authorization are retrieved and displayed in the lower portion of the screen.
- Double click the record that you wish to authorize. The Asset Management NAV Detail screen is displayed. Select Authorize operation from the Action List.
When a checker authorizes a record, details of validation, if any, that were overridden by the maker of the record during the Save operation are displayed. If any of these overrides results in an error, the checker must reject the record.
5.11.6 Amending Asset Management NAV Record
After a Asset Management NAV record is authorized, it can be modified using the Unlock operation from the Action List. To make changes to a record after authorization:
- Invoke the Asset Management NAV Summary screen from the Browser.
- Select the status of the record that you want to retrieve for authorization. You can only amend authorized records.
- Specify any or all of the details in the corresponding fields on the screen.
- Click ‘Search’ button. All records with the specified details that are pending authorization are retrieved and displayed in the lower portion of the screen.
- Double click the record that you wish to authorize. The Asset Management NAV Detail screen is displayed in amendment mode. Select Unlock operation from the Action List to amend the record.
- Amend the necessary information and click on Save to save the changes
5.11.7 Authorizing Amended Asset Management NAV Record
An amended Asset Management NAV record must be authorized for the amendment to be made effective in the system. The authorization of amended records can be done only from Fund Manager Module and Agency Branch module.
The subsequent process of authorization is the same as that for normal transactions.
5.12 UH NAV Alert Setup Detail
This section contains the following topics:
5.12.1 Invoking UH NAV Alert Setup Detail Screen
You can configure the NAV alerts for a fund using ‘UH NAV Alert Setup Detail’ screen. You can invoke this screen by typing ‘UTDUHNAV’ in the field at the top right corner of the Application tool bar and clicking on the adjoining arrow button.
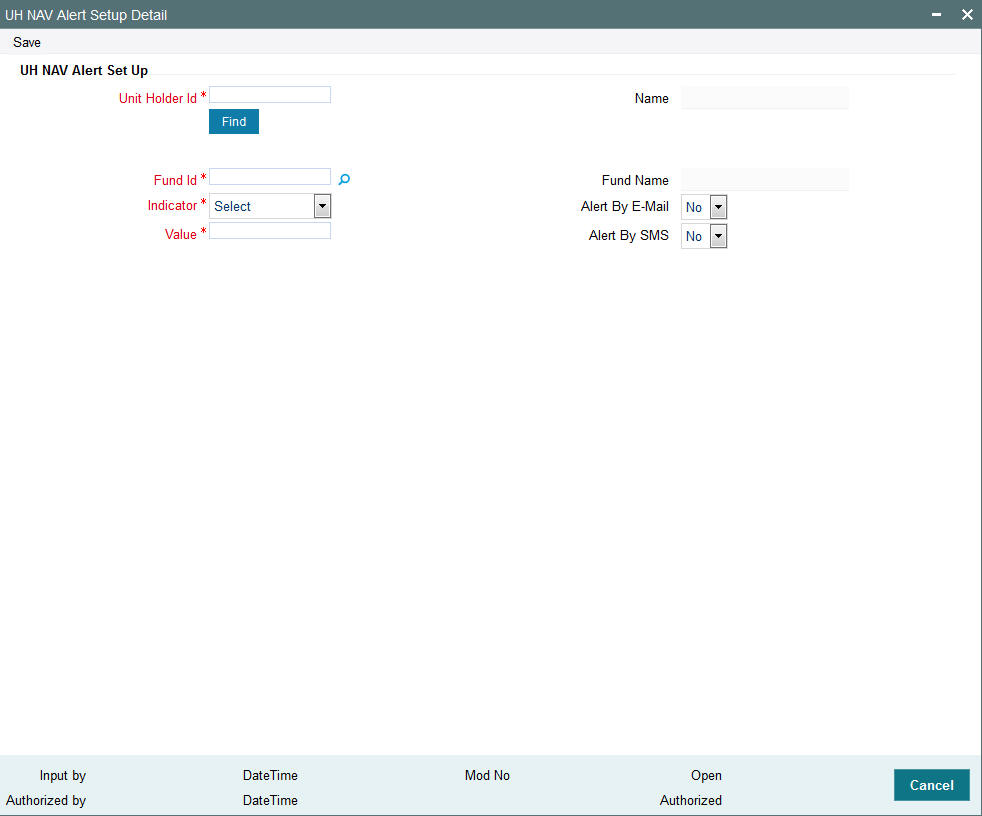
You can specify the following details:
UH NAV Alert Set Up
Unit Holder ID
Alphanumeric; 12 Characters; Mandatory
Specify the unit holder ID. You can query for unit holder ID by clicking ‘Fund’ button.
Name
Display
The system displays the name of the unit holder for the selected unit holder ID.
Fund ID
Alphanumeric; 6 Characters; Mandatory
Specify the fund ID. Alternatively, you can select fund ID from the option list. The list displays all valid fund ID maintained in the system.
Fund Name
Display
The system displays the name of the selected fund ID.
Indicator
Mandatory
Select the indicator from the drop-down list. The list displays the following values:
- Less
- Less or Equal
- Greater
- Greater or Equal
Value
Numeric; 30 Characters; Optional
Specify the NAV value.
Alert By E-Mail
Optional
Select ‘if alert has to be received by e-mail or not from the drop-down list. The list displays the following values:
- Yes
- No
Alert By SMS
Optional
Select ‘if alert has to be received by e-mail or not from the drop-down list. The list displays the following values:
- Yes
- No
5.13 UH NAV Alert Setup Summary Screen
This section contains the following topics:
- Section 5.13.1, "Retrieving a Record in UH NAV Alert Setup Summary Screen"
- Section 5.13.2, "Editing UH NAV Alert Record"
- Section 5.13.3, "Viewing UH NAV Alert Record"
- Section 5.13.4, "Deleting UH NAV Alert Record"
- Section 5.13.5, "Authorizing UH NAV Alert Record"
- Section 5.13.6, "Amending UH NAV Alert Record"
- Section 5.13.7, "Authorizing Amended UH NAV Alert Record"
5.13.1 Retrieving a Record in UH NAV Alert Setup Summary Screen
You can retrieve a previously entered record in the Summary Screen, as follows:
You can invoke ‘UH NAV Asset Setup Summary’ screen by typing ‘UTSUHNAV’ in the field at the top right corner of the Application tool bar and click the adjoining arrow.

- The status of the record in the Authorized Status field. If you choose the ‘Blank Space’ option, then all the records are retrieved.
- The status of the record in the Open Status field. If you choose the ‘Blank Space’ option, then all records are retrieved
- Unit Holder ID
- Fund ID
Click ‘Search’ button to view the records. All the records with the specified details are retrieved and displayed in the lower portion of the screen.
Note
You can also retrieve the individual record detail from the detail screen by querying in the following manner:
- Press F7
- Input the Fund ID
- Press F8
You can perform Edit, Delete, Amend, Authorize, Reverse, Confirm operations by selecting the operation from the Action list. You can also search a record by using a combination of % and alphanumeric value
5.13.2 Editing UH NAV Alert Record
You can modify the details of UH NAV Asset Setup record that you have already entered into the system, provided it has not subsequently authorized. You can perform this operation as follows:
- Invoke the UH NAV Asset Setup Summary screen from the Browser.
- Select the status of the record that you want to retrieve for modification in the Authorized field. You can only modify records that are unauthorized. Accordingly, choose the Unauthorized option.
- Specify any or all of the details in the corresponding fields to retrieve the record that is to be modified.
- Click ‘Search’ button. All unauthorized records with the specified details are retrieved and displayed in the lower portion of the screen.
- Double click the record that you want to modify in the list of displayed records. The UH NAV Asset Setup Detail screen is displayed.
- Select Unlock Operation from the Action list to modify the record. Modify the necessary information.
Click Save to save your changes. The UH NAV Asset Setup Detail screen is closed and the changes made are reflected in the UH NAV Asset Setup Summary screen.
5.13.3 Viewing UH NAV Alert Record
To view a record that you have previously input, you must retrieve the same in the UH NAV Asset Setup Summary screen as follows:
- Invoke the UH NAV Asset Setup Summary screen from the Browser.
- Select the status of the record that you want to retrieve for viewing in the Authorized field. You can also view all records that are either unauthorized or authorized only, by choosing the unauthorized / Authorized option.
- Specify any or all of the details of the record in the corresponding fields on the screen.
- Click ‘Search’ button. All records with the specified fields are retrieved and displayed in the lower portion of the screen.
- Double click the record that you want to view in the list of displayed records. The UH NAV Asset Setup Detail screen is displayed in View mode.
5.13.4 Deleting UH NAV Alert Record
You can delete only unauthorized records in the system. To delete a record that you have previously entered:
- Invoke the UH NAV Asset Setup Summary screen from the Browser.
- Select the status of the record that you want to retrieve for deletion.
- Specify any or all of the details in the corresponding fields on the screen.
- Click ‘Search’ button. All records with the specified fields are retrieved and displayed in the lower portion of the screen.
- Double click the record that you want to delete in the list of displayed records. The UH NAV Asset Setup Detail screen is displayed.
- Select Delete Operation from the Action list. The system prompts you to confirm the deletion and the record is physically deleted from the system database.
5.13.5 Authorizing UH NAV Alert Record
- An unauthorized UH NAV Asset Setup record must be authorized in the system for it to be processed. To authorize a record:
- Invoke the UH NAV Asset Setup Summary screen from the Browser.
- Select the status of the record that you want to retrieve for authorization. Typically, choose the unauthorized option.
- Specify any or all of the details in the corresponding fields on the screen.
- Click ‘Search’ button. All records with the specified details that are pending authorization are retrieved and displayed in the lower portion of the screen.
- Double click the record that you wish to authorize. The UH NAV Asset Setup Detail screen is displayed. Select Authorize operation from the Action List.
When a checker authorizes a record, details of validation, if any, that were overridden by the maker of the record during the Save operation are displayed. If any of these overrides results in an error, the checker must reject the record.
5.13.6 Amending UH NAV Alert Record
After a UH NAV Asset Setup record is authorized, it can be modified using the Unlock operation from the Action List. To make changes to a record after authorization:
- Invoke the UH NAV Asset Setup Summary screen from the Browser.
- Select the status of the record that you want to retrieve for authorization. You can only amend authorized records.
- Specify any or all of the details in the corresponding fields on the screen.
- Click ‘Search’ button. All records with the specified details that are pending authorization are retrieved and displayed in the lower portion of the screen.
- Double click the record that you wish to authorize. The UH NAV Asset Setup Detail screen is displayed in amendment mode. Select Unlock operation from the Action List to amend the record.
- Amend the necessary information and click on Save to save the changes
5.13.7 Authorizing Amended UH NAV Alert Record
An amended UH NAV Asset Setup record must be authorized for the amendment to be made effective in the system. The authorization of amended records can be done only from Fund Manager Module and Agency Branch module.
The subsequent process of authorization is the same as that for normal transactions.
5.14 General Ledger Setup
This section contains the following topics:
- Section 5.14.1, "Setting up General Ledger Template"
- Section 5.14.2, "Invoking GL Template Detail Screen"
5.14.1 Setting up General Ledger Template
Oracle FLEXCUBE Investor Servicing provides the facility to set up a General Ledger for the purpose of generating accounting entries that would be passed at each event in the life cycle of a transaction.
The events at which the accounting entries could be required for a transaction are as follows:
- Unitization
- Authorization
- Settlement
Also, a set of theoretical entries could be required at initiation of the transaction.
For these accounting entries, the relevant reporting heads are to be mapped to each transaction. According to the components mapped and the setup in the system, the appropriate accounting entries / theoretical entries are passed at either the Distributor or AMC installation, for the funds for which the setup has been maintained.
You can set up the General Ledger by setting up an accounting template for each transaction type and transaction event, and then mapping the template for a fund-investment account type combination, so that the template comes into effect for transactions in the fund-investment type combination.
5.14.2 Invoking GL Template Detail Screen
You can set up a General Ledger Template for each event in the life cycle of a transaction of a certain type, in the ‘GL Template Detail’ screen. You can invoke this screen by typing ‘UTDGLTMP’ in the field at the top right corner of the Application tool bar and clicking on the adjoining arrow button.
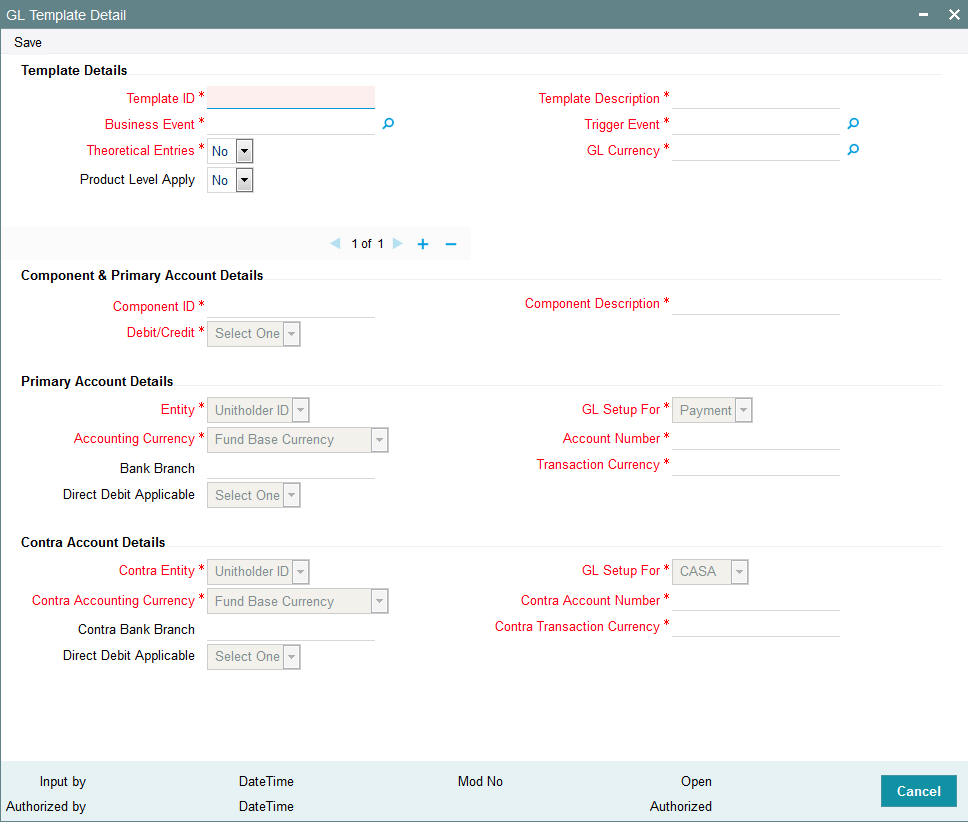
Details Section
Template ID
Alphanumeric; 10 Characters; Mandatory
Enter a unique id for the template that you are setting up.
Template Description
Alphanumeric; 35 Characters; Mandatory
Enter a description for the template.
Business Event
Alphanumeric; 2 Characters; Mandatory
Select the type of transaction/process for which the template is being defined.
Trigger Event
Alphanumeric; 15 Characters; Mandatory
Select the event on which GL Extraction will be initiated. The Trigger Event could be Unitization, Authorization or Settlement.
Theoretical Entries
Mandatory
Select one of the options from the drop-down to indicate if there are entries that will be used for reporting only.
- Yes
- No
GL Currency
Alphanumeric; 3 Characters; Mandatory
Select the GL Currency from the option list provided.
Product Level Apply
Optional
Indicate if the template is applicable at the product level or not from the drop-down list.
Note
You can maintain a GL Setup for more than one currency. This is done by choosing the option ‘All Currency’ against the field GL Currency. This allows you to maintain one GL for transactions carried out by the customer in different currencies. There will be a currency wise posting in the GL.
Component & Primary Account Details
Component ID
Alphanumeric; 20 Characters; Mandatory
Select the component ids of the components that must appear as entries in the general ledger sub-accounts of the selected funds, for the selected business event.
All the loads that have been defined in the system will be included in the drop-down list. You can also select the option ‘VAT’.
Component Description
Alphanumeric; 255 Characters; Mandatory
The description of the component id that you have selected will be displayed.
Debit/Credit
Mandatory
Indicate whether the entries arising due to the selected business event are to be deemed as positive (debit) entries or negative (credit) entries in the general ledger. Select the appropriate option from the drop-down list.
Primary Account Details
Entity
Mandatory
Select the primary initiating entity from the drop-down list. The list displays the following values:
- Unit Holder ID
- Distributor
- AMC
- Fund
- Product
GL SetUp For
Mandatory
The GL set up may be defined for Payment, General Ledger, CASA or SAP. Indicate the same in this field.
Different fields are displayed, enabled or disabled depending on what option you choose. The same is explained below:
Accounting Currency
Mandatory
Select the accounting currency for the primary entity from the drop-down list provided. The list displays the following values:
- Fund Base Currency
- Transaction Currency
- Product Base Currency
Bank Branch
Alphanumeric; 12 Characters; Optional
Select the bank branch from the option list provided.
Account Number
Alphanumeric; 16 Characters; Mandatory
Specify the bank account number.
Transaction Currency
Alphanumeric; 3 Characters; Mandatory
This field will be disabled if you choose the option Fund Base Currency in the field Accounting Currency. If you choose the option Transaction Currency, you can choose the Transaction Currency.
Direct Debit Applicable
Optional
Select if direct debit is applicable or not from the drop-down list. The list displays the following values:
- Yes
- No
Contra Account Details
Contra Entity
Mandatory
Select the counter party initiating entity from the drop-down list. The list displays the following values:
- Unit Holder ID
- Distributor
- AMC
- Fund
- Product
GL SetUp For
Mandatory
The GL set up may be defined for Payment, General Ledger, CASA or SAP. Indicate the same in this field from the drop-down list.
Different fields are displayed, enabled or disabled depending on what option you choose. The same is explained below:
- CASA
- GL
- SAP
- Payment
Depending on what you choose, certain fields will be displayed. The same is explained below:
Contra Accounting Currency
Mandatory
Select the accounting currency for the counter party entity from the drop-down list provided. The list displays the following values:
- Fund Base Currency
- Transaction Currency
- Product Base Currency
Contra Bank Branch
Alphanumeric; 12 Characters; Optional
Select the bank branch from the option list provided.
Contra Account Number
Alphanumeric; 16 Characters; Mandatory
Enter the bank account number.
Contra Transaction Currency
Alphanumeric; 3 Characters; Mandatory
This field will be disabled if you choose the option Fund Base Currency in the field Accounting Currency. If you choose the option Transaction Currency, you can choose the Transaction Currency.
Direct Debit Applicable
Optional
Select if direct debit is applicable or not from the drop-down list. The list displays the following values:
- Yes
- No
5.15 GL Template Summary Screen
This section contains the following topics:
- Section 5.15.1, "Invoking GL Template Summary Screen"
- Section 5.15.2, "Retrieving Record in GL Template Summary screen"
- Section 5.15.3, "Editing GL Template"
- Section 5.15.4, "Viewing GL Template"
- Section 5.15.5, "Deleting GL Template "
- Section 5.15.6, "Authorizing GL Template"
- Section 5.15.7, "Amending GL Template "
- Section 5.15.8, "Authorizing Amended GL Template"
- Section 5.15.9, "Copying Attributes"
5.15.1 Invoking GL Template Summary Screen
Invoke the ‘GL Template Summary’ screen by typing ‘UTSGLTMP’ in the field at the top right corner of the Application tool bar and clicking on the adjoining arrow button.
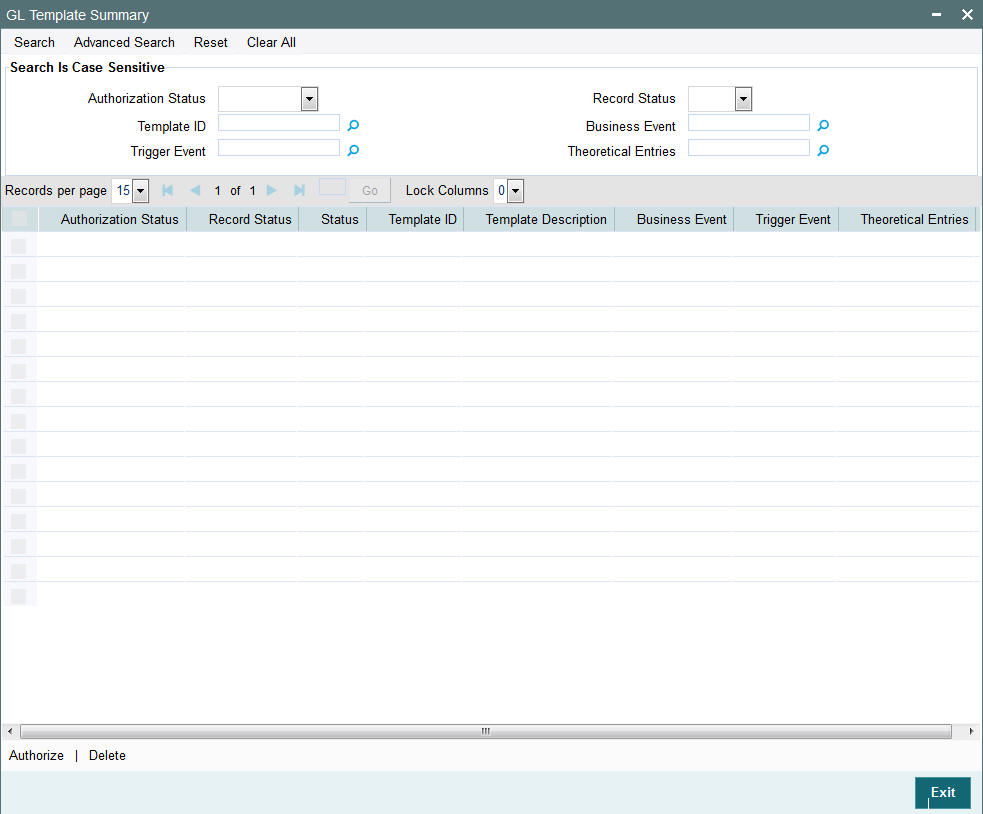
You can perform the following operations in the GL Template Summary screen:
5.15.2 Retrieving Record in GL Template Summary screen
You can retrieve a previously entered record in the Summary Screen, as follows:
Invoke the summary screen and specify any or all of the following details in the corresponding fields:
- The status of the record in the Authorization Status field. If you choose the ‘Blank Space’ option, then all the records are retrieved.
- The status of the record in the Open field. If you choose the ‘Blank Space’ option, then all records are retrieved
- Template ID
- Business Event
- Trigger Event
- Theoretical Entries
Click ‘Search’ button to view the records. All the records with the specified details are retrieved and displayed in the lower portion of the screen.
Note
You can also retrieve the individual record detail from the detail screen by querying in the following manner:
- Press F7
- Input the Template ID
- Press F8
You can perform Edit, Delete, Amend, Authorize operations by selecting the operation from the Action list. You can also search a record by using a combination of % and alphanumeric value.
For example:
You can search the record for Template ID by using the combination of % and alphanumeric value as follows:-
- Search by G%:- System will fetch all the records whose Template ID starts from Alphabet ‘G’. For example: GLTEMP etc.
- Search by %1:- System will fetch all the records whose Template ID ends with the by numeric value’ 1’. For example: GL1 etc.
5.15.3 Editing GL Template
You can modify the details of a GL Template that you have already entered into the system, provided it has not been subsequently authorized. You can perform this operation as follows:
- Invoke the GL Template Summary screen from the Browser.
- Select the status of the record that you want to retrieve for modification in the Authorized field. You can only modify records that are unauthorized. Accordingly, choose the unauthorized option.
- Specify any or all of the details in the corresponding fields to retrieve the record that is to be modified.
- Click ‘Search’ button. All unauthorized records with the specified details are retrieved and displayed in the lower portion of the screen.
- Double click the record that you want to modify in the list of displayed records. The GL Template Detail screen is displayed.
- Select Unlock Operation from the Action list to modify the record. Modify the necessary information.
- Click Save to save your changes. The GL Template Detail screen is closed and the changes made are reflected in the GL Template Summary screen.
5.15.4 Viewing GL Template
To view a record that you have previously input, you must retrieve the same in the GL Template Summary screen as follows:
- Invoke the GL Template Summary screen from the Browser.
- Select the status of the record that you want to retrieve for viewing in the Authorization Status field. You can also view all records that are either unauthorized or authorized only, by choosing the Unauthorized/ Authorized option.
- Specify any or all of the details of the record in the corresponding fields on the screen.
- Click ‘Search’ button. All records with the specified fields are retrieved and displayed in the lower portion of the screen.
- Double click the record that you want to view in the list of displayed records. The GL Template Detail screen is displayed in View mode.
5.15.5 Deleting GL Template
You can delete only unauthorized records in the system. To delete a record that you have previously entered:
- Invoke the GL Template Summary screen from the Browser.
- Select the status of the record that you want to retrieve for deletion.
- Specify any or all of the details in the corresponding fields on the screen.
- Click ‘Search’ button. All records with the specified fields are retrieved and displayed in the lower portion of the screen.
- Double click the record that you want to delete in the list of displayed records. The GL Template Detail screen is displayed.
- Select Delete Operation from the Action list. The system prompts you to confirm the deletion and the record is physically deleted from the system database.
5.15.6 Authorizing GL Template
An unauthorized GL Template must be authorized in the system for it to be processed. To authorize a record:
- Invoke the GL Template Summary screen from the Browser.
- Select the status of the record that you want to retrieve for authorization. Typically, choose the unauthorized option.
- Specify any or all of the details in the corresponding fields on the screen.
- Click ‘Search’ button. All records with the specified details that are pending authorization are retrieved and displayed in the lower portion of the screen.
- Double click the record that you wish to authorize. The GL Template Detail screen is displayed. Select Authorize operation from the Action List.
When a checker authorizes a record, details of validation, if any, that were overridden by the maker of the record during the Save operation are displayed. If any of these overrides results in an error, the checker must reject the record.
5.15.7 Amending GL Template
After a GL Template is authorized, it can be modified using the Unlock operation from the Action List. To make changes to a record after authorization:
- Invoke the GL Template Summary screen from the Browser.
- Select the status of the record that you want to retrieve for authorization. You can only amend authorized records.
- Specify any or all of the details in the corresponding fields on the screen.
- Click ‘Search’ button. All records with the specified details that are pending authorization are retrieved and displayed in the lower portion of the screen.
- Double click the record that you wish to amend. The GL Template Detail screen is displayed in amendment mode. Select Unlock operation from the Action List to amend the record.
- Amend the necessary information and click on Save to save the changes.
5.15.8 Authorizing Amended GL Template
An amended GL Template must be authorized for the amendment to be made effective in the system. The authorization of amended records can be done only from Fund Manager Module. The subsequent process of authorization is the same as that for normal transactions.
5.15.9 Copying Attributes
If you want to create a new GL Template with the same attributes of an existing maintenance, you can copy the attributes of an existing GL Template to a new one.
To copy the attributes:
- Retrieve the record whose attributes the new GL Template should inherit. You can retrieve the record through the Summary screen or through the F7-F8 operation explained in the previous sections of this chapter.
- Click on Copy
- Indicate the ID for the new GL Template. You can, however, change the details of the new template.
5.16 GL Template Mapping to Fund – Investment Account Type Combination
This section contains the following topics:
- Section 5.16.1, "Invoking GL Interface Setup Detail Screen"
- Section 5.16.2, "Extraction and Generation of Event based Accounting Entries"
- Section 5.16.3, "Regeneration of Extract"
5.16.1 Invoking GL Interface Setup Detail Screen
After authorized templates have been created, you can map the relevant template to a fund-investment account type combination, in the ‘GL Interface Set-Up Detail’ screen.
You can invoke this screen by typing ‘UTDGLISD’ in the field at the top right corner of the Application tool bar and clicking on the adjoining arrow button.
Fund Details Section
GL Reference Number
Alphanumeric; 10 Characters; Mandatory
Specify a reference number for the GL. The field GL Reference Number allows you the flexibility of creating several GL templates with a common Fund ID, Template ID, Component and Account Type. You can distinguish between them by entering a unique GL Reference Number for each.
Template ID
Alphanumeric; 10 Characters; Mandatory
Select the template that you desire to map to the fund-investment account combination to.
Note
When you choose the Template ID, the following sections are displayed in the screen:
- Template Details Section
- Component Details Section
- Restricted Reference Type Section
These have been explained in detail in the section ‘Setting Up a General Ledger Template’ in this chapter. Please refer to the same for more information.
Template Description
Display
The description of the template is displayed when you select the Template Id.
Fund ID
Alphanumeric; 6 Characters; Optional
Select the fund to which the template is being mapped from the option list provided.
ISIN Code
Display
The ISIN Code of the fund that you choose will be updated in this field.
You could, alternatively, select the ISIN Code of the fund and the Fund ID will be updated.
Apply at Product Level
Optional
Select if the template has to be applied at product level or nor from the drop-down list. The list displays the following values:
- Yes
- No
Product ID
Alphanumeric; 10 Characters; Optional
Select the Product to which the template is being mapped, from the option list provided.
Account Type
Alphanumeric; 2 Characters; Mandatory
Select the investment account type for which the template is being mapped.
GL Currency
Alphanumeric; 3 Characters; Mandatory
Select the GL Currency from the option list provided.
Note
- As mentioned above, the field GL Reference Number allows you the flexibility of creating several GL templates with a common Fund Id, Template Id, Component and Account Type. You can distinguish between them by entering a unique GL Reference Number for each.
- You can maintain a GL Setup for more than one account type. This is done by choosing the option ‘All Account Types’ against the field Account Type.
For example, if you want to define a GL setup for a fund FUND1 for two account types CPFOA and Cash Direct, you can choose the option ‘All Account Types’ instead defining two different GL templates for each of the account types.
You can maintain a GL Setup for more than one currency. This is done by choosing the option ‘All Currency’ against the field GL Currency. This allows you to maintain one GL for transactions carried out by the customer in different currencies. There will be a currency wise posting in the GL.
Template Details
Business Event
Alphanumeric; 2 Characters; Optional
Select the type of transaction/process for which the template is being defined.
Trigger Event
Alphanumeric; 15 Characters; Optional
Select the event on which GL Extraction will be initiated. The Trigger Event could be Unitization, Authorization or Settlement.
Theoretical Entries
Optional
Select one of the options from the drop-down to indicate if there are entries that will be used for reporting only.
- Yes
- No
Component Details
The system displays the following component details:
- Component ID
- Component Description
- Debit/Credit
- Primary/ Contra Entity Details
Restricted Reference Type
Restricted Reference Type
Alphanumeric; 10 Characters; Optional
Specify the Restricted Reference Type.
Restricted Sub Types
Restricted Sub Types
Alphanumeric; 255 Characters; Optional
Specify the Restricted Sub Type.
5.16.2 Extraction and Generation of Event based Accounting Entries
A batch process extracts the relevant accounting entries according to the GL setup for the fund, and generates the accounting entries that would be passed, automatically at EOD.
For cash nominee accounts, no theoretical entries are generated at the AMC when the GL extract is generated, since these accounts are of the Distributor.
The System checks whether the transaction date is a holiday in any of the calendars. The settlement date (Contractual Settlement Date) is derived based on the mode of payment, payment lag maintained for the fund.
As of the unitization or allocation date, the theoretical (cash flow indicator) entries, if indicated in the GL maintenance, are generated. At the Distributor, the accounting entries generated for the underlying transaction reflect the movement of funds to Distributor, unit holder and fund accounts. At the AMC, the accounting entries generated for the underlying transaction reflect the credit or debit to fund investment, fund manager, Distributor, rounding and transaction charge account.
The payment date for the underlying transaction is also arrived at according to the transaction payment mode. The settlement process is initiated on the date on which payment clearing is performed, which is tracked as the Actual Settlement Date. At the Distributor, the accounting entries generated reflect the movement of funds between the fund receivable account and the Distributor. At the AMC, the accounting entries generated reflect the movement of funds between the fund account and unit holder pooled investment account.
For cash based transactions, the unitization and payment date are the same and both theoretical and actual entries are passed as on this date.
5.16.3 Regeneration of Extract
Once the accounting data passed due to a GL setup has been extract, you can re-extract and regenerate the data, if required.
To re-extract the data, you must provide the ID of the fund and the unit holder for which you wish to re-extract the data and the date range between which the data was extracted. If you do not provide a fund or unit holder ID, the data is re-extracted for entries generated within the date range specified.
After re-extraction, you can either regenerate the entries or generating a report containing the entries.
5.17 GL Interface Set-Up Summary
This section contains the following topics:
- Section 5.17.1, "Retrieving a Record in GL Interface Set-Up Summary Screen"
- Section 5.17.2, "Editing GL Interface Set-Up Record"
- Section 5.17.3, "Viewing GL Interface Set-Up Record"
- Section 5.17.4, "Deleting GL Interface Set-Up Record"
- Section 5.17.5, "Authorizing GL Interface Set-Up Record"
- Section 5.17.6, "Amending GL Interface Set-Up Record"
- Section 5.17.7, "Authorizing Amended GL Interface Set-Up Record"
5.17.1 Retrieving a Record in GL Interface Set-Up Summary Screen
You can retrieve a previously entered record in the Summary Screen, as follows:
Invoke the ‘GL Interface Set-Up Summary’ screen by typing ‘UTSGLISD’ in the field at the top right corner of the Application tool bar. Click on the adjoining arrow button and specify any or all of the following details in the corresponding details.
- The status of the record in the Authorization Status field. If you choose the ‘Blank Space’ option, then all the records are retrieved.
- The status of the record in the Record Status field. If you choose the ‘Blank Space’ option, then all records are retrieved
- Product ID
- GL Reference Number
- Business Event
- Theoretical Entries
- Fund ID
- Template ID
- Account Type
Click ‘Search’ button to view the records. All the records with the specified details are retrieved and displayed in the lower portion of the screen.
Note
You can also retrieve the individual record detail from the detail screen by querying in the following manner:
- Press F7
- Input the Product ID
- Press F8
You can perform Edit, Delete, Amend, Authorize, Reverse, Confirm operations by selecting the operation from the Action list. You can also search a record by using a combination of % and alphanumeric value
5.17.2 Editing GL Interface Set-Up Record
You can modify the details of GL Interface Set-Up record that you have already entered into the system, provided it has not subsequently authorized. You can perform this operation as follows:
- Invoke the GL Interface Set-Up Summary screen from the Browser.
- Select the status of the record that you want to retrieve for modification in the Authorization Status field. You can only modify records that are unauthorized. Accordingly, choose the Unauthorized option.
- Specify any or all of the details in the corresponding fields to retrieve the record that is to be modified.
- Click ‘Search’ button. All unauthorized records with the specified details are retrieved and displayed in the lower portion of the screen.
- Double click the record that you want to modify in the list of displayed records. The GL Interface Set-Up Detail screen is displayed.
- Select Unlock Operation from the Action list to modify the record. Modify the necessary information.
Click Save to save your changes. The GL Interface Set-Up Detail screen is closed and the changes made are reflected in the GL Interface Set-Up Summary screen.
5.17.3 Viewing GL Interface Set-Up Record
To view a record that you have previously input, you must retrieve the same in the GL Interface Set-Up Summary screen as follows:
- Invoke the GL Interface Set-Up Summary screen from the Browser.
- Select the status of the record that you want to retrieve for viewing in the Authorization Status field. You can also view all records that are either unauthorized or authorized only, by choosing the unauthorized / Authorized option.
- Specify any or all of the details of the record in the corresponding fields on the screen.
- Click ‘Search’ button. All records with the specified fields are retrieved and displayed in the lower portion of the screen.
- Double click the record that you want to view in the list of displayed records. The GL Interface Set-Up Detail screen is displayed in View mode.
5.17.4 Deleting GL Interface Set-Up Record
You can delete only unauthorized records in the system. To delete a record that you have previously entered:
- Invoke the GL Interface Set-Up Summary screen from the Browser.
- Select the status of the record that you want to retrieve for deletion.
- Specify any or all of the details in the corresponding fields on the screen.
- Click ‘Search’ button. All records with the specified fields are retrieved and displayed in the lower portion of the screen.
- Double click the record that you want to delete in the list of displayed records. The GL Interface Set-Up Detail screen is displayed.
- Select Delete Operation from the Action list. The system prompts you to confirm the deletion and the record is physically deleted from the system database.
5.17.5 Authorizing GL Interface Set-Up Record
- An unauthorized GL Interface Set-Up record must be authorized in the system for it to be processed. To authorize a record:
- Invoke the GL Interface Set-Up Summary screen from the Browser.
- Select the status of the record that you want to retrieve for authorization. Typically, choose the unauthorized option.
- Specify any or all of the details in the corresponding fields on the screen.
- Click ‘Search’ button. All records with the specified details that are pending authorization are retrieved and displayed in the lower portion of the screen.
- Double click the record that you wish to authorize. The GL Interface Set-Up Detail screen is displayed. Select Authorize operation from the Action List.
When a checker authorizes a record, details of validation, if any, that were overridden by the maker of the record during the Save operation are displayed. If any of these overrides results in an error, the checker must reject the record.
5.17.6 Amending GL Interface Set-Up Record
After a GL Interface Set-Up record is authorized, it can be modified using the Unlock operation from the Action List. To make changes to a record after authorization:
- Invoke the GL Interface Set-Up Summary screen from the Browser.
- Select the status of the record that you want to retrieve for authorization. You can only amend authorized records.
- Specify any or all of the details in the corresponding fields on the screen.
- Click ‘Search’ button. All records with the specified details that are pending authorization are retrieved and displayed in the lower portion of the screen.
- Double click the record that you wish to authorize. The GL Interface Set-Up Detail screen is displayed in amendment mode. Select Unlock operation from the Action List to amend the record.
- Amend the necessary information and click on Save to save the changes
5.17.7 Authorizing Amended GL Interface Set-Up Record
An amended GL Interface Set-Up record must be authorized for the amendment to be made effective in the system. The authorization of amended records can be done only from Fund Manager Module and Agency Branch module.
The subsequent process of authorization is the same as that for normal transactions.
5.18 Accounting System General Ledger Setup
This section contains the following topics:
5.18.1 Invoking Accounting System GL Setup Detail Screen
You can use this screen in the Administration menu category of the Fund Manager component to
- Map the load component codes in FCIS to their corresponding charge codes in the external system.
- Edit existing mappings
- Delete existing mappings
When you map each load component code (GL Account Code) to its corresponding charge code that is defined for the load in the external system, the load information in the exported transaction data is recognized and assimilated in the external system.
Invoke the ‘Accounting System GL Setup Detail’ screen by typing ‘UTDGLACM’ in the field at the top right corner of the Application tool bar and clicking on the adjoining arrow button.
When you open this screen, all the codes that have already been mapped are displayed.
GL Account Code
Alphanumeric, 10 Characters; Mandatory
Select the account code in the FCIS system that must be mapped to its corresponding charge code in the external system. This is the GL Account Code that has been assigned to this load component in the Fund Load Setup record.
External Code
Alphanumeric, 10 Characters; Mandatory
Specify the account code in the external system that corresponds to the selected FCIS system code.
5.19 Accounting System GL Setup Summary
This section contains the following topics:
- Section 5.19.1, "Retrieving a Record in Accounting System GL Setup Summary Screen"
- Section 5.19.2, "Editing Accounting System GL Setup Record"
- Section 5.19.3, "Viewing Accounting System GL Setup Record"
- Section 5.19.4, "Deleting Accounting System GL Setup Record"
- Section 5.19.5, "Authorizing Accounting System GL Setup Record"
- Section 5.19.6, "Amending Accounting System GL Setup Record"
- Section 5.19.7, "Authorizing Amended Accounting System GL Setup Record"
5.19.1 Retrieving a Record in Accounting System GL Setup Summary Screen
You can retrieve a previously entered record in the Summary Screen, as follows:
Invoke the ‘Accounting System GL Setup Summary’ screen by typing ‘UTSGLACM’ in the field at the top right corner of the Application tool bar. Click on the adjoining arrow button and specify any or all of the following details in the corresponding details.
- The status of the record in the Authorized field. If you choose the ‘Blank Space’ option, then all the records are retrieved.
- The status of the record in the Open field. If you choose the ‘Blank Space’ option, then all records are retrieved
Click ‘Search’ button to view the records. All the records with the specified details are retrieved and displayed in the lower portion of the screen.
Note
You can also retrieve the individual record detail from the detail screen by querying in the following manner:
- Press F7
- Input any parameter
- Press F8
You can perform Edit, Delete, Amend, Authorize, Reverse, Confirm operations by selecting the operation from the Action list. You can also search a record by using a combination of % and alphanumeric value
5.19.2 Editing Accounting System GL Setup Record
You can modify the details of Accounting System GL Setup record that you have already entered into the system, provided it has not subsequently authorized. You can perform this operation as follows:
- Invoke the Accounting System GL Setup Summary screen from the Browser.
- Select the status of the record that you want to retrieve for modification in the Authorized field. You can only modify records that are unauthorized. Accordingly, choose the Unauthorized option.
- Specify any or all of the details in the corresponding fields to retrieve the record that is to be modified.
- Click ‘Search’ button. All unauthorized records with the specified details are retrieved and displayed in the lower portion of the screen.
- Double click the record that you want to modify in the list of displayed records. The Accounting System GL Setup Detail screen is displayed.
- Select Unlock Operation from the Action list to modify the record. Modify the necessary information.
Click Save to save your changes. The Accounting System GL Setup Detail screen is closed and the changes made are reflected in the Accounting System GL Setup Summary screen.
5.19.3 Viewing Accounting System GL Setup Record
To view a record that you have previously input, you must retrieve the same in the Accounting System GL Setup Summary screen as follows:
- Invoke the Accounting System GL Setup Summary screen from the Browser.
- Select the status of the record that you want to retrieve for viewing in the Authorized field. You can also view all records that are either unauthorized or authorized only, by choosing the unauthorized / Authorized option.
- Specify any or all of the details of the record in the corresponding fields on the screen.
- Click ‘Search’ button. All records with the specified fields are retrieved and displayed in the lower portion of the screen.
- Double click the record that you want to view in the list of displayed records. The Accounting System GL Setup Detail screen is displayed in View mode.
5.19.4 Deleting Accounting System GL Setup Record
You can delete only unauthorized records in the system. To delete a record that you have previously entered:
- Invoke the Accounting System GL Setup Summary screen from the Browser.
- Select the status of the record that you want to retrieve for deletion.
- Specify any or all of the details in the corresponding fields on the screen.
- Click ‘Search’ button. All records with the specified fields are retrieved and displayed in the lower portion of the screen.
- Double click the record that you want to delete in the list of displayed records. The Accounting System GL Setup Detail screen is displayed.
- Select Delete Operation from the Action list. The system prompts you to confirm the deletion and the record is physically deleted from the system database.
5.19.5 Authorizing Accounting System GL Setup Record
- An unauthorized Accounting System GL Setup record must be authorized in the system for it to be processed. To authorize a record:
- Invoke the Accounting System GL Setup Summary screen from the Browser.
- Select the status of the record that you want to retrieve for authorization. Typically, choose the unauthorized option.
- Specify any or all of the details in the corresponding fields on the screen.
- Click ‘Search’ button. All records with the specified details that are pending authorization are retrieved and displayed in the lower portion of the screen.
- Double click the record that you wish to authorize. The Accounting System GL Setup Detail screen is displayed. Select Authorize operation from the Action List.
When a checker authorizes a record, details of validation, if any, that were overridden by the maker of the record during the Save operation are displayed. If any of these overrides results in an error, the checker must reject the record.
5.19.6 Amending Accounting System GL Setup Record
After a Accounting System GL Setup record is authorized, it can be modified using the Unlock operation from the Action List. To make changes to a record after authorization:
- Invoke the Accounting System GL Setup Summary screen from the Browser.
- Select the status of the record that you want to retrieve for authorization. You can only amend authorized records.
- Specify any or all of the details in the corresponding fields on the screen.
- Click ‘Search’ button. All records with the specified details that are pending authorization are retrieved and displayed in the lower portion of the screen.
- Double click the record that you wish to authorize. The Accounting System GL Setup Detail screen is displayed in amendment mode. Select Unlock operation from the Action List to amend the record.
- Amend the necessary information and click on Save to save the changes
5.19.7 Authorizing Amended Accounting System GL Setup Record
An amended Accounting System GL Setup record must be authorized for the amendment to be made effective in the system. The authorization of amended records can be done only from Fund Manager Module and Agency Branch module.
The subsequent process of authorization is the same as that for normal transactions.
5.20 FCIS - Finware Interface
This section contains the following topics:
- Section 5.20.1, "FCIS-Finware Interface Description"
- Section 5.20.2, "GL Setup for FCIS – Finware Interface"
- Section 5.20.3, "Data Flow Diagram"
- Section 5.20.4, "Error Handling"
5.20.1 FCIS-Finware Interface Description
This interface supports the online settlement for the following:
- Subscriptions captured through FCIS
- Bulk Upload Subscriptions (Except Transactions sent from RTA to FCIS)
- Subscription Reversal
- Bulk Upload Subscription Reversal (Except Transactions sent from RTA to FCIS)
- IPO and IPO Reversal
When a customer makes an investment and the transaction is captured through FCIS, the CASA account in FINWARE will be debited with the gross amount of the subscription and will be credited to AMC Pool account. This activity will be trigged as an ‘Authorization’ event. The settlement will take place just before the transaction is saved and if a successful response is received from Finware, the transaction will be successfully saved in FCIS.
FCIS will post the Debit/Credit request to FC@Connect, which will then send the actual request to Finware, build the response as expected by FCIS and send the response.
Note
- Online settlement happens for transactions on the system date even if they are placed after the fund cut off time
- After the cut off time, transactions cannot be reversed or cancelled till the Transaction Date and System Date are equal
- Online settlement happens only for gross, unalloted, payment not cleared transactions (subscription, subscription reversal, IPO, IPO reversal transactions), with Payment Mode as 'Transfer'. Accounting details should have been maintained for the Unit Holder
- Bulk uploads from FCIS get settled online if the transactions (subscription, subscription reversal, IPO, IPO reversal) are gross transactions with Payment Mode as 'Transfer'.
5.20.2 GL Setup for FCIS – Finware Interface
You will have to setup a GL for the entries to be passed to FINWARE during authorization of subscription transactions in FCIS.
The following section lists the steps involved in setting up a GL for the FCIS – Finware interface:
- Set up a GL Template for the business event ‘Subscription’ through the General Ledger Template Setup screen.
- Enter Debit/Credit leg details of the GL through the Debit/Credit Details screen. The debit account should be the Customer CASA Account and the credit leg should be the AMC CASA Account.
- Specify that the trigger event should be ‘Authorization for new and reversal transactions for all events.
- Save the details entered in the General Ledger Template Setup screen and authorize the same.
- Create a GL Setup from the template created.
You will also have to setup a GL for the entries to be passed to FINWARE during authorization of subscription cancellations in FCIS. To do this, follow the procedure as explained above. The only difference here will be that the debit account will be the AMC CASA Account and the credit account will be the Customer CASA Account.
Each of the screens mentioned above has been explained in the section General Ledger Setup in this chapter. Refer to the same for further information.
5.20.3 Data Flow Diagram
The following diagram illustrates the flow of information:

5.20.3.1 Request Element
The table below describes the important elements of the request XML.
Level |
Request Element |
DTD |
Field |
Value |
TRANSACTION |
Header |
RRFAA51.xsd |
idrequest |
RRFAA51(Maintained as parameter in FCIS) |
|
|
|
datpost |
FCIS Date in RRRR-MM-DD Format |
|
|
|
referenceno |
FCIS Transaction Number |
|
|
|
extsystem |
IS |
|
|
|
flgrepeat |
N |
TRANSACTION |
txndata >debit |
RRFAA51.xsd |
draccountno |
Customer Bank Account Number |
|
|
|
drnarrative |
Customer Account Debit |
|
|
|
custid |
Customer ID(CID) |
|
txndata > credit |
|
craccountno |
AMC Bank Account Number |
|
|
|
crnarrative |
AMC Account Credit |
|
|
|
custid |
AMC Cust ID maintained in Finware and Entity Add Info 1 |
|
txndata |
|
txnamount |
Gross Amount of Subscription |
|
|
|
txncurrcod |
Currency Code for Transaction Currency |
5.20.3.2 Response Element
The table below describes the important elements of the response XML.
Level |
Response Element |
Field |
Description |
Transaction |
status |
returncodestatus |
Return Status of Finware Procedure. 0 means success. |
|
|
Errorcode |
0 means Success. Error Code |
|
|
Errormessage |
Error Message in case of Error. |
The table below lists the various parameters to be maintained:
ParamCode |
ParamValue |
ParamText |
FINCONNECT |
URL |
|
FINCONNECT |
PROXY_SERVER |
|
FINCONNECT |
NO_PROXY_DOMAINS |
|
FINCONNECT |
HTTP_VERSION |
HTTP/1.0 |
FINCONNECT |
CONTENT_TYPE |
text/xml |
FINCONNECT |
TIMEOUT |
|
FINCONNECT |
CONTENT_REQ |
|
The id request,exts ystem for the XML will be fetched from the following Parameter Setup:
ParamCode |
ParamValue |
ParamText |
FINXML |
IDREQ_NEWSUB |
RRFAA51 |
FINXML |
IDREQ_SUBREV |
RRFAA51 |
ParamCode |
ParamValue |
ParamText |
FINXML |
EXTSYSTEM |
IS |
FINXML |
XSD_PATH |
|
5.20.4 Error Handling
The flow chart illustrates the possible errors during a subscription:
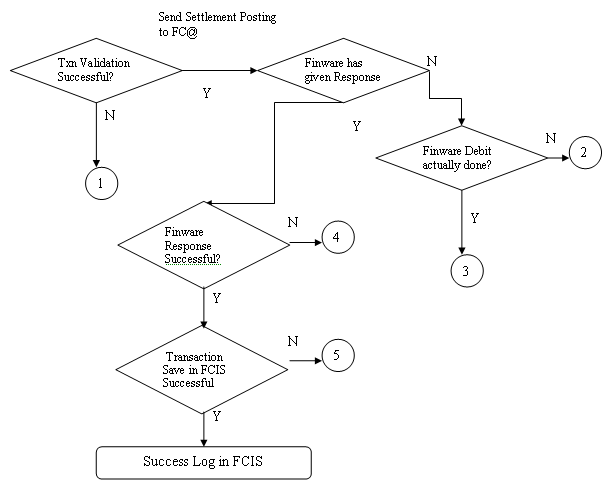
The flow chart illustrates the possible errors during a subscription reversal:

5.21 EPU Upload
This section contains the following topics:
- Section 5.21.1, "EPU Upload Processing"
- Section 5.21.2, "Interface Workflow"
- Section 5.21.3, "Attributes"
- Section 5.21.4, "Message Format"
5.21.1 EPU Upload Processing
In EPU Upload, FCIS receives distribution rates for all non Money Market Funds from an external system. The frequency of the upload depends on the frequency of distribution rates declared for each fund.
5.21.2 Interface Workflow
When a file is received, the system processes a record only if there is no previous EPU entry (for the fund as on the distribution date) and the dividend record is unprocessed. If there is an EPU record already existing, the system displays an error message ‘Duplicate Record’. If the system does not find any duplicate records, it stores the data in tables and deletes the file.
5.21.3 Attributes
The attributes present in the EPU upload file interface are as follows:
- The interface is capable of handling incoming information to FCIS as a delimited file.
- The upload is during EOD operations.
- The fields are separated by the delimiter ‘Comma’.
- The column headings of the header row are also separated by ‘Comma’.
- The records are separated by the New Line Character.
Outgoing responses are not within the scope of this interface.
5.21.4 Message Format
Refer the chapter ‘Appendix B - Upload file formats – B’, Volume IV of Upload Format User Manual.
5.22 Tax Aggregation Interface
This section contains the following topics:
- Section 5.22.1, "Tax Aggregation Interface Description"
- Section 5.22.2, "Interface Workflow"
- Section 5.22.3, "Attributes"
- Section 5.22.4, "Message Format"
5.22.1 Tax Aggregation Interface Description
The Tax Aggregation Interface facilitates the export and subsequent import of all tax information relating to Annuity Income. The dispatch and receipt of the information is done on a monthly basis.
5.22.2 Interface Workflow
FCIS collates tax information across all lines of business every month only for clients with Annuity income. This is sent across to an application which checks if the tax payable by the client has been accurately calculated. The application then sends the accurate values of tax which will be updated in the designated tables in FCIS. There will be no processing of the data imported.
5.22.3 Attributes
The attributes present in the Tax Aggregation File interface are as follows:
- The interface handles outgoing information from FCIS as a delimited file.
- The upload is manual.
- There is no header row.
- The trailer row is the Control Records
- The field separator is a comma.
- The records are separated by the New Line Character.
The incoming information into FCIS is handled the same manner as the outgoing information.
5.22.4 Message Format
Refer to the chapter ‘Appendix B - Upload file formats – B’ of Upload Format User Manual.
5.23 Agent Reference File
This section contains the following topics:
- Section 5.23.1, "Agent Reference File Description"
- Section 5.23.2, "Interface Attributes"
- Section 5.23.3, "Message Format"
5.23.1 Agent Reference File Description
The Agent Reference File is an import interface. The broker details like Broker Name, Broker Type, etc are updated in the FCIS using this interface. . The repository of OMIPAY, i.e., SAP, will send a file to the system which includes the broker details. These records are compared with the records present in the system. If there is any mismatch in the OMIPAY data, the system will be updated accordingly.
Note
This interface does not create new brokers; instead the existing broker details will be updated.
5.23.2 Interface Attributes
The attributes present in the Agent Reference File interface are as follows:
- The upload is triggered during End of Day process.
- The transport of data occurs through File System.
- The file type is delimited.
- The header row consists of column headings separated by commas.
- The Record separator is New Line Character.
- The Field separator is a comma.
5.23.3 Message Format
Refer to the chapter ‘Appendix B - Upload file formats – B’ of Upload Format User Manual for details on Message format.
5.24 Oracle Financial Interface
This section contains the following topics:
- Section 5.24.1, "Oracle Financial Interface Description"
- Section 5.24.2, "Interface Attributes"
- Section 5.24.3, "Message Format"
5.24.1 Oracle Financial Interface Description
Oracle Financial Interface is an export interface that will be done daily. The GL entries posted through out the day will be sent to the external system. The Oracle Financial Accounting System interface consolidates the journal postings and produces the accounts. All transactions and fees will be recorded in Oracle Financials General Ledger. This is an automated process that will run during EOD.
5.24.2 Interface Attributes
The attributes present in the Oracle Financial interface are as follows:
- The upload is triggered during End Of Day process.
- The transport of data occurs through File System.
- The file type is delimited.
- There is no header row.
- The Record separator is New Line Character.
- The Field separator is a comma.
5.24.3 Message Format
Refer to the chapter ‘Appendix B - Upload file formats – B’ of Upload Format User Manual for details on Message format.
5.25 Product-Fund- Asset Code Mapping Interface
This section contains the following topics:
- Section 5.25.1, "Product-Fund- Asset Code Mapping Interface Description"
- Section 5.25.2, "Executing Product–Fund–Asset Code Mapping Interface"
5.25.1 Product-Fund- Asset Code Mapping Interface Description
For every Product – Fund ID combination, the system creates an Asset Code. For every valid Product and Fund ID available as part of Product Portfolio mapping combination, the system will generate an Asset Code. The system picks up the Asset Code for reporting purpose for the Global Order Placement Interface/Report.
The Global Placement Interface has been explained in detail in the section ‘Global Order Placement Interface’ of this chapter.
5.25.2 Executing Product–Fund–Asset Code Mapping Interface
The Product Fund Asset Code Upload supports the Product Fund Asset Code Mapping and is a file based upload.
You can execute the Product Fund Asset Code Mapping through the ‘Online Execution of Interfaces’ screen.
Refer the section ‘Online Execution of Interfaces’ in this chapter for details on executing the interface maintenance definitions.
5.26 Global Order Placement Interface
This section contains the following topics:
- Section 5.26.1, "Global Order Placement Interface Description"
- Section 5.26.2, "Batch Process for Global Order Generation"
- Section 5.26.3, "Message Format"
5.26.1 Global Order Placement Interface Description
The Global Order Placement is an export interface. This interface will extract policy transaction information like Investment amount (minus Initial Admin and Initial Broker fees), Disinvestment Amount etc. from FCIS and creates a text file which will be handed over to the different AMC. This interface is manually triggered.
You can also report the net value of the Initial admin and Broker Fee to the AMC/ UT along with the UT initial fee return value using Global Order Placement. Hence the exported files will contain both the net amount (Policy amount – Fees) and UT fee return value.
You can group the transactions based on the following:
- Fund
- Transaction Date
- Transaction Type
- Subscription includes Pseudo Switch-in
- Redemption includes Pseudo Switch-out, True Switches, and Transfers
- Product
- UT Fee Return value
Note
System will consider Internal Switches (switch in and switch out) as separate transaction types.
5.26.2 Batch Process for Global Order Generation
The Global Order or Manco Instructions is generated using the batch process. The system will check for all the transactions in this batch process, i.e., if there are fees attached to the policy transaction, the system will forecast the Initial Admin fees and Initial Broker fees using the Project Allocation procedure.
Project Allocation projects the allocation which contains the allotted units based on the price available from the global order. The forecasted fee values are received through the project allocation package.
You can calculate the investment amount using the following formula: Investment Amount = (Policy Transaction Amount) – (Initial Admin Fee) – (Initial Broker Fee).
Investments and Disinvestment Adjustments (Reversals), i.e., Buying and reversal of Selling, will be consolidated into a single value per day’s transactions. Similarly, Disinvestments and Investment Adjustments (Reversals), i.e., Selling and reversal of Buying will be consolidated into a single value per day’s transactions.
Note
Netting of Investments and Disinvestments is not allowed.
You can report the separate records for the transactions such as Investment Amounts, Disinvestment Amounts, Disinvestment Units, Switches In and Switches Out, for the same Manco Fund per day.
Following points can be used as reference:
- Disinvestment Amount = Amount with a Negative Sign
- Investment Amount = Amount with a Positive Sign
- Reversal of Investment Amount = Amount with a Negative Sign
- Reversal of Disinvestment Amount = Amount with a Positive Sign
- Disinvestment Units = Units with a Negative Sign
5.26.3 Message Format
Refer to the chapter ‘Appendix B - Upload file formats – B’ of Upload Format User Manual for details on Message format.
5.27 Upload Master
This section contains the following topics:
5.27.1 Invoking Upload Master Screen
You can monitor the uploads being done through macro using ‘Upload Master’ screen. You can invoke this screen by typing ‘CVDUPLOD' in the field at the top right corner of the Application tool bar and click the adjoining arrow button.
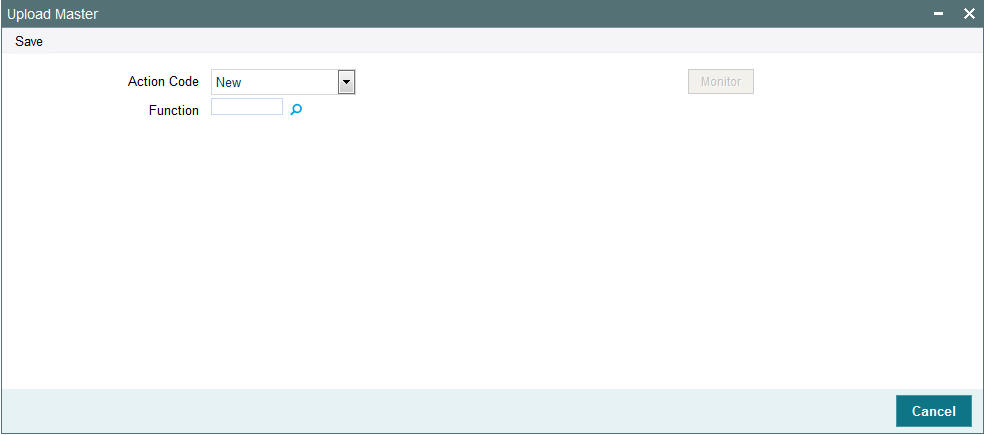
You can specify the following details:
Action Code
Optional
Select the action to monitor for which the upload is being done from the drop-down list. The list displays the following values:
- New - To monitor the upload when new record is being uploaded
- Modify -To monitor the upload when record is being modified through upload
- Delete - To monitor the upload when record is being deleted through upload
- Authorize - To monitor the upload when record is being authorized through upload
- New Rule -To monitor the upload when new rule for a record is being created through upload
- Incremental -To monitor the upload when the record is being modified through incremental upload
Function
Alphanumeric; 10 Characters; Optional
Specify the function ID to monitor the upload of the same. Alternatively, you can select from the option list. The list displays all valid function IDs maintained in the system.
On clicking ‘Monitor’ button, you can initiate the monitoring process.