4. Maintaining System Parameters
In Oracle FLEXCUBE Investor Servicing, you can maintain static parameter data such as additional information heads, fee categories for investors, and codes for additional parameters. You can also map these maintained parameters to be applicable for certain entities such as unit holders and brokers. The additional parameters enable you to capture information relating to entities such as unit holders and brokers that are not otherwise captured in the system.
This chapter describes the definition and maintenance of these parameters in the system. It also includes the definition and maintenance of basic system default data. Default data is information that will be used as defaulted in any maintenance operation such as setting up investor accounts, setting up entities, setting up brokers and so on.
All the menu options pertaining to the maintenance of system parameters and default information can be accessed through the System Parameters menu item in the Maintenance menu category of the Agency Branch main menu. The following screens can be accessed through this menu item:
- Defaults Setup: Use this option to access the Defaults Maintenance screen, where you can set up the system default information.
- Parameters Setup: Use this option to access the System Parameter Codes Maintenance screen, where you can view defined codes for parameters that will be used in the maintenance of entities as well as other data in the system, and add any applicable valid values.
- Entity Mapping: Use this option to access the Entity Additional Information Mapping screen, where you can map any additional information heads to be applicable for the maintenance of entities such as unit holders and brokers.
- Addl Info Maint: Use this option to access the Additional Information Maintenance screen, where you can define any additional information heads.
- Fee Category Setup: Use this option to access the Fee Category Codes Maintenance screen, where you can view any specific defined fee category (and sub category) that is applicable to different investor types. You can also add new fee sub-categories.
- Data Maintenance: Use this option to access the FCIS Data Mapping Codes Maintenance screen, where you can define data mapping between an external system and FCIS.
This chapter contains the following sections:
- Section 4.1, "System Default Information"
- Section 4.2, "System Parameters"
- Section 4.3, "Module Default Detail"
- Section 4.4, "Print Reports"
- Section 4.5, "Additional Information Heads"
- Section 4.6, "Entity Additional Information Mapping"
- Section 4.7, "Fee Categories and Sub-categories"
- Section 4.8, "Data Mapping"
- Section 4.9, "User Event Mapping"
- Section 4.10, "Dividend Component Details"
- Section 4.11, "Stop Code Maintenance"
- Section 4.12, "Stop Code Summary"
- Section 4.13, "RDR Parameters"
4.1 System Default Information
This section contains the following topics:
4.1.1 Maintaining System Default Information
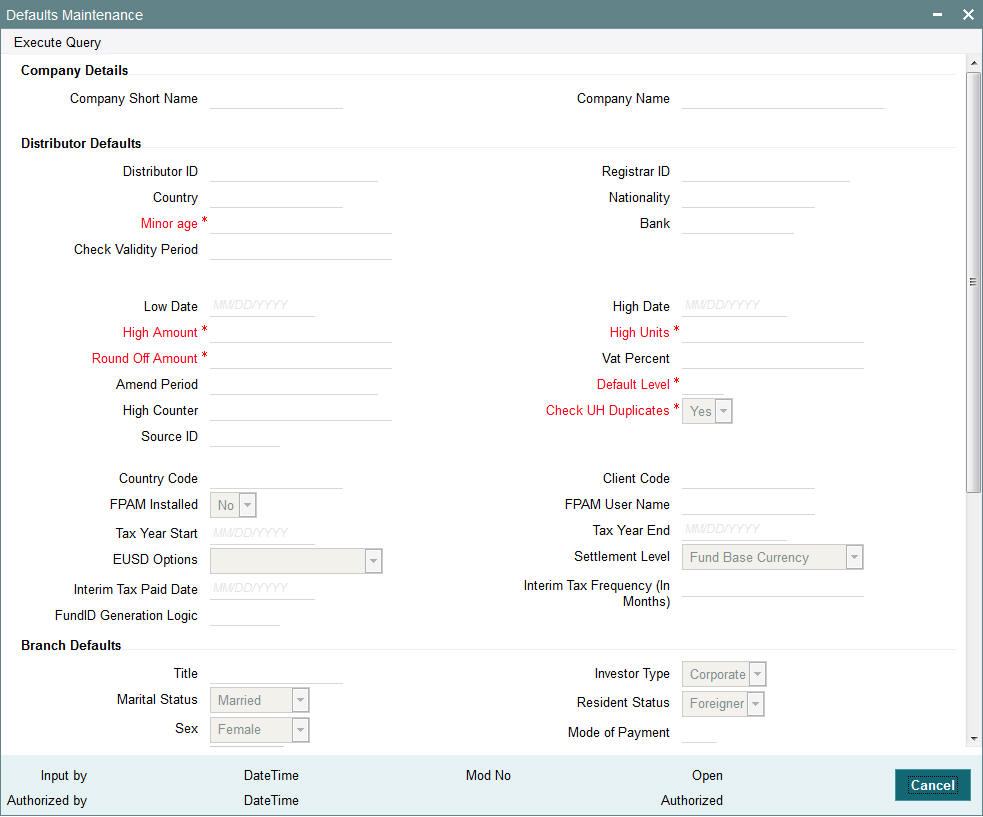
To set up system default information, use the ‘Defaults Maintenance’ screen. You can invoke this screen by typing ‘UTDDEFMT’ in the field at the top right corner of the Application tool bar and clicking on the adjoining arrow button..
In this screen press F7/F8 to query the data. You need to unlock and then modify the data if required.
Company Details
Company Short Name
Alphanumeric; 15 Characters; Optional
Enter the short name of the Company that is using Oracle FLEXCUBE Investor Servicing.
Company Name
Alphanumeric; 60 Characters; Optional
Enter the full name of the Company that is using Oracle FLEXCUBE Investor Servicing. The system will print this as the company name in all the reports.
Distributor Defaults
In this section, define the default information applicable for the AMC, in any maintenance operation in the system.
Distributor ID
Alphanumeric; 12 Characters; Optional
Enter the ID of the default distributor for the installation.
Country
Alphanumeric; 3 Characters; Optional
Enter the default Country of the unit holder.
Minor Age
Numeric; 22 Characters; Mandatory
Enter the default age limit for the Minors.
Check Validity Period
Numeric; 22 Characters; Optional
Enter the number of days for which a Check is valid, by default during transactions.
Registrar ID
Alphanumeric; 12 Characters; Optional
Enter the ID of the default Registrar for the installation.
Nationality
Alphanumeric; 3 Characters; Optional
Enter the default Nationality of the unit holder.
Bank
Alphanumeric; 12 Characters; Optional
Enter the code of the default Bank for the system.
Low Date
Date Format; Optional
Enter the default Low date value for the system.
High Date
Date Format; Optional
Enter the default High Date Value for the system.
High Amount
Numeric; 30 Characters;, Mandatory
Enter the default high amount value.
High Units
Numeric; 27 Characters;, Mandatory
Enter the default high unit value.
Round Off Amount
Numeric; 22 Characters;, Mandatory
Enter the default value for round off amount.
VAT Percent
Numeric; 5 Characters;, Optional
Displays the default value of Value Added Tax (VAT) Percentage.
Amend Period
Numeric; 22 Characters; Optional
Enter the default Amendment period for the Fund Rule/Transactions.
Default Level
Numeric; 2 Characters; Mandatory
This displays the hierarchy default number in the fund. For instance, if the existing fund has a parent fund, then the default level will be ‘2’.
High Counter
Numeric; 22 Characters; Optional
Enter the default high counter value.
Check UH Duplicates
Mandatory
Select Yes or No from drop-down list to check for unit holder Duplicates.
Source ID
Alphanumeric; 6 Characters; Optional
From the list, select the default exchange rate source for the AMC.
Country Code
Alphanumeric; 3 Characters; Optional
Displays the code given to the country where the client site is located.
Client Code
Alphanumeric; 15 Characters; Optional
Displays the code given to the client where Oracle FLEXCUBE Investor Servicing has been installed.
FPAM Installed
Optional
If Oracle FLEXCUBE Asset Management has been installed at the client site, select ‘Yes’ from the drop-down list.
FPAM User Name
Alphanumeric; 15 Characters; Optional
Specify the name of the user where Oracle FLEXCUBE Asset Management has been installed.
Tax Year Start
Date Format, Optional
Specify the start date from which the tax payment should be considered.
Tax Year End
Date Format, Optional
Specify the date till which the tax payment should be considered.
EUSD Options
Optional
Select the default EUSD (European Union Savings Directive) option for the segment. The options available are:
- WithHolding Tax (WHT): EUSD tax is computed and deducted
- Exchange of Information (EOI): EUSD tax is computed but not deducted
- Tax Exemption Certificate (TEC): EUSD tax is computed but not deducted
By default, the option is left unchecked. If you do not indicate any EUSD option, then EUSD option will not be applicable for the segment.
Note
This functionality is applicable only for the Fund Manager module.
Settlement Level
Optional
Indicate whether the payment amount must be compared with the fund base currency amount or the transaction currency amount from the drop-down list while processing transaction settlements.
Interim Tax Paid Date
Date Format; Optional
Specify the tax payment date here. This is only applicable for non-pensions funds.
Note
It is mandatory to specify the interim tax for funds where IOF/IRRF is applicable.
Interim Tax Frequency
Numeric; 2 Characters; Optional
Specify the tax payment frequency here. This is only applicable for non-pensions funds.
Note
It is mandatory to specify the interim tax frequency for funds where IOF/IRRF is applicable.
Fund ID Generation Logic
Alphanumeric; 6 Characters; Optional
Indicate the pattern using which the fund ID needs to be generated, where the first two characters represent the ISO Country Code (except for any jurisdiction with distributor schemas where the 2nd character will designate whether it is "R"egistrar-world or "D"istributor-world) and the following four characters are auto generated numerals.
Branch Defaults
In this section, define the default information applicable for any branch of the AMC, in any maintenance operation in the system.
Title
Alphanumeric; 15 Characters; Optional
Enter the Title to default during unit holder Data Entry. You can make a blank specification so that a blank entry may be accepted as a title by the system.
Investor Type
Optional
Enter the default Investor Type, whether Individual or Corporate from the drop-down list, during unit holder data entry.
Marital Status
Optional
Select the Marital Status from the drop-down list to default during unit holder data entry. The list displays the following values:
- Divorced
- Married
- Not Available
- Single
- Widow
Resident Status
Optional
Enter Resident or Non-Resident as the Resident Status to default during unit holder data entry.
Sex
Optional
Select Male or Female from drop-down list as the Sex to default during unit holder Data Entry.
Mode of Payment
Alphanumeric; 1 Character; Optional
Enter Cash, Check or Transfer as the Payment Mode to default during Transaction data entry.
Redemption Mode
Optional
Enter Amount or Units as the Redemption Mode to default during transaction acceptance.
Account Type
Alphanumeric; 1 Character; Optional
Enter Current, Savings or Fixed as the Payment Mode to default during Transaction data entry.
Language
Alphanumeric; 12 Characters; Optional
Enter English or Non-English as the default language in which the system should display messages.
Password Valid For (in days)
Numeric; 22 Characters; Optional
Enter the minimum number of days after which the Users will have to change the Password. At the end of this retention period, the system will automatically prompt the User at login time to change the password.
System General Reference Number
Mandatory
Enter the option of using a System General Reference Number. If yes, then the Reference Number for all the transactions will also be generated by the system. If not, the Reference Number must be specified at the time of entering the transaction.
Error Level
Numeric; 22 Characters; Optional
Enter the Error Messages Level.
- Enter 1 if you want the system to display an Error Message and not log it.
- Enter 2 if you want the system not to display an Error Message but to log it.
- Enter 3 if you want the system to display an Error Message and Log it.
- If any other level is indicated, the system will display Error Messages and Log it.
Online
Optional
Select the online status of the branch from the drop-down list, at the time of viewing this record. The list displays the following values:
- Yes
- No
Default Time Zone
Alphanumeric; 12 Characters; Optional
Select the default time zone from the values available. All time zones you have maintained through the Time Zone Maintenance screen are displayed in the option list.
Auto Clear Reinvestments
1 Character Maximum, Alphanumeric, Mandatory
Indicate whether 100% outflow transactions include freeze held and reinvestment units.
You can specify any of the following options:
- Option not allowed: Freeze held/reinvestment units should not be considered while processing 100% outflow transactions.
- Allowed – Default checked: Freeze held/reinvestment units should be considered while processing 100% outflow transactions by default.
- Allowed – Default unchecked: Freeze held/reinvestment units will not be considered while processing 100% outflow transactions by default. However, you can check this option while performing transactions.
Auto Clear Provisional Balance
Mandatory
Indicate whether 100% outflow transactions include provisionally allotted units. You can specify any of the following options:
- Option not allowed: Provisionally allotted units should not be considered while processing 100% outflow transactions.
- Allowed – Default checked: Provisionally allotted units should be considered while processing 100% outflow transactions by default.
- Allowed – Default unchecked: Provisionally allotted units will not be considered while processing 100% outflow transactions by default. However, you can check this option while performing transactions.
Other Defaults
In this section, define the other default information applicable for the AMC, in any maintenance operation in the system.
Database
Alphanumeric; 15 Characters; Optional
Enter the name of database that contains all the objects (tables, stored procedures, etc.) used by the system. This will be displayed at the footer of all the screens at run time. This field cannot be edited after it has been entered for the first time.
When you are in Edit mode, this is a Display Only field.
Agent
Alphanumeric; 12 Characters; Optional
Enter the code of the default Agent for the system.
Branch
Alphanumeric; 12 Characters; Optional
Enter the code of the default Agency Branch for the system.
When you are in Edit mode, the Agent and Branch fields are Display Only fields.
Component
Alphanumeric; 1 Character; Optional
Enter the default Component of the system for the installation.
4.2 System Parameters
This section contains the following topics:
- Section 4.2.1, "Maintaining System Parameters"
- Section 4.2.2, "System Parameter Codes Maintenance Screen"
4.2.1 Maintaining System Parameters
At the time of installation of Oracle FLEXCUBE Investor Servicing, the implementers set up codes for parameters that will be used in any maintenance operation in the system, involving both static tables and processing. They also set up a list of values that would be considered valid for each parameter code. In any drop down list in a maintenance screen where the parameter code is used, the valid values list will appear.
The implementers set up these codes and values based on the requirements at each installation. Through the System Parameter maintenance, static information such as the following master lists can be maintained:
- Bank account types
- Countries
- Corporation types
- Identification types
- Occupation types
- Dividend component types
- Investor category types
- Investment Component types
You as a user will be able to add to a list of valid values for a parameter code, if so designated by the implementers at the time of installation.
The valid value lists that you set up will be displayed in the option lists in the user interface, in whatever operation a system parameter value is required to be picked up.
For instance, when bank account types are maintained as a system parameter, a value list containing the different account types is maintained as part of the System Parameter maintenance. In the system, in any screen that requires an account type as input information, the value list will be displayed to the user to select the required account type.
You must define the various components required for validating Prudential Investment Guidelines/ Foreign Exchange Compliance under the parameter code “INVESTMENTCOMP”. This is a necessary maintenance required if you have selected Prudential Investment Guidelines as part of the Fund Product categories. The procedure for specifying the investment component code is the same for any other Parameter value to be maintained.
Note
For communication mode Param value is restricted to the length of 2 characters. No validation will be done during the maintenance.
You cannot modify or delete the factory shipped communication mode in ‘Parameter Setup’ screen. The system will display an error message as ‘Selected Param value cannot be Modified/Deleted’.
4.2.2 System Parameter Codes Maintenance Screen
To view the system parameters codes and add to valid value lists for the same, use the System ‘Parameter Setup Detail’ screen. You can invoke this screen by typing ‘UTDPARAM’ in the field at the top right corner of the Application tool bar and clicking on the adjoining arrow button. Select ‘New’ from the Actions menu in the Application tool bar or click new icon to enter the details.
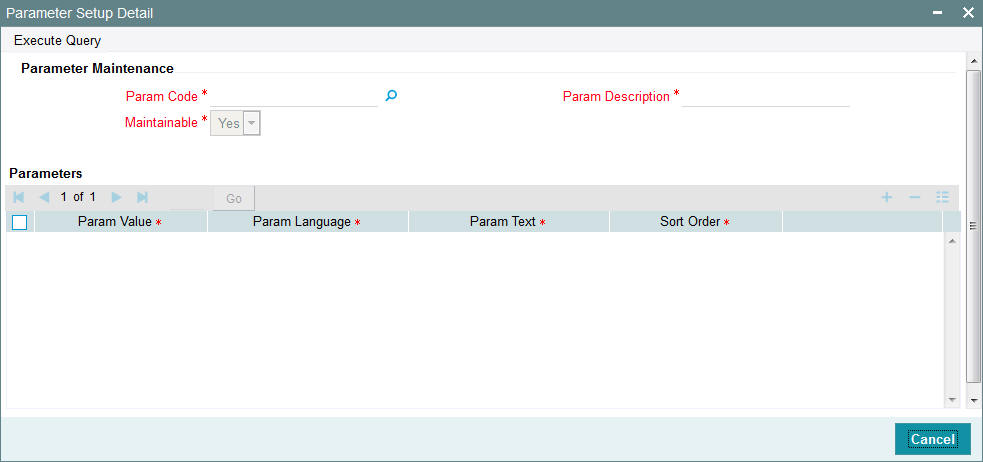
You can specify the following details:
Parameter Maintenance
Param Code
Alphanumeric; 25 Characters; Mandatory
Specify the param code.
Param Description
Display
The system displays the description for the selected param code.
Maintainable
Display
The system displays the maintained status.
After specifying the ‘Param Code’, click on ‘Execute Query’ button. The lsystem displays the following values:
- Param Value
- Param Language
- Param Text
- Sort Order
4.3 Module Default Detail
This section contains the following topics:
4.3.1 Invoking Module Default Detail Screen
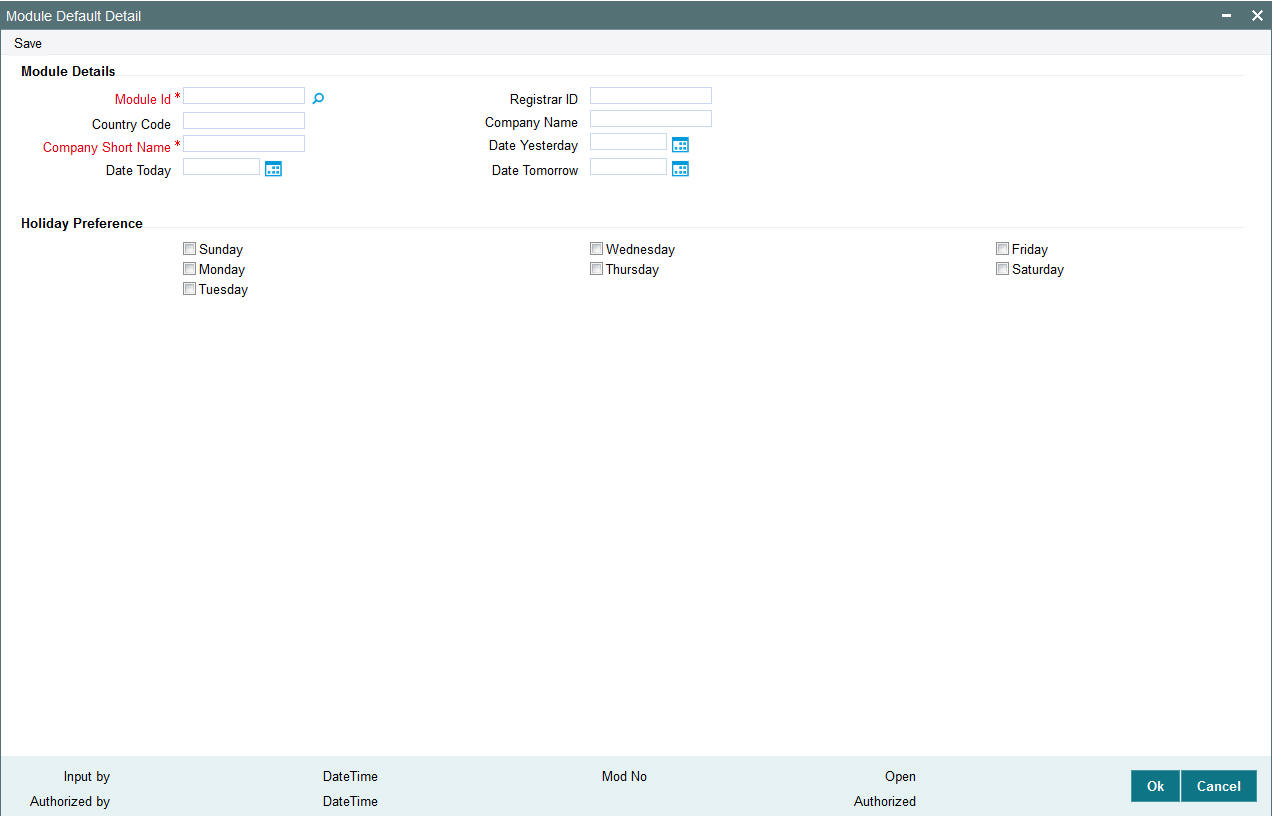
You can maintain module details using ‘Module Default Detail’ screen. You can invoke this screen by typing UTDMODDE in the field at the top right corner of the Application tool bar and clicking the adjoining arrow button.
You can specify the following details:
Module Details
Module ID
Alphanumeric; 50 Characters; Mandatory
Specify the module ID. Alternatively, you can select module ID from the option list. The list displays all valid module ID maintained in the system.
Registrar ID
Alphanumeric; 12 Characters; Optional
Specify the registrar ID. Alternatively, you can select registrar ID from the option list. The list displays all valid registrar ID maintained in the system.
Country Code
Alphanumeric; 15 Characters; Optional
Specify the country code.
Company Name
Alphanumeric; 60 Characters; Optional
Specify the name of the company
Company Short Name
Alphanumeric; 15 Characters; Optional
Specify the short name of the company.
Date Yesterday
Date Format; Optional
Select the previous date from the adjoining calendar.
Date Today
Date Format; Optional
Select the current date from the adjoining calendar.
Date Tomorrow
Date Format; Optional
Select the next date from the adjoining calendar.
Holiday Preference
Select the appropriate check box adjacent to holiday date. The options are as follows:
- Sunday
- Monday
- Tuesday
- Wednesday
- Thursday
- Friday
- Saturday
4.4 Print Reports
This section contains the following topics:
Section 4.4.1, "Invoking Print Reports Screen"
4.4.1 Invoking Print Reports Screen
You can update the new cheque number against an old expired dividend payment cheque using ‘Print Reports’ screen. You can invoke this screen by typing ‘UTDPRDIV’ in the field at the top right corner of the Application tool bar and clicking on the adjoining arrow button.
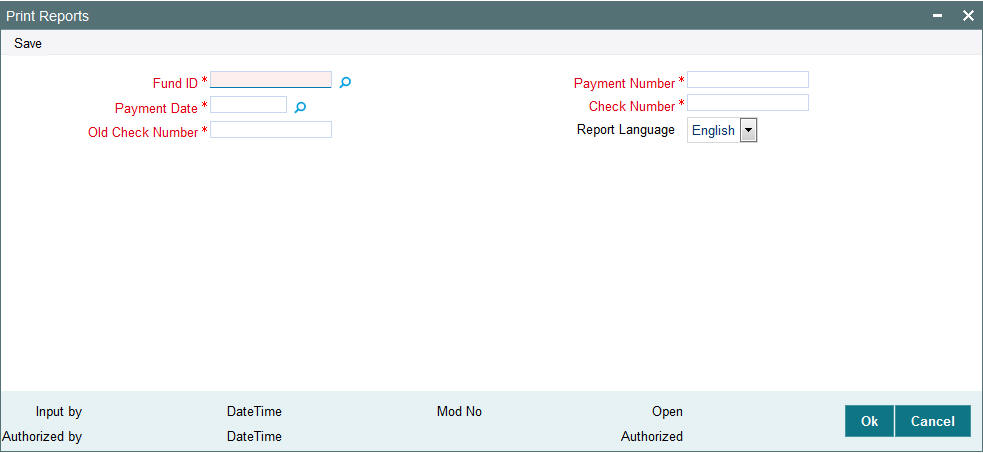
You can specify the following details:
Fund ID
Alphanumeric; 6 Characters; Mandatory
Specify the fund ID in which the dividend payment cheque was issued. Alternatively, you can select fund ID from the option list. The list displays all valid fund ID maintained in the system.
Payment Date
Date Format; Mandatory
Select the payment date for the dividend transaction from the adjoining calendar.
Payment Number
Numeric; 5 Characters; Mandatory
Specify the dividend payment number
Old Check Number
Alphanumeric; 16 Characters; Mandatory
Specify the old cheque number that was issued against the dividend payment.
Check Number
Alphanumeric; 16 Characters; Mandatory
Specify the new cheque number that is to be issued against the old dividend payment.
Report Language
Optional
Select the report language from the drop-down list. The list displays the following values:
- English
- German
4.5 Additional Information Heads
This section contains the following topics:
4.5.1 Maintaining Additional Information Heads
The Oracle FLEXCUBE Investor Servicing system gives you the facility of defining heads under which you can capture any additional information pertaining to any entities that you set up in the system, especially unit holders and brokers.
You can also set up a list of acceptable, valid values for each information head.
To define these additional information heads and their valid values, use the ‘Additional Information Maintenance’ screen. You can invoke this screen by typing ‘UTDADINF’ in the field at the top right corner of the Application tool bar and clicking on the adjoining arrow button.
Select ‘New’ from the Actions menu in the Application
tool bar or click new icon to enter the details.
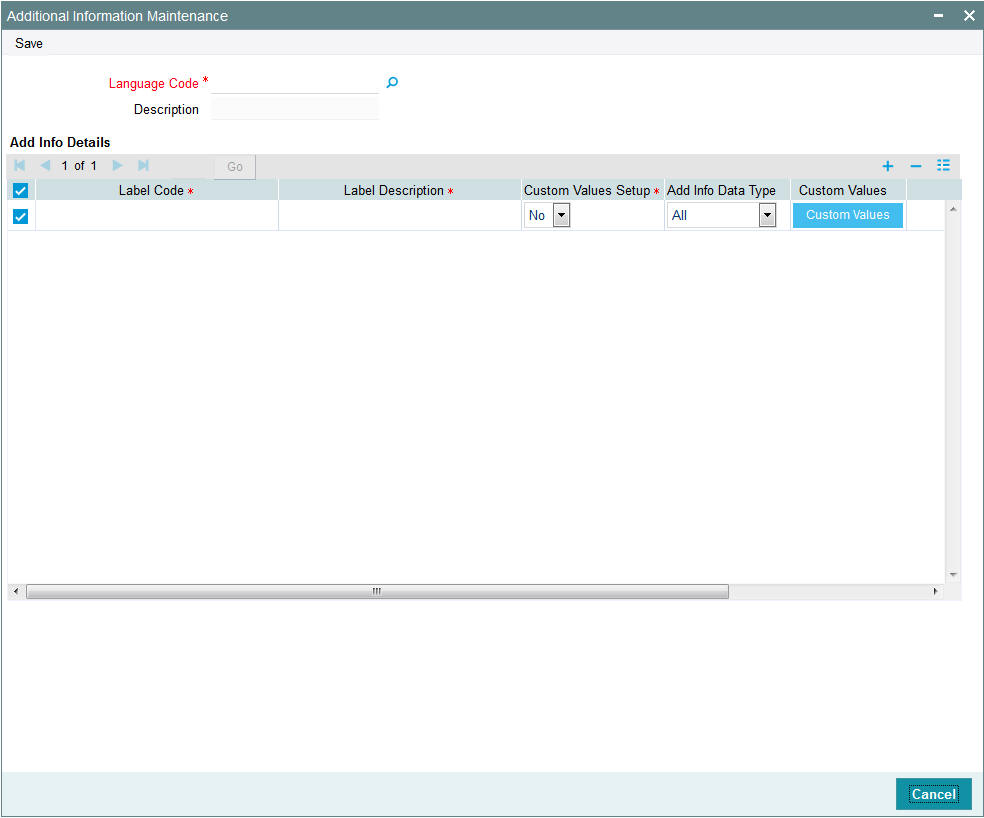
You can specify the following details:
Language Code
Alphanumeric; 12 Characters; Mandatory
Specify the language for which you want to define the additional information heads.
Description
Display
The system displays the description for the selected language code.
Add Info Details
To add a new information head, click the Add link in the Additional Information Maintenance screen. A new row is inserted at the bottom of the list.
Label Code
Alphanumeric; 30 Characters; Mandatory
Specify the label code.
Label Description
Alphanumeric; 100 Characters; Mandatory
Specify the description of the selected label code.
Custom Values Setup
Mandatory
Select the custom values setup status from the drop-down list. The list displays the following values:
- Yes
- No
Add Info Data Type
Optional
Select the type of data that can be entered into the additional information field. This specification can be made only for those additional information heads that are not linked to a system parameter.
In the system, when a value is entered into the additional information field, the data type of the entered value is validated by the system.
The drop-down list displays the following values:
- All
- Alphanumeric
- Numeric
- Date
Param Code
Alphanumeric; 25 Characters; Optional
Specify the param code.
If the additional information head being maintained is to be linked to a system parameter that has been maintained for the installation, you must also enter the code of the specific system parameter to which the additional information head is linked. The values maintained for the linked parameter are also applicable for the additional information head. When you click on the Custom Values button, you can select the system parameter to which the additional information head must be linked.
To define a set of valid values, click the Valid Values button. The following window is displayed:
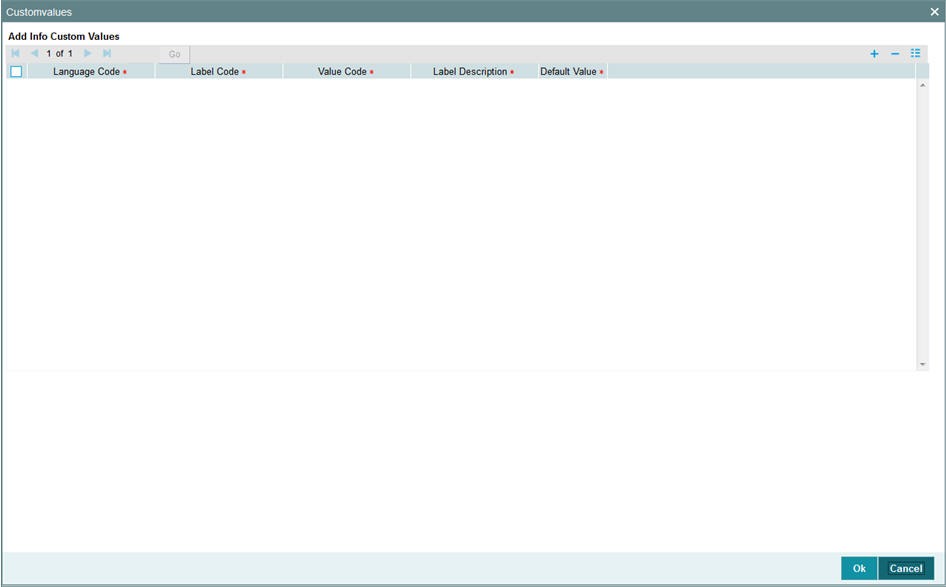
You can specify the following values:
Language Code
Alphanumeric; 12 Characters; Mandatory
Specify the language for which you want to define the additional information heads.
Label Code
Alphanumeric; 30 Characters; Mandatory
Specify the label code.
Value Code
Alphanumeric; 30 Characters; Mandatory
Specify the value code.
Label Description
Alphanumeric; 100 Characters; Mandatory
Specify the label description.
Default Value
Mandatory
Select if the value is to be shown as default, in the drop down list for this information head, in any maintenance screen in the system. The values available in drop-down list is as follows:
- Yes
- No
Click ‘Ok’ button. Your changes are saved, the List of Values screen is closed, and you are returned to the main Additional Information Maintenance screen.
Linking an additional information head to a system parameter
You can use the Link to Param field to indicate whether the additional information head that is being maintained is linked to a system parameter that has been maintained for the installation. Check this box to indicate such a linkage.
If a linkage is indicated, you must also enter the code of the specific system parameter to which the additional information head is linked. The values maintained for the linked parameter are also applicable for the additional information head. When you click on the Valid Values button, you can select the system parameter to which the additional information head must be linked.
You cannot maintain a restrictive list for an additional information head that is linked to a system parameter.
In the system, when the additional information field that is linked to a parameter code is displayed for data entry, a list of values button is provided for selection of the values defined for the linked parameter code.
4.5.1.1 Specifying RPO Code for Account Status as Additional Information Head
When you set up a unit holder account in the system, you can capture the RPO Code that would be used for tracking the status of the account. To enable this, the RPO Code is provided as an additional information head in the Additional Information Maintenance, with valid values such as Bankrupt, Deceased, Lien on Holdings, Return Mail and so on, as a pre-shipped maintenance.
Based on the RPO Code, specific transaction types could be allowed or disallowed, as follows:
RPO Code |
Processing Implications |
Normal/Active |
No associated RPO Code |
Bankrupt |
Redemptions, Transfer-In will be allowed. Subscription, Switch-Out, Switch-In, Transfer-Out transactions will not be allowed |
Deceased |
All transaction types disallowed |
Deceased Estate |
All transaction types disallowed |
Frozen |
All transaction types disallowed |
Hold |
All transaction types allowed |
Blacklist |
All transaction types disallowed |
Suspicious |
All transaction types allowed |
Closed |
All transaction types disallowed |
The RPO code can be tracked separately for each installation; therefore, the same account could have the BLOCKED status in one installation and ACTIVE in another. To mark a status, an Information Change must be used.
To capture the effective date for the RPO status, an additional information head RPO Effective Date is provided, with the data type as ‘Date Type’. The format for the date is picked up from the Parameter Code ‘DATEFORMATFORADDINFO’, which is a pre-shipped maintenance.
These additional information heads are provided at your installation only if specifically requested for.
4.6 Entity Additional Information Mapping
This section contains the following topics:
4.6.1 Invoking the Entity Additional Information Mapping Screen
After you have defined the additional information heads with their valid values in the Additional Information Maintenance screen, you must map them to be applicable during the maintenance of entities.
To do so, use the ‘Entity Additional Information Mapping’ screen. You can invoke this screen by typing ‘UTDENMAP’ in the field at the top right corner of the Application tool bar and clicking on the adjoining arrow button. Select ‘New’ from the Actions menu in the Application tool bar or click new icon to enter the details.
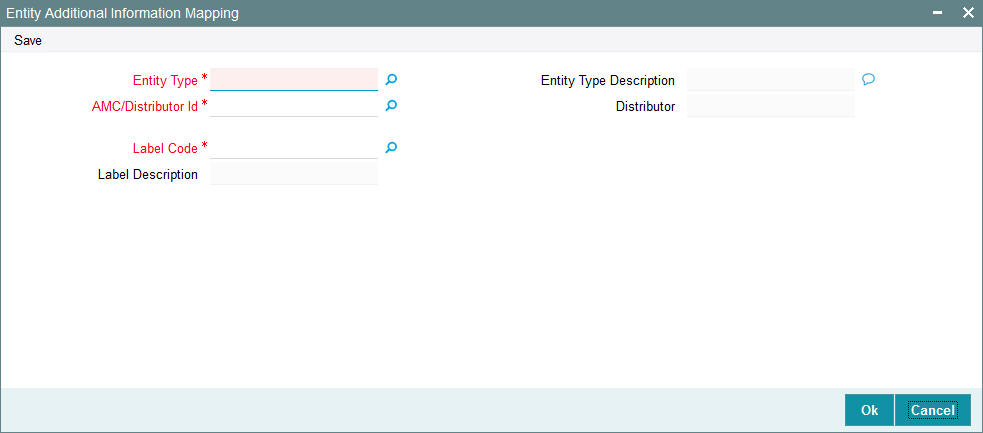
You can specify the following details:
Entity Type
Alphanumeric; 1 Character; Mandatory
Specify the entity type for which the information head must be mapped.
Entity Type Description
Display
The system displays the description for the selected entity type.
AMC/Distributor Id
Alphanumeric; 12 Characters; Mandatory
Specify the AMC or distributor ID for which the mapping is applicable.
Distributor
Display
The system displays the description for the selected distributor ID.
Label Code
Alphanumeric; 30 Characters; Mandatory
Specify the label code.
Label Description
Display
The system displays the description for the selected label code.
After you have mapped all the desired information heads in this manner, click the Save button to save your changes.
You can map a maximum of 30 add infos to an entity. If you try to map more than 30 entities, then the system will display an error message.
4.7 Fee Categories and Sub-categories
This section contains the following topics:
- Section 4.7.1, "Setting up Fee Categories and Sub-categories"
- Section 4.7.2, "Fee Category Code Maintenance Screen"
4.7.1 Setting up Fee Categories and Sub-categories
At the time of installation of Oracle FLEXCUBE Investor Servicing, the implementers set up codes for fee categories that will be deemed applicable for specific investor categories. They also set up a list of fee sub-categories that would be considered valid for each fee category.
The implementers set up these codes and values based on the requirements at each installation.
You as a user will be able to add to a list of fee sub-categories for a fee category code. However, you cannot set up any new fee categories.
4.7.2 Fee Category Code Maintenance Screen
To view a list of defined fee category codes or add any new fee sub-categories, use the ‘Fee Category Setup Detail’ screen. You can invoke this screen by typing ‘UTDFEECA’ in the field at the top right corner of the Application tool bar and clicking on the adjoining arrow button.
Select ‘New’ from the Actions menu in the Application tool bar or click new icon to enter the details.

You can specify the following details:
Fee Category Code Maintenance
Language Code
Alphanumeric; 12 Characters; Mandatory
Specify the language for which you want to view the defined fee category codes.
Language Description
Display
The system displays the description for the selected language code.
Fee Category
Alphanumeric; 3 Characters; Mandatory
Specify the fee category details. Alternatively, you can select the fee category from the option list. The list displays all defined fee categories for the selected language code.
Fee Category Description
Display
The system displays the description for the selected fee category.
Investor Type
Display
The system displays the type of investor.
Fee Sub Category Value Maintenance
To add a fee sub-category, click the Add link. A new row is inserted at the bottom of the list.
Fee Sub Category
Alphanumeric; 6 Characters; Mandatory
Specify the fee sub category.
Description
Alphanumeric; 60 Characters; Mandatory
Specify the description for the selected fee sub category.
4.8 Data Mapping
This section contains the following topics:
4.8.1 Maintaining Data Mapping
You can map data from external systems to FCIS using the ‘FCIS Data Mapping Maintenance Detail’ screen. You can invoke this screen by typing ‘UTDDMAP’ in the field at the top right corner of the Application tool bar and clicking on the adjoining arrow button.
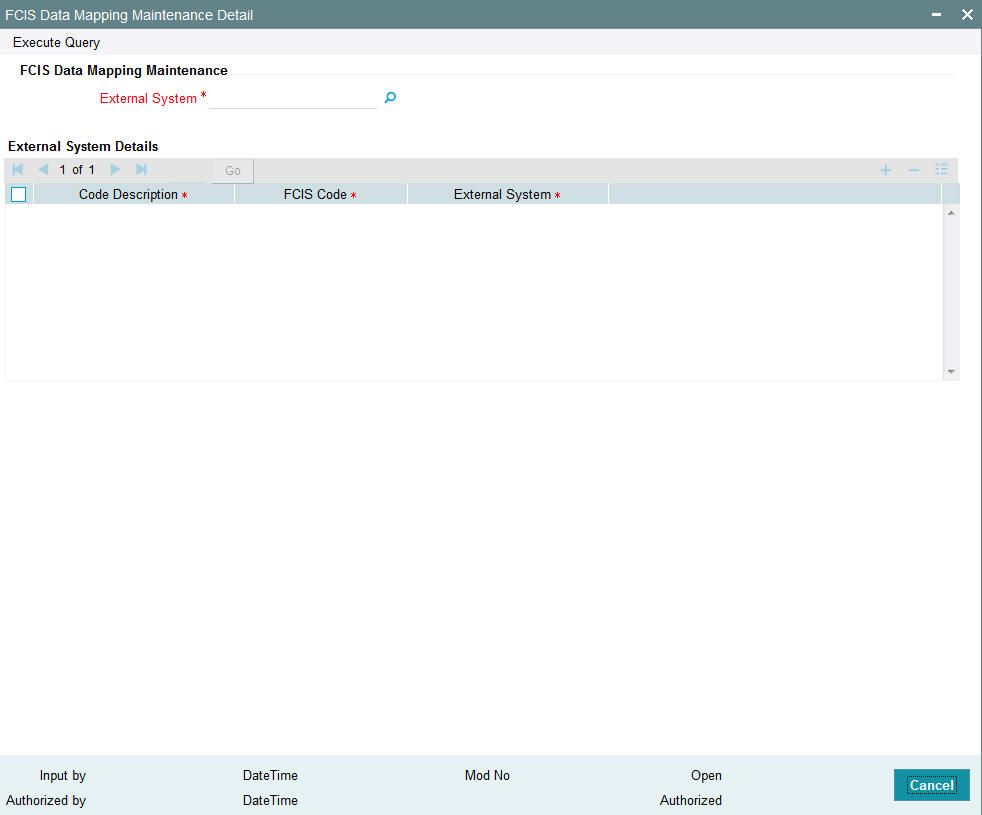
External System
Alphanumeric; 30 Characters; Mandatory
Specify the external system from which the data needs to be mapped. The options being:
- CAMS
- TEMPLETON
- KARVY
- HSBC
- Oasis
External System Details Section
Code Description
Alphanumeric; 100 Characters; Mandatory
Specify the category of codes from factory shipped values available.
FCIS Code
Alphanumeric; 255 Characters; Mandatory
Specify the corresponding factory shipped value available in FCIS for the specified category code.
External System Code
Alphanumeric; 50 Characters; Mandatory
Specify the external system code here.
Note
If the code description selected from the available list is linked to any existing PARAMS, system would display all valid codes irrespective of the maintenance.
4.9 User Event Mapping
This section contains the following topics:
4.9.1 Invoking the User Event Mapping Screen
FCIS provides the facility to map the users responsible for each event that can be raised during the End of Day (EOD) process. You can also capture the user’s telephone numbers.
To map an EOD operator with an event, use the ‘Event User Mapping Detail’ screen. You can invoke this by typing ‘UTDEUMAP’ in the field at the top right corner of the Application tool bar and clicking on the adjoining arrow button. Select ‘New’ from the Actions menu in the Application tool bar or click new icon to enter the details.

Event Code
Alphanumeric; 20 Characters; Mandatory
Select the event for which you wish to map a user from the drop-down list. The list contains all the valid event codes maintained in the system.
Event Description
Display
On selecting the event code, the system displays the description of the event code.
Event User Mapping Section
User ID
Alphanumeric; 12 Characters; Mandatory
Select the User Id of the person who is to be mapped to the chosen event. The list contains all the valid users maintained in the system.
User Name
Display
The system displays the name of the user for the selected user ID.
Contact Numbers 1 – 3
Alphanumeric; 16 Characters; Contact Number 1 is Mandatory
Enter the contact telephone numbers of the user. You can enter up to three contact numbers.
4.10 Dividend Component Details
This section contains the following topics:
4.10.1 Maintaining Dividend Component Details
Earnings from a dividend can be classified as permissible or non permissible. As per Shariah laws, non permissible income cannot be reinvested into the fund.
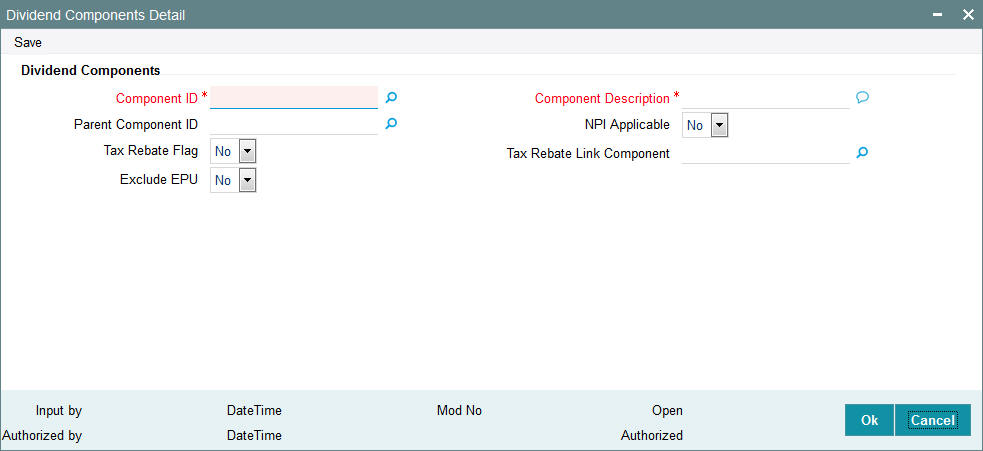
You can maintain dividend component details in the ‘Dividend Components Detail’ screen. You can invoke this screen by typing ‘UTDDVCOM’ in the field at the top right corner of the Application tool bar and clicking on the adjoining arrow button. Select ‘New’ from the Actions menu in the Application tool bar or click new icon to enter the details.
You can specify the following fields in this screen:
Component ID
Alphanumeric; 2 Characters; Mandatory
Enter a unique identifier for the dividend component that is to be classified as Non permissible income.
Component Description
Display
Enter a description of the component.
Parent Component ID
Alphanumeric; 2 Characters; Mandatory if the component is NPI Applicable
If the component has been classified as NPI Applicable then specify the parent dividend component. The parent component specified here will be used for reporting purposes. The option list contains the valid dividend component Ids maintained in the system.
NPI Applicable
Optional
Select ‘Yes’ from drop-down list to indicate that income from this component is non permissible.
Tax Rebate Flag
Optional
Select if tax to be deducted at source or not from the drop-down list. The list displays the following values:
- Yes
- No
Tax Rebate Link Component
Alphanumeric; 2 Characters; Optional
Specify the tax deducted at source link component to be linked.
Exclude EPU
Optional
Select if EPU component should be marked for exclusion of Tax or not from the adjoining drop-down list. Following are the options available:
- Yes
- No
The dividend tax process will check the dividend component ID’s marked as Tax rebate and the link component. The system will calculate the dividend withholding tax amount. If the tax difference amount is greater than zero then new WHT amount will be same as of Tax Difference Amount; Otherwise New WH Tax Amount will be zero.
4.10.1.1 Processing Fund Dividend WHT
You can mark the component defined as tax rebate component or as a link component. The component can also be marked to define if the Tax has to be excluded or included..
The dividend tax process will check if the dividend component ID’s marked as Tax rebate and the link component and calculate the dividend withholding tax amount. If the tax difference amount is greater than zero then new WHT amount will be same as of Tax Difference Amount; Otherwise New WH Tax Amount will be zero.
For all other taxable dividend components (meaning taxable component id which are not maintained as “Tax Rebate”), the system will calculate the dividend withholding tax as per the regular method / calculation. This is applicable for both UT and LEP business.
If ‘Exclude EPU’ is maintained as Yes then during fund dividend processing (fund dividend screen), the system will not add up to derive the EPU else there will be no change in processing the dividend.
4.11 Stop Code Maintenance
This section contains the following topics:
4.11.1 Maintaining Stop Code
You can maintain the Transaction Restrictions with different attributes.such as IPO Subscription (UTDTXN01), Subscription (UTDTXN02), Redemption (UTDTXN03), Switch Out UTDTXN04), Switch In (UTDTXN04), Transfer Out (UTDTXN05), Transfer In (UTDTXN05), Block (UTDTXN06),Unblock (UTDTXN07) and Standing Instruction Set up (UTDSIN). Restrictions applied to these transaction types will be applicable for all ref types under each transaction type.
Once the Stop Code is added and authorized in the system, you cannot delete it.
On modification/ changes in the Stop Codes restrictions (Transaction/Dividend/Payment) in ‘Stop Codes Maintenance screen, the restrictions will be effective to all the Unit Holders in the system once the stop codes maintenance screen is authorized.
4.11.2 Invoking Stop Code Maintenance Screen
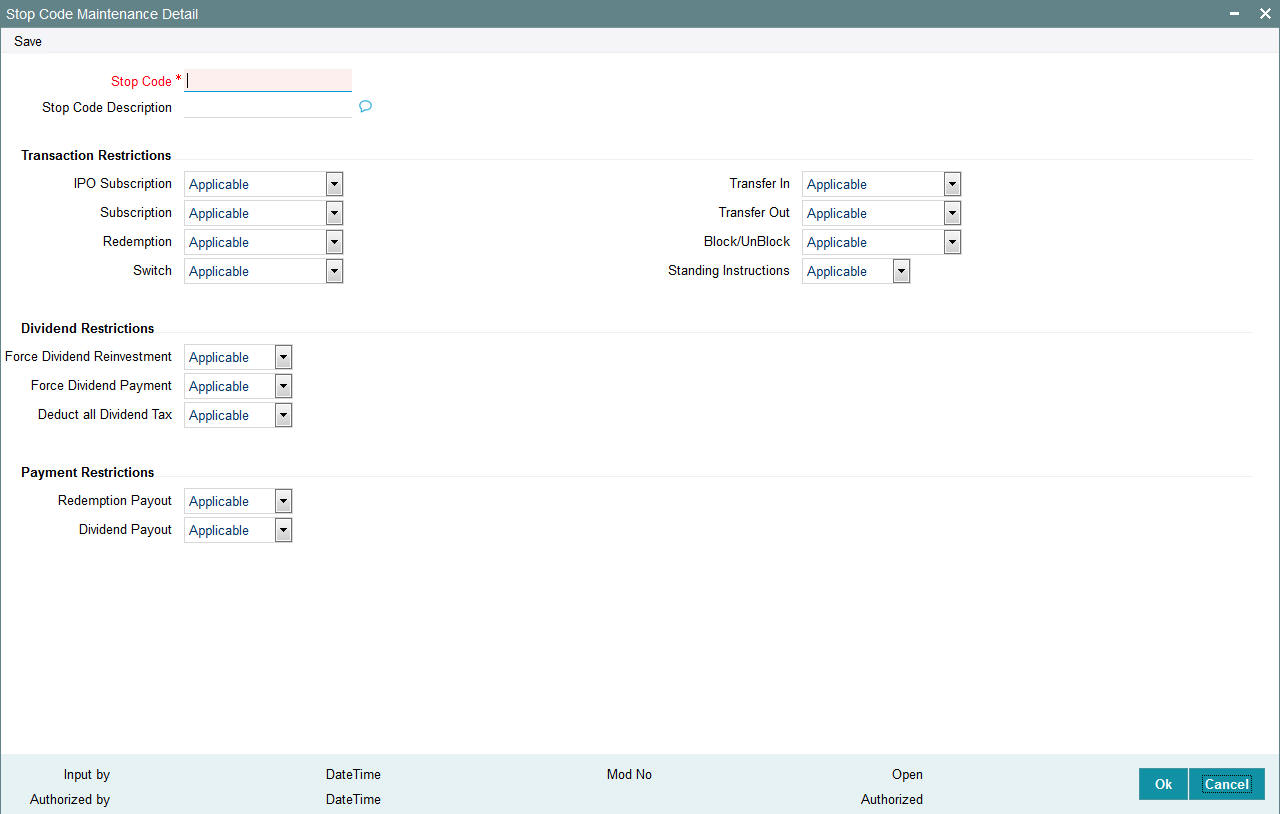
You can maintain new Stop codes using the predefined attributes in ‘Stop Code Maintenance Detail’ screen. You can invoke this screen by typing ‘UTDSTOPC’ in the field at the top right corner of the Application tool bar and clicking on the adjoining arrow button.
You can specify the following details:
Stop Code
Alphanumeric; 25 Characters; Mandatory
Specify the stop code.
Stop Code Description
Alphanumeric; 255 Characters; Optional
Specify the description for the stop code.
Transaction Restrictions
IPO Subscription
Optional
Select IPO Subscription transaction restrictions from the adjoining drop-down list. Following are the options available:
- Applicable
- Not Applicable
- Applicable with Warning
Subscription
Optional
Select Subscription transaction restrictions from the adjoining drop-down list. Following are the options available:
- Applicable
- Not Applicable
- Applicable with Warning
Redemption
Optional
Select redemption transaction restrictions from the adjoining drop-down list. Following are the options available:
- Applicable
- Not Applicable
- Applicable with Warning
If you select ‘Not Applicable’ and you try to map the relevant stop code to the UH, then the system will stop the Redemption payment generation for the UH. If you generate payment for Redemption with restriction as ‘Not Applicable’, the system will display an error message stating generating payment is restricted.
Redemption transactions which requires confirmations will not be available to confirm in ‘confirm redemption’ batch if ‘Redemption Payment’ is restricted for the UH.
Switch
Optional
Select switch transaction restrictions from the adjoining drop-down list. Following are the options available:
- Applicable
- Not Applicable
- Applicable with Warning
Transfer In
Optional
Select transfer in transaction restrictions from the adjoining drop-down list. Following are the options available:
- Applicable
- Not Applicable
- Applicable with Warning
Transfer Out
Optional
Select transfer out transaction restrictions from the adjoining drop-down list. Following are the options available:
- Applicable
- Not Applicable
- Applicable with Warning
Block/UnBlock
Optional
Select block/unblock transaction restrictions from the adjoining drop-down list. Following are the options available:
- Applicable
- Not Applicable
- Applicable with Warning
Standing Instructions
Optional
Select standing instruction transaction restrictions from the adjoining drop-down list. Following are the options available:
- Applicable
- Not Applicable
Note
- If Standing Instructions is ‘Not Applicable’ then it will Pause the existing SI and will disallow the new ones
- If Standing Instructions is ‘Applicable’ then it will allow the new SI and Pause SI (if any) will be restarted
In case for a particular transaction type, restriction is ‘Not Applicable’, then the system will display an error message as ‘STOPACCOUNT is issued for ‘Transaction Type’ to this Unit Holder” stating this transaction is restricted.
In case for a particular transaction type, restriction is ‘Applicable with Warning’, then the system will display a warning message as ‘STOPACCOUNT is issued for ‘Transaction Type’ to this Unit Holder’ stating this transaction is restricted. You can override the warning message.
Dividend Restrictions
Force Dividend Reinvestment
Optional
Select the force dividend reinvestment restrictions from the adjoining drop-down list. Following are the options available:
- Applicable
- Not Applicable
If the relevant Stop Code where restriction is applied for ‘Forced Dividend Reinvestment’ is mapped to the Unit Holder, the system will reinvest the dividend distribution irrespective of UH IDS maintenance.
Force Dividend Payment
Optional
Select the force dividend payment restrictions from the adjoining drop-down list. Following are the options available:
- Applicable
- Not Applicable
If the relevant Stop Code where restriction is applied for ‘Forced Dividend Payout’ is mapped to the Unit Holder, system will Payout the dividend distribution irrespective of UH IDS maintenance.
Deduct all Dividend Tax
Optional
Select the dividend tax restrictions from the adjoining drop-down list. Following are the options available:
- Applicable
- Not Applicable
If the relevant Stop Code where restriction is applied for ‘Deduct All Dividend Tax’ is mapped to the Unit Holder, system will Payout the dividend distribution irrespective of UH IDS maintenance.
Payment Restrictions
Redemption Payout
Optional
Select the redemption payment restriction from the adjoining drop-down list. Following are the options available:
- Applicable
- Not Applicable
If you select ‘Redemption Payout’ field as ‘Not Applicable’, and the relevant Stop code is mapped to the UH, then the system will stop the Redemption payment generation for the UH. If you try to generate payment for Redemption with this status, then the system will display an error message stating generating payment is restricted.
Dividend Payout
Optional
Select the dividend payment restriction from the adjoining drop-down list. Following are the options available:
- Applicable
- Not Applicable
If you select ‘Dividend Payout’ field as ‘Not Applicable’, and the relevant Stop code is mapped to the UH, then the system will stop the dividend payment generation for the UH. If you try to generate payment for a dividend with this status, then the system will display an error message stating generating payment is restricted.
The system will use these restrictions in EFT file generation for Redemptions and Dividend Payments. Check Payments and Transfer will be restricted based on Payment restrictions. Upon release of the Payment restrictions, the system will generate all the pending Dividend and Redemption payments individually.
4.12 Stop Code Summary
This section contains the following topics:
- Section 4.12.1, "Retrieving Stop Code in Summary Screen"
- Section 4.12.2, "Editing Stop Code Details"
- Section 4.12.3, "Viewing Stop Code Details"
- Section 4.12.4, "Deleting Stop Code Details"
- Section 4.12.5, "Authorizing Stop Code Details"
- Section 4.12.6, "Amending Stop Code Details"
- Section 4.12.7, "Authorizing Amended Stop Code Details"
4.12.1 Retrieving Stop Code in Summary Screen
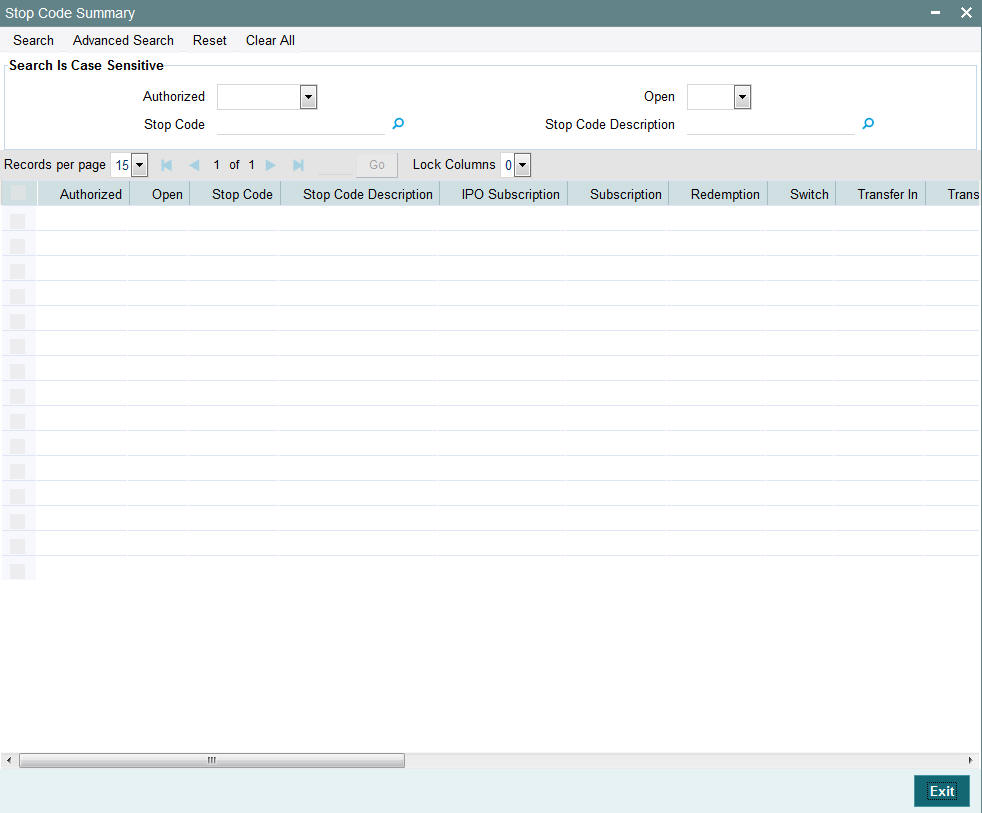
You can invoke the ‘Stop Code Summary’ screen by typing ‘UTSSTOPC’ in the field at the top right corner of the Application tool bar and clicking on the adjoining arrow button.
You can retrieve a previously entered stop code in the Summary screen, as follows:
- Invoke the Stop Code Summary screen and specify the following:
- The status of the fund type in the Authorized field. If you choose the “Blank Space” option, then all the fund types are retrieved.
- The status of the fund type in the Open field. If you choose the “Blank Space” option, then all the fund types are retrieved.
- Stop Code
- Stop Code Description
- After you have specified the required details, click ‘Search’ button. All Stop codes with the specified details are retrieved and displayed in the lower portion of the screen.
You can also retrieve the stop code detail from the detail screen by doing query in the following manner:-
- Press F7
- Input the Stop Code
- Press F8
You can perform Edit, Delete, Amend, Authorize, Reverse, Confirm operation by selecting from the Action list.
You can also search the record by using combination of % and alphanumeric value.
For example, you can search the record for Stop Code or Stop Code description by using the combination of % and alphanumeric value as follows:-
- Search by M%: The system will fetch all the records whose Stop Code description starts from Alphabet ‘M’. For example, Mutual Fund.
- Search by %7 : The system will fetch all the records whose Stop Code ends by numeric value’ 7’ For example, 217,267,77 and so forth.
- Search by %17%: The system will fetch all the records whose Stop Code contains the numeric value 17. For example, 3217, 2172 and so forth.
4.12.2 Editing Stop Code Details
You can modify the details of a stop code that you have already entered into the system, provided it has not been subsequently authorized. You can perform this operation as follows:
- Invoke the Stop Code Summary screen from the Browser.
- Select the status of the stop code that you want to retrieve for modification in the Authorization Status field. You can only modify records of stop codes that are unauthorized. Accordingly, choose the Unauthorized option from the drop-down list.
- Specify any or all of the details of the Stop Code in the corresponding fields on the screen to retrieve the fund type that is to be modified.
- Click ‘Search’ button. All unauthorized stop codes with the specified details are retrieved and displayed in the lower portion of the screen.
- Double click the stop code that you want to modify. The Stop Code Maintenance Detail screen is displayed.
- Select Unlock Operation from Action list to modify the record. Modify the necessary information.
- Click Save to save the changes. The Stop Code Maintenance Detail screen is closed and the changes made are reflected in the Stop Code Summary screen.
4.12.3 Viewing Stop Code Details
To view a Stop Code that you have previously entered:
- Invoke Stop Code Summary Screen from the Browser.
- Select the status of the stop code that you want to retrieve for viewing in the Authorization Status field. You can also view all stop codes that are either unauthorized or authorized only, by choosing the Unauthorized/ Authorized option.
- Specify any or all of the details of the stop code in the corresponding fields on the screen.
- Click ‘Search’ button. All stop codes with the specified details are retrieved and displayed in the lower portion of the screen.
- Double click the stop code that you want to view in the list of displayed Stop Codes. The Stop Code Maintenance Detail screen is opened in view mode.
4.12.4 Deleting Stop Code Details
You can delete only unauthorized stop codes in the system.
- Invoke the Stop Code Summary screen from the Browser.
- Select the status of the stop codes that you want to retrieve for deletion.
- Specify any or all of the details of the stop code in the corresponding fields on the screen.
- Click ‘Search’ button. All stop codes with the specified details are retrieved and displayed in the lower portion of the screen.
- Double click the stop code type that you want to delete. The Stop Code Maintenance Detail screen is displayed.
- Select Delete operation from the Action list. The system prompts you to confirm the deletion, and the record is deleted physically from the system database.
4.12.5 Authorizing Stop Code Details
An unauthorized stop code must be authorized in the system for it to be processed.
To authorize a stop code:
- Invoke the Stop Code Summary screen from the Browser.
- Select the status of the Stop Code that you want to retrieve for authorization. Typically, choose the Unauthorized option from the drop-down list.
- Specify any or all of the details of the fund type in the corresponding fields on the screen.
- Click ‘Search’ button. All stop codes with the specified details that are pending authorization are retrieved and displayed in the lower portion of the screen.
- Double click the stop code type that you wish to authorize. The Stop Code Maintenance screen displayed. Select Authorize operation from Action.
When the checker authorizes stop code, details of validations, if any, that were overridden by the maker of the transaction during the Save operation, are displayed. If any of these overrides results in an error, the checker must reject the stop code.
4.12.6 Amending Stop Code Details
After a stop code is authorized, it can be modified using the Unlock operation from Action list. To make changes to a stop code after authorization, you must invoke the Unlock operation which is termed as Amend Operation.
- Invoke the Stop Code Summary screen from the Browser.
- Select the status of the Stop Code that you wish to retrieve for amendment. You can only amend records of stop codes that are authorized.
- Specify any or all of the details of the stop code in the corresponding fields on the screen.
- Click ‘Search’ button. All stop codes with the specified details are retrieved and displayed in the lower portion of the screen.
- Double click the stop code that you want to amend. The Stop Code Maintenance screen is displayed in Amendment mode.
- Click the Unlock operation from the Action list to amend the stop code.
- Amend the necessary information. Click the Save button to save the changes.
4.12.7 Authorizing Amended Stop Code Details
An amended stop code must be authorized for the amendment to be made effective in the system.
The process of authorization is subsequently the same as that for normal transactions.
4.13 RDR Parameters
This section contains the following topics:
- Section 4.13.1, "Maintaining RDR Parameters"
- Section 4.13.2, "Invoking RDR Parameter Maintenance Screen"
- Section 4.13.3, "Processing RDR Parameters"
- Section 4.13.4, "Front-end Fees and Trail Commission Payments"
4.13.1 Maintaining RDR Parameters
The Financial Services Authority (FSA) is an independent non-governmental regulatory body. FSA has proposed new regulations Retail Distribution Review (RDR) on Retail Advised portion of the Fund Market with effect from 1st January 2013.
The Retail Distribution Review regulations ban the payment of commission on retail advised retail business after 31st December 2012. Execution only Business can be defined as transactions by investor post-RDR without any advice from any advisor. While Advised Business can be defined as transactions done by investor post-RDR based on advice from advisor. Post RDR, neither front-end nor trail commission can be paid on advised new retail business. However, payment of commission (front-end/trail) can continue on New Business classified as ‘Execution only Business’. Commission payments can also continue to be paid on ‘Legacy Business’. Post RDR, the payment of commissions will depend on the classification of transactions (‘Legacy Business’, ‘Advised Business’, and ‘Execution Only Business’).
The RDR regulations will be applicable to UK domiciled advisor irrespective of whether they purchase UK funds or non-UK funds. The TAs for funds outside UK that are purchased as result of advice from a UK domiciled advisor will need to comply with RDR. It will be required to ascertain whether the advisor is domiciled in UK or not.
It is required to define the front-end commission and trail commission payable based on classification of transaction and domicile of advisor. It will be required to provide the audit trail for front-end commission and trail commission.
In the absence of commission payments on new advised business, investor will be required to pay fees to the advisor for the advice received. The advisor fee will be agreed upon by the investor and the advisor. The advisor will also be able to charge for ongoing services provided to investors. It will be required to provide audit trail for advisor fees. These fees are expected to be handled outside the system.
An investor may hold units in a fund and could have made investments based on advice received Pre-RDR and Post RDR. The payment of commission or fees will depend on the classification of transactions. It will be required to segregate an investors holding (Pre-RDR/Post-RDR) and classify them. Segregation of investor’s holdings will also be required to classify transactions resulting from reinvestment of dividends. It will be required to provide the audit trail for Pre-RDR and Post-RDR holdings.
Payment of commission on SI transactions will depend on whether the SI transaction is classified as “Legacy Business”, “Advised Business” or “Execution Only Business”. The escalation in SI transactions will also need to be classified similarly.
Re-registration of an investment from one platform to another will not be by default classified as an advised event and trail commission can continued to be paid. In case the re-registration is based on advised activity, then trail commission cannot be paid. It will be required to capture whether re-registration is based on advice or not.
Post RDR, in case there is a change in agent, the reason for the same will determine the eligibility for payment of commission. In case the change of agent is due to agent’s decision like old agent selling his business, the new agent will inherit the terms of holdings and receive trail commission. If the change of agent is due decision by investor, no trial commission is payable to the new agent. Trail commission can be paid to the investor and reinvested.
At present, from the management fee charged by the AMC, a portion is paid to advisor as trail commission, portion paid to platform providers and the balance is retained for fund management. The RDR regulations ban payment of trail commission on new retail advised business. In order to comply with the regulations, the AMC may introduce a new fund class for all the existing funds with lower management fees. The AMC may also retain the existing funds and modify the fee structure. Post RDR, AMCs may reduce the management fees or retain the old structure and pay rebate to either or both platform providers and investors. In case platform providers are continued to be paid from the management fees, the same will required to be disclosed to the investors. In the future, the FSA would like to enforce all platforms to receive fees from investors for services provided.
The actual fee charging will be driven by business rules by mapping appropriate load ref type.
4.13.2 Invoking RDR Parameter Maintenance Screen
You need to segregate into pre-RDR and post-RDR holdings while paying the commission. You need to classify the transactions for the purpose of commission payments. the front-end load and trail commission (management fees) will be mapped as loads with appropriate ref types.
You can maintain RDR Parameters using ‘RDR Parameter Maintenance’ screen. You can invoke this screen by typing ‘UTDRDRPM’ in the field at the top right corner of the Application tool bar and clicking on the adjoining arrow button.

You can specify the following details:
RDR Applicable
Optional
Select if RDR is applicable or not from the adjoining drop-down list. Following are the options available:
- Yes
- No
RDR Date
Date Format; Optional
Specify RDR date.
RDR Warning
Optional
Select if RDR warning is applicable or not from the adjoining option list. Following are the options available:
- Yes
- No
RDR Hierarchy
Optional
Select if RDR hierarchy is applicable or not from the adjoining option list. Following are the options available:
- Yes
- No
Country
Alphanumeric; 3 Characters; Optional
Specify the country code. This adjoining option list displays all valid country code maintained in the system. You can choose the appropriate one.
Country Name
Display
The system displays the name of the country for the selected country code.
The system will determine the payment of commission by the classification of transactions, such as, IPO subscriptions, subscription, switch and transfer In, where transaction date is less than RDR Effective date and advisor is UK domiciled broker as ‘Legacy/Direct Business’.
Post RDR for UK domiciled advisor, the system will track the transactions, such as, IPO subscriptions, subscription, switch transfer In and Trail Commission reinvestment as new business. Based on the value of ‘Transaction Category’ field at the transaction level, the system will classify the transactions as either ‘Legacy/Direct Business’, ‘Advised Business’ or ‘Execution Only Business’.
For Non UK domiciled adviser, the system will default the Transaction category to ‘Legacy/Direct Business’. The defaulting of ‘Transaction Category’ field will happen on clicking the ‘Enrich Transaction’ button.
If you change the transaction category for non UK domiciled advisor to Advised/Execution Only Business, the system will display the following warning message:
Default Transaction Category has been overridden. Do you want to continue?
The above validation is also applicable, if you change the transaction category during edit/amend operation.
In case of agent hierarchy, if any entity in the hierarchy is domiciled in UK, you should tag the transaction as ‘Advised or Execution Business’. In such a case, if you choose the transaction category as Legacy Business, even if any one of the entity mapped in the Hierarchy is domiciled in UK, then the system will display the following warning message:
Default Transaction Category has been overridden. Do you want to continue?
The above validation is also applicable, if you change the transaction category during edit/amend operation.
The system will default the ‘Transaction Category’ field based on the country of Domicile of Advisor, RDR Applicable, RDR Date and the classification of broker at UH maintenance screen.
In case the transaction has broker which is not mapped at UH level and if the intermediary is UK domiciled, the system will default the transaction category to Execution. For non UK domiciled intermediary, the system will default the transaction category to Legacy/Direct Business.
The above validation is applicable if RDR Applicable is selected as ‘Yes’ and the transaction date is greater than or equal to RDR Date.
Post RDR, the holdings in a fund due to Share Class Conversion, Fund Merger, Fund Split, Dividend Reinvestment, Reverse split will be classified as ‘Legacy/Direct Business ‘, ‘Advised Business’ or ‘Execution Only Business’, based on the category of original holdings.
If a regular savings plan is in force at the RDR date, the system will continue the front end commission to be paid on each subsequent contribution. In addition, the system will tag the units/ shares allocated to the transaction as legacy/direct.
If for a existing or a new SI (post RDR Date), the SI is amended for escalation, then the system will display the following warning message:
SI is being escalated for UK domiciled broker transaction – Do you wish to continue?
If the transaction category is amended, the system will reflect the new category from next SI generation onwards.
For Non-UK domiciled advisor, all transactions including Switch/SI/escalations in SI will continue to be marked as Legacy/Direct Business irrespective of the trade date/SI registered Date.
4.13.3 Processing RDR Parameters
The system will charge front end fees, post RDR, based on the transaction category. The system will charge front end fees for transactions classified as ‘Legacy/Direct Business’ and ‘Execution Only Business’ done through a UK domiciled advisor.
For agent hierarchy, you need to map appropriate transaction category– depending on the business needs.
- Case1: If agent is domiciled in UK, then irrespective of the hierarchy, they may follow RDR rules
- Case 2: If agent is not domiciled in UK, then irrespective of the domicile of other entities in Hierarchy, they may not follow RDR rules.
Post RDR, the system will compute trail commission based on transaction category for the transactions, such as, ‘Legacy/Direct Business’ and ‘Execution Only Business’ done through a UK domiciled advisor. For ‘Advised Business’ done via a UK domiciled advisor, the system will not compute trail commission. You can maintain different rates of trail commission for the different transaction categories.
You can also set up configuration such that all trailer commission on legacy business get paid to the unitholder.
Post RDR, the AMC can maintain the same management fee for transactions done through a UK domiciled Advisor and give rebate to investor. The management fee (periodic load) with From entity as ‘AMC’ and To Entity as ‘Unit Holder’ to be given based on appropriate mapping.
In case of a Product periodic load, if at Unitholder level, and if Trailer commission preference at UH level is reinvestment, then the system will generate transaction into CMA fund for the UH on trailer commission payment date. If CMA fund is not maintained, then the system will generate reinvestment transaction into the preferred fund.If preferred fund is not maintained, then the system will generate reinvestment transaction for all funds available in the policy for which trailer fee has been computed.
The transaction category for this transaction will be legacy/execution depending on the advisor is UK domiciled or non UK domiciled. In case of reinvestment of trailer commissions, the transaction category will be updated as follows:
- Post RDR date, if default broker at UH level is UK domiciled and advise mode at UH level is Advised, then the transaction category will be Advised Business, else it will be Execution Business.
- Pre RDR Date, if default broker at UH level is UK domiciled, then the Transaction category will be Legacy/Direct business.
- If default broker is non UK domiciled, the generated transaction will have the transaction category as Legacy/Direct business.
The AMC can also decide to lower the management fee to be charged when the advisor is domiciled in UK. The new lower management fee with appropriate category for Advisor domiciled in UK will be mapped.
4.13.4 Front-end Fees and Trail Commission Payments
4.13.4.1 For legacy business
In cases, where To Entity is Unitholder, investor may receive trailer commission in the form of Cash or reinvestment (into same fund) – This is only applicable when from Entity is M.
4.13.4.2 For Execution business
Front end fee:
Case 1:
Load |
From Entity |
To Entity |
L1 |
Unit Holder |
AMC |
L2 |
AMC |
Broker/Agent |
Case 2:
Load |
From Entity |
To Entity |
L1 |
Unit Holder |
Broker |
L2 |
Broker |
AMC |
Trailer Fee:
Case 1:
Load |
From Entity |
To Entity |
T1 |
AMC |
Broker/Agent |
Case 2:
Load |
From Entity |
To Entity |
T1 |
AMC |
Broker/Agent |
T2 |
Broker/Agent |
Unit Holder |
Case 3:
Load |
From Entity |
To Entity |
T1 |
AMC |
Unit Holder |
Case 4:
Load |
From Entity |
To Entity |
T1 |
AMC |
Broker/Agent |
T2 |
AMC |
Unit Holder |
Case 5:
Load |
From Entity |
To Entity |
T1 |
Unit Holder |
Broker/Agent |
In this case Unitholder can mention his preferred fund, and fee can be paid by redeeming units from this fund.
4.13.4.3 For Advisor Business
Front end fee:
Case 1:
Load |
From Entity |
To Entity |
L1 |
Unit Holder |
AMC |
Trailer Fee
Case 1:
Load |
From Entity |
To Entity |
T1 |
AMC |
Unit Holder |
However the fee configurations are expected to be handled operationally by the business. Hence, for UK domiciled broker when the transaction category is Advised Business, you should not map any load which will have ‘To Entity’ as ‘Broker/Agent/Agency Branch/Account Officer/IFA’.
Appropriate transaction categories will be mapped to enable system to skip transactions where the transaction category is Advised business for trailer commissions when the To Entity is mapped as ‘Broker/Agent/Agency Branch/Account Officer/IFA’.
In case of Agent/Agency Branch /AO/IFA hierarchy, the system will compute Trailer commission based on the transaction category mapped for the hierarchy.
If the trailer commission computed for the hierarchy does not include ‘Advised Business’ transactions, then commission shared among other entities (in the hierarchy below the entity for which trailer commission has been computed) will also not include the commission eligible due to Advised Business.
Post RDR, the system will setup the payment of front-end fees based on load ref type.
In fund load mapping/group load mapping and product load mapping screen, you can map the appropriate load ref type for applying desired fee rate.