2. Job Scheduling
Job scheduling is the process where different tasks get executed at pre-determined time or when the right event happens. A job scheduler is a system that can be integrated with other software systems for the purpose of executing or notifying other software components when a pre-determined, scheduled time arrives. The two types of job schedulers used in Oracle FLEXCUBE Investor Servicing FCJ architecture are as follows:
- Quartz - provides scheduler interface to enable operations such as scheduling and un-scheduling of jobs and starting, stopping, pausing the scheduler
This section contains the following topics:
- Section 2.1, "Defining Jobs"
- Section 2.2, "Job Maintenance Summary"
- Section 2.3, "Scheduling Jobs"
- Section 2.4, "Controlling Jobs"
- Section 2.5, "Notification Process"
- Section 2.6, "EMS Process with Scheduling Architecture"
- Section 2.7, "Approach"
2.1 Defining Jobs
This section contains the following topics:
2.1.1 Invoking Job Maintenance Screen
A job is a business activity which the system performs repeatedly on timely basis. Oracle FLEXCUBE Investor Servicing enables you to define a job and schedule it using ‘Job Maintenance’ screen. You can invoke this screen by typing ‘STDJOBMT’ in the field at the top right corner of the Application tool bar and clicking on the adjoining arrow button.
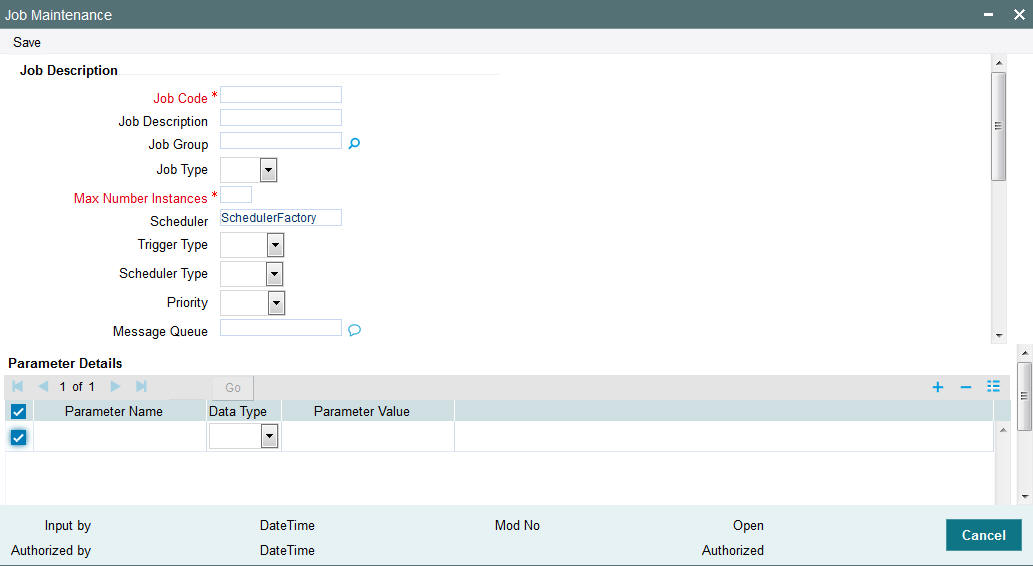
You can specify the following fields in this screen.
Job Code
Alphanumeric; 100 Characters; Mandatory
Specify the unique code to identify the Job.
Job Description
Alphanumeric; 200 Characters; Optional
Specify a brief description of what the job is supposed to do.
Job Group
Alphanumeric; 200 Characters; Optional
Specify the job group name to represent the same group of jobs for identification.
Job Type
Optional
Select the type of job from the drop-down list. The following options are available for selection:
- PL SQL
- JAVA
Max Number Instances
Numeric; 2 Characters; Mandatory
Specify the maximum number of instances that needs to be queued up.
Example
If a job runs for more than the duration defined, the next instance of the same job will be ready for processing. This parameter defines the job’s behavior in such cases,
If you maintain the job as ‘STATEFUL’, then the number of such missed instances will be queued up so that it would start executing once this long running job ends. This field specifies the number of such job instances that needs to be queued up.
If you maintain the job as ‘STATELESS’, it indicates the number of threads that can be executed in parallel.
If you maintain the max number instances as ‘0’, no instances are queued or parallel processed till the current running instance is completed.
Scheduler
Alphanumeric; 100 Characters; Optional
Specify the name of the scheduler. The system defaults the name to ‘SchedulerFactory’. However, you can modify this name. This signifies the scheduler name which is configured as part of infra.
Trigger Type
Optional
Select the type of the trigger from the drop-down list. The following options are available:
- Simple - Interval based jobs.(i.e., every one hour)
- Cron - Time based jobs.(i.e., Friday 4:30PM)
Scheduler Type
Optional
Select the type of scheduler from the drop-down list. The following options are available:
- Quartz
Priority
Optional
Select the priority on which the system should execute the jobs in the scheduler from the drop-down list. The following options are available.
- Normal
- High
- Low
If two jobs with different priorities fire at the same time, then system gives preference to the job with higher priority.
Message Queue
Alphanumeric; 100 Characters; Optional
Specify the default JMS queue to which a job needs to send message. You can specify this only if the job has to send messages to JMS.
Job Details
Cron Expression
Alphanumeric; 400 Characters; Optional
Specify the corresponding Cron expression for a job with trigger type as ‘Cron’. You need to do this to determine the time and interval of job firing. For instance, 40 * * * * ? Indicates job needs to be executed every 40 sections.
Example
For time based jobs, if Cron Expression is defined as 0 0/15 11-23 * * ?, then Parameter Definition will be as follows:
TIMEZONE Parameter to be defined: Asia/Hong_Kong
MODULEID: Job to be executed in FMGHKGDISTE
INTERFACEID: Interface ID to be mentioned
Above scenario indicates that the Job to be started at 11:00 am Hong Kong Timezone and stops at 11:00 pm Hong Kong Timezone.
Frequency will be every 15 minutes.
Class or Procedure
Alphanumeric; 400 Characters; Optional
Specify the Java class file name if job type is ‘Java’ or the PL/SQL procedure name if the job type is ‘PL/SQL’. This denotes which java class or pl/sql procedure the system should call when a job fires.
Number of Submissions
Alphanumeric; 3 Characters; Optional
Specify the number of times a job can fire before it is unscheduled from scheduler. This applies only to trigger types maintained as ‘Simple’.
Interval In Seconds
Numeric; 2 Characters; Optional
Specify the time interval between jobs. This applies only to trigger types maintained as ‘Simple’.
Trigger Listener
Alphanumeric; 200 Characters; Optional
Specify a java class as a trigger listener which will be notified of events such as before job fired, after job completed, misfired jobs.
Active
Optional
Check this box to set the job as active. The scheduler does not pick the inactive jobs for scheduling.
Ds Name
Alphanumeric; 100 Characters; Optional
Specify the name of the database schema to which the job has to connect. This attribute is used in case of multi instance deployment of Oracle FLEXCUBE Investor Servicing application.
Logging Required
Optional
Check this box to indicate that system should log each firing of job. This helps in logging the firing time of job and key log info as part of that firing. This also enables tracking of each job’s firing times and helps in identifying miss-fired jobs.
Veto Blocked Trigger
Optional
Check this box to trigger veto block.
Startup Mode
Optional
Specify start up mode of the job from the drop-down list. The following options are available:
- Auto - The job starts automatically when Oracle FLEXCUBE Investor Servicing application starts
- Manual - You should start the job manually in job controller by resuming the job.
Parameter Details
You can specify the job specific parameters, which are passed to job class or procedure at runtime. The following details are captured here:
Parameter Name
Alphanumeric; 200 Characters; Optional
Specify the name of the job parameter. The parameter name you specify here is passed to job class or procedure at run time. For instance, INTERFACEID to be defined with Interface ID.
Data Type
Optional
Select the data type of the parameter from the drop-down list. The list displays the following values:
- Varchar
- Date
- Number
Parameter Value
Alphanumeric; 200 Characters; Optional
Specify the value of the parameter.
Event Based - EOD
Job Code |
EOD_FMGHKGDISTE |
EVENTCODE |
BEPREEOD |
Event Description |
Pre-EOD completed |
|
On completion of Pre-EOD, the job will invoke EOD |
Event Based - BOD
Job Code |
BOD_FMGHKGDISTE |
EVENTCODE |
BE00003 |
Event Description |
FMG EOD Completed |
|
On completion of EOD, the job will invoke BOD |
The system will perform the following jobs to execute reports on completion of EOD:
Parameter Name: TASKID
Parameter Value: Tasks defined
Below job will initiate a TASK – EODUHBALSTMT – Unitholder Balance Statement on completion of EOD.

2.2 Job Maintenance Summary
This section contains the following topics:
- Section 2.2.1, "Retrieving a Record in Job Maintenance Summary Screen"
- Section 2.2.2, "Editing Job Maintenance Record"
- Section 2.2.3, "Viewing Job Maintenance Record"
- Section 2.2.4, "Deleting Job Maintenance Record"
- Section 2.2.5, "Authorizing Job Maintenance Record"
- Section 2.2.6, "Amending Job Maintenance Record"
- Section 2.2.7, "Authorizing Job Maintenance Record"
2.2.1 Retrieving a Record in Job Maintenance Summary Screen
You can retrieve a previously entered record in the Summary Screen, as follows:
Invoke the ‘Job Maintenance Summary’ screen by typing ‘STSJOBMT’ in the field at the top right corner of the Application tool bar and clicking on the adjoining arrow button and specify any or all of the following details in the corresponding details.
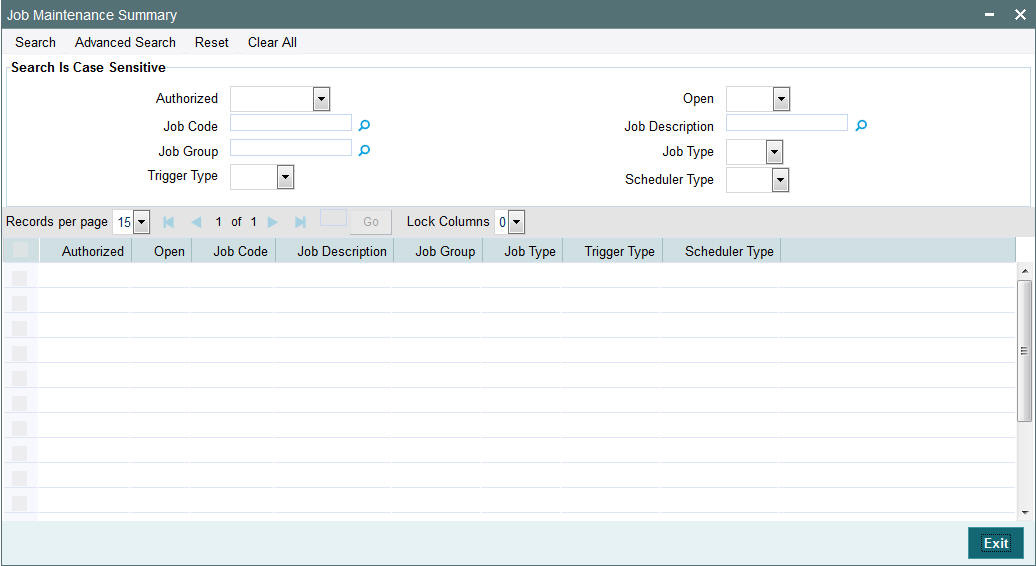
- The status of the record in the Authorization Status field. If you choose the ‘Blank Space’ option, then all the records are retrieved.
- The status of the record in the Record Status field. If you choose the ‘Blank Space’ option, then all records are retrieved
- Job Code
- Job Group
- Trigger Type
- Job Description
- Job Type
- Scheduler Type
Click ‘Search’ button to view the records. All the records with the specified details are retrieved and displayed in the lower portion of the screen.
Note
You can also retrieve the individual record detail from the detail screen by querying in the following manner:
- Press F7
- Input the Job Code
- Press F8
You can perform Edit, Delete, Amend, Authorize, operations by selecting the operation from the Action list. You can also search a record by using a combination of % and alphanumeric value
2.2.2 Editing Job Maintenance Record
You can modify the details of Job Maintenance record that you have already entered into the system, provided it has not subsequently authorized. You can perform this operation as follows:
- Invoke the Job Maintenance Summary screen from the Browser.
- Select the status of the record that you want to retrieve for modification in the Authorization Status field. You can only modify records that are unauthorized. Accordingly, choose the Unauthorized option.
- Specify any or all of the details in the corresponding fields to retrieve the record that is to be modified.
- Click ‘Search’ button. All unauthorized records with the specified details are retrieved and displayed in the lower portion of the screen.
- Double click the record that you want to modify in the list of displayed records. The Job Maintenance Detail screen is displayed.
- Select Unlock Operation from the Action list to modify the record. Modify the necessary information.
Click Save to save your changes. The Job Maintenance Detail screen is closed and the changes made are reflected in the Job Maintenance Summary screen.
2.2.3 Viewing Job Maintenance Record
To view a record that you have previously input, you must retrieve the same in the Job Maintenance Summary screen as follows:
- Invoke the Job Maintenance Summary screen from the Browser.
- Select the status of the record that you want to retrieve for viewing in the Authorization Status field. You can also view all records that are either unauthorized or authorized only, by choosing the unauthorized / Authorized option.
- Specify any or all of the details of the record in the corresponding fields on the screen.
- Click ‘Search’ button. All records with the specified fields are retrieved and displayed in the lower portion of the screen.
- Double click the record that you want to view in the list of displayed records. The Job Maintenance Detail screen is displayed in View mode.
2.2.4 Deleting Job Maintenance Record
You can delete only unauthorized records in the system. To delete a record that you have previously entered:
- Invoke the Job Maintenance Summary screen from the Browser.
- Select the status of the record that you want to retrieve for deletion.
- Specify any or all of the details in the corresponding fields on the screen.
- Click ‘Search’ button. All records with the specified fields are retrieved and displayed in the lower portion of the screen.
- Double click the record that you want to delete in the list of displayed records. The Job Maintenance Detail screen is displayed.
- Select Delete Operation from the Action list. The system prompts you to confirm the deletion and the record is physically deleted from the system database.
2.2.5 Authorizing Job Maintenance Record
- An unauthorized Job Maintenance record must be authorized in the system for it to be processed. To authorize a record:
- Invoke the Job Maintenance Summary screen from the Browser.
- Select the status of the record that you want to retrieve for authorization. Typically, choose the unauthorized option.
- Specify any or all of the details in the corresponding fields on the screen.
- Click ‘Search’ button. All records with the specified details that are pending authorization are retrieved and displayed in the lower portion of the screen.
- Double click the record that you wish to authorize. The Job Maintenance Detail screen is displayed. Select Authorize operation from the Action List.
When a checker authorizes a record, details of validation, if any, that were overridden by the maker of the record during the Save operation are displayed. If any of these overrides results in an error, the checker must reject the record.
2.2.6 Amending Job Maintenance Record
After a Job Maintenance record is authorized, it can be modified using the Unlock operation from the Action List. To make changes to a record after authorization:
- Invoke the Job Maintenance Summary screen from the Browser.
- Select the status of the record that you want to retrieve for authorization. You can only amend authorized records.
- Specify any or all of the details in the corresponding fields on the screen.
- Click ‘Search’ button. All records with the specified details that are pending authorization are retrieved and displayed in the lower portion of the screen.
- Double click the record that you wish to authorize. The Job Maintenance Detail screen is displayed in amendment mode. Select Unlock operation from the Action List to amend the record.
- Amend the necessary information and click on Save to save the changes
2.2.7 Authorizing Job Maintenance Record
An amended Job Maintenance record must be authorized for the amendment to be made effective in the system. The authorization of amended records can be done only from Fund Manager Module and Agency Branch module.
The subsequent process of authorization is the same as that for normal transactions.
2.3 Scheduling Jobs
All jobs for scheduling are stored in a static data store and each job is associated with a name indicating where the job has to execute. Jobs are created in the Application Server and are scheduled based on this data.
Note
The job name should be unique across the schedulers available in the system.
When the application server starts, the job details from static data store will get cached. These cached jobs will then be scheduled using Quartz scheduler.
For example, the notification process can be handled by the job schedulers as follows:
- When a contract is created in Oracle FLEXCUBE Investor Servicing, a database level trigger acting on the contract main table inserts details like base table name, primary key fields, primary key values and branch code into a notification log table and sets the process status of the inserted record as ‘U’ (unprocessed).
- The scheduled job polls the notification log table for unprocessed records and validates whether notification is required.
- If notification is not required, then the process status is set to ‘N’ (not required) in notification log table.
- If notification is required then notifications are sent to the respective destination and the process status of the record is changed to ‘P’ (Processed) in notification log table
2.4 Controlling Jobs
This section contains the following topic:
2.4.1 Invoking Job Details Summary Screen
The details of jobs that are scheduled can be viewed using the ‘Job Details’ screen. In this screen you can pause or resume a job that has been scheduled. You can submit the records as a job for replication in the branch database through this screen. You can invoke the ‘Job Details’ screen by typing ‘SMSJOBBR’ in the field at the top right corner of the Application tool bar and clicking the adjoining arrow button.

You can search for a scheduled job by specifying any of the following:
Job Name
Alphanumeric; 100 Characters; Optional
Select the name of the job that you want to search for from the option list provided.
Trigger State
Optional
Select the state of the job you want to search for from the option list provided. The following options are possible for Quartz schedulers:
- Not Scheduled
- Scheduled
- Paused
- Complete
- Error
Scheduler
Alphanumeric; 100 Characters; Optional
Select the scheduler to which the job you want to search for has been assigned.
Job Group
Alphanumeric; 200 Characters; Optional
Select the group to which the job you want to search for belongs, from the option list provided.
Next Fire Time
Numeric; 22 Characters; Optional
Select the time when the job is scheduled to be run next.
Click ‘Search’ button to view the details related to the job. You can pause a job by selecting it and clicking the ‘Pause’ button.
You can resume a paused job by clicking ‘Resume’ button and the job is scheduled for its next fire time.
A job can take any of the following states.
- SCHEDULED -This indicates that the message is processed.
- NOT SCHEDULED -This indicates that the message processing is not scheduled.
- PAUSED - This indicates that the job is manually paused from executing.
- ERROR - A job trigger arrives at the ‘Internal Server Error’
state when the scheduler attempts to fire it, but cannot due to an error
creating and executing its related job, hence pausing the job. Also,
a job arrives at ERROR state for the following reasons.:
- When the associated class for the job is not present in class path
- If during setup, the queue has not been created, but a job has been created for that queue.
- If call to the Scheduler EJB has failed.
- If job related pooling tables are invalid.
Note
Each job is created with the location code maintained in the table sttm_flexbranch_loc runs for the respective branch location.
If a new branch is added to the bank for branch replication then the application should be restarted to add that particular branch in the ‘Job Details’ screen.
2.5 Notification Process
The notification process is in two layers. In the first layer the notification process as part of jobs in FCJ scheduler sends minimal data required for notification to an internal JMS queue. In the second layer the notification process as part of an MDB that listens on internal JMS queue builds final notifications and sends them to their intended destinations.
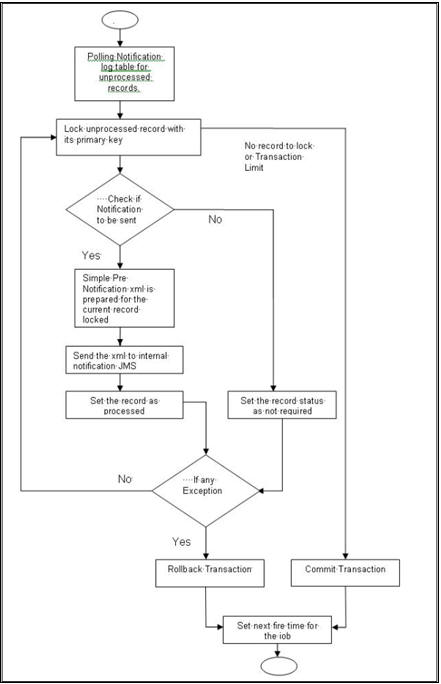
The Notification Process in Oracle FLEXCUBE Investor Servicing using the jobs scheduler is as follows:
- The trigger on the base table inserts key details into a static notification log table instead of Oracle AQ.
- Once Job is triggered, a request is sent to EJB layer from job execution class and the notification log table is polled for unprocessed records.
- Each unprocessed record is locked.
- The record is verified against the notification maintenance and checked whether notification is to be sent or not.
- If notification is to be sent, pre notification message xml is built and it is sent to internal notify_queue(JMS queue).
- The job is then rescheduled to fire next time based on the previous execution.
The notification process in MDB is as follows:
- The Notification MDB listens on the internal notify JMS queue.
- On any message received, the MDB identifies which schema to connect using the JNDI name being present as part of the message xml.
- Gateway notification processing package is called from MDB in order to build the actual notifications.
- In MDB the notifications built is processed and sent to the destination specified in corresponding notification.
- In case of any exception the whole transaction is rolled back.
- If all notifications are successfully processed then transaction is committed.
The flow chart of notification process in scheduler:
The flow chart for notification process in MDB:

2.6 EMS Process with Scheduling Architecture
This section contains the following topics:
2.6.1 EMS Process
Incoming EMS Process
A job is scheduled to poll the incoming folder on timely basis. Once a message is received in the folder, the job picks the message and sends it to an internal JMS queue. An MDB listening on the queue will read the message and identifies the media and processes the message.
Outgoing EMS Process
A job is scheduled to poll the outgoing messages that are generated but not handed off. Each messages polled will be sent to an internal JMS queue.
A MDB, acting upon the internal JMS queue will pick the message from queue and sends the message to appropriate destination (Folder, or e-mail, or JMS queue).
2.7 Approach
The Outgoing EMS Process happens in two layers.
The EMS process as part of jobs in FCJ scheduler, polls the outgoing message table of FLEXCUBE Investor Servicing for generated and un-send messages. The job then sends minimal data about the message to be handed off, to an internal JMS queue.
The EMS process as part of an MDB that listens on internal JMS queue to build final message and to send to their intended destinations.
The Incoming EMS Process happens in two layers.
The EMS process as part of jobs in FCJ scheduler, which polls the pre configured folder for messages and sends the messages read, to EMS internal queue.
The EMS process as part of an MDB, that listens on internal JMS queue identifies the message from queue and calls the incoming messages service package in backend to process the message. Additionally, the MDB can be made an independent unit to listen on external JMS to process incoming messages.
The Incoming EMS Process as part of jobs scheduler is as follows:
Once job is triggered, it polls for messages in a folder (Configured for incoming messages).
Each message is then sent to an internal JMS queue.
The job is then rescheduled to fire next time.
EMS processes in MDB are as follows:
An MDB that listens on the internal EMS incoming queue will receive the message.
The media details are identified and incoming message processing package in backend is called to process the message.
In case of any exception while processing, message will be sent to a deferred queue.
In case of messages directly arrive to JMS queue instead of a folder; the same MDB will be configured to listen on specific queue.