3. Enabling Auto Authorization
This chapter contains the following sections:
3.1 Normal Process of Authorization in System
Most of the information that you enter in to the system needs to be authorized to be effective. Except for the static information that you typically enter in to the system only once, all other information must be authorized. Authorization is required for all maintenance as well as transactional information in the system.
When you enter information related to any of these events into the system, the record that is initially saved when you complete the data entry is retained in the system as unauthorized information, which must be subsequently authorized to become effective.
Usually, authorizing information in the system is an activity that follows a maker-checker concept, i.e., the user that enters the information must be necessarily different from the user that authorizes the information. Therefore, whereas one user group will have access to functions that involve entering information into the system, a different user group has access to the functions that involve information authorization, and there is no overlap of access privileges.
3.2 Auto-authorization
This section contains the following topics:
- Section 3.2.1, "Auto-authorization Features in System"
- Section 3.2.2, "Using Auto-authorization Feature"
- Section 3.2.3, "Operations on Auto Authorization Records"
3.2.1 Auto-authorization Features in System
In some environments, the user that enters the information needs to be able to authorize it simultaneously. In such cases, the maker-checker concept leads to unnecessary delegation of activity, which is undesirable. This means that in such an environment, the user that enters the information must, on saving the entered record, be able to authorize the record. For such environments, the auto-authorization function is provided by the FCIS system. When this function is used, the Save operation in any screen that involves data entry (apart from static information screens) will also invoke and perform the authorization for the records that have been entered.
It is possible to be selective about the business functions for which you need to use the auto-authorization feature. This means that you can enable the auto-authorization feature for the functions for which you require simultaneous authorization on saving the record, and you can keep it disabled for others, allowing them to go through the normal maker-checker process of authorization.
The following features comprise the auto-authorization facility in the system:
- The user administrator users can map the business users to the menu items, and make auto-authorization feature allowable for any business user – menu item mapping. All business checks, validations and processes that must be performed when the authorization happens will be triggered immediately following the use of the save operation, when the auto-authorization feature is allowed.
- The user administrator users can enable (or disable) auto authorization rights at a user group level. Any user roles and / or users associated with the user group would inherit the auto authorization privileges assigned to the user group. If a user ID is associated with multiple user roles, the most restrictive privilege assigned to the roles will be applicable.
- You can enable (or disable) the auto authorization feature for data
operations in the New mode or the Amend mode, including data entry either
for reference information, investor accounts or transactions. For transaction
entry operations in either mode, you can enable (or disable) auto authorization
for transactions involving any of the following circumstances:
- Transactions for which the transaction currency is the limit currency, and the transaction amount falls within the limit amount for that currency
- Back dated transactions
- Transactions in respect of which applicable loads have been overridden
- Transactions for which third party payment or delivery has been specified
3.2.2 Using Auto-authorization Feature
To allow the auto-authorization feature for a user group and a certain set of menu items, you must map the user groups to the menu items or the task for which auto-authorization is applicable, using the ‘Auto Auth Maintenance’ screen.
You can use this screen to map user groups to the tasks for which auto-authorization is applicable. If the user administrator or the module administrator users do not maintain the setup for each of the user groups in this screen, the auto-authorization is not enabled for that user group.
For UT transaction screen, you can derive auto authorization status along with branch, Function ID and User Level Auto Auth Preference using ‘Auto Auth’ screen. If the Branch, Function ID and menu level auto auth maintenance is derived as ‘A’ then you should auto authorize a UT Transaction record.
- First priority will be Infra level Auto Auth Derivation [branch, function ID and user level]
- Second priority will be Auto Auth Derivation based on Auto Auth setup maintenance ‘SMDAUTAU’
- Third priority will be Auto Auth derivation FBC Access restriction detail ‘UTDFAR’
If in all three levels if the auto auth check is returning true, then the system will auto authorize a record.
If there is no maintenance done in FBC Access restriction detail ‘UTDFAR’, then auto auth check will happen using Infra level Auto Auth Derivation and Auto Auth Setup Maintenance ‘SMDAUTAU’.
If there is no maintenance done in Auto Auth Setup Maintenance ‘SMDAUTAU’, then auto auth check will happen using Infra level Auto Auth Derivation and FBC Access restriction detail.
If there is no maintenance done in Auto Auth Setup Maintenance ‘SMDAUTAU’ and FBC Access restriction detail ‘UTDFAR’. Then auto auth check will happen using Infra level auto auth derivation.
You can invoke this screen by typing ‘SMDAUTAU’ in the field at the top right corner of the Application tool bar and clicking on the adjoining arrow button.
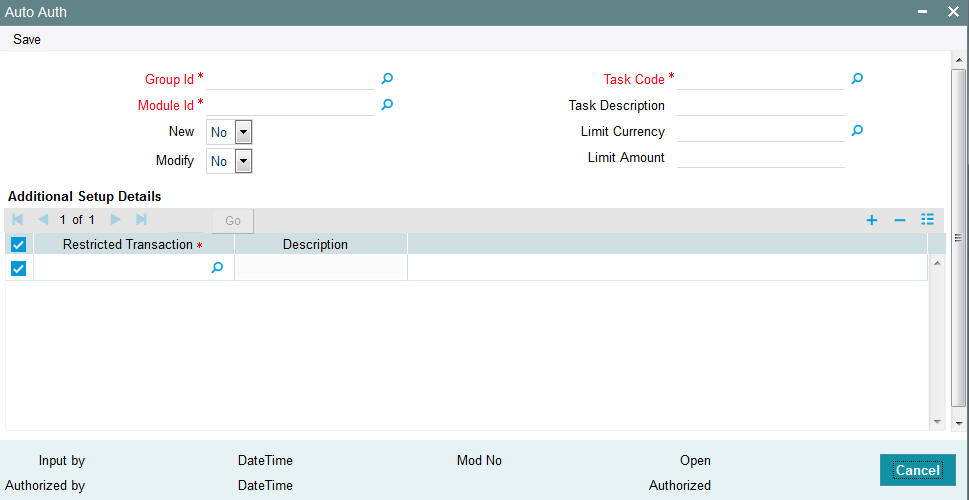
You can specify the following details:
Group Id
Alphanumeric; 15 Characters; Mandatory
Specify the group ID. Alternatively, you can select group ID from the option list. The option list displays all valid group ID maintained in the system.
Module Id
Alphanumeric; 30 Characters; Mandatory
Specify the module ID. Alternatively, you can select module ID from the option list. The option list displays all valid module ID maintained in the system.
New
Optional
Select if the auto authorization is enabled or not for New mode from the drop-down list. The list displays all following values:
- Yes
- No
Modify
Optional
Select if the auto authorization is enabled or not for Modify mode from the drop-down list. The list displays all following values:
- Yes
- No
Task Code
Alphanumeric; 30 Characters; Mandatory
Specify the task code. Alternatively, you can select task code from the option list. The option list displays all valid task code maintained in the system.
Task Description
Display
The system display the description for the selected task code.
Limit Currency
Alphanumeric; 3 Characters; Mandatory
Specify the limit currency code. Alternatively, you can select limit currency code from the option list. The option list displays all valid limit currency code maintained in the system.
Limit Amount
Numeric; 15 Characters; Mandatory
Specify the limit amount.
Additional Setup Details
Restricted Transaction
Numeric; 22 Characters; Mandatory
Specify the restricted transaction code. Alternatively, you can select restricted transaction code from the option list. The option list displays all valid restricted transaction code maintained in the system.
Auto auth setup can be done based on following additional information:
- Backdated Transaction
- Load Overridden Transaction
- Third Party Payment Transaction
- Third Party Delivery Transaction
Description
Display
The system display the description for the selected restricted transaction code.
3.2.2.1 Using Auto-authorization Feature
To allow the auto-authorization feature for a user group and a certain set of menu items, you must map the user groups to the menu items or the task for which auto-authorization is applicable, using the ‘Auto Auth Maintenance’ screen. You can access this screen by clicking Security Maintenance menu and selecting Auto Auth from the Browser.
3.2.2.2 Auto Auth Maintenance Screen
You can use this screen to map user groups to the tasks for which auto-authorization is applicable. If the user administrator or the module administrator users do not maintain the setup for each of the user groups in this screen, the auto-authorization is not enabled for that user group.
3.2.2.3 Enabling or Disabling Auto-authorization for User Group
When you open the Auto Auth Maintenance screen, the auto authorization features that have been enabled for the module and the group to which the logged in user belongs, are displayed.
To amend the displayed list, click unlock icon. The screen is displayed in Amend mode, where you can make your changes. The changes you make will apply to all users and roles in the Group ID to which the logged in user belongs, for the logged in Module.
You can make changes as follows:
- To enable auto-authorization in the New mode for a task item, select ‘YES’ in the New field for the task item. To enable auto-authorization in the Amend mode for a task, select ‘YES’ in the Amend field for the task item.
- For transaction data entry task items, you can limit the volume of the transactions that can be auto-authorized. To setup this limit, specify the highest volume of the transaction that can be auto-authorized, in the Limit Amount field. You must also indicate the currency in which the volume you have specified is reckoned, in the Limit Currency field. You can indicate a different limit for each role or Group ID, if necessary.
- For transaction data entry, you can also enable (or disable) the auto authorization feature for transactions in the following circumstances:
- Back dated transactions. Select ‘YES’ in the Restrict Back Dated Transaction field to disable auto authorization of backdated transactions in the selected mode. Select ‘NO’ to enable auto authorization of backdated transactions in the selected mode.
- Transactions in respect of which applicable loads have been overridden. Select ‘YES’ in the Restrict Load Override Transactions field to disable auto authorization of load override transactions in the selected mode. Select ‘NO’ to enable auto authorization of load override transactions in the selected mode.
- Transactions for which third party payment has been specified. Select ‘YES’ in the Restrict Third Party Payment Transactions field to disable auto authorization of third party payment transactions in the selected mode. Select ‘NO’ to enable auto authorization of third party payment transactions in the selected mode.
- Transactions for which third party delivery has been specified. Select ‘YES’ in the Restrict Third Party Delivery Transactions field to disable auto authorization of third party delivery transactions in the selected mode. Select ‘NO’ to enable auto authorization of third party delivery transactions in the selected mode.
- When you have finished making the auto-authorization specification for a user group, click save icon to save your changes.
- When you have finished making your auto-authorization specifications for each user group in this screen, and saved your changes, the auto-authorization feature is enabled, and when the user invokes the Save operation in any of the applicable task screens, the entered records are saved as authorized records.
- To enable auto authorization for a user group other than the logged in user group, click save icon in the Auto Auth Maintenance screen. The system displays the message as “Do you want to cancel the operation?”
Click on the ‘OK’ button. The auto authorization record of the logged in user group, which was on display, is closed, and the Auto Auth Maintenance screen is opened in New mode.
Select the user group for which you want to enable or disable the auto authorization rights, in the Group ID field. Select the corresponding module in the Module ID field, and click on ‘Ok’ button.
Subsequently, proceed to set up the auto authorization rights in the same manner as described above, for the amend operation.
Auto auth setup can be done based on additional information like whether transaction is as follows:
- Backdated Transaction
- Load Overridden Transaction
- Third Party Payment Transaction
- Third Party Delivery Transaction
Auto Auth maintenance can be setup based on Fund and RPO code in FBC Access Restriction Detail [UTDFAR] along with Access Restriction Information.
AutoAuthSetuptbl
The auto auth set up table is as follows:
Description |
Function Id |
Control String |
Limit Applicable |
Adjustment Subscription |
UTDADJ02 |
101111111 |
Y |
Adjustment Redemption |
UTDADJ03 |
101111111 |
Y |
Block |
UTDTXN06 |
101111111 |
Y |
Consolidation |
UTDTXN08 |
101111111 |
Y |
Switch |
UTDTXN04 |
101111111 |
Y |
Unblock |
UTDTXN07 |
101111111 |
Y |
IPO Subscription |
UTDTXN01 |
101111111 |
Y |
Subscription |
UTDTXN02 |
101111111 |
Y |
Reissue |
UTDTXN10 |
101111111 |
Y |
Redemption |
UTDTXN03 |
101111111 |
Y |
Split |
UTDTXN09 |
101111111 |
Y |
Transfer |
UTDTXN05 |
101111111 |
Y |
AutoAuthAddInfoTbl
The auto auth additional info table is as follows:
Description |
Function ID |
Adjustment Subscription |
UTDADJ02 |
Adjustment Redemption |
UTDADJ03 |
Block |
UTDTXN06 |
Consolidation |
UTDTXN08 |
Switch |
UTDTXN04 |
Unblock |
UTDTXN07 |
IPO Subscription |
UTDTXN01 |
Subscription |
UTDTXN02 |
Reissue |
UTDTXN10 |
Redemption |
UTDTXN03 |
Split |
UTDTXN09 |
Transfer |
UTDTXN05 |
3.2.3 Operations on Auto Authorization Records
After you have set up auto authorization for a user group, you must have another user authorize it so that it would be effective in the system.
Before the setup is authorized, you can edit its details as many times as necessary. You can also delete it before it is authorized.
After authorization, you can only make changes to any of the details through an amendment.
The Auto Auth Maintenance screen can be used for the following operations on auto authorization setup:
- Retrieval for viewing
- Editing unauthorized setup
- Deleting unauthorized setup
- Authorizing setup
- Amending authorized setup
To perform these operations, click on the appropriate buttons in the horizontal array of buttons in the Auto Auth Maintenance screen.