4. External System Maintenance
Integration of different applications and solutions is a key area in today’s systems. A variety of specialized applications deployed on disparate platforms and using different infrastructure need to be able to communicate and integrate seamlessly with FCIS, in order to exchange data. FCIS facilitates maintenance of such integration in the following screens:
- External System Maintenance
- External System Functions
- Message Media Maintenance
- Media Control System Maintenance
This chapter contains the following sections:
- Section 4.1, "External System"
- Section 4.2, "External System Summary"
- Section 4.3, "External System Functions"
- Section 4.4, "External System Functions Summary"
- Section 4.5, "Message Media"
- Section 4.6, "Message Media Details"
- Section 4.7, "Media Control System"
- Section 4.8, "Media Control System Details"
- Section 4.9, "Amendment Details"
- Section 4.10, "Amendment Details Retrieval"
- Section 4.11, "Events Log"
- Section 4.12, "Events Log"
- Section 4.13, "Integration Parameter Maintenance Screen"
- Section 4.14, "Upload Source Maintenance"
- Section 4.15, "Upload Source Summary"
- Section 4.16, "Source Preferences Maintenance"
- Section 4.17, "Source Preferences Summary"
- Section 4.18, "Notification Enroute Maintenance"
- Section 4.19, "Notifications Installed Maintenance "
- Section 4.20, "PIPA Audit Log"
4.1 External System
This section contains the following topics:
4.1.1 Maintaining External System
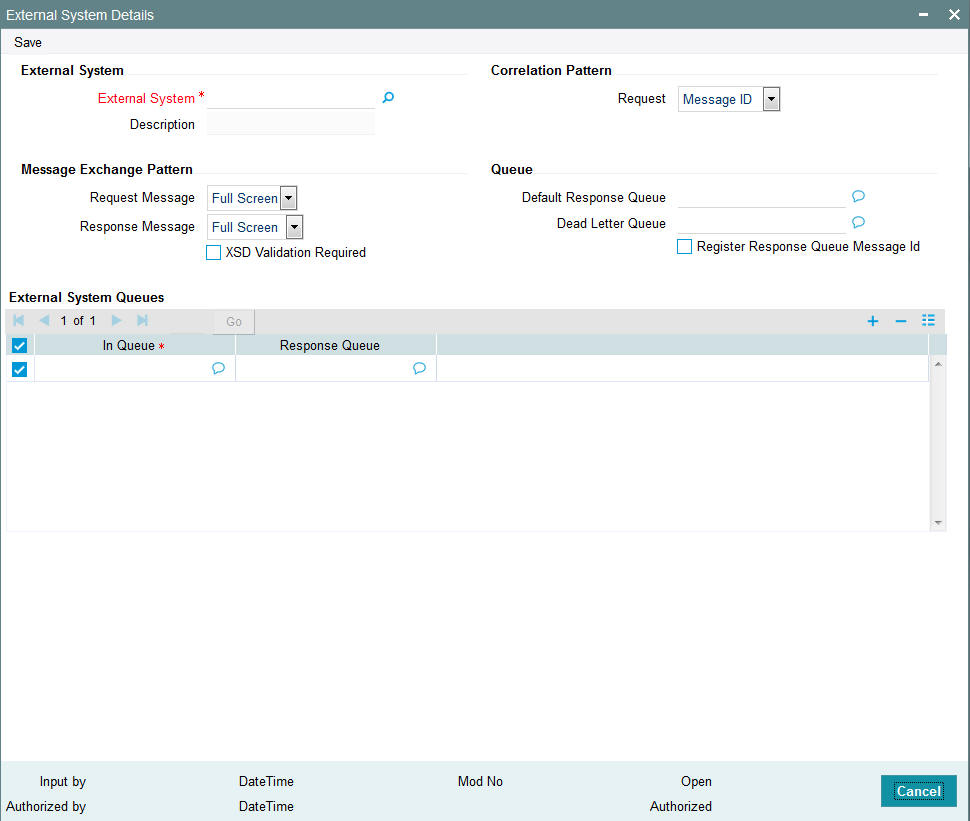
You need to maintain an external system that will communicate with FCIS. You can maintain and modify these parameters ‘External System Maintenance’ screen. You can invoke this screen by typing ‘UTDEXSYS’ in the field at the top right corner of the Application tool bar and clicking the adjoining arrow button.
The various parameters that can be maintained in this screen are described below.
External System
You can maintain the following parameters here:
External System
Alphanumeric; 15 Characters; Mandatory
Specify a name for the external system. This should be the same as the Source in an incoming message.
Description
Display
The system displays the description for the selected External System.
Correlation Pattern
You can maintain the following parameters here:
Request
Optional
Select a way in which the external system should correlate its request message with the response message, from the adjoining drop-down list. This list displays the following values:
- Message ID – Select if you want to use message ID of a request message as the Correlation ID in the corresponding response message.
- Correlation ID – Select if you want to maintain Correlation ID of a request message as the Correlation ID of the corresponding response message.
Message Exchange Pattern
You can maintain the following parameters here:
Request Message
Optional
Select a pattern for the generated request message from the adjoining drop-down list. This list displays the following values:
- Full Screen – Select if you want to view the full screen of the request message.
- Input Only – Select if you want to view only the input of the request message.
Note
If you select ‘Full Screen’ as the request message, the response message will also display ‘Full Screen’.
Response Message
Optional
Select a pattern for the generated response message from the adjoining drop-down list. This list displays the following values:
- Full Screen – Select if you have selected ‘Full Screen’ for the request message.
- Primary Key – Select if you have selected ‘Input Only’ for the request message.
XSD Validation Required
Optional
Check this box if you want to validate the request message against its corresponding XSD.
Queue
You can maintain the following parameters here:
Default Response Queue
Alphanumeric; 255 Characters; Optional
Specify a valid response queue name as the default response queue, for each of the ‘In Queue’ through which the External System will communicate with FCIS.
Dead Letter Queue
Alphanumeric; 255 Characters; Optional
Specify a valid queue as dead letter queue to direct the received messages which are non-readable.
Note
If the Dead Letter Queue is not defined, such messages will be redirected to a queue with the name of the request queue appended with ‘_E’.
Register Response Queue Message ID
Optional
Check this box if you want to log the message ID, which is provided by the Response Queue, when a response message is posted into the queue.
External System Queues
You can maintain the following parameters here:
In Queue
Alphanumeric; 255 Characters; Mandatory
Specify the name of the queue from which the messages were received. The name of the queue will help identify the external system.
Note
- This is required only if an incoming message does not display the source of the message. An In Queue is mapped to only one External System.
- You can map multiple queues to a source. System will allow a source to post messages to multiple queues.
Response Queue
Alphanumeric; 255 Characters; Optional
Specify a valid response queue to display the queue name on posting a request message into the In Queue, when the External System fails. Response queue can be maintained for every In Queue.
4.2 External System Summary
This section contains the following topics:
- Section 4.2.1, "Retrieving External System Details"
- Section 4.2.2, "Viewing External System Details"
- Section 4.2.3, "Deleting External System Details"
- Section 4.2.4, "Modifying External System Details"
- Section 4.2.5, "Authorizing External System Details"
4.2.1 Retrieving External System Details
You can view, modify, delete and authorize External system details in the ‘External System Summary’ screen. You can invoke this screen by typing ‘UTSEXSYS’ in the field at the top right corner of the Application tool bar and clicking on the adjoining arrow button.
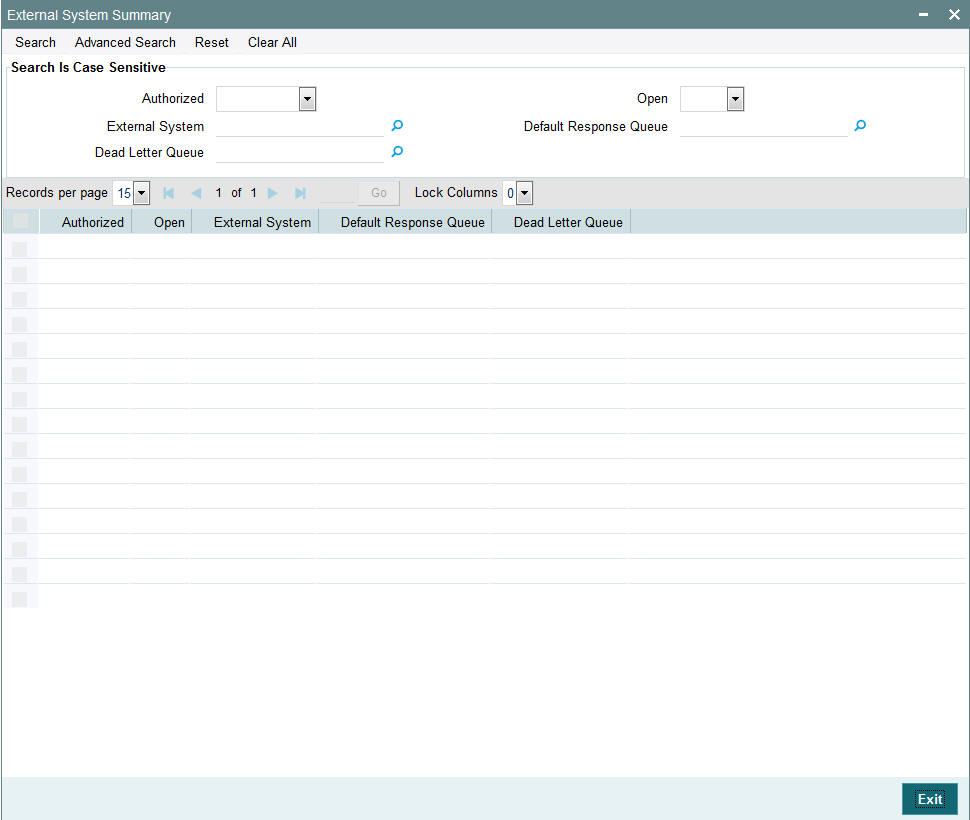
You can perform the following actions using this screen.
You can retrieve a previously entered stop code in the Summary screen, as follows:
- Invoke the External System Summary screen and specify the following:
- The status of the fund type in the Authorized field. If you choose the “Blank Space” option, then all the fund types are retrieved.
- The status of the fund type in the Open field. If you choose the “Blank Space” option, then all the fund types are retrieved.
- External System
- Dead Letter Queue
- Default Response Queue
- After you have specified the required details, click ‘Search’ button. All Stop codes with the specified details are retrieved and displayed in the lower portion of the screen.
You can also retrieve the stop code detail from the detail screen by doing query in the following manner:-
- Press F7
- Input External System
- Press F8
You can perform Edit, Delete, Amend, Authorize, Reverse, Confirm operation by selecting from the Action list.
You can also search the record by using combination of % and alphanumeric value.
For example, you can search the record for External System by using the combination of % and alphanumeric value as follows:-
- Search by M%: The system will fetch all the records whose External System starts from Alphabet ‘M’. For example, Mutual Fund.
- Search by %7 : The system will fetch all the records whose External System ends by numeric value’ 7’ For example, 217,267,77 and so forth.
- Search by %17%: The system will fetch all the records whose External System contains the numeric value 17. For example, 3217, 2172 and so forth.
4.2.2 Viewing External System Details
You can view previously entered details of external system in the ‘External System Summary’ screen, as follows:
- Specify any or all of the following details in the ‘External
System Summary’ screen:
- The status of the record in the Authorized field. If you choose the ‘Blank Space’ option, then all the records that involve the specified External System are retrieved.
- The status of the record in the Open field. If you choose the ‘Blank Space’ option, then all the records that involve the specified External System are retrieved.
- External System
- Default Response Queue
- Dead Letter Queue
Click ‘Search’ button to view the records. All records with the specified details are retrieved and displayed in the lower portion of the screen.
You can also search the record by using combination of % and alphanumeric value.
4.2.3 Deleting External System Details
You can delete only unauthorized records in the system. To delete a record that you have previously entered:
- Invoke the ‘External System Summary’ screen from the Browser.
- Select the status of the record that you want to retrieve for deletion.
- Specify any or all of the details and click ‘Search’ button. All records with the specified details are retrieved and displayed in the lower portion of the screen.
- Double click the record that you want to delete. The ‘External System Maintenance’ screen is displayed.
- Select Delete operation from the Action list. The system prompts you to confirm the deletion, and the record is deleted physically from the system database.
4.2.4 Modifying External System Details
You can modify only unauthorized records in the system. To modify a record that you have previously entered:
- Invoke the ‘External System Summary’ screen from the Browser.
- Select the status of the record that you want to retrieve for modification.
- Specify any or all of the details and click ‘Search’ button. All records with the specified details are retrieved and displayed in the lower portion of the screen.
- Double click the record that you want to modify. The ‘External System Maintenance’ screen is displayed.
- Select Edit operation from the Action list and modify the details. After modifying the details, click Save to save the modifications.
You can edit External System details as many times as necessary before you authorize it.
4.2.5 Authorizing External System Details
You can authorize records in the system. To authorize a record that you have previously entered:
- Invoke the ‘External System Summary’ screen from the Browser.
- Select the status of the record that you want to retrieve for authorization.
- Specify any or all of the details and click ‘Search’ button. All records with the specified details are retrieved and displayed in the lower portion of the screen.
- Double click the record that you want to authorize. The ‘External System Maintenance’ screen is displayed.
- Select authorize operation from the Action list. The system prompts you to confirm the authorization, and the record is authorized.
4.3 External System Functions
This section contains the following topics:
4.3.1 Maintaining External System Functions
You can define access rights to an external system using the ‘External System Functions’ screen. You can invoke this screen by typing ‘‘UTDEXFUN’ in the field at the top right corner of the Application tool bar and clicking the adjoining arrow button.
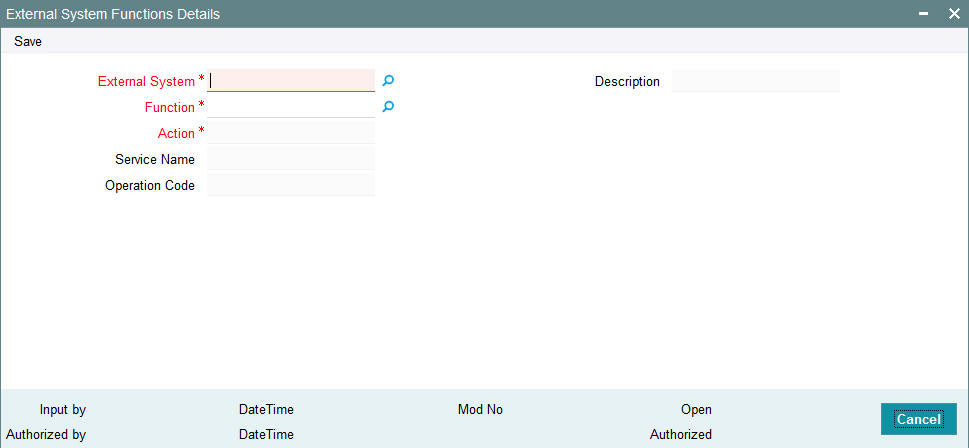
You can specify the following details:
External System
Alphanumeric; 15 Characters; Mandatory
Specify an external system for which you wish to provide access rights from the adjoining option list. The adjoining option list displays all the external systems you have maintained at the ‘External Systems Maintenance’ level.
Description
Display
The system displays the description of the specified external system.
Function
Alphanumeric; 8 Characters; Mandatory
Specify a valid function from the adjoining option list. The function are invoked from Gateway Functions.
Action
Display
The system displays an action based on the specified function ID.
Service Name
Display
The system displays the service name based on the specified Function ID and Action.
Operation Code
Display
The system displays Operation Code based on the specified Function ID and Action.
4.4 External System Functions Summary
This section contains the following topics:
- Section 4.4.1, "Retrieving External System Functions Details"
- Section 4.4.2, "Viewing External System Functions Details"
- Section 4.4.3, "Deleting External System Functions Details"
- Section 4.4.4, "Modifying External System Function Details"
- Section 4.4.5, "Authorizing External System Function Details"
4.4.1 Retrieving External System Functions Details
You can view, modify, delete and authorize external system function details in the ‘External System Functions Summary’ screen. You can invoke this screen by typing ‘UTSEXFUN’ in the field at the top right corner of the Application tool bar and clicking on the adjoining arrow button.

4.4.2 Viewing External System Functions Details
You can view previously entered details of external system in the ‘External System Functions Summary’ screen, as follows:
- Specify any or all of the following details in the ‘External
System Functions Summary’ screen:
- The status of the record in the Authorized field. If you choose the ‘Blank Space’ option, then all the records that involve the specified External System Functions are retrieved.
- The status of the record in the Open field. If you choose the ‘Blank Space’ option, then all the records that involve the specified External System Functions are retrieved.
- External System
- Function
- Action
Click ‘Search’ button to view the records. All records with the specified details are retrieved and displayed in the lower portion of the screen.
You can also search the record by using combination of % and alphanumeric value.
4.4.3 Deleting External System Functions Details
You can delete only unauthorized records in the system. To delete a record that you have previously entered:
- Invoke the ‘External System Functions Summary’ screen from the Browser.
- Select the status of the record that you want to retrieve for deletion.
- Specify any or all of the details and click ‘Search’ button. All records with the specified details are retrieved and displayed in the lower portion of the screen.
- Double click the record that you want to delete. The ‘External System Functions Maintenance’ screen is displayed.
- Select Delete operation from the Action list. The system prompts you to confirm the deletion, and the record is deleted physically from the system database.
4.4.4 Modifying External System Function Details
You can modify only unauthorized records in the system. To modify a record that you have previously entered:
- Invoke the ‘External System Functions Summary’ screen from the Browser.
- Select the status of the record that you want to retrieve for modification.
- Specify any or all of the details and click ‘Search’ button. All records with the specified details are retrieved and displayed in the lower portion of the screen.
- Double click the record that you want to modify. The ‘External System Functions Maintenance’ screen is displayed.
- Select Edit operation from the Action list and modify the details. After modifying the details, click Save to save the modifications.
You can edit External System details as many times as necessary before you authorize it.
4.4.5 Authorizing External System Function Details
You can authorize records in the system. To authorize a record that you have previously entered:
- Invoke the ‘External System Functions Summary’ screen from the Browser.
- Select the status of the record that you want to retrieve for authorization.
- Specify any or all of the details and click ‘Search’ button. All records with the specified details are retrieved and displayed in the lower portion of the screen.
- Double click the record that you want to authorize. The ‘External System Functions Maintenance’ screen is displayed.
- Select authorize operation from the Action list. The system prompts you to confirm the authorization, and the record is authorized.
4.5 Message Media
This section contains the following topics:
4.5.1 Maintaining Message Media
FCIS facilitates maintenance of different media through which advices and messages can be generated. At your bank, you can only receive or route messages through a media that you have maintained in this screen. These specifications can be made only at the main branch and will be applicable to all the branches of your bank.
You can maintain standard media like Mail, Telex and SWIFT and also other media like CHIPS or any other country or customer specific media from which the messages will be routed. You can invoke the ‘Message Media Maintenance’ screen by typing ‘UTDMEDIA’ in the field at the top right corner of the Application tool bar and clicking on the adjoining arrow button
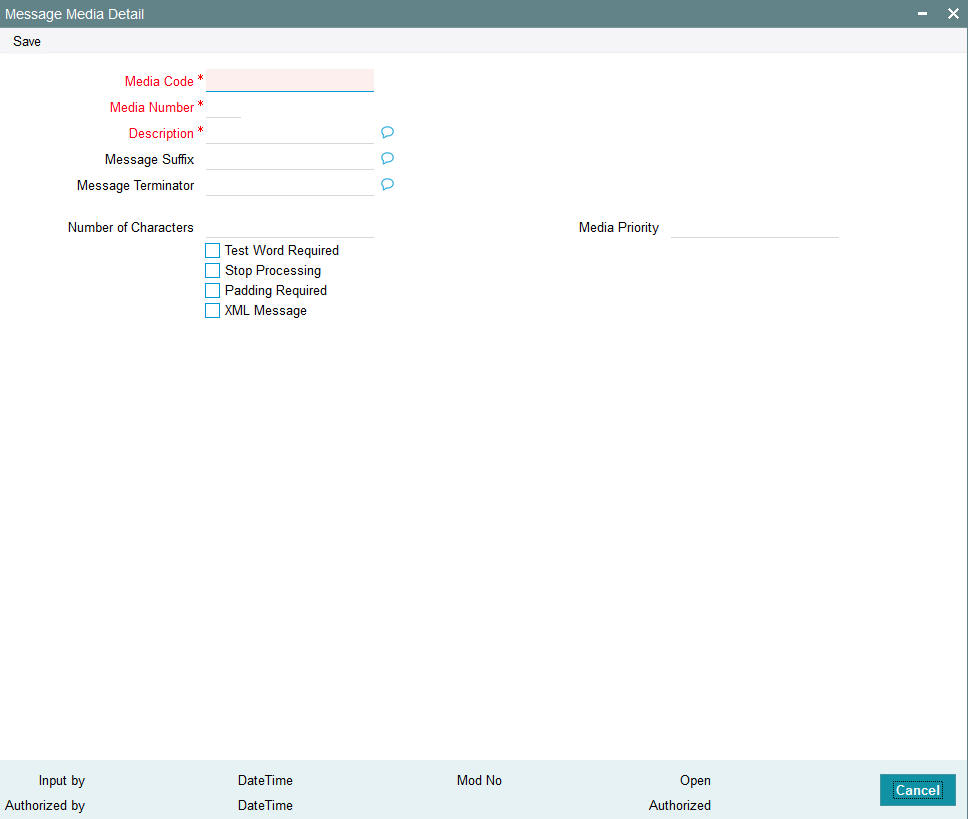
In this screen, you can maintain the following:
- The media types that can be used to transmit messages from and to your bank
- The compatible media for the media type you are maintaining
Media Code
Alphanumeric; 60 Characters; Mandatory
Specify a unique code to identify the media.
When you want to transit a message through a particular media type, you just have to specify the code assigned to the media type. The message will be routed automatically through the media.
Media Number
Numeric; 1 Character; Mandatory
Specify a unique number with which you want to represent the media.
Description
Alphanumeric; 420 Characters; Mandatory
Specify description for the specified media code. The description will help you identify the code that it represents.
Message Suffix
Alphanumeric; 400 Characters; Optional
Specify padding characters which you want to add to the end of every outgoing message, automatically. The specified padding characters will be inserted, automatically, at the end of every outgoing message in the media.
Message Terminator
Alphanumeric; 400 characters; Optional
Specify padded characters that mark the end of the incoming messages in a media. The system identifies the end of an incoming message, in a file containing several messages, when it encounters the padding characters that you have specified for a media type.
Number of Characters
Numeric; 3 Characters; Optional
Specify the number of times you want to repeat the set of specified padding characters, if you opted to suffix an outgoing message with a set of padding characters.
The padding characters will be suffixed to every outgoing message in the media as many times as you specify.
Media Priority
Numeric; 2 Characters; Mandatory
Specify usage priority for each media type that you maintain. When dispatching messages to customers, the media type used for sending the message will be the one that is higher on the priority rating.
Test Word Required
Optional
Check this option if you want to insert the test word to the telex message manually before it is generated from your branch.
Stop Processing
Optional
Check this box if you want to stop the processing for the incoming and outgoing messages.
Padding Required
Optional
Check this box if you want to add the suffix to the outgoing messages.
XML Message
Optional
Check this box if XML message is required.
4.6 Message Media Details
This section contains the following topics:
- Section 4.6.1, "Retrieving Message Media Details"
- Section 4.6.2, "Viewing Message Media Details"
- Section 4.6.3, "Deleting Message Media Details"
- Section 4.6.4, "Modifying Message Media Details"
- Section 4.6.5, "Authorizing Message Media Details"
4.6.1 Retrieving Message Media Details
You can view, modify, delete and authorize external system function details in the ‘Message Media Summary’ screen. You can invoke this screen by typing ‘UTSMEDIA’ in the field at the top right corner of the Application tool bar and clicking on the adjoining arrow button.

You can perform the following actions using this screen
4.6.2 Viewing Message Media Details
You can view previously entered details of external system in the ‘Message Media Summary’ screen, as follows:
- Specify any or all of the following details in the ‘Message
Media Summary’ screen:
- The status of the record in the Authorization Status field. If you choose the ‘Blank Space’ option, then all the records that involve the specified Message Media are retrieved.
- The status of the record in the Open field. If you choose the ‘Blank Space’ option, then all the records that involve the specified Message Media are retrieved.
- Media Code
- Description
- Media Number
Click ‘Search’ button to view the records. All records with the specified details are retrieved and displayed in the lower portion of the screen.
You can also search the record by using combination of % and alphanumeric value.
4.6.3 Deleting Message Media Details
You can delete only unauthorized records in the system. To delete a record that you have previously entered:
- Invoke the ‘Message Media Summary’ screen from the Browser.
- Select the status of the record that you want to retrieve for deletion.
- Specify any or all of the details and click ‘Search’ button. All records with the specified details are retrieved and displayed in the lower portion of the screen.
- Double click the record that you want to delete. The ‘Message Media Maintenance’ screen is displayed.
- Select Delete operation from the Action list. The system prompts you to confirm the deletion, and the record is deleted physically from the system database.
4.6.4 Modifying Message Media Details
You can modify only unauthorized records in the system. To modify a record that you have previously entered:
- Invoke the ‘Message Media Summary’ screen from the Browser.
- Select the status of the record that you want to retrieve for modification.
- Specify any or all of the details and click ‘Search’ button. All records with the specified details are retrieved and displayed in the lower portion of the screen.
- Double click the record that you want to modify. The ‘Message Media Maintenance’ screen is displayed.
- Select Edit operation from the Action list and modify the details. After modifying the details, click Save to save the modifications.
You can edit External System details as many times as necessary before you authorize it.
4.6.5 Authorizing Message Media Details
You can authorize records in the system. To authorize a record that you have previously entered:
- Invoke the ‘Message Media Summary’ screen from the Browser.
- Select the status of the record that you want to retrieve for authorization.
- Specify any or all of the details and click ‘Search’ button. All records with the specified details are retrieved and displayed in the lower portion of the screen.
- Double click the record that you want to authorize. The ‘Message Media Maintenance’ screen is displayed.
- Select authorize operation from the Action list. The system prompts you to confirm the authorization, and the record is authorized.
4.7 Media Control System
This section contains the following topics:
4.7.1 Maintaining Media Control System
The messages that are sent from and delivered to your bank are transmitted and received over sources that are external to FCIS. We shall call these external sources Media Control Systems (MCS).
In a distributed environment, the database of a branch is located in a node or server. The MCS of the messages are also installed in a node. Thus, while defining an MCS, you also need to indicate the node in which it is installed.
An MCS can handle only one media, hence you need to set up several media control systems for the various media types maintained for your bank. Apart from indicating the media type for an MCS, you can also indicate separate directories from which FCIS should read and write incoming and outgoing messages, for a given media.
You can invoke ‘Media Control System Maintenance’ screen by typing ‘UTDMCS’ in the field at the top right corner of the Application tool bar and clicking on the adjoining arrow button.

You can maintain the following parameters here:
Node
Alphanumeric; 420 Characters; Mandatory
Specify a node or server at which the MCS is located, from the adjoining option list. A node is the Database instance on which FCIS is installed. A branch’s database is located in a node and an MCS is also installed in a node.
Media Control System
Alphanumeric; 60 Characters; Mandatory
Specify a unique code for MCS to identify the external source. You can follow your own convention for devising this code.
Media
Alphanumeric; 60 Characters; Mandatory
Specify the media for which your bank is using the MCS, from the adjoining option list. The option-list displays the media codes maintained at the ‘Message Media Maintenance’ level.
Status
Optional
Select a valid status of an MCS from the adjoining drop-down list. This list displays the following values:
- Active – Select if you want to direct the messages through MCS.
- Passive – Select if you do not want to direct any message to through MCS. If the status of MCS is passive, then FCIS will not write into or read from the directories on the node.
Delivery Type
Optional
Select a valid type of delivery from the options. The following options are available for selection:
- Folder – If you select this option, you must specify the ‘In Directory’ and ‘Out Directory’ for Windows Server. Further, after selecting this option, if you check the option ‘Unix Swift Server’ for a UNIX SWIFT server, then you must specify the ‘Unix In-Directory’ and the ‘Unix Out-Directory’.
- Queue – If you select this option, you must specify ‘In Queue’, ‘Out Queue’ and select a valid type of queue from the options. The following options are available for selection:
In Directory
Alphanumeric; 512 Characters; Optional
Specify the full path of the directory from which FCIS should read and write incoming message, if you have maintained the Delivery Type as ‘Folder' and the SWIFT server as Windows server.
Out Directory
Alphanumeric; 512 Characters; Optional
Specify the full path of the directory from which FCIS should read and write outgoing message, if you have maintained the Delivery Type as ‘Folder' and the SWIFT server as Windows server.
File Prefix
Alphanumeric; 1 Character; Optional
Specify a unique identifier for the specified MCS to identify the outgoing message files generated in a different media.
Unix-In-Directory
Alphanumeric; 512 Characters; Optional
Specify the full path of the directory on the SWIFT server where you would like to store incoming SWIFT message hand-off files. The system will pickup and process all incoming SWIFT message files from this directory.
Unix-Out-Directory
Alphanumeric; 512 Characters; Optional
Specify the full path of the directory on the SWIFT server where you would like to store outgoing SWIFT message hand-off files.
In Queue
Alphanumeric; 1020 Characters; Optional
Specify the full path of the queue in the node or server into which the MCS should store the incoming message hand-off file, if the Delivery type is Queue. The system will pickup and read all incoming messages transmitted through the specified media from this queue, by default
Out Queue
Alphanumeric; 1020 Characters; Optional
Specify the full path of the queue in the node or server into which the message hand-off file from the system, for the specified media, should be stored. The MCS, which is also located on the same node, will store the outgoing messages in this queue by default.
Unix Swift Server
Optional
Check this box if the SWIFT server at your Bank is on UNIX.
Microsoft Message Queue
Optional
Check this option to select microsoft message queue.
WebSphere Messaging
Optional
Check this option to select websphere messaging.
4.8 Media Control System Details
This section contains the following topics:
- Section 4.8.1, "Retrieving Media Control System Details"
- Section 4.8.2, "Viewing Media Control System Details"
- Section 4.8.3, "Deleting Media Control System Details"
- Section 4.8.4, "Modifying Media Control System Details"
- Section 4.8.5, "Authorizing Media Control System Details"
4.8.1 Retrieving Media Control System Details
You can view, modify, delete and authorize external system function details in the ‘Media Control System Summary’ screen. You can invoke this screen by typing ‘UTSMCS’ in the field at the top right corner of the Application tool bar and clicking on the adjoining arrow button.

You can perform the following actions using this screen.
4.8.2 Viewing Media Control System Details
You can view previously entered details of external system in the ‘Media Control System Summary’ screen, as follows:
- Specify any or all of the following details in the ‘Media Control
System Summary’ screen:
- The status of the record in the Authorization Status field. If you choose the ‘Blank Space’ option, then all the records that involve the specified Media Control System are retrieved.
- The status of the record in the Open field. If you choose the ‘Blank Space’ option, then all the records that involve the specified Media Control System are retrieved.
- Node
- Media Control System
- Media
Click ‘Search’ button to view the records. All records with the specified details are retrieved and displayed in the lower portion of the screen.
You can also search the record by using combination of % and alphanumeric value.
4.8.3 Deleting Media Control System Details
You can delete only unauthorized records in the system. To delete a record that you have previously entered:
- Invoke the ‘Media Control System Summary’ screen from the Browser.
- Select the status of the record that you want to retrieve for deletion.
- Specify any or all of the details and click ‘Search’ button. All records with the specified details are retrieved and displayed in the lower portion of the screen.
- Double click the record that you want to delete. The ‘Media Control System Maintenance’ screen is displayed.
- Select Delete operation from the Action list. The system prompts you to confirm the deletion, and the record is deleted physically from the system database.
4.8.4 Modifying Media Control System Details
You can modify only unauthorized records in the system. To modify a record that you have previously entered:
- Invoke the ‘Media Control System Summary’ screen from the Browser.
- Select the status of the record that you want to retrieve for modification.
- Specify any or all of the details and click ‘Search’ button. All records with the specified details are retrieved and displayed in the lower portion of the screen.
- Double click the record that you want to modify. The ‘Media Control System Maintenance’ screen is displayed.
- Select Edit operation from the Action list and modify the details. After modifying the details, click Save to save the modifications.
You can edit External System details as many times as necessary before you authorize it.
4.8.5 Authorizing Media Control System Details
You can authorize records in the system. To authorize a record that you have previously entered:
- Invoke the ‘Media Control System Summary’ screen from the Browser.
- Select the status of the record that you want to retrieve for authorization.
- Specify any or all of the details and click ‘Search’ button. All records with the specified details are retrieved and displayed in the lower portion of the screen.
- Double click the record that you want to authorize. The ‘Media Control System Maintenance’ screen is displayed.
- Select authorize operation from the Action list. The system prompts you to confirm the authorization, and the record is authorized.
4.9 Amendment Details
This section contains the following topics:
4.9.1 Maintaining Amendment Details
FCIS facilitates maintenance of nodes and fields which are amended through external system. You can invoke this screen by typing ‘UTDAMDMT’ in the field at the top right corner of the Application tool bar and clicking the adjoining arrow button.
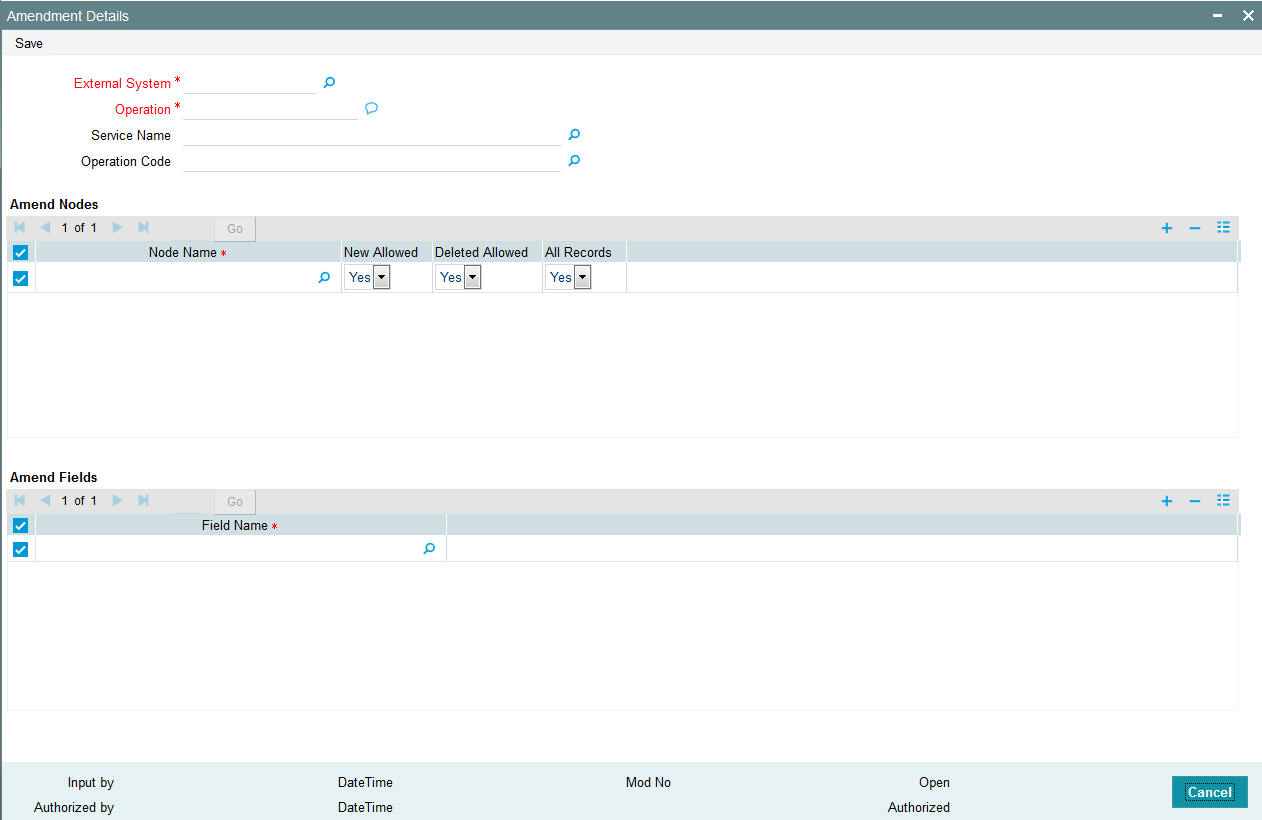
You can maintain the following parameters here:
External System
Alphanumeric; 15 Characters; Mandatory
Select an external system for which amendable maintenance is done, from the adjoining option list.
Operation
Alphanumeric; 50 Characters; Mandatory
Specify the Gateway operation for which Amendable maintenance is done.
Service Name
Alphanumeric; 50 Characters; Optional
Select the service name for which amendable maintenance is done, from the adjoining option list.
Operation Code
Alphanumeric; 50 Characters; Optional
Select the operation code from the adjoining option list.
Amend Nodes
Node Name
Alphanumeric; 50 Characters; Mandatory
Specify the name of the node which can be amended through external system. The adjoining option list displays the list of nodes.
New Allowed
Optional
Select whether new records can be added in the node or not from the drop-down list. The list displays the following values:
- Yes
- No
Deleted Allowed
Optional
Select whether existing records can be deleted from the node or not from the drop-down list. The list displays the following values:
- Yes
- No
All Records
Optional
Select if all records had to be amended or not from the drop-down list. The list displays the following values:
- Yes
- No
Amend Fields
Field Name
Alphanumeric; 50 Characters; Optional
Specify the field name which can be amended through external system. The adjoining option list displays the list of the fields in the node.
4.10 Amendment Details Retrieval
This section contains the following topics:
- Section 4.10.1, "Retrieving Amendment Details"
- Section 4.10.2, "Viewing Amendment Details"
- Section 4.10.3, "Deleting Amendment Details"
- Section 4.10.4, "Modifying Amendment Details"
- Section 4.10.5, "Authorizing Amendment Details"
4.10.1 Retrieving Amendment Details
You can view, modify, delete and authorize external system details in the ‘Amendment Maintenance Summary’ screen. You can invoke this screen by typing ‘UTSAMDMT’ in the field at the top right corner of the Application tool bar and clicking on the adjoining arrow button.

4.10.2 Viewing Amendment Details
You can view previously entered details of external system in the ‘Amendment Maintenance Summary’ screen, as follows:
- Specify any or all of the following details in the ‘Amendment
Maintenance Summary’ screen:
- The status of the record in the Authorization Status field. If you choose the ‘Blank Space’ option, then all the records that involve the specified External System are retrieved.
- The status of the record in the Open field. If you choose the ‘Blank Space’ option, then all the records that involve the specified External System are retrieved.
- External System
- Operation
Click ‘Search’ button to view the records. All records with the specified details are retrieved and displayed in the lower portion of the screen.
You can also search the record by using combination of % and alphanumeric value.
4.10.3 Deleting Amendment Details
You can delete only unauthorized records in the system. To delete a record that you have previously entered:
- Invoke the ‘Amendment Maintenance Summary’ screen from the Browser.
- Select the status of the record that you want to retrieve for deletion.
- Specify any or all of the details and click ‘Search’ button. All records with the specified details are retrieved and displayed in the lower portion of the screen.
- Double click the record that you want to delete. The ‘Amendment Details’ screen is displayed.
- Select Delete operation from the Action list. The system prompts you to confirm the deletion, and the record is deleted physically from the system database.
4.10.4 Modifying Amendment Details
You can modify only unauthorized records in the system. To modify a record that you have previously entered:
- Invoke the ‘Amendment Maintenance Summary’ screen from the Browser.
- Select the status of the record that you want to retrieve for modification.
- Specify any or all of the details and click ‘Search’ button. All records with the specified details are retrieved and displayed in the lower portion of the screen.
- Double click the record that you want to modify. The ‘Amendment Details’ screen is displayed.
- Select Edit operation from the Action list and modify the details. After modifying the details, click Save to save the modifications.
You can edit External System details as many times as necessary before you authorize it.
4.10.5 Authorizing Amendment Details
You can authorize records in the system. To authorize a record that you have previously entered:
- Invoke the ‘Amendment Maintenance Summary’ screen from the Browser.
- Select the status of the record that you want to retrieve for authorization.
- Specify any or all of the details and click ‘Search’ button. All records with the specified details are retrieved and displayed in the lower portion of the screen.
- Double click the record that you want to authorize. The ‘Amendment Details’ screen is displayed.
- Select authorize operation from the Action list. The system prompts you to confirm the authorization, and the record is authorized.
4.11 Events Log
This section contains the following topics:
4.11.1 Invoking Events Log Screen
You can invoke ‘Events’ screen by typing ‘SMREVNLO/ UTREVNLO’ in the field at the top right corner of the Application tool bar and clicking the adjoining arrow button.
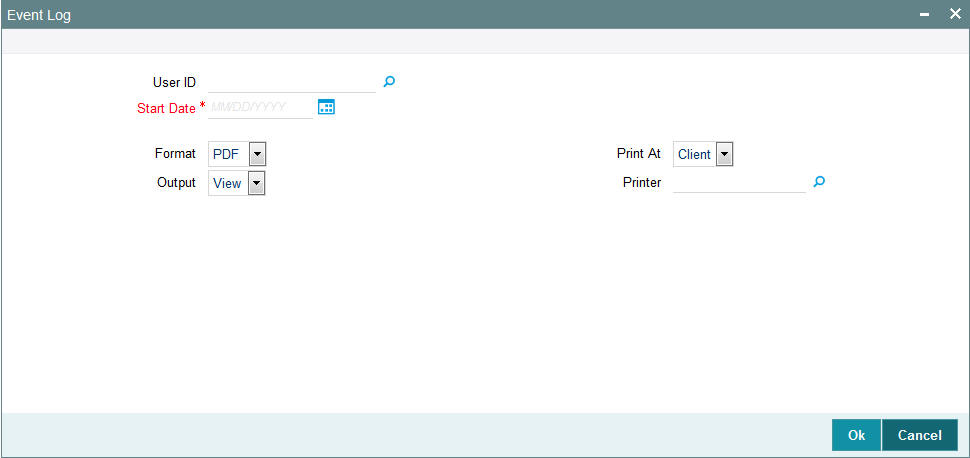
In this screen, you must specify the following as mandatory parameters for the generation of the report:
User ID
Alphanumeric; 30 Characters; Optional
Specify the user ID. Alternatively, you can select user ID from the option list. The list displays valid user ID maintained in the system.
Start Date
Date Format; Mandatory
Select the start date from the adjoining calendar.
Format
Optional
Select the format from the drop-down list. The list displays the following values:
- HTML
- Excel
- Excel (.xlsx)
- RTF
Output
Optional
Select the output from the drop-down list. The list displays the following values:
- View
- Spool
Print At
Optional
Select the printing location from the drop-down list. The list displays the following values:
- Client
- Server
Printer
Alphanumeric; 15 Characters; Optional
Specify the printer details from adjoining option list.
The system will generate the event logs after specifying the mandatory details.
4.12 Events Log
This section contains the following topics:
4.12.1 Invoking Events Log Screen
You can invoke ‘Events’ screen by typing ‘SMRPEVLG/ UTRPEVLG’ in the field at the top right corner of the Application tool bar and clicking the adjoining arrow button.
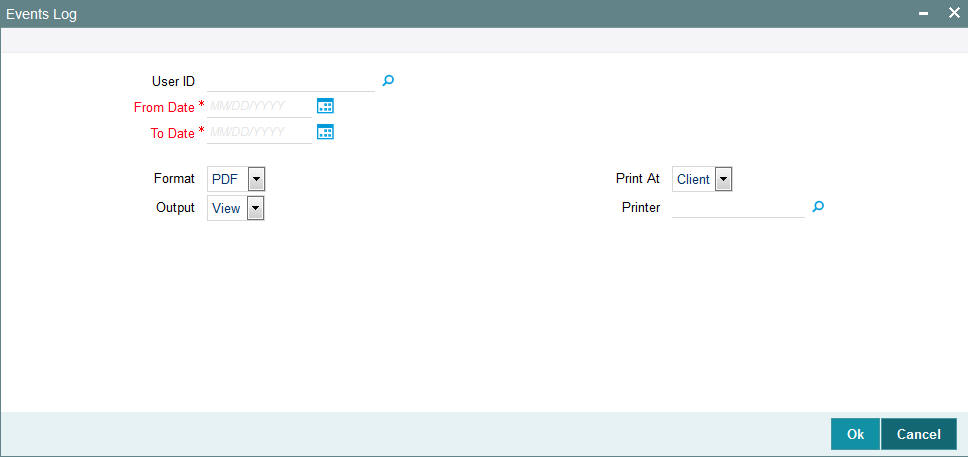
In this screen, you must specify the following as mandatory parameters for the generation of the report:
User ID
Alphanumeric; 30 Characters; Optional
Specify the user ID. Alternatively, you can select user ID from the option list. The list displays valid user ID maintained in the system.
Start Date
Date Format; Mandatory
Select the start date from the adjoining calendar.
Format
Optional
Select the format from the drop-down list. The list displays the following values:
- HTML
- Excel
- Excel (.xlsx)
- RTF
Output
Optional
Select the output from the drop-down list. The list displays the following values:
- View
- Spool
Print At
Optional
Select the printing location from the drop-down list. The list displays the following values:
- Client
- Server
Printer
Alphanumeric; 15 Characters; Optional
Specify the printer details from adjoining option list.
The system will generate the event logs after specifying the mandatory details.
4.13 Integration Parameter Maintenance Screen
This section contains the following topic:
4.13.1 Invoking Integration Parameter Maintenance Screen
You can invoke ‘Integration Parameter Maintenance’ screen by typing ‘IFDINPRM’ in the field at the top right corner of the Application tool bar and clicking on the adjoining arrow button.
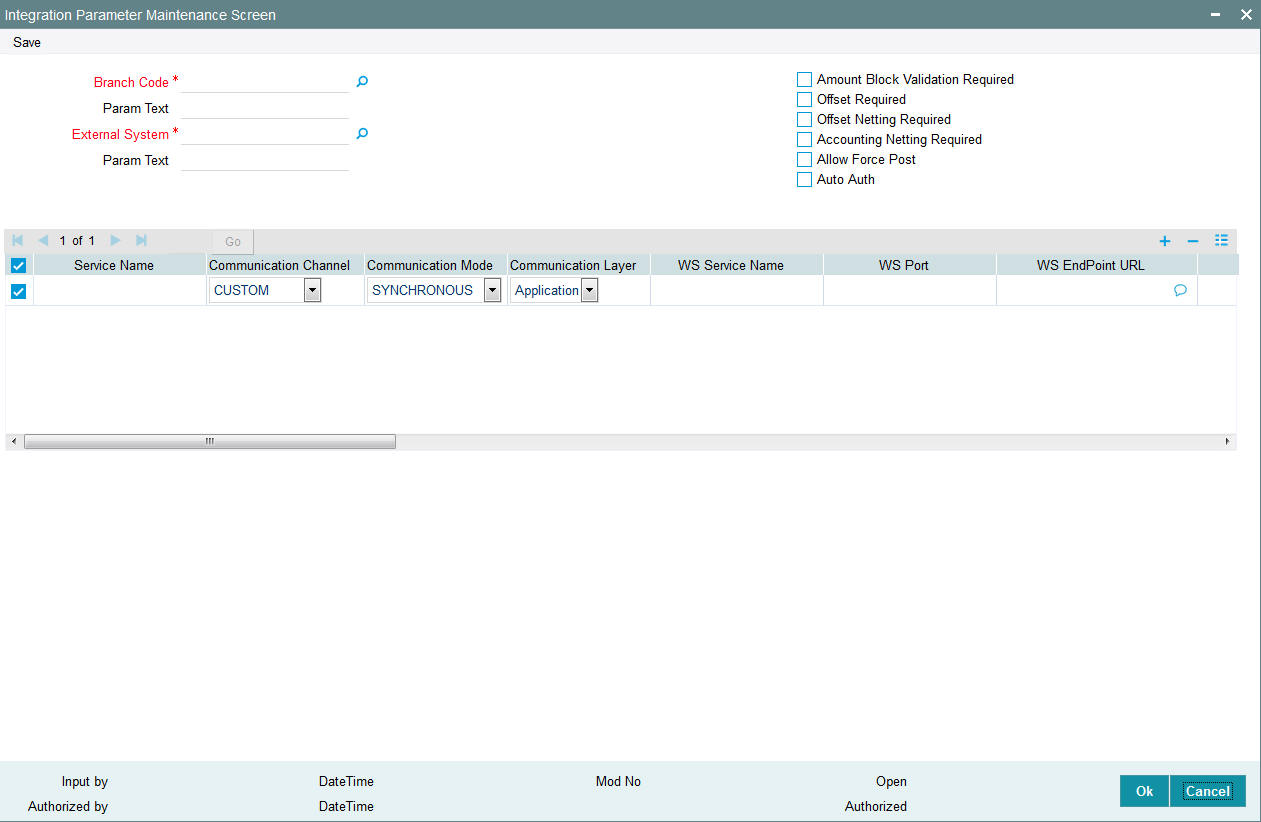
You can specify the following details:
Branch Code
Alphanumeric; 3 Characters; Mandatory
Specify the branch code. Alternatively, you can select the branch code from the option list. The list display all valid branch code maintained in the system.
Param Text
Display
The system displays the description for the selected branch code.
External System
Alphanumeric; 50 Characters; Mandatory
Specify the external system details. Alternatively, you can select the external system details from the option list. The list display all valid external system details maintained in the system.
Param Text
Display
The system displays the description for the selected external system.
Amount Block Validation Required
Optional
Check this box if amount block validation is required.
Offset Required
Optional
Check this box if offset is required.
Offset Netting Required
Optional
Check this box if offset netting is required.
Accounting Netting Required
Optional
Check this box if accounting netting is required.
Allow Force Post
Optional
Check this box if force post is allowed.
Auto Auth
Optional
Check this box if auto authorization is required.
Service Name
Alphanumeric; 100 Characters; Mandatory
Specify the service name.
Communication Channel
Optional
Select the communication channel from the drop-down list. The list displays the following values:
- Custom
- Webservice
- MDB
- Internal
Communication Mode
Optional
Select the communication mode from the drop-down list. The list displays the following values:
- Synchronous
- Asynchronous
Communication Layer
Optional
Select the communication layer from the drop-down list. The list displays the following values:
- Application
- Database
WS Service Name
Alphanumeric; 250 Characters; Optional
Specify WS Service Name.
WS Port
Numeric; 250 Characters; Optional
Specify WS Port.
WS EndPoint URL
Alphanumeric; 500 Characters; Optional
Specify WS EndPoint URL.
WS User
Alphanumeric; 128 Characters; Optional
Specify WS User.
WS Password
Alphanumeric; 128 Characters; Optional
Specify WS Password.
Custom Classname
Alphanumeric; 255 Characters; Optional
Specify Custom Classname.
ATM Server IP
Numeric; 50 Characters; Optional
Specify the ATM server IP address.
ATM Server Port
Numeric; 50 Characters; Optional
Specify ATM Server Port.
MDB QCF
Alphanumeric; 255 Characters; Optional
Specify MDB QCF details.
MDB Out Queue
Alphanumeric; 255 Characters; Optional
Specify MDB out queue details
MDB Response Queue
Alphanumeric; 255 Characters; Optional
Specify MDB response queue details.
Audit Enabled
Alphanumeric; 2 Characters; Optional
Specify audit enabled details.
Source
Alphanumeric; 20 Characters; Optional
Specify source details.
External DataSource
Alphanumeric; 50 Characters; Optional
Specify external data source details.
Symmetric Key
Alphanumeric; 50 Characters; Optional
Specify symmetric key details.
4.14 Upload Source Maintenance
This section contains the following topic:
4.14.1 Invoking Upload Source Maintenance Screen
Oracle FLEXCUBE Investor Servicing facilitates upload of data from an external source. The details of the source from which data has to be uploaded need to be maintained in Oracle FLEXCUBE Investor Servicing using the ‘Upload Source Maintenance’ screen.
You can invoke the ‘Upload Source Maintenance’ screen by typing ‘SMDSORCE’ in the field at the top right corner of the Application tool bar and clicking on the adjoining arrow button.

You can specify the following details.
Source Code
Alphanumeric; 15 Characters; Mandatory
Specify a source code from which data has to be uploaded to Oracle FLEXCUBE Investor Servicing.
Description
Alphanumeric; 105 Characters; Mandatory
Specify the description for the source code specified.
Authentication Required
Optional
Check this box to indicate if base data has to be uploaded from Oracle FLEXCUBE Investor Servicing.
4.15 Upload Source Summary
This section contains the following topic:
- Section 4.15.1, "Retrieving a Record in Upload Source Summary Screen"
- Section 4.15.2, "Editing Upload Source Record"
- Section 4.15.3, "Viewing Upload Source Record"
- Section 4.15.4, "Deleting Upload Source Record"
- Section 4.15.5, "Authorizing Upload Source Record"
- Section 4.15.6, "Amending Upload Source Record"
- Section 4.15.7, "Authorizing Amended Upload Source Record"
4.15.1 Retrieving a Record in Upload Source Summary Screen
You can retrieve a previously entered record in the Summary Screen, as follows:
Invoke the ‘Upload Source Summary’ screen by typing ‘SMSSORCE’ in the field at the top right corner of the Application tool bar and clicking on the adjoining arrow button and specify any or all of the following details in the corresponding details.
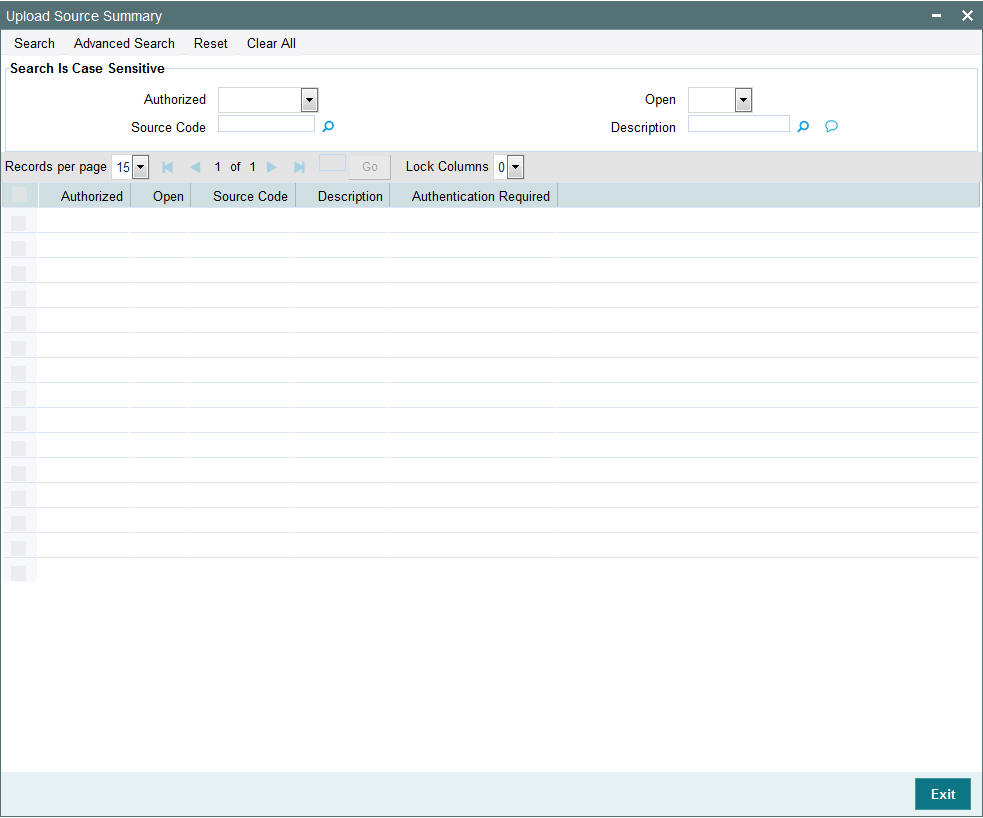
- The status of the record in the Authorized field. If you choose the ‘Blank Space’ option, then all the records are retrieved.
- The status of the record in the Open field. If you choose the ‘Blank Space’ option, then all records are retrieved
- Source Code
- Description
Click ‘Search’ button to view the records. All the records with the specified details are retrieved and displayed in the lower portion of the screen.
Note
You can also retrieve the individual record detail from the detail screen by querying in the following manner:
- Press F7
- Input the Source Code
- Press F8
You can perform Edit, Delete, Amend, Authorize, Reverse, Confirm operations by selecting the operation from the Action list. You can also search a record by using a combination of % and alphanumeric value
4.15.2 Editing Upload Source Record
You can modify the details of Upload Source record that you have already entered into the system, provided it has not subsequently authorized. You can perform this operation as follows:
- Invoke the Upload Source Summary screen from the Browser.
- Select the status of the record that you want to retrieve for modification in the Authorized field. You can only modify records that are unauthorized. Accordingly, choose the Unauthorized option.
- Specify any or all of the details in the corresponding fields to retrieve the record that is to be modified.
- Click ‘Search’ button. All unauthorized records with the specified details are retrieved and displayed in the lower portion of the screen.
- Double click the record that you want to modify in the list of displayed records. The Upload Source Maintenance screen is displayed.
- Select Unlock Operation from the Action list to modify the record. Modify the necessary information.
Click Save to save your changes. The Upload Source Maintenance screen is closed and the changes made are reflected in the Upload Source Summary screen.
4.15.3 Viewing Upload Source Record
To view a record that you have previously input, you must retrieve the same in the Upload Source Summary screen as follows:
- Invoke the Upload Source Summary screen from the Browser.
- Select the status of the record that you want to retrieve for viewing in the Authorized field. You can also view all records that are either unauthorized or authorized only, by choosing the unauthorized / Authorized option.
- Specify any or all of the details of the record in the corresponding fields on the screen.
- Click ‘Search’ button. All records with the specified fields are retrieved and displayed in the lower portion of the screen.
- Double click the record that you want to view in the list of displayed records. The Upload Source Maintenance screen is displayed in View mode.
4.15.4 Deleting Upload Source Record
You can delete only unauthorized records in the system. To delete a record that you have previously entered:
- Invoke the Upload Source Summary screen from the Browser.
- Select the status of the record that you want to retrieve for deletion.
- Specify any or all of the details in the corresponding fields on the screen.
- Click ‘Search’ button. All records with the specified fields are retrieved and displayed in the lower portion of the screen.
- Double click the record that you want to delete in the list of displayed records. The Upload Source Maintenance screen is displayed.
- Select Delete Operation from the Action list. The system prompts you to confirm the deletion and the record is physically deleted from the system database.
4.15.5 Authorizing Upload Source Record
- An unauthorized Upload Source record must be authorized in the system for it to be processed. To authorize a record:
- Invoke the Upload Source Summary screen from the Browser.
- Select the status of the record that you want to retrieve for authorization. Typically, choose the unauthorized option.
- Specify any or all of the details in the corresponding fields on the screen.
- Click ‘Search’ button. All records with the specified details that are pending authorization are retrieved and displayed in the lower portion of the screen.
- Double click the record that you wish to authorize. The Upload Source Maintenance screen is displayed. Select Authorize operation from the Action List.
When a checker authorizes a record, details of validation, if any, that were overridden by the maker of the record during the Save operation are displayed. If any of these overrides results in an error, the checker must reject the record.
4.15.6 Amending Upload Source Record
After a Upload Source record is authorized, it can be modified using the Unlock operation from the Action List. To make changes to a record after authorization:
- Invoke the Upload Source Summary screen from the Browser.
- Select the status of the record that you want to retrieve for authorization. You can only amend authorized records.
- Specify any or all of the details in the corresponding fields on the screen.
- Click ‘Search’ button. All records with the specified details that are pending authorization are retrieved and displayed in the lower portion of the screen.
- Double click the record that you wish to authorize. The Upload Source Maintenance screen is displayed in amendment mode. Select Unlock operation from the Action List to amend the record.
- Amend the necessary information and click on Save to save the changes
4.15.7 Authorizing Amended Upload Source Record
An amended Upload Source record must be authorized for the amendment to be made effective in the system. The authorization of amended records can be done only from Fund Manager Module and Agency Branch module.
The subsequent process of authorization is the same as that for normal transactions.
4.16 Source Preferences Maintenance
This section contains the following topic:
4.16.1 Invoking Source Preferences Maintenance Screen
You can set preferences for upload of data from an external source in the ‘Source Preferences Maintenance’ screen. You can invoke the ‘Source Preferences Maintenance’ screen by typing ‘SMDUPLDM’ in the field at the top right corner of the Application tool bar and clicking the adjoining arrow button.
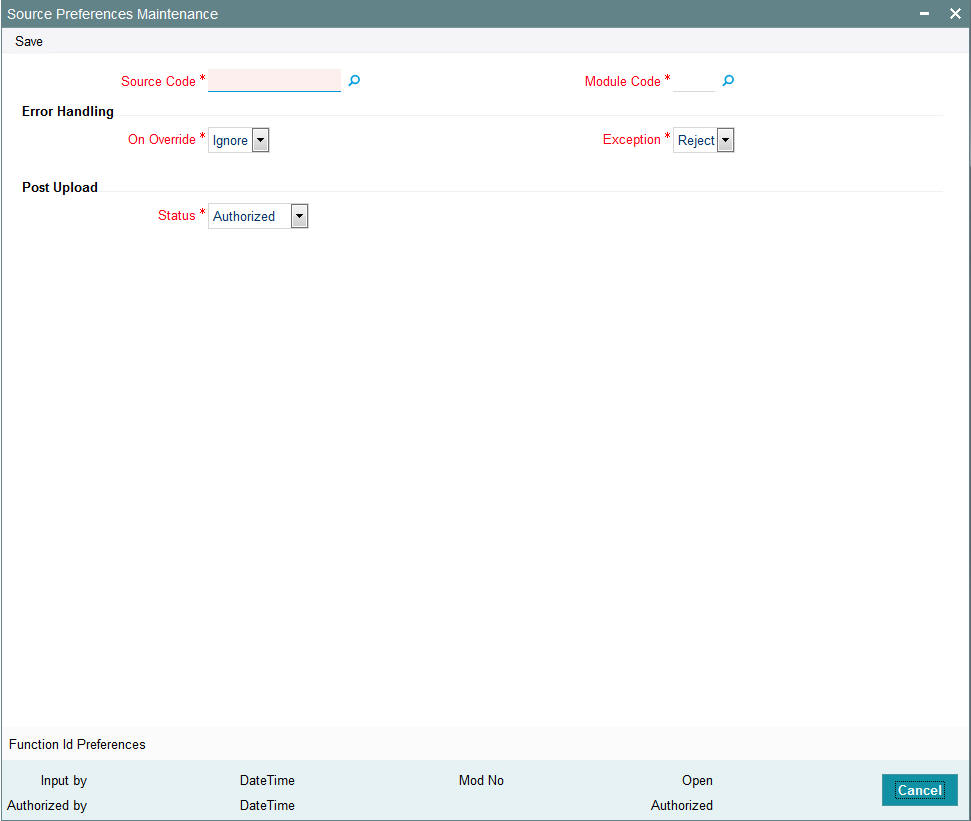
The following details are captured here:
Source Code
Alphanumeric; 15 Characters; Mandatory
Select Source Code from the option list. Depending on the source code you select here data is uploaded from that source into Oracle FLEXCUBE IS.
Module Code
Alphanumeric; 2 Characters; Mandatory
You can choose to upload data from a source directly onto a module in Oracle FLEXCUBE IS. Indicate the module into which you would like to upload data from a given source.
Error Handling
On Override
Mandatory
Oracle FLEXCUBE IS generates override messages in case it encounters any discrepancies during data upload. You can choose to do any of the following:
- Ignore – Select this option to ignore such error messages and continue with the upload process
- Reject – Select this option to reject the record
Exception
Mandatory
In case a serious error occurs during data upload, Oracle FLEXCUBE IS generates an error message. You can choose to put the record with the error on hold. If you would like to reject the record altogether, choose ‘Reject’ from the drop-down list.
Post Upload
Status
Mandatory
Select the status post upload from the drop-down list. The list displays the following values:
- Authorized
- Unauthorized
If you would like to automatically authorize the data that is uploaded into Oracle FLEXCUBE choose the ‘Authorize’ option here.
If you would like the record to be put on hold choose this option in this field.
If you would like the record to be unauthorized, choose the ‘Unauthorized’ option in this field. The record will not be authorized automatically on upload. You will have to manually authorize the data.
4.16.2 Function ID Preferences Button
Click ‘Function ID Preferences’ button in ‘Source Preferences Maintenance’ screen.
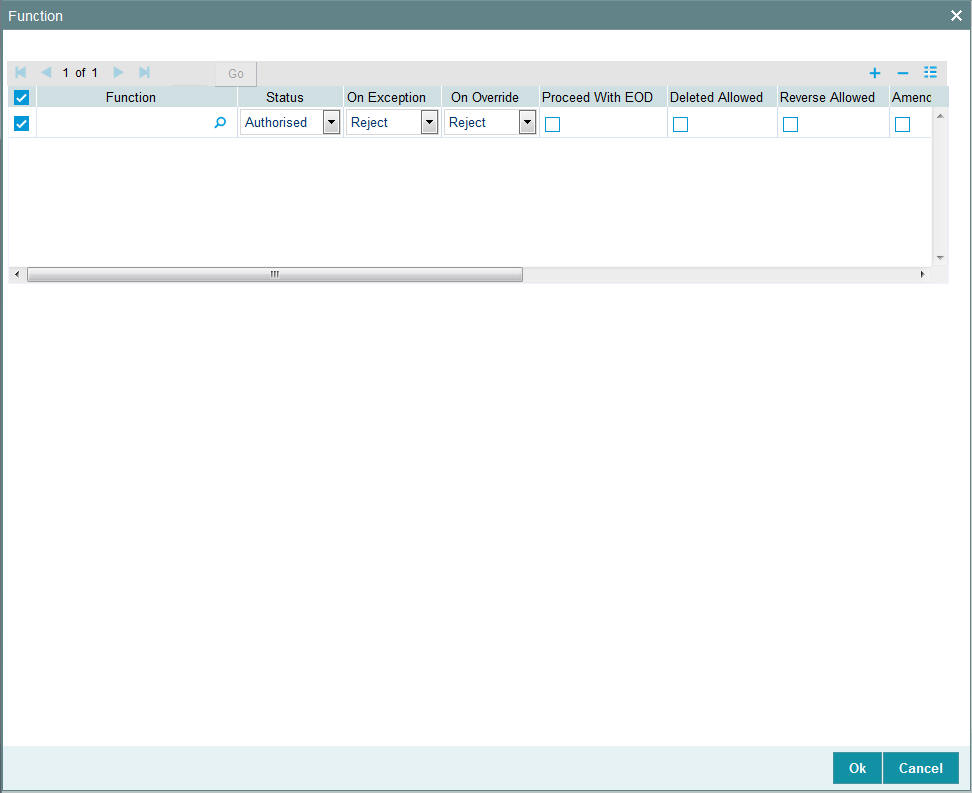
You can specify the following details:
Function
Alphanumeric; 8 Characters; Optional
Specify the function ID. Alternatively, you can also select function ID from the option list. The system displays all valid function IDs maintained in the system.
Status
Optional
Select the status from the drop-down list. The list displays the following values:
- Authorised
- Unauthorised
On Exception
Optional
Select the on exception details from the drop-down list. The list displays the following values:
- Reject
- Put on Hold
On Override
Optional
Select the on override details from the drop-down list. The list displays the following values:
- Reject
- Put on Hold
- Ignore
Proceed With EOD
Optional
Check this box to proceed with EOD.
Deleted Allowed
Optional
Check this box if deletion of a record is allowed.
Reverse Allowed
Optional
Check this box if reversal of a record is allowed.
Amend Allowed
Optional
Check this box if amending a record is allowed.
Purge Days
Numeric; 4 Characters; Optional
Specify the number of days to be purged.
Allow Deffered Processing
Optional
Check this box to allow deferred processing.
Allow EOD With Deffered
Optional
Check this box to allow EOD with deferred record.
4.17 Source Preferences Summary
This section contains the following topics:
- Section 4.17.1, "Retrieving a Record in Source Preferences Summary Screen"
- Section 4.17.2, "Editing Source Preference Record"
- Section 4.17.3, "Viewing Source Preferences Record"
- Section 4.17.4, "Deleting Source Preferences Record"
- Section 4.17.5, "Authorizing Source Preferences Record"
- Section 4.17.6, "Amending Source Preferences Record"
- Section 4.17.7, "Authorizing Amended Source Preferences Record"
4.17.1 Retrieving a Record in Source Preferences Summary Screen
You can retrieve a previously entered record in the Summary Screen, as follows:
Invoke the ‘Source Preferences Summary’ screen by typing ‘SMSUPLDM’ in the field at the top right corner of the Application tool bar. Click on the adjoining arrow button and specify any or all of the following details in the corresponding details.
- The status of the record in the Authorized field. If you choose the ‘Blank Space’ option, then all the records are retrieved.
- The status of the record in the Open field. If you choose the ‘Blank Space’ option, then all records are retrieved
- Source Code
- Status
- On Override
- Module Code
- Exception
Click ‘Search’ button to view the records. All the records with the specified details are retrieved and displayed in the lower portion of the screen.
Note
You can also retrieve the individual record detail from the detail screen by querying in the following manner:
- Press F7
- Input the Source Code
- Press F8
You can perform Edit, Delete, Amend, Authorize, Reverse, Confirm operations by selecting the operation from the Action list. You can also search a record by using a combination of % and alphanumeric value
4.17.2 Editing Source Preference Record
You can modify the details of Source Preferences record that you have already entered into the system, provided it has not subsequently authorized. You can perform this operation as follows:
- Invoke the Source Preferences Summary screen from the Browser.
- Select the status of the record that you want to retrieve for modification in the Authorized field. You can only modify records that are unauthorized. Accordingly, choose the Unauthorized option.
- Specify any or all of the details in the corresponding fields to retrieve the record that is to be modified.
- Click ‘Search’ button. All unauthorized records with the specified details are retrieved and displayed in the lower portion of the screen.
- Double click the record that you want to modify in the list of displayed records. The Source Preferences Maintenance screen is displayed.
- Select Unlock Operation from the Action list to modify the record. Modify the necessary information.
Click Save to save your changes. The Source Preferences Maintenance screen is closed and the changes made are reflected in the Source Preferences Summary screen.
4.17.3 Viewing Source Preferences Record
To view a record that you have previously input, you must retrieve the same in the Source Preferences Summary screen as follows:
- Invoke the Source Preferences Summary screen from the Browser.
- Select the status of the record that you want to retrieve for viewing in the Authorized field. You can also view all records that are either unauthorized or authorized only, by choosing the unauthorized / Authorized option.
- Specify any or all of the details of the record in the corresponding fields on the screen.
- Click ‘Search’ button. All records with the specified fields are retrieved and displayed in the lower portion of the screen.
- Double click the record that you want to view in the list of displayed records. The Source Preferences Maintenance screen is displayed in View mode.
4.17.4 Deleting Source Preferences Record
You can delete only unauthorized records in the system. To delete a record that you have previously entered:
- Invoke the Source Preferences Summary screen from the Browser.
- Select the status of the record that you want to retrieve for deletion.
- Specify any or all of the details in the corresponding fields on the screen.
- Click ‘Search’ button. All records with the specified fields are retrieved and displayed in the lower portion of the screen.
- Double click the record that you want to delete in the list of displayed records. The Source Preferences Maintenance screen is displayed.
- Select Delete Operation from the Action list. The system prompts you to confirm the deletion and the record is physically deleted from the system database.
4.17.5 Authorizing Source Preferences Record
- An unauthorized Source Preferences record must be authorized in the system for it to be processed. To authorize a record:
- Invoke the Source Preferences Summary screen from the Browser.
- Select the status of the record that you want to retrieve for authorization. Typically, choose the unauthorized option.
- Specify any or all of the details in the corresponding fields on the screen.
- Click ‘Search’ button. All records with the specified details that are pending authorization are retrieved and displayed in the lower portion of the screen.
- Double click the record that you wish to authorize. The Source Preferences Maintenance screen is displayed. Select Authorize operation from the Action List.
When a checker authorizes a record, details of validation, if any, that were overridden by the maker of the record during the Save operation are displayed. If any of these overrides results in an error, the checker must reject the record.
4.17.6 Amending Source Preferences Record
After a Source Preferences record is authorized, it can be modified using the Unlock operation from the Action List. To make changes to a record after authorization:
- Invoke the Source Preferences Summary screen from the Browser.
- Select the status of the record that you want to retrieve for authorization. You can only amend authorized records.
- Specify any or all of the details in the corresponding fields on the screen.
- Click ‘Search’ button. All records with the specified details that are pending authorization are retrieved and displayed in the lower portion of the screen.
- Double click the record that you wish to authorize. The Source Preferences Maintenance screen is displayed in amendment mode. Select Unlock operation from the Action List to amend the record.
- Amend the necessary information and click on Save to save the changes
4.17.7 Authorizing Amended Source Preferences Record
An amended Source Preferences record must be authorized for the amendment to be made effective in the system. The authorization of amended records can be done only from Fund Manager Module and Agency Branch module.
The subsequent process of authorization is the same as that for normal transactions.
4.18 Notification Enroute Maintenance
This section contains the following topics:
4.18.1 Invoking Notification Enroute Maintenance Screen
You can set up notification queue at module level using ‘Notification Enroute Maintenance’ screen. Notification job will look into the SMS data store for any pending activity and depending upon the module code call will be made to respective LOB to build response xml and place it in the maintained notification queue for that module.
You can invoke ‘Notification Enroute Maintenance’ screen by typing ‘UTDNTFEN’ in the field at the top right corner of the Application tool bar and clicking on the adjoining arrow button.
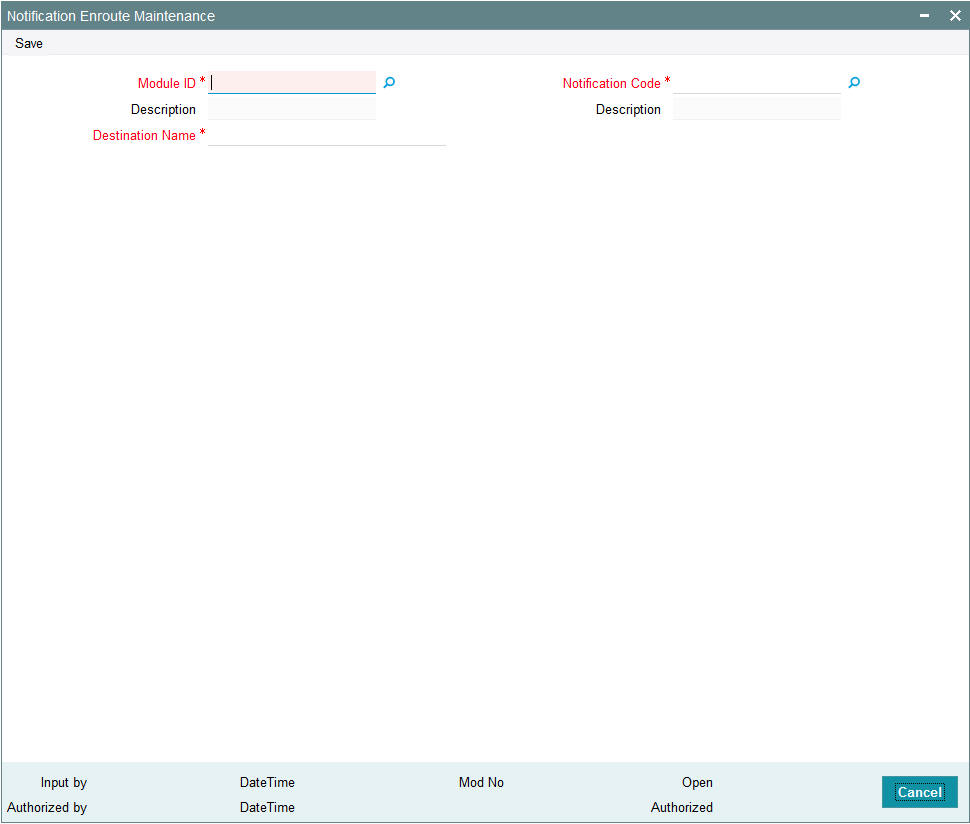
You can specify the following details:
Module ID
Alphanumeric; 30 Characters; Mandatory
Specify the module ID. Alternatively, you can select module ID from the option list. The list displays all valid module ID maintained in the system.
Description
Display
The system displays the description for the selected module ID.
Notification Code
Alphanumeric; 30 Characters; Mandatory
Specify the notification code. Alternatively, you can select modification code from the option list. The list displays all valid notification code maintained in the system.
Description
Display
The system displays the description for the selected notification code.
Destination Name
Alphanumeric; 100 Characters; Mandatory
Specify the destination name.
4.19 Notifications Installed Maintenance
This section contains the following topics:
4.19.1 Invoking Notifications Installed Maintenance Screen
You can maintain installed notifications using ‘Notifications Installed Maintenance’ screen. You can invoke this screen by typing ‘UTDNTFIN’ in the field at the top right corner of the Application tool bar and click the adjoining arrow.
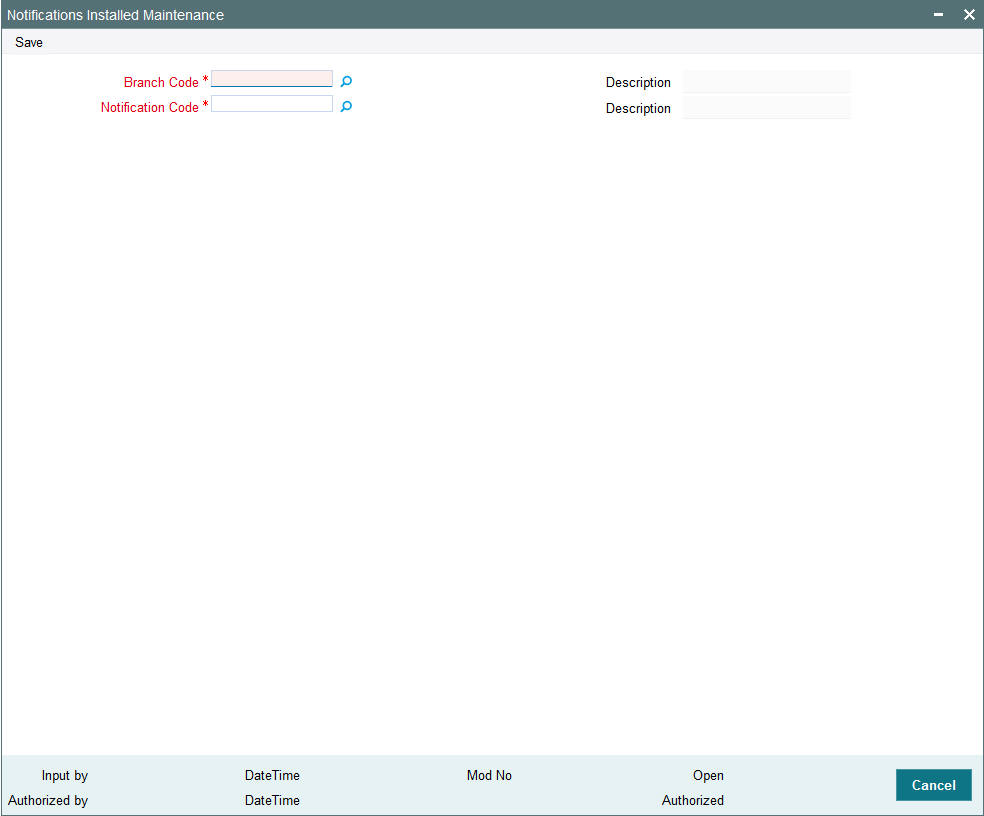
You can specify the following details:
Branch Code
Alphanumeric; 12 Characters; Mandatory
Specify the branch code. Alternatively, you can select the branch code from option list. The list displays all valid branch code maintained in the system.
Description
Display
The system displays the description for the selected branch code.
Notification Code
Alphanumeric; 120 Characters; Mandatory
Specify the notification code. Alternatively, you can select the notification code from option list. The list displays all valid notification code maintained in the system.
Description
Display
The system displays the description for the selected notification code.
4.20 PIPA Audit Log
This section contains the following topic:
4.20.1 Uploading PIPA Audit Log
As per Article 12 of Enforcement Rules of Personal Information Protection Act which is enacted according to Article 55 of the Personal Information Protection Act (‘the Act’), the government agency or the non-government agency will have to take technical or organizational measures for the purpose of preventing personal information from being stolen, altered, damaged, destroyed or disclosed. This includes but is not limited to establishing a mechanism of auditing information security and keeping records of the use, locus information and proof.
You can log audit information to access unit holder/ customer/ transaction and balance related information. The system will store the details of data accessed by the business user for the current day. The data access log covers the following data:
- Unit Holder Account Information and change of information (amendment)
- Customer Information and change of information
- Transactions
- Unit holder balance
- Consolidated inquiry
- Unit holder income distribution setup
- Balance view through various transaction screen (through hyper links)
Audit of personnel accessing the above data will stored/ logged and the details are as follows:
- User Identification
- Access date and Time (Application date and system date)
- Operation
- Function ID accessed
- Unit holder account/ Entity ID/ Auth rep ID
- Customer account
- To unit holder account (in case of transfers)
- To Customer account (in case of transfers)
The audit log process happens for the following New/ Modify/ Query/ Delete operations for a single record and fetch a single record from summary screen and view in detail screen. You can track actions in audit log in ‘View’ mode for a specific record for:
- UH and CIF – Tracks when user views specific record.
- Transaction – Tracks when specific transaction details is retrieved
- Queries/ Reports:
- Consolidate Inquiry – Tracks when ‘Investor Fund Balance’ button is clicked for the retrieved UH Fund Balances
- Unit Holder Balance – Tracks when specific Unit holder Balances is retrieved (this includes Balance view through various transaction screen by clicking ‘View Balance’ screen)
The system uses ‘PIPA Audit log’ as part of EOD activity to extract the data logged for the current day and for the module logged.
The multi record fetched through summary screen will not be logged; but a single record selected through the summary result will record the log.
You can fetch subscription records through summary screen by selecting a single record and view the record through detail screen.
Any data viewed via Detail screen by clicking Search/ Fetch button like List of values, find UH will not be logged by the system.
Note
All queries irrespective of success or unsuccessful output will be logged as part of audit requirement.
Following are the list of function IDs impacted in the system:
Function ID |
Description |
Audit against the Operations |
UTDCUST |
Customer Maintenance -> Detail |
New/ Modify/ Query/ Delete/ Close/ Reopen |
UTDCADD |
CIF Address -> Detail |
New/ Close/ Query/ Modify/ Reopen |
UTDCFNMP |
CIF Address Fund Map -> Detail |
New/ Delete/ Close/ Authorise/Query/ Reopen |
UTDCIFLG |
Customer Log -> Customer Log |
New/ Query |
UTDUH |
Unit holder -> Detail |
New/ Copy/ Query/ Modify/ Reopen |
UTDUHBAL |
Unit Holder Balances -> Summary |
Enter Query |
UTDUHCOE |
Unit Holder Currency of Expression -> Detail |
New/ Delete/ Close/ Authorise/Query/ Reopen/ Modify |
UTDUHDEL |
Unit holder Deal -> Detail |
New/ Delete/ Close/ Authorise/Query/ Reopen/ Modify |
UTDUHIDS |
UH IDS Setup -> Detail |
New/ Delete/ Close/ Authorise/Query/ Reopen/ Modify |
UTDUHIOF |
UH IRRF Preference -> Detail |
New/ Delete/ Close/ Authorise/Query/ Reopen/ Modify |
UTDUHLOI |
UH LOI -> Detail |
New/ Delete/ Close/ Authorise/Query/ Reopen/ Modify |
UTDUHNPI |
UH NPI Preference -> Detail |
New/ Delete/ Close/ Authorize/Query/ Reopen/ Modify |
UTDUHNTX |
UH Non Tax Limits -> Detail |
New/ Delete/ Close/ Authorise/Query/ Reopen/ Modify |
UTDUHPR |
UH Portfolio Re Adjustment -> Detail |
New/ Delete/ Close/ Authorize/Query/ Reopen/ Modify |
UTDACCLS |
UH Status Change -> Detail |
New/ Delete/ Authorize/ Query/ Modify |
UTDADJ02 |
Transaction -> Adjustment Subscription |
New/ Delete/ Authorize/ Query/ Modify |
UTDADJ03 |
Transaction -> Adjustment Redemption |
New/ Delete/ Authorize/ Query/ Modify |
UTDTXN01 |
Transaction -> IPO Subscription |
New/ Delete/ Authorize/ Reverse Query/ Modify |
UTDTXN02 |
Transaction -> Subscription |
New/ Delete/ Authorize/ Reverse/ Query/ Modify |
UTDTXN03 |
Transaction -> Redemption |
New/ Delete/ Authorize/ Reverse/Query/ Modify |
UTDTXN04 |
Transaction -> Switch |
New/ Delete/ Authorize/ Reverse/Query/ Modify |
UTDTXN05 |
Transaction -> Transfer |
New/ Delete/ Authorize/ Reverse/Query/ Modify |
UTDTXN06 |
Transaction -> Block |
New/ Delete/ Authorize/ Query/ Modify |
UTDTXN07 |
Transaction -> Un-Block |
New/ Delete/ Authorize/ Query/ Modify |
UTDTXN08 |
Transaction -> Consolidation |
New/ Delete/ Authorize/ Query/ Modify |
UTDTXN09 |
Transaction -> Split |
New/ Delete/ Authorize/ Query/ Modify |
UTDTXN10 |
Transaction -> Reissue |
New/ Delete/ Authorize/ Query/ Modify |
UTDTXNEE |
Transaction -> Enrich Exchange Rate |
Query |
UTDTXNLT |
Transaction -> Light Weight Transaction |
New/ Authorize/ View/ Query |
UTDCNVTX |
Transaction -> Conversion |
New/ Delete/ Authorize/ Query/ Modify |
UTDAMT06 |
Amount Block -> Detail |
New/ Delete/ Authorise/ Query/ Modify |
UTDAMT07 |
Amount Un-Block -> Detail |
New/ Delete/ Authorise/ Query/ Modify |
UTDCOMCL |
Tax Compliance -> Classification |
New/ Delete/ Authorise/ Query/ Modify |
UTDDCTRO |
UH Dividend Component Override -> Detail |
New/ Delete/ Authorise/ Query/ Modify |
UTDFATMT |
FATCA -> Entity FATCA Classification |
New/ Delete/ Authorize/ Query/ Modify |
UTDFNBAL |
Investor fund Balance -> Summary |
Query |
UTDFNENT |
Fund Entity -> Detail |
New/ Delete/ Close/ Authorise/Query/ Reopen/ Modify |
UTDKYCCD |
KYC Chasing Details -> Detail |
New/ Delete/ Authorise/ Query/ Modify |
UTDOLT |
One Legged Transfer -> Detail |
New/ Query |
UTDPRQRY |
Back Data Propagation -> Propagation Enquiry |
Enter Query |
UTDPRTXN |
Back Data Propagation -> UT Transaction |
New/ Delete/ Authorize/ Query/ Modify |
UTDROPUT |
Back Data Propagation -> UT Propagation |
New/ Authorise/ Query |
LEDPROSI |
Back Data Propagation -> LEP Propagate SI |
New/ Delete/ Authorize/ Query/ Modify |
LEDPRTXN |
Back Data Propagation -> LEP Transaction |
New/ Delete/ Authorize/ Query/ Modify |
UTDRTAIO |
RTA Transfers -> Detail |
New/ Query |
UTDSCADH |
Share Class Adhoc Conversion -> Detail |
New/ Delete/ Close/ Authorise/Query/ Modify/ Reopen |
UTSCOINQ |
Queries -> Consolidated Enquiry |
View |
LEDPLAN |
LEP Online -> Policy |
New/ Delete/ Close/ Authorise/Query/ Reopen/ Modify |
LEDPLCES |
LEP Maintenance -> Policy Cession |
New/ Delete/ Reverse/ Authorise/Query/ Modify |
LEDPLREV |
LEP Online -> Policy Reversal |
New/ Delete/ Authorise/ Query/Modify |
LEDPLSUR |
LEP Online -> Policy Surrender |
New/ Delete/ Reverse/ Authorise/Query/ Modify |
LEDPLSWI |
LEP Online -> Policy Switch |
New/ Delete/ Reverse/ Authorise/Query/ Modify |
LEDPLTOP |
LEP Online -> Policy Top Up |
New/ Delete/ Reverse/ Authorise/Query/ Modify |
UTDATREP |
Auth Rep Maintenance -> Detail |
New/ Delete/ Authorise/ Query/ Modify |
UTDENTMN |
Single Entity Maintenance -> Detail |
New/ Delete/ Authorise/ Query/ Modify |
The SMTB_SMS_LOG and SMTBS_SMS_ACTION_LOG tables will log the audit information and hence the system will purge/ archive the data of these two data stores.
Note
After EOD, the system will store the audit logging details in PIPAAUDITPROCESSTBL. The purging will happen in PIPAAUDITPROCESSTBL table.