4. Processing Transaction Requests
Transactions are the operations that are requested by investors upon their holdings in any fund, with the prospect of reaping higher returns or distributing their holdings more profitably. To this end, they can enter into any of the following types of transactions:
- IPO
- Purchases (or Subscriptions)
- Sales (or Redemption)
- Switch
- Transfer
- Block
- Unblock
- Consolidation
- Split
- Reissue
- Transaction Enrichment
This chapter enables you to understand how transaction requests are accepted and processed in the FC-IS system. It consists of the following sections:
- Types of Transaction Requests
- Transaction Processing – The flow of events
- Transaction Processing Procedures
- Fields in the Transaction Detail screens
- Fields in the Transaction Summary screens
- Mandatory Information for all transaction types
Finding what You Need in this Chapter
- To understand the different types of transaction requests that may be encountered in an AMC, refer the section Types of Transaction Requests.
- To understand the flow of events according to which transaction requests are accepted and processed in the FC-IS system, refer the section Transaction Processing – The flow of events.
- To understand how to perform any procedures in respect of transaction processing, refer the section Transaction Processing Procedures.
- For a description of all the fields in the Transaction Detail screen, refer the section Fields in the Transaction Detail screens. Similarly, for a description of all fields in the Transaction Summary screen, refer the section Fields in the Transaction Summary screens.
- For an exhaustive list of all mandatory information that you need to capture in the transaction screens, refer the section Mandatory Information for all transaction types.
This chapter contains the following sections:
- Section 4.1, "Types of Transaction Requests"
- Section 4.2, "Transaction Processing –Flow of Events"
- Section 4.3, "Transaction Processing Procedures"
- Section 4.4, "IPO Subscription Detail"
- Section 4.5, "IPO Subscription Summary Screen"
- Section 4.6, "Bulk Transactions"
- Section 4.7, "Bulk Transaction Summary"
- Section 4.8, "Subscription Transaction Detail"
- Section 4.9, "Subscription Transaction Summary Screen"
- Section 4.10, "Cancel Transaction Detail"
- Section 4.11, "Redemption Transaction Detail"
- Section 4.12, "Redemption Transaction Summary"
- Section 4.13, "Redemption Confirmation"
- Section 4.14, "Early Redemption Detail"
- Section 4.15, "Transaction Switch Detail"
- Section 4.16, "Transaction Switch Summary Screen"
- Section 4.17, "Light Weight Transaction Detail"
- Section 4.18, "Transfer Detail"
- Section 4.19, "Transfer Summary Screen"
- Section 4.20, "Block Transaction Detail"
- Section 4.21, "Block Transaction Summary Screen"
- Section 4.22, "Unblock Transaction Detail"
- Section 4.23, "Unblock Transaction Summary Screen"
- Section 4.24, "Consolidation Transaction Detail"
- Section 4.25, "Consolidation Transaction Summary Screen"
- Section 4.26, "Split Transaction Detail"
- Section 4.27, "Split Transaction Summary Screen"
- Section 4.28, "Reissue Transaction Detail"
- Section 4.29, "Reissue Transaction Summary Screen"
- Section 4.30, "Defaulting of Price Date in Transaction Screens"
- Section 4.31, "Completing Transaction"
- Section 4.32, "Processing Back Data Propagation for Transactions"
- Section 4.33, "Auto Completion"
4.1 Types of Transaction Requests
This section contains the following topic:
4.1.1 Types of Transaction Requests
IPO Subscription and Subscription
When an investor chooses to invest capital into a fund, the investment is typically made by ‘buying’ units in the fund. This is also known as ‘subscribing’ into the fund.
The investor can subscribe to a fund either during its Initial Public Offering (IPO) Period, or later. If the subscription is made during the IPO Period, the resulting transaction is an IPO subscription transaction, and the unit price for these transactions is fixed, generally the par value of the units, and not dependent on the prevalent net asset value for the fund.
If the investor’s subscription is made after the initial IPO Period, the resulting transaction is known plainly as a subscription transaction, and the unit price for these transactions will vary on a fixed frequency basis, depending upon the prevalent net asset value of the fund.
Redemption
When an investor decides to pull investment out of a fund (or disinvest in a fund), the units held by the investor are sold back to the fund (“redeemed”) at the prevalent Net Asset Value on the date of sale. This kind of a transaction is known as a redemption transaction. An investor can redeem all the holdings (complete redemption) or part of the holdings (partial redemption)
While “redeeming” or selling back units to the fund, the investor recovers the value of the holdings in the fund at that given point in time. It also means that the fund buys back its units from the investor.
An investor can redeem a specified number of units, or a specified amount, or a specified percentage of the holdings in any fund.
The fund may also prompt the investor to partially redeem the holdings under the following circumstances:
- The minimum registered capital has fallen below the minimum limit defined for the fund in the fund rules. In such a case, the redemption transaction is not allocated at all.
- The fund investor category limit falling down to the minimum limit defined for the fund in the fund rules.
Partial redemption may also occur due to other prevailing circumstances.
The AMC can set a limit on the total volume of redemption transactions that would be accepted for a fund on a given business day. The limit could be specified in terms of a percentage or an amount. Redemption transactions that are requested which result in exceeding the limit set for the fund will not be accepted, in such a case.
In the system, if the investor’s balance reduces to zero as an account of a redemption transaction, the investor’s account will be marked as pending closure.
Redemption through check writing
An investor may also request for the check writing facility, for usage of holdings in any of the funds. In such a case, a checkbook is issued to the investor for each fund. The investor may issue checks for payments, to any third party.
When these checks are presented at the specified bank, they are sent to the appropriate clearing house. The bank then sends a file to the AMC, containing used check information from the clearing house.
When the AMC receives details of used checks from the bank, a redemption transaction is initiated in the investor’s account, and units are redeemed in the fund for which the checkbook was issued, to the extent of amount used on each check. No payment details are required for such redemption transactions.
Switch
An investor may choose to “switch” the investment in one fund, to another fund, for any reason. This would mean redeeming the investment in one fund and investing this redeemed capital in the other desired fund. This kind of exchange or switch is called a switch transaction.
In the system, a switch transaction is processed as two separate transactions, the first involving a redemption from the first fund, and the second involving a subscription to the second fund. The switching facility in the system provides for switching either between funds in the same fund family, or between any two funds of the AMC. Switching within the same fund is defined as ‘Bed and Breakfast switch’ (the ‘Switch from’ fund and the ‘Switch to’ fund in a switch transaction is same).
Transfer
An investor may choose to transfer ownership of holdings in any fund to another investor. This kind of a transfer of ownership is called a transfer transaction.
A transfer transaction is different from a switch transaction in the sense that in a transfer transaction, the fund remains the same whereas the unit holder changes.
Block / Unblock
Typically, when lien is noted in respect of an investor’s holdings in a fund either in part or entirely, the concerned units are said to be “blocked”. These blocked units are subsequently (and temporarily) unavailable to the investor for further transacting. Blocking of units could also occur due to any reason other than lien noting. The process of blocking units is called a block transaction.
To release the blocked units for further transacting, the investor must ‘unblock’ these units, or the lien must be lifted. This is known as an unblock transaction.
Split / Consolidation / Reissue
In certain funds, the investors receive certificates that are representative of their holdings (investment units) in the fund. These funds are called scrip-based funds. In certain funds, the investors are given units for their investment in the fund, without certificates. These funds are called scrip-less funds.
In certain funds, the investor is given the option of requesting for certificates. If the investor chooses to receive certificates, then the fund furnishes the same. If not, then no certificates are issued. Such funds are termed as certificate-option funds.
In scrip-based funds and certificate option funds where certificates have been requested for, an investor may choose to:
- Split a single certificate into certificates of smaller denominations, resulting in a split transaction.
- Merge many certificates of smaller denominations into a single certificate of their total denomination, resulting in a consolidation transaction.
- Seek a ‘reissue’ of certificates for reasons of losing a certificate or mutilation of certification etc, resulting in a reissue transaction. In such an event, the reissued certificates are printed with a ‘Duplicate’ tag on them.
The FCIS system provides the facility to process any of the transaction types enumerated above.
4.2 Transaction Processing –Flow of Events
This section contains the following topics:
- Section 4.2.1, "Unauthorized Stage"
- Section 4.2.2, "Authorized Stage"
- Section 4.2.3, "Amendment Stage"
- Section 4.2.4, "Allocation of Transactions"
4.2.1 Unauthorized Stage
The transaction is first initiated into the system database when it is entered into the Transaction Detail screen for the required transaction type. In this screen, it is saved as an unauthorized transaction, which means that it is not reflected in the system’s financial data stores as yet.
The transaction is given a unique identification called the Transaction Number.
During this unauthorized phase of the transaction, you can edit the details of the transaction as many times as is deemed necessary, using the Edit operation through the Transaction Summary screen. The transaction number is not changed when you edit a transaction.
An unauthorized transaction can only be edited by the user who initiated it into the system.
Due to various reasons, the supervisor can also reject transactions. Any such rejected transaction can also be edited.
4.2.2 Authorized Stage
When the transaction is authorized, the value of the transaction will be reflected in the system database.
The user who enters the transaction in the system cannot authorize it. A user other than the one that entered the transaction can perform authorization.
When a transaction is authorized, the authorizer must re-key the transaction amount or number of units, which was specified for the transaction during transaction entry. When this is successfully done, the transaction can be authorized.
The events that take place when you authorize a transaction can be understood from the table given below:
Online Allocation facility |
Mode of Payment |
Check / Credit Card / Transfer allocations on par with cash |
Upon Authorization |
Allocation of Units |
Available |
Cash |
|
Confirmed units allocated |
Confirmed units allocated upon authorization |
Available |
Check / Credit Card / Transfer |
Available |
Provisional Units allocated |
Provisional Units allocated upon authorization, confirmed units on the date on which the check / credit card / transfer instrument is cleared in the system |
Available |
Check / Credit Card / Transfer |
Not Available |
No allocation at authorization |
Confirmed units are allocated only on the date on which the check / credit card / transfer instrument is cleared in the system |
Not Available |
Cash |
|
Units allocated by End of Day processes on the date of authorization |
Units allocated by End of Day processes on the date of authorization |
Not Available |
Check / Credit Card / Transfer |
Available |
Provisional Units allocated by the End of Day processes on the date of authorization |
Provisional Units allocated by the End of Day processes on the date of authorization, confirmed units on the date on which the check / credit card / transfer instrument is cleared in the system. |
Not Available |
Check / Credit Card / Transfer |
Not Available |
No allocation at authorization |
Units allocated by End of Day processes on the date on which the payment instrument is cleared in the system |
“*” – as designated in Transaction Processing Rules for the fund |
||||
4.2.3 Amendment Stage
After authorization, changes to a transaction request can only be made through an amendment. You can no longer “edit” the transaction through the Transaction Summary screen. You must choose the Amend menu option. Therefore, amendments are operations that you can perform only on authorized transaction records.
The amendment facility is not available for the following types of transactions:
- Unblock
You can amend an authorized transaction:
- Before the units in respect of the transaction have been allocated.
- After the allocation of units in respect of the same
- Within the default amendment period specified in the Defaults Maintenance
Subsequently, the amended transaction must be authorized again for it to be effective. The authorization of an amended transaction can be done only from the Fund Manager module.
Note
Once a transaction is amended and the amendment has been subsequently authorized, it cannot be amended again.
4.2.4 Allocation of Transactions
Once a transaction is authorized, the units in respect of it must be allocated to the concerned unit holder. The unit holder’s balance holdings in the system database must reflect the changes due to the acquisition or the sale of units due to the transaction. The allocation processes in the system perform this function.
To understand how allocation is performed, refer to the Allocation chapter in Fund Manager User Manual.
Allocation can be performed in any (or all) of the following three ways:
Online Allocation
The allocation is performed at the time the transaction is authorized, i.e., simultaneously with authorization. This is true for amended transactions for which the amendment is authorized, too. Online allocation is only possible if it is designated as available in the Transaction Processing Rules for the fund.
Allocation by the End of Day processes
All transactions that have been entered and authorized on a given business day will be automatically allocated by the End of Day processes that are performed at the installation for that business day.
Allocation through the Menu
You can also manually trigger the allocation for a transaction through the corresponding menu item in the End of Day menu category in the Fund Manager component.
You can use this facility to perform allocation for transactions involving payment instruments, on the clearing date.
Note
If the application is offline, you can capture the transaction through web service only if there is an entry for that function ID entry in ‘GWTMS_ AVAIL OPERATIONS’ table.
4.3 Transaction Processing Procedures
This section contains the following topic:
4.3.1 Requesting Transaction
Before you enter a transaction request from an investor into the system, ensure that the following details have been taken care of:
- All required static data maintenance for the branch in which you are accepting the transaction must be in place, including the user profiles.
- The investor that is requesting the transaction must be set up as a valid unit holder in the system, with a Unit Holder ID and a unit holder account.
You can accept and process an IPO or subscription transaction request for an unauthorized unit holder.
Note
You can accept redemption, transfer and unblock transaction requests from unit holders whose account is pending closure in the system.
- The funds in which the transaction is requested must be authorized funds that are effective in the system as on the date of the transaction.
- The date and time on which you enter the transaction request into the system must be within the Start and End Dates (and Start and End Times) specified for the requested transaction type, in the Transaction Processing Rules.
Maintenance for cheque writing facility
For investors using cheque writing facility, you must ensure that the following have been maintained, before you enter cheque redemption transactions:
- For each unit holder who requests use of the cheque writing facility, it must be specified as allowed, in the account profile, either while creating the account or through an information change.
- The cheque vendors who will print the cheque books for investors using the cheque writing facility, as entities in the system, through the Entity Maintenance. The vendors must also be associated with the funds for which they would print the chequebooks.
- In the System Parameters, you must maintain ‘MMF Check’ as one of the communication modes through which a transaction request can be entered.
- The rules that will govern the processing of the cheque redemption transactions, for each fund. You maintain these rules in the General Operating Rules for a fund.
For a detailed description of these rules, refer the chapter ‘Setting up Fund Rules’, in the Fund Setup User manual.
- The details of cheque books requested by unit holders for each fund must be maintained, through the cheque Book Request screen.
- Interface definitions that will be used to upload details of used cheques from the clearing house, as a bulk file. The upload file contains the number of each cheque that has been issued, as well as the amount on each cheque.
- Interface definitions that would be used to export details of cheque book requests from unit holders to the designated cheque vendors, and to import details of cheque books printed against requests, from the cheque vendors.
You define these interfaces using the Interface Definition facility in the system. You can use the Online Execution of Interfaces menu option to execute these interfaces. This option would execute each of the following interfaces that you have defined:
- To export details of cheque books requested by unit holders to the designated cheque vendors
- To import details of cheque books printed by cheque vendors against requests received
- To trigger automatic generation of cheque redemption transactions based on the information in the upload file sent by the clearing house or bank. You can also manually enter the redemption transactions in the system, in the Transaction Detail screen for Redemption.
Specifying Details for Limit Order Transactions
You can enter limit order transactions in the same manner as you would a normal subscription transaction (for a buy order) or a normal redemption transaction (for a sell order), in the corresponding transaction input detail screens. In other words, you can enter a buy order in the Subscription Detail screen, and a sell order in the Redemption Detail screen in the same manner as you would normal subscription and redemption transactions. You must, however, specify the options for the limit orders, in each case.
After you have initiated the transactions in the corresponding transaction input screens, the orders would be executed according to the options you have specified, either automatically by the end of day processes (if allowed for the fund) or after manual confirmation is received (if automatic processing is not allowed for the fund).
Limit orders can be executed whenever the desired price is prevalent within a specified period (price-based) or on a specified future date (date based).
Specifying Delivery Options
This feature is only available if your installation has requested for it. To learn how to specify delivery options for a transaction, refer the Annexure.
Specifying KYC documents details
You can maintain KYC lists for the combination of country type and the investor category. You can check the documents received from the investor while processing a transaction.
System allows you to save with the transaction even if the unitholder has not submitted all the required KYC documents. However, you will not be allowed to perform the completion operation on that transaction unless all the required documents have been received from the investor.
For information on setting up KYC lists, refer the chapter ‘Maintaining Reference Information’ in Reference Information User manual.
This feature is only available if your installation has requested for it.
4.4 IPO Subscription Detail
This section contains the following topics:
- Section 4.4.1, "Invoking IPO Subscription Detail Screen"
- Section 4.4.2, "UH and Fund Tab"
- Section 4.4.3, "Transaction Tab"
- Section 4.4.4, "Other Tab"
- Section 4.4.5, "Intermediary Tab"
- Section 4.4.6, "Load Override Tab"
- Section 4.4.7, "KYC and Document Tab"
- Section 4.4.8, "Add Info Tab"
- Section 4.4.9, "Fee Payment Tab"
- Section 4.4.10, "Certificate Tab"
- Section 4.4.11, "Limit Order Tab"
- Section 4.4.12, "Settlement Details Button"
- Section 4.4.13, "Receipt Detail Button"
- Section 4.4.14, "Project Allocation Details Button"
- Section 4.4.15, "Allocation Details Button"
- Section 4.4.16, "Saving Transaction"
- Section 4.4.17, "Transaction Processing Logic for Currency of Expression Funds"
4.4.1 Invoking IPO Subscription Detail Screen
Enter an IPO transaction request into the system in the following sequence of events:
Invoke ‘FCIS IPO Subscription Detail’ screen by typing ‘UTDTXN01’ in the field at the top right corner of the Application tool bar and clicking on the adjoining arrow button.
Select 'New' from the Actions menu in the Application tool bar or click new icon to enter the details of the IPO Subscription transaction.
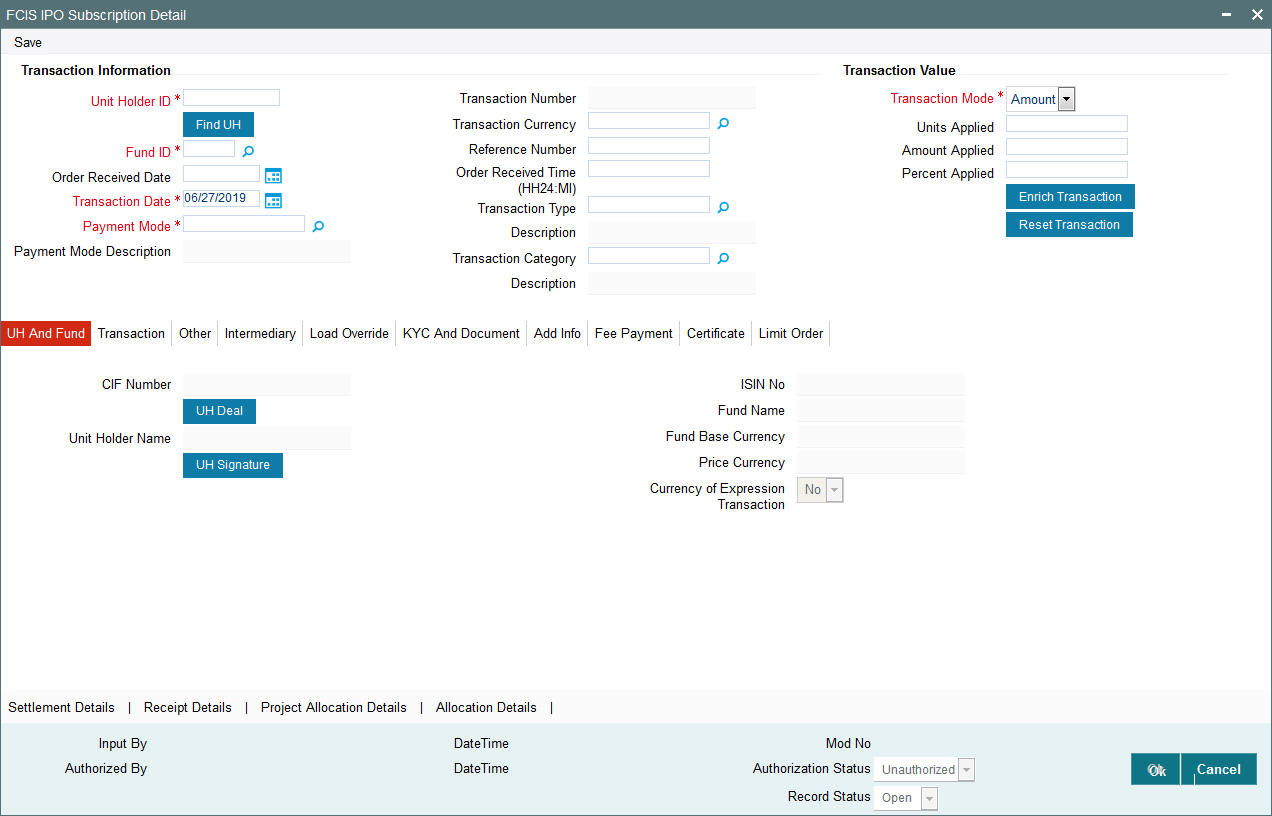
You can specify the following details:
Transaction Information
Unit Holder ID
Alphanumeric; 12 Characters; Mandatory
Specify the unit holder that has requested the transaction, in the Transaction Information section. Alternatively, you can select unit holder ID from the option list. The list displays all valid unit holder ID maintained in the system.
You must select a unit holder that is not restricted (or does not belong to a restricted category) for the fund into which the transaction is being entered. If not, the system does not allow the transaction to be saved.
When you specify the unit holder,
- The IPO funds in which the specified unit holder can transact are displayed in the Fund Id list of values.
- The transaction date is reckoned to be the application date by default. You can alter this and specify any date that is not designated as a holiday in the system. If you do specify a holiday, the system prompts you to specify a different date.
If you specify an earlier date, the fund that you choose for the transaction must be one for which backdating of transactions is allowed in the Transaction Processing Rules. The specified earlier date must also be within the backdating limit, as specified for the fund in the Transaction Processing Rules.
Click ‘Find UH’ button to open ‘Unit Holder Find Options’ screen. You can get the Unit holder details by entering the required values in that screen.
Fund ID
Alphanumeric; 6 Characters; Mandatory
Specify the fund ID in which the requested transaction is to be put through. Alternatively, you can select fund ID from the option list. The list displays all valid fund ID maintained in the system.
Order Received Date
Date Format; Optional
Specify the order received date.
Transaction Date
Date Format; Mandatory
Specify the order received date.
Payment Mode
Alphanumeric; 2 Characters; Mandatory
Specify the fund ID in which the requested transaction is to be put through. Alternatively, you can select fund ID from the option list. The list displays all valid fund ID maintained in the system.
Payment Mode Description
Display
The system displays the description for the mode of payment selected.
Transaction Number
Display
The system displays the transaction number.
Transaction Currency
Alphanumeric; 3 Characters; Optional
Specify the currency in which the amount value for the transaction will be reckoned. Alternatively, you can select transaction currency from the option list. The list displays all valid transaction currency maintained in the system.
The currency you select here must be one that is a valid transaction currency designated for the selected fund in the Fund Transaction Currency rule.
Reference Number
Alphanumeric; 16 Characters; Optional
Specify the reference number for the transaction. If the reference number is designated to be system-generated for the agency branch, then the Reference Number field is locked and the number will be generated by the system when you save the transaction.
Order Received Time (HH24:MI)
Time Format; Optional
Specify the order received time.
Transaction Type
Alphanumeric; 1 Character; Optional
Select the transaction type. In case for a particular transaction type restriction is ‘Not Applicable’, then the system will display an error message as ‘STOPACCOUNT is issued for ‘Transaction Type’ to this Unit Holder’.
Description
Display
The system displays the description for the selected Transaction type.
Transaction Category
Alphanumeric; 1 Character; Optional
Specify the type of transaction. Alternatively, you can select transaction category from the option list. The list displays all valid transaction category code maintained in the system.
If the transactions captured are for MIFID funds/ products, the transaction category ‘Advised and execution only’ will be applicable (if fund/ product is MIFID regulated). For MIFID funds/ products related transactions; the defaulting of transaction category to legacy will not be applicable, only if MIFID fund/ Product is selected as ‘Yes’ at fund and product level.
In the transaction screen, the transaction category will be based on ‘RDRTXNCATEGORY’ PARAM maintenance.
For products if the risk level for a product is defined and risk profile for a UH is maintained during LEP transactions (plan initial investment, premiums, plan switch, plan top up) the system will perform the risk checks for LEP transactions, considering the product level risk and UH risk profile along with risk expiry date.
If ‘MIFID fund/ product’ is selected as ‘Yes’, the transaction applicable are IPO subscriptions, subscription, switch, Standing instructions and transfer In, plan initial investment, premiums, plan switch, plan top up. For MIFID funds; ‘Transaction Category’ at the transaction level will be classified as either ‘Advised Business’ or ‘Execution Only Business’.
The SI transactions (subscriptions and switches, includes premiums and recurring switches) escalations will be categorized as ‘Advised Business’ or ‘Execution Only Business’. If you amend the SI, the system displays the warning message as ‘Transaction category amended for the SI’. The next SI will reflect the changed category.
If you change the ‘Transaction Category’ for a MIFID transaction during edit or amend operation, then the system displays the warning message as ‘Default Transaction Category has been overridden. Do you want to continue?’
Note
If the MIFID applicable value is NO for an UH (irrespective of UH is MIFID classified or not), the system displays a warning message.
This is applicable for IPO Subscriptions, Subscription, Switch, Standing Instructions and Transfer transactions.
Description
Display
The system displays the description for the selected transaction category.
This field is enabled after you click ‘Enrich’ button.
Transaction Value
Transaction Mode
Mandatory
Select the transaction mode from the drop-down list. Following are the options available in the drop-down list:
- Amount
- Units
- Percent
Units Applied
Numeric; 27 Characters; Optional
Specify the units applied details.
You can specify the details in this field only if you have selected ‘Transaction Mode’ field as Units. Else, while clicking ‘Enrich Transaction’ button, the system will display an error message.
Amount Applied
Numeric; 27 Characters; Optional
Specify the amount applied details.
You can specify the details in this field only if you have selected ‘Transaction Mode’ field as Amount. Else, while clicking ‘Enrich Transaction’ button, the system will display an error message.
Percent Applied
Numeric; 27 Characters; Optional
Specify the percent applied details.
You can specify the details in this field only if you have selected ‘Transaction Mode’ field as Percent. Else, while clicking ‘Enrich Transaction’ button, the system will display an error message.
After entering all details in Transaction Information section click ‘Enrich Transaction’ button. The list of transactions applicable for the Unit Holder selected is defaulted in UH and Fund section.
On click of ‘Enrich Transaction’ button all the header fields will be disabled. Clicking ‘Enrich Transaction’ button during the transaction input, the system will remove all the entered details except the header data entered and re-open all the fields to capture new transaction.
Click ‘Reset Transaction’ button to reset the entire transaction during transaction input, modification and amendment.
For transaction modification/amendment, you can query the transaction and on clicking ‘Reset Transaction’ button, all the transaction details can be modified without changing the transaction number.
For any modification/amendment in any of the primary field including Fund ID or Transaction Date, you need to click ‘Reset Transaction’ button. Using this option, the system will clear all the entered details except the header data entered and re-open all the fields to capture new details.
The reset function does clearing of all the data with the same transaction number. The system will display an override message. Hence all the data needs to be provided again if reset is clicked.
The following primary fields will be enabled for modification and Amendment of the transaction:
- Order Received Date
- Order Received Time
- Transaction date
- Fund ID
- Transaction Currency
- Unitholder ID
- Reference number
- Transaction mode
- Amount applied
- Units applied
- Percentage applied
- Payment mode
- Transaction type
- To Fund ID
- To Unitholder ID
- Subscription fund ID
For any change/ modification or amendment in the above primary fields in transaction screens, system will re-populate the transaction screen and linked dependent fields details on enrich of the transaction.
During transaction input/modification or amendment, if you override the details, system will retain the user override data for transaction entry/save. However, post overriding the details/value if you change any of the primary fields, the system will re-populate the transaction screen with latest details.
The linked dependent details will include Settlement Date, Settlement Due Date, Price Date, Load details and Dealing Date.
The system will default the Settlement date/due date, Price date, dealing date on enrich/save of the transaction only if the previous calendar year is maintained in the system.
Note
- This is not applicable to transactions captured through any other function/UI/channels/uploads.
- If UBS integration is enabled then system will disallow all the above modification or changes and pertaining to the changes proposed. The ‘Reset Transaction’ Button will be disabled, if UBS- Integration is enabled.
Deriving the order received date and time
The system will validate the Fund cut off based on the Order received time and not the actual time the Transaction is captured in the system. The transaction date will be derived by the system based on these two fields. For instance, if the Fund Cut off is 14.00 hrs at a Fund level and the transaction is captured at 15.00 hrs in the system with the Order Received time as 13.00 then the system should validate the time maintained at Order Received time and not the time the transaction is actually captured. This will be considered as the same day transaction.
If all the below mentioned transactions are captured on 15-Oct-2012 at 16:00 hrs then the transaction dates will be derived as detailed below. In case the transaction date is amended then the system has to consider the amended transaction date. Post authorisation of the transaction, you cannot amend order received date and time.
Fund Cut off |
Order Received Date |
Order Received time |
Transaction Date |
14:00 |
15-Oct-2012 |
13:50 |
15-Oct-2012 |
14:00 |
15-Oct-2012 |
14:10 |
16-Oct-2012 |
14:00 |
14-Oct-2012 |
13:25 |
14-Oct-2012 |
14:00 |
14-Oct-2012 |
15:15 |
15-Oct-2012 |
4.4.2 UH and Fund Tab
Click UH and Fund tab in FCIS IPO Subscription Detail screen.
The system displays the following values:
- CIF Number
- Unit Holder Name
Click ‘UH Signature’ button to upload the image.
Click on the UH Deals button to view the details of all the deals set up for the unit holder. Enter the relevant search criteria in the Find Options screen. The system will display the records that match the search criteria you have specified.
Choose the unit holder deal that you want to view by clicking on the View button alongside the record. The Unit Holder - Deal Setup screen is invoked in View mode, where you can view the details of the record.
The system displays the following values:
- ISIN No
- Fund Name
- Fund Base Currency
- Price Currency
- Currency of Expression Transaction
4.4.3 Transaction Tab
Click on Transaction tab in the FCIS IPO Subscription Detail screen.
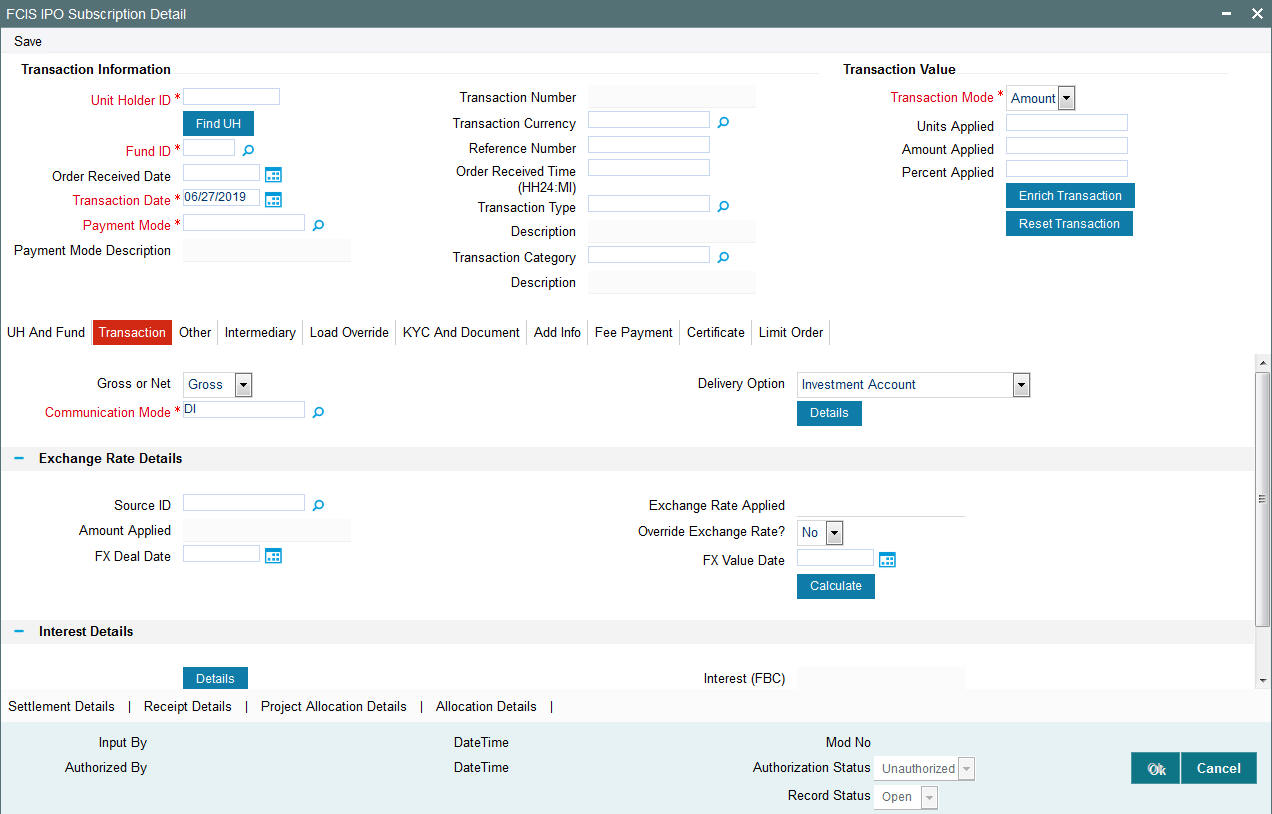
You can specify the following details:
Gross or Net
Optional
Select the net value exclusive of the loads from the drop-down list. The list displays the following values:
- Gross
- Net
Communication Mode
Alphanumeric; 2 Characters; Mandatory
Specify the communication mode through which the transaction request was communicated.. Alternatively, you can select mode of communication from the option list. the list displays all valid communication mode maintained in the system.
Delivery Option
Optional
Select the delivery option from the drop-down list. The list displays the following values:
- Investment Account
- Clearing Account - Against Payment
- Clearing Account - Free of Payment
- Delivery to Custodian
- Physical Delivery
- PUEV
Clicking ‘Details’ button, the ‘Delivery Details’ window will be opened, where in you can enter the following details:
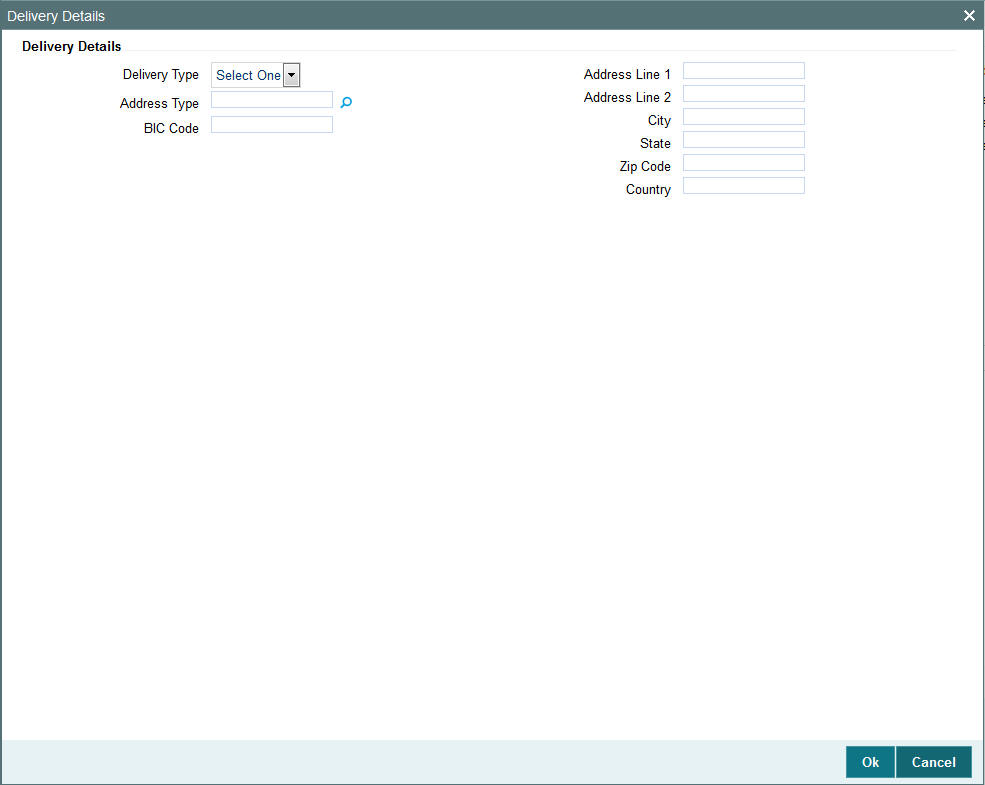
Delivery Type
Optional
Select the type of delivery from the drop-down list. Following are the options available:
- Self
- Third Party
Address Type
Alphanumeric; 2 Characters; Optional
Specify the type of address. Alternatively, you can select address type ID from the option list. The list displays all valid address maintained in the system.
BIC Code
Alphanumeric; 12 Characters; Optional
Specify the BIC code.
Address Line 1-2
Alphanumeric; 80 Characters; Optional
Specify the residing address of the customer.
City
Alphanumeric; 80 Characters; Optional
Specify the residing city code.
State
Alphanumeric; 80 Characters; Optional
Specify the name of the residing state.
Zip Code
Alphanumeric; 10 Characters; Optional
Specify the zip code of the residing area.
Country
Alphanumeric; 3 Characters; Optional
Specify the residing country code.
Exchange Rate Details
Source ID
Alphanumeric; 6 Characters; Optional
Specify the source ID. Alternatively, you can select source ID from the option list. The list displays all valid source ID maintained in the system.
Amount Applied
Display
The system displays the amount applied details.
FX Deal Date
Date Format; Optional
Specify the FX deal date.
Exchange Rate Applied
Display
The system displays the exchange rate applied details.
Override Exchange Rate?
Optional
Select if exchange rate applied has to be overridden from the drop-down list. The list displays the following values;
- Yes
- No
FX Value Date
Date Format; Optional
Specify the FX value date.
Interest Details
Interest
Alphanumeric; 30 Characters; Optional
Specify the interest details.
Interest (FBC)
Display
The system displays the fund base currency interest details.
Clicking ‘Details’ button, ‘Interest Details’ window is displayed.
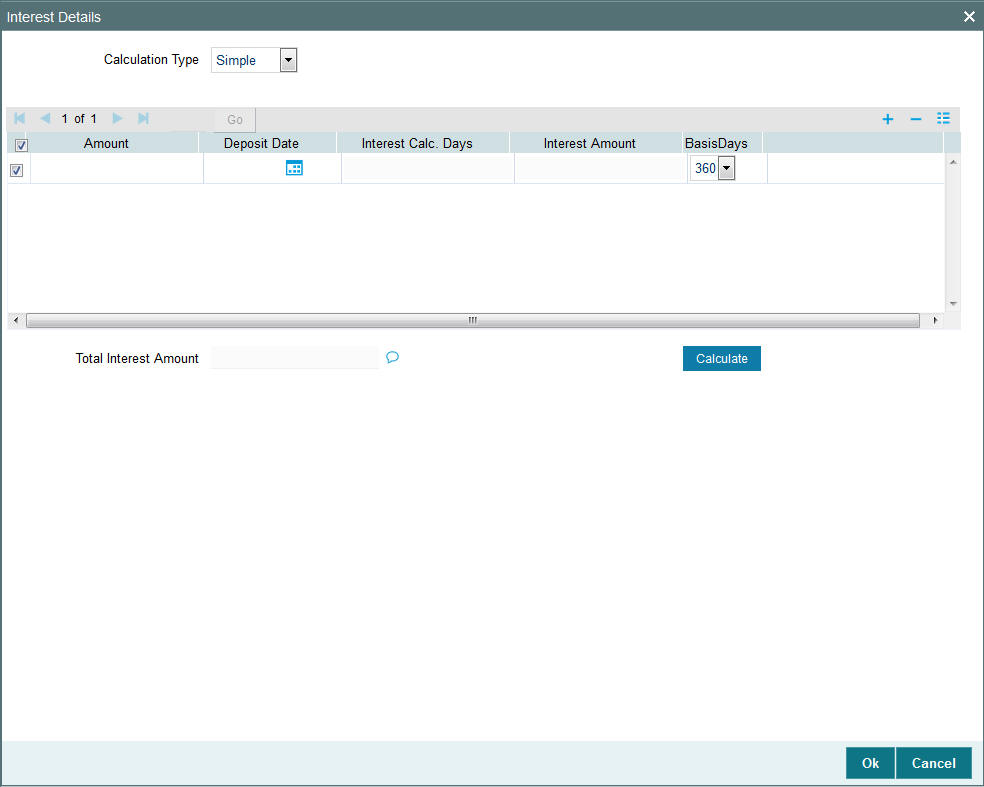
You can specify the following details:
Calculation Type
Optional
Select the calculation type from the drop-down list. The list displays the following values:
- Simple
- Compound
Amount
Numeric; 18 Characters; Optional
Specify the amount details.
Deposit Date
Date Format; Optional
Specify the deposited date.
Interest Calc. Days
Display
The system displays the calculated interest days.
Interest Amount
Display
The system displays the interest amount.
Basis Days
Optional
Select the basis days from the drop-down list. The list displays the following values:
- 360
- 365
Total Interest Amount
Display
The system displays the total interest amount details.
After specifying all the necessary details, click ‘Calculate’ button to calculate the interest details. The system obtains the applicable exchange rate for the application date and computes the equivalent of the transaction value in the fund base currency. This value is displayed in the Amount in Fund Base Currency field. The applied exchange rate is also displayed in the Override Exchange Rate field.
4.4.4 Other Tab
Click on ‘Other’ tab in the FCIS IPO Subscription Detail screen.

You can specify the following details:
Settlement Date
Date Format; Optional
Specify the settlement date.
Remarks
Alphanumeric; 255 Characters; Optional
Specify remarks, if any.
Base Cost
Numeric; 6 Characters; Optional
Specify the base cost details.
Payment Allowed
Optional
Select if payment allowed is or not from the drop-down list. The list displays the following values:
- Yes
- No
Auto Clear Reinvestments
Optional
Select if reinvestment details should be automatically cleared or not from the drop-down list. The list displays the following values:
- Yes
- No
Dealing Date
Date Format; Optional
Specify the dealing date.
The system displays the dealing date derived based on the dealing date maintained for the fund in the Specific Fund Price Date Setup screen. The date displayed here can be altered, if required, and you can specify the requisite dealing date. Dealing date will not be displayed on the screen if it is not maintained for a fund or the fund is not a specific price date fund. System will default the transaction date as the dealing date.
If you have defined a different trade cycle for the fund in the ‘Override Trade Cycle Date’ screen and the transaction falls within the override period mentioned in this maintenance, the system will default the dealing date from the maintenance.
Refer the chapter ‘Other Fund Activities’ in the Fund Manager User Manual for more details on maintaining alternate trade cycles for a fund
EUSD Option
Optional
Select the EUSD option from the drop-down list. The list displays the following values;
- With Holding Tax
- Exchange of Information
- Tax Exemption Certificate
Price Date
Date Format; Optional
The field From Price Date is enabled when you select the fund in which the requested transaction is to be put through. The fund should be one for which you have specified forward pricing is applicable. The price date is arrived at by taking into consideration several conditions. This is explained in the section ‘Defaulting of Price Dates in the Transaction’ Screens in this chapter. You can modify this field.
If you have defined a different trade cycle for the fund in the ‘Override Trade Cycle Date’ screen and the transaction falls within the override period mentioned in this maintenance, the system will default the price date from the maintenance.
Reversal Code
Display
The system displays the reversal code.
This field is only available during transaction amendment, and you can use it to capture the appropriate rejection code, if any, for the amendment. The codes available in the option list are specific to the transaction type being amended.
Maturity Date
Date Format; Optional
If the fund in which the transaction is being put through is a closed-end fund, then specify the maturity date for the transaction in the Maturity Date field. This field is only applicable for AMCs that have opted for the maturity date facility.
Note
In case of block transactions, enter the maturity date of the block transaction. If the system date is equal to or greater than the date specified here, and the Auto generate Unblock option is checked then system generates an automatic unblock transaction on the date specified here. If the maturity date falls on a holiday, then the unblock transaction will be generated on the next working day.
Cancel Instruction
Optional
Select the cancel instruction from the drop-down list. The list displays the following values:
- Standing Instructions
You can use this field to indicate whether standing instructions defined in respect of a unit holder, in the selected fund, are to be cancelled. If you select this option, all standing instructions for the transaction is cancelled, including those that are to be generated after an automatic redemption occurs. Select the ‘Standing Instruction’ option in this field to indicate cancellation of standing instructions.
If this option has been chosen in the General Operating Rules for the fund, the automatic redemption process generates redemption transactions for unit holders in the fund, with the ‘Cancel Instruction’ option automatically set.
If this option has been set for the transaction in this field, the End of Day process cancels all standing instructions (irrespective of the transaction type) for the unit holder in the fund after the outflow transactions (redemption, switch and transfer) involving the unit holder have been allocated for the day.
Note
Reversal or amendment of an outflow transaction for which Cancel Instruction has been set to ‘Standing Instruction’, would re-instate the standing instructions.
Auto Clear Provisional Balance
Optional
Select ‘Yes’ option to indicate that 100% outflow transaction should include provisionally allotted units. This option will be enabled if the transaction mode is ‘Percent’ and the transaction value is ‘100’.
Fund Price Basis
Alphanumeric; 6 Characters; Optional
Specify the fund price basis details. Alternatively, you can select fund price basis details from the option list. The list displays all valid fund price basis maintained in the system.
Short trade Units
Numeric; 27 Characters; Optional
Specify the short trade units.
Units Classification
Alphanumeric; 1 Character; Optional
Specify the units classification in which the units have to be linked. Alternatively, you can select units classification from the option list. The list displays all valid units maintained in the system.
This field is applicable only for onshore funds with ‘USERMNTFIFO’ ageing logic. The system will validate the same during save of the transactions.
Units Classification Description
Display
The system displays the description for the selected unit classification code.
The system generated inflow transactions like standing instructions and dividend reinvestments will be tagged as FEL units. The system generated outflow transactions like Periodic Fee Redemption, Auto Redemption will be tagged with ‘Age out Preference’ as blank and it will follow the Fund Rule ageing Logic as ‘USERMNTFIFO’ during ageing process.
The system will tag Swift inflow transactions with unit classification as FEL and outflow transactions will be tagged with ‘Age out Preference’ as blank and will follow the Fund Rule ageing logic.
The system will tag block transaction with ‘Age out Preference’ as blank and it will follow the Fund Rule Ageing Logic ‘USERMNTFIFO’ during ageing process.
Completion Date
Date Format; Optional
The date on which the transaction is completed.
LOI Transaction
Optional
Select the status of LOI transaction from the drop-down list. The list displays the following values:
- Yes
- No
If the unit holder that is subscribing to the fund through IPO is designated as a Letter or Intent investor, then specify if the present transaction is to be deemed and processed as a Letter of Intent transaction.
This specification is only applicable for LOI unit holders that are transacting in a fund in a group for which LOI is deemed as allowed.
CPMF Bonus Percent
Numeric; 30 Characters; Optional
Specify the percentage of CPMF bonus.
By default, the CPMF Bonus percentage is displayed here which is arrived at based on the fund CPMF preference. If CPMF Bonus Type is 'Fixed', Percentage cannot be modified during the transaction input i.e., Bonus is credited on the lag EOD activity. Details regarding CPMF Preference are explained in the section ‘Maintaining Fund CPMF Preferences’ in the Fund Manager module.
CPMF Credit Lag
Numeric; 4 Characters; Optional
Indicate the lag for the CPMF bonus to be credited.
Lock-In Period for Gain
Numeric; 4 Characters; Optional
The default lock-in period for the funds where IOF/IRRF are applicable is defaulted here. This can however be modified.
Note
Reversals are not allowed post allocation. However if there is any judicial blocking (partial or full) or the subscription is partially redeemed the reversals will not be allowed.
KIID Received?
Optional
Select if the transaction is KIID compliant or not from the drop-down list. The list displays the following values:
- Yes
- No
The system will default the KIID compliant at the transaction level upon the selection of the Unitholder and Fund in the transaction screens. If the ‘UCITS Fund’ at the Fund level is ‘Yes’ and the UH mapping to the Fund in the ‘UH KIID Compliance’ tab is ‘NO’ then at the transaction level, the system will default the ‘KIID Complaint’ to ‘No’.
If the KIID Received is set to ‘No’, the system display an error message while saving the transaction as ‘The Unit holder has not received the KIID’.
If the flag is set to ‘YES’ there will be no error message and treated as if the UH has received the KIID. The system will always look at the latest UCITS fund mapping maintained at the UH level.
If the transaction is being done in a fund which is not a UCITS Fund then the field KIID received at transaction level will be defaulted to Blank. You cannot change this option to either a Yes or No at the transactions level if it is not a UCITS Fund.
The business user can change the KIID Compliant flag at the transaction from ‘No’ to ‘Yes’ and proceed with the transaction capture but visa versa is not possible. The record at the Unit Holder level will however not get updated. You will have to manually update the same.
In case of backdated transactions, if transaction date is less than effective date, system will default the KIID Compliant field to ‘No’ and then you need to manually override it.
4.4.5 Intermediary Tab
Click on ‘Intermediary’ tab in the FCIS IPO Subscription Detail screen.
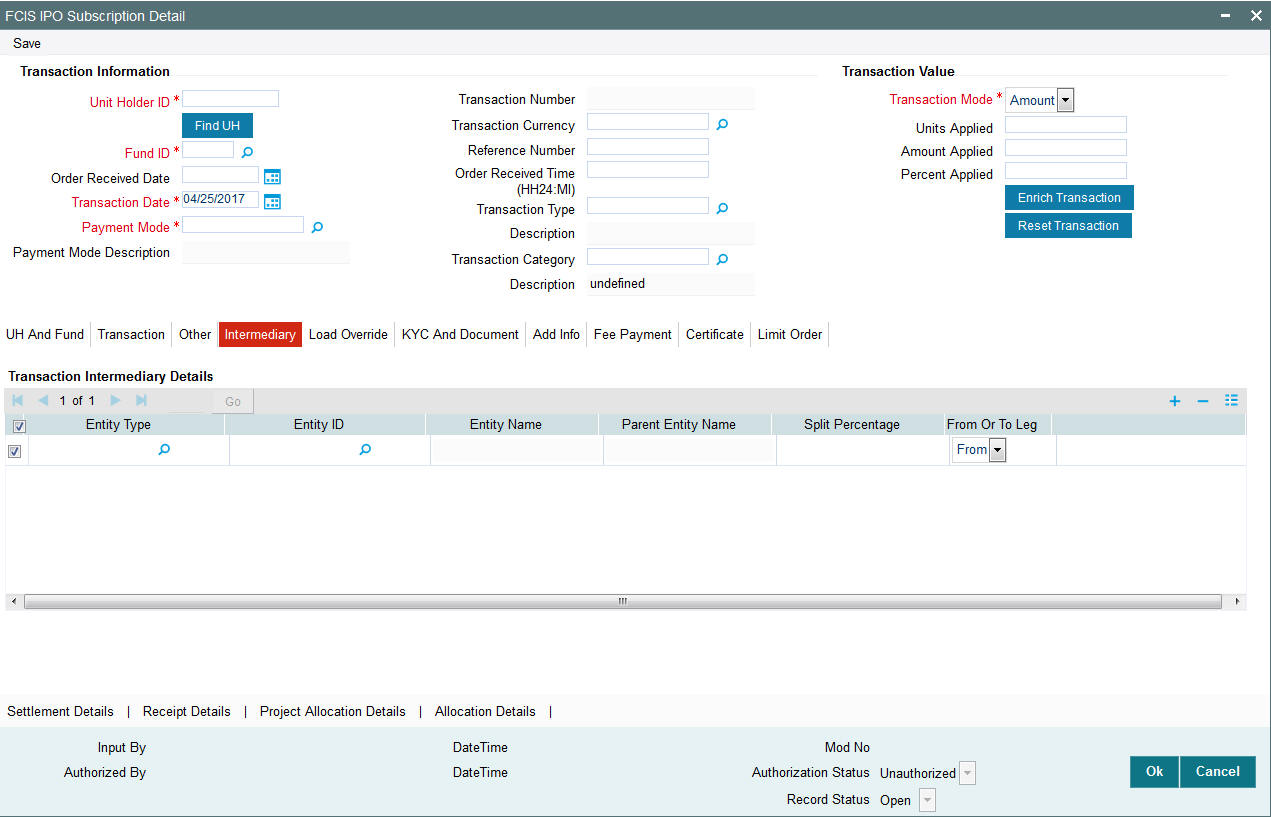
If an entity has been identified as an intermediary for the transaction, then you must identify the same in this section, along with the commission percentage split for an entity.
Entity Type
Alphanumeric; 1 Character; Optional
Select the entity type that has been identified as the intermediary for the transaction.
Entity ID
Alphanumeric; 12 Characters; Optional
For each entity type, specify the intermediary in this field. The name of the selected intermediary is displayed in the Entity Name field.
While entering a transaction, system will default the intermediary specified here. However, you can override the defaulted value.
Entity Name
Display
When you select the broker code, the name of the broker is displayed.
Parent Entity Name
Display
When you select the broker code, the name of the parent broker for the selected broker is displayed.
Split Percentage
Numeric; 5 Characters; Optional
Specify the percentage of total commission that is to accrue to the selected broker. The sum of all the percentages specified for any brokers identified for the transaction must equal one hundred percent.
From or To Leg
Optional
Select from or to leg details from the drop-down list. The list displays the following values:
- From
- To
4.4.6 Load Override Tab
Click on ‘Load Override’ tab in the FCIS IPO Subscription Detail screen.
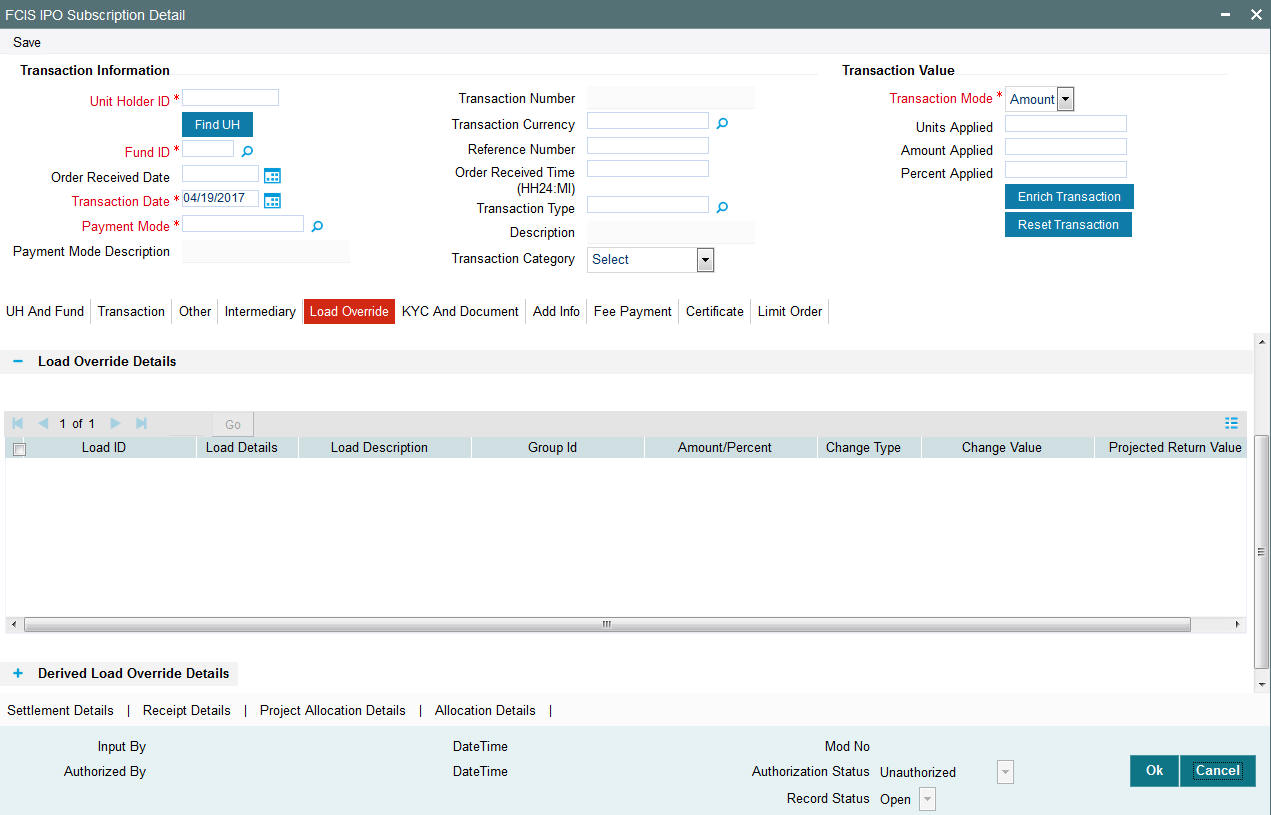
In this section, you can override or alter the value of any load (including derived loads, if any) mapped to the selected fund and applicable for the transaction type, which is to be computed at the time of allocation. The frequency of computation for such loads would be "allocation".
This section is only enabled for funds that have allocation time loads mapped to them as applicable for the transaction type.
If you click ‘Load Override Details’ button, the system defaults the load details. If you do not click this button, then the system will not default even if the fund has load. In this case, load will get computed during allocation only.
Load ID
Display
The ID of the allocation time load that has been mapped to the fund for the transaction type is displayed here. The load ID is displayed as a link. To view details of the load, click the ID link.
If a derived load has been mapped, it is also displayed here and can be overridden.
Load Details
Display
The system displays the load details.
Load Description
Display
The description of the allocation time load that has been mapped to the fund for the transaction type is displayed here.
Group ID
Display
The system displays the group ID.
Amount Percent
Display
The type of the allocation time load that has been mapped to the fund for the transaction type is displayed here. The ‘type’ of the load refers to the base value upon which the load is applied. There are two possible types – amount-based loads, and percentage-based loads.
Change Value
Display
The system displays the change value details.
Change type
Display
The system displays the change type.
When you override or alter an allocation time load at the time of entering a transaction, you can effect the change in any of the following ways:
- Discount (reducing the load return value in all the slabs)
- Increase (increasing the load return value in all slabs)
- Return Value (assigning an altered return value that will be applicable to all the loads)
Project Return Value
Display
The system populates the return value from the load setup.
If the UH Deal maintained is same for Unit Holder, Load and Fund Setup then overridden value from UH Deal is displayed.
If there are criteria based loans in UT transactions, the criteria is evaluated and only loads applicable for the transaction is displayed.
You can view the applicable loads and projected return values by clicking ‘Enrich Transaction’ in the transaction screen.
The system uses the projected return value for load amount computation and also to compute the net amount to AMC while generating GO
In LEP transactions, if there are criteria based loads, the criteria is evaluated during UT transaction generation and it will be used during allocation.
Derived Load Override Details
The system displays the following values:
- Load ID
- Parent Load ID
- Load Description
- Change Type
- Change Value
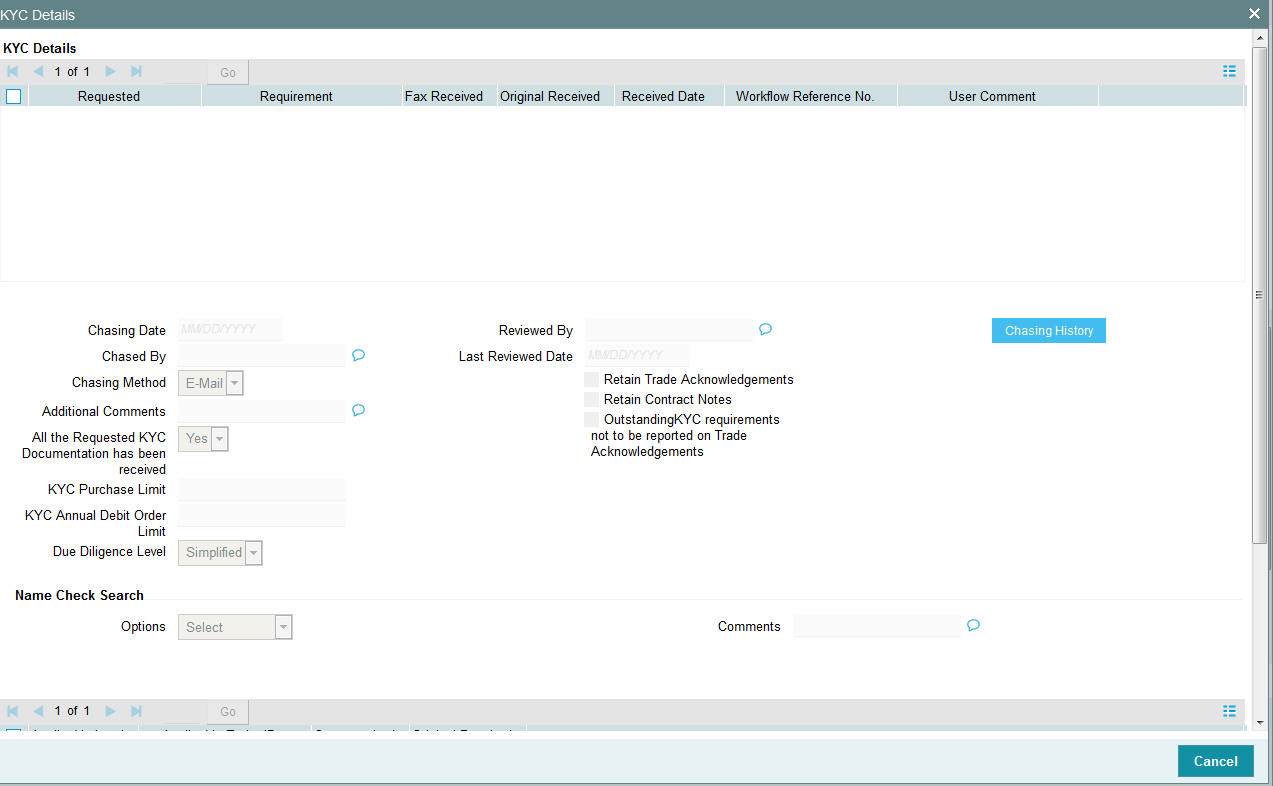
4.4.7 KYC and Document Tab
Click on ‘KYC and Document’ tab in the FCIS IPO Subscription Detail screen.

KYC Transaction Details
Requested
Optional
Check this box to indicate KYC details are requested.
Requirement
Alphanumeric; 255 Characters; Mandatory
Specify the list of KYC documents required for the unit holder.
Received
Optional
Check this box to indicate KYC details are received.
Received Date
Date Format; Optional
Specify the date on which the documents are received from the investor.
Tax Document
Optional
Select if tax document is required or not from the drop-down list. The list displays the following values:
- Yes
- No
Chasing Date
Date Format; Optional
Specify the date on which the document chasing is initiated, if the investor has not completed the KYC requirements.
KYC Received
Optional
Select if KYC is received or not from the drop-down list. The list displays the following values:
- Yes
- No
Document Details
Document ID
Alphanumeric; 25 Characters; Optional
Specify the document ID.
Document Type
Alphanumeric; 4 Characters; Optional
Specify the document type.
Type Description
Alphanumeric; 255 Characters; Optional
Specify the description for the type of document.
If during a subscription or IPO transaction, the inflow amount is greater than the maximum amount for Tax ID, system verifies if the unit holder has a Tax ID maintained (PAN). If PAN is not specified, system verifies Tax Document in KYC.
The system checks if the current transaction is an initial purchase or a subsequent one - based on the actual transactions carried out by the UH. In the case of an initial purchase, the system allows you to save an IPO transaction even if the UH has not met the KYC requirements.
Note
If no list has been maintained for this transaction, you may still record the KYC list for the transaction as well as the unit holder. If KYC list is not maintained for your installation, system will consider the documents as submitted by default.
Clicking on ‘UH KYC Details’ button, the system displays all the KYC details available for the UH.
The details are populated from Unit Holder Maintenance screen (UTDUH).
If any KYC document is received then it can be marked at transaction KYC detail as ‘Received’. However, you should update the UH maintenance screen for the KYC documents received. If the KYC received at transaction level is ‘Yes’ with some KYC documents and all KYC received at UH level is ‘No’, then the system will display a warning message as ‘Transaction All KYC Received cannot be complete if Unit holder KYC is Incomplete’ during save of the transaction.
For further details on this screen, refer ‘KYC Details Tab’ in ‘Unit Holder Maintenance Detail’ screen (UTDUH) in Entities User Manual.
4.4.8 Add Info Tab
Click on ‘Add Info’ tab in the FCIS IPO Subscription Detail screen.
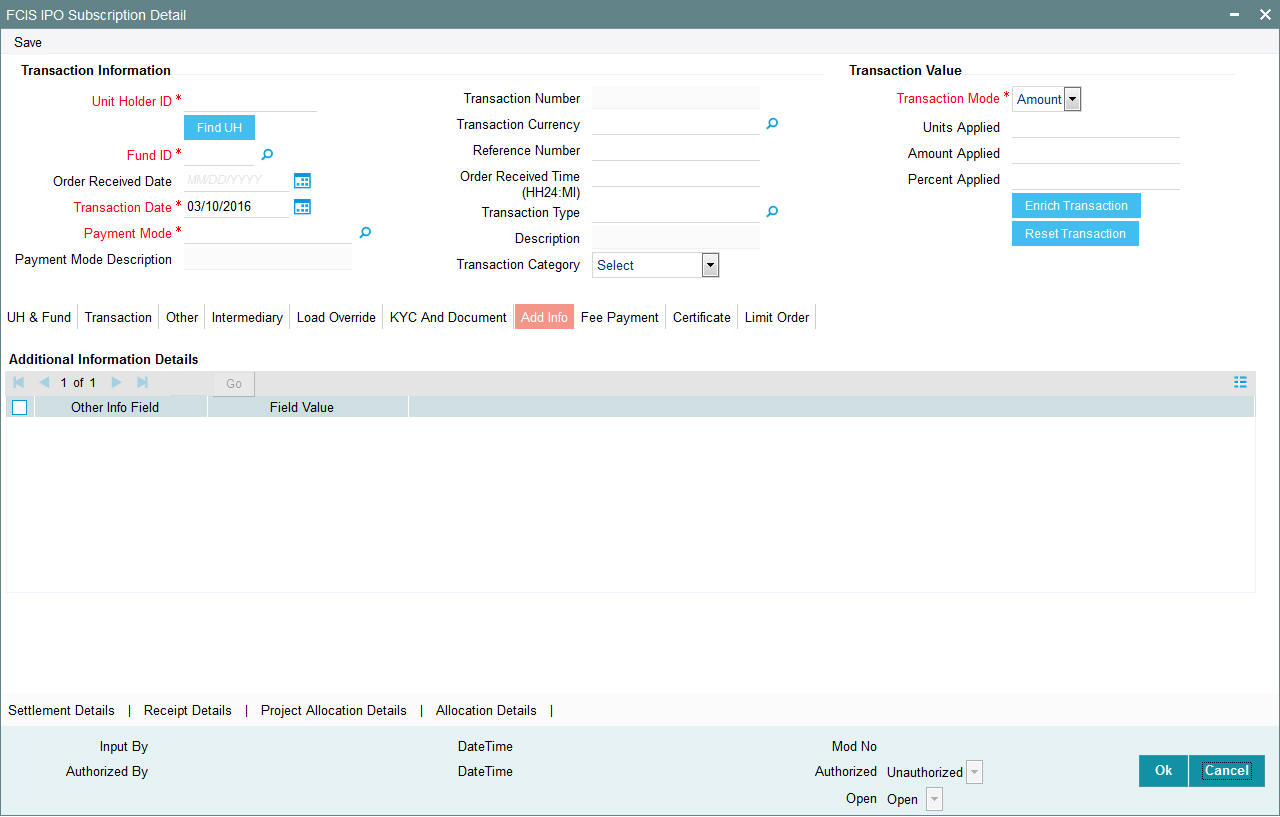
Other Info Field
Display
The system displays the additional information if any information heads have been maintained in the System Parameters, to be applicable for the segment.
Field Value
Alphanumeric; 60 Characters; Optional
Specify the field value.
4.4.9 Fee Payment Tab
Click on ‘Fee Payment’ tab in the FCIS IPO Subscription Detail screen.
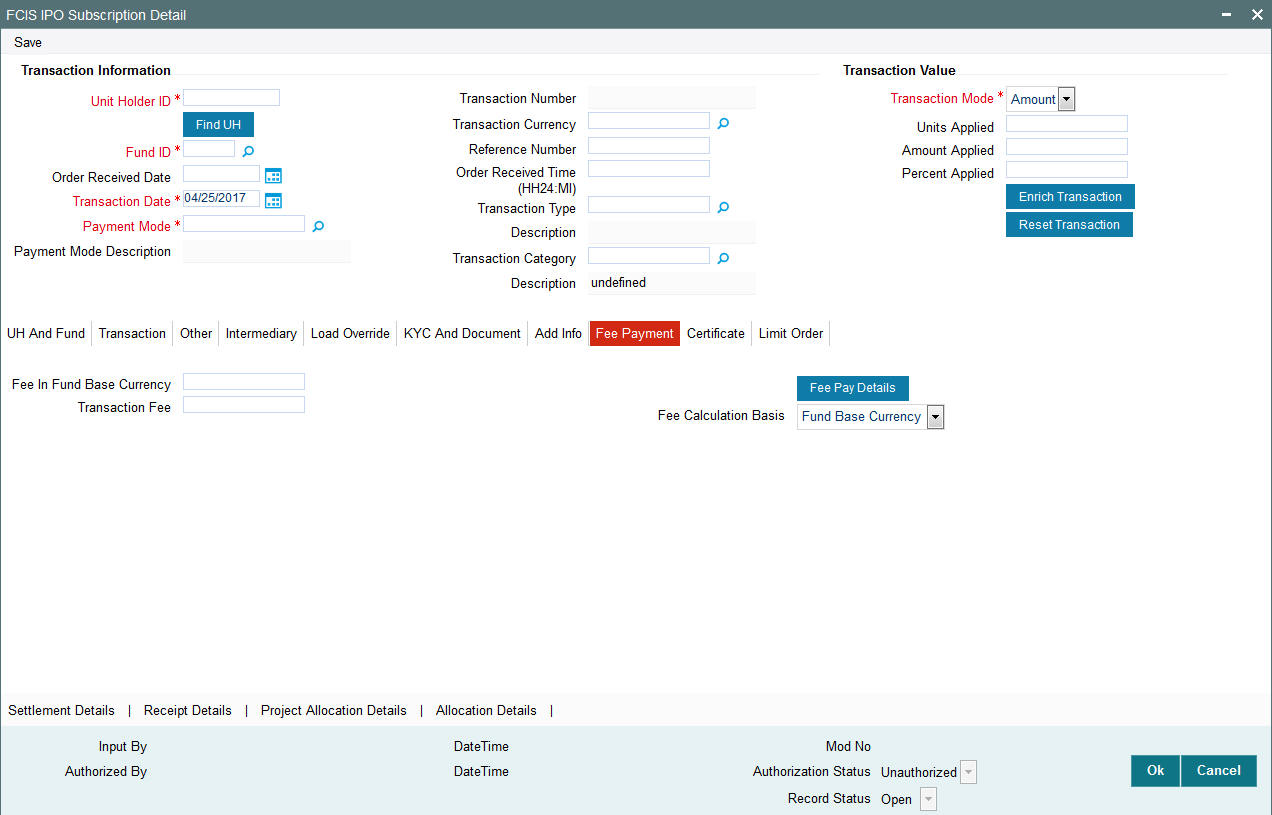
If you have selected a fund for which transaction entry charges or allocation charges (or both) are applicable, then the following fields are enabled for data entry:
Fee in Fund Base Currency
Numeric; 30 Characters; Optional
Specify the fee in fund base currency details.
Transaction Fee
Numeric; 30 Characters; Optional
Specify the transaction fee.
If a transaction entry charge or transaction time fee is applicable for the fund the transaction time fee equivalent in both fund currency and transaction currency is computed by the system and displayed.
Fee Calculation Basis
Optional
Select the fee calculation basis from the drop-down list. The list displays the following values:
- Fund Base Currency
- Transaction Currency
Click ‘Fee Pay Details’ button to specify fee payment details.
You can specify the following values:
Transaction Fee
Numeric; 30 Characters; Optional
Specify the transaction fee.
Payment Mode
Optional
Select the payment mode from the drop-down list. The list displays the following values:
- Cheque
- Transfer
- Draft
- Card
Bank
Alphanumeric; 12 Characters; Optional
Specify the bank details.
Branch
Alphanumeric; 20 Characters; Optional
Specify the branch code.
Cheque Number
Alphanumeric; 16 Characters; Optional
Specify the cheque number.
Cheque Date
Date Format; Optional
Specify the cheque date.
Transfer Branch
Alphanumeric; 12 Characters; Optional
Specify the transfer branch details. Alternatively, you can select the transfer branch details from the option list. The list displays all valid branch code maintained in the system.
Account Type
Optional
Select the type of account from the drop-down list. The list displays the following values:
- Current Account
- Fixed Account
- Loan Account
- Mortgage Account
- Overdraft Account
- PF Account
- Recurring Account
- Savings Account
- Sweeping Account
Account Number
Alphanumeric; 16 Characters; Optional
Specify the account number.
Clearing Date
Date Format; Optional
Specify the clearing date.
Account Holder Name
Alphanumeric; 100 Characters; Optional
Specify the name of the account holder.
IBAN
Alphanumeric; 40 Characters; Optional
Specify the IBAN details.
4.4.10 Certificate Tab
Click on the certificate tab in the FCIS IPO Subscription Detail screen.
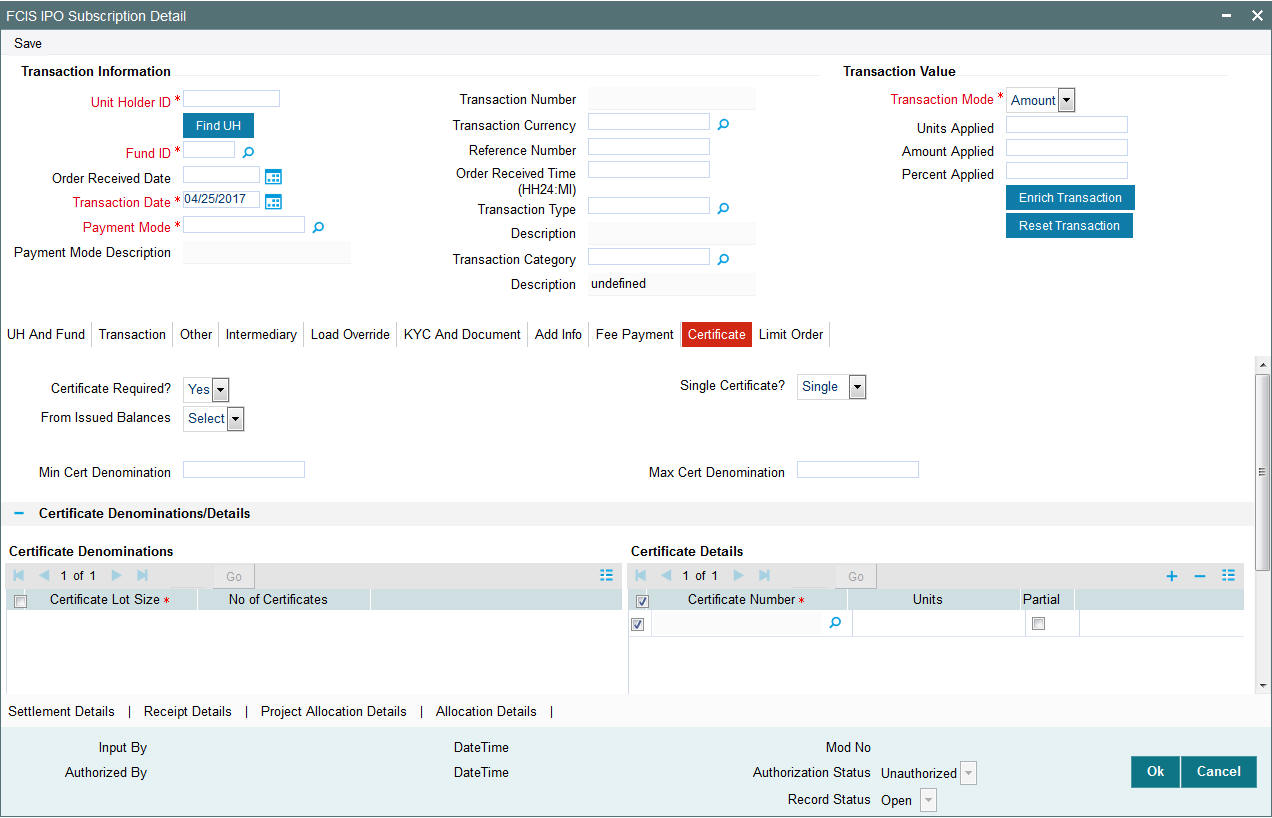
Certificate Required?
Optional
Select if certificate required or not from the drop-down list. The list displays the following values:
- Yes
- No
If the fund you have chosen is a Certificate Option fund as specified in the Shares Characteristics, and the unit holder has requested for certificates, then choose ‘Yes’ in the Certificate Required field.
Single Certificate?
Optional
Specify whether a single certificate or multiple certificates have been requested, in the Number of Certificates field. If single certificates have been designated for the fund, you cannot specify multiple certificates here.
If you have selected a certificate option fund, then all certificate information fields are enabled. The fields are Certificate Required, Single Certificate, From Issued Balances, and Max Cert Denomination and Min Cert Denomination under Certificate Section.
From Issued Balances
Optional
Select from issued balances details from the drop-down list. The list displays the following values:
- Yes
- No
- Both
Min Cert Denomination
Numeric; 22 Characters; Optional
Specify the minimum certificate denomination details.
Max Cert Denomination
Numeric; 22 Characters; Optional
Specify the maximum certificate denomination details.
Certificate Denominations/ Details
Certificate Denominations
Certificate Lot Size
Display
The system displays the certificate lot size details.
No of Certificates
Display
The system displays the number of certificates.
Certificate Details
Certificate Number
Numeric; 10 Characters; Optional
Specify the certificate number. Alternatively, you can select certificate number from the option list. The list displays all valid certificate number maintained in the system.
Units
Numeric; 27 Characters; Optional
Specify the units details.
Partial
Optional
Check this box if partial details to be selected.
4.4.11 Limit Order Tab
Click on ‘Limit Order’ tab in the FCIS IPO Subscription Detail screen.
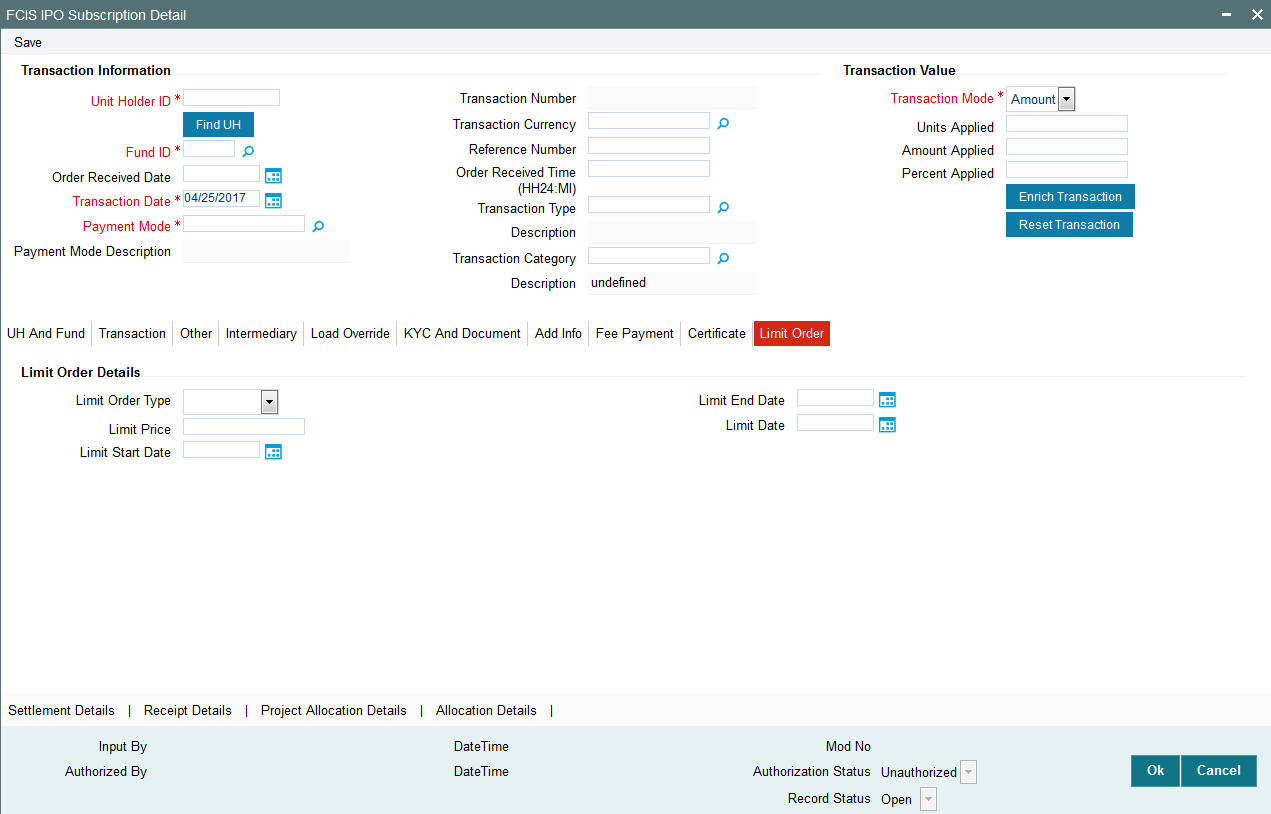
Limit Order Details
Select the ‘Limit Order for Subscription’ (buy) option in the Type of Transaction field. The Limit Order section is enabled.
Limit Order Type
Optional
Select ‘Price Based’ in the Limit Order Type field. The options available in the drop-down are as follows:
- Price-Based
- Date Based
Limit Price
Numeric; 9 Characters; Optional
Specify the price for the limit order, in the Limit Price field. This represents the price equal to or below which the transaction must be put through (for buy orders).
Limit Start and End Date
Date Format; Optional
Specify the period within which the limit order must be executed, by indicating the boundary dates, in the Limit Start Date and Limit End Date fields.
Limit Date
Date Format; Optional
To set up a date-based limit order, specify the following details in the Limit Order section:
- Select ‘Date Based’ in the Limit Order Type field.
- Specify the future date on which the limit order transaction must be executed, in the Limit Date field.
4.4.12 Settlement Details Button
Here, you can maintain settlement details only for the multi transactions. Click the ‘Settlement Details’ button to invoke the ‘Settlement Details’ screen.
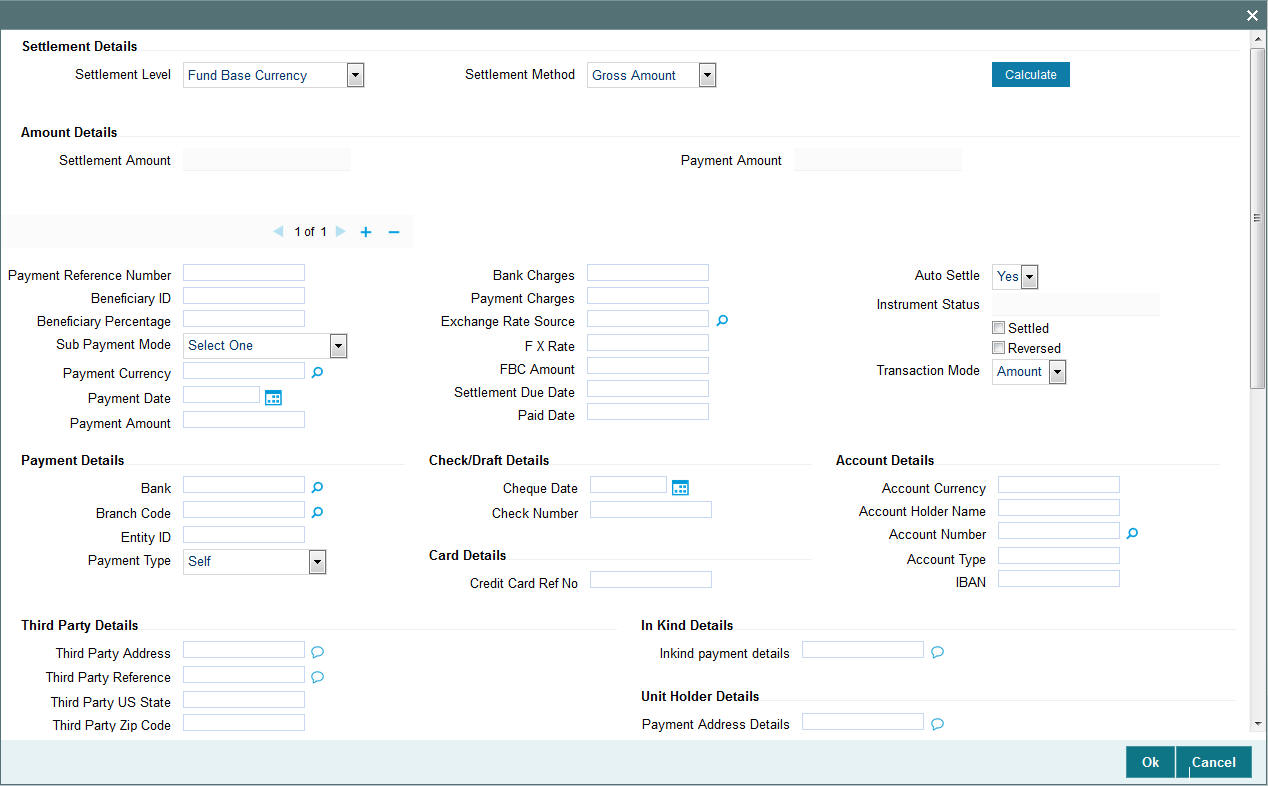
4.4.12.1 Settlement Details
Settlement Level
Optional
Select the settlement level from the drop-down list. The list displays the following values:
- Fund Base Currency
- Transaction Base Currency
Settlement Method
Optional
Select the settlement method from the drop-down list. The list displays the following values:
- Gross Amount
- Net of Agent Fees
- Net of All Fees
- Net of FM Fees
Amount Details
The system displays the following values by clicking ‘Calculate’ button.
Settlement Amount
Display
The system displays the settlement amount.
Payment Amount
Display
The system displays the payment amount.
Payment Details
Payment Reference Number
Alphanumeric; 50 Characters; Optional
Specify the payment reference number.
Beneficiary ID
Alphanumeric; 50 Characters; Optional
Specify the beneficiary ID.
Beneficiary Percentage
Numeric; 5 Characters; Optional
Specify the beneficiary percentage.
Sub Payment Mode
Optional
Select the mode of payment. The following options are available:
- Demand Draft
- Pay Order
- Against Payment
- In Kind Payment
- CMA Cheque
- Broker Cheque
- Cashier Cheque
- Foreign Cheque
- Government Cheque
- Other Institution Cheque
- Local Cheque
- Out Of Town Cheque
- Payroll Deduction Cheque
- Reserve Bank Cheque
- Debit Card
- Credit Card
- Advice
- CMA Transfer
- Direct Debit
- Money Transfer
- Telegraphic Transfer
- Wire Transfer
- Cash
Payment Currency
Alphanumeric; 3 Characters; Optional
Specify the payment currency. You can also select the currency from the adjoining option list. The list consists of valid and authorised currencies maintained in the system.
Payment Date
Date Format; Optional
Specify the payment date.
Payment Amount
Numeric; 18 Characters; Optional
The payment amount is displayed.
Amount Block Number
Display
The system displays the amount block number.
Bank Code
Alphanumeric; 3 Characters; Optional
Specify the bank code. Alternatively, you can select bank code from the adjoining option list. The list displays all valid bank code maintained in the system.
Branch Code
Alphanumeric; 20 Characters; Optional
Specify the branch code. Alternatively, you can select branch code from the adjoining option list. The list displays all valid branch code maintained in the system.
Entity ID
Alphanumeric; 12 Characters; Optional
Specify the entity ID.
Payment Type
Optional
Select the type of payment from the drop-down list. The list displays the following values:
- Self
- Third Party
- Broker
- Retained
- Advanced Payment
- Absorbed/Paid Back
- Garnishee
Bank Charges
Numeric; 12 Characters; Optional
Specify the bank charges.
Payment Charges
Numeric; 12 Characters; Optional
Specify the payment charges.
Exchange Rate Source
Alphanumeric; 6 Characters; Optional
Specify the source of exchange rate. You can also select the source of exchange rate from the adjoining option list. This exchange rate source is used to convert aggregate currency to transaction currency and vice versa.
FX Rate
Numeric; 15 Characters; Optional
Specify the foreign exchange rate.
FBC Amount
Display
The system displays the fund base currency amount.
Settlement Due Date
Date Format; Optional
Select the due date of the transaction from the adjoining calendar.
Paid Date
Date Format; Optional
Select the paid date of the transaction from the adjoining calendar.
Auto Settle
Optional
Select ‘Yes’ option from drop-down list if you require auto settlement. Else select No.
Instrument Status
Display
The status of the instrument is displayed.
Settled
Optional
Check this option if the transaction is settled.
Reversed
Optional
Check this option if the transaction is reversed.
Transaction Mode
Optional
Select the mode of transaction from the drop-down list. The list displays the following values:
- Amount
- Percent
- Residual
Check/Draft Details
Cheque Date
Date Format; Optional
Select the cheque date from the adjoining calendar.
Check Number
Alphanumeric; 16 Characters; Optional
Specify the check number.
Card Details
Credit Card Ref No
Alphanumeric; 16 Characters; Optional
Specify the credit card reference number.
Account Details
Account Currency
Alphanumeric; 3 Characters; Optional
Specify the account currency code. Alternatively, you can select account currency from the option list. The list displays all valid account currency code maintained in the system.
Account Holder Name
Alphanumeric; 100 Characters; Optional
Specify the account holder name.
Account Number
Alphanumeric; 20 Characters; Optional
Specify the account number. Alternatively, you can select account number from the option list. The list displays all valid account number maintained in the system.
Account Type
Alphanumeric; 1 Character; Optional
Specify the type of account. Alternatively, you can select account type from the option list. The list displays all valid account type maintained in the system.
IBAN
Alphanumeric; 40 Characters; Optional
Specify the IBAN details.
Third Party Details
Third Party Address
Alphanumeric; 255 Characters; Optional
Specify the third party address.
Third Party Reference
Alphanumeric; 255 Characters; Optional
Specify the third party reference details.
Third Party US State
Alphanumeric; 1 Character; Optional
Specify the third party US state name.
Third Party Zip Code
Alphanumeric; 10 Characters; Optional
Specify the third party zip code.
Unit Holder Details
Payment Address Details
Alphanumeric; 255 Characters; Optional
Specify the unit holder’s address details.
In Kind Details
Inkind payment details
Alphanumeric; 255 Characters; Optional
Specify the in kind payment details.
Fund Bank Details
The system displays the following details:
- ISIN Code
- Fund Base Currency
- Bank
- Bank Branch
- Description
- Account Number
- Account Name
- Direct Debit
- Close Account
Routing Bank Detail
SWIFT format
Optional
Select the SWIFT format from the drop-down list. The list displays the following values:
- MT103
- MT202
Bank Charged
Optional
Select the bank charged details from the drop-down list. The list displays the following values:
- Beneficiary
- Remitter
- Share
Beneficiary Details
Beneficiary
Alphanumeric; 35 Characters; Optional
Specify the beneficiary name.
Beneficiary Add 1-3
Alphanumeric; 35 Characters; Optional
Specify the beneficiary address. There are three lines available for the same.
Beneficiary BIC Code
Alphanumeric; 24 Characters; Optional
Specify the BIC code of the beneficiary.
Beneficiary Acct No
Alphanumeric; 24 Characters; Optional
Specify the account number of the beneficiary.
Beneficiary Code
Alphanumeric; 24 Characters; Optional
Specify the code of the beneficiary.
Beneficiary Info
Alphanumeric; 100 Characters; Optional
Enter more information about the beneficiary.
Beneficiary IBAN
Alphanumeric; 40 Characters; Optional
Specify the beneficiary IBAN details.
Intermediary Details
Intermediary
Alphanumeric; 35 Characters; Optional
Specify the intermediary detail.
Intermediary Add 1-3
Alphanumeric; 35 Characters; Optional
Specify the intermediary address. There are three lines available for the same
Intermediary BIC Code
Alphanumeric; 24 Characters; Optional
Specify the BIC code of the Intermediary.
Intermediary Acct No
Alphanumeric; 24 Characters; Optional
Specify the account number of the Intermediary.
Intermediary Code
Alphanumeric; 24 Characters; Optional
Specify the code of the Intermediary.
Intermediary Info
Alphanumeric; 100 Characters; Optional
Enter more information about the Intermediary.
Intermediary IBAN
Alphanumeric; 40 Characters; Optional
Specify the intermediary IBAN details.
Further Credit Details
Further Credit Name
Alphanumeric; 40 Characters; Optional
Specify the further credit name.
Further Credit Acct No
Alphanumeric; 35 Characters; Optional
Specify the further credit account number.
Reference
Reference1
Alphanumeric; 35 Characters; Optional
Specify reference details.
Reference2
Alphanumeric; 35 Characters; Optional
Specify reference details.
4.4.12.2 Processing Multi Transactions
To process the outflow transactions, execute the ‘Multiple Transaction Generation’ batch as part of EOD process. While processing multi transactions, settlement will take precedence over the subscription transactions to be generated (with the exception of settlement of residual). Also, while doing settlement or while generating subscription the following will be the precedence order:
- Fixed – Units (Not applicable for settlement)
- Fixed – Amount (For subscription transaction generation, both unit and amount takes same priority)
- Percentage
- Residual
The system will either create settlement entries or create subscription transactions as per the multiple transactions. Once all the redemption transactions are allocated and settled, the subscription transactions are generated by a BOD batch. If any of the redemption transaction is not allotted, then the system will not pick up the entire wrapper transaction for settlement. In this case, the subscription transaction is also not created.
Note
- Each outflow and inflow transactions are saved as separate transactions but against the same wrapper reference number
- Backdated and future date transactions are allowed only for the out flow transactions
- The transaction date for the subscription transaction will be the highest settlement date of the redemption transactions.
- The settlement details entered at the individual transaction level will be overridden by the settlement details maintained at the multi transaction level.
- Settlement for the subscription transaction will always be by cash and the redemption transaction settlement will be based on the settlement details you have maintained.
- Reversing multiple transactions is not allowed from the ‘FCIS Bulk Transaction’ screen. However, you can reverse the individual transaction from online transaction screen.
- You can modify the individual linked transaction using the online transaction screen. In this case, the system will display a warning message indicating the transaction is a linked transaction
- The sum of redemption and sum of subscription should be same, else you can select transaction mode as residual.
- When the payment mode is given as multi payment, the payment mode should be provided in settlement details
- On saving the multi transaction, if any transaction fails, the system will display an error message. However, it saves the remaining transactions. You can correct the failed transactions and save it again.
4.4.13 Receipt Detail Button
Receipt details does not support IPO Subscription transaction.
4.4.14 Project Allocation Details Button
At this stage, the transaction is ready to be saved. If you wish to see a projected picture of how the transaction would most possibly be allocated, then click the Project Allocation Details button.
You can view Dividend amount for each of the redemption transactions. This amount is the net payment amount payable along with the redemption post WHT and IDS being considered
You can view the projected allocation details only for funds in which the ageing policy is FIFO (first-in, first-out) or Transaction Receipts. If the prices are not available for subscription transactions on the transaction date, the latest available price is picked up for allocation.
For validating dilution levy breach amount, the system does a project allocation for the transaction and then calculates the net amount of the transaction.
When you request the allocation process, the system temporarily saves the transaction into temporary stores in the database and gives it a unique key string. The system then performs a ‘mock’ temporary allocation, and displays the details of the same in the Allocation Projection screen. The following project allocation details are displayed:
- The Fund ID
- The Product ID
- The Unit Price for the transaction, as on the date of the temporary allocation.
- The Allocation Price
- The Gross amount in fund base currency
- The Settlement Amount in transaction currency
- The Linked Product ID
- The Load amount in fee currency
- The number of units allocated
- The Base Price
- The total load amount
- The Net amount in fund base currency
- The Settlement Amount in Price Currency
- The Linked units
- The Unit Balance
The following Load Details are displayed during the allocation:
- Fund ID
- Load ID
- Load Description
- Load Amount
- Load amount in fee currency
- VAT Amount in Fee Currency
The following Performance Fee Details are displayed during the allocation:
- Link Transaction Number
- InOutFlag
- Element Identification
- Element Description
After you have viewed the projected allocation details, click Close button to close the screen.
4.4.15 Allocation Details Button
Clicking ‘Allocation Details’ button, the following screen is displayed:
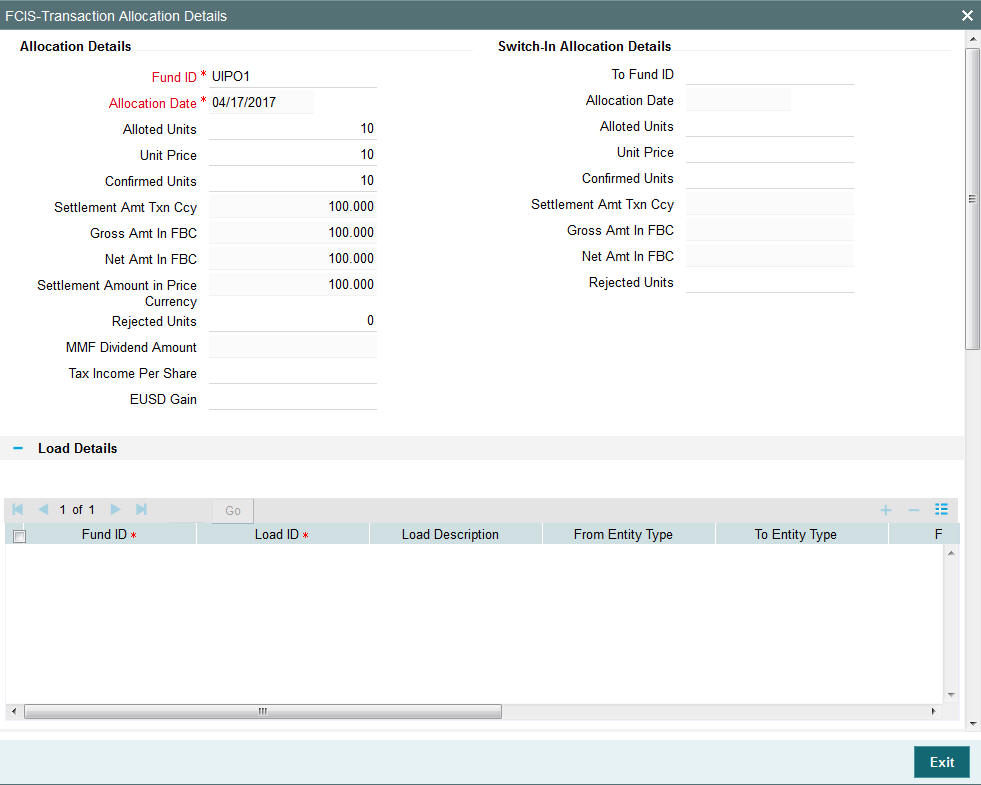
The following allocation details are displayed:
Allocation Details
The following Allocation details are displayed:
- Fund ID
- Allocation Date
- Allotted Units
- Unit Price
- Confirmed Units
- Settlement Amount Transaction Currency
- Gross Amount in FBC
- Net Amount in FBC
- Settlement Amount in Price Currency
- Rejected Units
- MMF Dividend Amount
- Tax Income Per Share
- EUSD Gain
Switch-In Allocation Details
The following Switch-in allocation details are displayed:
- To Fund ID
- Allocation Date
- Allotted Units
- Unit Price
- Confirmed Units
- Settlement Amount Transaction Currency
- Gross Amount in FBC
- Net Amount in FBC
- Rejected Units
Load Details
The following Load Details are displayed during the allocation:
- Fund ID
- Load ID
- Load Description
- From Entity Type
- To Entity Type
- From Entity
- To Entity
- Load Amount
- Load Amount in Fee Currency
Performance Fee Details
The following Performance Fee Details are displayed during the allocation:
- Link Transaction Number
- In Out Flag
- Element Identification
- Element Description
- Value
Transaction Component Details
The following Transaction Component Details are displayed during the allocation:
- Offer Price
- Share Capital
- Fund Capital
- Switch In Bid Price
- To Fund Capital
- Bid Price
- Income
- Share Premium
- Switch In Offer Price
CGT Deduction Details
The following CGT Deduction Details are displayed during the allocation:
- Unit Holder/ Joint Unit Holder ID
- Unit Holder/ Joint Unit Holder Name
- Tax Amount
4.4.16 Saving Transaction
At this stage, you can save the transaction by clicking the Save button at the bottom of the Transaction Information Section. The transaction is saved, and the system generated transaction number (and the reference number, if any) is displayed.
Note
If the Auto-authorization feature is enabled for the Save operation for the AMC ID, then the transaction is saved as an authorized transaction. If not, it is saved as an unauthorized transaction. In either case, the Transaction Number is generated and displayed when you invoke the Save operation.
Alternatively, the following information may also need to be captured before you save an IPO transaction.
In the Intermediary section, ensure that all the identified brokers for the unit holder, that have not been disabled as on the application date, have been selected, and that the commission split percentages for all selected brokers sum up to one hundred percent.
In the Settlement Details under Transaction Section, you may need to capture the payment details for the transaction.
In the Load Override section, you may need to override an allocation-frequency charge or load. There are three options available for such overrides - Discount, Return Value and Increase. ‘Discount’ will reduce the slab value by the specified percent/amount for all slabs. ‘Increase’ will increase the slab value by the specified percent/amount for all slabs. ‘Return Value’ will change the return value for all the slabs to the specified percent/amount.
In the Certificate Details section, you may need to alter the minimum and maximum denominations. An override of these specifications is possible if it is allowed as designated in the fund rules.
In the Document Details section, you may need to capture the document id of the unit holder. You can either enter the document id or choose the same from the option list provided. This section will be enabled only if your installation is integrated with DMS.
You can now save the transaction.
Note
In case of 100% outflows redemption/switch/transfers, if blocked/provisional units are present for the Unitholder and fund combination, then the system will display the warning message as ‘Blocked/provisional Units available for this Fund and Unit holder’, However, you can override this message and save the transaction.
If any unalloted 100% outflow transaction exists across dates, i.e. across transaction types captured for same UH fund combination, then the system will display the warning message.
4.4.17 Transaction Processing Logic for Currency of Expression Funds
The system defaults the UH currency of expression in the ‘Transaction Currency’ field, if available, during transaction capture based on UH and fund combination.
If there is no UH currency of expression maintained in UTDUHCOE, then FBC will be defaulted in the ‘Transaction Currency’ field. If the transaction is processed, then upon authorization of the transaction FBC will be defaulted as UHCOE at the UHCOE maintenance (UTDUHCOE). The defaulted currency of expression in the UHCOE maintenance will be as system user.
If there is no UHCOE maintained in UTDUHCOE, then FBC will be defaulted in the ‘Transaction Currency’ field (Transaction capture) and if you override this defaulted currency to one of the FPC (from the fund level new) then upon authorization of the transaction FPC will be defaulted as UHCOE at the UHCOE maintenance.
If there is no UHCOE maintained in UTDUHCOE, then FBC will be defaulted in the ‘Transaction Currency’ field and if you override this defaulted currency to neither FBC/FPC, then upon authorization of the transaction FBC will be defaulted as UHCOE at the UHCOE maintenance.
Following are the system behaviour in case there is an unauthorized or a modified and unauthorized UHCOE maintenance:
Case 1: You need to input a transaction when there is an unauthorized UHCOE maintenance. During transaction input there is not UHCOE to be defaulted as the maintenance is still in unauthorized status. Hence as per logic Fund base currency defaults during transaction capture and this fund base currency will not get defaulted to UHCOE maintenance. Once the UHCOE maintenance is authorized then defaulting will happen during transaction capture.
Case 2: Authorized UHCOE is modified which is still in unauthorized status. In this case if you input a transaction, then the new modified UHCOE will get defaulted during transaction input.
4.4.17.1 FX Logic
The FX rate will not be considered between transaction base currency and fund price currency for currency of expression fund transactions if they are same. This is applicable for subscriptions, redemptions and switch (normal and pseudo) transactions.
The system will use the transaction price currency to get the load; and after applying the load, the net amount and gross amount will get calculated in fund price currency and FBC as well. The currency of expression factor is applied to derive values in fund base currency. The net, gross and load amount will be calculated in currency of expression for a currency of expression transaction and using the COE factor the same is stored in fund base currency only. For a transaction placed using one of the fund price currency; in the project allocation/allocation tab, the load amount in fee currency and vat amount in fee currency field will display the value in fund price currency only irrespective of the fee calculation basis value of the transaction.
For currency of expression transactions the exchange rate applied field during transaction capture will be defaulted to ‘1’. If you change it, then while saving, the system will display warning message as ‘This is a currency of expression transaction and exchange rate will be defaulted to 1 by the system’. This message is shown if do not click the ‘Enrich’ button after changing the exchange rate. The amount applied field will show the values in fund base currency.
If you change the exchange rate and click ‘Enrich’ button, then the system default the value to ‘1’ while saving without any warning message.
Note
The rounding precision for fund price currencies will be base price.
If the transactions are posted using fund price currencies then the system computes the load amount, net and gross amount in FBC using the COE factor. The display of these fields is mandatory fields that are to be computed as part of core allocation process. The exchange rate field will show default value as 1 in this case as COE factor is applied.
If there is no price available for the fund price currency during transaction input, the system will use the par value to arrive at the price. While saving the transaction, the system will display an override message as ‘Price not available for the price currency and the system will use the par value for the transaction’. If you continue, then the system will use the par value for processing the transactions. The unit price in project allocation will display FPC price. This logic will be for project allocation but during menu allocation or batch allocation, if the price is still not available, then the transaction will not be allotted.
4.4.17.2 Processing Unit Holder Currency of Expression
You can select Fund Base currency as currency of expression. There will be no restriction in changing/ amending the currency of expression any number of times against an UH and fund combination.You can maintain only one currency as currency of expression for a UH- Fund combination.
If a UH is closed and reopened then the corresponding action will not happen for the unit holder currency of expression maintenance. The UHCOE maintenance will get closed once the UH is closed but you have to manually reopen the currency of expression for the unit holder fund combination. In case, you do not reopen the UHCOE maintenance after UH reopening, and simultaneously input a transaction, then the system will not apply COE defaulting logic at UHCOE maintenance as there is already a record available for reopen.
Note
After maintaining the unit holder currency of expression, if one of the FPC is removed (at the fund level) and that currency is UHCOE for a UH, then defaulting at transaction capture will happen but the price currency/COE logic will not happen for the fund, it will be a case where TBC≠FBC or FPC (this will be a normal cross currency case). At the UHCOE maintenance this will be operationally controlled.
4.4.17.3 Processing Fund Price Maintenance
The system will validate at the time of fund price capture whether price is being maintained for the Fund in fund price currencies. If it is not maintained. then the system will display warning message as ‘Prices for all currencies are not maintained do you wish to continue?’
The Pre EOD checks ‘Number of Funds for which Fund Price has not been entered’ will be changed to check whether price in FPC have been maintained for the day in the system. This will be mandatory check. If the system does not find the Price in currency of expression, then the transaction entered in currency of expression will not be allotted.
The Units will be allocated using respective currency of expression/ fund price if the transaction is done in currency of expression. If the transaction is done in fund base currency then the allocation will take place by taking the fund price captured in fund base currency. If the transaction is done in a currency which is other than FBC or currency of expression then the allocation of units will be done using prices captured in FBC.
Fluctuation percentage will be applicable for FPC’s as well. For project allocation, the system will take the latest available price and show the project allocation.
In case of menu allocation if the price is not available then the system will not allocate the transactions.
4.4.17.4 NAV Correction impact for fund price currencies
If the NAV is corrected for fund price currency, say, for instance, GBP and the amend transaction is set to Yes; then all the transactions will be corrected with the new NAV price for the fund price currency (GBP). In case the amend transaction is set to No; the new price will not be corrected at transaction level. ‘Reflect in Trading’ field will not be impacted.
4.4.17.5 Currency of expression logic applied during Transactions
Case 1: If transaction base currency is not a part of the fund price currency and UH COE is not maintained
If the transaction is done in a transaction currency (TBC) other than the fund base currency and this currency is not present in the list of fund price currencies allowed for the fund, then the fund base currency will be defaulted as the unit holder’s currency of expression and for this transaction; FBC price will be applied. For this transaction FX has to be applied to convert TBC to FBC. This logic is applied to all the transaction Types, specially for Subscription transaction.
Case 2: Transaction Currency is part of the Fund Price Currency and UHCOE is not maintained
In case there is no UH COE maintained for a Fund and when an investor transacts in a transaction currency (TBC) which is one of the allowed fund price currencies (FPC) for the fund or FBC, then this transaction currency will be added as the Unit holder’s currency of expression for this fund. Transactions should not apply FX if Transaction Currency is one of the Fund's price currency or FBC.
Post the transaction authorization, the fund price currency/FBC has to be defaulted as UH preferred currencies at the UHCOE maintenance. (Post authorization user will not be able to amend the TBC hence defaulting will be post authorization).
Case 3: Transaction Currency is part of the Fund Price Currency and UHCOE is maintained
If Transaction base currency is other than the Unit holder’s currency of expression and the Unit Holder already has a UH COE for this fund, then while saving, the system will display warning message as ‘The transaction currency is not the currency of expression for the unit holder’.
UHCOE = FPC and TBC≠UHCOE
Note
The bulk and light weight screen will not be impacted with new any new fields but the validations pertaining to COE will be applied (UHCOE defaulting logic if the transaction is done for the first time), for light weight screen as the transaction currency is defaulted to Fund base currency; fund base currency will be defaulted as UHCOE). If the UHCOE is maintained for a UH-Fund combination and transaction is placed through light weight screen then UHCOE will be defaulted as Transaction currency. Light weight screen will allow transaction currency to be in fund base currency (FBC) or fund price currency (FPC) for COE funds and if the transaction is done in FPC for the first time- fund price currency will be defaulted in the UTDUHCOE maintenance. Also If the UH is transacting through light weight screen subsequently and if UTDUHCOE is already maintained then the UHCOE will be defaulted as Transaction currency.
4.4.17.6 System logic to derive the Price Currency
The system will derive the applicable fund price currency for currency of expression fund transactions as follows:
If TBC = fund base currency, then price currency will be FBC itself. No FX will be required. This is applicable for subscription, redemption and switch transactions.
When a trade is placed in a currency (TBC) that is the allowed fund price currency for the fund then Price currency will be respective fund price currency. No FX will be required. This is applicable for Subscription, Redemption and Switch transactions. (TBC = FPC then price CCY will be FPC)
When a trade is placed in a currency that is neither the fund base currency nor an allowed fund price currency for the fund, Price Currency will be FBC. FX will be required between Transaction Currency and FBC. This is applicable for Subscription and redemptions. (TBC ≠FBC or FPC; then Price CCY will be FBC).
4.4.17.7 Switch Logic for currency of expression
The Price Currency of SWITCH OUT leg will be used as Transaction Currency for SWITCH In Leg transaction and the SWITCH In leg Transaction amount will be Settlement Amount of OUT leg equivalent of Switch out Price currency. This is applicable only for currency of expression and non currency of expression fund switch transactions.
4.5 IPO Subscription Summary Screen
This section contains the following topics:
- Section 4.5.1, "Retrieving a Record in FCIS IPO Subscription Summary Screen"
- Section 4.5.2, "Editing FCIS IPO Subscription Record"
- Section 4.5.3, "Viewing FCIS IPO Subscription Record "
- Section 4.5.4, "Deleting FCIS IPO Subscription Record"
- Section 4.5.5, "Authorizing FCIS IPO Subscription Record "
- Section 4.5.6, "Amending FCIS IPO Subscription Record "
- Section 4.5.7, "Authorizing Amended FCIS IPO Subscription Record "
4.5.1 Retrieving a Record in FCIS IPO Subscription Summary Screen
You can retrieve a previously entered record in the Summary Screen, as follows:
Invoke the ‘FCIS IPO Subscription Summary’ screen by typing ‘UTSTXN01/ UTSTRA01’ in the field at the top right corner of the Application tool bar and clicking on the adjoining arrow button and specify any or all of the following details in the corresponding details.
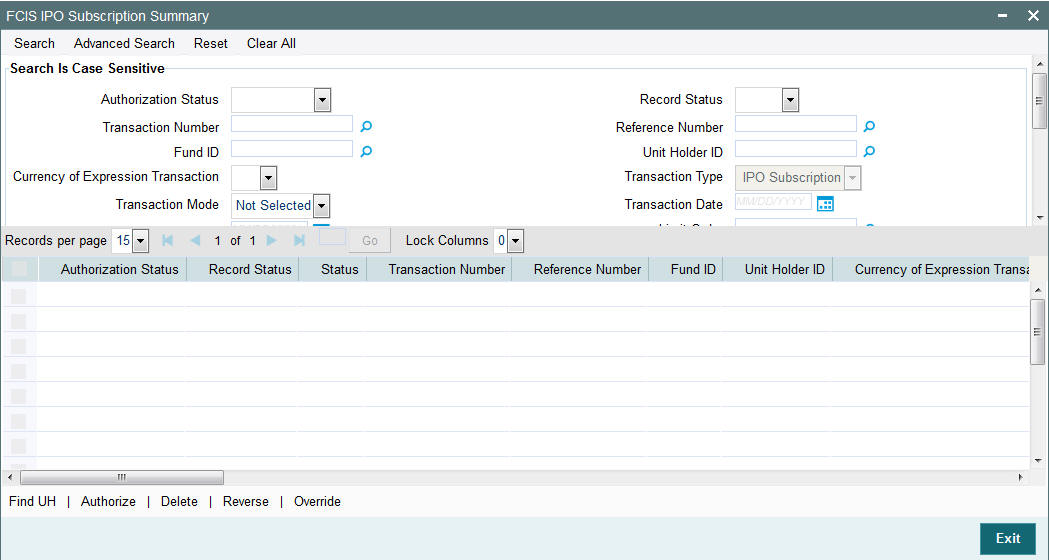
- The status of the record in the Authorization Status field. If you choose the ‘Blank Space’ option, then all the records are retrieved.
- The status of the record in the Record Status field. If you choose the ‘Blank Space’ option, then all records are retrieved
- Transaction Number
- Fund ID
- Currency of Expression Transaction
- Transaction Mode
- Dealing Date
- Transaction Status
- AMC ID
- Completion Date
- Payment Mode
- Communication Mode
- Reference Number
- Unit Holder ID
- Transaction Type
- Transaction Date
- Limit Order
- Transaction Currency
- Maker ID
- Agent Code
- Ref Type
Click ‘Search’ button to view the records. All the records with the specified details are retrieved and displayed in the lower portion of the screen.
Note
You can also retrieve the individual record detail from the detail screen by querying in the following manner:
- Press F7
- Input the Transaction Number
- Press F8
You can perform Edit, Delete, Amend, Authorize, Reverse, Confirm operations by selecting the operation from the Action list. You can also search a record by using a combination of % and alphanumeric value.
Note
The status field in the Records pane of the summary screen displays the bulk operation results.
4.5.2 Editing FCIS IPO Subscription Record
You can modify the details of FCIS IPO Subscription record that you have already entered into the system, provided it has not subsequently authorized. You can perform this operation as follows:
- Invoke the FCIS IPO Subscription Summary screen from the Browser.
- Select the status of the record that you want to retrieve for modification in the Authorization Status field. You can only modify records that are unauthorized. Accordingly, choose the Unauthorized option.
- Specify any or all of the details in the corresponding fields to retrieve the record that is to be modified.
- Click ‘Search’ button. All unauthorized records with the specified details are retrieved and displayed in the lower portion of the screen.
- Double click the record that you want to modify in the list of displayed records. The FCIS IPO Subscription Detail screen is displayed.
- Select Unlock Operation from the Action list to modify the record. Modify the necessary information.
Click Save to save your changes. The FCIS IPO Subscription Detail screen is closed and the changes made are reflected in the FCIS IPO Subscription Summary screen.
4.5.3 Viewing FCIS IPO Subscription Record
To view a record that you have previously input, you must retrieve the same in the FCIS IPO Subscription Summary screen as follows:
- Invoke the FCIS IPO Subscription Summary screen from the Browser.
- Select the status of the record that you want to retrieve for viewing in the Authorization Status field. You can also view all records that are either unauthorized or authorized only, by choosing the unauthorized / Authorized option.
- Specify any or all of the details of the record in the corresponding fields on the screen.
- Click ‘Search’ button. All records with the specified fields are retrieved and displayed in the lower portion of the screen.
- Double click the record that you want to view in the list of displayed records. The FCIS IPO Subscription Detail screen is displayed in View mode.
4.5.4 Deleting FCIS IPO Subscription Record
You can delete only unauthorized records in the system. To delete a record that you have previously entered:
- Invoke the FCIS IPO Subscription Summary screen from the Browser.
- Select the status of the record that you want to retrieve for deletion.
- Specify any or all of the details in the corresponding fields on the screen.
- Click ‘Search’ button. All records with the specified fields are retrieved and displayed in the lower portion of the screen.
- Double click the record that you want to delete in the list of displayed records. . The FCIS IPO Subscription Detail screen is displayed.
- Select Delete Operation from the Action list. The system prompts you to confirm the deletion and the record is physically deleted from the system database.
4.5.5 Authorizing FCIS IPO Subscription Record
- An unauthorized FCIS IPO Subscription record must be authorized in the system for it to be processed. To authorize a record:
- Invoke the FCIS IPO Subscription Summary screen from the Browser.
- Select the status of the record that you want to retrieve for authorization. Typically, choose the unauthorized option.
- Specify any or all of the details in the corresponding fields on the screen.
- Click ‘Search’ button. All records with the specified details that are pending authorization are retrieved and displayed in the lower portion of the screen.
- Double click the record that you wish to authorize. The FCIS IPO Subscription Detail screen is displayed. Select Authorize operation from the Action List.
When a checker authorizes a record, details of validation, if any, that were overridden by the maker of the record during the Save operation are displayed. If any of these overrides results in an error, the checker must reject the record.
4.5.6 Amending FCIS IPO Subscription Record
After a FCIS IPO Subscription record is authorized, it can be modified using the Unlock operation from the Action List. To make changes to a record after authorization:
- Invoke the FCIS IPO Subscription Summary screen from the Browser.
- Select the status of the record that you want to retrieve for authorization. You can only amend authorized records.
- Specify any or all of the details in the corresponding fields on the screen.
- Click ‘Search’ button. All records with the specified details that are pending authorization are retrieved and displayed in the lower portion of the screen.
- Double click the record that you wish to authorize. The FCIS IPO Subscription Detail screen is displayed in amendment mode. Select Unlock operation from the Action List to amend the record.
- Amend the necessary information and click on Save to save the changes
4.5.7 Authorizing Amended FCIS IPO Subscription Record
An amended FCIS IPO Subscription record must be authorized for the amendment to be made effective in the system. The authorization of amended records can be done only from Fund Manager Module and Agency Branch module.
The subsequent process of authorization is the same as that for normal transactions.
4.6 Bulk Transactions
This section contains the following topics:
- Section 4.6.1, "Invoking Bulk Transaction Screen"
- Section 4.6.2, "Settlement Details Button"
- Section 4.6.3, "Processing Dilution Levy"
- Section 4.6.4, "Viewing Balance Button"
4.6.1 Invoking Bulk Transaction Screen
You may need to enter multiple transactions in multiple funds for a unit holder. Use ‘FCIS Bulk Transaction’ screen for such requirements. You can invoke this screen by typing ‘UTDTXNB’ in the field at the top right corner of the Application tool bar and click the adjoining arrow.
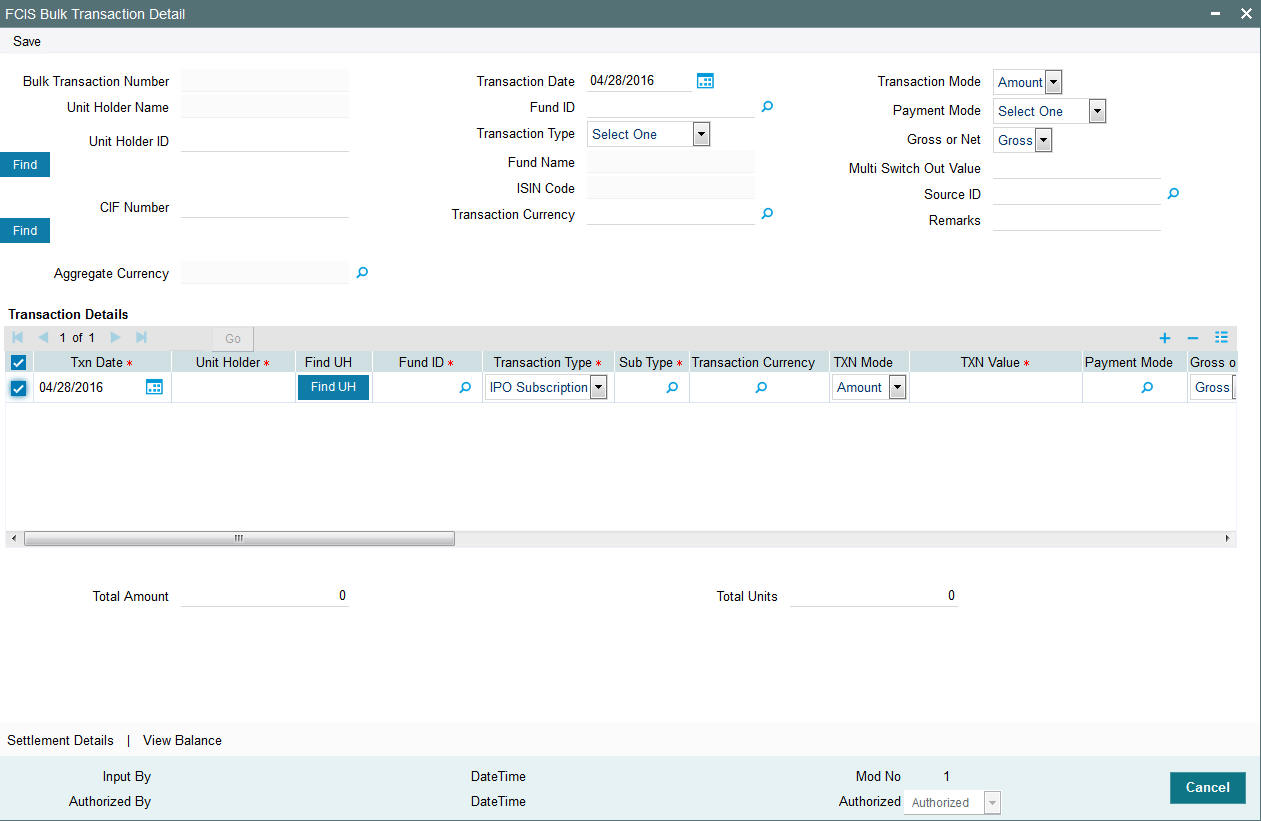
You can maintain the following details:
Bulk Transaction Number
Display
When you save the multiple transactions that you have entered in this screen, a bulk transaction number is generated by the system for each set of multiple transactions entered. You can use the bulk transaction number to retrieve the transactions, in the Bulk Transactions Summary screen.
Unit Holder Name
Display
The name of the unit holder is displayed.
Unit Holder ID
Alphanumeric; 12 Characters; Optional
Specify the unit holder ID. You can also click the ‘Find’ button to list the unit holder IDs maintained in the system. Select the required ID.
If you select unit holder ID, the system displays the CIF number and vice versa.
CIF Number
Alphanumeric; 12 Characters; Optional
Specify the CIF number of the unit holder for whom you wish to enter multiple transactions. You can also click the ‘Find’ button to list the CIF number maintained in the system. Select the required ID.
Aggregate Currency
Alphanumeric; 3 Characters; Optional
Specify the aggregate currency. You can also select the currency from the option list provided. The list consists of valid and authorised currencies maintained in the system.
Aggregate currency is used in case of multiple transactions with multiple currencies. This currency is used as an intermediate currency to do settlement between outflow and inflow transactions. If the fund base currency is same for all the funds involved in the transaction, then the system defaults the aggregate currency as the fund base currency. However, if the currency is different, then the system prompts to enter the aggregate currency on save.
Transaction Date
Date Format; Optional
The transaction date is defaulted. However, you can modify the same.
Fund ID
Alphanumeric; 6 Characters; Optional
Specify the transaction Fund ID.
Transaction Type
Optional
Select the type of transaction from the drop-down list. The options available are:
- IPO Subscription
- Subscription
- Redemption
- Switch
- Transfer
- Multi Transaction
- Multi Switch
For a unit holder, you can capture multiple redemptions, for which multiple settlements and subscriptions are captured through one wrapper reference number. This wrapper reference will be the reference number for all the subscription and redemption transactions. If you select the ‘Multi Transaction’ option, then the system will link all the transactions to one reference number. For instance, you can capture multiple transactions as follows:
Outflows,
- Redeem 1000 units from F1 as R1
- Redeem 5000 USD from F2 as R2
- Redeem 50% from F3 as R3
Inflows,
- Invest 30% into F4 as S1
- Invest 1000 USD to F5 as S2
- Invest remaining into F6 as S3
All these transactions will be linked to one wrapper reference number.
Fund Name
Display
The name of the fund is displayed.
ISIN Code
Display
The system displays the ISIN code.
Transaction Currency
Alphanumeric; 3 Characters; Mandatory
Specify the transaction currency. Alternatively, you can select transaction currency from the option list. The list displays all valid transaction currency maintained in the system.
Transaction Mode
Optional
Select the mode of transaction. The options available are:
- Amount
- Units
- Percent
Payment Mode
Optional
Select the mode of payment from the drop-down list. The following are the options available:
- Cash
- Cheque
- Money Transfer
- Multi Payment
- Direct Debit
Gross or Net
Optional
Select if the bulk transaction is gross or net mode for pseudo switch out leg for multi switch transactions from the drop-down list. The list displays the following values:
- Gross
- Net
Multi Switch Out Value
Numeric; 22 Characters; Mandatory
Specify the multi switch out value for the pseudo switch out leg for multi switch transactions.
If selected, the system will treat the transaction captured as part of multiple switch transactions and it will link them with same reference number (wrapper number). This multi switch transaction will be a pseudo switch transaction. The system will switch out from one fund (pseudo switch out) to multiple switch into different funds (pseudo switch-in)
Multi switch transaction will allow one pseudo switch out (PS03) transaction captured against multiple inflows pseudo switch in (PS02) in bulk transaction screen. Internally it will create one-out leg transaction for each in-leg transaction. If switch out fund and switch in fund are different then it will be saved as pseudo switch and if switch out fund and switch in fund are same then it will be saved as bed and breakfast switch.
Source ID
Alphanumeric; 12 Characters; Optional
Select the source through which the transactions are routed.
Remarks
Alphanumeric; 255 Characters; Optional
You can specify any remarks for the transactions.
Transaction Details
You can enter information that is specific to each individual transaction that you wish to enter.
To add a new transaction, click the ‘Add’ (+) button. To delete a transaction that you have entered, select the transaction row and click the ‘Delete’ (-) button.
The default details that you have specified above are displayed for each transaction. However, you can change the following details:
Transaction Date
Date Format; Mandatory
The system displays the transaction date. However you can amend the same.
Unit Holder
Alphanumeric; 12 Characters; Mandatory
Specify the unit holder details.
You can query for unit holder ID by clicking on ‘Fund UH’ button.
Fund ID
Alphanumeric; 6 Characters; Mandatory
The system displays the fund ID. However you can amend the same.
Transaction Type
Mandatory
Select the type of transaction from the drop-down list. The list displays the following values:
Sub Type
Alphanumeric; 1 Character; Mandatory
Specify the sub type. Alternatively, you can select the sub type from the option list. The list displays all valid sub types maintained in the system.
Transaction Currency
Alphanumeric; 3 Characters; Optional
The system displays the transaction currency. However, you can amend this value.
TXN Mode
Optional
Select the mode of transaction from the drop-down list. The list displays the following values:
- Amount
- Units
- Present
- Residual
TXN Value
Numeric; 22 Characters; Mandatory
Specify the transaction value.
Payment Mode
Alphanumeric; 2 Characters; Optional
Specify the mode of payment. Alternatively, you can select payment mode from the option list. The list displays all valid mode of payment maintained in the system.
Gross or Net
Optional
Select Gross or Net option from the drop-down list.
To Unit Holder ID
Alphanumeric; 12 Characters; Optional
Specify To unit holder ID. You can query for To Unit holder ID by clicking ‘Find UH’ button.
To Fund ID
Alphanumeric; 6 Characters; Optional
Specify the To Fund ID. Alternatively, you can select To Fund ID from the option list. The list displays all valid To Fund ID maintained in the system.
Reference Number
Alphanumeric; 16 Characters; Optional
Specify the reference number.
Txn Number
Alphanumeric; 16 Characters; Optional
Specify the transaction number.
Click ‘Detail’ button to get the transaction details.
Click ‘Clear’ button to clear all the transaction details.
Click ‘Log’ button to view the transaction error details. The ‘Log’ field will log the overrides (warning messages) and error messages. You can view overrides/ error post authorization of the bulk transaction. On launching the sub screen; system will display the following:
- Transaction Number
- Error/ Override
- Code
- Description
Transaction Number
Alphanumeric; 16 Characters; Optional
Specify the transaction number.
Error/Override
Alphanumeric; 50 Characters; Optional
Specify the error or override details.
Code
Alphanumeric; 20 Characters; Optional
Specify the code.
Description
Alphanumeric; 255 Characters; Optional
Specify the error description.
Operate?
Optional
Select the operate status from the drop-down list. The list displays the follwoing values:
- Edit
- Delete
Units Classification
Alphanumeric; 1 Character; Optional
Specify the unit classification details.
Age out Preference
Alphanumeric; 1 Character; Optional
Specify the age out preference details.
Status
Alphanumeric; 4000 Characters; Optional
Specify the status of transaction.
Total Amount
Numeric; 22 Characters; Optional
Specify the total amount.
Total Units
Numeric; 22 Characters; Optional
Specify the total units.
Note
- For multi transactions, only redemption and subscription transactions are allowed
- For multi transaction, the transaction date and the unit holder ID are defaulted from the header and you cannot modify the same.
- For subscription transactions, you can select the following transaction modes:
- Amount
- Units
- Percentage
- Residual
- For redemption transactions,’ Residual’ transaction mode is not applicable
- You have to maintain different fund IDs for multiple transactions
The unit holder will be same for all the outflows and inflow transactions. If there is a different unit holder, the system will validate when the transaction is saved.
Whenever a multi switch transaction is captured, the system will check the unit balance including unallocated units from any other outflow transaction of the same fund. If the unit balance thus calculated is less than the transaction value, the transaction generation will fail for ‘Insufficient Unit Balance’. For un-allotted unit based or percentage based transactions, the system will identify the unallocated units from the transaction details.
For Amount based transaction, the system will compute the units balance as follows:
Un-allotted units= Amount/ Latest Available NAV * (1 - Fluctuation %)
Note
Fluctuation % is a system level param value that can be maintained in Parameter Maintenance Screen (UTDPARAM) considering the maximum load and maximum fluctuation in price that can happen. PARAM Code to be maintained is ‘FLUCTUATIONPERCENT’.
Example
Opening Balance |
120 |
Buffer % |
5% |
NAV |
11.23778 |
TXN |
Txn Mode |
Txn Value |
Units redeemed |
Settlement Amount |
Outstanding |
Txn Status |
Remarks |
RED1 |
Units |
75 |
75 |
842.8335 |
45 |
Success |
No un-allotted Transactions during RED1 capture hence available units will be 120 |
RED2 |
Units |
50 |
NA |
NA |
NA |
Failed |
Un-allotted units - 75 pending, hence system will consider the available units as 45 (120-75) |
RED3 |
Amount |
100 |
9.3669 |
105.2632 |
35.6331 |
Success |
System will use buffer % to arrive at units for amount based outflow transactions |
The system will run ‘Multi Switch’ batch to generate pseudo switch in-leg. The system will split the pseudo out-leg and link to each pseudo in-leg (For instance, multiple switch out from 1 fund to 3 funds. There should be 3 out-leg link to 3 in-leg).If there is residual balance of units, it should be generated at the point of the allotment of pseudo switch out-leg.
Pseudo switch-in generation will be part of BOD sequence. The same can be scheduled as part of Mini-EOD, based on business requirement.
4.6.1.1 Multi Transaction Capture Flow
PS Out-leg Capture
In the header section the system will capture PS-out leg details:
Field |
Description |
UH ID |
Investor ID |
Fund ID |
Switch-out fund ID |
Net/Gross |
Gross/Net |
Transaction mode |
Out leg mode |
Multi switch out value |
Switch-out value |
Transaction Currency |
Should be switch-out fund base currency |
PS In-leg Capture
The system captures PS In-leg details as part of the multi record on click of add rows icon.
Field |
Description |
Transaction date |
Defaulted from header |
UH ID |
Defaulted from header |
Fund ID |
Defaulted from header |
Transaction Type |
Should be switch |
Transaction Sub Type |
Should be Pseudo switch |
Transaction Currency |
Transaction currency |
Transaction Mode |
Only for Amount/Units |
Transaction Value |
Value to be switched |
Gross/Net |
Gross/Net |
To Fund ID |
Switch-in fund ID |
On saving, the system generates multi switch wrapper reference number. the reference number will be same as wrapper reference number.
Note
Transaction number will be showing as key string till authorization.
On authorization, the system will update the transaction reference number generated as key string to the actual switch out transaction number. The reference number will be same as wrapper reference number.
Note
Error and overrides will be logged for the PS out transactions.
4.6.2 Settlement Details Button
Here, you can maintain settlement details only for the multi transactions. Click the ‘Settlement Details’ button to invoke the ‘Settlement Details’ screen.
For further details, refer ‘Settlement Details’ button in IPO Subscription Detail section of this User Manual.
4.6.2.1 Processing Multi Transactions
To process the outflow transactions, execute the ‘Multiple Transaction Generation’ batch as part of EOD process. While processing multi transactions, settlement will take precedence over the subscription transactions to be generated (with the exception of settlement of residual). Also, while doing settlement or while generating subscription the following will be the precedence order:
- Fixed – Units (Not applicable for settlement)
- Fixed – Amount (For subscription transaction generation, both unit and amount takes same priority)
- Percentage
- Residual
The system will either create settlement entries or create subscription transactions as per the multiple transactions. Once all the redemption transactions are allocated and settled, the subscription transactions are generated by a BOD batch. If any of the redemption transaction is not allotted, then the system will not pick up the entire wrapper transaction for settlement. In this case, the subscription transaction is also not created.
Note
- Each outflow and inflow transactions are saved as separate transactions but against the same wrapper reference number
- Backdated and future date transactions are allowed only for the out flow transactions
- The transaction date for the subscription transaction will be the highest settlement date of the redemption transactions.
- The settlement details entered at the individual transaction level will be overridden by the settlement details maintained at the multi transaction level.
- Settlement for the subscription transaction will always be by cash and the redemption transaction settlement will be based on the settlement details you have maintained.
- Reversing multiple transactions is not allowed from the ‘FCIS Bulk Transaction’ screen. However, you can reverse the individual transaction from online transaction screen.
- You can modify the individual linked transaction using the online transaction screen. In this case, the system will display a warning message indicating the transaction is a linked transaction
- The sum of redemption and sum of subscription should be same, else you can select transaction mode as residual.
- When the payment mode is given as multi payment, the payment mode should be provided in settlement details
- On saving the multi transaction, if any transaction fails, the system will display an error message. However, it saves the remaining transactions. You can correct the failed transactions and save it again.
4.6.3 Processing Dilution Levy
The Inflow breach factor for IN transactions and Outflow breach factor for OUT transactions are considered for arriving at the fund inflow/outflow dilution levy breach limit (Fund Corpus * Inflow / Outflow Breach Factor < Net Amount in FBC) for the day. For validating the dilution limit breach, a project allocation is done with the available price for the transaction and thereby the net amount of that transaction is calculated.
Dilution levy is validated against the gross transaction amount. If gross transaction amount is is greater than the dilution levy breach limit, then a warning message is displayed by the system as follows:
The transaction exceeds the dilution levy breach limit
Dilution levy value can be overridden. The overridden value is considered only if the transaction is breaching the dilution levy limit amount. If a transaction is saved and if there are overrides while saving such a transaction, then the following warning message is displayed by the system.
Transactions are saved with overrides.
4.6.4 Viewing Balance Button
You can view the available fund balance details of a unit holder. For this, click the ‘View Balance’ button in the ‘FCIS Bulk Transaction Detail’ screen. The ‘Investor Fund Balance’ (UTDFNBAL) screen is displayed in view mode displaying the unit holder fund balance details
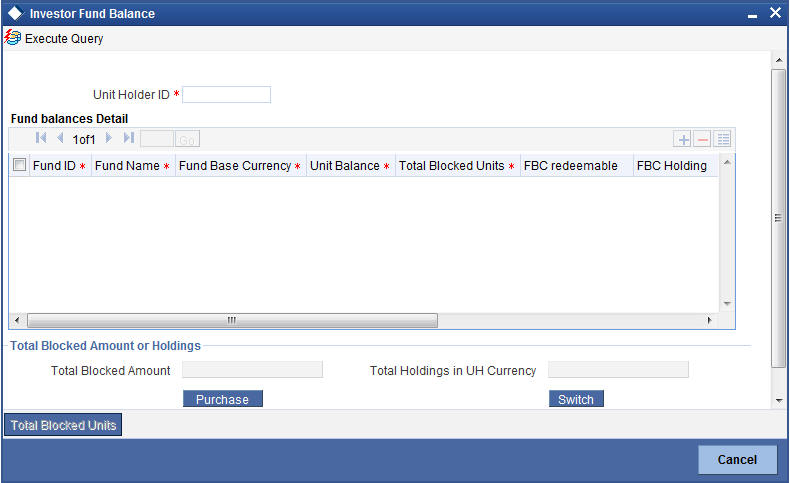
For further details, refer View Balance Button sub section in ‘IPO Subscription Detail’ section in this User Manual.
4.7 Bulk Transaction Summary
This section contains the following topics:
- Section 4.7.1, "Invoking Bulk Transactions Summary Screen"
- Section 4.7.2, "Retrieving a Record in FCIS Bulk Transaction Summary Screen"
- Section 4.7.3, "Editing FCIS Bulk Transaction Record"
- Section 4.7.4, "Viewing FCIS Bulk Transaction Record "
- Section 4.7.5, "Deleting FCIS Bulk Transaction Record"
- Section 4.7.6, "Authorizing FCIS Bulk Transaction Record "
- Section 4.7.7, "Amending FCIS Bulk Transaction Record "
- Section 4.7.8, "Authorizing Amended FCIS Bulk Transaction Record "
4.7.1 Invoking Bulk Transactions Summary Screen
The following operations can be performed for multiple transactions using ‘FCIS Multiple Transaction’ screen:
- New - You can capture outflows and inflows transactions in this screen. This will then be grouped under one transaction.
- Modify - You can modify the unauthorized multi transactions. Click ‘Unlock’ option in the action menu and amend the individual transaction by editing each transaction using ‘Edit’ option available in the ‘Transaction Details’ section in the ‘FCIS Bulk Transaction Detail’ screen.
- Delete - To delete a particular transaction, unlock the unauthorized record and select the ‘Delete’ option available in the ‘Transaction Details’ section in the ‘FCIS Bulk Transaction Detail’ screen.
- Authorize - Authorizing the multi transaction results in authorizing all the linked transactions along with it.
4.7.2 Retrieving a Record in FCIS Bulk Transaction Summary Screen
You can retrieve a previously entered record in the Summary Screen, as follows:
Invoke the ‘FCIS Bulk Transaction Summary’ screen by typing ‘UTSTXNB’ in the field at the top right corner of the Application tool bar and clicking on the adjoining arrow button and specify any or all of the following details in the corresponding details.
- The status of the record in the Authorized field. If you choose the ‘Blank Space’ option, then all the records are retrieved.
- The status of the record in the Open field. If you choose the ‘Blank Space’ option, then all records are retrieved
- Bulk Transaction Number
- Transaction Date
- Fund ID
- Unit Holder ID
Click ‘Search’ button to view the records. All the records with the specified details are retrieved and displayed in the lower portion of the screen.
Note
You can also retrieve the individual record detail from the detail screen by querying in the following manner:
- Press F7
- Input the Bulk Transaction Number
- Press F8
You can perform Edit, Delete, Amend, Authorize, Reverse, Confirm operations by selecting the operation from the Action list. You can also search a record by using a combination of % and alphanumeric value.
For example:
You can search the record for Fund ID by using the combination of % and alphanumeric value as follows:-
- Search by A%:- System will fetch all the records whose Fund ID starts from Alphabet ‘A’. For example:- AGC17,AGVO6,AGC74 etc.
- Search by%7:- System will fetch all the records whose Fund ID ends by numeric value’ 7’ . For example: AGC17, GSD267, AGC77 etc.
- Search by%17%:- System will fetch all the records whose Fund ID contains
the numeric value 17. For example: GSD217, GSD172, AGC17 etc.
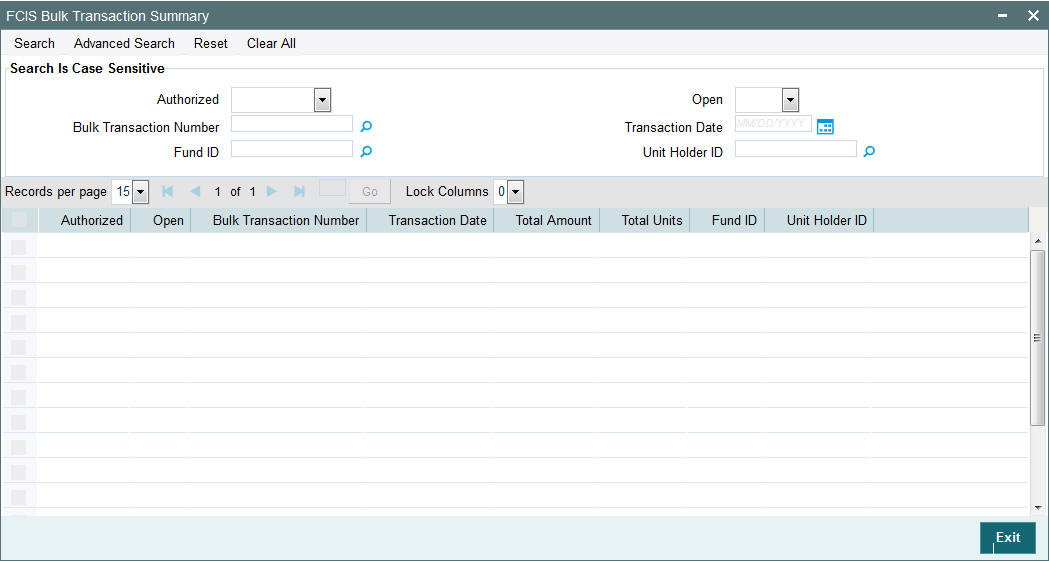
4.7.3 Editing FCIS Bulk Transaction Record
You can modify the details of FCIS Bulk Transaction record that you have already entered into the system, provided it has not subsequently authorized. You can perform this operation as follows:
- Invoke the FCIS Bulk Transaction Summary screen from the Browser.
- Select the status of the record that you want to retrieve for modification in the Authorization Status field. You can only modify records that are unauthorized. Accordingly, choose the Unauthorized option.
- Specify any or all of the details in the corresponding fields to retrieve the record that is to be modified.
- Click ‘Search’ button. All unauthorized records with the specified details are retrieved and displayed in the lower portion of the screen.
- Double click the record that you want to modify in the list of displayed records. The FCIS Bulk Transaction Detail screen is displayed.
- Select Unlock Operation from the Action list to modify the record. Modify the necessary information.
Click Save to save your changes. The FCIS Bulk Transaction Detail screen is closed and the changes made are reflected in the FCIS Bulk Transaction Summary screen.
4.7.4 Viewing FCIS Bulk Transaction Record
To view a record that you have previously input, you must retrieve the same in the FCIS Bulk Transaction Summary screen as follows:
- Invoke the FCIS Bulk Transaction Summary screen from the Browser.
- Select the status of the record that you want to retrieve for viewing in the Authorization Status field. You can also view all records that are either unauthorized or authorized only, by choosing the unauthorized / Authorized option.
- Specify any or all of the details of the record in the corresponding fields on the screen.
- Click ‘Search’ button. All records with the specified fields are retrieved and displayed in the lower portion of the screen.
- Double click the record that you want to view in the list of displayed records. The FCIS Bulk Transaction Detail screen is displayed in View mode.
4.7.5 Deleting FCIS Bulk Transaction Record
You can delete only unauthorized records in the system. To delete a record that you have previously entered:
- Invoke the FCIS Bulk Transaction Summary screen from the Browser.
- Select the status of the record that you want to retrieve for deletion.
- Specify any or all of the details in the corresponding fields on the screen.
- Click ‘Search’ button. All records with the specified fields are retrieved and displayed in the lower portion of the screen.
- Double click the record that you want to delete in the list of displayed records. The FCIS Bulk Transaction Detail screen is displayed.
- Select Delete Operation from the Action list. The system prompts you to confirm the deletion and the record is physically deleted from the system database.
4.7.6 Authorizing FCIS Bulk Transaction Record
- An unauthorized FCIS Bulk Transaction record must be authorized in the system for it to be processed. To authorize a record:
- Invoke the FCIS Bulk Transaction Summary screen from the Browser.
- Select the status of the record that you want to retrieve for authorization. Typically, choose the unauthorized option.
- Specify any or all of the details in the corresponding fields on the screen.
- Click ‘Search’ button. All records with the specified details that are pending authorization are retrieved and displayed in the lower portion of the screen.
- Double click the record that you wish to authorize. The FCIS Bulk Transaction Detail screen is displayed. Select Authorize operation from the Action List.
When a checker authorizes a record, details of validation, if any, that were overridden by the maker of the record during the Save operation are displayed. If any of these overrides results in an error, the checker must reject the record.
4.7.7 Amending FCIS Bulk Transaction Record
After a FCIS Bulk Transaction record is authorized, it can be modified using the Unlock operation from the Action List. To make changes to a record after authorization:
- Invoke the FCIS Bulk Transaction Summary screen from the Browser.
- Select the status of the record that you want to retrieve for authorization. You can only amend authorized records.
- Specify any or all of the details in the corresponding fields on the screen.
- Click ‘Search’ button. All records with the specified details that are pending authorization are retrieved and displayed in the lower portion of the screen.
- Double click the record that you wish to authorize. The FCIS Bulk Transaction Detail screen is displayed in amendment mode. Select Unlock operation from the Action List to amend the record.
- Amend the necessary information and click on Save to save the changes
4.7.8 Authorizing Amended FCIS Bulk Transaction Record
An amended FCIS Bulk Transaction record must be authorized for the amendment to be made effective in the system. The authorization of amended records can be done only from Fund Manager Module and Agency Branch module.
The subsequent process of authorization is the same as that for normal transactions.
4.8 Subscription Transaction Detail
This section contains the following topics:
- Section 4.8.1, "Invoking Subscription Transactions Detail Screen"
- Section 4.8.2, "UH And Fund Tab"
- Section 4.8.3, "Transaction Tab"
- Section 4.8.4, "Others Tab"
- Section 4.8.5, "Intermediary Tab"
- Section 4.8.6, "Load Override Tab"
- Section 4.8.7, "KYC and Document Tab"
- Section 4.8.8, "Add Info Tab"
- Section 4.8.9, "Fee Payment Tab"
- Section 4.8.10, "Certificate Tab"
- Section 4.8.11, "Limit Order Tab"
- Section 4.8.12, "Settlement Details Button"
- Section 4.8.13, "Receipt Detail Button"
- Section 4.8.14, "Project Allocation Details Button"
- Section 4.8.15, "Allocation Details Button"
- Section 4.8.16, "Saving the transaction"
- Section 4.8.17, "Transaction Processing Logic for Currency of Expression Funds"
4.8.1 Invoking Subscription Transactions Detail Screen
Enter a subscription transaction request into the system in the following sequence of events:
Invoke the ‘FCIS Subscription Transaction Detail’ screen by typing ‘UTDTXN02’ in the field at the top right corner of the Application tool bar and clicking on the adjoining arrow button. The Transaction Detail screen for subscription transactions is displayed, with all the default information.
Select ‘New’ from the Actions menu in the Application toolbar or click new icon to enter the details of the Subscription transaction.
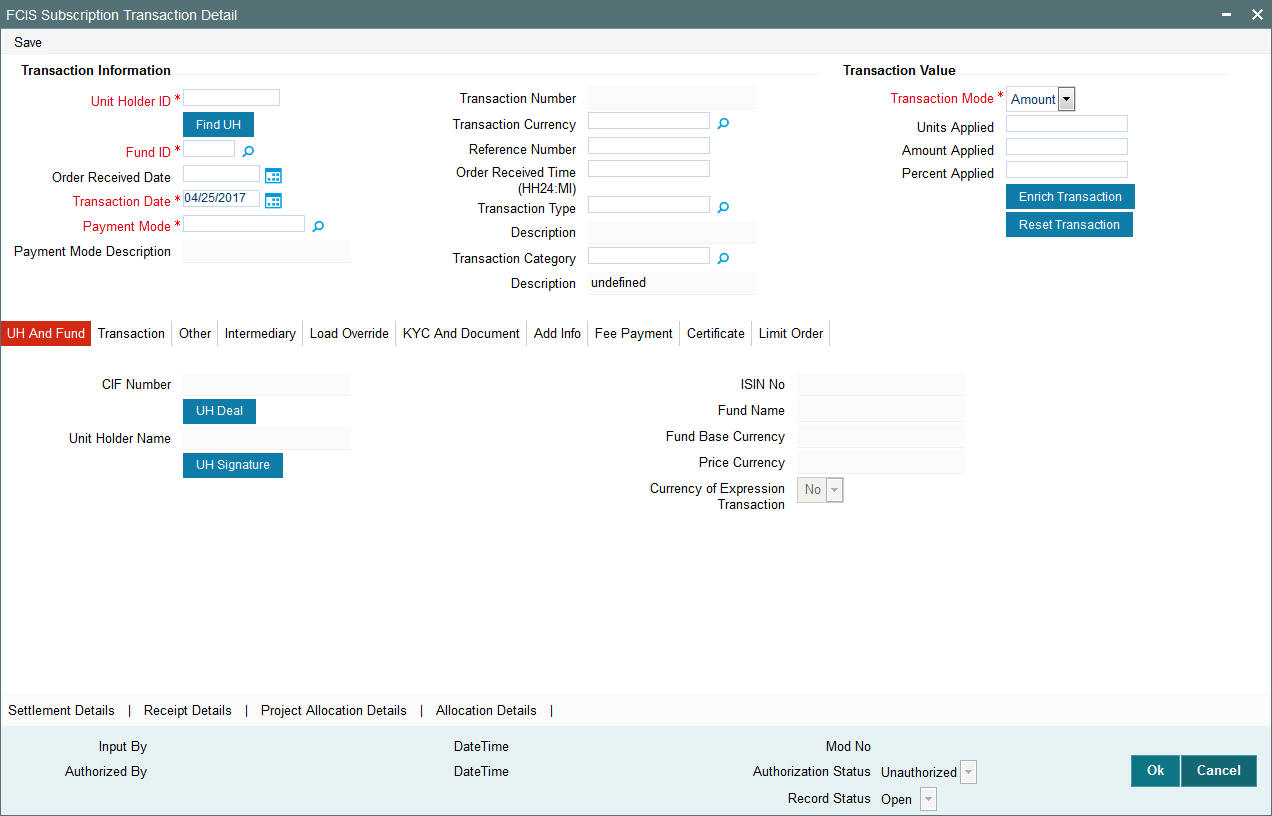
You can specify the following details:
Transaction Information
Unit Holder ID
Alphanumeric; 12 Characters; Mandatory
Specify the unit holder that has requested the transaction, in the Transaction Information section. Alternatively, you can select unit holder ID from the option list. The list displays all valid unit holder ID maintained in the system.
Provided the client country parameter is set to ‘HSBCSPECIFIC’ for your bank, the validation for settlement date being greater than or equal to the transaction date will not be carried out.
Click ‘Find UH’ button to open ‘Unit Holder Find Options’ screen. You can get the Unit holder details by entering the required values in that screen.
Fund ID
Alphanumeric; 6 Characters; Mandatory
Specify the fund ID in which the requested transaction is to be put through. Alternatively, you can select fund ID from the option list. The list displays all valid fund ID maintained in the system.
Order Received Date
Date Format; Optional
Specify the order received date.
Transaction Date
Date Format; Mandatory
Specify the order received date.
Payment Mode
Alphanumeric; 2 Characters; Mandatory
Specify the fund ID in which the requested transaction is to be put through. Alternatively, you can select fund ID from the option list. The list displays all valid fund ID maintained in the system.
Payment Mode Description
Display
The system displays the description for the mode of payment selected.
Transaction Number
Display
The system displays the transaction number.
Transaction Currency
Alphanumeric; 3 Characters; Optional
Specify the currency in which the amount value for the transaction will be reckoned. Alternatively, you can select transaction currency from the option list. The list displays all valid transaction currency maintained in the system.
The currency you select here must be one that is a valid transaction currency designated for the selected fund in the Fund Transaction Currency rule.
Reference Number
Alphanumeric; 16 Characters; Optional
Specify the reference number for the transaction. If the reference number is designated to be system-generated for the agency branch, then the Reference Number field is locked and the number will be generated by the system when you save the transaction.
Order Received Time (HH24:MI)
Time Format; Optional
Specify the order received time.
Transaction Type
Alphanumeric; 1 Character; Optional
Select the transaction type. In case for a particular transaction type restriction is ‘Not Applicable’, then the system will display an error message as ‘STOPACCOUNT is issued for ‘Transaction Type’ to this Unit Holder’.
Description
Display
The system displays the description for the selected Transaction type.
Transaction Category
Alphanumeric; 1 Character; Optional
Specify the type of transaction. Alternatively, you can select transaction category from the option list. The list displays all valid transaction category code maintained in the system.
Description
Display
The system displays the description for the selected transaction category.
This field is enabled after you click ‘Enrich’ button.
Transaction Value
Transaction Mode
Mandatory
Select the transaction mode from the drop-down list. Following are the options available in the drop-down list:
- Amount
- Units
- Percent
Units Applied
Numeric; 27 Characters; Optional
Specify the units applied details.
You can specify the details in this field only if you have selected ‘Transaction Mode’ field as Units. Else, while clicking ‘Enrich Transaction’ button, the system will display an error message.
Amount Applied
Numeric; 27 Characters; Optional
Specify the amount applied details.
You can specify the details in this field only if you have selected ‘Transaction Mode’ field as Amount. Else, while clicking ‘Enrich Transaction’ button, the system will display an error message.
Percent Applied
Numeric; 27 Characters; Optional
The system displays the percent applied details.
Specify the percent applied details.
You can specify the details in this field only if you have selected ‘Transaction Mode’ field as Percent. Else, while clicking ‘Enrich Transaction’ button, the system will display an error message.
After entering all details in Transaction Information section click on ‘Enrich Transaction’ button. The list of transactions applicable for the Unit Holder selected is defaulted in UH and Fund section.
On click of ‘Enrich Transaction’ button all the header fields will be disabled. Clicking ‘Enrich Transaction’ button during the transaction input, the system will remove all the entered details except the header data entered and re-open all the fields to capture new transaction.
Click ‘Reset Transaction’ button to reset the entire transaction during transaction input, modification and amendment.
For transaction modification/amendment, you can query the transaction and on clicking ‘Reset Transaction’ button, all the transaction details can be modified without changing the transaction number.
For any modification/amendment in any of the primary field including Fund ID or Transaction Date, you need to click ‘Reset Transaction’ button. Using this option, the system will clear all the entered details except the header data entered and re-open all the fields to capture new details.
The reset function does clearing of all the data with the same transaction number. The system will display an override message. Hence all the data needs to be provided again if reset is clicked.
The following primary fields will be enabled for modification and Amendment of the transaction:
- Order Received Date
- Order Received Time
- Transaction date
- Fund ID
- Transaction Currency
- Unitholder ID
- Reference number
- Transaction mode
- Amount applied
- Units applied
- Percentage applied
- Payment mode
- Transaction type
- To Fund ID
- To Unitholder ID
- Subscription fund ID
For any change/ modification or amendment in the above primary fields in transaction screens, system will re-populate the transaction screen and linked dependent fields details on enrich of the transaction.
During transaction input/modification or amendment, if you override the details, system will retain the user override data for transaction entry/save. However, post overriding the details/value if you change any of the primary fields, the system will re-populate the transaction screen with latest details.
The linked dependent details will include Settlement Date, Settlement Due Date, Price Date, Load details and Dealing Date.
The system will default the Settlement date/due date, Price date, dealing date on enrich/save of the transaction only if the previous calendar year is maintained in the system.
Note
- This is not applicable to transactions captured through any other function/UI/channels/uploads.
- If UBS integration is enabled then system will disallow all the above modification or changes and pertaining to the changes proposed. The ‘Reset Transaction’ Button will be disabled, if UBS- Integration is enabled
4.8.2 UH And Fund Tab
Click ‘UH And Fund’ tab in FCIS Subscription Transaction Detail screen.
Click ‘UH Signature’ button to upload the image.
Click on the UH Deals tab to view the details of all the deals set up for the unit holder. Enter the relevant search criteria in the Find Options screen. The system will display the records that match the search criteria you have specified.
By Clicking on Enrich transaction button information is defaulted in the UH and fund section. If the selected investor is eligible for tax-exemption, select the tax product in which the investor wishes to purchase units, in the Product ID field. When you select the product, you are indicating to the system that this transaction will affect the used up amount of the non-taxable limit set up for the selected unit holder in the Non-Tax Limits Setup options.
The system will display the following values:
- ISIN No
- Fund Name
- Fund Base Currency
- Price Currency
- Currency of Expression Transaction
4.8.3 Transaction Tab
Click ‘Transaction’ tab in FCIS Subscription Transaction Detail screen
![]()
You can specify the following details:
Gross or Net
Optional
Select the net value exclusive of the loads from the drop-down list. The list displays the following values:
- Gross
- Net
Communication Mode
Alphanumeric; 2 Characters; Mandatory
Specify the communication mode through which the transaction request was communicated. Alternatively, you can select mode of communication from the option list. the list displays all valid communication mode maintained in the system.
Delivery Option
Optional
Select the delivery option from the drop-down list. The list displays the following values:
- Investment Account
- Clearing Account - Against Payment
- Clearing Account - Free of Payment
- Delivery to Custodian
- Physical Delivery
- PUEV
Clicking ‘Details’ button, the ‘Delivery Details’ window will be opened, where in you can enter the following details:
Delivery Type
Optional
Select the type of delivery from the drop-down list. Following are the options available:
- Self
- Third Party
Address Type
Alphanumeric; 2 Characters; Optional
Specify the type of address. Alternatively, you can select address type ID from the option list. The list displays all valid address maintained in the system.
BIC Code
Alphanumeric; 12 Characters; Optional
Specify the BIC code.
Address Line 1-2
Alphanumeric; 80 Characters; Optional
Specify the residing address of the customer.
City
Alphanumeric; 80 Characters; Optional
Specify the residing city code.
State
Alphanumeric; 80 Characters; Optional
Specify the name of the residing state.
Zip Code
Alphanumeric; 10 Characters; Optional
Specify the zip code of the residing area.
Country
Alphanumeric; 3 Characters; Optional
Specify the residing country code.
Exchange Rate Details
Source ID
Alphanumeric; 6 Characters; Optional
Specify the source ID. Alternatively, you can select source ID from the option list. The list displays all valid source ID maintained in the system.
Amount Applied
Display
The system displays the amount applied details.
FX Deal Date
Date Format; Optional
Specify the FX deal date.
Exchange Rate Applied
Display
The system displays the exchange rate applied details.
Override Exchange Rate?
Optional
Select if exchange rate applied has to be overridden from the drop-down list. The list displays the following values;
- Yes
- No
FX Value Date
Date Format; Optional
Specify the FX value date.
Interest Details
Interest
Alphanumeric; 30 Characters; Optional
Specify the interest details.
Interest (FBC)
Display
The system displays the fund base currency interest details.
Clicking ‘Details’ button, ‘Interest Details’ window is displayed. You can specify the following details:
Calculation Type
Optional
Select the calculation type from the drop-down list. The list displays the following values:
- Simple
- Compound
Amount
Numeric; 18 Characters; Optional
Specify the amount details.
Deposit Date
Date Format; Optional
Specify the deposited date.
Interest Calc. Days
Display
The system displays the calculated interest days.
Interest Amount
Display
The system displays the interest amount.
Basis Days
Optional
Select the basis days from the drop-down list. The list displays the following values:
- 360
- 365
Total Interest Amount
Display
Specify the total interest amount details.
After specifying all the necessary details, click ‘Calculate’ button to calculate the interest details. Click the Calculate button. The system obtains the applicable exchange rate for the application date and computes the equivalent of the transaction value in the fund base currency. This value is displayed in the Amount in Fund Base Currency field. The applied exchange rate is also displayed in the Override Exchange Rate field.
Dilution Levy Processing
To arrive at the dilution levy breach limit the outflow breach factor is considered. (Fund Corpus * Outflow Breach Factor < Net Amount in FBC). Dilution Levy limit breach is validated against the gross transaction amount. If the gross transaction amount exceeds the dilution levy breach limit, then a warning message is displayed by the system. The dilution levy breach limit amount can be overridden at the transaction level. The overridden value is considered only if the transaction attracts dilution levy.
An EOD batch computes the aggregated net transaction amount at unit holder, fund and transaction type level. This batch is schedules before the allocation process. If the gross aggregated amount for Unit Holder, Fund and Transaction type combination is identified breaching, then a dilution levy fee is applied on all transactions of that fund, Unit Holder, and transaction type combination.
4.8.4 Others Tab
Click ‘Other’ tab in the FCIS Subscription Transaction Detail screen
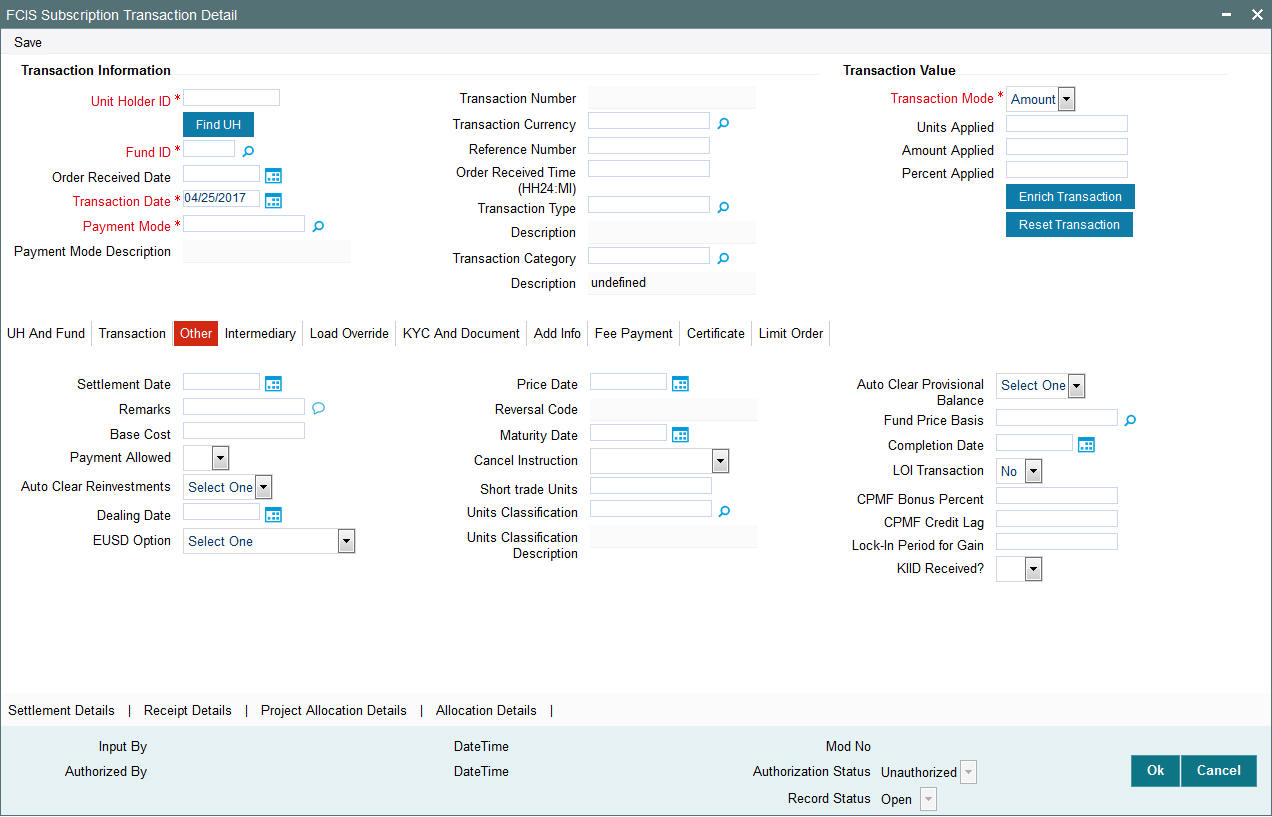
You can specify the following details:
Settlement Date
Date Format; Optional
Specify the settlement date.
Remarks
Alphanumeric; 255 Characters; Mandatory
Specify remarks, if any.
Base Cost
Numeric; 6 Characters; Optional
Specify the base cost details.
Payment Allowed
Optional
Select if payment allowed is or not from the drop-down list. The list displays the following values:
- Yes
- No
Auto Clear Reinvestments
Optional
Select if reinvestment details should be automatically cleared or not from the drop-down list. The list displays the following values:
- Yes
- No
Dealing Date
Date Format; Optional
By default, the dealing date is derived based on the dealing date maintained for the fund in the Specific Fund Price Date Setup screen. The date displayed here can be altered, if required, and you can specify the requisite dealing date. Dealing date will not be displayed on the screen if it is not maintained for a fund or the fund is not a specific price date fund. System will default the transaction date as the dealing date.
If you have defined a different trade cycle for the fund in the ‘Override Trade Cycle Date’ screen and the transaction falls within the override period mentioned in this maintenance, the system will default the dealing date from the maintenance.
Refer the chapter ‘Other Fund Activities’ in the Fund Manager User Manual for more details on maintaining alternate trade cycles for a fund
EUSD Option
Optional
Select the EUSD option from the drop-down list. The list displays the following values;
- With Holding Tax
- Exchange of Information
- Tax Exemption Certificate
Price Date
Date Format; Optional
The field From Price Date is enabled when you select the fund in which the requested transaction is to be put through. The fund should be one for which you have specified forward pricing is applicable. The price date is arrived at by taking into consideration several conditions. This is explained in the section ‘Defaulting of Price Dates in the Transaction’ Screens in this chapter. You can modify this field.
If you have defined a different trade cycle for the fund in the ‘Override Trade Cycle Date’ screen and the transaction falls within the override period mentioned in this maintenance, the system will default the price date from the maintenance.
Reversal Code
Display
The system displays the reversal code.
This field is only available during transaction amendment, and you can use it to capture the appropriate rejection code, if any, for the amendment. The codes available in the option list are specific to the transaction type being amended.
Maturity Date
Date Format; Optional
If the fund in which the transaction is being put through is a closed-end fund, then specify the maturity date for the transaction in the Maturity Date field. This field is only applicable for AMCs that have opted for the maturity date facility.
Note
In case of block transactions, enter the maturity date of the block transaction. If the system date is equal to or greater than the date specified here, and the Auto generate Unblock option is checked then system generates an automatic unblock transaction on the date specified here. If the maturity date falls on a holiday, then the unblock transaction will be generated on the next working day.
Cancel Instruction
Optional
Select the cancel instruction from the drop-down list. The list displays the following values:
- Standing Instructions
You can use this field to indicate whether standing instructions defined in respect of a unit holder, in the selected fund, are to be cancelled. If you select this option, all standing instructions for the transaction is cancelled, including those that are to be generated after an automatic redemption occurs. Select the ‘Standing Instruction’ option in this field to indicate cancellation of standing instructions.
If this option has been chosen in the General Operating Rules for the fund, the automatic redemption process generates redemption transactions for unit holders in the fund, with the ‘Cancel Instruction’ option automatically set.
If this option has been set for the transaction in this field, the End of Day process cancels all standing instructions (irrespective of the transaction type) for the unit holder in the fund after the outflow transactions (redemption, switch and transfer) involving the unit holder have been allocated for the day.
Note
Reversal or amendment of an outflow transaction for which Cancel Instruction has been set to ‘Standing Instruction’, would re-instate the standing instructions.
Short Trade Units
Numeric; 27 Characters; Optional
Specify short trade units.
Units Classification
Alphanumeric; 3 Characters; Optional
Specify the units classification in which the units have to be linked. Alternatively, you can select units classification from the option list. The list displays all valid units maintained in the system.
This field is applicable only for onshore funds with ‘USERMNTFIFO’ ageing logic. The system will validate the same during save of the transactions.
Units Classification Description
Display
The system displays the description for the selected unit classification code.
Auto Clear Provisional Balance
Optional
Select ‘Yes’ option to indicate that 100% outflow transaction should include provisionally allotted units. This option will be enabled if the transaction mode is ‘Percent’ and the transaction value is ‘100’.
Fund Price Basis
Alphanumeric; 6 Characters; Optional
Specify the fund price basis details. Alternatively, you can select fund price basis details from the option list. The list displays all valid fund price basis maintained in the system.
Completion Date
Date Format; Optional
The date on which the transaction is completed.
LOI Transaction
Optional
Select the status of LOI transaction
If the unit holder that is subscribing to the fund through IPO is designated as a Letter or Intent investor, then specify if the present transaction is to be deemed and processed as a Letter of Intent transaction.
This specification is only applicable for LOI unit holders that are transacting in a fund in a group for which LOI is deemed as allowed.
This specification is only applicable for LOI unit holders that are transacting in a fund in a group for which LOI is deemed as allowed.
CPMF Bonus Percent
Numeric; 30 Characters; Optional
Specify the percentage of CPMF bonus.
By default, the CPMF Bonus percentage is displayed here which is arrived at based on the fund CPMF preference. If CPMF Bonus Type is 'Fixed', Percentage cannot be modified during the transaction input i.e., Bonus is credited on the lag EOD activity. Details regarding CPMF Preference are explained in the section ‘Maintaining Fund CPMF Preferences’ in the Fund Manager module.
CPMF Credit Lag
Numeric; 4 Characters; Optional
Indicate the lag for the CPMF bonus to be credited.
Lock-in Period for Gain Days
Numeric, 4 Characters; Optional
The default lock-in period for the funds where IOF/IRRF are applicable is defaulted here. This can however be modified.
Note
Reversals are not allowed post allocation. However if there is any judicial blocking (partial or full) or the subscription is partially redeemed the reversals will not be allowed.
KIID Received?
Optional
Select if the transaction is KIID compliant or not from the drop-down list. The list displays the following values:
- Yes
- No
The system will default the KIID compliant at the transaction level upon the selection of the Unitholder and Fund in the transaction screens. If the ‘UCITS Fund’ at the Fund level is ‘Yes’ and the UH mapping to the Fund in the ‘UH KIID Compliance’ tab is ‘NO’ then at the transaction level, the system will default the ‘KIID Complaint’ to ‘No’.
If the KIID Received is set to ‘No’, the system display an error message while saving the transaction as ‘The Unit holder has not received the KIID’.
If the flag is set to ‘YES’ there will be no error message and treated as if the UH has received the KIID. The system will always look at the latest UCITS fund mapping maintained at the UH level.
If the transaction is being done in a fund which is not a UCITS Fund then the field KIID received at transaction level will be defaulted to Blank. You cannot change this option to either a Yes or No at the transactions level if it is not a UCITS Fund.
The business user can change the KIID Compliant flag at the transaction from ‘No’ to ‘Yes’ and proceed with the transaction capture but visa versa is not possible. The record at the Unit Holder level will however not get updated. You will have to manually update the same.
In case of backdated transactions, if transaction date is less than effective date, system will default the KIID Compliant field to ‘No’ and then you need to manually override it.
4.8.5 Intermediary Tab
Click ‘Intermediary’ tab in the FCIS Subscription Transaction Detail screen
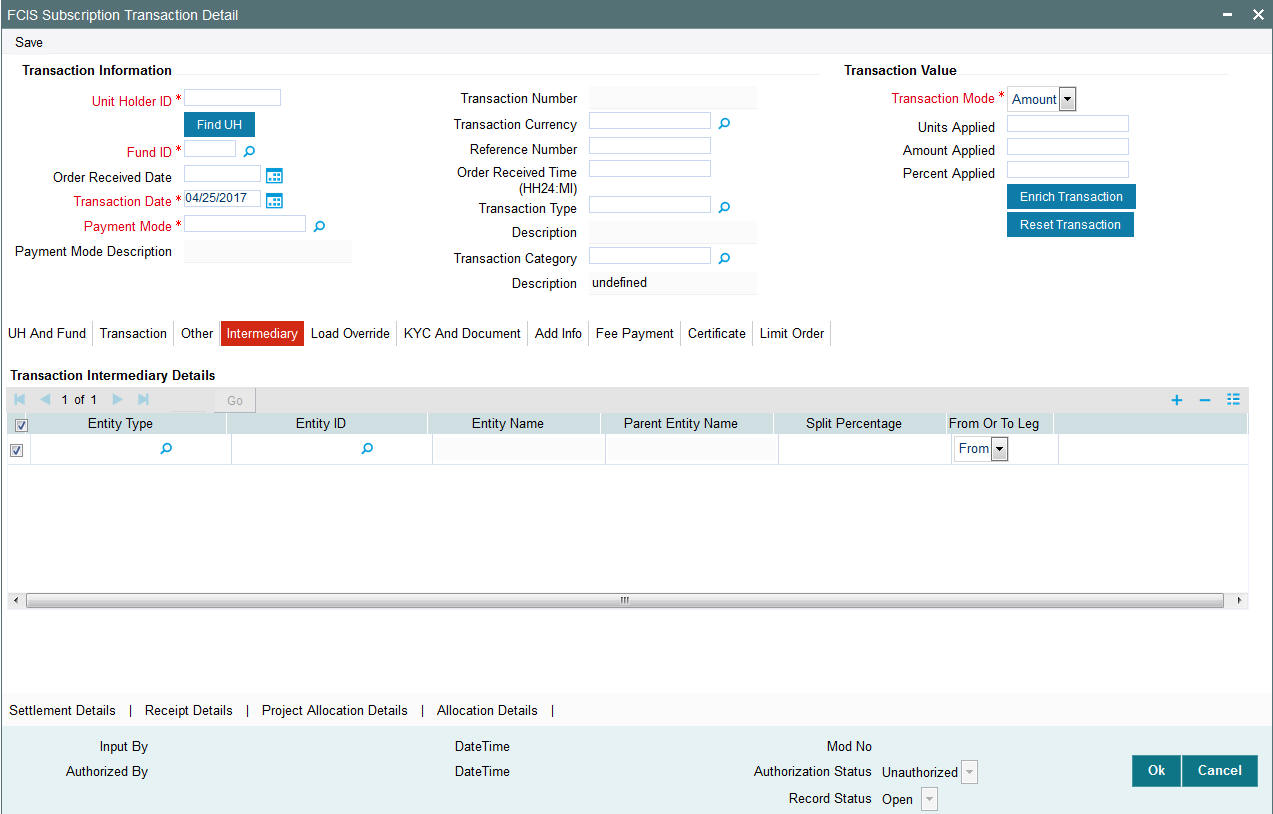
If an entity has been identified as an intermediary for the transaction, then you must identify the same in this section, along with the commission percentage split for an entity.
Entity Type
Alphanumeric; 1 Character; Optional
Select the entity type that has been identified as the intermediary for the transaction.
Entity ID
Alphanumeric; 12 Characters; Optional
For each entity type, specify the intermediary in this field. The name of the selected intermediary is displayed in the Entity Name field.
While entering a transaction, system will default the intermediary specified here. However, you can override the defaulted value.
Entity Name
Display
When you select the broker code, the name of the broker is displayed.
Parent Entity Name
Display
When you select the broker code, the name of the parent broker for the selected broker is displayed.
Split Percentage
Numeric; 5 Characters; Optional
Specify the percentage of total commission that is to accrue to the selected broker. The sum of all the percentages specified for any brokers identified for the transaction must equal one hundred percent.
From or To Leg
Optional
Specify the from or to leg details.
4.8.6 Load Override Tab
Click ‘Load Override’ tab in the FCIS Subscription Transaction Detail screen.
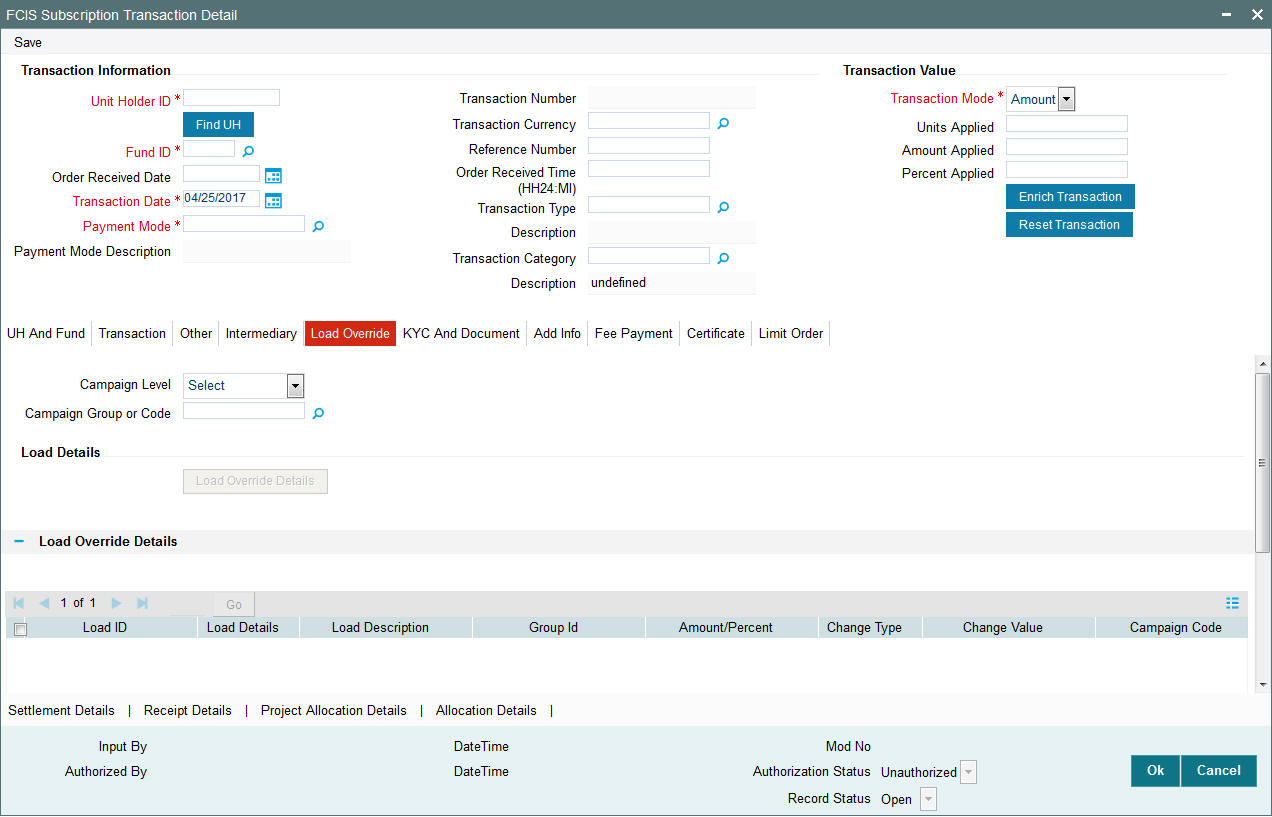
In this section, you can override or alter the value of any load (including derived loads, if any) mapped to the selected fund and applicable for the transaction type, which is to be computed at the time of allocation. The frequency of computation for such loads would be "allocation".
This section is only enabled for funds that have allocation time loads mapped to them as applicable for the transaction type.
Campaign Level
Optional
Select the campaign level from the drop-down list. The list displays the following values:
- Campaign Code
- Campaign Group
By default, campaign code will be selected.
Campaign Group or Code
Alphanumeric; 6 Characters; Optional
Specify the campaign group or code to show the result based on Campaign Level selected. Alternatively, you can select campaign code from the option list. The list displays all valid campaign code maintained in the campaign maintenance.
While saving the transaction, if you have selected Campaign Level as ‘Campaign Group’ and Campaign Group is mentioned in Campaign Code option list, then the system will evaluate the best rate for investor during save of transaction and will tag the campaign against the transaction.
If campaign Level is ‘Campaign Code’, then the system will tag the campaign while saving the transaction.
You can link the campaign to the subscription and switch transaction type of standing instruction. Specify the campaign to be mapped. You can also select the campaign code from the option list.
Note
Campaign is applicable only for subscription /Switch screens only.
If you click ‘Load Override Details’ button, the system defaults the load details. If you do not click this button, then the system will not default even if the fund has load. In this case, load will get computed during allocation only.
Load ID
Display
The ID of the allocation time load that has been mapped to the fund for the transaction type is displayed here. The load ID is displayed as a link. To view details of the load, click the ID link.
If a derived load has been mapped, it is also displayed here and can be overridden.
Load Details
Display
The system displays the load details.
Load Description
Display
The description of the allocation time load that has been mapped to the fund for the transaction type is displayed here.
Group ID
Display
The system displays the group ID.
Amount Percent
Display
The type of the allocation time load that has been mapped to the fund for the transaction type is displayed here. The ‘type’ of the load refers to the base value upon which the load is applied. There are two possible types – amount-based loads, and percentage-based loads.
Change Type
Display
When you override or alter an allocation time load at the time of entering a transaction, you can effect the change in any of the following ways:
- Discount (reducing the load return value in all the slabs)
- Increase (increasing the load return value in all slabs)
- Return Value (assigning an altered return value that will be applicable to all the loads)
Change Value
Display
The system displays the change value details.
Campaign Code
Display
The system displays the campaign code.
Campaign Load ID
Display
The system displays the campaign load ID details.
Project Return Value
Display
The system populates the return value from the load setup.
If the UH Deal maintained is same for Unit Holder, Load and Fund Setup then overridden value from UH Deal is displayed.
If there are criteria based loans in UT transactions, the criteria is evaluated and only loads applicable for the transaction is displayed.
You can view the applicable loads and projected return values by clicking ‘Enrich Transaction’ in the transaction screen.
The system uses the projected return value for load amount computation and also to compute the net amount to AMC while generating GO
In LEP transactions, if there are criteria based loads, the criteria is evaluated during UT transaction generation and it will be used during allocation.
Derived Load Override Details
The system displays the following values:
- Load ID
- Parent Load ID
- Load Description
- Change Type
- Change Value
4.8.7 KYC and Document Tab
Click on ‘KYC and Document’ tab in the ‘FCIS Subscription Transaction Detail’ screen.
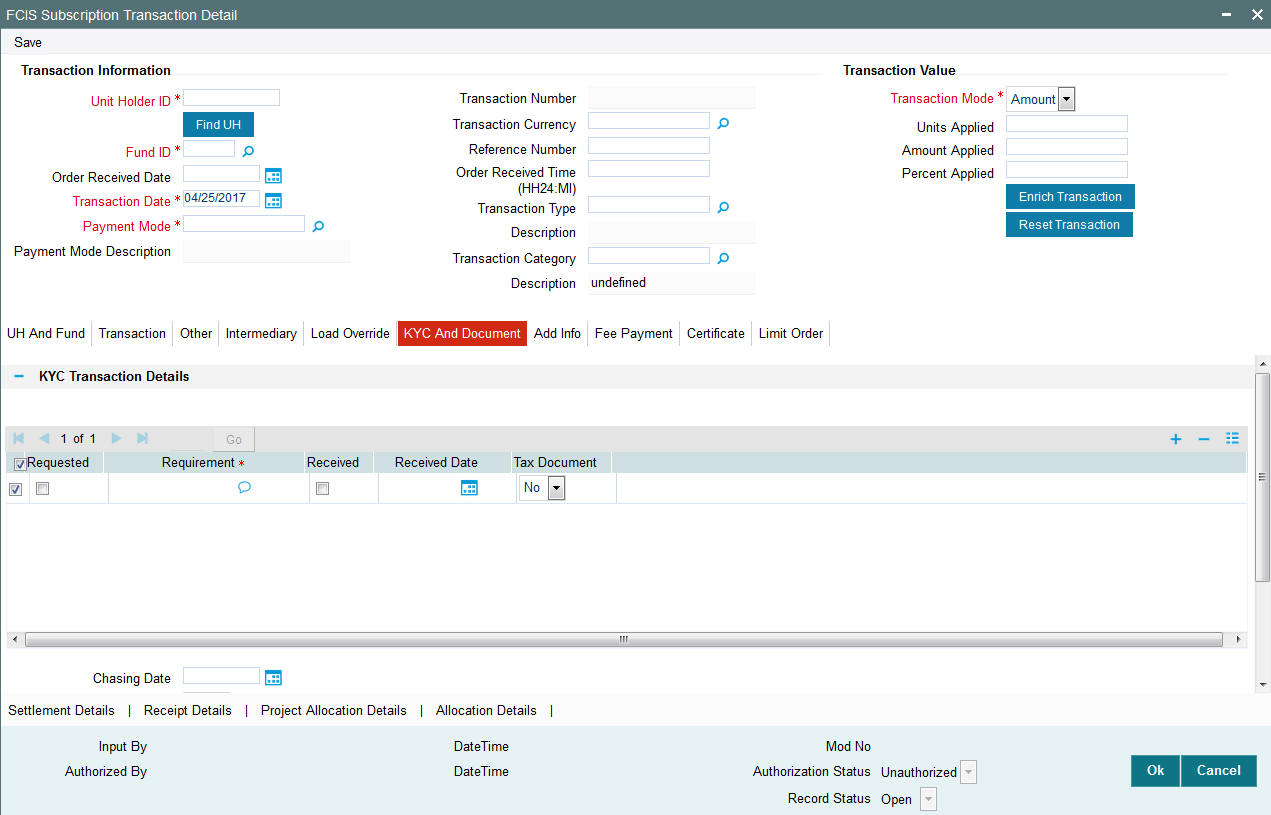
KYC Transaction Details
Requested
Optional
Check this box to indicate KYC details are requested.
Requirement
Alphanumeric; 255 Characters; Mandatory
Specify the list of KYC documents required for the unit holder.
Received
Optional
Check this box to indicate KYC details are received.
Received Date
Date Format; Optional
Specify the date on which the documents are received from the investor.
Tax Document
Optional
Select if tax document is required or not from the drop-down list. The list displays the following values:
- Yes
- No
Chasing Date
Date Format; Optional
Specify the date on which the document chasing is initiated, if the investor has not completed the KYC requirements.
KYC Received
Optional
Select if KYC is received or not from the drop-down list. The list displays the following values:
- Yes
- No
Document Details
Document ID
Alphanumeric; 25 Characters; Optional
Specify the document ID.
Document Type
Alphanumeric; 4 Characters; Optional
Specify the document type.
Type Description
Alphanumeric; 255 Characters; Optional
Specify the description for the type of document.
If during a subscription or IPO transaction, the inflow amount is greater than the maximum amount for Tax Id, system verifies if the unit holder has a Tax ID maintained (PAN). If PAN is not specified, system verifies Tax Document in KYC.
The system checks if the current transaction is an initial purchase or a subsequent one - based on the actual transactions carried out by the UH. In the case of an initial purchase, the system allows you to save an IPO transaction even if the UH has not met the KYC requirements.
Note
If no list has been maintained for this transaction, you may still record the KYC list for the transaction as well as the unit holder. If KYC list is not maintained for your installation, system will consider the documents as submitted by default.
Clicking on ‘UH KYC Details’ button, the system displays all the KYC details available for the UH.
The details are populated from Unit Holder Maintenance screen (UTDUH).
If any KYC document is received then it can be marked at transaction KYC detail as ‘Received’. However, you should update the UH maintenance screen for the KYC documents received. If the KYC received at transaction level is ‘Yes’ with some KYC documents and all KYC received at UH level is ‘No’, then the system will display a warning message as ‘Transaction All KYC Received cannot be complete if Unit holder KYC is Incomplete’ during save of the transaction.
For further details on this screen, refer ‘KYC Details Tab’ in ‘Unit Holder Maintenance Detail’ screen (UTDUH) in Entities User Manual.
4.8.8 Add Info Tab
Click on ‘Add Info’ tab in the ‘FCIS Subscription Transaction Detail’ screen
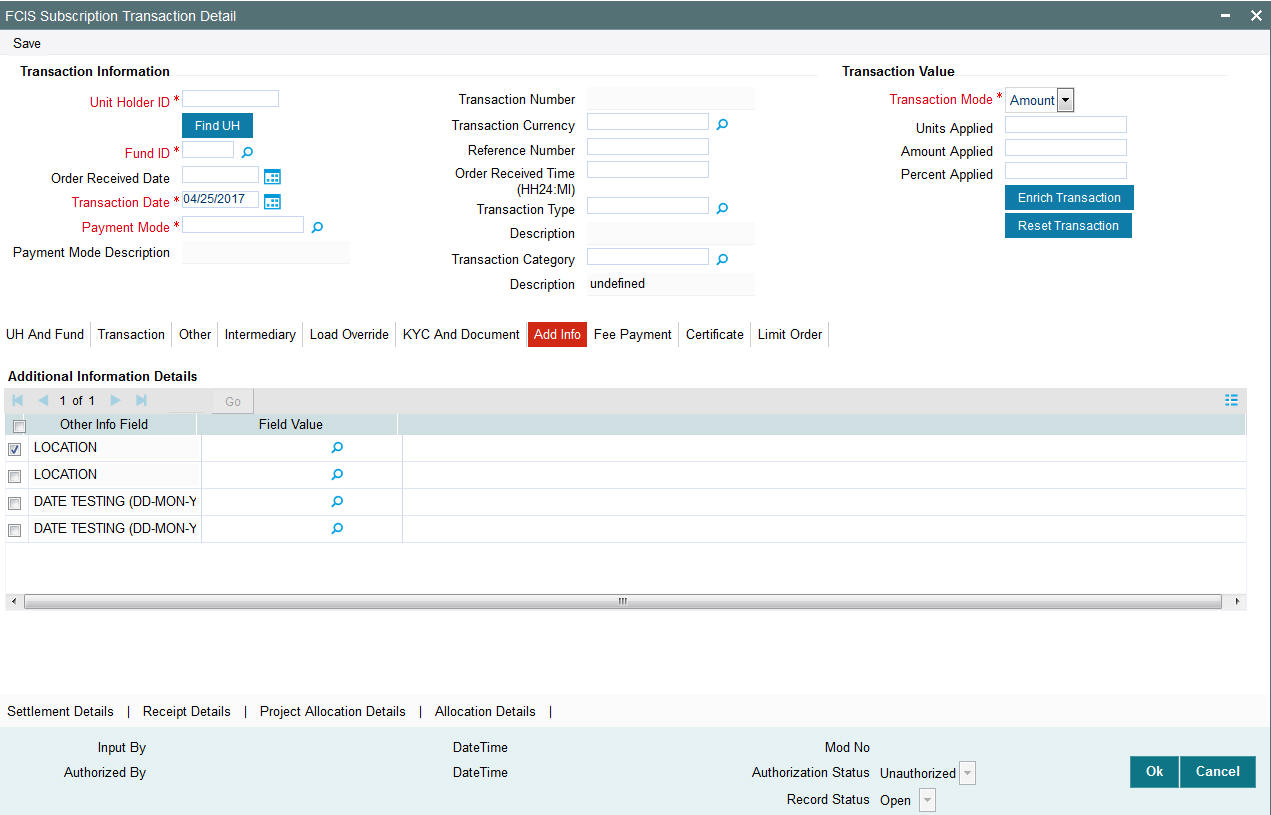
Other Info Field
Display
You can maintain additional information if any information heads have been maintained in the System Parameters, to be applicable for the segment.
Field Value
Alphanumeric; 60 Characters; Optional
The system displays the field value.
4.8.9 Fee Payment Tab
Click on ‘Fee Payment’ tab in the FCIS Subscription Transaction Detail screen.
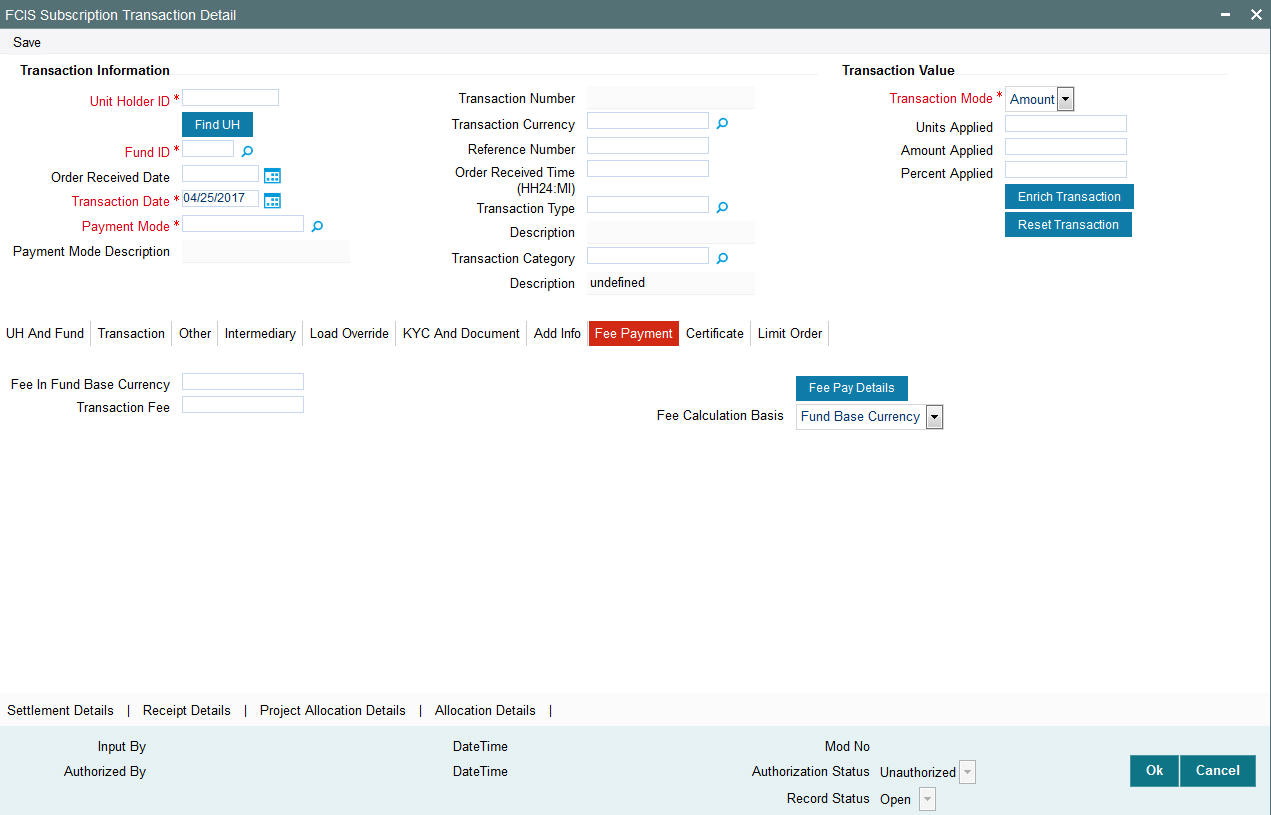
If you have selected a fund for which transaction entry charges or allocation charges (or both) are applicable, then the following fields are enabled for data entry:
Fee in Fund Base Currency
Numeric; 30 Characters; Optional
Specify the fee in fund base currency details.
Transaction Fee
Numeric; 30 Characters; Optional
Specify the transaction fee.
If a transaction entry charge or transaction time fee is applicable for the fund the transaction time fee equivalent in both fund currency and transaction currency is computed by the system and displayed.
Fee Calculation Basis
Optional
Select the fee calculation basis from the drop-down list. The list displays the following values:
- Fund Base Currency
- Transaction Currency
Click ‘Fee Pay Details’ button to specify fee payment details.
You can specify the following values:
Transaction Fee
Numeric; 30 Characters; Optional
Specify the transaction fee.
Payment Mode
Optional
Select the payment mode from the drop-down list. The list displays the following values:
- Cheque
- Transfer
- Draft
- Card
Bank
Alphanumeric; 12 Characters; Optional
Specify the bank details.
Branch
Alphanumeric; 20 Characters; Optional
Specify the branch code.
Cheque Number
Alphanumeric; 16 Characters; Optional
Specify the cheque number.
Cheque Date
Date Format; Optional
Specify the cheque date.
Transfer Branch
Alphanumeric; 12 Characters; Optional
Specify the transfer branch details. Alternatively, you can select the transfer branch details from the option list. The list displays all valid branch code maintained in the system.
Account Type
Optional
Select the type of account from the drop-down list. The list displays the following values:
- Current Account
- Fixed Account
- Loan Account
- Mortgage Account
- Overdraft Account
- PF Account
- Recurring Account
- Savings Account
- Sweeping Account
Account Number
Alphanumeric; 16 Characters; Optional
Specify the account number.
Clearing Date
Date Format; Optional
Specify the clearing date.
Account Holder Name
Alphanumeric; 100 Characters; Optional
Specify the name of the account holder.
IBAN
Alphanumeric; 40 Characters; Optional
Specify the IBAN details.
4.8.10 Certificate Tab
Click Certificate tab in the FCIS Subscription Transaction Detail screen.
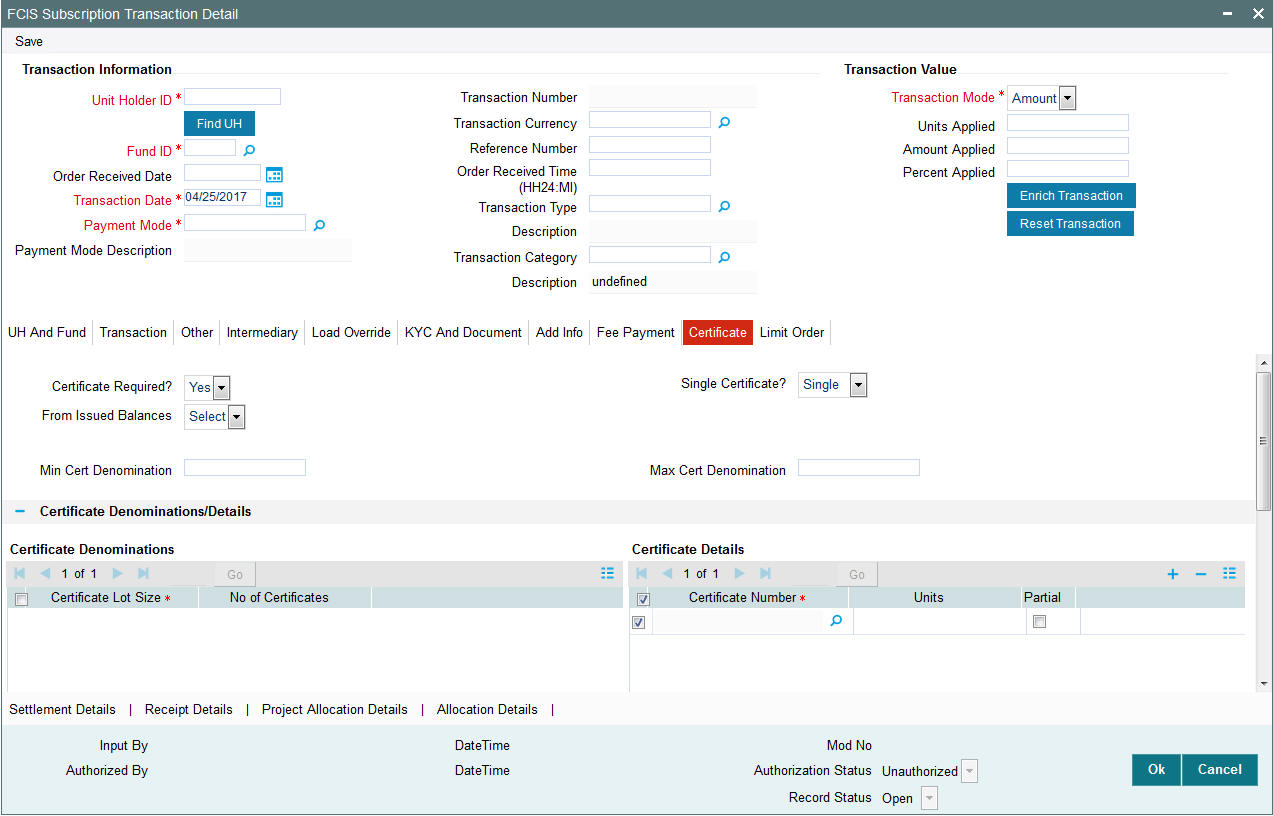
Certificate Required?
Optional
Select if certificate required or not from the drop-down list. The list displays the following values:
- Yes
- No
If the fund you have chosen is a Certificate Option fund as specified in the Shares Characteristics, and the unit holder has requested for certificates, then choose ‘Yes’ in the Certificate Required field.
Single Certificate?
Optional
Specify whether a single certificate or multiple certificates have been requested, in the Number of Certificates field. If single certificates have been designated for the fund, you cannot specify multiple certificates here.
If you have selected a certificate option fund, then all certificate information fields are enabled. The fields are Certificate Required, Single Certificate, From Issued Balances, and Max Cert Denomination and Min Cert Denomination under Certificate Section.
From Issued Balances
Optional
Select from issued balances details from the drop-down list. The list displays the following values:
- Yes
- No
- Both
Note
From issued balance field ‘Both Option’ is not applicable for the subscription transaction.
Min Cert Denomination
Numeric; 22 Characters; Optional
Specify the minimum certificate denomination details.
Max Cert Denomination
Numeric; 22 Characters; Optional
Specify the maximum certificate denomination details.
Certificate Denominations
Certificate Lot Size
Display
The system displays the certificate lot size details.
No of Certificates
Display
The system displays the number of certificates.
Certificate Details
Certificate Number
Numeric; 10 Characters; Optional
Specify the certificate number. Alternatively, you can select certificate number from the option list. The list displays all valid certificate number maintained in the system.
Units
Numeric; 27 Characters; Optional
Specify the units details.
Partial
Optional
Check this box if partial details to be selected.
4.8.11 Limit Order Tab
Click on ‘Limit Order’ tab in the FCIS Subscription Transaction Detail screen.
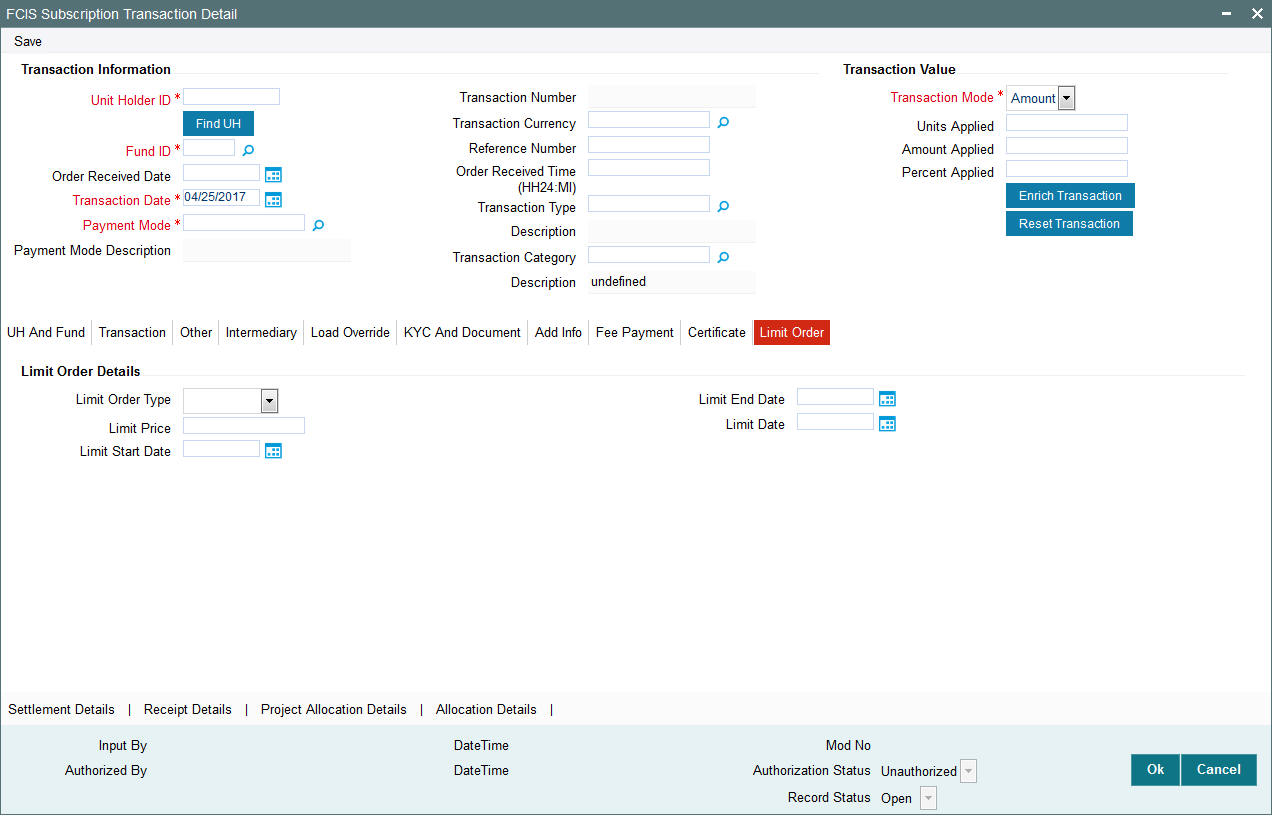
Limit Order Details
Select the ‘Limit Order for Subscription’ (buy) option in the Type of Transaction field. The Limit Order section is enabled.
Limit Order Type
Optional
Select ‘Price Based’ in the Limit Order Type field. The options available in the drop-down are as follows:
- Price-Based
- Date Based
Limit Price
Numeric; 9 Characters; Optional
Specify the price for the limit order, in the Limit Price field. This represents the price equal to or below which the transaction must be put through (for buy orders).
Limit Start and End Date
Date Format; Optional
Specify the period within which the limit order must be executed, by indicating the boundary dates, in the Limit Start Date and Limit End Date fields.
Limit Date
Date Format; Optional
To set up a date-based limit order, specify the following details in the Limit Order section:
- Select ‘Date Based’ in the Limit Order Type field.
- Specify the future date on which the limit order transaction must be executed, in the Limit Date field.
4.8.12 Settlement Details Button
Here, you can maintain settlement details only for the multi transactions. Click the ‘Settlement Details’ button to invoke the ‘Settlement Details’ screen.
For more details on this screen, refer Settlement Details Button sub section in ‘IPO Subscription Detail’ section in this User Manual
4.8.12.1 Processing Multi Transactions
To process the outflow transactions, execute the ‘Multiple Transaction Generation’ batch as part of EOD process. While processing multi transactions, settlement will take precedence over the subscription transactions to be generated (with the exception of settlement of residual). Also, while doing settlement or while generating subscription the following will be the precedence order:
- Fixed – Units (Not applicable for settlement)
- Fixed – Amount (For subscription transaction generation, both unit and amount takes same priority)
- Percentage
- Residual
The system will either create settlement entries or create subscription transactions as per the multiple transactions. Once all the redemption transactions are allocated and settled, the subscription transactions are generated by a BOD batch. If any of the redemption transaction is not allotted, then the system will not pick up the entire wrapper transaction for settlement. In this case, the subscription transaction is also not created.
Note
- Each outflow and inflow transactions are saved as separate transactions but against the same wrapper reference number
- Backdated and future date transactions are allowed only for the out flow transactions
- The transaction date for the subscription transaction will be the highest settlement date of the redemption transactions.
- The settlement details entered at the individual transaction level will be overridden by the settlement details maintained at the multi transaction level.
- Settlement for the subscription transaction will always be by cash and the redemption transaction settlement will be based on the settlement details you have maintained.
- Reversing multiple transactions is not allowed from the ‘FCIS Bulk Transaction’ screen. However, you can reverse the individual transaction from online transaction screen.
- You can modify the individual linked transaction using the online transaction screen. In this case, the system will display a warning message indicating the transaction is a linked transaction
- The sum of redemption and sum of subscription should be same, else you can select transaction mode as residual.
- When the payment mode is given as multi payment, the payment mode should be provided in settlement details
- On saving the multi transaction, if any transaction fails, the system will display an error message. However, it saves the remaining transactions. You can correct the failed transactions and save it again.
4.8.13 Receipt Detail Button
Receipt details does not support IPO Subscription transaction.
4.8.14 Project Allocation Details Button
At this stage, the transaction is ready to be saved. If you wish to see a projected picture of how the transaction would most possibly be allocated, then click the Project Allocation Details button.
You can view Dividend amount for each of the redemption transactions. This amount is the net payment amount payable along with the redemption post WHT and IDS being considered
You can view the projected allocation details only for funds in which the ageing policy is FIFO (first-in, first-out) or Transaction Receipts. If the prices are not available for subscription transactions on the transaction date, the latest available price is picked up for allocation.
For validating dilution levy breach amount, the system does a project allocation for the transaction and then calculates the net amount of the transaction.
When you request the allocation process, the system temporarily saves the transaction into temporary stores in the database and gives it a unique key string. The system then performs a ‘mock’ temporary allocation, and displays the details of the same in the Allocation Projection screen. The following allocation details are displayed:
- The Fund ID
- The Product ID
- The Unit Price for the transaction, as on the date of the temporary allocation.
- The Allocation Price
- The Gross amount in fund base currency
- The Settlement Amount in transaction currency
- The Linked Product ID
- The Load amount in fee currency
- The number of units allocated
- The Base Price
- The total load amount
- The Net amount in fund base currency
- The Settlement Amount in Price Currency
- The Linked units
- The Unit Balance
The following Load Details are displayed during the allocation:
- Fund ID
- Load ID
- Load Description
- Load Amount
- Load amount in fee currency
- VAT Amount in Fee Currency
The following Performance Fee Details are displayed during the allocation:
- Link Transaction Number
- InOutFlag
- Element Identification
- Element Description
- Value
After you have viewed the projected allocation details, click Close button to close the screen.
4.8.15 Allocation Details Button
Clicking ‘Allocation Details’ button, the Allocation screen is displayed:
Allocation Details
The following Allocation details are displayed:
- Fund ID
- Allocation Date
- Alloted Units
- Unit Price
- Confirmed Units
- Settlement Amt Txn Ccy
- Gross Amt In FBC
- Net Amt In FBC
- Settlement Amount in Price Currency
- Rejected Units
- MMF Dividend Amount
- Tax Income Per Share
- EUSD Gain
Switch-In Allocation Details
The following Switch-in allocation details are displayed:
- To Fund ID
- Allocation Date
- Allotted Units
- Unit Price
- Confirmed Units
- Settlement Amount Transaction Currency
- Gross Amount in FBC
- Net Amount in FBC
- Rejected Units
Load Details
The following Load Details are displayed during the allocation:
- Fund ID
- Load ID
- Load Description
- From Entity Type
- To Entity Type
- From Entity
- To Entity
- Load Amount
- Load Amount in Fee Currency
Performance Fee Details
The following Performance Fee Details are displayed during the allocation:
- Link Transaction Number
- In Out Flag
- Element Identification
- Element Description
- Value
Transaction Component Details
The following Transaction Component Details are displayed during the allocation:
- Offer Price
- Bid Price
- Share Capital
- Income
- Fund Capital
- Share Premium
- Switch In Bid Price
- Switch In Offer Price
- To Fund Capital
CGT Deduction Details
The following CGT Deduction Details are displayed during the allocation:
- Unit Holder/ Joint Unit Holder ID
- Unit Holder/ Joint Unit Holder Name
- Tax Amount
4.8.16 Saving the transaction
At this stage, you can save the transaction by clicking the Save button at the bottom of the Transaction Information Section. The transaction is saved, and the system generated transaction number (and the reference number, if any) is displayed.
The system will validate the following if CPMF is applicable for the fund involved in the transaction:
- Transaction amount should be greater than the minimum amount for CPMF
- Mode of payment is Money transfer
- The subscription is Gross-Amount based
- Only one bank account is maintained in the payment details.
- The account type of the transfer account is an eligible account type
- In case 'Credit on Outflow' is ‘No’, and if there is any redemption linked to this subscription before credit date (barring any interim taxation), crediting will not happen.
- CPMF percentage and Lag cannot be modified for System generated authorized transactions.
- In Subscription screen, If Lag basis is 'Trigger based', Lag will be defaulted to '-1' and cannot be changed. If Lag basis is 'Transaction date', lag will be 0.
Note
If the Auto-authorization feature is enabled for the Save operation for the AMC ID, then the transaction is saved as an authorized transaction. If not, it is saved as an unauthorized transaction. In either case, the Transaction Number is generated and displayed when you invoke the Save operation.
4.8.16.1 Viewing Balance Holdings of a Unit Holder
You can view the available fund balance details of a unit holder. For this, click the ‘View Balance’ button in the ‘FCIS Subscription Transaction Detail’ screen. The ‘Investor Fund Balance Summary’ screen is displayed in view mode displaying the unit holder fund balance details.
4.8.17 Transaction Processing Logic for Currency of Expression Funds
The system defaults the UH currency of expression in the ‘Transaction Currency’ field, if available, during transaction capture based on UH and fund combination.
If there is no UH currency of expression maintained in UTDUHCOE, then FBC will be defaulted in the ‘Transaction Currency’ field. If the transaction is processed, then upon authorization of the transaction FBC will be defaulted as UHCOE at the UHCOE maintenance (UTDUHCOE). The defaulted currency of expression in the UHCOE maintenance will be as system user.
If there is no UHCOE maintained in UTDUHCOE, then FBC will be defaulted in the ‘Transaction Currency’ field (Transaction capture) and if you override this defaulted currency to one of the FPC (from the fund level new) then upon authorization of the transaction FPC will be defaulted as UHCOE at the UHCOE maintenance.
If there is no UHCOE maintained in UTDUHCOE, then FBC will be defaulted in the ‘Transaction Currency’ field and if you override this defaulted currency to neither FBC/FPC, then upon authorization of the transaction FBC will be defaulted as UHCOE at the UHCOE maintenance.
Following are the system behaviour in case there is an unauthorized or a modified and unauthorized UHCOE maintenance:
Case 1: You need to input a transaction when there is an unauthorized UHCOE maintenance. During transaction input there is not UHCOE to be defaulted as the maintenance is still in unauthorized status. Hence as per logic Fund base currency defaults during transaction capture and this fund base currency will not get defaulted to UHCOE maintenance. Once the UHCOE maintenance is authorized then defaulting will happen during transaction capture.
Case 2: Authorized UHCOE is modified which is still in unauthorized status. In this case if you input a transaction, then the new modified UHCOE will get defaulted during transaction input.
4.8.17.1 FX Logic
The FX rate will not be considered between transaction base currency and fund price currency for currency of expression fund transactions if they are same. This is applicable for subscriptions, redemptions and switch (normal and pseudo) transactions.
The system will use the transaction price currency to get the load; and after applying the load, the net amount and gross amount will get calculated in fund price currency and FBC as well. The currency of expression factor is applied to derive values in fund base currency. The net, gross and load amount will be calculated in currency of expression for a currency of expression transaction and using the COE factor the same is stored in fund base currency only. For a transaction placed using one of the fund price currency; in the project allocation/allocation tab, the load amount in fee currency and vat amount in fee currency field will display the value in fund price currency only irrespective of the fee calculation basis value of the transaction.
For currency of expression transactions the exchange rate applied field during transaction capture will be defaulted to ‘1’. If you change it, then while saving, the system will display warning message as ‘This is a currency of expression transaction and exchange rate will be defaulted to 1 by the system’. This message is shown if do not click the ‘Enrich’ button after changing the exchange rate. The amount applied field will show the values in fund base currency.
If you change the exchange rate and click ‘Enrich’ button, then the system default the value to ‘1’ while saving without any warning message.
Note
The rounding precision for fund price currencies will be base price.
If the transactions are posted using fund price currencies then the system computes the load amount, net and gross amount in FBC using the COE factor. The display of these fields is mandatory fields that are to be computed as part of core allocation process. The exchange rate field will show default value as 1 in this case as COE factor is applied.
If there is no price available for the fund price currency during transaction input, the system will use the par value to arrive at the price. While saving the transaction, the system will display an override message as ‘Price not available for the price currency and the system will use the par value for the transaction’. If you continue, then the system will use the par value for processing the transactions. The unit price in project allocation will display FPC price. This logic will be for project allocation but during menu allocation or batch allocation, if the price is still not available, then the transaction will not be allotted.
4.8.17.2 Processing Unit Holder Currency of Expression
You can select Fund Base currency as currency of expression. There will be no restriction in changing/ amending the currency of expression any number of times against an UH and fund combination.You can maintain only one currency as currency of expression for a UH- Fund combination.
If a UH is closed and reopened then the corresponding action will not happen for the unit holder currency of expression maintenance. The UHCOE maintenance will get closed once the UH is closed but you have to manually reopen the currency of expression for the unit holder fund combination. In case, you do not reopen the UHCOE maintenance after UH reopening, and simultaneously input a transaction, then the system will not apply COE defaulting logic at UHCOE maintenance as there is already a record available for reopen.
Note
After maintaining the unit holder currency of expression, if one of the FPC is removed (at the fund level) and that currency is UHCOE for a UH, then defaulting at transaction capture will happen but the price currency/COE logic will not happen for the fund, it will be a case where TBC≠FBC or FPC (this will be a normal cross currency case). At the UHCOE maintenance this will be operationally controlled.
4.8.17.3 Processing Fund Price Maintenance
The system will validate at the time of fund price capture whether price is being maintained for the Fund in fund price currencies. If it is not maintained. then the system will display warning message as ‘Prices for all currencies are not maintained do you wish to continue?’
The Pre EOD checks ‘Number of Funds for which Fund Price has not been entered’ will be changed to check whether price in FPC have been maintained for the day in the system. This will be mandatory check. If the system does not find the Price in currency of expression, then the transaction entered in currency of expression will not be allotted.
The Units will be allocated using respective currency of expression/ fund price if the transaction is done in currency of expression. If the transaction is done in fund base currency then the allocation will take place by taking the fund price captured in fund base currency. If the transaction is done in a currency which is other than FBC or currency of expression then the allocation of units will be done using prices captured in FBC.
Fluctuation percentage will be applicable for FPC’s as well. For project allocation, the system will take the latest available price and show the project allocation.
In case of menu allocation if the price is not available then the system will not allocate the transactions.
4.8.17.4 NAV Correction impact for fund price currencies
If the NAV is corrected for fund price currency, say, for instance, GBP and the amend transaction is set to Yes; then all the transactions will be corrected with the new NAV price for the fund price currency (GBP). In case the amend transaction is set to No; the new price will not be corrected at transaction level. ‘Reflect in Trading’ field will not be impacted.
4.8.17.5 Currency of expression logic applied during Transactions
Case 1: If transaction base currency is not a part of the fund price currency and UH COE is not maintained
If the transaction is done in a transaction currency (TBC) other than the fund base currency and this currency is not present in the list of fund price currencies allowed for the fund, then the fund base currency will be defaulted as the unit holder’s currency of expression and for this transaction; FBC price will be applied. For this transaction FX has to be applied to convert TBC to FBC. This logic is applied to all the transaction Types, specially for Subscription transaction.
Case 2: Transaction Currency is part of the Fund Price Currency and UHCOE is not maintained
In case there is no UH COE maintained for a Fund and when an investor transacts in a transaction currency (TBC) which is one of the allowed fund price currencies (FPC) for the fund or FBC, then this transaction currency will be added as the Unit holder’s currency of expression for this fund. Transactions should not apply FX if Transaction Currency is one of the Fund's price currency or FBC.
Post the transaction authorization, the fund price currency/FBC has to be defaulted as UH preferred currencies at the UHCOE maintenance. (Post authorization user will not be able to amend the TBC hence defaulting will be post authorization).
Case 3: Transaction Currency is part of the Fund Price Currency and UHCOE is maintained
If Transaction base currency is other than the Unit holder’s currency of expression and the Unit Holder already has a UH COE for this fund, then while saving, the system will display warning message as ‘The transaction currency is not the currency of expression for the unit holder’.
UHCOE = FPC and TBC≠UHCOE
Note
The bulk and light weight screen will not be impacted with new any new fields but the validations pertaining to COE will be applied (UHCOE defaulting logic if the transaction is done for the first time), for light weight screen as the transaction currency is defaulted to Fund base currency; fund base currency will be defaulted as UHCOE). If the UHCOE is maintained for a UH-Fund combination and transaction is placed through light weight screen then UHCOE will be defaulted as Transaction currency. Light weight screen will allow transaction currency to be in fund base currency (FBC) or fund price currency (FPC) for COE funds and if the transaction is done in FPC for the first time- fund price currency will be defaulted in the UTDUHCOE maintenance. Also If the UH is transacting through light weight screen subsequently and if UTDUHCOE is already maintained then the UHCOE will be defaulted as Transaction currency.
4.8.17.6 System logic to derive the Price Currency
The system will derive the applicable fund price currency for currency of expression fund transactions as follows:
If TBC = fund base currency, then price currency will be FBC itself. No FX will be required. This is applicable for subscription, redemption and switch transactions.
When a trade is placed in a currency (TBC) that is the allowed fund price currency for the fund then Price currency will be respective fund price currency. No FX will be required. This is applicable for Subscription, Redemption and Switch transactions. (TBC = FPC then price CCY will be FPC)
When a trade is placed in a currency that is neither the fund base currency nor an allowed fund price currency for the fund, Price Currency will be FBC. FX will be required between Transaction Currency and FBC. This is applicable for Subscription and redemptions. (TBC ≠FBC or FPC; then Price CCY will be FBC).
4.8.17.7 Switch Logic for currency of expression
The Price Currency of SWITCH OUT leg will be used as Transaction Currency for SWITCH In Leg transaction and the SWITCH In leg Transaction amount will be Settlement Amount of OUT leg equivalent of Switch out Price currency. This is applicable only for currency of expression and non currency of expression fund switch transactions.
4.9 Subscription Transaction Summary Screen
This section contains the following topics:
- Section 4.9.1, "Retrieving a Record in FCIS Subscription Transaction Summary Screen"
- Section 4.9.2, "Editing FCIS Subscription Transaction Record"
- Section 4.9.3, "Viewing FCIS Subscription Transaction Record "
- Section 4.9.4, "Deleting FCIS Subscription Transaction Record"
- Section 4.9.5, "Authorizing FCIS Subscription Transaction Record "
- Section 4.9.6, "Amending FCIS Subscription Transaction Record "
- Section 4.9.7, "Authorizing Amended FCIS Subscription Transaction Record "
4.9.1 Retrieving a Record in FCIS Subscription Transaction Summary Screen
You can retrieve a previously entered record in the Summary Screen, as follows:
Invoke the ‘FCIS Subscription Transaction Summary’ screen by typing ‘UTSTXN02/ UTSTRA02’ in the field at the top right corner of the Application tool bar and clicking on the adjoining arrow button and specify any or all of the following details in the corresponding details.
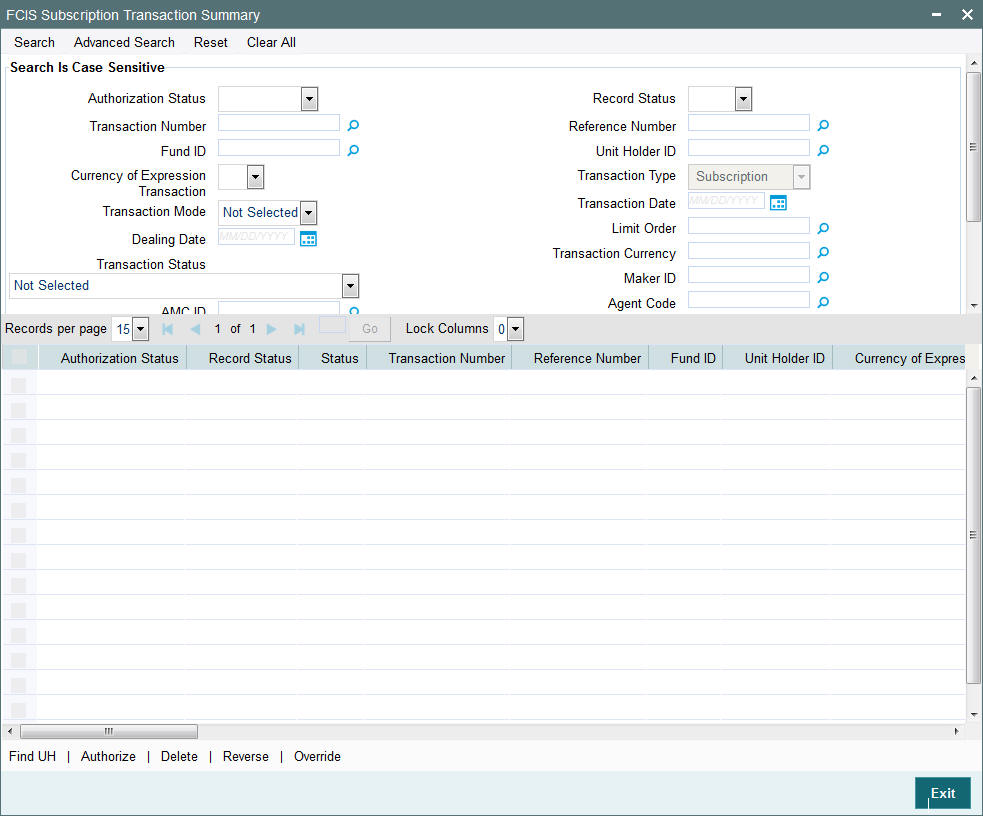
- The status of the record in the Authorization Status field. If you choose the ‘Blank Space’ option, then all the records are retrieved.
- The status of the record in the Record Status field. If you choose the ‘Blank Space’ option, then all records are retrieved
- Transaction Number
- Fund ID
- Currency of Expression Transaction
- Transaction Mode
- Dealing Date
- Transaction Status
- AMC ID
- Completion Date
- Payment Mode
- Communication Mode
- Reference Number
- Unit Holder ID
- Transaction Type
- Transaction Date
- Limit Order
- Transaction Currency
- Maker ID
- Agent Code
- Ref Type
Click ‘Search’ button to view the records. All the records with the specified details are retrieved and displayed in the lower portion of the screen.
Note
You can also retrieve the individual record detail from the detail screen by querying in the following manner:
- Press F7
- Input the Transaction Number
- Press F8
You can perform Edit, Delete, Amend, Authorize, Reverse, Confirm operations by selecting the operation from the Action list. You can also search a record by using a combination of % and alphanumeric value.
For example:
You can search the record for Fund ID by using the combination of % and alphanumeric value as follows:-
- Search by A% :- System will fetch all the records whose Fund ID starts from Alphabet ‘A’. For example:- AGC17,AGVO6,AGC74 etc.
- Search by %7 :- System will fetch all the records whose Fund ID ends by numeric value’ 7’. For example: AGC17, GSD267, AGC77 etc.
- Search by %17%:- System will fetch all the records whose Fund ID contains the numeric value 17. For example: GSD217, GSD172, AGC17 etc.
Note
The status field in the Records pane of the summary screen displays the bulk operation results.
4.9.2 Editing FCIS Subscription Transaction Record
You can modify the details of FCIS Subscription Transaction record that you have already entered into the system, provided it has not subsequently authorized. You can perform this operation as follows:
- Invoke the FCIS Subscription Transaction Summary screen from the Browser.
- Select the status of the record that you want to retrieve for modification in the Authorization Status field. You can only modify records that are unauthorized. Accordingly, choose the Unauthorized option.
- Specify any or all of the details in the corresponding fields to retrieve the record that is to be modified.
- Click ‘Search’ button. All unauthorized records with the specified details are retrieved and displayed in the lower portion of the screen.
- Double click the record that you want to modify in the list of displayed records. The FCIS Subscription Transaction Detail screen is displayed.
- Select Unlock Operation from the Action list to modify the record. Modify the necessary information.
Click Save to save your changes. The FCIS Subscription Transaction Detail screen is closed and the changes made are reflected in the FCIS Subscription Transaction Summary screen.
4.9.3 Viewing FCIS Subscription Transaction Record
To view a record that you have previously input, you must retrieve the same in the FCIS Subscription Transaction Summary screen as follows:
- Invoke the FCIS Subscription Transaction Summary screen from the Browser.
- Select the status of the record that you want to retrieve for viewing in the Authorization Status field. You can also view all records that are either unauthorized or authorized only, by choosing the unauthorized / Authorized option.
- Specify any or all of the details of the record in the corresponding fields on the screen.
- Click ‘Search’ button. All records with the specified fields are retrieved and displayed in the lower portion of the screen.
- Double click the record that you want to view in the list of displayed records. The FCIS Subscription Transaction Detail screen is displayed in View mode.
4.9.4 Deleting FCIS Subscription Transaction Record
You can delete only unauthorized records in the system. To delete a record that you have previously entered:
- Invoke the FCIS Subscription Transaction Summary screen from the Browser.
- Select the status of the record that you want to retrieve for deletion.
- Specify any or all of the details in the corresponding fields on the screen.
- Click ‘Search’ button. All records with the specified fields are retrieved and displayed in the lower portion of the screen.
- Double click the record that you want to delete in the list of displayed records. The FCIS Subscription Transaction Detail screen is displayed.
- Select Delete Operation from the Action list. The system prompts you to confirm the deletion and the record is physically deleted from the system database.
4.9.5 Authorizing FCIS Subscription Transaction Record
- An unauthorized FCIS Subscription Transaction record must be authorized in the system for it to be processed. To authorize a record:
- Invoke the FCIS Subscription Transaction Summary screen from the Browser.
- Select the status of the record that you want to retrieve for authorization. Typically, choose the unauthorized option.
- Specify any or all of the details in the corresponding fields on the screen.
- Click ‘Search’ button. All records with the specified details that are pending authorization are retrieved and displayed in the lower portion of the screen.
- Double click the record that you wish to authorize. The FCIS Subscription Transaction Detail screen is displayed. Select Authorize operation from the Action List.
When a checker authorizes a record, details of validation, if any, that were overridden by the maker of the record during the Save operation are displayed. If any of these overrides results in an error, the checker must reject the record.
4.9.6 Amending FCIS Subscription Transaction Record
After a FCIS Subscription Transaction record is authorized, it can be modified using the Unlock operation from the Action List. To make changes to a record after authorization:
- Invoke the FCIS Subscription Transaction Summary screen from the Browser.
- Select the status of the record that you want to retrieve for authorization. You can only amend authorized records.
- Specify any or all of the details in the corresponding fields on the screen.
- Click ‘Search’ button. All records with the specified details that are pending authorization are retrieved and displayed in the lower portion of the screen.
- Double click the record that you wish to authorize. The FCIS Subscription Transaction Detail screen is displayed in amendment mode. Select Unlock operation from the Action List to amend the record.
- Amend the necessary information and click on Save to save the changes
4.9.7 Authorizing Amended FCIS Subscription Transaction Record
An amended FCIS Subscription Transaction record must be authorized for the amendment to be made effective in the system. The authorization of amended records can be done only from Fund Manager Module and Agency Branch module.
The subsequent process of authorization is the same as that for normal transactions.
4.10 Cancel Transaction Detail
This section contains the following topics:
- Section 4.10.1, "Invoking Cancel Transaction Detail Screen"
- Section 4.10.2, "Processing Cancellations"
4.10.1 Invoking Cancel Transaction Detail Screen
An initial purchase (subscription) transaction entered into by an investor can be cancelled at the investor’s request, through a Cancel operation, provided the cancellation period specified for the fund has not elapsed.
When a cancellation is processed, a redemption transaction that annuls the original subscription transaction is generated. Upon successful processing of the cancel operation, the subscription amount refunded.
Cancellation is possible only for subscription transactions.
To enter a cancellation request, you can use the ‘FCIS Cancel Transaction Detail’ screen. You can invoke this screen by typing ‘UTDCNTXN’ in the field at the top right corner of the Application tool bar and clicking on the adjoining arrow button.
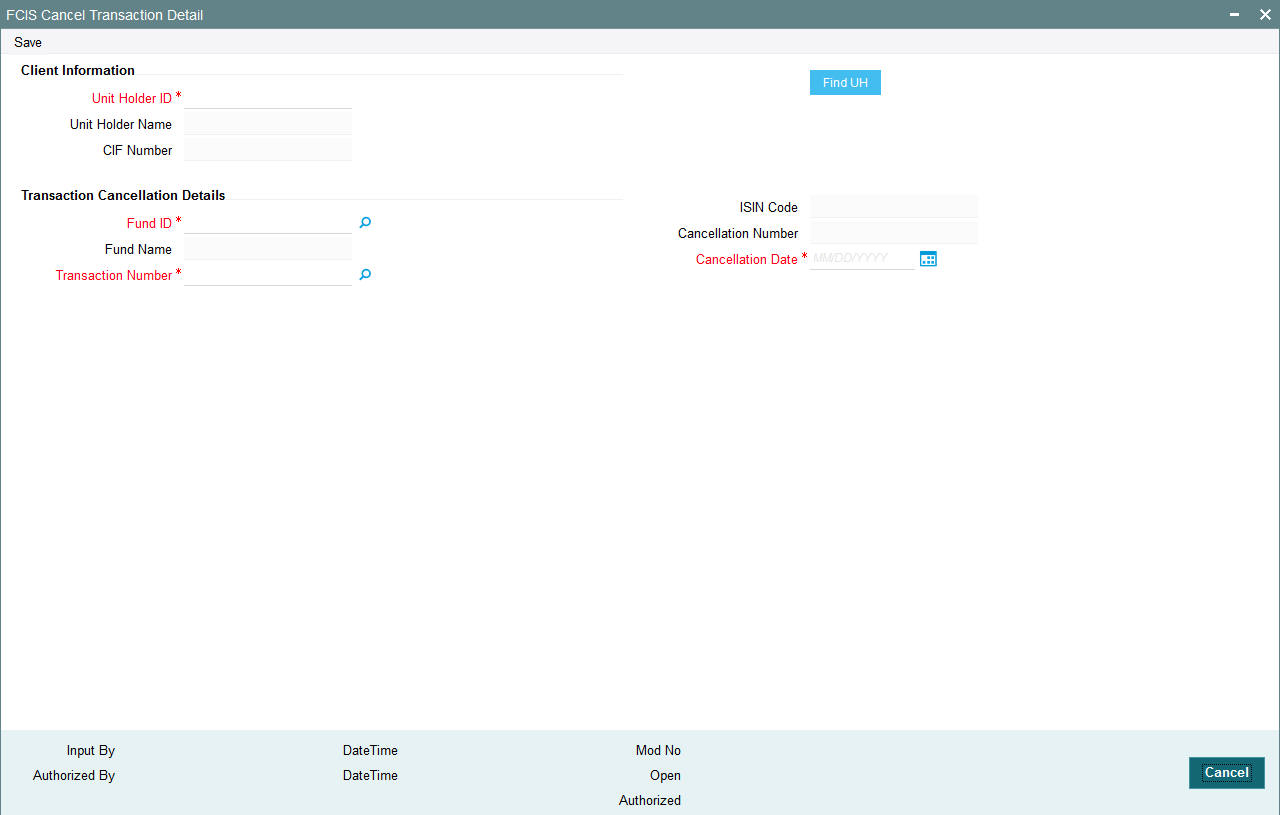
You need to specify the following details:
Client Information
Unit Holder ID
Alphanumeric; 12 Characters; Mandatory
Specify the unit holder that has requested for a cancellation.
You can query for unit holder ID by clicking ‘Find UH’ button.
Unit Holder Name
Display
The system displays the name of the selected unit holder ID.
CIF Number
Display
The system displays the CIF number for the selected unit holder ID.
Transaction Cancellation Details
Fund ID
Alphanumeric; 6 Characters; Mandatory
Specify the fund in which the subscription was entered, for which a cancellation is being sought.
Fund Name
Display
The system displays the name of the fund for the selected fund ID.
ISIN Code
Display
The system displays the ISIN code for the selected fund ID.
Transaction Number
Alphanumeric; 16 Characters; Mandatory
Specify the transaction number of the subscription transaction being cancelled.
Cancellation Number
Display
The system displays the cancellation number.
Cancellation Date
Date Format; Mandatory
Select the cancellation date from the adjoining calendar. The cancellation date, which is deemed to be the current date. It must fall within the cancellation period for the fund.
The system checks to see that the transaction being cancelled is an initial purchase, and that the unit holder has no holdings in the fund at the time of cancellation; also, that the cancellation date is within the cancellation period for the fund. If any of these checks fail, an override is sought.
4.10.2 Processing Cancellations
Cancellations are processed as follows:
- The cancellation is processed based on the fund-level cancellation
parameters, as follows:
- The price basis for the cancellation depends on the Cancellation Price Basis defined in the fund rules.
- The fund load mapping for cancellation would have been set up similar to the loads applicable for the initial subscription, with entity types reversed.
- Upon authorization, the cancellation creates an underlying redemption transaction with transaction date as the cancellation date and units equal to the original allotted units of the subscription transaction.
- Upon authorization of the cancellation, the original subscription cannot be amended or reversed. Also, the original subscription cannot be reversed or aged against any other redemption.
- The cancellation transaction is a sub type of redemption transaction.
- The administration fee for cancellation is captured as a transaction time fee.
- If the original transaction has already been redeemed out, the System records an error.
- If the original transaction has not been settled (that is, there are provisional units), there is no payout due to the generated redemption, which is generated as confirmed and paid.
- The load amount for the redemption is the sum of loads due to refund of the original load amounts.
- Allocation of the cancellation age out the original units allotted. The settlement amount after this allocation is the market value of cancellation.
- Market value of cancellation is taken to be:
Units allotted * NAV / Bid / Offer price + Front end load on original purchase
- The cancellation amount (settlement amount) due to the transaction
is determined as shown below:
Case
Description
Market Value more than or equal to original investment amount
Market value less than original investment amount
Consideration of original Subscription price as cancellation price during allocation
Cancellation amount is equal to the original investment amount
In case of a price increase, the difference between the cancellation amount and original investment amount is accounted to the fund
Cancellation amount is equal to the Market Value.
In this case, the difference between the cancellation amount and the original investment amount is ‘Due to Fund Manager’
4.11 Redemption Transaction Detail
This section contains the following topics:
- Section 4.11.1, "Invoking Redemption Transaction Detail Screen"
- Section 4.11.2, "UH And Fund Tab"
- Section 4.11.3, "Transaction Tab"
- Section 4.11.4, "Other Tab"
- Section 4.11.5, "Intermediary Tab"
- Section 4.11.6, "Load Override Tab"
- Section 4.11.7, "KYC and Document Tab"
- Section 4.11.8, "Add Info Tab"
- Section 4.11.9, "Fee Payment Tab"
- Section 4.11.10, "Certificate Tab"
- Section 4.11.11, "Limit Order Tab"
- Section 4.11.12, "Settlement Details Button"
- Section 4.11.13, "Receipt Detail Button"
- Section 4.11.14, "Project Allocation Details Button"
- Section 4.11.15, "Allocation Details Button"
- Section 4.11.16, "View Balance Button"
- Section 4.11.17, "Transaction Processing Logic for Currency of Expression Funds"
4.11.1 Invoking Redemption Transaction Detail Screen
Enter a redemption transaction request into the system in the following sequence of events:
Invoke the ‘FCIS Redemption Transaction Detail’ screen by typing ‘UTDTXN03’ in the field at the top right corner of the Application tool bar and clicking on the adjoining arrow button. The Transaction Detail screen for redemption transactions is displayed, with all the default information. To enable the fields for entry, select 'New' from the Actions menu in the Application tool bar or click new icon.

Transaction Information
Unit Holder ID
Alphanumeric; 12 Characters; Mandatory
Specify the unit holder that has requested the transaction, in the Transaction Information section. Alternatively, you can select unit holder ID from the option list. The list displays all valid unit holder ID maintained in the system.
You must select a unit holder that is not restricted (or does not belong to a restricted category) for the fund into which the transaction is being entered. If not, the system does not allow the transaction to be saved.
If you specify an earlier date, the fund that you choose for the transaction must be one for which backdating of transactions is allowed in the Transaction Processing Rules. The specified earlier date must also be within the backdating limit, as specified for the fund in the Transaction Processing Rules.
Click ‘Find UH’ button to open ‘Unit Holder Find Options’ screen. You can get the Unit holder details by entering the required values in that screen.
Fund ID
Alphanumeric; 6 Characters; Mandatory
Specify the fund ID in which the requested transaction is to be put through. Alternatively, you can select fund ID from the option list. The list displays all valid fund ID maintained in the system.
Order Received Date
Date Format; Optional
Specify the order received date.
Transaction Date
Date Format; Mandatory
Specify the order received date.
Payment Mode
Alphanumeric; 2 Characters; Mandatory
Specify the fund ID in which the requested transaction is to be put through. Alternatively, you can select fund ID from the option list. The list displays all valid fund ID maintained in the system.
Payment Mode Description
Display
The system displays the description for the mode of payment selected.
Transaction Number
Display
The system displays the transaction number.
Transaction Currency
Alphanumeric; 3 Characters; Optional
Specify the currency in which the amount value for the transaction will be reckoned. Alternatively, you can select transaction currency from the option list. The list displays all valid transaction currency maintained in the system.
The currency you select here must be one that is a valid transaction currency designated for the selected fund in the Fund Transaction Currency rule.
Reference Number
Alphanumeric; 16 Characters; Optional
Specify the reference number for the transaction. If the reference number is designated to be system-generated for the agency branch, then the Reference Number field is locked and the number will be generated by the system when you save the transaction.
Order Received Time (HH24:MI)
Time Format; Optional
Specify the order received time.
Transaction Type
Alphanumeric; 1 Character; Optional
Select the transaction type. In case for a particular transaction type restriction is ‘Not Applicable’, then the system will display an error message as ‘STOPACCOUNT is issued for ‘Transaction Type’ to this Unit Holder’.
Description
Display
The system displays the description for the selected Transaction type.
Transaction Category
Alphanumeric; 1 Character; Optional
Specify the type of transaction. Alternatively, you can select transaction category from the option list. The list displays all valid transaction category code maintained in the system.
Description
Display
The system displays the description for the selected Transaction category.
Transaction Value
Transaction Mode
Mandatory
Select the transaction mode from the drop-down list. Following are the options available in the drop-down list:
- Amount
- Units
- Percent
Units Applied
Numeric; 27 Characters; Optional
Specify the units applied details.
You should specify the details in this field only if you have selected ‘Transaction Mode’ field as Units. Else, while clicking ‘Enrich Transaction’ button, the system will display an error message.
Amount Applied
Numeric; 27 Characters; Optional
Specify the amount applied details.
You should specify the details in this field only if you have selected ‘Transaction Mode’ field as Amount. Else, while clicking ‘Enrich Transaction’ button, the system will display an error message.
Percent Applied
Numeric; 27 Characters; Optional
Specify the percent applied details.
You should specify the details in this field only if you have selected ‘Transaction Mode’ field as Percent. Else, while clicking ‘Enrich Transaction’ button, the system will display an error message.
After entering all details in Transaction Information section click on ‘Enrich Transaction’ button. The list of transactions applicable for the Unit Holder selected is defaulted in UH and Fund section.
On click of ‘Enrich Transaction’ button all the header fields will be disabled. Clicking ‘Enrich Transaction’ button during the transaction input, the system will remove all the entered details except the header data entered and re-open all the fields to capture new transaction.
Click ‘Reset Transaction’ button to reset the entire transaction during transaction input, modification and amendment.
For transaction modification/amendment, you can query the transaction and on clicking ‘Reset Transaction’ button, all the transaction details can be modified without changing the transaction number.
For any modification/amendment in any of the primary field including Fund ID or Transaction Date, you need to click ‘Reset Transaction’ button. Using this option, the system will clear all the entered details except the header data entered and re-open all the fields to capture new details.
The reset function does clearing of all the data with the same transaction number. The system will display an override message. Hence all the data needs to be provided again if reset is clicked.
The following primary fields will be enabled for modification and Amendment of the transaction:
- Order Received Date
- Order Received Time
- Transaction date
- Fund ID
- Transaction Currency
- Unitholder ID
- Reference number
- Transaction mode
- Amount applied
- Units applied
- Percentage applied
- Payment mode
- Transaction type
- To Fund ID
- To Unitholder ID
- Subscription fund ID
For any change/ modification or amendment in the above primary fields in transaction screens, system will re-populate the transaction screen and linked dependent fields details on enrich of the transaction.
During transaction input/modification or amendment, if you override the details, system will retain the user override data for transaction entry/save. However, post overriding the details/value if you change any of the primary fields, the system will re-populate the transaction screen with latest details.
The linked dependent details will include Settlement Date, Settlement Due Date, Price Date, Load details and Dealing Date.
The system will default the Settlement date/due date, Price date, dealing date on enrich/save of the transaction only if the previous calendar year is maintained in the system.
Note
- This is not applicable to transactions captured through any other function/UI/channels/uploads.
- If UBS integration is enabled then system will disallow all the above modification or changes and pertaining to the changes proposed. The ‘Reset Transaction’ Button will be disabled, if UBS- Integration is enabled
Deriving the order received date and time
The system will validate the Fund cut off based on the Order received time and not the actual time the Transaction is captured in the system. The transaction date will be derived by the system based on these two fields. For instance, if the Fund Cut off is 14.00 hrs at a Fund level and the transaction is captured at 15.00 hrs in the system with the Order Received time as 13.00 then the system should validate the time maintained at Order Received time and not the time the transaction is actually captured. This will be considered as the same day transaction.
If all the below mentioned transactions are captured on 15-Oct-2012 at 16:00 hrs then the transaction dates will be derived as detailed below. In case the transaction date is amended then the system has to consider the amended transaction date. Post authorisation of the transaction, you cannot amend order received date and time.
Fund Cut off |
Order Received Date |
Order Received time |
Transaction Date |
14:00 |
15-Oct-2012 |
13:50 |
15-Oct-2012 |
14:00 |
15-Oct-2012 |
14:10 |
16-Oct-2012 |
14:00 |
14-Oct-2012 |
13:25 |
14-Oct-2012 |
14:00 |
14-Oct-2012 |
15:15 |
15-Oct-2012 |
4.11.2 UH And Fund Tab
Click UH And Fund tab in FCIS Redemption Transaction Detail screen.
The system displays the following values:
- CIF Number
- Unit Holder Name
Click ‘UH Signature’ button to upload the image.
Click on the UH Deals button to view the details of all the deals set up for the unit holder. Enter the relevant search criteria in the Find Options screen. The system will display the records that match the search criteria you have specified.
If the selected investor is eligible for tax-exemption, select the tax product in which the investor wishes to redeem units, in the Product ID field. When you select the product, you are indicating to the system that this transaction will affect the used up amount of the non-taxable limit set up for the selected unit holder in the Non-Tax Limits Setup options.
The system displays the following values:
- ISIN No
- Fund Name
- Fund Base Currency
- Price Currency
- Currency of Expression Transaction
4.11.3 Transaction Tab
Click on Transaction tab in the Redemption Transaction screen.
![]()
You can specify the following details:
Gross or Net
Optional
Select the net value exclusive of the loads from the drop-down list. The list displays the following values:
- Gross
- Net
Communication Mode
Alphanumeric; 2 Characters; Mandatory
Specify the communication mode through which the transaction request was communicated. Alternatively, you can select mode of communication from the option list. the list displays all valid communication mode maintained in the system.
Delivery Option
Optional
Select the delivery option from the drop-down list. The list displays the following values:
- Investment Account
- Clearing Account - Against Payment
- Clearing Account - Free of Payment
- Delivery to Custodian
- Physical Delivery
- PUEV
Clicking ‘Details’ button, the ‘Delivery Details’ window will be opened, where in you can enter the following details:
Delivery Type
Optional
Select the type of delivery from the drop-down list. Following are the options available:
- Self
- Third Party
Address Type
Alphanumeric; 2 Characters; Optional
Specify the type of address. Alternatively, you can select address type ID from the option list.
The list displays all valid address maintained in the system.
BIC Code
Alphanumeric; 12 Characters; Optional
Specify the BIC code.
Address Line 1-2
Alphanumeric; 80 Characters; Optional
Specify the residing address of the customer.
City
Alphanumeric; 80 Characters; Optional
Specify the residing city code.
State
Alphanumeric; 80 Characters; Optional
Specify the name of the residing state.
Zip Code
Alphanumeric; 10 Characters; Optional
Specify the zip code of the residing area.
Country
Alphanumeric; 3 Characters; Optional
Specify the residing country code.
Exchange Rate Details
Source ID
Alphanumeric; 6 Characters; Optional
Specify the source ID. Alternatively, you can select source ID from the option list. The list displays all valid source ID maintained in the system.
Amount Applied
Display
The system displays the amount applied details.
FX Deal Date
Date Format; Optional
Specify the FX deal date.
Exchange Rate Applied
Display
The system displays the exchange rate applied details.
Override Exchange Rate?
Optional
Select if exchange rate applied has to be overridden from the drop-down list. The list displays the following values;
- Yes
- No
FX Value Date
Date Format; Optional
Specify the FX value date.
Interest Details
Interest
Alphanumeric; 30 Characters; Optional
Specify the interest details.
Interest (FBC)
Alphanumeric; Optional
Specify the fund base currency interest details.
Clicking ‘Details’ button, ‘Interest Details’ window is displayed.
For further details on this screen, refer ‘Transaction Tab’ sub section in IPO Subscription Detail section of this user manual.
4.11.3.1 Dilution Levy Processing
To arrive at the dilution levy breach limit the inflow breach factor is considered. (Fund Corpus * inflow Breach Factor < Net Amount in FBC). Dilution Levy limit breach is validated against the gross transaction amount. If the gross transaction amount exceeds the dilution levy breach limit, then a warning message is displayed by the system. The dilution levy breach limit amount can be overridden at the transaction level. The overridden value is considered only if the transaction attracts dilution levy.
An EOD batch computes the aggregated net transaction amount at unit holder, fund and transaction type level. This batch is schedules before the allocation process. If the gross aggregated amount for Unit Holder, Fund and Transaction type combination is identified breaching, then a dilution levy fee is applied on all transactions of that fund, Unit Holder, and transaction type combination.
4.11.4 Other Tab
Click on ‘Other’ tab in the Redemption Transaction Detail.
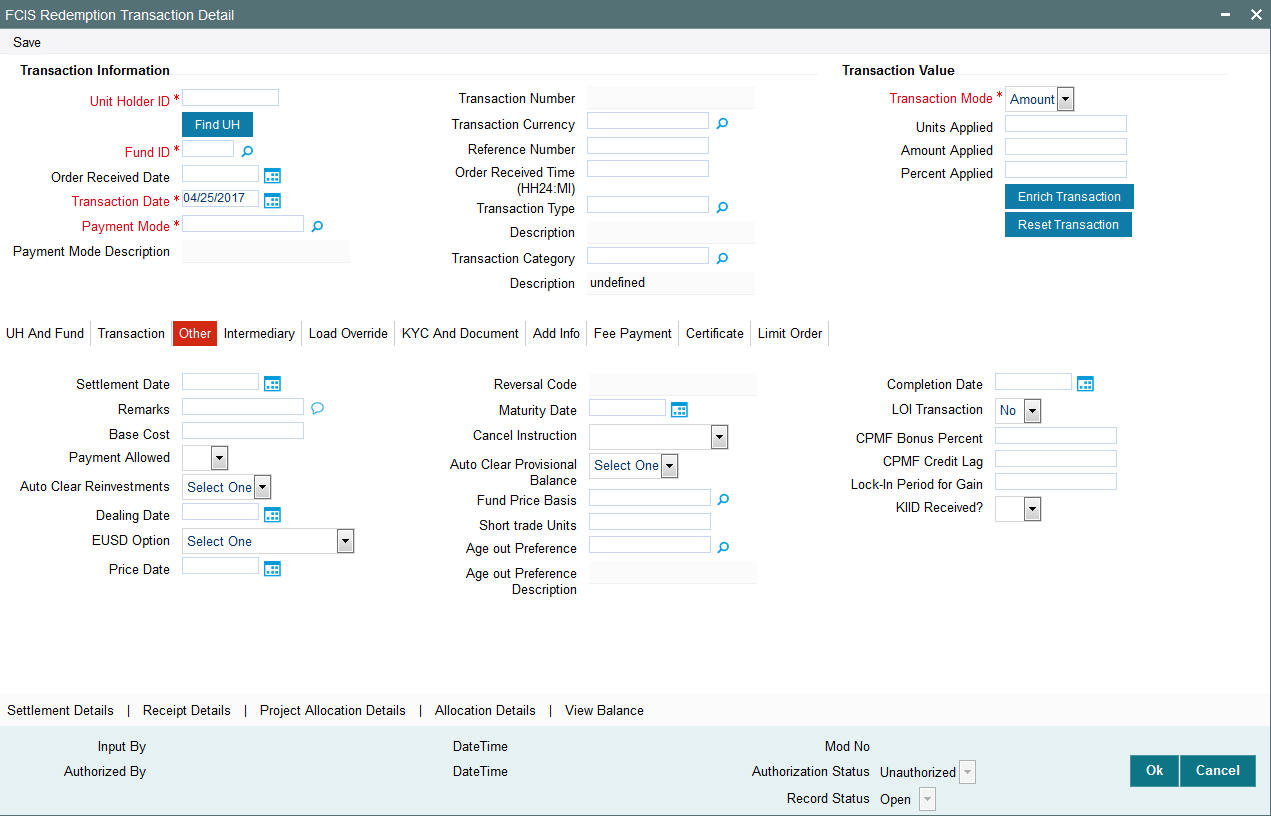
You can specify the following details:
Settlement Date
Date Format; Optional
Specify the settlement date.
Remarks
Alphanumeric; 255 Characters; Optional
Specify remarks, if any.
Base Cost
Numeric; 6 Characters; Optional
Specify the base cost details.
Payment Allowed
Optional
Select if payment allowed is or not from the drop-down list. The list displays the following values:
- Yes
- No
Auto Clear Reinvestments
Optional
Select if reinvestment details should be automatically cleared or not from the drop-down list. The list displays the following values:
- Yes
- No
Dealing Date
Date Format; Optional
By default, the dealing date is derived based on the dealing date maintained for the fund in the Specific Fund Price Date Setup screen. The date displayed here can be altered, if required, and you can specify the requisite dealing date. Dealing date will not be displayed on the screen if it is not maintained for a fund or the fund is not a specific price date fund. System will default the transaction date as the dealing date.
If you have defined a different trade cycle for the fund in the ‘Override Trade Cycle Date’ screen and the transaction falls within the override period mentioned in this maintenance, the system will default the dealing date from the maintenance.
Refer the chapter ‘Other Fund Activities’ in the Fund Manager User Manual for more details on maintaining alternate trade cycles for a fund
EUSD Option
Optional
Select the EUSD option from the drop-down list. The list displays the following values;
- With Holding Tax
- Exchange of Information
- Tax Exemption Certificate
Price Date
Date Format; Optional
The field From Price Date is enabled when you select the fund in which the requested transaction is to be put through. The fund should be one for which you have specified forward pricing is applicable. The price date is arrived at by taking into consideration several conditions. This is explained in the section ‘Defaulting of Price Dates in the Transaction’ Screens in this chapter. You can modify this field.
If you have defined a different trade cycle for the fund in the ‘Override Trade Cycle Date’ screen and the transaction falls within the override period mentioned in this maintenance, the system will default the price date from the maintenance.
Reversal Code
Display
The system displays the reversal code.
This field is only available during transaction amendment, and you can use it to capture the appropriate rejection code, if any, for the amendment. The codes available in the option list are specific to the transaction type being amended.
Maturity Date
Date Format; Optional
If the fund in which the transaction is being put through is a closed-end fund, then specify the maturity date for the transaction in the Maturity Date field. This field is only applicable for AMCs that have opted for the maturity date facility.
Note
In case of block transactions, enter the maturity date of the block transaction. If the system date is equal to or greater than the date specified here, and the Auto generate Unblock option is checked then system generates an automatic unblock transaction on the date specified here. If the maturity date falls on a holiday, then the unblock transaction will be generated on the next working day.
Cancel Instruction
Optional
Select the cancel instruction from the drop-down list. The list displays the following values:
- Standing Instructions
You can use this field to indicate whether standing instructions defined in respect of a unit holder, in the selected fund, are to be cancelled. If you select this option, all standing instructions for the transaction is cancelled, including those that are to be generated after an automatic redemption occurs. Select the ‘Standing Instruction’ option in this field to indicate cancellation of standing instructions.
If this option has been chosen in the General Operating Rules for the fund, the automatic redemption process generates redemption transactions for unit holders in the fund, with the ‘Cancel Instruction’ option automatically set.
If this option has been set for the transaction in this field, the End of Day process cancels all standing instructions (irrespective of the transaction type) for the unit holder in the fund after the outflow transactions (redemption, switch and transfer) involving the unit holder have been allocated for the day.
Note
Reversal or amendment of an outflow transaction for which Cancel Instruction has been set to ‘Standing Instruction’, would re-instate the standing instructions.
Auto Clear Provisional Balance
Optional
Select ‘Yes’ option to indicate that 100% outflow transaction should include provisionally allotted units. This option will be enabled if the transaction mode is ‘Percent’ and the transaction value is ‘100’.
Fund Price Basis
Alphanumeric; 6 Characters; Optional
Specify the fund price basis details. Alternatively, you can select fund price basis details from the option list. The list displays all valid fund price basis maintained in the system.
Short Trade Units
Numeric; 27 Characters; Optional
Specify the short trade units.
If the unit holder is nominee account, only then system will allow you to capture the short trade units.
Applicable short trade units will be taken for applying penalty.
If short trade units is not entered, then the transaction allocation will follow the normal allocation process.
Age out Preference
Alphanumeric; 1 Character; Optional
Specify the age out preference from which we need to preferably redeem the units during outflow and is applicable for Redemption, Switch and Transfer screens. Alternatively, you can select age out preference from the option list. The list displays all valid age out preference code maintained in the system.
While saving a Redemption, Switch or Transfer based on ‘Age out preference’ value, the system will check for available balance in particular classification like CDSC or FEL. In case of insufficient unit balance, the system will display an error message. The system will consider unalloted transaction for unit balance check.
- In case of an unallotted unit based or percentage based transactions, the unallocated units will be directly identified from the transaction details.
- In case of un unalloted amount based transaction, the system will
compute the unallotted units as follows:
- Unallotted units = Amount/ (Latest Available NAV * (1 - Fluctuation %)
- Fluctuation % is a system level param value that can be maintained in ‘Parameter Maintenance’ screen (UTDPARAM) considering the maximum fluctuation in price that can happen. The system maintains the Param Code as ‘FLUCTUATIONPERCENT’.
If you have not specified ‘Age out Preference’ value for the transaction, then system will save the field as blank and will follow the fund level ageing logic.
During actual ageing if there is no sufficient units in respective classification, the system will redeem from available classification based on fund level ageing policy.
Based on the ‘Age out preference’ selection, the system will age out the transactions during outflow. If there is no sufficient balance in the respective buckets, then system will age out the transactions from other buckets based on fund rule ageing logic.
Age out Preference Description
Display
The system displays the description for the selected age out preference.
Completion Date
Date Format; Optional
The date on which the transaction is completed.
LOI Transaction
Optional
Select the status of LOI transaction from the drop-down list. The list displays the following values:
- Yes
- No
If the unit holder that is subscribing to the fund through IPO is designated as a Letter or Intent investor, then specify if the present transaction is to be deemed and processed as a Letter of Intent transaction.
This specification is only applicable for LOI unit holders that are transacting in a fund in a group for which LOI is deemed as allowed.
This specification is only applicable for LOI unit holders that are transacting in a fund in a group for which LOI is deemed as allowed.
CPMF Bonus Percent
Numeric; 30 Characters; Optional
Specify the percentage of CPMF bonus.
By default, the CPMF Bonus percentage is displayed here which is arrived at based on the fund CPMF preference. If CPMF Bonus Type is 'Fixed', Percentage cannot be modified during the transaction input i.e., Bonus is credited on the lag EOD activity. Details regarding CPMF Preference are explained in the section ‘Maintaining Fund CPMF Preferences’ in the Fund Manager module.
CPMF Credit Lag
Numeric; 4 Characters; Optional
Indicate the lag for the CPMF bonus to be credited.
Lock-in Period for Gain Days
Numeric, 4 Characters; Optional
The default lock-in period for the funds where IOF/IRRF are applicable is defaulted here. This can however be modified.
Note
Reversals are not allowed post allocation. However if there is any judicial blocking (partial or full) or the subscription is partially redeemed the reversals will not be allowed.
KIID Received?
Optional
Select if the transaction is KIID compliant or not from the drop-down list. The list displays the following values:
- Yes
- No
The system will default the KIID compliant at the transaction level upon the selection of the Unitholder and Fund in the transaction screens. If the ‘UCITS Fund’ at the Fund level is ‘Yes’ and the UH mapping to the Fund in the ‘UH KIID Compliance’ tab is ‘NO’ then at the transaction level, the system will default the ‘KIID Complaint’ to ‘No’.
If the KIID Received is set to ‘No’, the system display an error message while saving the transaction as ‘The Unit holder has not received the KIID’.
If the flag is set to ‘YES’ there will be no error message and treated as if the UH has received the KIID. The system will always look at the latest UCITS fund mapping maintained at the UH level.
If the transaction is being done in a fund which is not a UCITS Fund then the field KIID received at transaction level will be defaulted to Blank. You cannot change this option to either a Yes or No at the transactions level if it is not a UCITS Fund.
The business user can change the KIID Compliant flag at the transaction from ‘No’ to ‘Yes’ and proceed with the transaction capture but visa versa is not possible. The record at the Unit Holder level will however not get updated. You will have to manually update the same.
In case of backdated transactions, if transaction date is less than effective date, system will default the KIID Compliant field to ‘No’ and then you need to manually override it.
4.11.5 Intermediary Tab
Click on ‘Intermediary’ tab in the Redemption Transaction Detail screen

If an entity has been identified as an intermediary for the transaction, then you must identify the same in this section, along with the commission percentage split for an entity..
Entity Type
Alphanumeric; 1 Character; Optional
Select the entity type that has been identified as the intermediary for the transaction.
Entity ID
Alphanumeric; 12 Characters; Optional
For each entity type, specify the intermediary in this field. The name of the selected intermediary is displayed in the Entity Name field.
While entering a transaction, system will default the intermediary specified here. However, you can override the defaulted value.
Entity Name
Display
When you select the broker code, the name of the broker is displayed.
Parent Entity Name
Display
When you select the broker code, the name of the parent broker for the selected broker is displayed.
Split Percentage
Numeric; 5 Characters; Optional
Specify the percentage of total commission that is to accrue to the selected broker. The sum of all the percentages specified for any brokers identified for the transaction must equal one hundred percent.
From or To Leg
Optional
Select from or to leg details from the drop-down list. The list displays the following values:
- From
- To
4.11.6 Load Override Tab
Click on ‘Load Override’ tab in the Redemption Transaction Detail screen.
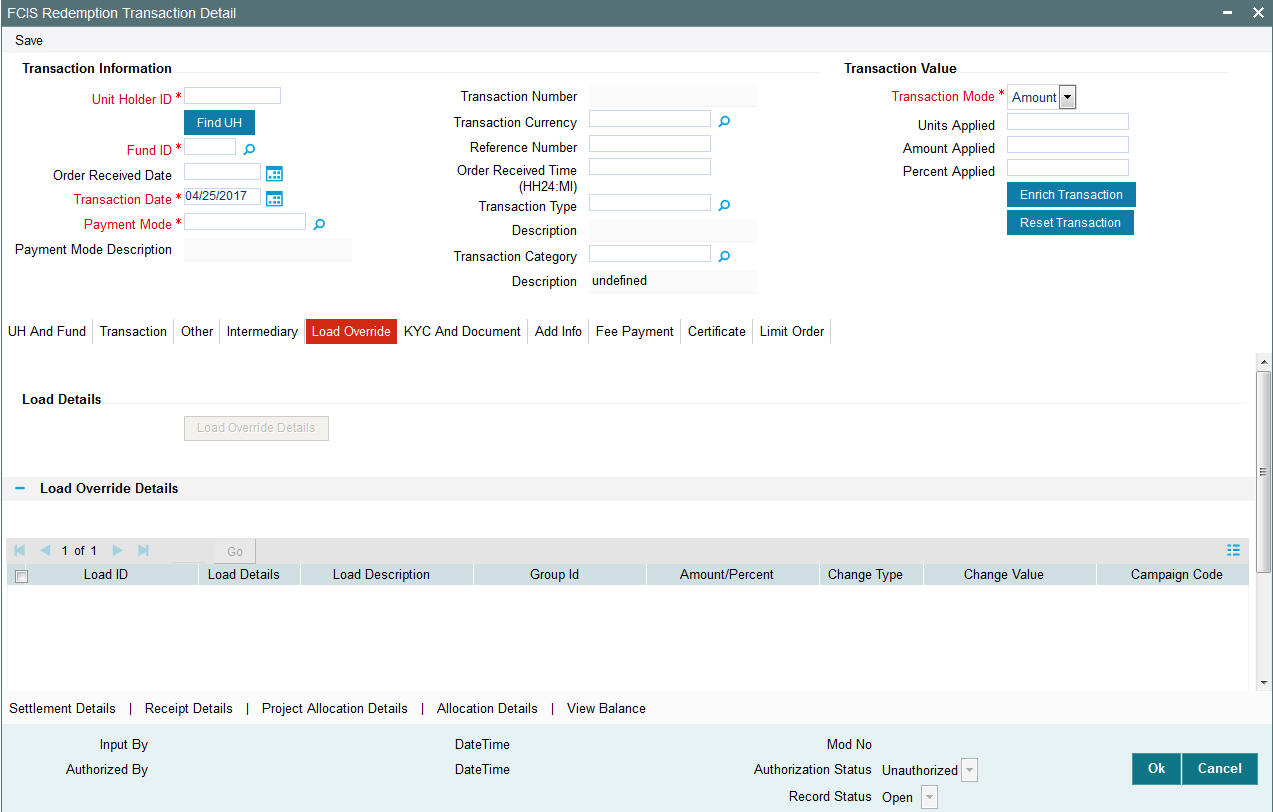
In this section, you can override or alter the value of any load (including derived loads, if any) mapped to the selected fund and applicable for the transaction type, which is to be computed at the time of allocation. The frequency of computation for such loads would be "allocation".
This section is only enabled for funds that have allocation time loads mapped to them as applicable for the transaction type.
Load Details
Load ID
Display
The ID of the allocation time load that has been mapped to the fund for the transaction type is displayed here. The load ID is displayed as a link. To view details of the load, click the ID link.
If a derived load has been mapped, it is also displayed here and can be overridden.
Load Details
Display
The system displays the load details.
Load Description
Display
The description of the allocation time load that has been mapped to the fund for the transaction type is displayed here.
Group ID
Display
The system displays the group ID.
Amount Percent
Display
The type of the allocation time load that has been mapped to the fund for the transaction type is displayed here. The ‘type’ of the load refers to the base value upon which the load is applied. There are two possible types – amount-based loads, and percentage-based loads.
This value will be validated against the minimum, maximum and step values specified for redemption transactions in the Transaction Processing Rules for the fund. It is also validated against the amount / units limit values maintained for both the communication mode selected for the transaction, and the investor category of the selected unit holder. A warning, which can be overridden, is displayed if the value is not within the limits.
If the client country option ‘NETUNALLOTEDAMT’ is set to true for your bank, then the system will match the units to be redeemed with the unit holder’s current balance minus the un-allotted redemptions (if any). If the transaction value exceeds the balance available, the system will throw up an error message. It will not save the transaction.
If the transaction is being put through as a result of a check issued by an investor with the check writing facility, in a fund for which the check writing facility is allowed, the transaction amount that you specify here must fall within the minimum and maximum limits specified for the fund, for check redemption transactions.
For transactions by gross amount, a transaction value that exceeds the Minimum Amount for Tax ID that has been specified in the fund rules, the system validates the availability of the PAN Number in the unit holder account profile. If the PAN Number has not been specified in the profile, you must enter a transaction value that does not exceed the Minimum Amount for Tax ID value, or make a change to the unit holder account and specify the PAN Number, and then attempt to input the transaction.
If specified in the General Operating Rules for the fund, the End of Day processes perform the minimum holdings validation, by picking up all allocated transactions during the business day and grouping according to CIF-level or unit holder-level, as indicated in the General Operating Rules. During this, the system validates whether the current holdings balance of the investor either equals or exceeds the minimum holdings balance specified in the General Operating Rules.
Change Type
Display
The system displays the change type.
When you override or alter an allocation time load at the time of entering a transaction, you can effect the change in any of the following ways:
- Discount (reducing the load return value in all the slabs)
- Increase (increasing the load return value in all slabs)
- Return Value (assigning an altered return value that will be applicable to all the loads)
Change Value
Display
The system displays the change value details.
Campaign Code
Display
The system displays the campaign code.
Campaign Load ID
Display
The system displays the campaign load ID.
Project Return Value
Display
The system populates the return value from the load setup.
If the UH Deal maintained is same for Unit Holder, Load and Fund Setup then overridden value from UH Deal is displayed.
If there are criteria based loans in UT transactions, the criteria is evaluated and only loads applicable for the transaction is displayed.
You can view the applicable loads and projected return values by clicking ‘Enrich Transaction’ in the transaction screen.
The system uses the projected return value for load amount computation and also to compute the net amount to AMC while generating GO
In LEP transactions, if there are criteria based loads, the criteria is evaluated during UT transaction generation and it will be used during allocation.
Derived Load Override Details
The system displays the following values:
- Load ID
- Parent Load ID
- Load Description
- Change Type
- Change Value
4.11.7 KYC and Document Tab
Click on ‘KYC and Document’ tab in the Redemption Transaction Detail screen.

KYC Transaction Details
Requested
Optional
Check this box to indicate KYC details are requested.
Requirement
Alphanumeric; 255 Characters; Mandatory
Specify the list of KYC documents required for the unit holder.
Received
Optional
Check this box to indicate KYC details are received.
Received Date
Date Format; Optional
Specify the date on which the documents are received from the investor.
Tax Document
Optional
Select if tax document is required or not from the drop-down list. The list displays the following values:
- Yes
- No
Chasing Date
Date Format; Optional
Specify the date on which the document chasing is initiated, if the investor has not completed the KYC requirements.
KYC Received
Optional
Select if KYC is received or not from the drop-down list. The list displays the following values:
- Yes
- No
Document Details
Document ID
Alphanumeric; 25 Characters; Optional
Specify the document ID.
Document Type
Alphanumeric; 4 Characters; Optional
Specify the document type.
Type Description
Alphanumeric; 255 Characters; Optional
Specify the description for the type of document.
If during a subscription or IPO transaction, the inflow amount is greater than the maximum amount for Tax Id, system verifies if the unit holder has a Tax ID maintained (PAN). If PAN is not specified, system verifies Tax Document in KYC.
The system checks if the current transaction is an initial purchase or a subsequent one - based on the actual transactions carried out by the UH. In the case of an initial purchase, the system allows you to save an IPO transaction even if the UH has not met the KYC requirements.
Note
If no list has been maintained for this transaction, you may still record the KYC list for the transaction as well as the unit holder. If KYC list is not maintained for your installation, system will consider the documents as submitted by default.
Clicking on ‘UH KYC Details’ button, the system displays all the KYC details available for the UH.
The details are populated from Unit Holder Maintenance screen (UTDUH).
Clicking on ‘UH KYC Details’ button, the system displays all the KYC details available for the UH. If any KYC document is received then it can be marked at transaction KYC detail as ‘Received’. However, you should update the UH maintenance screen for the KYC documents received. If the KYC received at transaction level is ‘Yes’ with some KYC documents and all KYC received at UH level is ‘No’, then the system will display a warning message as ‘Transaction All KYC Received cannot be complete if Unit holder KYC is Incomplete’ during save of the transaction.
For further details on this screen, refer ‘KYC Details Tab’ in ‘Unit Holder Maintenance Detail’ screen (UTDUH) in Entities User Manual.
4.11.8 Add Info Tab
Click on ‘Add Info’ tab in the Redemption Transaction Detail screen.

Other Info Field
Display
The system displays the additional information if any information heads have been maintained in the System Parameters, to be applicable for the segment.
Field Value
Alphanumeric; 60 Characters; Optional
The system displays the field value.
4.11.9 Fee Payment Tab
Click on ‘Fee Payment’ tab in the Redemption Transaction Detail screen.

If you have selected a fund for which transaction entry charges or allocation charges (or both) are applicable, then the following fields are enabled for data entry:
Fee in Fund Base Currency
Numeric; 30 Characters; Optional
Specify the fee in fund base currency details.
Transaction Fee
Numeric; 30 Characters; Optional
Specify the transaction fee.
If a transaction entry charge or transaction time fee is applicable for the fund the transaction time fee equivalent in both fund currency and transaction currency is computed by the system and displayed.
Fee Calculation Basis
Optional
Select the fee calculation basis from the drop-down list. The list displays the following values:
- Fund Base Currency
- Transaction Currency
Click ‘Fee Pay Details’ button to specify fee payment details.
You can specify the following values:
Transaction Fee
Numeric; 30 Characters; Optional
Specify the transaction fee.
Payment Mode
Optional
Select the payment mode from the drop-down list. The list displays the following values:
- Cheque
- Transfer
- Draft
- Card
Bank
Alphanumeric; 12 Characters; Optional
Specify the bank details.
Branch
Alphanumeric; 12 Characters; Optional
Specify the branch code.
Cheque Number
Alphanumeric; 16 Characters; Optional
Specify the cheque number.
Cheque Date
Date Format; Optional
Specify the cheque date.
Transfer Branch
Alphanumeric; 12 Characters; Optional
Specify the transfer branch details. Alternatively, you can select the transfer branch details from the option list. The list displays all valid branch code maintained in the system.
Account Type
Optional
Select the type of account from the drop-down list. The list displays the following values:
- Current Account
- Fixed Account
- Loan Account
- Mortgage Account
- Overdraft Account
- PF Account
- Recurring Account
- Savings Account
- Sweeping Account
Account Number
Alphanumeric; 16 Characters; Optional
Specify the account number.
Clearing Date
Date Format; Optional
Specify the clearing date.
Account Holder Name
Alphanumeric; 100 Characters; Optional
Specify the name of the account holder.
IBAN
Alphanumeric; 40 Characters; Optional
Specify the IBAN details.
4.11.10 Certificate Tab
Click Certificate tab in the Redemption Transaction Detail screen.
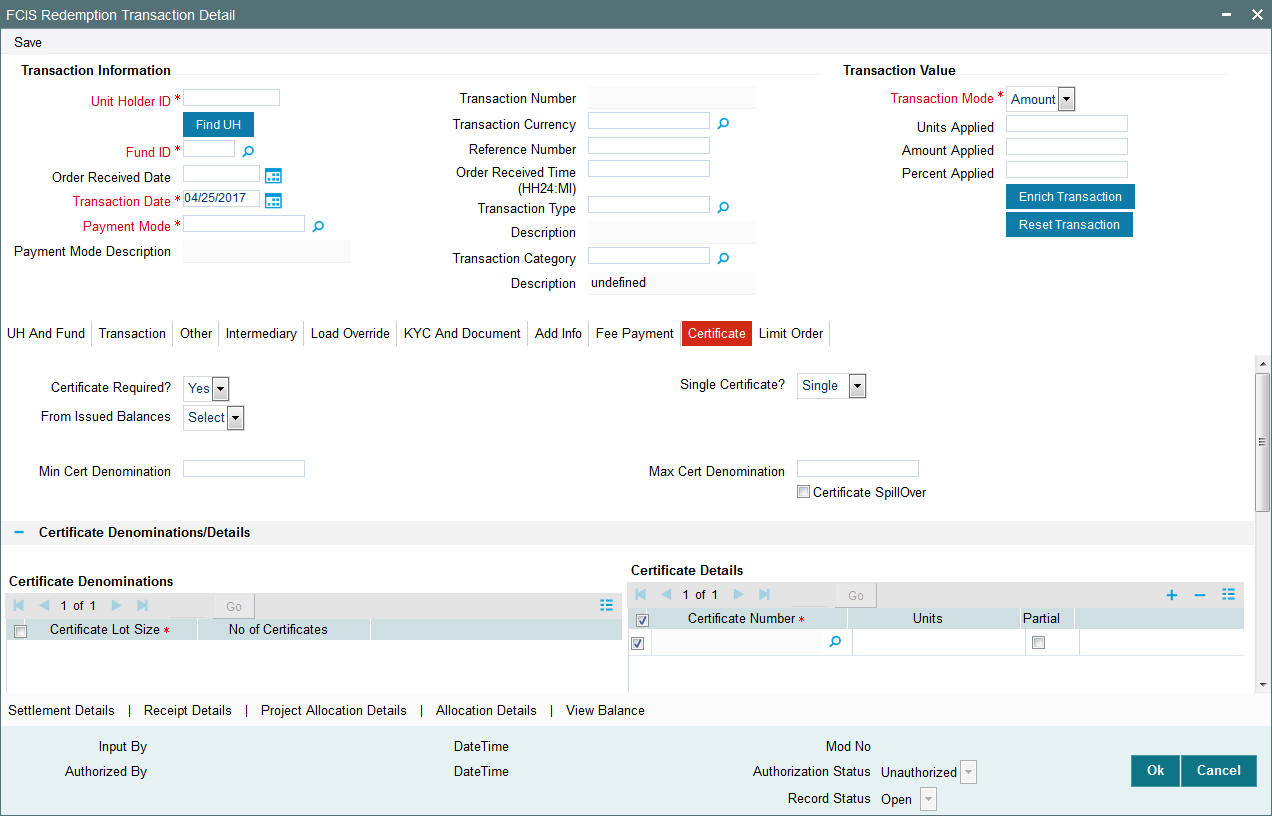
Certificate Required?
Optional
Select if certificate required or not from the drop-down list. The list displays the following values:
- Yes
- No
If the fund you have chosen is a Certificate Option fund as specified in the Shares Characteristics, and the unit holder has requested for certificates, then choose ‘Yes’ in the Certificate Required field.
Single Certificate?
Optional
Specify whether a single certificate or multiple certificates have been requested, in the Number of Certificates field. If single certificates have been designated for the fund, you cannot specify multiple certificates here.
If you have selected a certificate option fund, then all certificate information fields are enabled. The fields are Certificate Required, Single Certificate, From Issued Balances, and Max Cert Denomination and Min Cert Denomination under Certificate Section.
From Issued Balances
Optional
Select from issued balances details from the drop-down list. The list displays the following values:
- Yes
- No
- Both
Min Cert Denomination
Numeric; 22 Characters; Optional
Specify the minimum certificate denomination details.
Max Cert Denomination
Numeric; 22 Characters; Optional
Specify the maximum certificate denomination details.
Certificate Spillover
Optional
Check this box if certificate spillover is required.
Certificate Denominations/Details
Certificate Denominations
Certificate Lot Size
Display
The system displays the certificate lot size details.
No of Certificates
Display
The system displays the number of certificates.
Certificate Details
Certificate Number
Numeric; 10 Characters; Optional
Specify the certificate number. Alternatively, you can select certificate number from the option list. The list displays all valid certificate number maintained in the system.
Units
Numeric; 27 Characters; Optional
Specify the units details.
Partial
Optional
Check this box if partial details to be selected.
4.11.11 Limit Order Tab
Click on ‘Limit Order’ tab in the Redemption Transaction Detail screen.
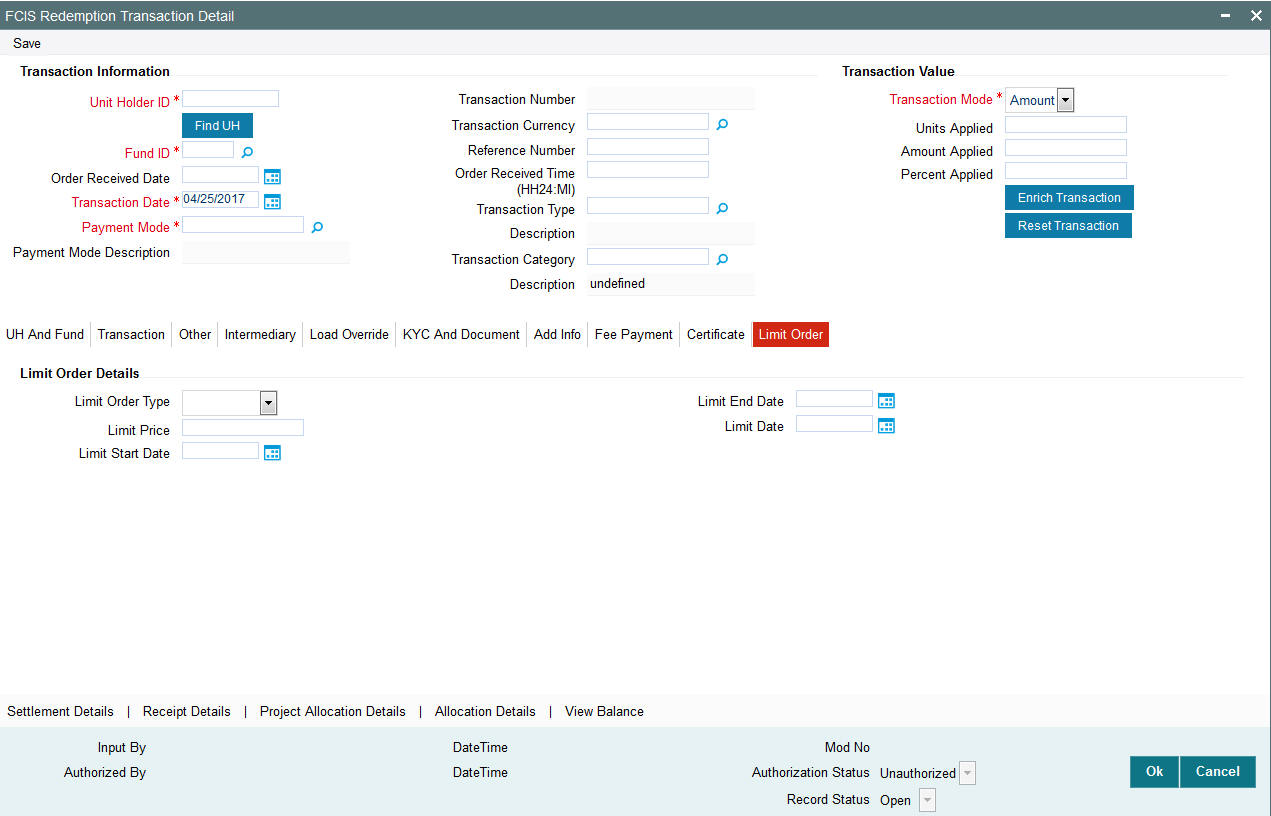
Select the ‘Limit Order for Subscription’ (buy) option in the Type of Transaction field. The Limit Order section is enabled.
Limit Order Type
Optional
Select ‘Price Based’ in the Limit Order Type field. The options available in the drop-down are as follows:
- Price-Based
- Date Based
Limit Price
Numeric; 9 Characters; Optional
Specify the price for the limit order, in the Limit Price field. This represents the price equal to or below which the transaction must be put through (for buy orders).
Limit Start and End Date
Date Format; Optional
Specify the period within which the limit order must be executed, by indicating the boundary dates, in the Limit Start Date and Limit End Date fields.
Limit Date
Date Format; Optional
To set up a date-based limit order, specify the following details in the Limit Order section:
- Select ‘Date Based’ in the Limit Order Type field.
- Specify the future date on which the limit order transaction must be executed, in the Limit Date field.
4.11.12 Settlement Details Button
Here, you can maintain settlement details only for the multi transactions. Click the ‘Settlement Details’ button to invoke the ‘Settlement Details’ screen.
For further details, refer ‘Settlement Details Button’ sub section in ‘IPO Subscription Detail’ section in this user manual.
4.11.12.1 Processing Multi Transactions
To process the outflow transactions, execute the ‘Multiple Transaction Generation’ batch as part of EOD process. While processing multi transactions, settlement will take precedence over the subscription transactions to be generated (with the exception of settlement of residual). Also, while doing settlement or while generating subscription the following will be the precedence order:
- Fixed – Units (Not applicable for settlement)
- Fixed – Amount (For subscription transaction generation, both unit and amount takes same priority)
- Percentage
- Residual
The system will either create settlement entries or create subscription transactions as per the multiple transactions. Once all the redemption transactions are allocated and settled, the subscription transactions are generated by a BOD batch. If any of the redemption transaction is not allotted, then the system will not pick up the entire wrapper transaction for settlement. In this case, the subscription transaction is also not created.
Note
- Each outflow and inflow transactions are saved as separate transactions but against the same wrapper reference number
- Backdated and future date transactions are allowed only for the out flow transactions
- The transaction date for the subscription transaction will be the highest settlement date of the redemption transactions.
- The settlement details entered at the individual transaction level will be overridden by the settlement details maintained at the multi transaction level.
- Settlement for the subscription transaction will always be by cash and the redemption transaction settlement will be based on the settlement details you have maintained.
- Reversing multiple transactions is not allowed from the ‘FCIS Bulk Transaction’ screen. However, you can reverse the individual transaction from online transaction screen.
- You can modify the individual linked transaction using the online transaction screen. In this case, the system will display a warning message indicating the transaction is a linked transaction
- The sum of redemption and sum of subscription should be same, else you can select transaction mode as residual.
- When the payment mode is given as multi payment, the payment mode should be provided in settlement details
- On saving the multi transaction, if any transaction fails, the system will display an error message. However, it saves the remaining transactions. You can correct the failed transactions and save it again.
4.11.13 Receipt Detail Button
Click on ‘Receipt Detail’ button to invoke Receipt Details screen.
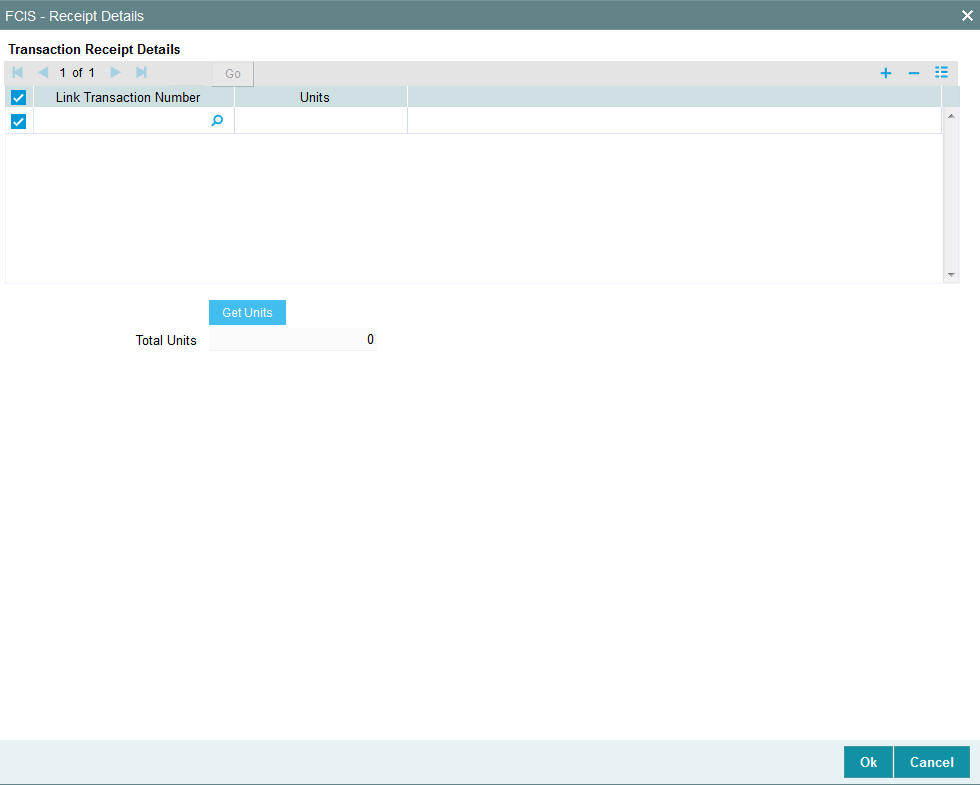
You can specify the following details:
Link Transaction Number
Alphanumeric; 16 Characters; Optional
Specify the link transaction number.
Units
Numeric; 22 Characters; Optional
Specify the units details.
Total Units
Display
The system displays the total number of units by clicking ‘Get Units’ button.
4.11.14 Project Allocation Details Button
At this stage, the transaction is ready to be saved. If you wish to see a projected picture of how the transaction would most possibly be allocated, then click the Project Allocation Details button.
You can view Dividend amount for each of the redemption transactions. This amount is the net payment amount payable along with the redemption post WHT and IDS being considered
You can view the projected allocation details only for funds in which the ageing policy is FIFO (first-in, first-out) or Transaction Receipts. If the prices are not available for subscription transactions on the transaction date, the latest available price is picked up for allocation.
For validating dilution levy breach amount, the system does a project allocation for the transaction and then calculates the net amount of the transaction.
When you request the allocation process, the system temporarily saves the transaction into temporary stores in the database and gives it a unique key string. The system then performs a ‘mock’ temporary allocation, and displays the details of the same in the Allocation Projection screen. The following allocation details are displayed:
- The Fund ID
- The Product ID
- The Unit Price for the transaction, as on the date of the temporary allocation.
- The Allocation Price
- The Gross amount in fund base currency
- The Settlement Amount in transaction currency
- The Linked Product ID
- The Load amount in fee currency
- The number of units allocated
- The Base Price
- The total load amount
- The Net amount in fund base currency
- The Settlement Amount in Price Currency
- The Linked units
- The Unit Balance
The following Load Details are displayed during the allocation:
- Fund ID
- Load ID
- Load Description
- Load Amount
- Load amount in fee currency
- VAT Amount in Fee Currency
The following Performance Fee Details are displayed during the allocation:
- Link Transaction Number
- InOutFlag
- Element Identification
- Element Description
After you have viewed the projected allocation details, click Close button to close the screen.
4.11.15 Allocation Details Button
Clicking ‘Allocation Details’ button, the following screen is displayed:
The following allocation details are displayed:
Allocation Details
The following Allocation details are displayed:
- Fund ID
- Allocation Date
- Allotted Units
- Unit Price
- Confirmed Units
- Settlement Amount Transaction Currency
- Gross Amount in FBC
- Net Amount in FBC
- Settlement Amount in Price Currency
- Rejected Units
- MMF Dividend Amount
- Tax Income Per Share
- EUSD Gain
Switch-In Allocation Details
The following Switch-in allocation details are displayed:
- To Fund ID
- Allocation Date
- Allotted Units
- Unit Price
- Confirmed Units
- Settlement Amount Transaction Currency
- Gross Amount in FBC
- Net Amount in FBC
- Rejected Units
Load Details
The following Load Details are displayed during the allocation:
- Fund ID
- Load ID
- Load Description
- From Entity Type
- To Entity Type
- From Entity
- To Entity
- Load Amount
- Load Amount in Fee Currency
Performance Fee Details
The following Performance Fee Details are displayed during the allocation:
- Link Transaction Number
- In Out Flag
- Element Identification
- Element Description
- Value
Transaction Component Details
The following Transaction Component Details are displayed during the allocation:
- Offer Price
- Bid Price
- Share Capital
- Income
- Fund Capital
- Share Premium
CGT Deduction Details
The following CGT Deduction Details are displayed during the allocation:
- Unit Holder/ Joint Unit Holder ID
- Unit Holder/ Joint Unit Holder Name’
- Tax Amount
4.11.16 View Balance Button
Clicking ‘View Balance’ button, ‘Investor Fund Balance’ screen is displayed:

Unit Holder ID
Alphanumeric; 12 Characters; Mandatory
Specify the unit holder ID. Alternatively, you can select unit holder ID form the option list.
You can also search for unit holder ID by clicking ‘Find UH’ button.
Click ‘Execute Query’ button to view the following fund balance details:
- Fund ID
- Fund Name
- Fund Base Currency
- UH Currency of Expression
- Policy Number
- Product ID
- Unit Balance
- Total Blocked Units
- FBC redeemable
- FBC Holding
- UHBC Redeemable
- Average Cost
- Provisional Units
- UHBC Holding
- Balance in Currency of Expression
- UH Preferred Currency
- Balance in UH Preferred Currency
- G1 Units
- G2 Units
The system also displays the Total Blocked Amount or Total Holdings in UH Currency.
4.11.16.1 Unit Block Details Button
You can also view financier and fund-wise blocked units and total number of units blocked in the ‘Total Block Units’ screen. You can invoke this screen by clicking the ‘Total Blocked Units’ button in the ’Investor Fund Balance Summary’ screen.

The system displays the following values:
- Unit Holder ID
- Financier Details
- Financer
- Fund ID
- Fund Name Short
- Units
- Total Blocked Units
During block transaction, if the financier name is not maintained, then all the records will be categorized and consolidated under financier as ‘Others’.
Note
You will be able to open the subscription /redemption/switch/SI screens from the Client Enquiry Fund Balances screen provided you have the SMS rights to open and transact in those screens.
4.11.16.2 Category-wise Balance Button
You can also view transaction category and unit holder details in the ‘CAT BAL’ screen. You can invoke this screen by clicking the ‘Category-wise Balance’ button in the ‘Investor Fund Balance Summary’ screen.

The system displays the following values:
- Unit Holder ID
- Fund ID
- Product ID
- Policy Number
- Transaction Category
- Confirmed Units
- Provisional Units
- Blocked Units
4.11.16.3 Unit Holdings Classification Button
You can view unit holder holdings classification details in ‘Unit Holder Holdings Classification’ screen. You can invoke this screen by clicking the ‘Unit Holdings Classification’ button in the ’Investor Fund Balance Summary’ screen.

Unit Holder ID
Display
The system displays the unit holder ID for which holding details will be displayed based on the value selected in ‘Consolidate Enquiry Screen’ (UTSCOINQ).
Fund ID
Display
The system defaults the fund ID for which holding details will be displayed based on the fund that is selected in the ‘Investor Fund Balance Details’ grid.
You need to select only one fund from the Fund Balance Detail grid.
Holding Classification
Display
The system displays the unit classification based on the fund selected.
Total Units
Display
The system displays the total sum of units for the corresponding classification.
Cost
Display
The system displays the total cost of the unit holdings for the classification.
The detail section will be populated with corresponding details as the case of on-shore or off-shore fund
For on-shore fund, the system displays the FEL/ CDSC holdings summary.
For off-shore fund holdings will be grouped into 2 different categories based on the Transaction Currency.
- All transaction with Transaction currency as Installed Entity Base Currency (TWD) (refers to AMC base currency)
- All transaction with Transaction currency other than Installed Entity Base Currency.
Click ‘View’ button to view the details of the selected unit classification. On click of ‘View’ button Holding Details screen will be launched.
The system displays the units holding and the cost for following classifications:
- Holding Type: CDSC, FEL, TWD etc.
- Transaction Type: Subscription, RSP
- Certificate option: Certificate or non-Certificate
- Redeemable: Redeemable or Blocked
- Units: Current units balance for the said classification
- Cost: Cost of the current unit holdings
Clicking ‘Purchase’ button, ‘FCIS Subscription Transaction Detail’ screen is displayed. After specifying the necessary details, save the transaction to purchase the same.
Clicking ‘Redeem’ button, ‘FCIS Redemption Transaction Detail’ screen is displayed. After specifying the necessary details, save the transaction to redeem the same.
Clicking ‘Switch’ button, ‘FCIS Transaction Switch Detail’ screen is displayed. After specifying the necessary details, save the transaction to switch the same.
Clicking ‘New SI’ button, ‘FCIS Standing Instructions Detail’ screen is displayed. After specifying the necessary details, save the standing instruction.
At this stage, you can save the transaction by clicking the Save button at the bottom of the Transaction Information Section. The transaction is saved, and the system generated transaction number (and the reference number, if any) is displayed.
Note
If the Auto-authorization feature is enabled for the Save operation for the AMC ID, then the transaction is saved as an authorized transaction. If not, it is saved as an unauthorized transaction. In either case, the Transaction Number is generated and displayed when you invoke the Save operation.
Specify Intermediary Details, Override Allocation Loads and Document Details, if necessary.
- Alternatively, the following information may also need to be captured before you save a redemption transaction.
- In the Intermediary section, ensure that all the identified brokers for the unit holder, that have not been disabled as on the application date, have been selected, and that the commission split percentages for all selected brokers sum up to one hundred percent.
- In the Load Override section, you may need to override an allocation-frequency charge or load. There are three options available for such overrides - Discount, Return Value and Increase. ‘Discount’ will reduce the slab value by the specified percent/amount for all slabs. ‘Increase’ will increase the slab value by the specified percent/amount for all slabs. ‘Return Value’ will change the return value for all the slabs to the specified percent/amount.
- In the Document Details section, you may need to capture the document id of the unit holder. You can either enter the document id or choose the same from the option list provided. This section will be enabled only if your installation is integrated with DMS.
- You can now save the transaction.
4.11.17 Transaction Processing Logic for Currency of Expression Funds
The system defaults the UH currency of expression in the ‘Transaction Currency’ field, if available, during transaction capture based on UH and fund combination.
If there is no UH currency of expression maintained in UTDUHCOE, then FBC will be defaulted in the ‘Transaction Currency’ field. If the transaction is processed, then upon authorization of the transaction FBC will be defaulted as UHCOE at the UHCOE maintenance (UTDUHCOE). The defaulted currency of expression in the UHCOE maintenance will be as system user.
If there is no UHCOE maintained in UTDUHCOE, then FBC will be defaulted in the ‘Transaction Currency’ field (Transaction capture) and if you override this defaulted currency to one of the FPC (from the fund level new) then upon authorization of the transaction FPC will be defaulted as UHCOE at the UHCOE maintenance.
If there is no UHCOE maintained in UTDUHCOE, then FBC will be defaulted in the ‘Transaction Currency’ field and if you override this defaulted currency to neither FBC/FPC, then upon authorization of the transaction FBC will be defaulted as UHCOE at the UHCOE maintenance.
Following are the system behaviour in case there is an unauthorized or a modified and unauthorized UHCOE maintenance:
Case 1: You need to input a transaction when there is an unauthorized UHCOE maintenance. During transaction input there is not UHCOE to be defaulted as the maintenance is still in unauthorized status. Hence as per logic Fund base currency defaults during transaction capture and this fund base currency will not get defaulted to UHCOE maintenance. Once the UHCOE maintenance is authorized then defaulting will happen during transaction capture.
Case 2: Authorized UHCOE is modified which is still in unauthorized status. In this case if you input a transaction, then the new modified UHCOE will get defaulted during transaction input.
4.11.17.1 FX Logic
The FX rate will not be considered between transaction base currency and fund price currency for currency of expression fund transactions if they are same. This is applicable for subscriptions, redemptions and switch (normal and pseudo) transactions.
The system will use the transaction price currency to get the load; and after applying the load, the net amount and gross amount will get calculated in fund price currency and FBC as well. The currency of expression factor is applied to derive values in fund base currency. The net, gross and load amount will be calculated in currency of expression for a currency of expression transaction and using the COE factor the same is stored in fund base currency only. For a transaction placed using one of the fund price currency; in the project allocation/allocation tab, the load amount in fee currency and vat amount in fee currency field will display the value in fund price currency only irrespective of the fee calculation basis value of the transaction.
For currency of expression transactions the exchange rate applied field during transaction capture will be defaulted to ‘1’. If you change it, then while saving, the system will display warning message as ‘This is a currency of expression transaction and exchange rate will be defaulted to 1 by the system’. This message is shown if do not click the ‘Enrich’ button after changing the exchange rate. The amount applied field will show the values in fund base currency.
If you change the exchange rate and click ‘Enrich’ button, then the system default the value to ‘1’ while saving without any warning message.
Note
The rounding precision for fund price currencies will be base price.
If the transactions are posted using fund price currencies then the system computes the load amount, net and gross amount in FBC using the COE factor. The display of these fields is mandatory fields that are to be computed as part of core allocation process. The exchange rate field will show default value as 1 in this case as COE factor is applied.
If there is no price available for the fund price currency during transaction input, the system will use the par value to arrive at the price. While saving the transaction, the system will display an override message as ‘Price not available for the price currency and the system will use the par value for the transaction’. If you continue, then the system will use the par value for processing the transactions. The unit price in project allocation will display FPC price. This logic will be for project allocation but during menu allocation or batch allocation, if the price is still not available, then the transaction will not be allotted.
4.11.17.2 Processing Unit Holder Currency of Expression
You can select Fund Base currency as currency of expression. There will be no restriction in changing/ amending the currency of expression any number of times against an UH and fund combination.You can maintain only one currency as currency of expression for a UH- Fund combination.
If a UH is closed and reopened then the corresponding action will not happen for the unit holder currency of expression maintenance. The UHCOE maintenance will get closed once the UH is closed but you have to manually reopen the currency of expression for the unit holder fund combination. In case, you do not reopen the UHCOE maintenance after UH reopening, and simultaneously input a transaction, then the system will not apply COE defaulting logic at UHCOE maintenance as there is already a record available for reopen.
Note
After maintaining the unit holder currency of expression, if one of the FPC is removed (at the fund level) and that currency is UHCOE for a UH, then defaulting at transaction capture will happen but the price currency/COE logic will not happen for the fund, it will be a case where TBC≠FBC or FPC (this will be a normal cross currency case). At the UHCOE maintenance this will be operationally controlled.
4.11.17.3 Processing Fund Price Maintenance
The system will validate at the time of fund price capture whether price is being maintained for the Fund in fund price currencies. If it is not maintained. then the system will display warning message as ‘Prices for all currencies are not maintained do you wish to continue?’
The Pre EOD checks ‘Number of Funds for which Fund Price has not been entered’ will be changed to check whether price in FPC have been maintained for the day in the system. This will be mandatory check. If the system does not find the Price in currency of expression, then the transaction entered in currency of expression will not be allotted.
The Units will be allocated using respective currency of expression/ fund price if the transaction is done in currency of expression. If the transaction is done in fund base currency then the allocation will take place by taking the fund price captured in fund base currency. If the transaction is done in a currency which is other than FBC or currency of expression then the allocation of units will be done using prices captured in FBC.
Fluctuation percentage will be applicable for FPC’s as well. For project allocation, the system will take the latest available price and show the project allocation.
In case of menu allocation if the price is not available then the system will not allocate the transactions.
4.11.17.4 NAV Correction impact for fund price currencies
If the NAV is corrected for fund price currency, say, for instance, GBP and the amend transaction is set to Yes; then all the transactions will be corrected with the new NAV price for the fund price currency (GBP). In case the amend transaction is set to No; the new price will not be corrected at transaction level. ‘Reflect in Trading’ field will not be impacted.
4.11.17.5 Currency of expression logic applied during Transactions
Case 1: If transaction base currency is not a part of the fund price currency and UH COE is not maintained
If the transaction is done in a transaction currency (TBC) other than the fund base currency and this currency is not present in the list of fund price currencies allowed for the fund, then the fund base currency will be defaulted as the unit holder’s currency of expression and for this transaction; FBC price will be applied. For this transaction FX has to be applied to convert TBC to FBC. This logic is applied to all the transaction Types, specially for Subscription transaction.
Case 2: Transaction Currency is part of the Fund Price Currency and UHCOE is not maintained
In case there is no UH COE maintained for a Fund and when an investor transacts in a transaction currency (TBC) which is one of the allowed fund price currencies (FPC) for the fund or FBC, then this transaction currency will be added as the Unit holder’s currency of expression for this fund. Transactions should not apply FX if Transaction Currency is one of the Fund's price currency or FBC.
Post the transaction authorization, the fund price currency/FBC has to be defaulted as UH preferred currencies at the UHCOE maintenance. (Post authorization user will not be able to amend the TBC hence defaulting will be post authorization).
Case 3: Transaction Currency is part of the Fund Price Currency and UHCOE is maintained
If Transaction base currency is other than the Unit holder’s currency of expression and the Unit Holder already has a UH COE for this fund, then while saving, the system will display warning message as ‘The transaction currency is not the currency of expression for the unit holder’.
UHCOE = FPC and TBC≠UHCOE
Note
The bulk and light weight screen will not be impacted with new any new fields but the validations pertaining to COE will be applied (UHCOE defaulting logic if the transaction is done for the first time), for light weight screen as the transaction currency is defaulted to Fund base currency; fund base currency will be defaulted as UHCOE). If the UHCOE is maintained for a UH-Fund combination and transaction is placed through light weight screen then UHCOE will be defaulted as Transaction currency. Light weight screen will allow transaction currency to be in fund base currency (FBC) or fund price currency (FPC) for COE funds and if the transaction is done in FPC for the first time- fund price currency will be defaulted in the UTDUHCOE maintenance. Also If the UH is transacting through light weight screen subsequently and if UTDUHCOE is already maintained then the UHCOE will be defaulted as Transaction currency.
4.11.17.6 System logic to derive the Price Currency
The system will derive the applicable fund price currency for currency of expression fund transactions as follows:
If TBC = fund base currency, then price currency will be FBC itself. No FX will be required. This is applicable for subscription, redemption and switch transactions.
When a trade is placed in a currency (TBC) that is the allowed fund price currency for the fund then Price currency will be respective fund price currency. No FX will be required. This is applicable for Subscription, Redemption and Switch transactions. (TBC = FPC then price CCY will be FPC)
When a trade is placed in a currency that is neither the fund base currency nor an allowed fund price currency for the fund, Price Currency will be FBC. FX will be required between Transaction Currency and FBC. This is applicable for Subscription and redemptions. (TBC ≠FBC or FPC; then Price CCY will be FBC).
4.11.17.7 Switch Logic for currency of expression
The Price Currency of SWITCH OUT leg will be used as Transaction Currency for SWITCH In Leg transaction and the SWITCH In leg Transaction amount will be Settlement Amount of OUT leg equivalent of Switch out Price currency. This is applicable only for currency of expression and non currency of expression fund switch transactions.
4.12 Redemption Transaction Summary
This section contains the following topics:
- Section 4.12.1, "Retrieving a Record in Redemption Transaction Summary Screen"
- Section 4.12.2, "Editing Redemption Transaction Record"
- Section 4.12.3, "Viewing Redemption Transaction Record "
- Section 4.12.4, "Deleting Redemption Transaction Record"
- Section 4.12.5, "Authorizing Redemption Transaction Record "
- Section 4.12.6, "Amending Redemption Transaction Record "
- Section 4.12.7, "Authorizing Amended FCIS Redemption Transaction Record "
4.12.1 Retrieving a Record in Redemption Transaction Summary Screen
You can retrieve a previously entered record in the Summary Screen, as follows:
Invoke the ‘FCIS Redemption Transaction Summary’ screen by typing ‘UTSTXN03/ UTSTRA03’ in the field at the top right corner of the Application tool bar and clicking on the adjoining arrow button and specify any or all of the following details in the corresponding details.

- The status of the record in the Authorization Status field. If you choose the ‘Blank Space’ option, then all the records are retrieved.
- The status of the record in the Record Status field. If you choose the ‘Blank Space’ option, then all records are retrieved
- Transaction Number
- Fund ID
- Currency of Expression Transaction
- Transaction Mode
- Dealing Date
- Transaction Status
- AMC ID
- Completion Date
- Payment Mode
- Communication Mode
- Reference Number
- Unit Holder ID
- Transaction Type
- Transaction Date
- Limit Order
- Transaction Currency
- Maker ID
- Agent Code
- Ref Type
Click ‘Search’ button to view the records. All the records with the specified details are retrieved and displayed in the lower portion of the screen.
Note
You can also retrieve the individual record detail from the detail screen by querying in the following manner:
- Press F7
- Input the Transaction Number
- Press F8
You can perform Edit, Delete, Amend, Authorize, Reverse, Confirm operations by selecting the operation from the Action list. You can also search a record by using a combination of % and alphanumeric value.
Note
The status field in the Records pane of the summary screen displays the bulk operation results.
Example:
You can search the record for Fund ID by using the combination of % and alphanumeric value as follows:-
- Search by A% :- System will fetch all the records whose Transaction Number starts from Alphabet ‘A’. For example:- AGC17,AGVO6,AGC74 etc.
- Search by %7 :- System will fetch all the records whose Transaction Number ends by numeric value’ 7’. For example: AGC17, GSD267, AGC77 etc.
- Search by %17%:- System will fetch all the records whose Transaction Number contains the numeric value 17. For example: GSD217, GSD172, AGC17 etc.
4.12.2 Editing Redemption Transaction Record
You can modify the details of FCIS Redemption Transaction record that you have already entered into the system, provided it has not subsequently authorized. You can perform this operation as follows:
- Invoke the FCIS Redemption Transaction Summary screen from the Browser.
- Select the status of the record that you want to retrieve for modification in the Authorization Status field. You can only modify records that are unauthorized. Accordingly, choose the Unauthorized option.
- Specify any or all of the details in the corresponding fields to retrieve the record that is to be modified.
- Click ‘Search’ button. All unauthorized records with the specified details are retrieved and displayed in the lower portion of the screen.
- Double click the record that you want to modify in the list of displayed records. The FCIS Redemption Transaction Detail screen is displayed.
- Select Unlock Operation from the Action list to modify the record. Modify the necessary information.
Click Save to save your changes. The FCIS Redemption Transaction Detail screen is closed and the changes made are reflected in the FCIS Redemption Transaction Summary screen.
4.12.3 Viewing Redemption Transaction Record
To view a record that you have previously input, you must retrieve the same in the FCIS Redemption Transaction Summary screen as follows:
- Invoke the FCIS Redemption Transaction Summary screen from the Browser.
- Select the status of the record that you want to retrieve for viewing in the Authorization Status field. You can also view all records that are either unauthorized or authorized only, by choosing the unauthorized / Authorized option.
- Specify any or all of the details of the record in the corresponding fields on the screen.
- Click ‘Search’ button. All records with the specified fields are retrieved and displayed in the lower portion of the screen.
- Double click the record that you want to view in the list of displayed records. The FCIS Redemption Transaction Detail screen is displayed in View mode.
4.12.4 Deleting Redemption Transaction Record
You can delete only unauthorized records in the system. To delete a record that you have previously entered:
- Invoke the FCIS Redemption Transaction Summary screen from the Browser.
- Select the status of the record that you want to retrieve for deletion.
- Specify any or all of the details in the corresponding fields on the screen.
- Click ‘Search’ button. All records with the specified fields are retrieved and displayed in the lower portion of the screen.
- Double click the record that you want to delete in the list of displayed records. . The FCIS Redemption Transaction Detail screen is displayed.
- Select Delete Operation from the Action list. The system prompts you to confirm the deletion and the record is physically deleted from the system database.
4.12.5 Authorizing Redemption Transaction Record
- An unauthorized FCIS Redemption Transaction record must be authorized in the system for it to be processed. To authorize a record:
- Invoke the FCIS Redemption Transaction Summary screen from the Browser.
- Select the status of the record that you want to retrieve for authorization. Typically, choose the unauthorized option.
- Specify any or all of the details in the corresponding fields on the screen.
- Click ‘Search’ button. All records with the specified details that are pending authorization are retrieved and displayed in the lower portion of the screen.
- Double click the record that you wish to authorize. The FCIS Redemption Transaction Detail screen is displayed. Select Authorize operation from the Action List.
When a checker authorizes a record, details of validation, if any, that were overridden by the maker of the record during the Save operation are displayed. If any of these overrides results in an error, the checker must reject the record.
4.12.6 Amending Redemption Transaction Record
After a FCIS Redemption Transaction record is authorized, it can be modified using the Unlock operation from the Action List. To make changes to a record after authorization:
- Invoke the FCIS Redemption Transaction Summary screen from the Browser.
- Select the status of the record that you want to retrieve for authorization. You can only amend authorized records.
- Specify any or all of the details in the corresponding fields on the screen.
- Click ‘Search’ button. All records with the specified details that are pending authorization are retrieved and displayed in the lower portion of the screen.
- Double click the record that you wish to authorize. The FCIS Redemption Transaction Detail screen is displayed in amendment mode. Select Unlock operation from the Action List to amend the record.
- Amend the necessary information and click on Save to save the changes
4.12.7 Authorizing Amended FCIS Redemption Transaction Record
An amended FCIS Redemption Transaction record must be authorized for the amendment to be made effective in the system. The authorization of amended records can be done only from Fund Manager Module and Agency Branch module.
The subsequent process of authorization is the same as that for normal transactions.
4.13 Redemption Confirmation
This section contains the following topic:
- Section 4.13.1, "Invoking Redemption Confirmation Screen"
- Section 4.13.2, "Show Details Button"
- Section 4.13.3, "Process Button"
- Section 4.13.4, "View Error Log Button"
4.13.1 Invoking Redemption Confirmation Screen
You can confirm redemption transaction using ‘Confirm Redemption Detail’ screen. You can invoke this screen by typing ‘UTDCNRED’ in the field at the top right corner of the Application tool bar and clicking on the adjoining arrow button.
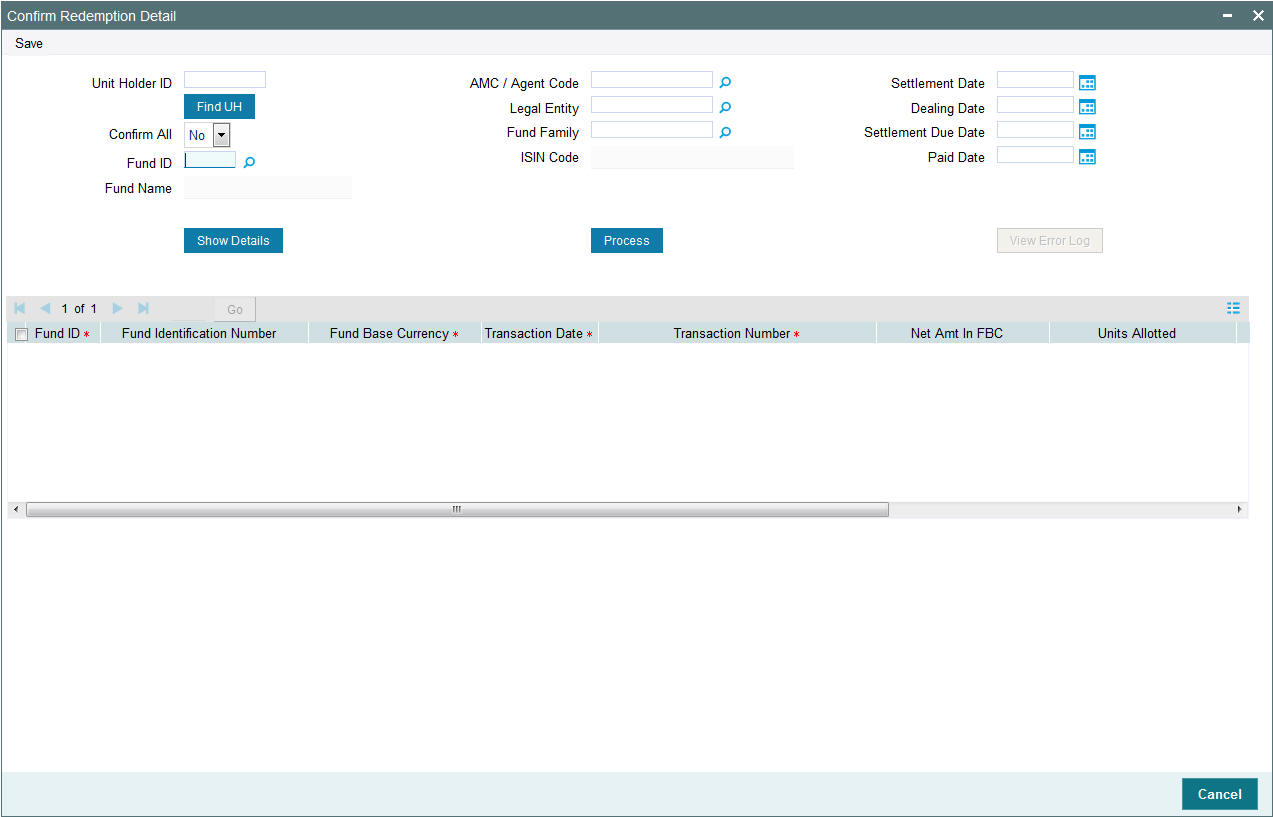
You can specify the following details:
Unit Holder ID
Alphanumeric; 12 Characters; Optional
Specify the unit holder ID.
Confirm All
Optional
Select if redemption transaction is confirmed or not from the drop-down list. The list displays the following values:
- Yes
- No
Clicking ‘Yes’ option, the system will clear the transaction details irrespective of trades chosen individually for confirmation or not. That is, if ‘Process’ button is clicked with ‘Confirm All’ option is ‘Yes’ then all the trades pertaining to the selected criteria will be confirmed irrespective of whether trades have been individually selected or not.
Fund ID
Alphanumeric; 6 Characters; Optional
Specify the fund ID. Alternatively, you can select the fund ID from the option list. The list displays all the valid fund IDs maintained in the system.
Fund Name
Display
The system displays the fund name for the selected fund ID.
AMC / Agent Code
Alphanumeric; 12 Characters; Optional
Specify the AMC or agent code. Alternatively, you can select the AMC or agent code from the option list. The list displays all the valid AMC or agent codes maintained in the system.
Legal Entity
Alphanumeric; 6 Characters; Optional
Specify the legal entity. Alternatively, you can select legal entity from the option list. The list displays all the valid legal entity code maintained in the system.
Fund Family
Alphanumeric; 6 Characters; Mandatory
Specify the fund family details. Alternatively, you can select fund family from the option list. The list displays all the valid fund family code maintained in the system.
ISIN Code
Display
The system displays ISIN code for the selected fund ID.
Settlement Date
Date Format; Optional
Select the settlement date from the adjoining calendar.
Dealing Date
Date Format; Optional
Select the dealing date from the adjoining calendar.
Settlement Due Date
Date Format; Optional
Select the settlement due date from the adjoining calendar.
Paid Date
Date Format; Optional
Select the paid date from the adjoining calendar.
4.13.2 Show Details Button
Clicking ‘Show Details’ button, the system will display the following details:
- Fund ID
- Fund Identification Number
- Fund Base Currency
- Transaction Date
- Transaction Number
- Net Amount in FBC
- Units Allotted
- Confirmation Date
- Dealing Date
- Settlement Due Date
4.13.3 Process Button
if ‘Process’ button is clicked with ‘Confirm All’ option is ‘Yes’ then all the trades pertaining to the selected criteria will be confirmed irrespective of whether trades have been individually selected or not. The system will display a confirmation message as ‘Choosing this option will pick all the transactions matching the criteria for processing. Do you want to continue?’
4.13.4 View Error Log Button
Clicking ‘View Error Log’ button, the following window is displayed:
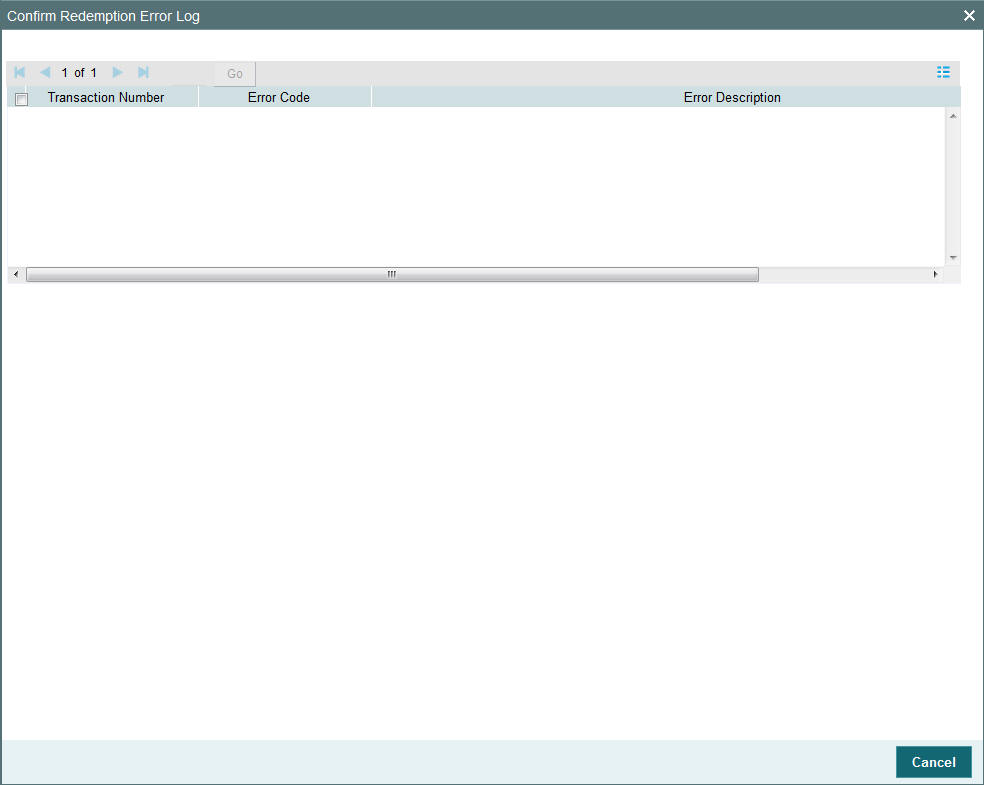
The system will persist the error and the failed records will be shown along with the error description. The following values are displayed:
- Transaction Number
- Error Code
- Error Description
The following types of errors will be considered:
- Stop account Errors for redemption settlement
- Stop Account is issued for redemption Settlement to this Unitholder
- Confirmation date cannot be less than transaction date
- Settlement process related
- Redemption transaction is not allotted
- Settlement is not matching with the total payment amount
- General error – Redemption confirmation failed
- If Client country ‘REDCONFCCYCHECK’ is ON then the system will check transaction currency for holiday. If it is OFF, then the system will check for fund calendar. The system will display an error message as ‘Date entered is a holiday’
If entered confirmation date is greater than date allotted and confirmation lag, then the system will display an error message as ‘Confirmation date is greater than allowed limit’.
4.14 Early Redemption Detail
This section contains the following topics:
4.14.1 Invoking Early Redemption Detail Screen
You can maintain early redemption details using ‘Early Redemption Detail’ screen. You can invoke this screen by typing ‘UTDERRED’ in the field at the top right corner of the Application tool bar and clicking on the adjoining arrow button.

You can specify the following details:
Fund ID
Alphanumeric; 6 Characters; Optional
Specify the fund ID. Alternatively, you can select fund ID from the option list. The list displays all valid fund ID maintained in the system.
Transaction Date
Date Format; Optional
Select the transaction date from the adjoining calendar.
After specifying the necessary details, click ‘Show Records’ button. The system displays the following transaction details:
- Fund ID
- Transaction Date
- Transaction Number
- Unit Holder ID
- Branch Code
- Units
- Units Applied
4.15 Transaction Switch Detail
This section contains the following topics:
- Section 4.15.1, "Invoking Transaction Switch Detail Screen"
- Section 4.15.2, "UH and Fund Tab"
- Section 4.15.3, "Exchange Details Tab"
- Section 4.15.4, "Other Details Tab"
- Section 4.15.5, "Intermediary Tab"
- Section 4.15.6, "Load Override Tab"
- Section 4.15.7, "KYC and Document Tab"
- Section 4.15.8, "Add Info Tab"
- Section 4.15.9, "Fee Payment Details Tab"
- Section 4.15.10, "Switch Overrides Tab"
- Section 4.15.11, "Certificate Tab"
- Section 4.15.12, "Document Details Button"
- Section 4.15.13, "Receipt Detail Button"
- Section 4.15.14, "Settlement Details Button"
- Section 4.15.15, "Project Allocation Details Button"
- Section 4.15.16, "Allocation Details Button"
- Section 4.15.17, "View Balance Button"
- Section 4.15.18, "Saving the Transaction"
- Section 4.15.19, "Transaction Processing Logic for Currency of Expression Funds"
4.15.1 Invoking Transaction Switch Detail Screen
Enter a switch transaction request into the system in the following sequence of events:
Invoke the ‘FCIS Transaction Switch Detail’ screen by typing ‘UTDTXN04’ in the field at the top right corner of the Application tool bar and clicking on the adjoining arrow button. The Transaction Detail screen for switch transactions is displayed, with all the default information. Select 'New' from the Actions menu in the Application tool bar or click new icon to enter the details of the Switch Transaction.
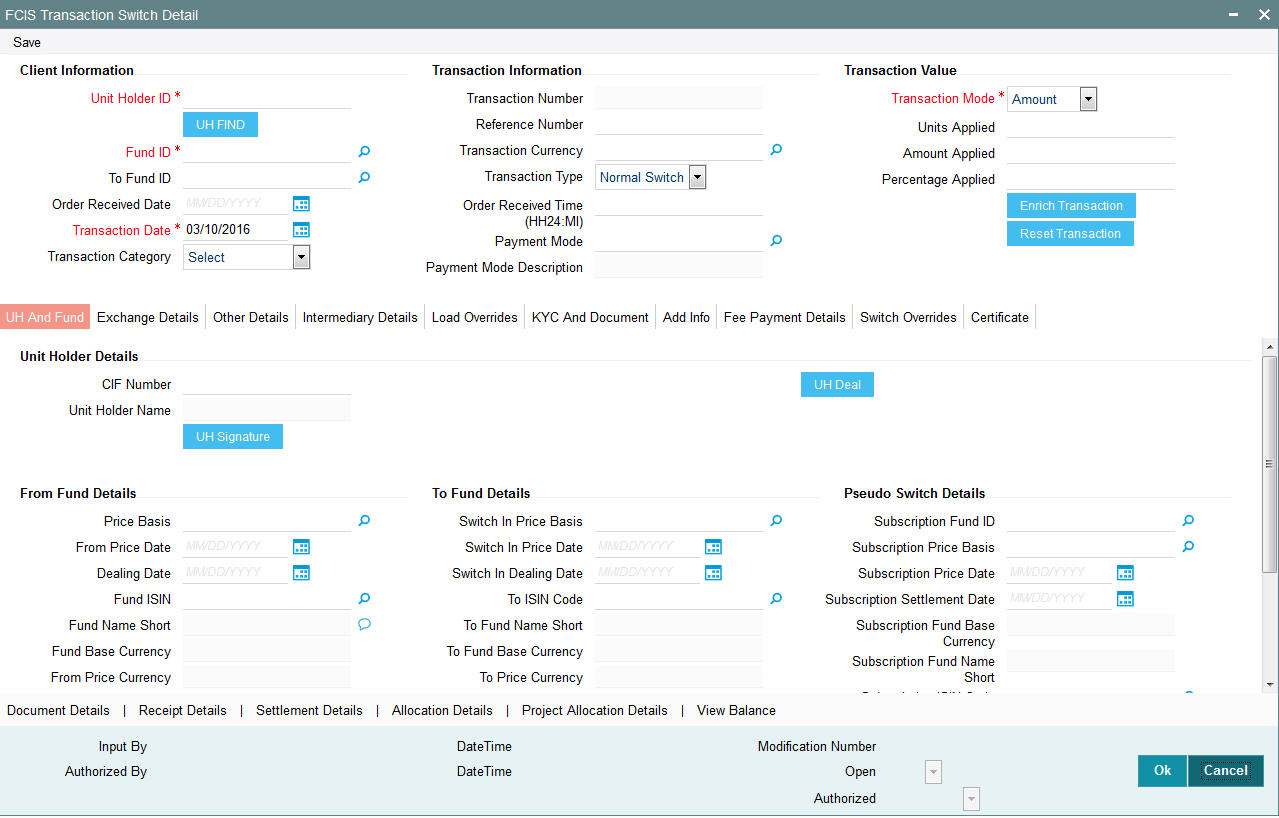
In this screen, you can maintain the following details:
Client Information
Unit Holder ID
Alphanumeric; 12 Characters; Mandatory
Specify the unit holder who has requested the transaction, in the Client Information section. Specify the CIF Number and then choose the required unit holder in the Unit Holder field, or else specify the ID of the unit holder in the Unit Holder field.
You can query unit holder ID by clicking ‘Find UH’ button.
You must select a CIF or unit holder that is not restricted (or does not belong to a restricted category) for the fund into which the transaction is being entered. If not, the system does not allow the transaction to be saved.
When you specify the unit holder,
The funds in which the specified unit holder can transact are displayed in the Fund drop down list.
The default brokers maintained for the specified unit holder that have not been disabled as on the transaction date, are displayed by default in the Broker Details Section of the screen.
Fund ID
Alphanumeric; 6 Characters; Mandatory
Specify the fund ID in which the requested transaction is to be put through. Alternatively, you can select fund ID from the option list. The list displays all valid fund ID maintained in the system.
To Fund ID
Alphanumeric; 6 Characters; Optional
Specify the To fund ID. Alternatively, you can select To fund ID from the option list. The list displays all valid To fund ID maintained in the system.
Order Received Date
Date Format; Optional
Specify the order received date.
Transaction Date
Date Format; Mandatory
The transaction date is reckoned to be the application date by default. You can alter this and specify any date that is not designated as a holiday in the system. If you do specify a holiday, the system prompts you to specify a different date.
If you specify an earlier date, the fund that you choose for the transaction must be one for which backdating of transactions is allowed in the Transaction Processing Rules. The specified earlier date must also be within the backdating limit, as specified for the fund in the Transaction Processing Rules.
If the unit holder account has a stop instruction (i.e., is frozen), then you can only input the transaction if the transaction date is ahead of the Stop Account Release Date specified in the account profile.
Transaction Category
Alphanumeric; 1 Character; Optional
Specify the type of transaction. Alternatively, you can select transaction category from the option list. The list displays all valid transaction category code maintained in the system.
Description
Display
The system displays the description for the selected transaction category.
Transaction Information
Transaction Number
Display
The system displays the transaction number.
Reference Number
Alphanumeric; 16 Characters; Optional
Specify the reference number for the transaction in the Reference Number field. If the reference number is designated to be system-generated for the agency branch, then the Reference Number field is locked and the number will be generated by the system when you save the transaction.
Transaction Currency
Alphanumeric; 3 Characters; Optional
Specify the transaction currency. Alternatively, you can select transaction currency from the option list. The list displays all transaction currency code maintained in the system.
Transaction Type
Optional
Select the type of switch transaction requested by the unitholder from the drop-down list. The list displays the following values:
- Normal Switch
- Pseudo Switch
- CMA Switch
- BB Switch
- Systematic PS
In case of normal switch transaction, the following sequence of events occurs:
- Select the fund from which the requested switching is to be put through, from the drop down list in the Fund field. You can also specify the ISIN Code of the fund. The base currency for the fund is displayed in the Fund Base Currency field. The name of the chosen fund is displayed in the Fund Name field.
- If you have selected a certificate option fund, then all certificate information fields are enabled. The fields are Certificate Required, Number of Certificates and the Certificate Details section.
- If you have selected a fund for which transaction entry charges or allocation charges (or both) are applicable, then the following fields are enabled for data entry:
- The Fee Details including the Calculate Fee button, the Fee in Fund Base Currency, Fee in Transaction Currency, Override Fee and the Fee after Override fields.
- The Fee Payment Details Section.
- The Load Override Section.
- Specify the fund to which the unit holder wishes to switch the investment, in the To Fund field. You can also specify the ISIN Code of the fund. The name of the chosen fund is displayed in the Fund Name field. Switching is allowed either between funds in a fund family or between funds in an AMC, as designated in the Entity Maintenance record for the AMC. You are allowed to switch to a fund provided you do not have any holdings in the fund complementary to the fund you have chosen.
In case of pseudo switch transaction, the following fields will be displayed:
- Subscription Fund ID
- Subscription Price Basis
- Switch In Fund Base Currency
Bed and Breakfast switch means switching within the same fund i.e. if the ‘Switch from’ fund and the ‘Switch to’ fund in a switch transaction are same. In case of Band B switch, the following sequence of events occurs:
- The system bypasses all the check which restricts switching into same fund at the time of allocation if the reftype is ‘BB’.
- The system defaults the ‘Switch To’ fund to same as ‘Switch From’ fund. You will not be able to edit the same.
- For the switch subscription leg, transaction date will be defaulted with the switch redemption leg transaction date
- For a transaction, you will not be able to specify the settlement details for either the redemption leg or the subscription leg.
- The transaction currency and the fund base currency should be same. On enriching the transaction, the system defaults the transaction currency to same as the fund base currency.
As part of EOD batch, amount based subscription leg transaction is generated once the allocation of redemption leg is through and it is settled. B & B transaction processing and allocation is similar to that of the pseudo switch transaction type. The settlement amount in fund base currency of the redemption transaction will be used as the transaction currency amount for the subscription leg. The transaction currency for the subscription leg will be the fund base currency.
Select the transaction type. In case for a particular transaction type restriction is ‘Not Applicable’, then the system will display an error message as ‘STOPACCOUNT is issued for ‘Transaction Type’ to this Unit Holder’.
Note
- Allocation for both redemption and subscription transaction is done on the same day.
- Based on the redemption and subscription allocation price, the subscription leg allotted units could be different from the redemption leg allotted units
- The Bed and Breakfast subscription transaction is generated only after its linked redemption and its original subscription transaction status is complete.
Order Received Time (HH24:MI)
Time Format; Mandatory
Specify the order received time.
Payment Mode
Alphanumeric; 2 Characters; Optional
Specify the payment mode. Alternatively, you can select payment mode from the option list. The list displays the valid payment mode maintained in the system.
Payment Mode Description
Display
The system displays the payment mode description.
Deriving the order received date and time
The system will validate the Fund cut off based on the Order received time and not the actual time the Transaction is captured in the system. The transaction date will be derived by the system based on these two fields. For instance, if the Fund Cut off is 14.00 hrs at a Fund level and the transaction is captured at 15.00 hrs in the system with the Order Received time as 13.00 then the system should validate the time maintained at Order Received time and not the time the transaction is actually captured. This will be considered as the same day transaction.
If all the below mentioned transactions are captured on 15-Oct-2012 at 16:00 hrs then the transaction dates will be derived as detailed below. In case the transaction date is amended then the system has to consider the amended transaction date. Post authorisation of the transaction, you cannot amend order received date and time.
Fund Cut off |
Order Received Date |
Order Received time |
Transaction Date |
14:00 |
15-Oct-2012 |
13:50 |
15-Oct-2012 |
14:00 |
15-Oct-2012 |
14:10 |
16-Oct-2012 |
14:00 |
14-Oct-2012 |
13:25 |
14-Oct-2012 |
14:00 |
14-Oct-2012 |
15:15 |
15-Oct-2012 |
Transaction Value
Transaction Mode
Mandatory
Select the transaction mode from the drop-down list. Following are the options available in the drop-down list:
- Amount
- Units
- Percent
Units Applied
Numeric; 27 Characters; Optional
Specify the units applied details.
You should specify the details in this field only if you have selected ‘Transaction Mode’ field as Units. Else, while clicking ‘Enrich Transaction’ button, the system will display an error message.
Amount Applied
Numeric; 27 Characters; Optional
Specify the amount applied details.
You should specify the details in this field only if you have selected ‘Transaction Mode’ field as Amount. Else, while clicking ‘Enrich Transaction’ button, the system will display an error message.
Percent Applied
Numeric; 27 Characters; Optional
Specify the percent applied details.
You should specify the details in this field only if you have selected ‘Transaction Mode’ field as Percent. Else, while clicking ‘Enrich Transaction’ button, the system will display an error message.
After entering all details in Transaction Information section click on ‘Enrich Transaction’ button. The list of transactions applicable for the Unit Holder selected is defaulted in UH and Fund section.
On click of ‘Enrich Transaction’ button all the header fields will be disabled. Clicking ‘Enrich Transaction’ button during the transaction input, the system will remove all the entered details except the header data entered and re-open all the fields to capture new transaction.
Click ‘Reset Transaction’ button to reset the entire transaction during transaction input, modification and amendment.
For transaction modification/amendment, you can query the transaction and on clicking ‘Reset Transaction’ button, all the transaction details can be modified without changing the transaction number.
For any modification/amendment in any of the primary field including Fund ID or Transaction Date, you need to click ‘Reset Transaction’ button. Using this option, the system will clear all the entered details except the header data entered and re-open all the fields to capture new details.
The reset function does clearing of all the data with the same transaction number. The system will display an override message. Hence all the data needs to be provided again if reset is clicked.
The following primary fields will be enabled for modification and Amendment of the transaction:
- Order Received Date
- Order Received Time
- Transaction date
- Fund ID
- Transaction Currency
- Unitholder ID
- Reference number
- Transaction mode
- Amount applied
- Units applied
- Percentage applied
- Payment mode
- Transaction type
- To Fund ID
- To Unitholder ID
- Subscription fund ID
For any change/ modification or amendment in the above primary fields in transaction screens, system will re-populate the transaction screen and linked dependent fields details on enrich of the transaction.
Both the ‘From’ and ‘To’ fund IDs of Switch Transaction will be enabled for modification and amendment.
During transaction input/modification or amendment, if you override the details, system will retain the user override data for transaction entry/save. However, post overriding the details/value if you change any of the primary fields, the system will re-populate the transaction screen with latest details.
The linked dependent details will include Settlement Date, Settlement Due Date, Price Date, Load details and Dealing Date.
The system will default the Settlement date/due date, Price date, dealing date on enrich/save of the transaction only if the previous calendar year is maintained in the system.
Note
- This is not applicable to transactions captured through any other function/UI/channels/uploads.
- If UBS integration is enabled then system will disallow all the above modification or changes and pertaining to the changes proposed. The ‘Reset Transaction’ Button will be disabled, if UBS- Integration is enabled
4.15.2 UH and Fund Tab
Click UH and Fund tab in FCIS Transaction Switch Detail screen.
CIF Number
Alphanumeric; 12 Characters; Optional
The system displays the CIF number based on the unit holder ID selected. However, you can amend this value.
Unit Holder Name
Display
The system displays the unit holder name for the selected unit holder ID.
Click ‘UH Signature’ button to upload the image.
Click UH Deals button to view the details of all the deals set up for the unit holder. Enter the relevant search criteria in the Find Options screen. The system will display the records that match the search criteria you have specified.
Fund Details
From Fund Details
Price Basis
Alphanumeric; 10 Characters; Optional
Specify the price basis details. Alternatively, you can select price basis from the option list. The list displays all valid price basis maintained in the system.
From Price Date
Date Format; Optional
Specify the from price date.
Dealing Date
Date Format; Optional
By default, the dealing date is derived based on the dealing date maintained for the fund in the Specific Fund Price Date Setup screen. The date displayed here can be altered, if required, and you can specify the requisite dealing date. Dealing date will not be displayed on the screen if it is not maintained for a fund or the fund is not a specific price date fund. System will default the transaction date as the dealing date.
If you have defined a different trade cycle for the fund in the ‘Override Trade Cycle Date’ screen and the transaction falls within the override period mentioned in this maintenance, the system will default the dealing date from the maintenance.
Refer the chapter ‘Other Fund Activities’ in the Fund Manager User Manual for more details on maintaining alternate trade cycles for a fund
Fund ISIN
Alphanumeric; 25 Characters; Optional
Specify the Fund ISIN code. Alternatively, you can select fund ISIN code from the option list. The list displays all valid fund ISIN code maintained in the system.
If you have specified fund ID, then the system displays the fund ISIN code and vice versa.
Fund Name Short
Display
The system displays the short fund name for the selected fund ID.
Fund Base Currency
Display
The system displays the fund base currency.
From Price Currency
Display
The system displays the from price base currency.
To Fund Details
Switch in Price Basis
Alphanumeric; 10 Characters; Optional
Specify the Switch in price basis details. Alternatively, you can select switch in price basis from the option list. The list displays all valid switch in price basis maintained in the system.
Switch in Price Date
Date Format; Optional
Specify the switch in price date.
Switch in Dealing Date
Date Format; Optional
Specify the switch in dealing date.
To ISIN Code
Alphanumeric; 25 Characters; Optional
Specify the To ISIN code. Alternatively, you can select To ISIN code from the option list. The list displays all valid To ISIN code maintained in the system.
To Fund Name Short
Display
The system displays the short fund name.
To Fund Base Currency
Display
The system displays the To fund base currency.
To Price Currency
Display
The system displays the To price currency.
Pseudo Switch Details
Subscription Fund ID
Alphanumeric; 6 Characters; Optional
Specify the subscription fund ID. Alternatively, you can select subscription fund ID from the option list. The list displays all valid subscription fund ID maintained in the system.
Subscription Price Basis
Alphanumeric; 10 Characters; Optional
Specify the subscription price basis. Alternatively, you can select subscription price basis from the option list. The list displays all valid subscription price basis maintained in the system.
Subscription Price Date
Date Format; Optional
Specify the subscription price date.
Subscription Settlement Date
Date Format; Optional
Specify the subscription settlement date.
Subscription Fund Base Currency
Display
The system displays Subscription Fund Base Currency details.
Subscription Fund Name Short
Display
The system displays Subscription Short Fund Name.
Subscription ISIN Code
Alphanumeric; 25 Characters; Optional
Specify the subscription ISIN code. Alternatively, you can select subscription ISIN code from the option list. The list displays all valid subscription ISIN code maintained in the system.
Subscription Price Currency
Display
The system displays Subscription Price Currency details.
Currency of Expression Transaction
Optional
Select the currency of Expression transaction status from the drop-down list. The list displays the following values:
- Yes
- No
Subscription Transaction Date
Display
The system displays Subscription Transaction Date.
4.15.3 Exchange Details Tab
Click Exchange Details tab in the Transaction Switch Detail screen.
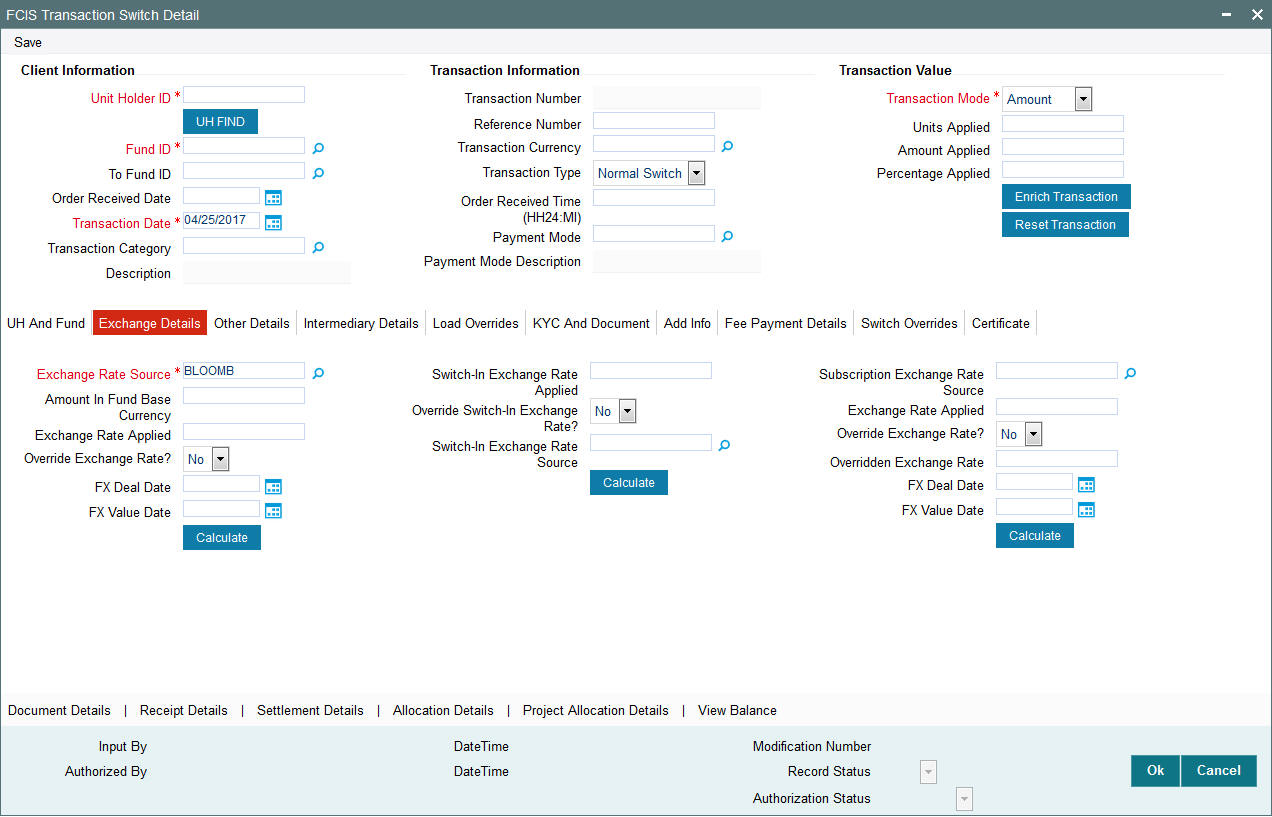
You can specify the following details:
Exchange Rate Source
Alphanumeric; 6 Characters; Mandatory
Specify the exchange rate source. Alternatively, you can select exchange rate source from the option list. The list displays all valid Exchange Rate Source maintained in the system.
Amount In Fund Base Currency
Numeric; 18 Characters; Optional
Specify the amount in fund base currency.
Exchange Rate Applied
Numeric; 21 Characters; Optional
Specify the applied exchange rate.
Override Exchange Rate?
Optional
Select if exchange rate applied has to be overridden from the drop-down list. The list displays the following values;
- Yes
- No
FX Deal Date
Date Format; Optional
Specify the FX deal date.
FX Value Date
Date Format; Optional
Specify the FX value date.
Switch-In Exchange Rate Applied
Numeric; 21 Characters; Optional
Specify the switch-in exchange rate applied.
Override Switch-in Exchange Rate
Optional
Select if switch-in exchange rate should be overridden or not from the drop-down list. The list displays the following values:
- Yes
- No
Switch-in Exchange Rate Source
Alphanumeric; 12 Characters; Optional
Specify the switch-in exchange rate source.
Subscription Exchange Rate Source
Alphanumeric; 6 Characters; Optional
Specify the subscription exchange rate source.
Exchange Rate Applied
Numeric; 21 Characters; Optional
Specify the exchange rate applied.
Override Exchange Rate
Optional
Select if exchange rate should be overridden or not from the drop-down list. The list displays the following values:
- Yes
- No
Overridden Exchange Rate
Numeric; 21 Characters; Optional
Specify the overridden exchange rate applied.
FX Deal Date
Date Format; Optional
Specify the FX deal date.
FX Value Date
Date Format; Optional
Specify the FX value date.
After specifying all the necessary details, click ‘Calculate’ button to calculate the exchange details. The system obtains the applicable exchange rate for the application date and computes the equivalent of the transaction value in the fund base currency. This value is displayed in the Amount in Fund Base Currency field. The applied exchange rate is also displayed in the Override Exchange Rate field.
4.15.4 Other Details Tab
Click on ‘Other Details’ tab in the FCIS Transaction Switch Detail screen.
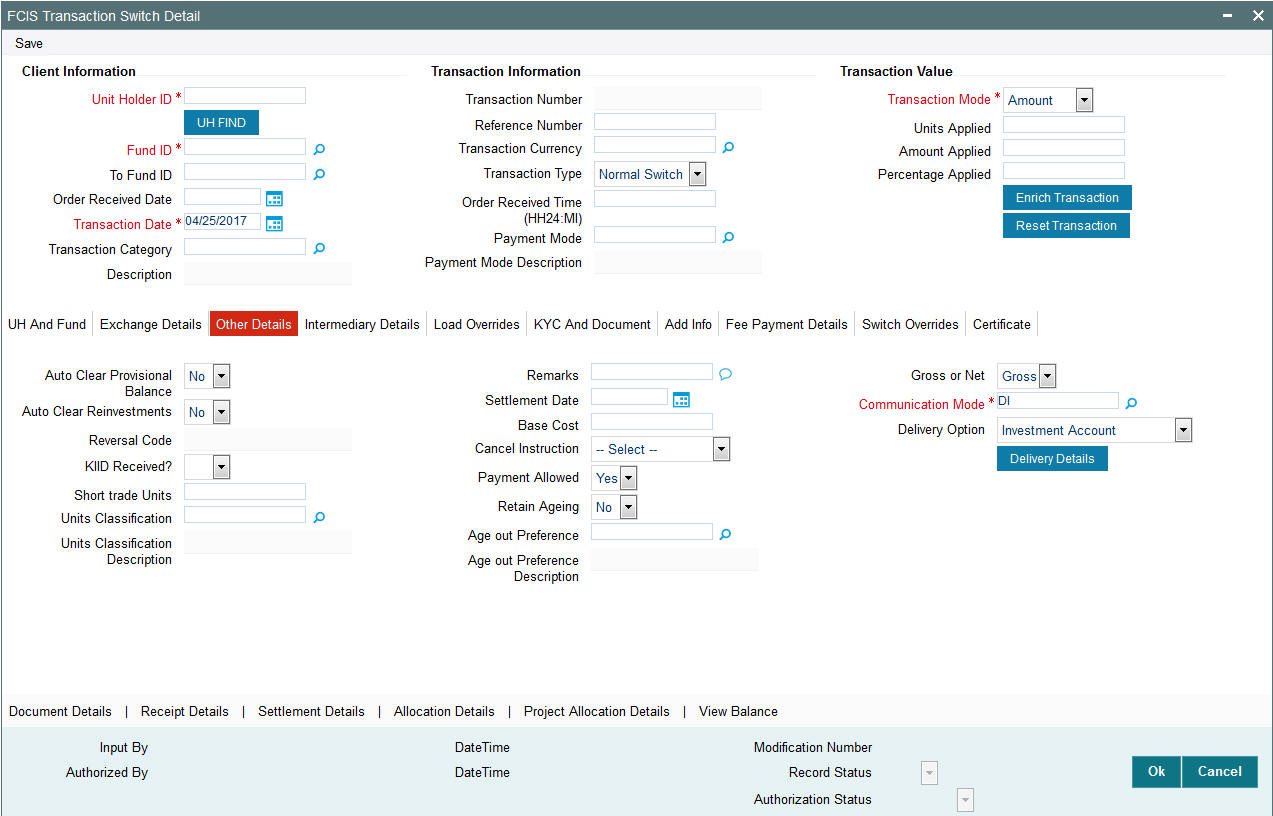
You can specify the following details:
Auto Clear Provisional Balance
Optional
Select ‘Yes’ option from drop-down list to indicate that 100% outflow transaction should include provisionally allotted units. This option will be enabled if the transaction mode is ‘Percent’ and the transaction value is ‘100’.
Auto Clear Reinvestments
Optional
Select if reinvestment details should be automatically cleared or not from the drop-down list. The list displays the following values:
- Yes
- No
Reversal Code
Display
The system displays the reversal code.
This field is only available during transaction amendment, and you can use it to capture the appropriate rejection code, if any, for the amendment. The codes available in the option list are specific to the transaction type being amended.
KIID Received?
Optional
Select if the transaction is KIID compliant or not from the drop-down list. The list displays the following values:
- Yes
- No
The system will default the KIID compliant at the transaction level upon the selection of the Unitholder and Fund in the transaction screens. If the ‘UCITS Fund’ at the Fund level is ‘Yes’ and the UH mapping to the Fund in the ‘UH KIID Compliance’ tab is ‘NO’ then at the transaction level, the system will default the ‘KIID Complaint’ to ‘No’.
If the KIID Received is set to ‘No’, the system display an error message while saving the transaction as ‘The Unit holder has not received the KIID’.
If the flag is set to ‘YES’ there will be no error message and treated as if the UH has received the KIID. The system will always look at the latest UCITS fund mapping maintained at the UH level.
If the transaction is being done in a fund which is not a UCITS Fund then the field KIID received at transaction level will be defaulted to Blank. You cannot change this option to either a Yes or No at the transactions level if it is not a UCITS Fund.
The business user can change the KIID Compliant flag at the transaction from ‘No’ to ‘Yes’ and proceed with the transaction capture but visa versa is not possible. The record at the Unit Holder level will however not get updated. You will have to manually update the same.
In case of backdated transactions, if transaction date is less than effective date, system will default the KIID Compliant field to ‘No’ and then you need to manually override it.
Short Trade Units
Numeric; 27 Characters; Optional
Specify the short trade units.
If the unit holder is nominee account, only then system will allow you to capture the short trade units.
Applicable short trade units will be taken for applying penalty.
If short trade units is not entered, then the transaction allocation will follow the normal allocation process.
Units Classification
Alphanumeric; 1 Character; Optional
Specify the units classification code. Alternatively, you can select units classification code from the option list. The list displays valid unit classification code maintained in the system.
Note
As part of corporate action for merger, split and reverse split, if both from fund and to fund is CDSC fund with ‘USERMNTFIFO’ ageing Logic, then movement of unit holdings will be in same unit classification bucket.
Units Classification Description
Display
The system displays the description for the selected units classification code.
Remarks
Alphanumeric; 255 Characters; Optional
Specify remarks, if any.
Settlement Date
Date Format; Optional
Specify the settlement date.
Base Cost
Numeric; 15 Characters; Optional
Specify the base cost details.
Cancel Instruction
Optional
Select the cancel instruction from the drop-down list. The list displays the following values:
- Standing Instructions
You can use this field to indicate whether standing instructions defined in respect of a unit holder, in the selected fund, are to be cancelled. If you select this option, all standing instructions for the transaction is cancelled, including those that are to be generated after an automatic redemption occurs. Select the ‘Standing Instruction’ option in this field to indicate cancellation of standing instructions.
If this option has been chosen in the General Operating Rules for the fund, the automatic redemption process generates redemption transactions for unit holders in the fund, with the ‘Cancel Instruction’ option automatically set.
If this option has been set for the transaction in this field, the End of Day process cancels all standing instructions (irrespective of the transaction type) for the unit holder in the fund after the outflow transactions (redemption, switch and transfer) involving the unit holder have been allocated for the day.
Note
Reversal or amendment of an outflow transaction for which Cancel Instruction has been set to ‘Standing Instruction’, would re-instate the standing instructions.
Payment Allowed
Optional
Select if payment allowed is or not from the drop-down list. The list displays the following values:
- Yes
- No
Retain Ageing
Optional
Select if ageing is retained or not from the drop-down list. The list displays the following values:
- Yes
- No
Age out Preference
Alphanumeric; 1 Character; Optional
Specify the age out preference from which we need to preferably redeem the units during outflow and is applicable for Redemption, Switch and Transfer screens. Alternatively, you can select age out preference from the option list. The list displays all valid age out preference code maintained in the system.
Based on the ‘Age out preference’ selection, the system will age out the transactions during outflow. If there is no sufficient balance in the respective buckets, then the system will age out the transactions from other buckets based on fund rule ageing logic.
The system will consider the following parameter to age out onshore funds based on ‘USERMNTFIFO’ ageing logic:
- Unit classification
- Ageing Sequence
Age out Preference Description
Display
The system displays the description for the selected age out preference code.
Gross or Net
Optional
Select if gross or net has to be selected from the drop-down list. The list displays the following values:
- Gross
- Net
Communication Mode
Mandatory
Select the mode of communication from the drop-down list. Alternatively, you can select communication mode from the option list. The list displays all valid communication mode maintained in the system.
Delivery Option
Optional
Select the delivery option from the drop-down list. The list displays the following values:
- Investment Account
- Clearing Ac-Against Payment
- Clearing Ac-Free of Payment
- Delivery to Custodian
- Physical Delivery
- PUEV
Click ‘Delivery Details’ button to specify the delivery details.
For further information on delivery details, refer ‘Transaction Tab’ sub section in ‘IPO Subscription Detail’ section in this User Manual.
In case of Pseudo switch between equity funds and money funds, the system will perform the following logic for CDSC load computation:
CDSC Computation Logic |
||||
|
From units |
To units |
Switch out Leg (PS-03) |
Switch in Leg (PS-02) |
Case 1 |
Equity Fund CDSC units |
Equity Fund FEL units |
Invalid combination. Will be restricted at the screen level |
Invalid combination. Will be restricted at the screen level |
Case 2 |
Equity Fund CDSC units |
Equity Fund CDSC units |
No CDSC fee will be applied on switch out leg. |
CDSC ageing should be carried forward. Retain ageing flag will be turned on to cater this requirement. Switch fee on switch-in leg |
Case 3 |
Equity Fund CDSC units |
MMF FEL units |
CDSC fee on switch-out leg |
No switch fee on switch-in leg |
Case 4 |
Equity Fund FEL units |
Equity Fund FEL units |
No CDSC Fee |
Switch fee on switch-in leg |
Case 5 |
Equity Fund FEL units |
Equity Fund CDSC units |
Invalid combination .will be restricted at screen level |
|
Case 6 |
Equity Fund FEL units |
MMF FEL units |
No CDSC Fee |
No switch fee on switch-in leg |
Case 7 |
MMF FEL units |
Equity Fund FEL units |
No CDSC Fee |
Switch fee on switch-in leg |
Case 8 |
MMF FEL units |
Equity Fund CDSC units |
No CDSC Fee |
No switch fee on switch-in leg |
Case 9 |
MMF FEL units |
MMF FEL units |
No CDSC Fee |
No switch fee on switch-in leg |
4.15.5 Intermediary Tab
Click on ‘Intermediary’ tab in the FCIS Transaction Switch Detail screen.
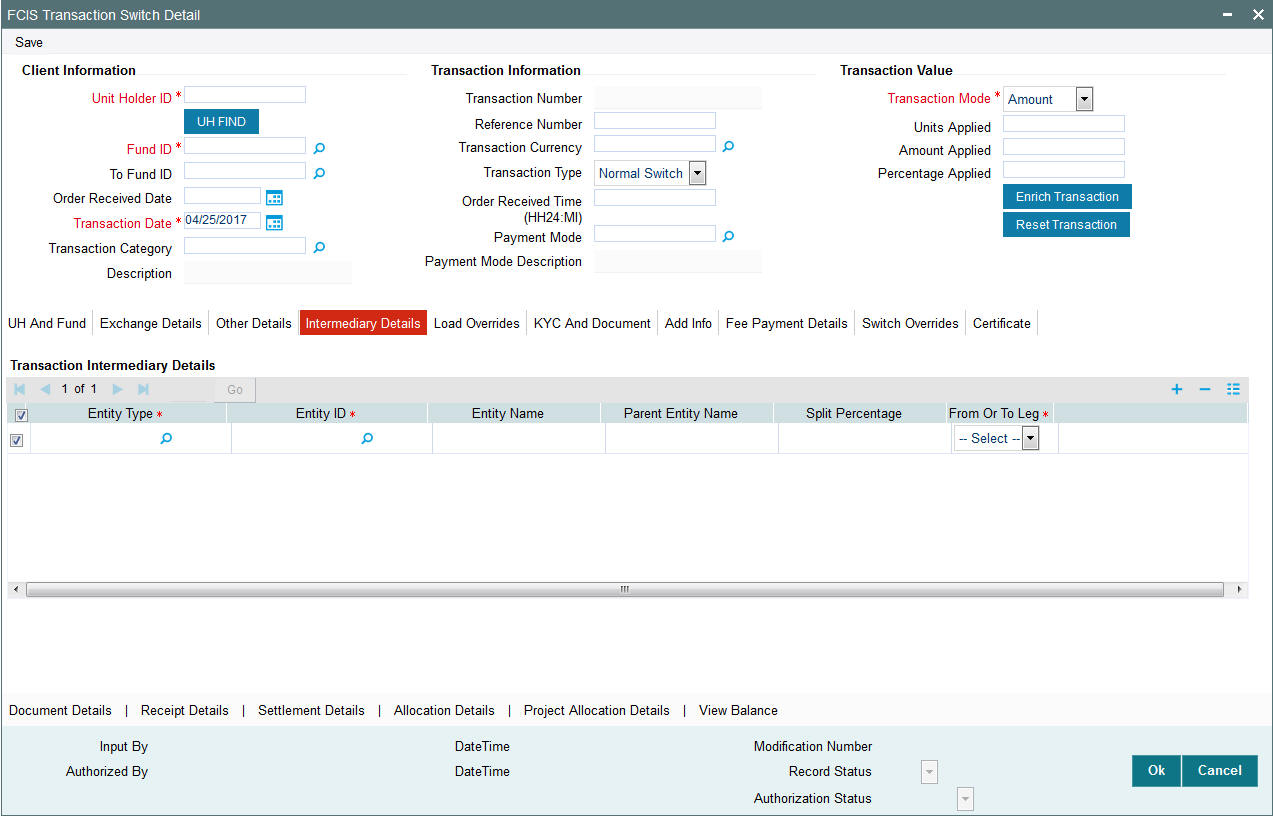
If an entity has been identified as an intermediary for the transaction, then you must identify the same in this section, along with the commission percentage split for an entity.
Transaction Intermediary Details
Entity Type
Alphanumeric; 1 Character; Mandatory
Select the entity type that has been identified as the intermediary for the transaction.
Entity ID
Alphanumeric; 12 Characters; Mandatory
For each entity type, specify the intermediary in this field. The name of the selected intermediary is displayed in the Entity Name field.
While entering a transaction, system will default the intermediary specified here. However, you can override the defaulted value.
Entity Name
Alphanumeric; 100 Characters; Optional
When you select the broker code, the name of the broker is displayed. However, you can amend this value.
Parent Entity Name
Alphanumeric; 100 Characters; Optional
When you select the broker code, the name of the parent broker for the selected broker is displayed. However, you can amend this value.
Split Percentage
Numeric; 5 Characters; Optional
Specify the percentage of total commission that is to accrue to the selected broker. The sum of all the percentages specified for any brokers identified for the transaction must equal one hundred percent.
From or To Leg
Mandatory
Select the from or to leg details from the drop-down list. The list displays the following values:
- From
- To
4.15.6 Load Override Tab
Click on ‘Load Override’ tab in the FCIS Transaction Switch Detail screen.
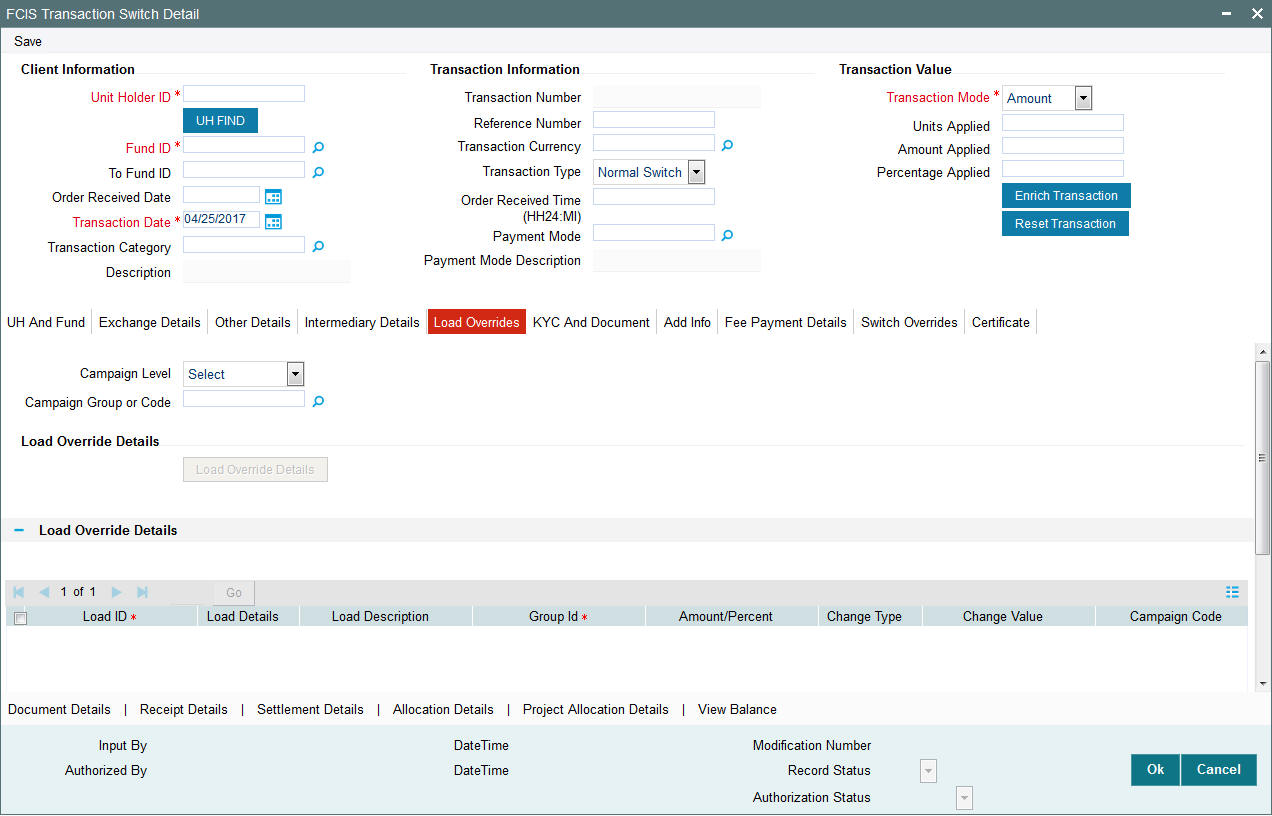
In this section, you can override or alter the value of any load (including derived loads, if any) mapped to the selected fund and applicable for the transaction type, which is to be computed at the time of allocation. The frequency of computation for such loads would be "allocation".
This section is only enabled for funds that have allocation time loads mapped to them as applicable for the transaction type.
If you click ‘Load Override Details’ button, the system defaults the load details. If you do not click this button, then the system will not default even if the fund has load. In this case, load will get computed during allocation only.
Campaign Level
Optional
Select the campaign level from the drop-down list. The list displays the following values:
- Campaign Code
- Campaign Group
By default, campaign code will be selected.
Campaign Group or Code
Alphanumeric; 10 Characters; Optional
Specify the campaign group or code to show the result based on Campaign Level selected. Alternatively, you can select campaign code from the option list. The list displays all valid campaign code maintained in the campaign maintenance.
While saving the transaction, if you have selected Campaign Level as ‘Campaign Group’ and Campaign Group is mentioned in Campaign Code option list, then the system will evaluate the best rate for investor during save of transaction and will tag the campaign against the transaction.
If campaign Level is ‘Campaign Code’, then the system will tag the campaign while saving the transaction.
You can link the campaign to the subscription and switch transaction type of standing instruction. Specify the campaign to be mapped. You can also select the campaign code from the option list.
Note
Campaign is applicable only for subscription /Switch screens only.
Load Override Details
Click ‘Load Override Details’ button to view Load Override details.
Load Override Details
Load ID
Display
The ID of the allocation time load that has been mapped to the fund for the transaction type is displayed here. The load ID is displayed as a link. To view details of the load, click the ID link.
If a derived load has been mapped, it is also displayed here and can be overridden.
Load Details
Display
The system displays the load details.
Load Description
Display
The description of the allocation time load that has been mapped to the fund for the transaction type is displayed here.
Group ID
Display
The system displays the group ID.
Amount Percent
Display
The type of the allocation time load that has been mapped to the fund for the transaction type is displayed here. The ‘type’ of the load refers to the base value upon which the load is applied. There are two possible types – amount-based loads, and percentage-based loads.
If the client country option ‘NETUNALLOTEDAMT’ is set to true for your bank, then the system will match the units to be redeemed with the unit holder’s current balance minus the un-allotted switches (if any). If the transaction value exceeds the balance available, the system will throw up an error message. It will not save the transaction.
For transactions by gross amount, a transaction value that exceeds the Minimum Amount for Tax ID that has been specified in the fund rules for either the switched-in or switched-out fund, the system validates the availability of the PAN Number in the unit holder account profile. If the PAN Number has not been specified in the profile, you must enter a transaction value that does not exceed the Minimum Amount for Tax ID value, or make a change to the unit holder account and specify the PAN Number, and then attempt to input the transaction.
If specified in the General Operating Rules for the fund, the End of Day processes perform the minimum holdings validation, by picking up all allocated transactions during the business day and grouping according to CIF-level or unit holder-level, as indicated in the General Operating Rules. During this, the system validates whether the current holdings balance of the investor either equals or exceeds the minimum holdings balance specified in the General Operating Rules.
Campaign Code
The system displays the campaign code.
Campaign Load ID
The system displays the campaign load ID.
Change type
Display
The system displays the change type.
When you override or alter an allocation time load at the time of entering a transaction, you can effect the change in any of the following ways:
- Discount (reducing the load return value in all the slabs)
- Increase (increasing the load return value in all slabs)
- Return Value (assigning an altered return value that will be applicable to all the loads)
Change Value
Display
The system displays the change value details.
Campaign Code
Display
The system displays the campaign code.
Campaign Load ID
Display
The system displays the campaign load ID.
Project Return Value
The System populates the return value from the load setup.
If the UH Deal maintained is same for Unit Holder, Load and Fund Setup then overridden value from UH Deal is displayed.
If there are criteria based loans in UT transactions, the criteria is evaluated and only loads applicable for the transaction is displayed.
You can view the applicable loads and projected return values by clicking ‘Enrich Transaction’ in the transaction screen.
The system uses the projected return value for load amount computation and also to compute the net amount to AMC while generating GO
In LEP transactions, if there are criteria based loads, the criteria is evaluated during UT transaction generation and it will be used during allocation.
Derived Load Override Details
The system displays the following values:
- Load ID
- Parent Load ID
- Load Description
- Change Type
- Change Value
4.15.7 KYC and Document Tab
Click on ‘KYC and Document’ tab in the FCIS Transaction Switch Detail screen.
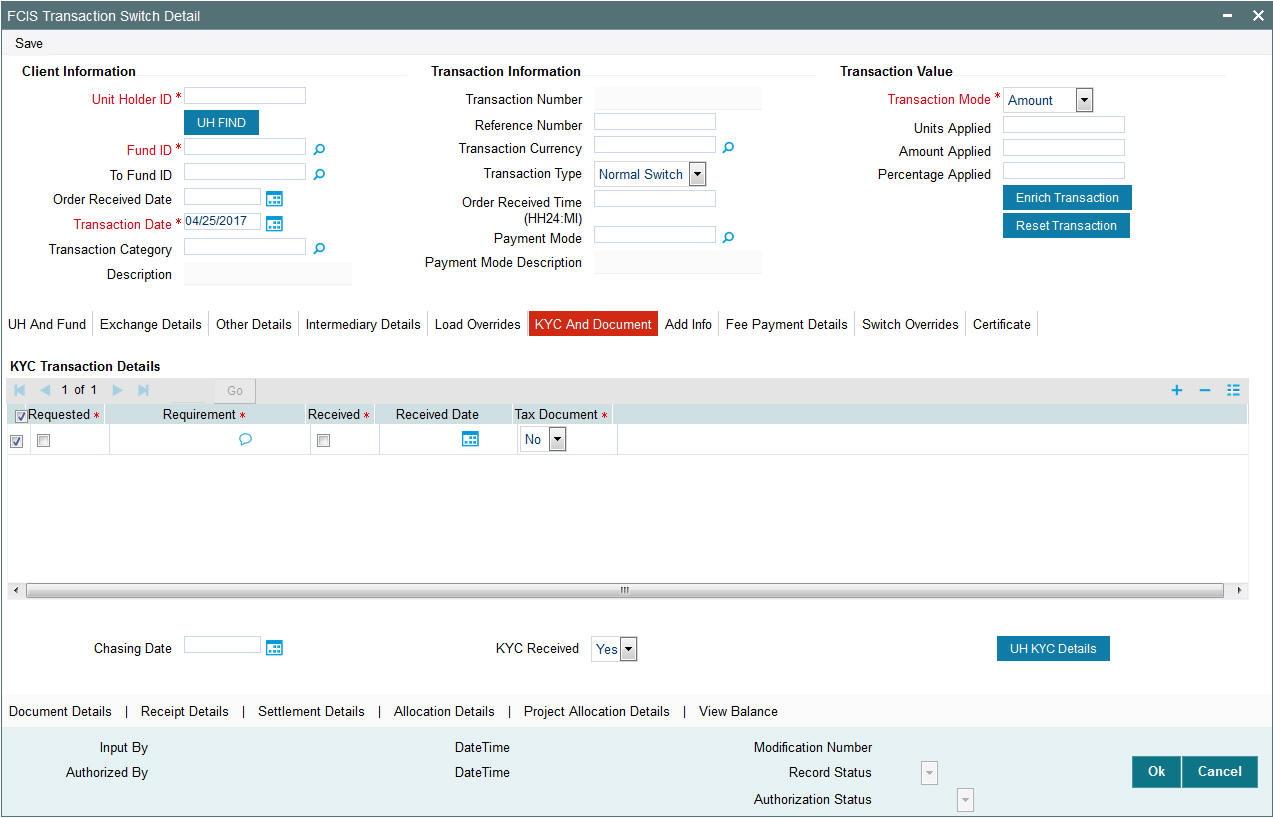
KYC Transaction Details
Requested
Mandatory
Check this box to indicate KYC details are requested.
Requirement
Alphanumeric; 255 Characters; Mandatory
Specify the list of KYC documents required for the unit holder.
Received
Mandatory
Check this box to indicate KYC details are received.
Received Date
Date Format; Optional
Specify the date on which the documents are received from the investor.
Tax Document
Mandatory
Select if tax document is required or not from the drop-down list. The list displays the following values:
- Yes
- No
Chasing Date
Date Format; Optional
Specify the date on which the document chasing is initiated, if the investor has not completed the KYC requirements.
KYC Received
Optional
Select if KYC is received or not from the drop-down list. The list displays the following values:
- Yes
- No
Clicking on ‘UH KYC Details’ button, the system displays all the KYC details available for the UH.
The details are populated from Unit Holder Maintenance screen (UTDUH).
Clicking on ‘UH KYC Details’ button, the system displays all the KYC details available for the UH. If any KYC document is received then it can be marked at transaction KYC detail as ‘Received’. However, you should update the UH maintenance screen for the KYC documents received. If the KYC received at transaction level is ‘Yes’ with some KYC documents and all KYC received at UH level is ‘No’, then the system will display a warning message as ‘Transaction All KYC Received cannot be complete if Unit holder KYC is Incomplete’ during save of the transaction.
For further details on this screen, refer ‘KYC Details Tab’ in ‘Unit Holder Maintenance Detail’ screen (UTDUH) in Entities User Manual.
4.15.8 Add Info Tab
Click on ‘Add Info’ tab in the FCIS Transaction Switch Detail screen.
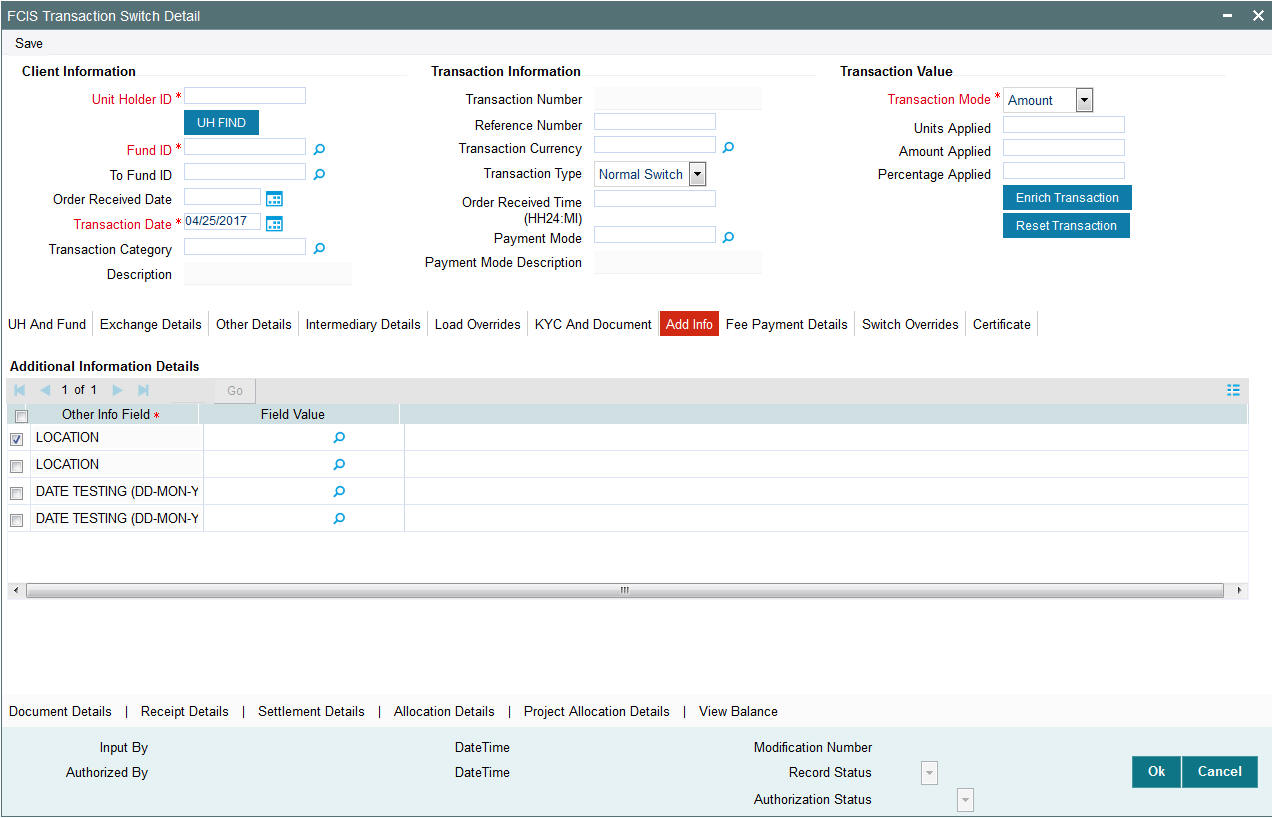
Other Info Field
Display
The system displays the additional information if any information heads have been maintained in the System Parameters, to be applicable for the segment.
Field Value
Display
The system displays the field value.
4.15.9 Fee Payment Details Tab
Click on ‘Fee Payment Details’ tab in the FCIS Transaction Switch Detail screen.
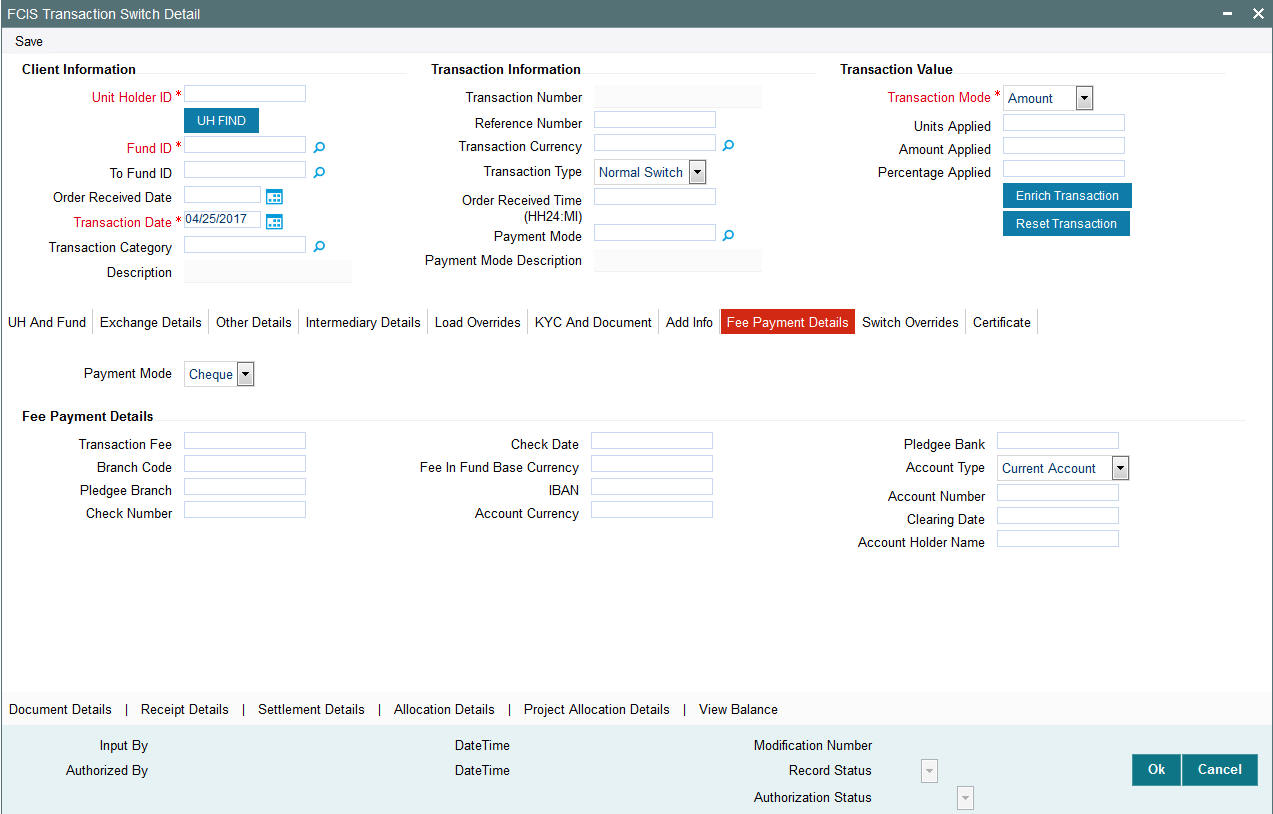
If you have selected a fund for which transaction entry charges or allocation charges (or both) are applicable, then the following fields are enabled for data entry:
Payment Mode
Optional
Select the mode of payment from the drop-down list. The list displays the following values:
- Cheque
- Transfer
- Draft
- Card
Fee Payment Details
Transaction Fee
Numeric; 30 Characters; Optional
Specify the transaction fee.
If a transaction entry charge or transaction time fee is applicable for the fund the transaction time fee equivalent in both fund currency and transaction currency is computed by the system and displayed.
Branch Code
Alphanumeric; 12 Characters; Optional
Specify the branch code. Alternatively, you can select the branch code from the option list. The list displays all valid branch code maintained in the system.
Pledgee Branch
Alphanumeric; 20 Characters; Optional
Specify the pledgee branch code.
Check Number
Alphanumeric; 16 Characters; Optional
Specify the cheque number.
Check Date
Date Format; Optional
Specify the cheque date.
Fee in Fund Base Currency
Alphanumeric; 3 Characters; Optional
Specify the fee in fund base currency details.
IBAN
Alphanumeric; 40 Characters; Optional
Specify the IBAN details.
Account Currency
Numeric; 30 Characters; Optional
Specify the account currency details.
Pledgee Bank
Alphanumeric; 12 Characters; Optional
Specify the pledgee bank details.
Account Type
Optional
Select the type of account from the drop-down list. The list displays the following values:
- Current Account
- Fixed Account
- Loan Account
- Mortgage Account
- Overdraft Account
- PF Account
- Recurring Account
- Savings Account
- Sweeping Account
Account Number
Alphanumeric; 16 Characters; Optional
Specify the account number.
Clearing Date
Date Format; Optional
Specify the clearing date.
Account Holder Name
Alphanumeric; 100 Characters; Optional
Specify the name of the account holder.
4.15.10 Switch Overrides Tab
Click on ‘Switch Overrides’ tab in the FCIS Transaction Switch Detail screen.
You can specify the following details:
Campaign Level
Optional
Select the campaign level from the drop-down list. The list displays the following values:
- Campaign Code
- Campaign Group
By default, campaign code will be selected.
Campaign Group or Code
Alphanumeric; 10 Characters; Optional
Specify the campaign group or code to show the result based on Campaign Level selected. Alternatively, you can select campaign code from the option list. The list displays all valid campaign code maintained in the campaign maintenance.
While saving the transaction, if you have selected Campaign Level as ‘Campaign Group’ and Campaign Group is mentioned in Campaign Code option list, then the system will evaluate the best rate for investor during save of transaction and will tag the campaign against the transaction.
If campaign Level is ‘Campaign Code’, then the system will tag the campaign while saving the transaction.
You can link the campaign to the subscription and switch transaction type of standing instruction. Specify the campaign to be mapped. You can also select the campaign code from the option list.
Note
Campaign is applicable only for subscription /Switch screens only.
Switch Load Override
Click ‘Switch Load Override’ button to view Load Override details.
Switch In Fund Load Override Details
Load ID
Display
The ID of the allocation time load that has been mapped to the fund for the transaction type is displayed here. The load ID is displayed as a link. To view details of the load, click the ID link.
If a derived load has been mapped, it is also displayed here and can be overridden.
Load Description
Display
The description of the allocation time load that has been mapped to the fund for the transaction type is displayed here.
Load Type
Display
The system displays the load type.
Group ID
The system displays the group ID.
Change type
Display
The system displays the change type.
When you override or alter an allocation time load at the time of entering a transaction, you can effect the change in any of the following ways:
- Discount (reducing the load return value in all the slabs)
- Increase (increasing the load return value in all slabs)
- Return Value (assigning an altered return value that will be applicable to all the loads)
Change Value
Display
The system displays the change value details.
Campaign Code
Display
The system displays the campaign code.
Campaign Load ID
Display
The system displays the campaign load ID.
Switch In Fund Derived Load Override Details
The system displays the following values:
- Load ID
- Load Description
- Parent Load ID
- Change Type
- Change Value
4.15.11 Certificate Tab
Click on the Certificate tab in the FCIS Transaction Switch Detail screen.
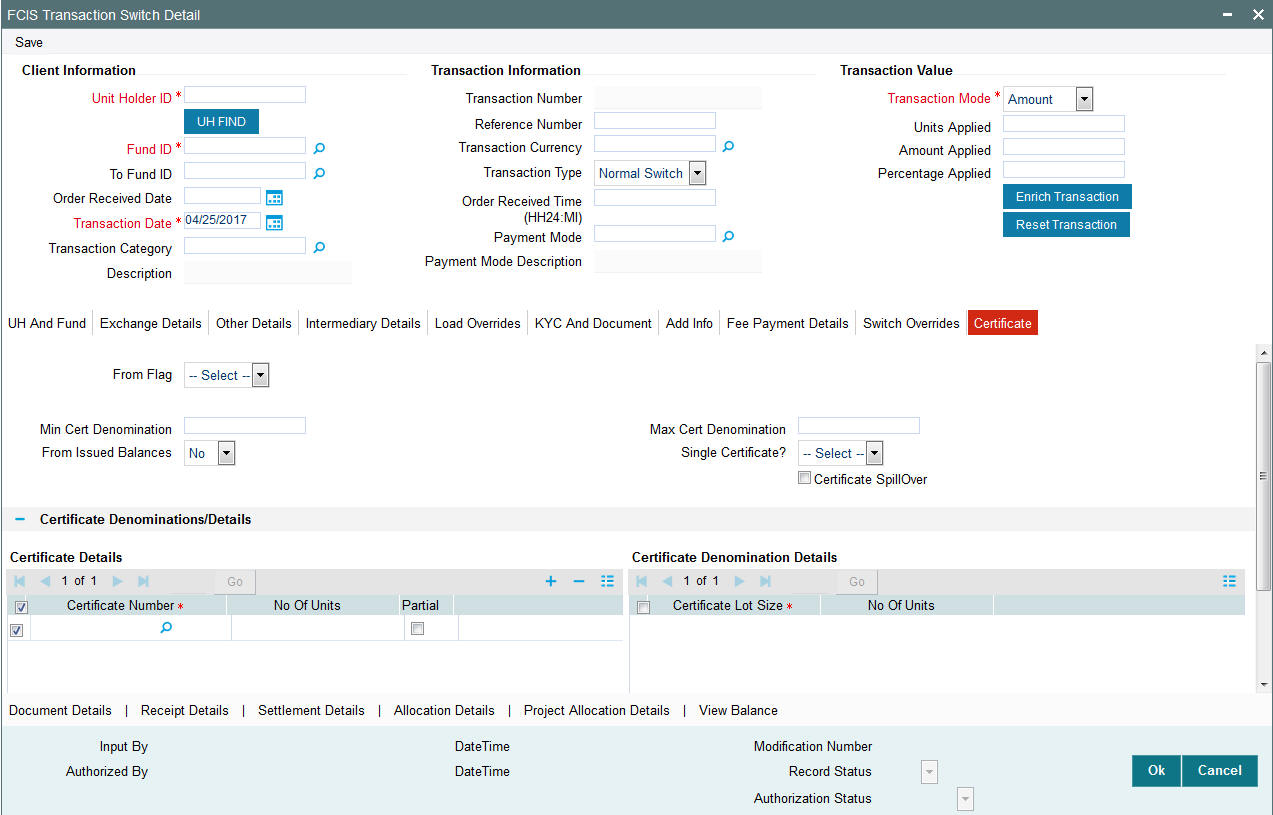
From Flag
Optional
Select the From or To flag from the drop-down list. The list displays the following values:
- From
- To
Min Cert Denomination
Numeric; 22 Characters; Optional
Specify the minimum certificate denomination details.
Max Cert Denomination
Numeric; 22 Characters; Optional
Specify the maximum certificate denomination details.
From Issued Balances
Optional
Select from issued balances details from the drop-down list. The list displays the following values:
- Yes
- No
- Both
Single Certificate?
Optional
Select whether a single certificate or multiple certificates have been requested from the drop-down list. The list displays the following values:
- Single
- Multiple
If single certificates have been designated for the fund, you cannot specify multiple certificates here.
If you have selected a certificate option fund, then all certificate information fields are enabled. The fields are Certificate Required, Single Certificate, From Issued Balances, and Max Cert Denomination and Min Cert Denomination under Certificate Section.
Certificate SpillOver
Optional
Check this box to enable certificate spillover status.
Certificate Denominations/Details
Certificate Details
Certificate Number
Numeric; 10 Characters; Mandatory
Specify the certificate number. Alternatively, you can select certificate number from the option list. The list displays all valid certificate number maintained in the system.
No of Units
Numeric; 27 Characters; Optional
Specify the units details.
Partial
Optional
Check this box if partial details to be selected.
Certificate Denominations
Certificate Lot Size
Display
The system displays the certificate lot size details.
No of Certificates
Display
The system displays the number of certificates.
4.15.12 Document Details Button
Click ‘Document Details’ button to invoke ‘Document Details’ window
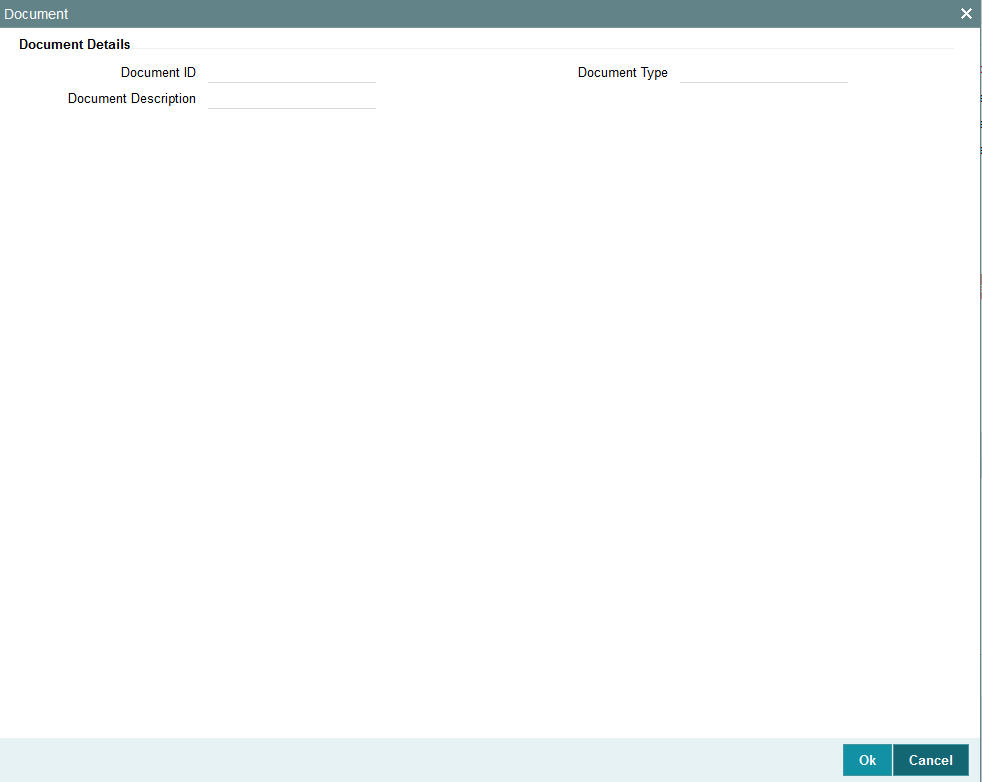
You can specify the following details:
Document Details
Document ID
Alphanumeric; 25 Characters; Optional
Specify the document ID.
Document Description
Alphanumeric; 255 Characters; Optional
Specify the document description for the selected document ID.
Document Type
Alphanumeric; 4 Characters; Optional
Specify the document type.
4.15.13 Receipt Detail Button
Click on ‘Receipt Detail’ button to invoke Receipt Detail screen.
You can specify the following details:
Transaction Receipt Details
Link Transaction Number
Alphanumeric; 16 Characters; Optional
Specify the link transaction number.
Units
Numeric; 22 Characters; Optional
Specify the units details.
Total Units
Display
The system displays the total number of units by clicking ‘Get Units’ button.
4.15.14 Settlement Details Button
Here, you can maintain settlement details only for the multi transactions. Click the ‘Settlement Details’ button to invoke the ‘Settlement Details’ screen.
For further details, refer ‘Settlement Details Button’ sub section in ‘IPO Subscription Detail’ section in this user manual.
4.15.14.1 Processing Multi Transactions
To process the outflow transactions, execute the ‘Multiple Transaction Generation’ batch as part of EOD process. While processing multi transactions, settlement will take precedence over the subscription transactions to be generated (with the exception of settlement of residual). Also, while doing settlement or while generating subscription the following will be the precedence order:
- Fixed – Units (Not applicable for settlement)
- Fixed – Amount (For subscription transaction generation, both unit and amount takes same priority)
- Percentage
- Residual
The system will either create settlement entries or create subscription transactions as per the multiple transactions. Once all the redemption transactions are allocated and settled, the subscription transactions are generated by a BOD batch. If any of the redemption transaction is not allotted, then the system will not pick up the entire wrapper transaction for settlement. In this case, the subscription transaction is also not created.
Note
- Each outflow and inflow transactions are saved as separate transactions but against the same wrapper reference number
- Backdated and future date transactions are allowed only for the out flow transactions
- The transaction date for the subscription transaction will be the highest settlement date of the redemption transactions.
- The settlement details entered at the individual transaction level will be overridden by the settlement details maintained at the multi transaction level.
- Settlement for the subscription transaction will always be by cash and the redemption transaction settlement will be based on the settlement details you have maintained.
- Reversing multiple transactions is not allowed from the ‘FCIS Bulk Transaction’ screen. However, you can reverse the individual transaction from online transaction screen.
- You can modify the individual linked transaction using the online transaction screen. In this case, the system will display a warning message indicating the transaction is a linked transaction
- The sum of redemption and sum of subscription should be same, else you can select transaction mode as residual.
- When the payment mode is given as multi payment, the payment mode should be provided in settlement details
- On saving the multi transaction, if any transaction fails, the system will display an error message. However, it saves the remaining transactions. You can correct the failed transactions and save it again.
4.15.15 Project Allocation Details Button
At this stage, the transaction is ready to be saved. If you wish to see a projected picture of how the transaction would most possibly be allocated, then click the Project Allocation Details button.
You can view Dividend amount for each of the redemption transactions. This amount is the net payment amount payable along with the redemption post WHT and IDS being considered
You can view the projected allocation details only for funds in which the ageing policy is FIFO (first-in, first-out) or Transaction Receipts. If the prices are not available for subscription transactions on the transaction date, the latest available price is picked up for allocation.
For validating dilution levy breach amount, the system does a project allocation for the transaction and then calculates the net amount of the transaction.
When you request the allocation process, the system temporarily saves the transaction into temporary stores in the database and gives it a unique key string. The system then performs a ‘mock’ temporary allocation, and displays the details of the same in the Allocation Projection screen. The following allocation details are displayed:
- The Fund ID
- The Product ID
- The Unit Price for the transaction, as on the date of the temporary allocation.
- The Allocation Price
- The Gross amount in fund base currency
- The Settlement Amount in transaction currency
- The Linked Product ID
- The Load amount in fee currency
- The number of units allocated
- The Base Price
- The total load amount
- The Net amount in fund base currency
- The Settlement Amount in Price Currency
- The Linked units
- The Unit Balance
The following Load Details are displayed during the allocation:
- Fund ID
- Load ID
- Load Description
- Load Amount
- Load amount in fee currency
- VAT Amount in Fee Currency
The following Performance Fee Details are displayed during the allocation:
- Link Transaction Number
- InOutFlag
- Element Identification
- Element Description
After you have viewed the projected allocation details, click the Close button to close the screen.
4.15.16 Allocation Details Button
Clicking ‘Allocation Details’ button, the following screen is displayed:
The following allocation details are displayed:
Allocation Details
The following Allocation details are displayed:
- Fund ID
- Allocation Date
- Allotted Units
- Unit Price
- Confirmed Units
- Settlement Amount Transaction Currency
- Gross Amount in FBC
- Net Amount in FBC
- Settlement Amount in Price Currency
- Rejected Units
- MMF Dividend Amount
- Tax Income Per Share
- EUSD Gain
Switch-In Allocation Details
The following Switch-in allocation details are displayed:
- To Fund ID
- Allocation Date
- Allotted Units
- Unit Price
- Confirmed Units
- Settlement Amount Transaction Currency
- Gross Amount in FBC
- Net Amount in FBC
- Rejected Units
Load Details
The following Load Details are displayed during the allocation:
- Fund ID
- Load ID
- Load Description
- From Entity Type
- To Entity Type
- From Entity
- To Entity
- Load Amount
- Load Amount in Fee Currency
Performance Fee Details
The following Performance Fee Details are displayed during the allocation:
- Link Transaction Number
- In Out Flag
- Element Identification
- Element Description
- Value
Transaction Component Details
The following Transaction Component Details are displayed during the allocation:
- Offer Price
- Bid Price
- Share Capital
- Income
- Fund Capital
- Share Premium
CGT Deduction Details
The following CGT Deduction Details are displayed during the allocation:
- Unit Holder/ Joint Unit Holder ID
- Unit Holder/ Joint Unit Holder Name
- Tax Amount
4.15.17 View Balance Button
Clicking ‘View Balance’ button, ‘Investor Fund Balance’ screen is displayed:
For further details, refer View Balance Button sub section in ‘IPO Subscription Detail’ section in this User Manual.
4.15.18 Saving the Transaction
At this stage, you can save the transaction by clicking the Save button at the bottom of the Transaction Information Section. The transaction is saved, and the system generated transaction number (and the reference number, if any) is displayed.
Note
If the Auto-authorization feature is enabled for the Save operation for the AMC ID, then the transaction is saved as an authorized transaction. If not, it is saved as an unauthorized transaction. In either case, the Transaction Number is generated and displayed when you invoke the Save operation.
4.15.19 Transaction Processing Logic for Currency of Expression Funds
The system defaults the UH currency of expression in the ‘Transaction Currency’ field, if available, during transaction capture based on UH and fund combination.
If there is no UH currency of expression maintained in UTDUHCOE, then FBC will be defaulted in the ‘Transaction Currency’ field. If the transaction is processed, then upon authorization of the transaction FBC will be defaulted as UHCOE at the UHCOE maintenance (UTDUHCOE). The defaulted currency of expression in the UHCOE maintenance will be as system user.
If there is no UHCOE maintained in UTDUHCOE, then FBC will be defaulted in the ‘Transaction Currency’ field (Transaction capture) and if you override this defaulted currency to one of the FPC (from the fund level new) then upon authorization of the transaction FPC will be defaulted as UHCOE at the UHCOE maintenance.
If there is no UHCOE maintained in UTDUHCOE, then FBC will be defaulted in the ‘Transaction Currency’ field and if you override this defaulted currency to neither FBC/FPC, then upon authorization of the transaction FBC will be defaulted as UHCOE at the UHCOE maintenance.
Following are the system behaviour in case there is an unauthorized or a modified and unauthorized UHCOE maintenance:
Case 1: You need to input a transaction when there is an unauthorized UHCOE maintenance. During transaction input there is not UHCOE to be defaulted as the maintenance is still in unauthorized status. Hence as per logic Fund base currency defaults during transaction capture and this fund base currency will not get defaulted to UHCOE maintenance. Once the UHCOE maintenance is authorized then defaulting will happen during transaction capture.
Case 2: Authorized UHCOE is modified which is still in unauthorized status. In this case if you input a transaction, then the new modified UHCOE will get defaulted during transaction input.
4.15.19.1 FX Logic
The FX rate will not be considered between transaction base currency and fund price currency for currency of expression fund transactions if they are same. This is applicable for subscriptions, redemptions and switch (normal and pseudo) transactions.
The system will use the transaction price currency to get the load; and after applying the load, the net amount and gross amount will get calculated in fund price currency and FBC as well. The currency of expression factor is applied to derive values in fund base currency. The net, gross and load amount will be calculated in currency of expression for a currency of expression transaction and using the COE factor the same is stored in fund base currency only. For a transaction placed using one of the fund price currency; in the project allocation/allocation tab, the load amount in fee currency and vat amount in fee currency field will display the value in fund price currency only irrespective of the fee calculation basis value of the transaction.
For currency of expression transactions the exchange rate applied field during transaction capture will be defaulted to ‘1’. If you change it, then while saving, the system will display warning message as ‘This is a currency of expression transaction and exchange rate will be defaulted to 1 by the system’. This message is shown if do not click the ‘Enrich’ button after changing the exchange rate. The amount applied field will show the values in fund base currency.
If you change the exchange rate and click ‘Enrich’ button, then the system default the value to ‘1’ while saving without any warning message.
Note
The rounding precision for fund price currencies will be base price.
If the transactions are posted using fund price currencies then the system computes the load amount, net and gross amount in FBC using the COE factor. The display of these fields is mandatory fields that are to be computed as part of core allocation process. The exchange rate field will show default value as 1 in this case as COE factor is applied.
If there is no price available for the fund price currency during transaction input, the system will use the par value to arrive at the price. While saving the transaction, the system will display an override message as ‘Price not available for the price currency and the system will use the par value for the transaction’. If you continue, then the system will use the par value for processing the transactions. The unit price in project allocation will display FPC price. This logic will be for project allocation but during menu allocation or batch allocation, if the price is still not available, then the transaction will not be allotted.
4.15.19.2 Processing Unit Holder Currency of Expression
You can select Fund Base currency as currency of expression. There will be no restriction in changing/ amending the currency of expression any number of times against an UH and fund combination.You can maintain only one currency as currency of expression for a UH- Fund combination.
If a UH is closed and reopened then the corresponding action will not happen for the unit holder currency of expression maintenance. The UHCOE maintenance will get closed once the UH is closed but you have to manually reopen the currency of expression for the unit holder fund combination. In case, you do not reopen the UHCOE maintenance after UH reopening, and simultaneously input a transaction, then the system will not apply COE defaulting logic at UHCOE maintenance as there is already a record available for reopen.
Note
After maintaining the unit holder currency of expression, if one of the FPC is removed (at the fund level) and that currency is UHCOE for a UH, then defaulting at transaction capture will happen but the price currency/COE logic will not happen for the fund, it will be a case where TBC≠FBC or FPC (this will be a normal cross currency case). At the UHCOE maintenance this will be operationally controlled.
4.15.19.3 Processing Fund Price Maintenance
The system will validate at the time of fund price capture whether price is being maintained for the Fund in fund price currencies. If it is not maintained. then the system will display warning message as ‘Prices for all currencies are not maintained do you wish to continue?’
The Pre EOD checks ‘Number of Funds for which Fund Price has not been entered’ will be changed to check whether price in FPC have been maintained for the day in the system. This will be mandatory check. If the system does not find the Price in currency of expression, then the transaction entered in currency of expression will not be allotted.
The Units will be allocated using respective currency of expression/ fund price if the transaction is done in currency of expression. If the transaction is done in fund base currency then the allocation will take place by taking the fund price captured in fund base currency. If the transaction is done in a currency which is other than FBC or currency of expression then the allocation of units will be done using prices captured in FBC.
Fluctuation percentage will be applicable for FPC’s as well. For project allocation, the system will take the latest available price and show the project allocation.
In case of menu allocation if the price is not available then the system will not allocate the transactions.
4.15.19.4 NAV Correction impact for fund price currencies
If the NAV is corrected for fund price currency, say, for instance, GBP and the amend transaction is set to Yes; then all the transactions will be corrected with the new NAV price for the fund price currency (GBP). In case the amend transaction is set to No; the new price will not be corrected at transaction level. ‘Reflect in Trading’ field will not be impacted.
4.15.19.5 Currency of expression logic applied during Transactions
Case 1: If transaction base currency is not a part of the fund price currency and UH COE is not maintained
If the transaction is done in a transaction currency (TBC) other than the fund base currency and this currency is not present in the list of fund price currencies allowed for the fund, then the fund base currency will be defaulted as the unit holder’s currency of expression and for this transaction; FBC price will be applied. For this transaction FX has to be applied to convert TBC to FBC. This logic is applied to all the transaction Types, specially for Subscription transaction.
Case 2: Transaction Currency is part of the Fund Price Currency and UHCOE is not maintained
In case there is no UH COE maintained for a Fund and when an investor transacts in a transaction currency (TBC) which is one of the allowed fund price currencies (FPC) for the fund or FBC, then this transaction currency will be added as the Unit holder’s currency of expression for this fund. Transactions should not apply FX if Transaction Currency is one of the Fund's price currency or FBC.
Post the transaction authorization, the fund price currency/FBC has to be defaulted as UH preferred currencies at the UHCOE maintenance. (Post authorization user will not be able to amend the TBC hence defaulting will be post authorization).
Case 3: Transaction Currency is part of the Fund Price Currency and UHCOE is maintained
If Transaction base currency is other than the Unit holder’s currency of expression and the Unit Holder already has a UH COE for this fund, then while saving, the system will display warning message as ‘The transaction currency is not the currency of expression for the unit holder’.
UHCOE = FPC and TBC≠UHCOE
Note
The bulk and light weight screen will not be impacted with new any new fields but the validations pertaining to COE will be applied (UHCOE defaulting logic if the transaction is done for the first time), for light weight screen as the transaction currency is defaulted to Fund base currency; fund base currency will be defaulted as UHCOE). If the UHCOE is maintained for a UH-Fund combination and transaction is placed through light weight screen then UHCOE will be defaulted as Transaction currency. Light weight screen will allow transaction currency to be in fund base currency (FBC) or fund price currency (FPC) for COE funds and if the transaction is done in FPC for the first time- fund price currency will be defaulted in the UTDUHCOE maintenance. Also If the UH is transacting through light weight screen subsequently and if UTDUHCOE is already maintained then the UHCOE will be defaulted as Transaction currency.
4.15.19.6 System logic to derive the Price Currency
The system will derive the applicable fund price currency for currency of expression fund transactions as follows:
If TBC = fund base currency, then price currency will be FBC itself. No FX will be required. This is applicable for subscription, redemption and switch transactions.
When a trade is placed in a currency (TBC) that is the allowed fund price currency for the fund then Price currency will be respective fund price currency. No FX will be required. This is applicable for Subscription, Redemption and Switch transactions. (TBC = FPC then price CCY will be FPC)
When a trade is placed in a currency that is neither the fund base currency nor an allowed fund price currency for the fund, Price Currency will be FBC. FX will be required between Transaction Currency and FBC. This is applicable for Subscription and redemptions. (TBC ≠FBC or FPC; then Price CCY will be FBC).
4.15.19.7 Switch Logic for currency of expression
The Price Currency of SWITCH OUT leg will be used as Transaction Currency for SWITCH In Leg transaction and the SWITCH In leg Transaction amount will be Settlement Amount of OUT leg equivalent of Switch out Price currency. This is applicable only for currency of expression and non currency of expression fund switch transactions.
4.16 Transaction Switch Summary Screen
This section contains the following topics:
- Section 4.16.1, "Retrieving a Record in FCIS Transaction Switch Summary Screen"
- Section 4.16.2, "Editing FCIS Transaction Switch Record"
- Section 4.16.3, "Viewing FCIS Transaction Switch Record "
- Section 4.16.4, "Deleting FCIS Transaction Switch Record"
- Section 4.16.5, "Authorizing FCIS Transaction Switch Record "
- Section 4.16.6, "Amending FCIS Transaction Switch Record "
- Section 4.16.7, "Authorizing Amended FCIS Transaction Switch Record "
4.16.1 Retrieving a Record in FCIS Transaction Switch Summary Screen
You can retrieve a previously entered record in the Summary Screen, as follows:
Invoke the ‘FCIS Transaction Switch Summary’ screen by typing ‘UTSTXN04’ in the field at the top right corner of the Application tool bar and clicking on the adjoining arrow button and specify any or all of the following details in the corresponding details.
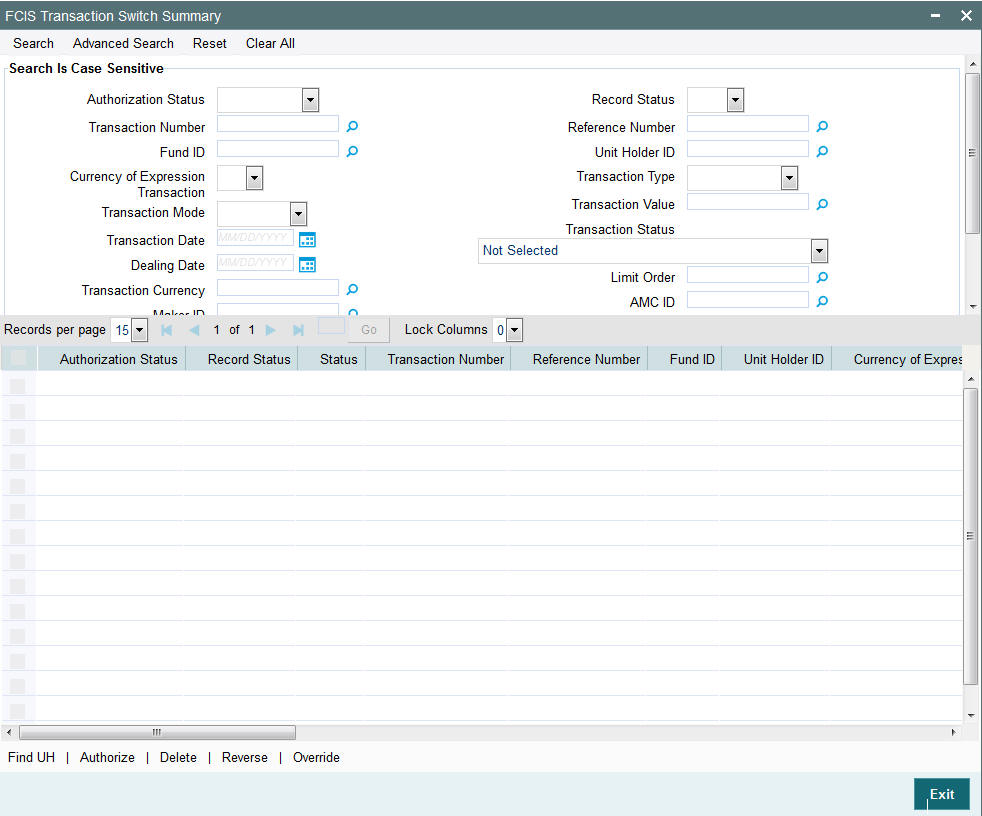
- The status of the record in the Authorization Status field. If you choose the ‘Blank Space’ option, then all the records are retrieved.
- The status of the record in the Record Status field. If you choose the ‘Blank Space’ option, then all records are retrieved
- Transaction Number
- Fund ID
- Currency of Expression Transaction
- Transaction Mode
- Transaction Date
- Dealing Date
- Transaction Currency
- Maker ID
- Payment Mode
- Communication Mode
- Unit Holder ID
- Transaction Type
- Transaction Value
- Transaction Status
- Limit Order
- AMC ID
- Transaction Category
- Ref Type
Click ‘Search’ button to view the records. All the records with the specified details are retrieved and displayed in the lower portion of the screen.
Note
You can also retrieve the individual record detail from the detail screen by querying in the following manner:
- Press F7
- Input the Transaction Number
- Press F8
You can perform Edit, Delete, Amend, Authorize, Reverse, Confirm operations by selecting the operation from the Action list. You can also search a record by using a combination of % and alphanumeric value.
Note
The status field in the Records pane of the summary screen displays the bulk operation results.
For example:
You can search the record for Transaction Number by using the combination of % and alphanumeric value as follows:-
- Search by A% :- System will fetch all the records whose Transaction Number starts from Alphabet ‘A’. For example:- AGC17,AGVO6,AGC74 etc.
- Search by %7:- System will fetch all the records whose Transaction Number ends by numeric value’ 7’ . For example: AGC17, GSD267, AGC77 etc.
- Search by %17%:- System will fetch all the records whose Transaction Number contains the numeric value 17 . For example: GSD217, GSD172, AGC17 etc.
4.16.2 Editing FCIS Transaction Switch Record
You can modify the details of FCIS Transaction Switch record that you have already entered into the system, provided it has not subsequently authorized. You can perform this operation as follows:
- Invoke the FCIS Transaction Switch Summary screen from the Browser.
- Select the status of the record that you want to retrieve for modification in the Authorization Status field. You can only modify records that are unauthorized. Accordingly, choose the Unauthorized option.
- Specify any or all of the details in the corresponding fields to retrieve the record that is to be modified.
- Click ‘Search’ button. All unauthorized records with the specified details are retrieved and displayed in the lower portion of the screen.
- Double click the record that you want to modify in the list of displayed records. The FCIS Transaction Switch Detail screen is displayed.
- Select Unlock Operation from the Action list to modify the record. Modify the necessary information.
Click Save to save your changes. The FCIS Transaction Switch Detail screen is closed and the changes made are reflected in the FCIS Transaction Switch Summary screen.
4.16.3 Viewing FCIS Transaction Switch Record
To view a record that you have previously input, you must retrieve the same in the FCIS Transaction Switch Summary screen as follows:
- Invoke the FCIS Transaction Switch Summary screen from the Browser.
- Select the status of the record that you want to retrieve for viewing in the Authorization Status field. You can also view all records that are either unauthorized or authorized only, by choosing the unauthorized / Authorized option.
- Specify any or all of the details of the record in the corresponding fields on the screen.
- Click ‘Search’ button. All records with the specified fields are retrieved and displayed in the lower portion of the screen.
- Double click the record that you want to view in the list of displayed records. The FCIS Transaction Switch Detail screen is displayed in View mode.
4.16.4 Deleting FCIS Transaction Switch Record
You can delete only unauthorized records in the system. To delete a record that you have previously entered:
- Invoke the FCIS Transaction Switch Summary screen from the Browser.
- Select the status of the record that you want to retrieve for deletion.
- Specify any or all of the details in the corresponding fields on the screen.
- Click ‘Search’ button. All records with the specified fields are retrieved and displayed in the lower portion of the screen.
- Double click the record that you want to delete in the list of displayed records. The FCIS Transaction Switch Detail screen is displayed.
- Select Delete Operation from the Action list. The system prompts you to confirm the deletion and the record is physically deleted from the system database.
4.16.5 Authorizing FCIS Transaction Switch Record
- An unauthorized FCIS Transaction Switch record must be authorized in the system for it to be processed. To authorize a record:
- Invoke the FCIS Transaction Switch Summary screen from the Browser.
- Select the status of the record that you want to retrieve for authorization. Typically, choose the unauthorized option.
- Specify any or all of the details in the corresponding fields on the screen.
- Click ‘Search’ button. All records with the specified details that are pending authorization are retrieved and displayed in the lower portion of the screen.
- Double click the record that you wish to authorize. The FCIS Transaction Switch Detail screen is displayed. Select Authorize operation from the Action List.
When a checker authorizes a record, details of validation, if any, that were overridden by the maker of the record during the Save operation are displayed. If any of these overrides results in an error, the checker must reject the record.
4.16.6 Amending FCIS Transaction Switch Record
After a FCIS Transaction Switch record is authorized, it can be modified using the Unlock operation from the Action List. To make changes to a record after authorization:
- Invoke the FCIS Transaction Switch Summary screen from the Browser.
- Select the status of the record that you want to retrieve for authorization. You can only amend authorized records.
- Specify any or all of the details in the corresponding fields on the screen.
- Click ‘Search’ button. All records with the specified details that are pending authorization are retrieved and displayed in the lower portion of the screen.
- Double click the record that you wish to authorize. The FCIS Transaction Switch Detail screen is displayed in amendment mode. Select Unlock operation from the Action List to amend the record.
- Amend the necessary information and click on Save to save the changes
4.16.7 Authorizing Amended FCIS Transaction Switch Record
An amended FCIS Transaction Switch record must be authorized for the amendment to be made effective in the system. The authorization of amended records can be done only from Fund Manager Module and Agency Branch module.
The subsequent process of authorization is the same as that for normal transactions.
4.17 Light Weight Transaction Detail
This section contains the following topic:
4.17.1 Invoking Light Weight Transaction Detail Screen
Enter a switch transaction request into the system in the following sequence of events:
Invoke the ‘FCIS Light Weight Transaction Detail’ screen by typing ‘UTDTXNLT’ in the field at the top right corner of the Application tool bar and clicking on the adjoining arrow button. Specify ‘Switch Form’ in the ‘Transaction Type’ field. The Switch Detail screen for transactions is displayed, with all the default information..
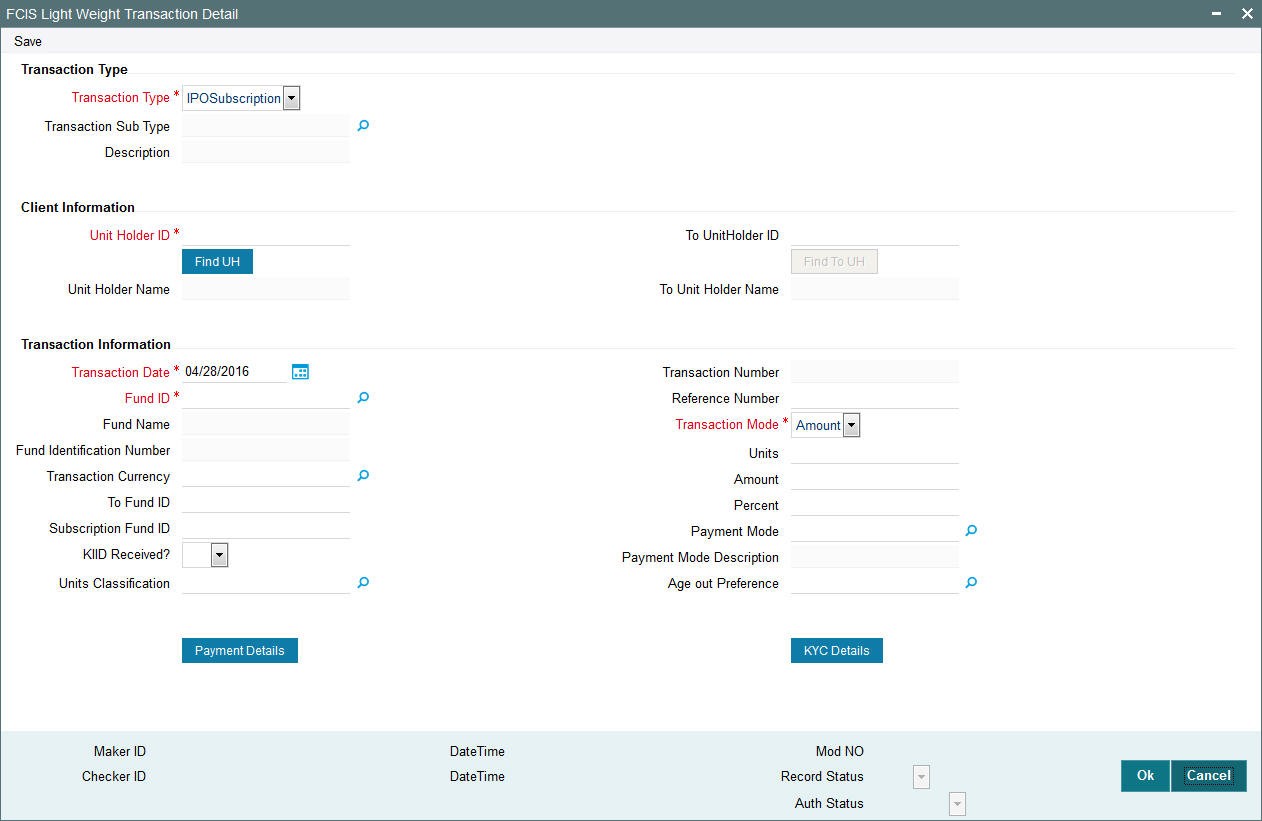
Transaction Type
Transaction Type
Mandatory
Select the type of transaction from the drop-down list. The list displays the following values:
- IPO Subscription
- Subscription
- Redemption
- Switch From
- Transfer
Transaction Sub Type
Alphanumeric; 1 Character; Optional
Specify the transaction sub type. Alternatively, you can select transaction sub type from the option list. The option list display all valid transaction sub type maintained in the system.
Note
For a ‘Switch From’ transaction type, you cannot opt the ‘Bed and Breakfast Switch’ sub type.
Description
Display
The system displays the description for the selected transaction sub type.
Client Information
Unit Holder ID
Alphanumeric; 12 Characters; Mandatory
Specify the unit holder ID of the unit holder who has requested for the transaction. You can select the unit holder ID by clicking ‘Find UH’ button.
Unit Holder Name
Display
The system displays the name of the selected unit holder ID.
To UnitHolder ID
Alphanumeric; 12 Characters; Optional
Specify the to unit holder ID. You can also select To Unit Holder ID by clicking ‘Find UH’ button.
This field is enabled only if you have selected ‘Transfer’ option in ‘Transaction Type’ field.
To Unit Holder Name
Display
The system displays the name of the selected unit holder ID.
Transaction Information
Transaction Date
Date Format; Mandatory
By default, the settlement date is arrived at by taking the payment lag defined for the fund in the Transaction Processing Rules into consideration. The date displayed here can be altered, if required, and you can specify the requisite settlement date.
Fund ID
Alphanumeric; 6 Characters; Mandatory
Specify the fund id for which the requested transaction is to be put through, from the option list in the Fund ID field.
Fund Name
Display
The system displays the name of the selected fund ID.
Fund Identification Number
Display
The system displays the Fund Identification Number.
Transaction Currency
Alphanumeric; 3 Characters; Optional
Specify the currency in which the amount value for the transaction will be reckoned, in the Transaction Currency field.
The option list displays only the maintained fund base currency and fund price currencies for the Fund ID selected.
Refer the session above to know more about the validation of these fields and about the link KYC details and Payment Details.
You can now save the transaction. A summary screen will appear showing all the details of the transaction along with defaults and transaction number.
Note
Ensure that the verified bank accounts are used for redemption transaction. If the bank accounts are unverified, such accounts should not be processed till the account status is changed to ‘Verified’.
This can be only a Fund Base Currency or Fund Price Currency
You can now save the transaction. A summary screen will appear showing all the details of the transaction along with defaults and transaction number.
Refer the session above to know more about the validation of these fields.
Note
Multi currency is not handled in light-weight screens and Bulk client defaults should be maintained.
The Inflow breach factor for IN transactions and Outflow breach factor for OUT transactions are considered for arriving at the fund inflow/outflow dilution levy breach limit (Fund Corpus * Inflow / Outflow Breach Factor < Net Amount in FBC) for the day. Dilution levy is validated against the gross transaction amount. If gross transaction amount is greater than the dilution levy breach limit, then a warning message is displayed by the system. Dilution levy value can be overridden. The overridden value is considered only if the transaction is breaching the dilution levy limit amount. If a transaction is saved and if there are overrides while saving such a transaction, then the warning message is displayed by the system as ‘Transactions are saved with overrides.’
To Fund ID
Alphanumeric; 6 Characters; Optional
Specify the fund to which the unit holder wishes to switch the investment, in the To Fund ID field.
This field is enabled only if you have selected ‘Switch From’ or ‘Transfer’ option in ‘Transaction Type’ field.
Subscription Fund ID
Alphanumeric; 6 Characters; Optional
Specify the subscription fund ID. Alternatively, you can select subscription fund ID from the option list. The list displays all valid subscription fund ID maintained in the system.
KIID Received?
Mandatory
Select if KIID is received or not from the drop-down list. The list displays the following values:
- Yes
- No
Units Classification
Alphanumeric; 1 Character; Optional
Specify the units classification details. Alternatively, you can select units classification code from the option list. The list displays all valid units classification code maintained in the system.
Units Classification Description
Display
The system displays the description for the selected unit classification.
Transaction Number
Display
The system displays the transaction number.
Reference Number
Alphanumeric; 16 Characters; Optional
Specify the reference number.
Transaction Mode
Mandatory
Select the mode in which the transaction value will be reckoned from the drop-down list. The list displays the following values:
- Amount
- Percent
- Units
Note
Transaction Mode will be enabled for only Pseudo switch transactions.
Units
Numeric; 27 Characters; Optional
Specify the units applied details.
You should specify the details in this field only if you have selected ‘Transaction Mode’ field as Units. Else, while clicking ‘Enrich Transaction’ button, the system will display an error message.
Amount
Numeric; 27 Characters; Optional
Specify the amount applied details.
You should specify the details in this field only if you have selected ‘Transaction Mode’ field as Amount. Else, while clicking ‘Enrich Transaction’ button, the system will display an error message.
Percent
Numeric; 27 Characters; Optional
Specify the percent applied details.
You should specify the details in this field only if you have selected ‘Transaction Mode’ field as Percent. Else, while clicking ‘Enrich Transaction’ button, the system will display an error message.
Payment Mode
Alphanumeric; 2 Characters; Optional
Specify the mode in which the payment for the transaction will be made, in the Payment Mode field.
Payment Mode Description
Display
The description for the mode selected is displayed here.
Age Out Preference
Alphanumeric; 1 Character; Optional
Specify the age out preference details. Alternatively, you can select age out preference from the option list. The list displays all valid age out preference details maintained in the system.
Age out Preference Description
Display
The system displays the description for the selected age out preference.
The ‘Payment Details’ button is disabled if you select ‘Transfer’ option in Transaction Type field.
Click ‘Payment Details’ button. The following window is displayed:
For further details, refer ‘Settlement Details button’ sub section in ‘IPO Subscription Detail’ section in this user manual.
Click ‘KYC Details’ button. The following window is displayed:
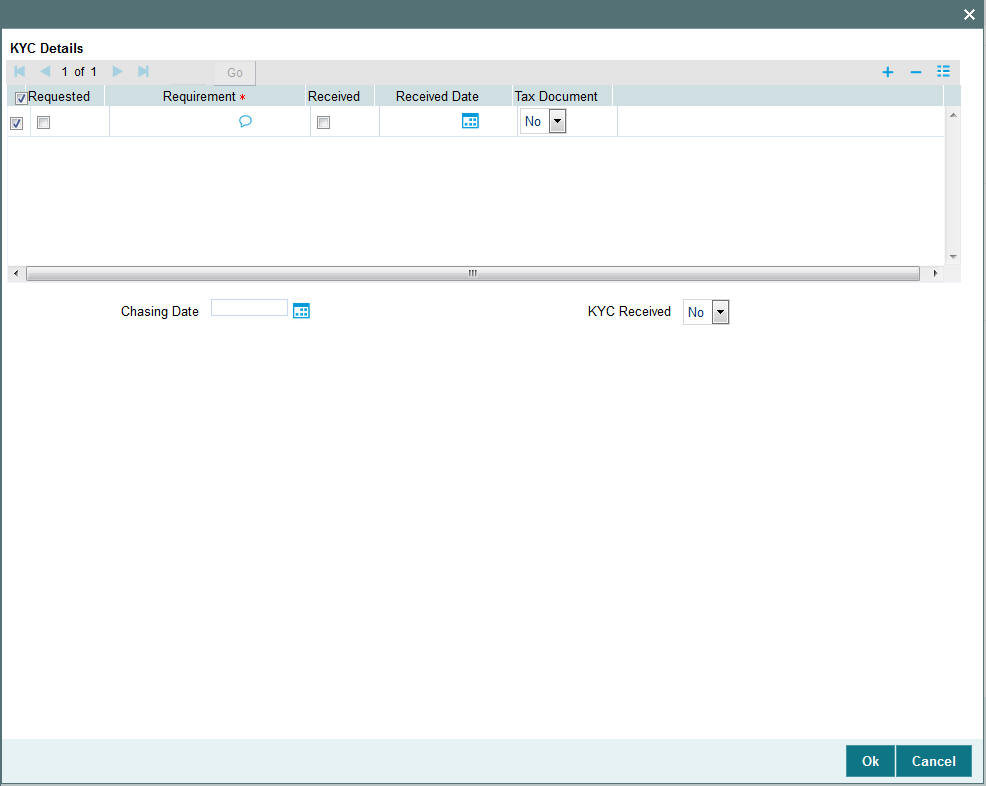
You can specify the following details:
KYC Details
Requested
Optional
Check this box to indicate KYC details are requested.
Requirement
Alphanumeric; 255 Characters; Mandatory
Specify the list of KYC documents required for the unit holder.
Received
Optional
Check this box to indicate KYC details are received.
Received Date
Date Format; Optional
Specify the date on which the documents are received from the investor.
Tax Document
Optional
Select if tax document is required or not from the drop-down list. The list displays the following
values:
- Yes
- No
Chasing Date
Date Format; Optional
Specify the date on which the document chasing is initiated, if the investor has not completed the KYC requirements.
KYC Received
Optional
Select if KYC is received or not from the drop-down list. The list displays the following values:
- Yes
- No
4.18 Transfer Detail
This section contains the following topics:
- Section 4.18.1, "Invoking Transfer Detail Screen"
- Section 4.18.2, "UH Fund Tab"
- Section 4.18.3, "Other Tab"
- Section 4.18.4, "Intermediary Tab"
- Section 4.18.5, "Load Override Tab"
- Section 4.18.6, "KYC and Document Tab"
- Section 4.18.7, "Add Info Tab"
- Section 4.18.8, "Fee Payment Tab"
- Section 4.18.9, "Certificate Tab"
- Section 4.18.10, "Receipt Detail Button"
- Section 4.18.11, "Allocation Details Button"
- Section 4.18.12, "View Balance Button"
4.18.1 Invoking Transfer Detail Screen
To enter a transfer transaction request into the system, perform the following sequence of steps:
Invoke the ‘FCIS Transfer Detail’ screen by typing ‘UTDTXN05’ in the field at the top right corner of the Application tool bar and clicking on the adjoining arrow button. The Transaction Detail screen for Transfer transactions is displayed, with all the default information..
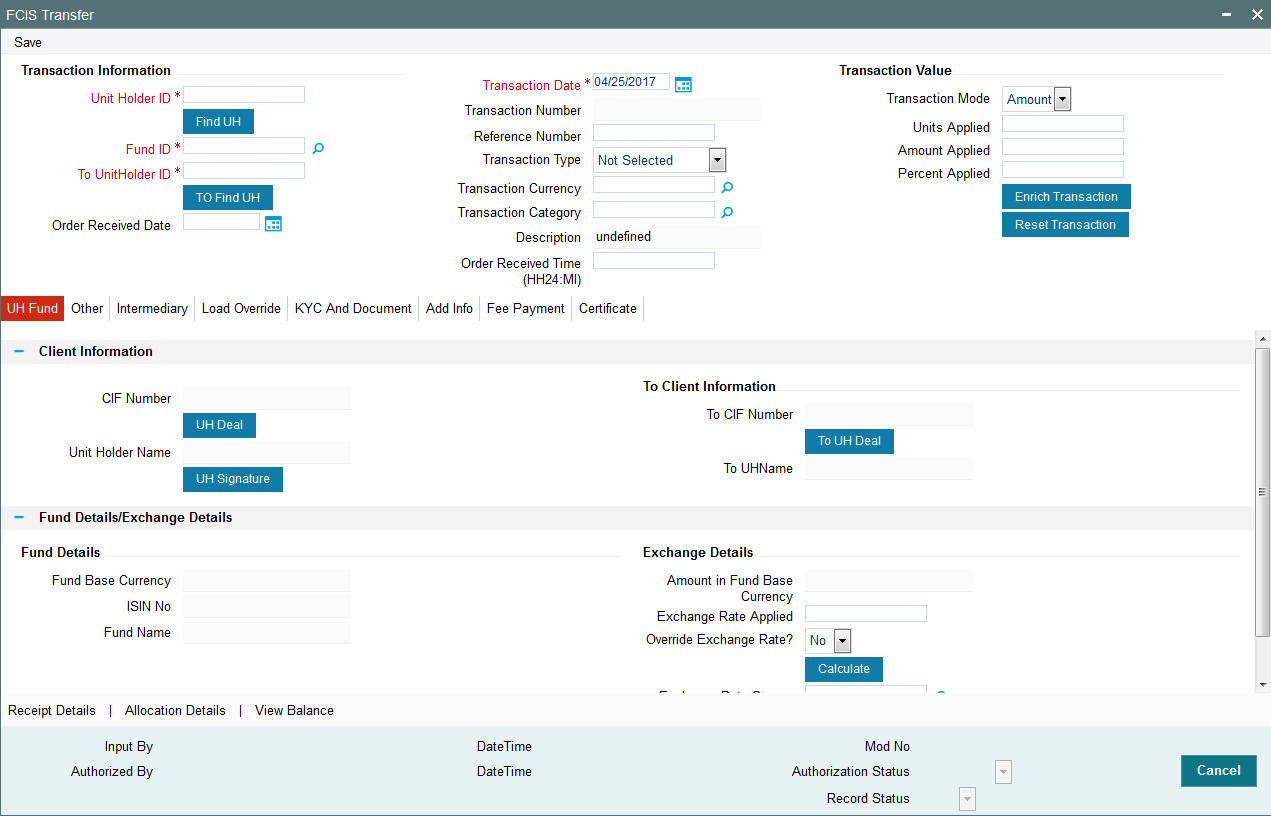
You can specify the following details:
Transaction Information
Unit Holder ID
Alphanumeric; 12 Characters; Mandatory
Specify the unit holder that has requested the transaction, in the Transaction Information section.
You can query for unit holder ID by clicking ‘Find UH’ button.
Fund ID
Alphanumeric; 6 Characters; Mandatory
Specify the fund ID in which the requested transaction is to be put through. Alternatively, you can select fund ID from the option list. The list displays all valid fund ID maintained in the system.
To UnitHolder ID
Alphanumeric; 12 Characters; Mandatory
Specify To unit holder that has requested the transaction, in the Transaction Information section.
You can query for To unit holder ID by clicking ‘Find UH’ button.
Order Received Date
Date Format; Optional
Specify the order received date.
Transaction Number
Display
The system displays the transaction number.
Reference Number
Alphanumeric; 16 Characters; Optional
Specify the reference number for the transaction. If the reference number is designated to be system-generated for the agency branch, then the Reference Number field is locked and the number will be generated by the system when you save the transaction.
Transaction Type
Optional
Select the type of transaction from the drop-down list. The list displays the following values:
- Book to Certificate
- Certificate to Book
- Normal Transfer
- Roll Over
Transaction Currency
Alphanumeric; 3 Characters; Optional
Specify the currency in which the amount value for the transaction will be reckoned. Alternatively, you can select transaction currency from the option list. The list displays all valid transaction currency maintained in the system.
The currency you select here must be one that is a valid transaction currency designated for the selected fund in the Fund Transaction Currency rule.
Transaction Category
Alphanumeric; 1 Character; Optional
Specify the type of transaction. Alternatively, you can select transaction category from the option list. The list displays all valid transaction category code maintained in the system.
Description
Display
The system displays the description for the selected transaction category.
Order Received Time (HH24:MI)
Time Format; Optional
Specify the order received time.
Transaction Value
Transaction Mode
Mandatory
Select the transaction mode from the drop-down list. Following are the options available in the drop-down list:
- Amount
- Units
- Percent
Units Applied
Numeric; 27 Characters; Optional
Specify the units applied details.
You should specify the details in this field only if you have selected ‘Transaction Mode’ field as Units. Else, while clicking ‘Enrich Transaction’ button, the system will display an error message.
Amount Applied
Numeric; 27 Characters; Optional
Specify the amount applied details.
You should specify the details in this field only if you have selected ‘Transaction Mode’ field as Amount. Else, while clicking ‘Enrich Transaction’ button, the system will display an error message.
Percent Applied
Numeric; 27 Characters; Optional
Specify the percent applied details.
You should specify the details in this field only if you have selected ‘Transaction Mode’ field as Percent. Else, while clicking ‘Enrich Transaction’ button, the system will display an error message.
After entering all details in Transaction Information section click on ‘Enrich Transaction’ button. The list of transactions applicable for the Unit Holder selected is defaulted in UH and Fund section.
On click of ‘Enrich Transaction’ button all the header fields will be disabled. Clicking ‘Enrich Transaction’ button during the transaction input, the system will remove all the entered details except the header data entered and re-open all the fields to capture new transaction.
Click ‘Reset Transaction’ button to reset the entire transaction during transaction input, modification and amendment.
For transaction modification/amendment, you can query the transaction and on clicking ‘Reset Transaction’ button, all the transaction details can be modified without changing the transaction number.
For any modification/amendment in any of the primary field including Fund ID or Transaction Date, you need to click ‘Reset Transaction’ button. Using this option, the system will clear all the entered details except the header data entered and re-open all the fields to capture new details.
The reset function does clearing of all the data with the same transaction number. The system will display an override message. Hence all the data needs to be provided again if reset is clicked.
The following primary fields will be enabled for modification and Amendment of the transaction:
- Order Received Date
- Order Received Time
- Transaction date
- Fund ID
- Transaction Currency
- Unitholder ID
- Reference number
- Transaction mode
- Amount applied
- Units applied
- Percentage applied
- Payment mode
- Transaction type
- To Fund ID
- To Unitholder ID
- Subscription fund ID
For any change/ modification or amendment in the above primary fields in transaction screens, system will re-populate the transaction screen and linked dependent fields details on enrich of the transaction.
During transaction input/modification or amendment, if you override the details, system will retain the user override data for transaction entry/save. However, post overriding the details/value if you change any of the primary fields, the system will re-populate the transaction screen with latest details.
The linked dependent details will include Settlement Date, Settlement Due Date, Price Date, Load details and Dealing Date.
The system will default the Settlement date/due date, Price date, dealing date on enrich/save of the transaction only if the previous calendar year is maintained in the system.
Note
- This is not applicable to transactions captured through any other function/UI/channels/uploads.
- If UBS integration is enabled then system will disallow all the above modification or changes and pertaining to the changes proposed. The ‘Reset Transaction’ Button will be disabled, if UBS- Integration is enabled
4.18.2 UH Fund Tab
Click UH Fund tab in FCIS Transfer Detail screen.
Client Information
The system displays the following values:
- CIF Number
- Unit Holder Name
Click ‘UH Signature’ button to upload the image.
Click ‘UH Deal’ button to view the details of all the deals set up for the unit holder. Enter the relevant search criteria in the Find Options screen. The system will display the records that match the search criteria you have specified.
To Client Information
The system displays the following values:
- To CIF Number
- To Unit Holder Name
Click ‘To UH Deal’ button to view the details of all the deals set up for the unit holder. Enter the relevant search criteria in the Find Options screen. The system will display the records that match the search criteria you have specified.
Fund Details/Exchange Details
Fund Details
When you specify the unit holder, the following details are displayed:
- Fund Base Currency
- IAIN Number
- Fund Name
Exchange Details
Amount in Fund Base Currency
Display
The system displays the amount in fund base currency.
Exchange Rate Applied
Numeric; 21 Characters; Optional
Specify the exchange rate applied.
Override Exchange Rate?
Optional
Select if exchange rate has to be overridden or not from the drop-down list. The list displays the following values:
- Yes
- No
Exchange Rate Source
Alphanumeric; 6 Characters; Optional
Specify the exchange rate source.
Click ‘Calculate’ button. The system obtains the applicable exchange rate for the application date and computes the equivalent of the transaction value in the fund base currency. This value is displayed in the Amount in Fund Base Currency field. The applied exchange rate is also displayed in the Applied Exchange Rate field.
If the transaction value is specified in units or percentage of holdings, then the prevalent price for a transfer transaction on the transaction date is used to compute the amount of the transaction, and the same is converted into the fund base currency equivalent.
If you wish to override the applied exchange rate at this stage, select the ‘Yes’ option in the Override Exchange Rate field. Specify the overridden exchange rate in the Applied Exchange Rate field, and click the Calculate button again. If overridden, the overridden exchange rate should be within the permitted fluctuation limits defined in the Source Maintenance.
4.18.3 Other Tab
Click on ‘Other’ tab in the FCIS Transfer screen
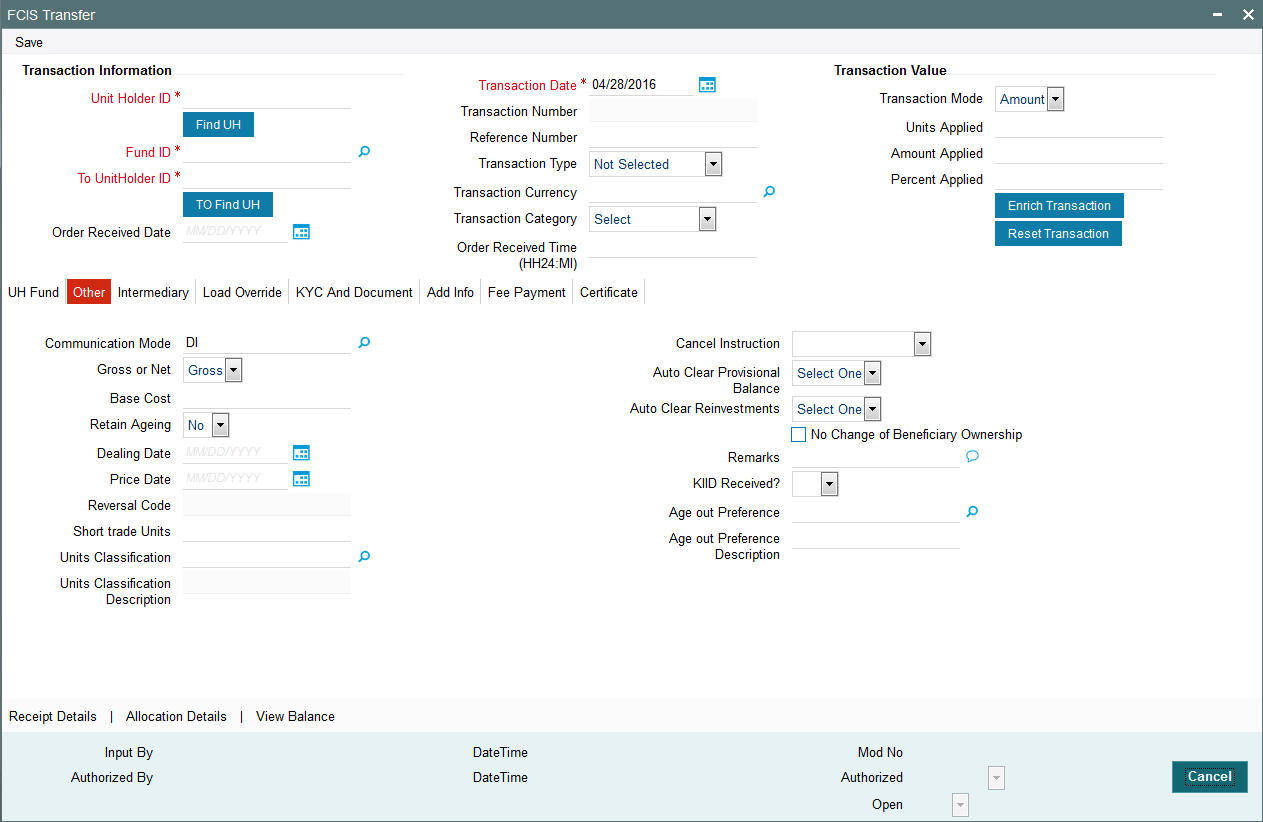
You can specify the following details:
Communication Mode
Alphanumeric; 2 Characters; Mandatory
Specify the communication mode through which the transaction request was communicated. Alternatively, you can select mode of communication from the option list. the list displays all valid communication mode maintained in the system.
Gross or Net
Optional
Select the net value exclusive of the loads from the drop-down list. The list displays the following values:
- Gross
- Net
Base Cost
Numeric; 6 Characters; Optional
Specify the base cost details.
Retain Ageing
Optional
Select if ageing has to be retained or not from the drop-down list. The list displays the following values:
- Yes
- No
Note
The flag for Retain Ageing to Subscription is not available for System generated transactions like Standing Instructions. System would take default values from the Fund Rules for such transactions.
Dealing Date
Date Format; optional
By default, the dealing date is derived based on the dealing date maintained for the fund in the Specific Fund Price Date Setup screen. The date displayed here can be altered, if required, and you can specify the requisite dealing date. Dealing date will not be displayed on the screen if it is not maintained for a fund or the fund is not a specific price date fund. System will default the transaction date as the dealing date.
If you have defined a different trade cycle for the fund in the ‘Override Trade Cycle Date’ screen and the transaction falls within the override period mentioned in this maintenance, the system will default the dealing date from the maintenance.
Refer the chapter ‘Other Fund Activities’ in the Fund Manager User Manual for more details on maintaining alternate trade cycles for a fund
Price Date
Date Format; optional
The field From Price Date is enabled when you select the fund in which the requested transaction is to be put through. The fund should be one for which you have specified forward pricing is applicable. The price date is arrived at by taking into consideration several conditions. This is explained in the section ‘Defaulting of Price Dates in the Transaction’ Screens in this chapter. You can modify this field.
If you have defined a different trade cycle for the fund in the ‘Override Trade Cycle Date’ screen and the transaction falls within the override period mentioned in this maintenance, the system will default the price date from the maintenance.
Reversal Code
Display
The system displays the reversal code.
This field is only available during transaction amendment, and you can use it to capture the appropriate rejection code, if any, for the amendment. The codes available in the option list are specific to the transaction type being amended.
Cancel Instruction
Optional
Select the cancel instruction from the drop-down list. The list displays the following values:
- Standing Instructions
You can use this field to indicate whether standing instructions defined in respect of a unit holder, in the selected fund, are to be cancelled. If you select this option, all standing instructions for the transaction is cancelled, including those that are to be generated after an automatic redemption occurs. Select the ‘Standing Instruction’ option in this field to indicate cancellation of standing instructions.
If this option has been chosen in the General Operating Rules for the fund, the automatic redemption process generates redemption transactions for unit holders in the fund, with the ‘Cancel Instruction’ option automatically set.
If this option has been set for the transaction in this field, the End of Day process cancels all standing instructions (irrespective of the transaction type) for the unit holder in the fund after the outflow transactions (redemption, switch and transfer) involving the unit holder have been allocated for the day.
Note
Reversal or amendment of an outflow transaction for which Cancel Instruction has been set to ‘Standing Instruction’, would re-instate the standing instructions.
Auto Clear Provisional Balance
Optional
Select ‘Yes’ option to indicate that 100% outflow transaction should include provisionally allotted units. This option will be enabled if the transaction mode is ‘Percent’ and the transaction value is ‘100’.
Short Trade Units
Numeric; 27 Characters; Optional
Specify the short trade units.
If the unit holder is nominee account, only then system will allow you to capture the short trade units.
Applicable short trade units will be taken for applying penalty.
If short trade units is not entered, then the transaction allocation will follow the normal allocation process.
Units Classification
Alphanumeric; 1 Character; Optional
Specify the units classification code. Alternatively, you can select units classification code from the option list. The list displays valid unit classification code maintained in the system.
Units Classification Description
Display
The system displays the description for the selected units classification code.
Auto Clear Reinvestments
Optional
Select if reinvestment details should be automatically cleared or not from the drop-down list. The list displays the following values:
- Yes
- No
No Change of Beneficiary Ownership
Optional
Check this box if there is no change in beneficiary ownership details.
Remarks
Alphanumeric; 255 Characters; Optional
Specify remarks, if any.
KIID Received?
Optional
Select if the transaction is KIID compliant or not from the drop-down list. The list displays the following values:
- Yes
- No
The system will default the KIID compliant at the transaction level upon the selection of the Unitholder and Fund in the transaction screens. If the ‘UCITS Fund’ at the Fund level is ‘Yes’ and the UH mapping to the Fund in the ‘UH KIID Compliance’ tab is ‘NO’ then at the transaction level, the system will default the ‘KIID Complaint’ to ‘No’.
If the KIID Received is set to ‘No’, the system display an error message while saving the transaction as ‘The Unit holder has not received the KIID’.
If the flag is set to ‘YES’ there will be no error message and treated as if the UH has received the KIID. The system will always look at the latest UCITS fund mapping maintained at the UH level.
If the transaction is being done in a fund which is not a UCITS Fund then the field KIID received at transaction level will be defaulted to Blank. You cannot change this option to either a Yes or No at the transactions level if it is not a UCITS Fund.
The business user can change the KIID Compliant flag at the transaction from ‘No’ to ‘Yes’ and proceed with the transaction capture but visa versa is not possible. The record at the Unit Holder level will however not get updated. You will have to manually update the same.
In case of backdated transactions, if transaction date is less than effective date, system will default the KIID Compliant field to ‘No’ and then you need to manually override it.
Age out Preference
Alphanumeric; 1 Character; Optional
Specify the age out preference from which we need to preferably redeem the units during outflow and is applicable for Redemption, Switch and Transfer screens. Alternatively, you can select age out preference from the option list. The list displays all valid age out preference code maintained in the system.
Age out Preference Description
Display
The system displays the description for the selected age out preference code.
4.18.4 Intermediary Tab
Click on ‘Intermediary’ tab in the FCIS Transfer Detail screen.
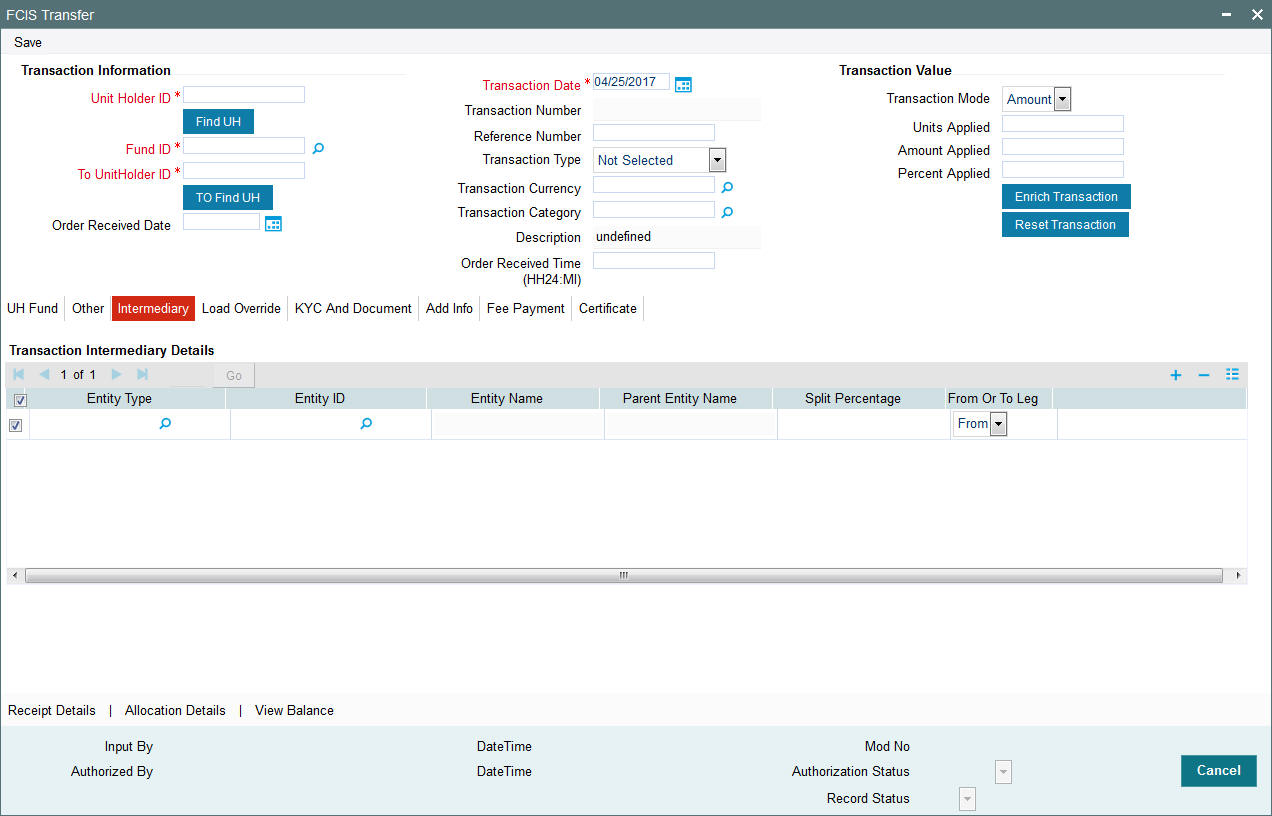
If an entity has been identified as an intermediary for the transaction, then you must identify the same in this section, along with the commission percentage split for an entity..
Entity Type
Alphanumeric; 1 Character; Optional
Select the entity type that has been identified as the intermediary for the transaction.
Entity ID
Alphanumeric; 12 Characters; Optional
For each entity type, specify the intermediary in this field. The name of the selected intermediary is displayed in the Entity Name field.
While entering a transaction, system will default the intermediary specified here. However, you can override the defaulted value.
Entity Name
Display
When you select the broker code, the name of the broker is displayed.
Parent Entity Name
Display
When you select the broker code, the name of the parent broker for the selected broker is displayed.
Split Percentage
Numeric; 5 Characters; Optional
Specify the percentage of total commission that is to accrue to the selected broker. The sum of all the percentages specified for any brokers identified for the transaction must equal one hundred percent.
From or To Leg
Optional
Specify the from or to leg details from the drop-down list. The list displays the following values:
- From
- To
4.18.5 Load Override Tab
Click on ‘Load Override’ tab in the FCIS Transfer Detail screen.
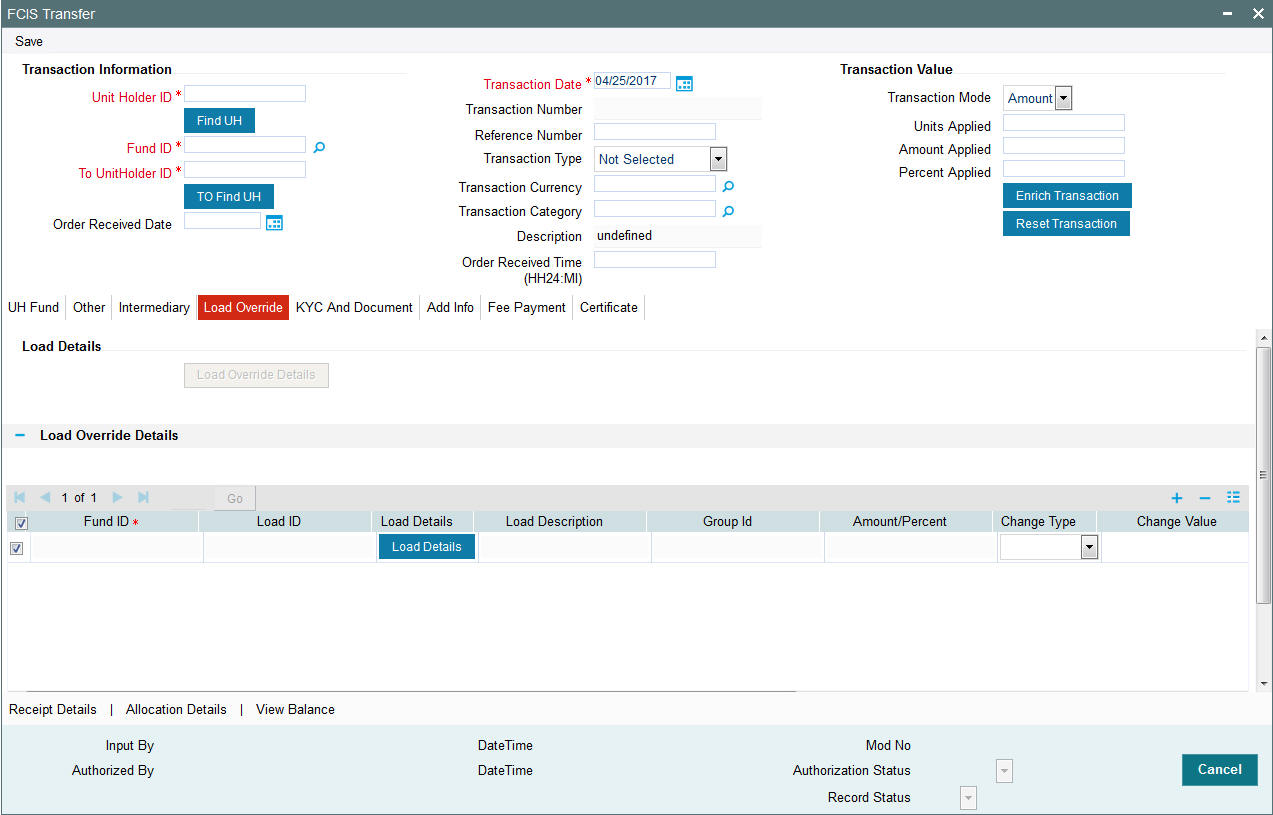
In this section, you can override or alter the value of any load (including derived loads, if any) mapped to the selected fund and applicable for the transaction type, which is to be computed at the time of allocation. The frequency of computation for such loads would be "allocation".
This section is only enabled for funds that have allocation time loads mapped to them as applicable for the transaction type.
If you click ‘Load Override Details’ button, the system defaults the load details. If you do not click this button, then the system will not default even if the fund has load. In this case, load will get computed during allocation only.
Fund ID
Display
The system displays the fund ID.
Load ID
Display
The ID of the allocation time load that has been mapped to the fund for the transaction type is displayed here. The load ID is displayed as a link. To view details of the load, click the ID link.
If a derived load has been mapped, it is also displayed here and can be overridden.
Load Details
Clicking ‘Load Details’ button, ‘Load Maintenance Detail’ screen is displayed.
For further details refer ‘Load Maintenance Detail’ section in Fund Rule user manual.
Load Description
Display
The description of the allocation time load that has been mapped to the fund for the transaction type is displayed here.
Group ID
Display
The system displays the group ID.
Amount/Percent
Display
The type of the allocation time load that has been mapped to the fund for the transaction type is displayed here. The ‘type’ of the load refers to the base value upon which the load is applied. There are two possible types – amount-based loads, and percentage-based loads.
Change type
Optional
Select the change type from the drop-down list. The list displays the following values:
- Discount
- Increase
- Return Value
When you override or alter an allocation time load at the time of entering a transaction, you can effect the change in any of the following ways:
- Discount (reducing the load return value in all the slabs)
- Increase (increasing the load return value in all slabs)
- Return Value (assigning an altered return value that will be applicable to all the loads)
Change Value
Alphanumeric; 30 Characters; Optional
Specify the change value details.
Campaign Code
Display
The system displays the campaign code.
Campaign Load ID
Display
The system displays the campaign load ID.
Project Return Value
Display
The system populates the return value from the load setup.
If the UH Deal maintained is same for Unit Holder, Load and Fund Setup then overridden value from UH Deal is displayed.
If there are criteria based loans in UT transactions, the criteria is evaluated and only loads applicable for the transaction is displayed.
You can view the applicable loads and projected return values by clicking ‘Enrich Transaction’ in the transaction screen.
The system uses the projected return value for load amount computation and also to compute the net amount to AMC while generating GO
In LEP transactions, if there are criteria based loads, the criteria is evaluated during UT transaction generation and it will be used during allocation.
Derived Load Override Details
The system displays the following values:
- Load ID
- Parent Load ID
- Load Description
Change type
Optional
Select the change type from the drop-down list. The list displays the following values:
- Discount
- Increase
- Return Value
When you override or alter an allocation time load at the time of entering a transaction, you can effect the change in any of the following ways:
- Discount (reducing the load return value in all the slabs)
- Increase (increasing the load return value in all slabs)
- Return Value (assigning an altered return value that will be applicable to all the loads)
Change Value
Alphanumeric; 30 Characters; Optional
Specify the change value details.
4.18.6 KYC and Document Tab
Click on ‘KYC and Document’ tab in the FCIS Transfer Detail screen.
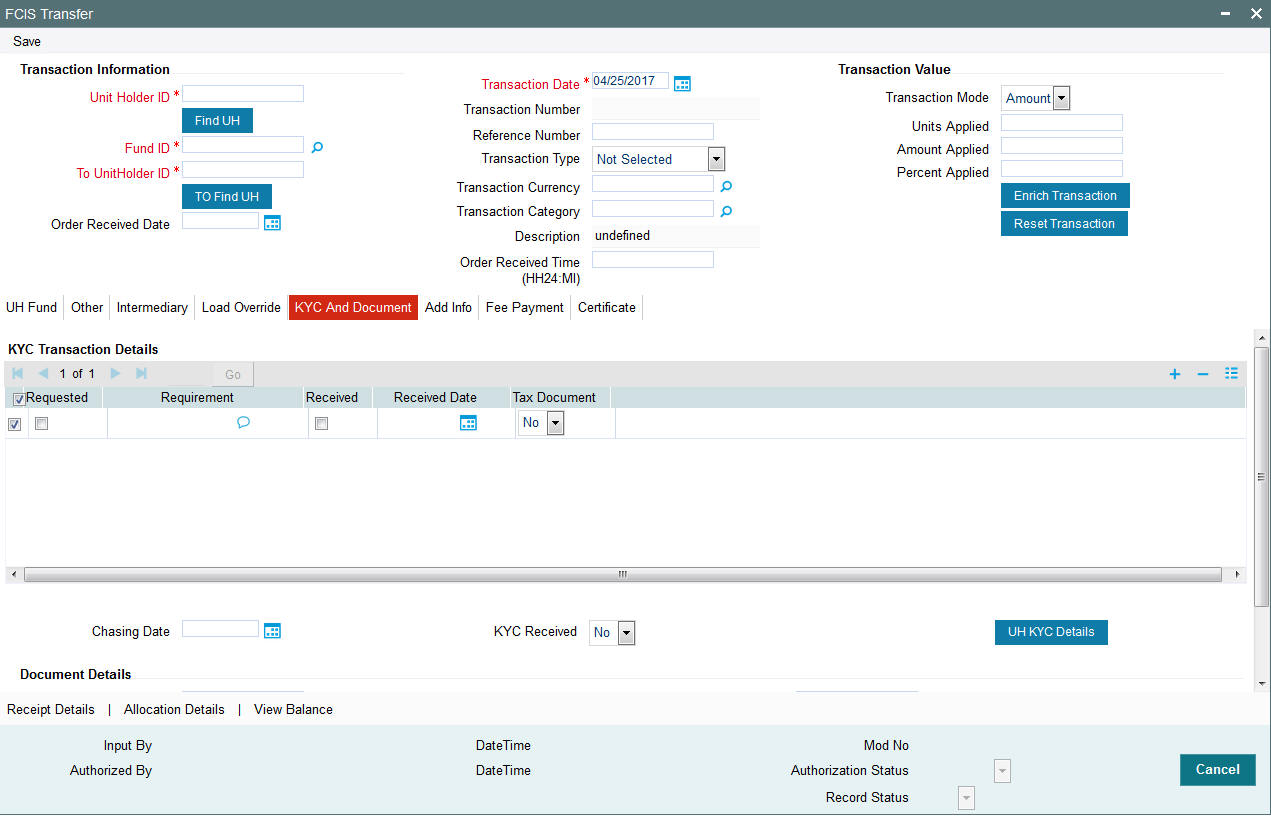
Requested
Optional
Check this box to indicate KYC details are requested.
Requirement
Alphanumeric; 255 Characters; Optional
Specify the list of KYC documents required for the unit holder.
Received
Optional
Check this box to indicate KYC details are received.
Received Date
Date Format; Optional
Specify the date on which the documents are received from the investor.
Tax Document
Optional
Select if tax document is required or not from the drop-down list. The list displays the following values:
- Yes
- No
Chasing Date
Date Format; Optional
Specify the date on which the document chasing is initiated, if the investor has not completed the KYC requirements.
KYC Received
Optional
Select if KYC is received or not from the drop-down list. The list displays the following values:
- Yes
- No
Document Details
Document ID
Alphanumeric; 25 Characters; Optional
Specify the document ID.
Document Type
Alphanumeric; 4 Characters; Optional
Specify the document type.
Type Description
Alphanumeric; 255 Characters; Optional
Specify the description for the type of document.
If during a subscription or IPO transaction, the inflow amount is greater than the maximum amount for Tax Id, system verifies if the unit holder has a Tax ID maintained (PAN). If PAN is not specified, system verifies Tax Document in KYC.
The system checks if the current transaction is an initial purchase or a subsequent one - based on the actual transactions carried out by the UH. In the case of an initial purchase, the system allows you to save an IPO transaction even if the UH has not met the KYC requirements.
Note
If no list has been maintained for this transaction, you may still record the KYC list for the transaction as well as the unit holder. If KYC list is not maintained for your installation, system will consider the documents as submitted by default.
Clicking on ‘UH KYC Details’ button, the system displays all the KYC details available for the UH..
The details are populated from Unit Holder Maintenance screen (UTDUH).
Clicking on ‘UH KYC Details’ button, the system displays all the KYC details available for the UH. If any KYC document is received then it can be marked at transaction KYC detail as ‘Received’. However, you should update the UH maintenance screen for the KYC documents received. If the KYC received at transaction level is ‘Yes’ with some KYC documents and all KYC received at UH level is ‘No’, then the system will display a warning message as ‘Transaction All KYC Received cannot be complete if Unit holder KYC is Incomplete’ during save of the transaction.
For further details on this screen, refer ‘KYC Details Tab’ in ‘Unit Holder Maintenance Detail’ screen (UTDUH) in Entities User Manual.
4.18.7 Add Info Tab
Click on ‘Add Info’ tab in the FCIS Transfer Detail screen.
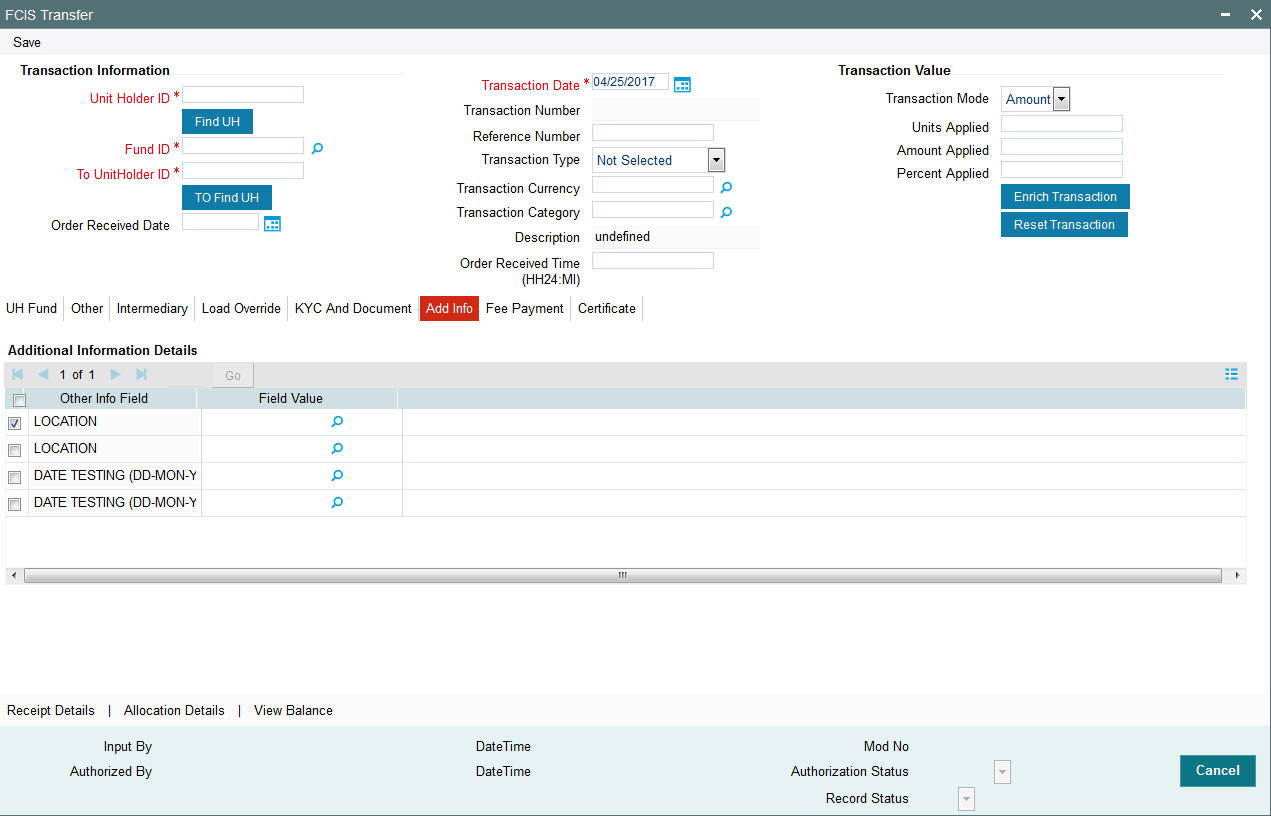
Other Info Field
Display
The system displays additional information, if any information heads have been maintained in the System Parameters, to be applicable for the segment.
Field Value
Display
The system displays the field value.
4.18.8 Fee Payment Tab
Click on ‘Fee Payment’ tab in the FCIS Transfer Detail screen.
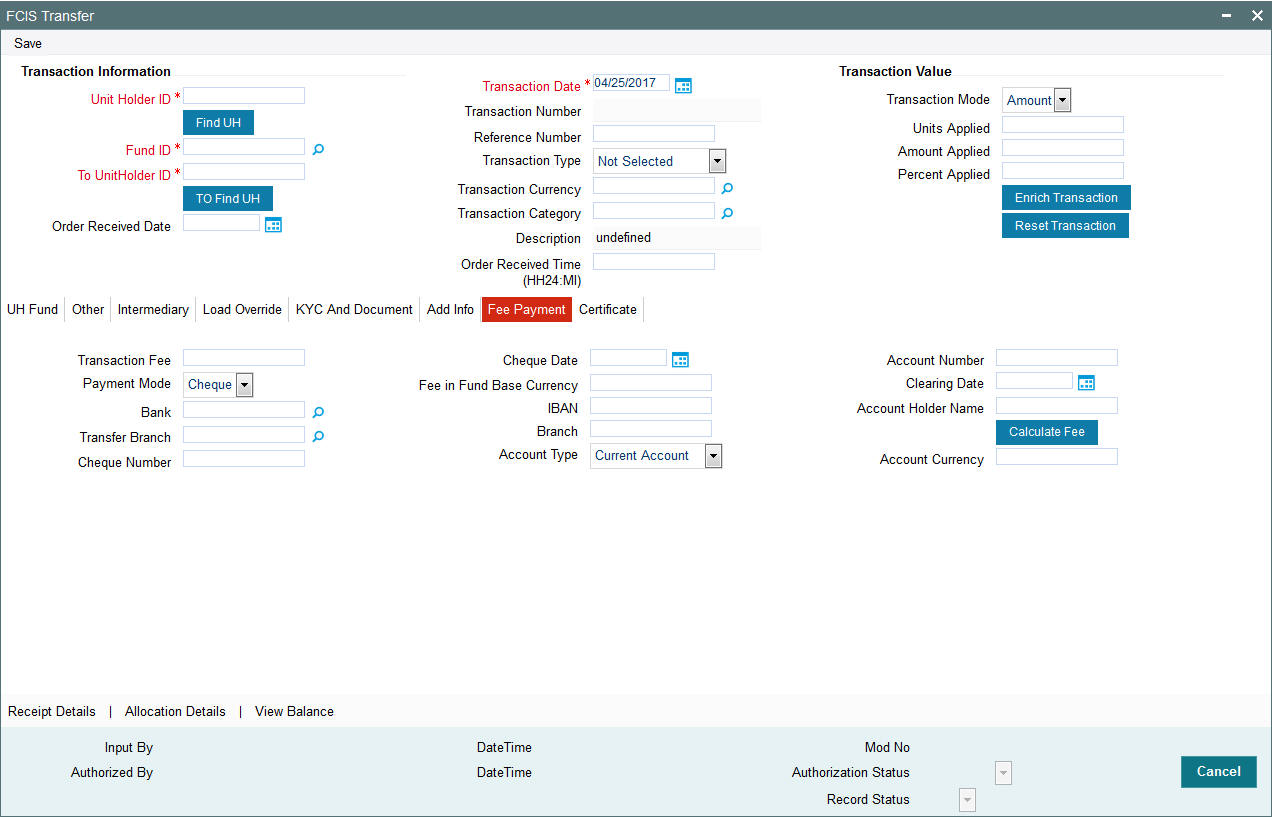
If you have selected a fund for which transaction entry charges or allocation charges (or both) are applicable, then the following fields are enabled for data entry:
Transaction Fee
Numeric; 30 Characters; Optional
Specify the transaction fee.
If a transaction entry charge or transaction time fee is applicable for the fund the transaction time fee equivalent in both fund currency and transaction currency is computed by the system and displayed.
Payment Mode
Optional
Select the payment mode from the drop-down list. The list displays the following values:
- Cheque
- Transfer
- Draft
- Card
Bank
Alphanumeric; 12 Characters; Optional
Specify the bank details.
Transfer Branch
Alphanumeric; 12 Characters; Optional
Specify the transfer branch details. Alternatively, you can select the transfer branch details from the option list. The list displays all valid branch code maintained in the system.
Cheque Number
Alphanumeric; 16 Characters; Optional
Specify the cheque number.
Cheque Date
Date Format; Optional
Specify the cheque date.
Fee in Fund Base Currency
Alphanumeric; 3 Characters; Optional
Specify the fee in fund base currency details.
IBAN
Alphanumeric; 40 Characters; Optional
Specify the IBAN details.
Transfer Branch
Alphanumeric; 20 Characters; Optional
Specify the branch code.
Account Type
Optional
Select the type of account from the drop-down list. The list displays the following values:
- Current Account
- Fixed Account
- Loan Account
- Mortgage Account
- Overdraft Account
- PF Account
- Recurring Account
- Savings Account
- Sweeping Account
Account Number
Alphanumeric; 16 Characters; Optional
Specify the account number.
Clearing Date
Date Format; Optional
Specify the clearing date.
Account Holder Name
Alphanumeric; 100 Characters; Optional
Specify the name of the account holder.
Account Currency
Alphanumeric; 3 Characters; Optional
Specify the account currency details.
Clicking ‘Calculate Fee’ button, the system calculates the fee payment details.
4.18.9 Certificate Tab
Click ‘Certificate’ tab in the FCIS Transfer Detail screen.
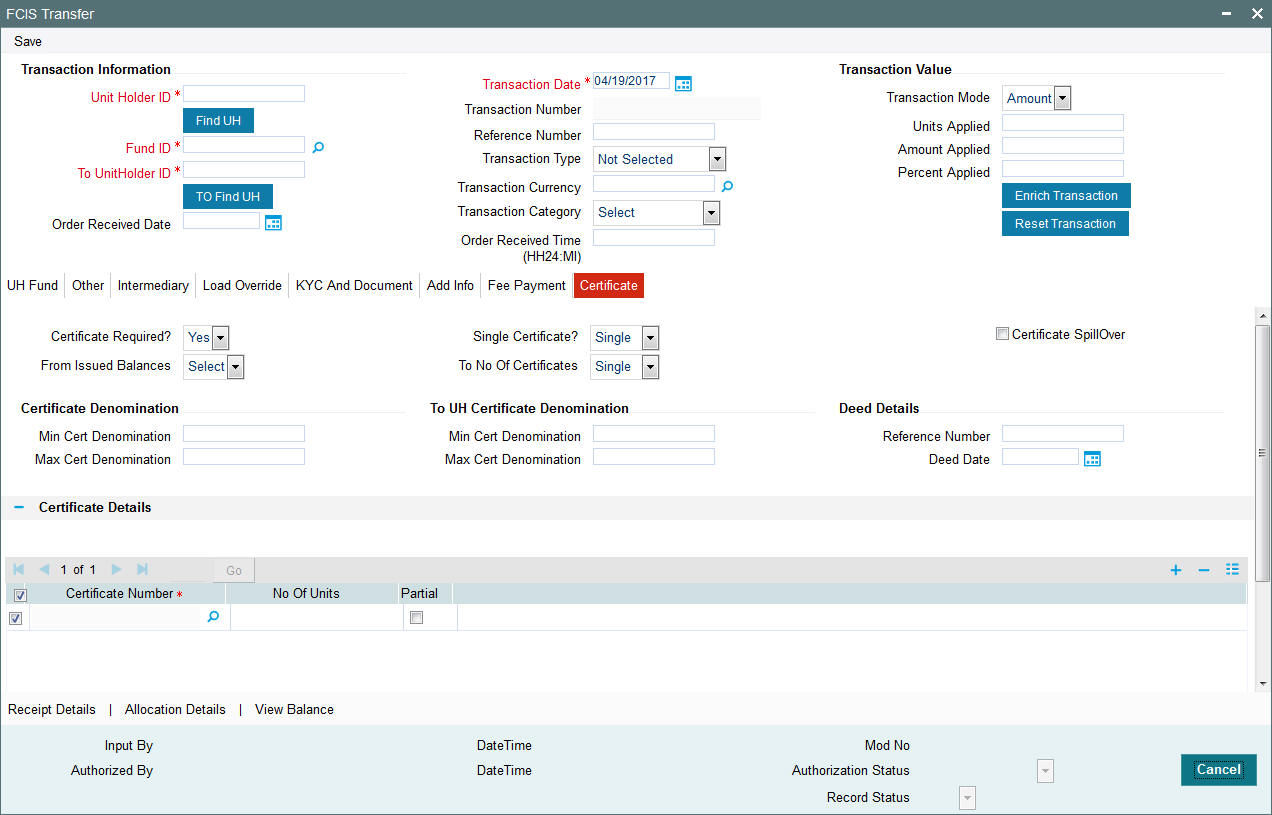
Certificate Required?
Optional
Select if certificate required or not from the drop-down list. The list displays the following values:
- Yes
- No
If the fund you have chosen is a Certificate Option fund as specified in the Shares Characteristics, and the unit holder has requested for certificates, then choose ‘Yes’ in the Certificate Required field.
Single Certificate?
Optional
Select whether a single certificate or multiple certificates have been requested from the drop-down list. The list displays the following values:
- Single
- Multiple
If single certificates have been designated for the fund, you cannot specify multiple certificates here.
If you have selected a certificate option fund, then all certificate information fields are enabled. The fields are Certificate Required, Single Certificate, From Issued Balances, and Max Cert Denomination and Min Cert Denomination under Certificate Section.
Certificate Spill Over?
Optional
Check this box to allow certificate spill over.
From Issued Balances
Optional
Select from issued balances details from the drop-down list. The list displays the following values:
- Yes
- No
- Both
To No Of Certificates
Optional
Select To number of certificates from the drop-down list. The list displays the following values:
- Single
- Multiple
Certificate Denomination
Min Cert Denomination
Numeric; 22 Characters; Optional
Specify the minimum certificate denomination details.
Max Cert Denomination
Numeric; 22 Characters; Optional
Specify the maximum certificate denomination details.
To UH Certificate Denomination
Min Cert Denomination
Numeric; 22 Characters; Optional
Specify the minimum certificate denomination details.
Max Cert Denomination
Numeric; 22 Characters; Optional
Specify the maximum certificate denomination details.
Deed Details
Reference Number
Alphanumeric; 22 Characters; Optional
Specify the reference number.
Deed Date
Date Format; Optional
Specify the deed date.
Certificate Details
Certificate Number
Numeric; 10 Characters; Optional
Specify the certificate number. Alternatively, you can select certificate number from the option list. The list displays all valid certificate number maintained in the system.
Units
Numeric; 27 Characters; Optional
Specify the units details.
Partial
Optional
Check this box if partial details to be selected.
4.18.10 Receipt Detail Button
Click on ‘Receipt Detail’ button to invoke Receipt Details screen.
You can specify the following details:
Link Transaction Number
Alphanumeric; 16 Characters; Optional
Specify the link transaction number.
Units
Numeric; 22 Characters; Optional
Specify the units details.
Total Units
Display
The system displays the total number of units by clicking ‘Get Units’ button.
4.18.11 Allocation Details Button
Clicking ‘Allocation Details’ button, the following screen is displayed:
The following allocation details are displayed:
Allocation Details
The following Allocation details are displayed:
- Fund ID
- Allocation Date
- Allotted Units
- Unit Price
- Confirmed Units
- Settlement Amount Transaction Currency
- Gross Amount in FBC
- Net Amount in FBC
- Settlement Amount in Price Currency
- Rejected Units
- MMF Dividend Amount
- Tax Income Per Share
- EUSD Gain
Switch-In Allocation Details
The following Switch-in allocation details are displayed:
- To Fund ID
- Allocation Date
- Allotted Units
- Unit Price
- Confirmed Units
- Settlement Amount Transaction Currency
- Gross Amount in FBC
- Net Amount in FBC
- Rejected Units
Load Details
The following Load Details are displayed during the allocation:
- Fund ID
- Load ID
- Load Description
- From Entity Type
- To Entity Type
- From Entity
- To Entity
- Load Amount
- Load Amount in Fee Currency
Performance Fee Details
The following Performance Fee Details are displayed during the allocation:
- Link Transaction Number
- In Out Flag
- Element Identification
- Element Description
- Value
Transaction Component Details
The following Transaction Component Details are displayed during the allocation:
- Offer Price
- Bid Price
- Share Capital
- Income
- Fund Capital
- Share Premium
CGT Deduction Details
The following CGT Deduction Details are displayed during the allocation:
- Unit Holder/ Joint Unit Holder ID
- Unit Holder/ Joint Unit Holder Name
- Tax Amount
4.18.12 View Balance Button
Clicking ‘View Balance’ button, ‘Investor Fund Balance’ screen is displayed:
For further details, refer View Balance Button sub section in ‘IPO Subscription Detail’ section in this User Manual.
4.19 Transfer Summary Screen
You can perform the following operations in this screen:
- Section 4.19.1, "Retrieving a Record in Transfer Summary Screen"
- Section 4.19.2, "Editing Transfer Record"
- Section 4.19.3, "Viewing Transfer Record "
- Section 4.19.4, "Deleting Transfer Record"
- Section 4.19.5, "Authorizing Transfer Record "
- Section 4.19.6, "Amending Transfer Record "
- Section 4.19.7, "Authorizing Amended Transfer Record "
4.19.1 Retrieving a Record in Transfer Summary Screen
You can retrieve a previously entered record in the Summary Screen, as follows:
Invoke the ‘FCIS Transfer Summary’ screen by typing ‘UTSTXN05’ in the field at the top right corner of the Application tool bar and clicking on the adjoining arrow button and specify any or all of the following details in the corresponding details.
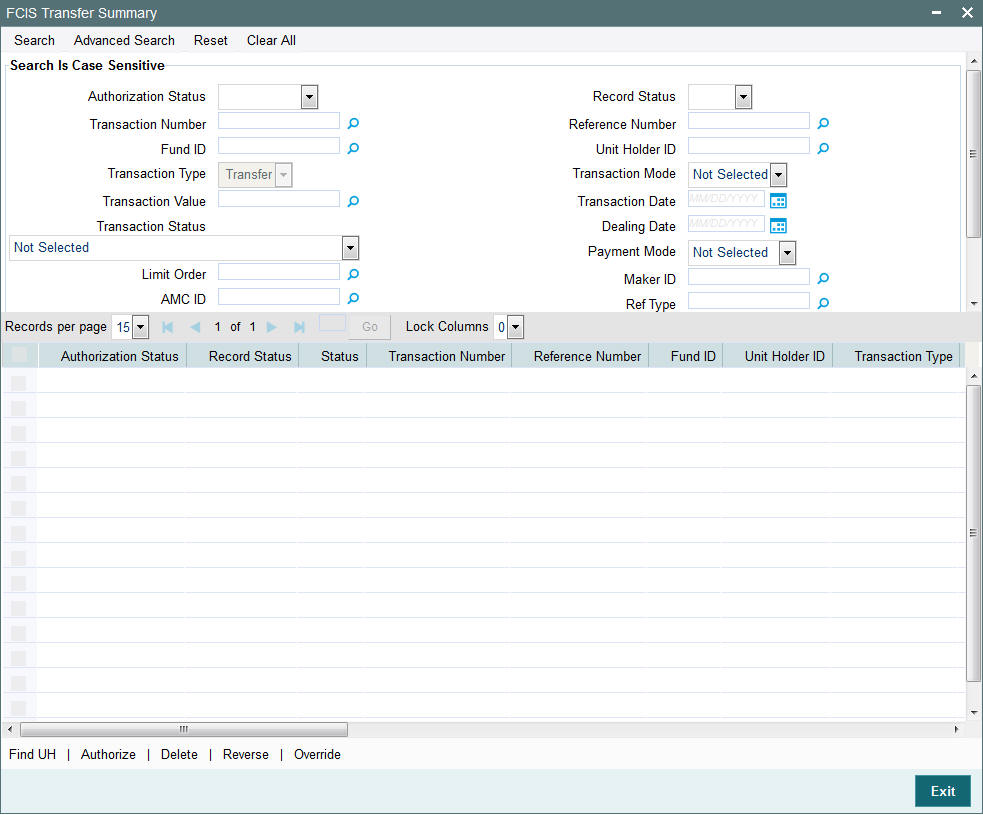
- The status of the record in the Authorization Status field. If you choose the ‘Blank Space’ option, then all the records are retrieved.
- The status of the record in the Record Status field. If you choose the ‘Blank Space’ option, then all records are retrieved
- Transaction Number
- Fund ID
- Transaction Type
- Transaction Value
- Transaction Status
- Limit Order
- AMC ID
- Transaction Category
- Communication Mode
- Reference Number
- Unit Holder ID
- Transaction Mode
- Transaction Date
- Dealing Date
- Payment Mode
- Maker ID
- Ref Type
Click ‘Search’ button to view the records. All the records with the specified details are retrieved and displayed in the lower portion of the screen.
Note
You can also retrieve the individual record detail from the detail screen by querying in the following manner:
- Press F7
- Input the Transaction Number
- Press F8
You can perform Edit, Delete, Amend, Authorize, Reverse, Confirm operations by selecting the operation from the Action list. You can also search a record by using a combination of % and alphanumeric value.
Note
The status field in the Records pane of the summary screen displays the bulk operation results.
For example:
You can search the record for Fund ID by using the combination of % and alphanumeric value as follows:-
- Search by A% :- System will fetch all the records whose Fund ID starts from Alphabet ‘A’. For example:- AGC17,AGVO6,AGC74 etc.
- Search by %7 :- System will fetch all the records whose Fund ID ends by numeric value’ 7’ . For example: AGC17, GSD267, AGC77 etc.
- Search by %17%:- System will fetch all the records whose Fund ID contains the numeric value 17 . For example: GSD217, GSD172, AGC17 etc.
4.19.2 Editing Transfer Record
You can modify the details of FCIS Transfer record that you have already entered into the system, provided it has not subsequently authorized. You can perform this operation as follows:
- Invoke the FCIS Transfer Summary screen from the Browser.
- Select the status of the record that you want to retrieve for modification in the Authorization Status field. You can only modify records that are unauthorized. Accordingly, choose the Unauthorized option.
- Specify any or all of the details in the corresponding fields to retrieve the record that is to be modified.
- Click ‘Search’ button. All unauthorized records with the specified details are retrieved and displayed in the lower portion of the screen.
- Double click the record that you want to modify in the list of displayed records. The FCIS Transfer Detail screen is displayed.
- Select Unlock Operation from the Action list to modify the record. Modify the necessary information.
Click Save to save your changes. The FCIS Transfer Detail screen is closed and the changes made are reflected in the FCIS Transfer Summary screen.
4.19.3 Viewing Transfer Record
To view a record that you have previously input, you must retrieve the same in the FCIS Transfer Summary screen as follows:
- Invoke the FCIS Transfer Summary screen from the Browser.
- Select the status of the record that you want to retrieve for viewing in the Authorization Status field. You can also view all records that are either unauthorized or authorized only, by choosing the unauthorized / Authorized option.
- Specify any or all of the details of the record in the corresponding fields on the screen.
- Click ‘Search’ button. All records with the specified fields are retrieved and displayed in the lower portion of the screen.
- Double click the record that you want to view in the list of displayed records. The FCIS Transfer Detail screen is displayed in View mode.
4.19.4 Deleting Transfer Record
You can delete only unauthorized records in the system. To delete a record that you have previously entered:
- Invoke the FCIS Transfer Summary screen from the Browser.
- Select the status of the record that you want to retrieve for deletion.
- Specify any or all of the details in the corresponding fields on the screen.
- Click ‘Search’ button. All records with the specified fields are retrieved and displayed in the lower portion of the screen.
- Double click the record that you want to delete in the list of displayed records. The FCIS Transfer Detail screen is displayed.
- Select Delete Operation from the Action list. The system prompts you to confirm the deletion and the record is physically deleted from the system database.
4.19.5 Authorizing Transfer Record
- An unauthorized FCIS Transfer record must be authorized in the system for it to be processed. To authorize a record:
- Invoke the FCIS Transfer Summary screen from the Browser.
- Select the status of the record that you want to retrieve for authorization. Typically, choose the unauthorized option.
- Specify any or all of the details in the corresponding fields on the screen.
- Click ‘Search’ button. All records with the specified details that are pending authorization are retrieved and displayed in the lower portion of the screen.
- Double click the record that you wish to authorize. The FCIS Transfer Detail screen is displayed. Select Authorize operation from the Action List.
When a checker authorizes a record, details of validation, if any, that were overridden by the maker of the record during the Save operation are displayed. If any of these overrides results in an error, the checker must reject the record.
4.19.6 Amending Transfer Record
After a FCIS Transfer record is authorized, it can be modified using the Unlock operation from the Action List. To make changes to a record after authorization:
- Invoke the FCIS Transfer Summary screen from the Browser.
- Select the status of the record that you want to retrieve for authorization. You can only amend authorized records.
- Specify any or all of the details in the corresponding fields on the screen.
- Click ‘Search’ button. All records with the specified details that are pending authorization are retrieved and displayed in the lower portion of the screen.
- Double click the record that you wish to authorize. The FCIS Transfer Detail screen is displayed in amendment mode. Select Unlock operation from the Action List to amend the record.
- Amend the necessary information and click on Save to save the changes
4.19.7 Authorizing Amended Transfer Record
An amended FCIS Transfer record must be authorized for the amendment to be made effective in the system. The authorization of amended records can be done only from Fund Manager Module and Agency Branch module.
The subsequent process of authorization is the same as that for normal transactions.
4.20 Block Transaction Detail
This section contains the following topics:
- Section 4.20.1, "Invoking Block Transaction Detail Screen"
- Section 4.20.2, "Details Tab"
- Section 4.20.3, "Intermediary Tab"
- Section 4.20.4, "KYC Details Tab"
- Section 4.20.5, "Add Info Tab"
- Section 4.20.6, "Pledgee Tab"
- Section 4.20.7, "Certificate Tab"
- Section 4.20.8, "Allocation Details Button"
- Section 4.20.9, "View Balance Button"
- Section 4.20.10, "Saving the transaction"
4.20.1 Invoking Block Transaction Detail Screen
To enter a block transaction request into the system, perform the following sequence of steps:
Invoke the ‘FCIS Block Transaction Detail’ screen by typing ‘UTDTXN06’ in the field at the top right corner of the Application tool bar and clicking on the adjoining arrow button. The Transaction Detail screen for Block transactions is displayed, with all the default information..
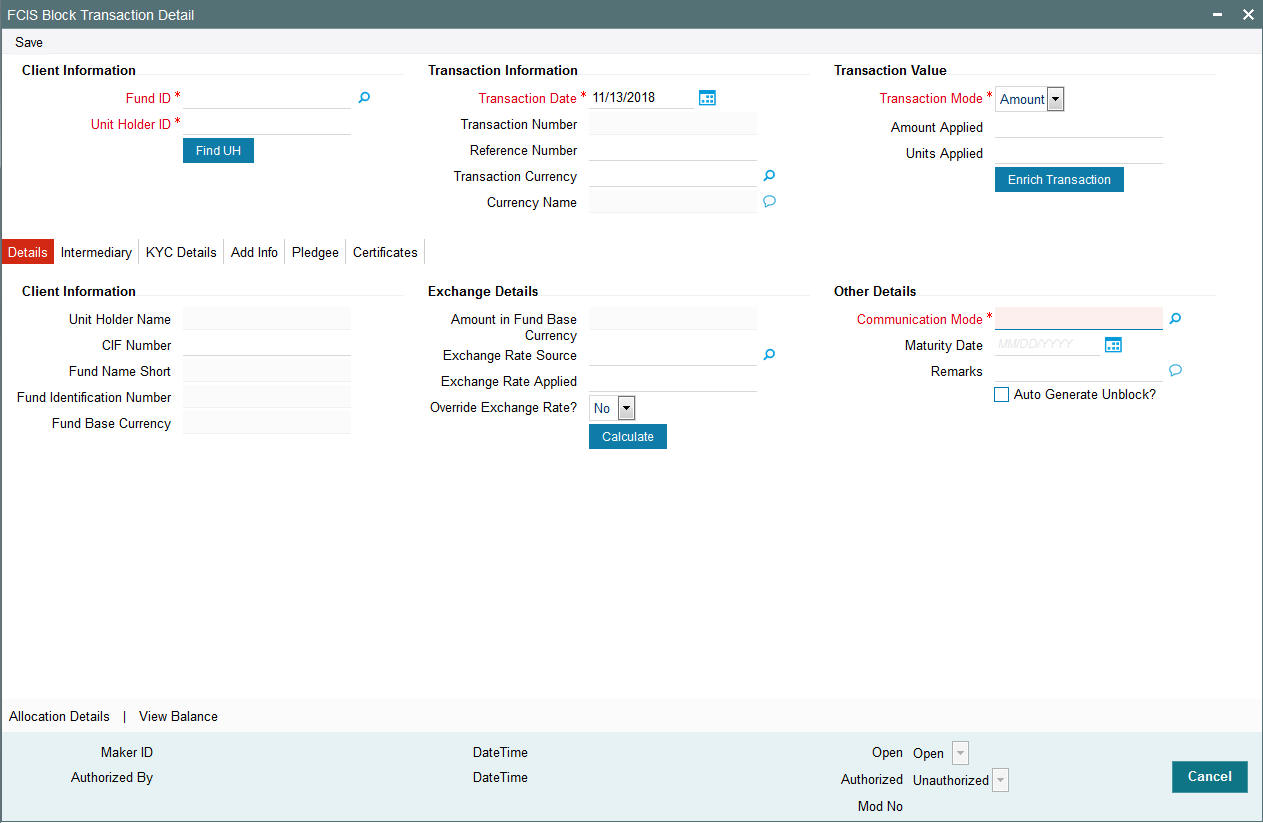
You can specify the following details:
Client Information
Fund ID
Alphanumeric; 6 Characters; Mandatory
Specify the fund ID in which the requested transaction is to be put through. Alternatively, you can select fund ID from the option list. The list displays all valid fund ID maintained in the system.
Unit Holder ID
Alphanumeric; 12 Characters; Mandatory
Specify the unit holder that has requested the transaction, in the Client Information section. Specify the CIF Number and then choose the required unit holder in the Unit Holder field, or else specify the ID of the unit holder in the Unit Holder field.
You must select a CIF or unit holder that is not restricted (or does not belong to a restricted category) for the fund into which the transaction is being entered. If not, the system does not allow the transaction to be saved.
You can also query for unit holder ID by clicking ‘Find UH’ button.
Transaction Information
Transaction Date
Date Format; Mandatory
The transaction date is reckoned to be the application date by default. You can alter this and specify any date that is not designated as a holiday in the system. If you do specify a holiday, the system prompts you to specify a different date.
Transaction Number
Display
The system displays the transaction number.
Reference Number
Alphanumeric; 16 Characters; Optional
Specify the reference number for the transaction. If the reference number is designated to be system-generated for the agency branch, then the Reference Number field is locked and the number will be generated by the system when you save the transaction.
Transaction Currency
Alphanumeric; 3 Characters; Optional
Specify the currency in which the amount value for the transaction will be reckoned. Alternatively, you can select transaction currency from the option list. The list displays all valid transaction currency maintained in the system.
The currency you select here must be one that is a valid transaction currency designated for the selected fund in the Fund Transaction Currency rule.
Currency Name
Display
The system displays the name of the currency.
Transaction Value
Transaction Mode
Mandatory
Select the transaction mode from the drop-down list. Following are the options available in the drop-down list:
- Amount
- Units
Amount Applied
Numeric; 27 Characters; Optional
Specify the amount applied details.
You should specify the details in this field only if you have selected ‘Transaction Mode’ field as Amount. Else, while clicking ‘Enrich Transaction’ button, the system will display an error message.
Units Applied
Numeric; 27 Characters; Optional
Specify the units applied details.
You should specify the details in this field only if you have selected ‘Transaction Mode’ field as Units. Else, while clicking ‘Enrich Transaction’ button, the system will display an error message.
After entering all details in Transaction Information section click on ‘Enrich Transaction’ button. The list of transactions applicable for the Unit Holder selected is defaulted in UH and Fund section.
4.20.2 Details Tab
Click ‘Details’ tab in the FCIS Block Transaction Detail screen.

You can specify the following details:
Client Information
CIF Number
Alphanumeric; 12 Characters; Optional
Specify the CIF number.
The system will display the following values:
- Unit Holder Name
- Fund Name Short
- Fund Identification Number
- Fund Base Currency
Exchange Details
Amount in Fund Base Currency
Display
The system displays the amount in fund base currency.
Exchange Rate Source
Alphanumeric; 6 Characters; Optional
Specify the exchange rate source. Alternatively, you can select the exchange rate source from the option list. The list displays all valid exchange rate source maintained in the system.
Exchange Rate Applied
Numeric; 6 Characters; Optional
Specify the applied exchange rate.
Override Exchange Rate?
Optional
Select if exchange rate is to be overridden or not from the drop-down list. The list displays the following values:
- Yes
- No
Other Details
Communication Mode
Alphanumeric; 2 Characters; Mandatory
Specify the communication mode through which the transaction request was communicated. Alternatively, you can select mode of communication from the option list. the list displays all valid communication mode maintained in the system.
Remarks
Alphanumeric; 255 Characters; Optional
Specify remarks, if any.
Maturity Date
Date Format; Optional
If the fund in which the transaction is being put through is a closed-end fund, then specify the maturity date for the transaction in the Maturity Date field. This field is only applicable for AMCs that have opted for the maturity date facility.
Note
In case of block transactions, enter the maturity date of the block transaction. If the system date is equal to or greater than the date specified here, and the Auto generate Unblock option is checked then system generates an automatic unblock transaction on the date specified here. If the maturity date falls on a holiday, then the unblock transaction will be generated on the next working day.
Auto Generate Block?
Optional
Check this box if block transactions needs to be automatically generated.
After specifying all the necessary details, click ‘Calculate’ button to calculate the interest details. Click the Calculate button. The system obtains the applicable exchange rate for the application date and computes the equivalent of the transaction value in the fund base currency. This value is displayed in the Amount in Fund Base Currency field. The applied exchange rate is also displayed in the Override Exchange Rate field.
4.20.3 Intermediary Tab
Click ‘Intermediary’ tab in the FCIS Block Transaction Detail screen.
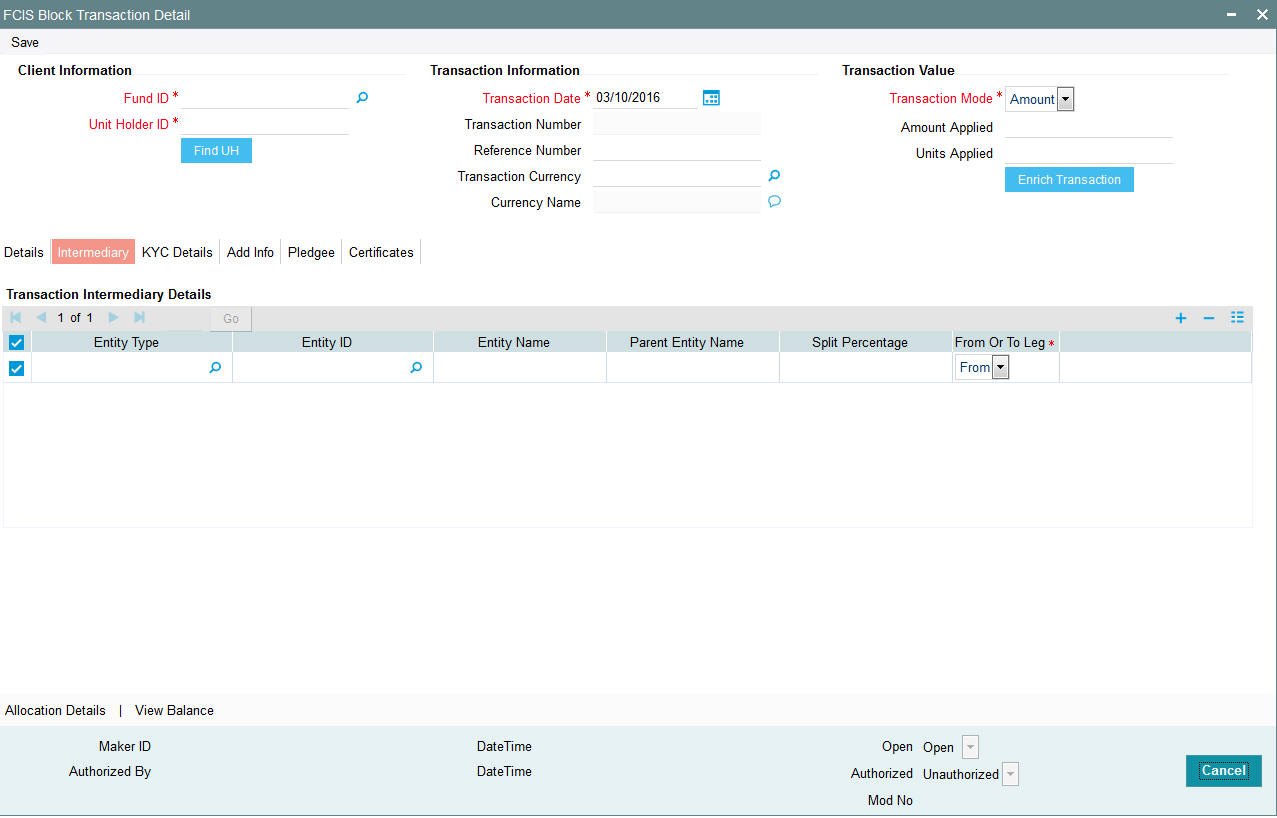
If an entity has been identified as an intermediary for the transaction, then you must identify the same in this section, along with the commission percentage split for an entity..
Entity Type
Alphanumeric; 1 Character; Optional
Select the entity type that has been identified as the intermediary for the transaction.
Entity ID
Alphanumeric; 12 Characters; Optional
For each entity type, specify the intermediary in this field. The name of the selected intermediary is displayed in the Entity Name field.
While entering a transaction, system will default the intermediary specified here. However, you can override the defaulted value.
Entity Name
Alphanumeric; 100 Characters; Optional
When you select the broker code, the name of the broker is displayed. However, you can amend this value.
Parent Entity Name
Alphanumeric; 100 Characters; Optional
When you select the broker code, the name of the parent broker for the selected broker is displayed. However, you can amend this value.
Split Percentage
Numeric; 5 Characters; Optional
Specify the percentage of total commission that is to accrue to the selected broker. The sum of all the percentages specified for any brokers identified for the transaction must equal one hundred percent.
From or To Leg
Mandatory
Select the from or to leg details from the drop-down list. The list displays the follwoing values:
- From
- To
4.20.4 KYC Details Tab
Click ‘KYC Details’ tab in the FCIS Block Transaction Detail screen.
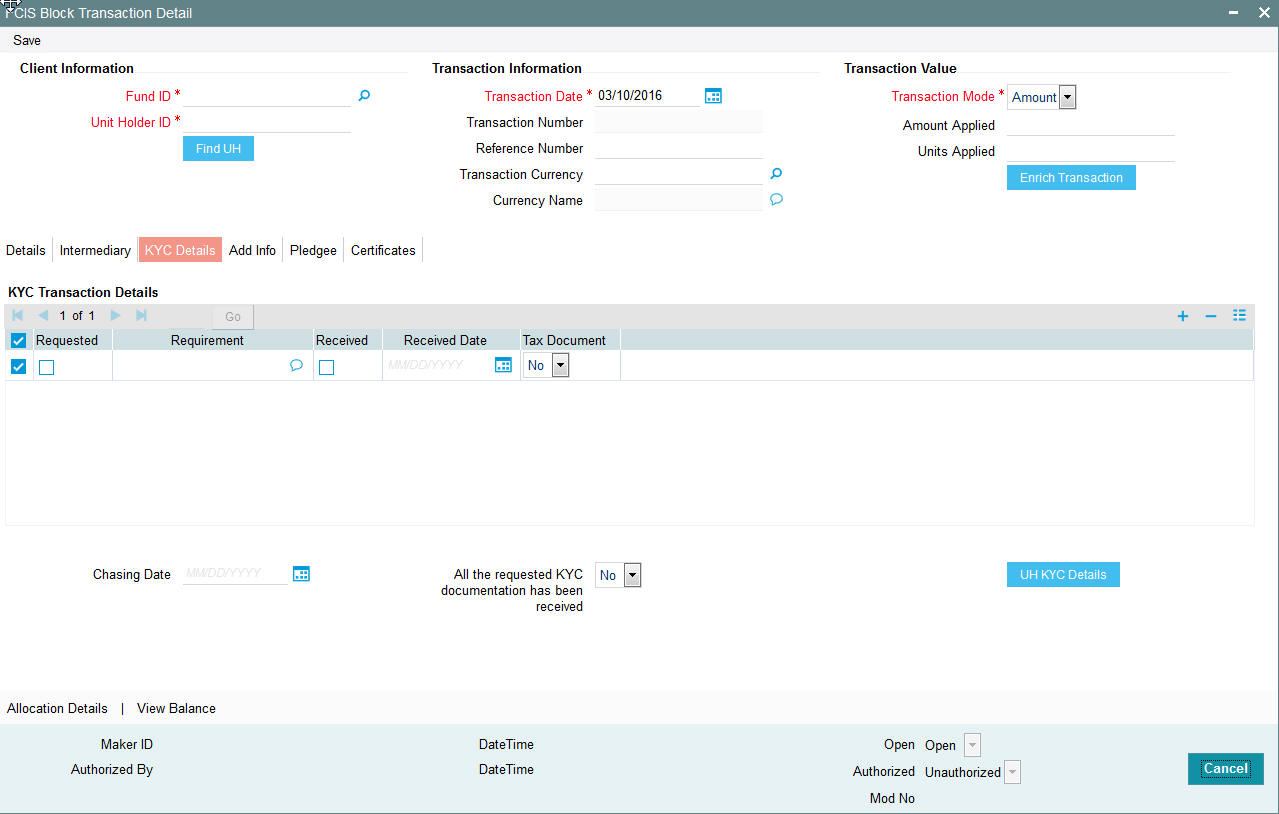
Requested
Optional
Check this box to indicate KYC details are requested.
Requirement
Alphanumeric; 255 Characters; Optional
Specify the list of KYC documents required for the unit holder.
Received
Optional
Check this box to indicate KYC details are received.
Received Date
Date Format; Optional
Specify the date on which the documents are received from the investor.
Tax Document
Optional
Select if tax document is required or not from the drop-down list. The list displays the following values:
- Yes
- No
Chasing Date
Date Format; Optional
Specify the date on which the document chasing is initiated, if the investor has not completed the KYC requirements.
All the requested KYC documentation has been received
Optional
Select if KYC is received or not from the drop-down list. The list displays the following values:
- Yes
- No
Clicking on ‘UH KYC Details’ button, the system displays all the KYC details available for the UH..
The details are populated from Unit Holder Maintenance screen (UTDUH).
Note
Transaction Status will not check the KYC Details to complete the transaction.
For further details on this screen, refer ‘KYC Details Tab’ in ‘Unit Holder Maintenance Detail’ screen (UTDUH) in Entities User Manual.
4.20.5 Add Info Tab
Click on ‘Add Info’ tab in the FCIS Block Transaction Detail screen.

Other Info Field
Display
The system displays additional information, if any information heads have been maintained in the System Parameters, to be applicable for the segment.
Field Value
Display
The system displays the field value.
4.20.6 Pledgee Tab
Click ‘Pledgee’ tab in FCIS Block Transaction Detail screen.
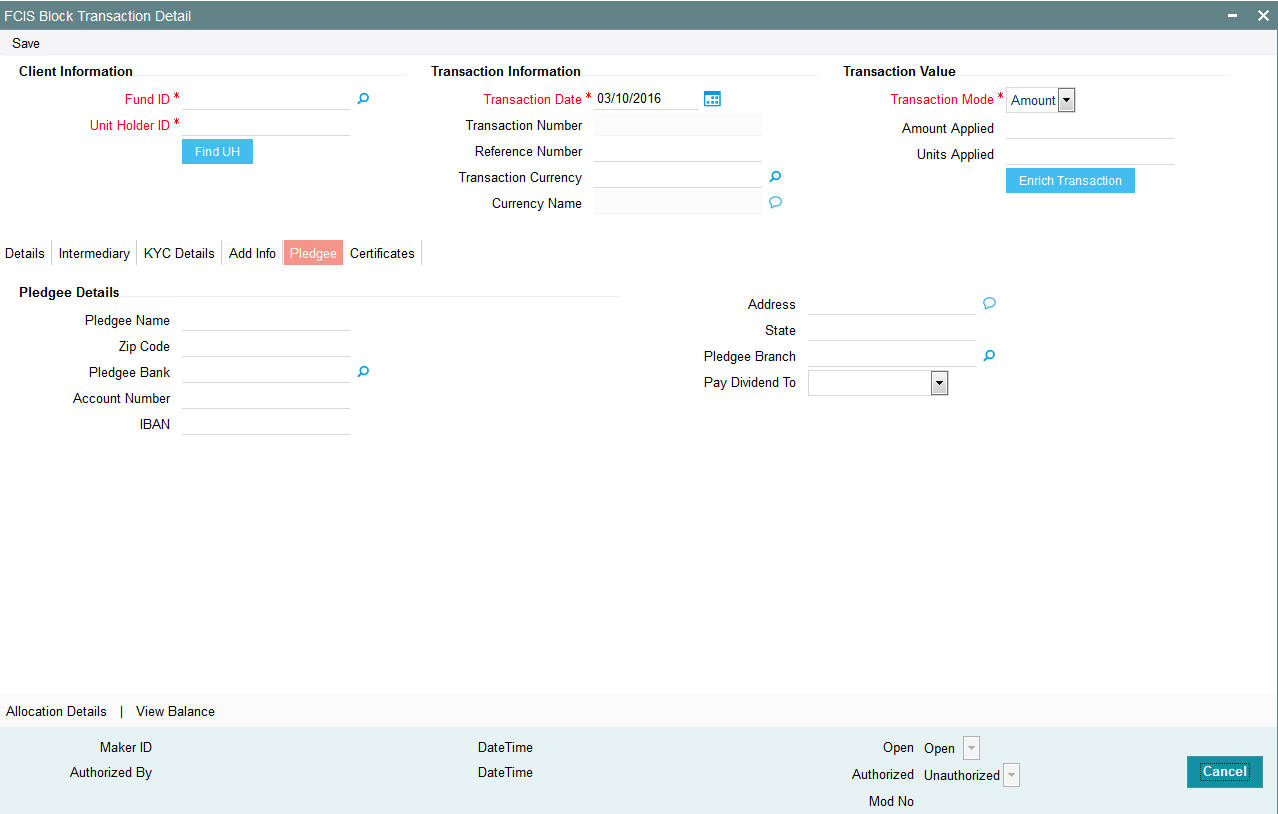
You can specify the following details:
Pledgee Name
Alphanumeric; 100 Characters; Optional
Specify the pledgee name.
Zip Code
Alphanumeric; 10 Characters; Optional
Specify the residing zip code of the pledgee.
Pledgee Bank
Alphanumeric; 12 Characters; Optional
Specify the bank details of the pledgee. Alternatively, you can select pledgee bank details from the option list. The list displays all valid pledgee bank details maintained in the system
Address
Alphanumeric; 255 Characters; Optional
Specify the residing address of the Pledgee.
Account Number
Alphanumeric; 16 Characters; Optional
Specify the Account number details of the pledgee.
IBAN
Alphanumeric; 40 Characters; Optional
Specify the IBAN details.
Pledgee Branch
Alphanumeric; 20 Characters; Optional
Specify the branch code.
Pay Dividend To
Optional
Specify whether the dividend proceeds on the blocked units should be paid to the pledgor, pledgee or to hold back the payment.
- Pledgee - If you choose to pay the dividend to the pledgee, you need to specify the details of the pledgee such as pledgee name, address and account details.
- Pledgor
- Hold Back Account
State
Alphanumeric; 20 Characters; Optional
Specify the residing state name of the pledgee.
4.20.7 Certificate Tab
Click Certificate tab in the FCIS Block Transaction Details screen.
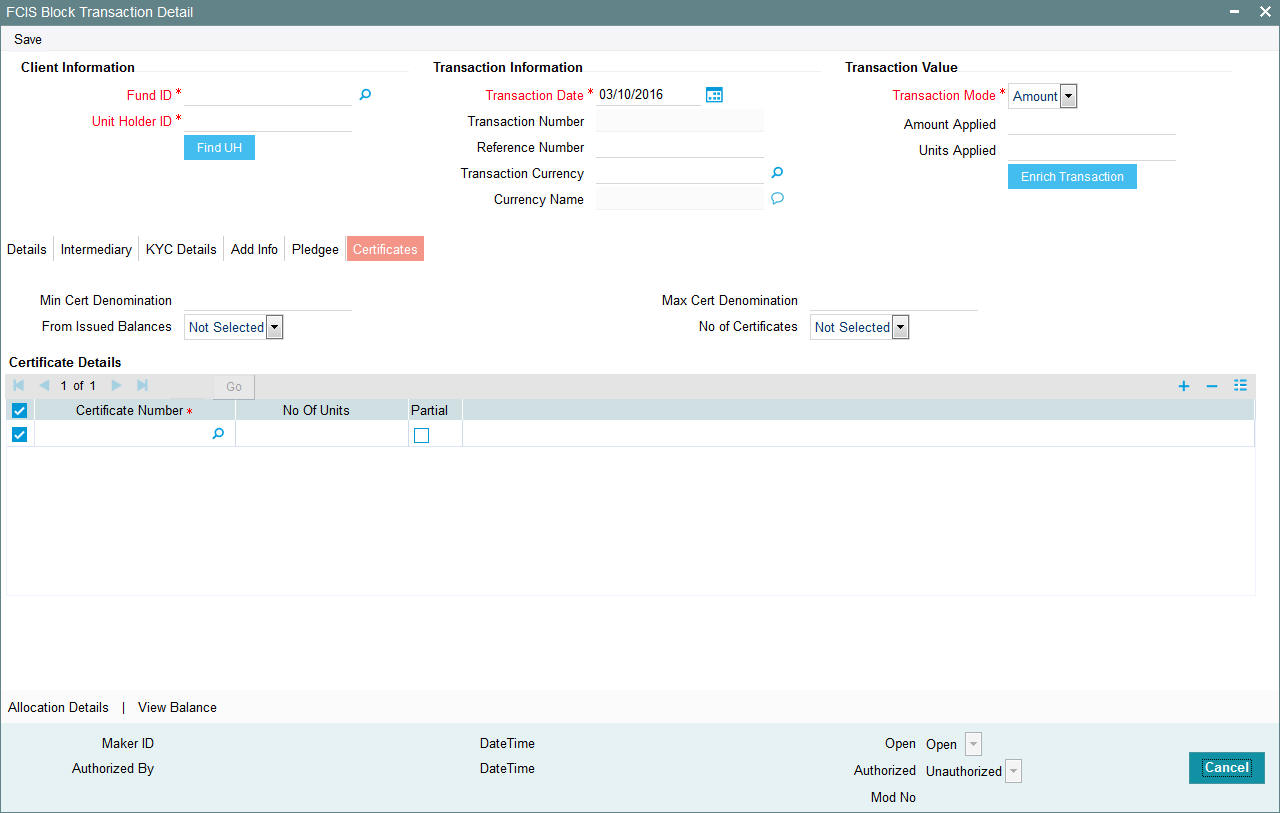
Min Cert Denomination
Numeric; 22 Characters; Optional
Specify the minimum certificate denomination details.
Max Cert Denomination
Numeric; 22 Characters; Optional
Specify the maximum certificate denomination details.
From Issued Balances
Optional
Select from issued balances details from the drop-down list. The list displays the following values:
- Yes
- No
- Both
Note
From issued balance field ‘Both Option’ is not applicable for the subscription transaction
No of Certificates
Optional
Select the number of certificates from the drop-down list. The list displays the following values:
- Single
- Multiple
Certificate Details
Certificate Number
Numeric; 10 Characters; Mandatory
Specify the certificate number. Alternatively, you can select the certificate number from the option list. The list displays all valid certificate number maintained in the system.
No of Units
Numeric; 27 Characters; Optional
Specify the number of units details.
Partial
Optional
Check this box if partial details to be selected.
4.20.8 Allocation Details Button
The following allocation details are displayed:
Allocation Details
The following Allocation details are displayed:
- Fund ID
- Allocation Date
- Allotted Units
- Unit Price
- Confirmed Units
- Settlement Amount Transaction Currency
- Gross Amount in FBC
- Net Amount in FBC
- Settlement Amount in Price Currency
- Rejected Units
- MMF Dividend Amount
- Tax Income Per Share
- EUSD Gain
Switch-In Allocation Details
The following Switch-in allocation details are displayed:
- To Fund ID
- Allocation Date
- Allotted Units
- Unit Price
- Confirmed Units
- Settlement Amount Transaction Currency
- Gross Amount in FBC
- Net Amount in FBC
- Rejected Units
Load Details
The following Load Details are displayed during the allocation:
- Fund ID
- Load ID
- Load Description
- From Entity Type
- To Entity Type
- From Entity
- To Entity
- Load Amount
- Load Amount in Fee Currency
Performance Fee Details
The following Performance Fee Details are displayed during the allocation:
- Link Transaction Number
- In Out Flag
- Element Identification
- Element Description
- Value
Transaction Component Details
The following Transaction Component Details are displayed during the allocation:
- Offer Price
- Bid Price
- Share Capital
- Income
- Fund Capital
- Share Premium
CGT Deduction Details
The following CGT Deduction Details are displayed during the allocation:
- Unit Holder/ Joint Unit Holder ID
- Unit Holder/ Joint Unit Holder Name
- Tax Amount
4.20.9 View Balance Button
Clicking ‘View Balance’ button, ‘Investor Fund Balance’ screen is displayed:
For further details, refer View Balance Button sub section in ‘IPO Subscription Detail’ section in this User Manual.
4.20.10 Saving the transaction
At this stage, you can save the transaction by clicking the Save button at the bottom of the Transaction Information Section. The transaction is saved, and the system generated transaction number (and the reference number, if any) is displayed.
Note
If the Auto-authorization feature is enabled for the Save operation for the AMC ID, then the transaction is saved as an authorized transaction. If not, it is saved as an unauthorized transaction. In either case, the Transaction Number is generated and displayed when you invoke the Save operation.
4.21 Block Transaction Summary Screen
This section contains the following topics:
- Section 4.21.1, "Retrieving a Record in Block Transaction Summary Screen"
- Section 4.21.2, "Editing Block Transaction Record"
- Section 4.21.3, "Viewing Block Transaction Record "
- Section 4.21.4, "Deleting Block Transaction Record"
- Section 4.21.5, "Authorizing Block Transaction Record "
- Section 4.21.6, "Amending Block Transaction Record "
- Section 4.21.7, "Authorizing Amended Block Transaction Record "
4.21.1 Retrieving a Record in Block Transaction Summary Screen
You can retrieve a previously entered record in the Summary Screen, as follows:
Invoke the ‘FCIS Block Transaction Summary’ screen by typing ‘UTSTXN06’ in the field at the top right corner of the Application tool bar and clicking on the adjoining arrow button and specify any or all of the following details in the corresponding details.
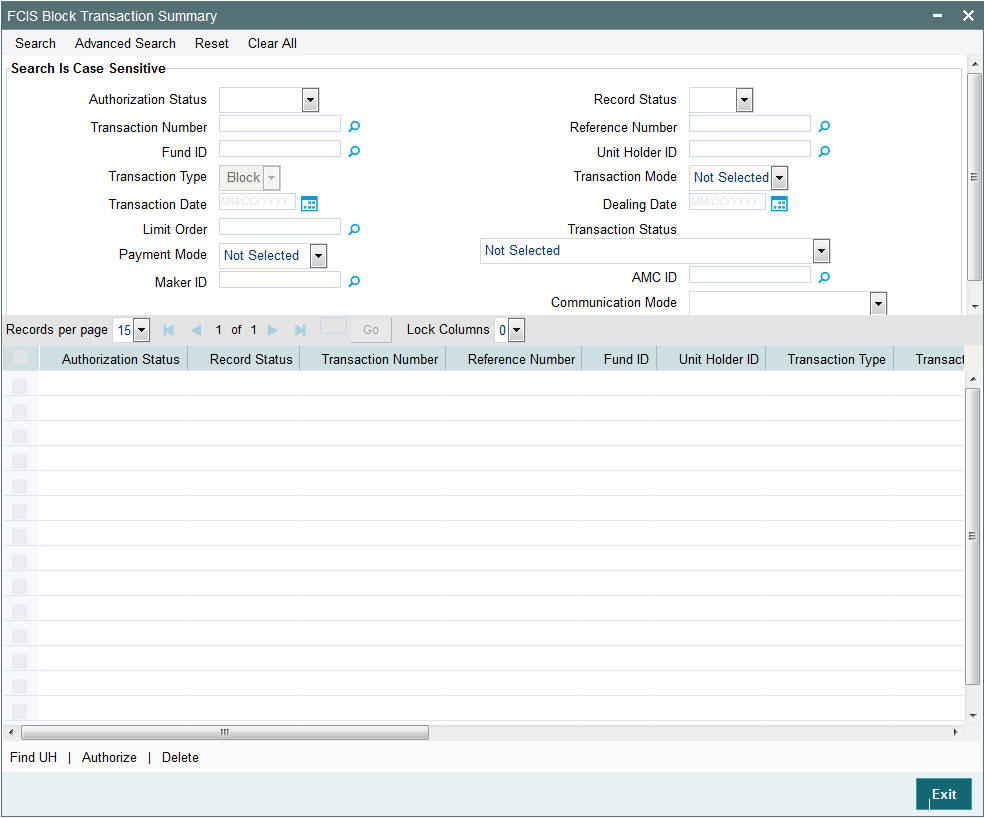
- The status of the record in the Authorization Status field. If you choose the ‘Blank Space’ option, then all the records are retrieved.
- The status of the record in the Record Status field. If you choose the ‘Blank Space’ option, then all records are retrieved
- Transaction Number
- Fund ID
- Transaction Type
- Transaction Date
- Limit Order
- Payment Mode
- Maker ID
- Reference Number
- Unit Holder ID
- Transaction Mode
- Dealing Date
- Transaction Status
- AMC ID
- Communication Mode
Click ‘Search’ button to view the records. All the records with the specified details are retrieved and displayed in the lower portion of the screen.
Note
You can also retrieve the individual record detail from the detail screen by querying in the following manner:
- Press F7
- Input the Transaction Number
- Press F8
You can perform Edit, Delete, Amend, Authorize, Reverse, Confirm operations by selecting the operation from the Action list. You can also search a record by using a combination of % and alphanumeric value.
For example:
You can search the record for Transaction Number by using the combination of % and alphanumeric value as follows:-
- Search by A% :- System will fetch all the records whose Transaction Number starts from Alphabet ‘A’. For example:- AGC17,AGVO6,AGC74 etc.
- Search by %7 :- System will fetch all the records whose Transaction Number ends by numeric value’ 7’ . For example: AGC17, GSD267, AGC77 etc.
- Search by %17%:- System will fetch all the records whose Transaction Number contains the numeric value 17 . For example: GSD217, GSD172, AGC17 etc
4.21.2 Editing Block Transaction Record
You can modify the details of FCIS Block Transaction record that you have already entered into the system, provided it has not subsequently authorized. You can perform this operation as follows:
- Invoke the FCIS Block Transaction Summary screen from the Browser.
- Select the status of the record that you want to retrieve for modification in the Authorization Status field. You can only modify records that are unauthorized. Accordingly, choose the Unauthorized option.
- Specify any or all of the details in the corresponding fields to retrieve the record that is to be modified.
- Click ‘Search’ button. All unauthorized records with the specified details are retrieved and displayed in the lower portion of the screen.
- Double click the record that you want to modify in the list of displayed records. The FCIS Block Transaction Detail screen is displayed.
- Select Unlock Operation from the Action list to modify the record. Modify the necessary information.
Click Save to save your changes. The FCIS Block Transaction Detail screen is closed and the changes made are reflected in the FCIS Block Transaction Summary screen.
4.21.3 Viewing Block Transaction Record
To view a record that you have previously input, you must retrieve the same in the FCIS Block Transaction Summary screen as follows:
- Invoke the FCIS Block Transaction Summary screen from the Browser.
- Select the status of the record that you want to retrieve for viewing in the Authorization Status field. You can also view all records that are either unauthorized or authorized only, by choosing the unauthorized / Authorized option.
- Specify any or all of the details of the record in the corresponding fields on the screen.
- Click ‘Search’ button. All records with the specified fields are retrieved and displayed in the lower portion of the screen.
- Double click the record that you want to view in the list of displayed records. The FCIS Block Transaction Detail screen is displayed in View mode.
4.21.4 Deleting Block Transaction Record
You can delete only unauthorized records in the system. To delete a record that you have previously entered:
- Invoke the FCIS Block Transaction Summary screen from the Browser.
- Select the status of the record that you want to retrieve for deletion.
- Specify any or all of the details in the corresponding fields on the screen.
- Click ‘Search’ button. All records with the specified fields are retrieved and displayed in the lower portion of the screen.
- Double click the record that you want to delete in the list of displayed records. The FCIS Block Transaction Detail screen is displayed.
- Select Delete Operation from the Action list. The system prompts you to confirm the deletion and the record is physically deleted from the system database.
4.21.5 Authorizing Block Transaction Record
- An unauthorized FCIS Block Transaction record must be authorized in the system for it to be processed. To authorize a record:
- Invoke the FCIS Block Transaction Summary screen from the Browser.
- Select the status of the record that you want to retrieve for authorization. Typically, choose the unauthorized option.
- Specify any or all of the details in the corresponding fields on the screen.
- Click ‘Search’ button. All records with the specified details that are pending authorization are retrieved and displayed in the lower portion of the screen.
- Double click the record that you wish to authorize. The FCIS Block Transaction Detail screen is displayed. Select Authorize operation from the Action List.
When a checker authorizes a record, details of validation, if any, that were overridden by the maker of the record during the Save operation are displayed. If any of these overrides results in an error, the checker must reject the record.
4.21.6 Amending Block Transaction Record
After a FCIS Block Transaction record is authorized, it can be modified using the Unlock operation from the Action List. To make changes to a record after authorization:
- Invoke the FCIS Block Transaction Summary screen from the Browser.
- Select the status of the record that you want to retrieve for authorization. You can only amend authorized records.
- Specify any or all of the details in the corresponding fields on the screen.
- Click ‘Search’ button. All records with the specified details that are pending authorization are retrieved and displayed in the lower portion of the screen.
- Double click the record that you wish to authorize. The FCIS Block Transaction Detail screen is displayed in amendment mode. Select Unlock operation from the Action List to amend the record.
- Amend the necessary information and click on Save to save the changes
4.21.7 Authorizing Amended Block Transaction Record
An amended FCIS Block Transaction record must be authorized for the amendment to be made effective in the system. The authorization of amended records can be done only from Fund Manager Module and Agency Branch module.
The subsequent process of authorization is the same as that for normal transactions.
4.22 Unblock Transaction Detail
This section contains the following topic:
- Section 4.22.1, "Invoking Unblock Transaction Detail Screen"
- Section 4.22.2, "Details Tab"
- Section 4.22.3, "Intermediary Tab"
- Section 4.22.4, "KYC Details Tab"
- Section 4.22.5, "Add Info Tab"
- Section 4.22.6, "Certificates Tab"
- Section 4.22.7, "Allocation Details Button"
- Section 4.22.8, "Saving the Transaction"
4.22.1 Invoking Unblock Transaction Detail Screen
To enter an unblock transaction request into the system, perform the following sequence of steps:
Invoke the ‘FCIS UnBlock Transaction Detail’ screen by typing ‘UTDTXN07’ in the field at the top right corner of the Application tool bar and clicking on the adjoining arrow button. The Transaction Detail screen for Unblock transactions is displayed with all the default information..
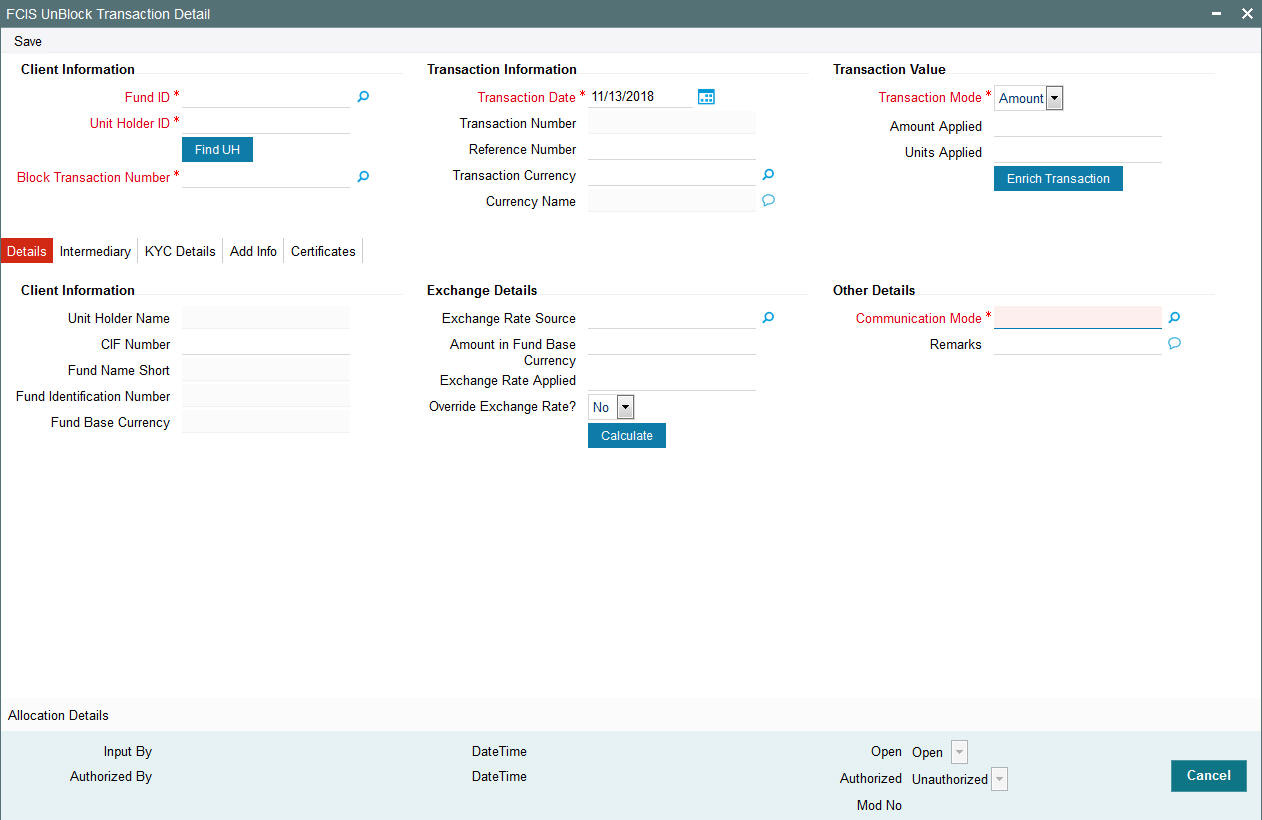
You can specify the following details:
Client Information
Fund ID
Alphanumeric; 6 Characters; Mandatory
Specify the fund ID in which the requested transaction is to be put through. Alternatively, you can select fund ID from the option list. The list displays all valid fund ID maintained in the system.
Unit Holder ID
Alphanumeric; 12 Characters; Mandatory
Specify the unit holder that has requested the transaction, in the Client Information section. Specify the CIF Number and then choose the required unit holder in the Unit Holder field, or else specify the ID of the unit holder in the Unit Holder field.
You must select a CIF or unit holder that is not restricted (or does not belong to a restricted category) for the fund into which the transaction is being entered. If not, the system does not allow the transaction to be saved.
You can also query for unit holder ID by clicking ‘Find UH’ button.
Block Transaction Number
Alphanumeric; 16 Characters; Optional
Specify the block transaction number.
Transaction Information
Transaction Date
Date Format; Mandatory
The transaction date is reckoned to be the application date by default. You can alter this and specify any date that is not designated as a holiday in the system. If you do specify a holiday, the system prompts you to specify a different date.
If you specify an earlier date, the fund that you choose for the transaction must be one for which backdating of transactions is allowed in the Transaction Processing Rules. The specified earlier date must also be within the backdating limit, as specified for the fund in the Transaction Processing Rules.
Transaction Number
Display
The system displays the transaction number.
Reference Number
Alphanumeric; 16 Characters; Optional
Specify the reference number for the transaction. If the reference number is designated to be system-generated for the agency branch, then the Reference Number field is locked and the number will be generated by the system when you save the transaction.
Transaction Currency
Alphanumeric; 3 Characters; Optional
Specify the currency in which the amount value for the transaction will be reckoned. Alternatively, you can select transaction currency from the option list. The list displays all valid transaction currency maintained in the system.
The currency you select here must be one that is a valid transaction currency designated for the selected fund in the Fund Transaction Currency rule.
Currency Name
Display
The system displays the name of the currency.
Transaction Value
Transaction Mode
Mandatory
Select the transaction mode from the drop-down list. Following are the options available in the drop-down list:
- Amount
- Units
Amount Applied
Numeric; 27 Characters; Optional
Specify the amount applied details.
You should specify the details in this field only if you have selected ‘Transaction Mode’ field as Amount. Else, while clicking ‘Enrich Transaction’ button, the system will display an error message.
Units Applied
Numeric; 27 Characters; Optional
Specify the units applied details.
You should specify the details in this field only if you have selected ‘Transaction Mode’ field as Units. Else, while clicking ‘Enrich Transaction’ button, the system will display an error message.
After entering all details in Transaction Information section click on ‘Enrich Transaction’ button. The list of transactions applicable for the Unit Holder selected is defaulted in UH and Fund section.
4.22.2 Details Tab
Click ‘Details’ tab in the FCIS UnBlock Transaction Detail screen.
You can specify the following details:
Client Information Section
CIF Number
Alphanumeric; 12 Characters; Optional
Specify the CIF number.
The system will display the following values:
- Unit holder name
- Fund Name Short
- Fund Identification Number
- Fund Base Currency
Exchange Details
Exchange Rate Source
Alphanumeric; 6 Characters; Optional
Specify the exchange rate source. Alternatively, you can select the exchange rate source from the option list. The list displays all valid exchange rate source maintained in the system.
Amount in Fund Base Currency
Numeric; 18 Characters; Optional
Specify the amount in fund base currency.
Exchange Rate Applied
Numeric; 21 Characters; Optional
The system displays the applied exchange rate.
Override Exchange Rate?
Optional
Select if exchange rate is to be overridden or not from the drop-down list. The list displays the following values:
- Yes
- No
Other Details
Communication Mode
Alphanumeric; 2 Characters; Mandatory
Specify the communication mode through which the transaction request was communicated. Alternatively, you can select mode of communication from the option list. the list displays all valid communication mode maintained in the system.
Remarks
Alphanumeric; 255 Characters; Optional
Specify remarks, if any.
After specifying all the necessary details, click ‘Calculate’ button to calculate the interest details. The system obtains the applicable exchange rate for the application date and computes the equivalent of the transaction value in the fund base currency. This value is displayed in the Amount in Fund Base Currency field. The applied exchange rate is also displayed in the Override Exchange Rate field.
4.22.3 Intermediary Tab
Click ‘Intermediary’ tab in the FCIS UnBlock Transaction Detail screen.
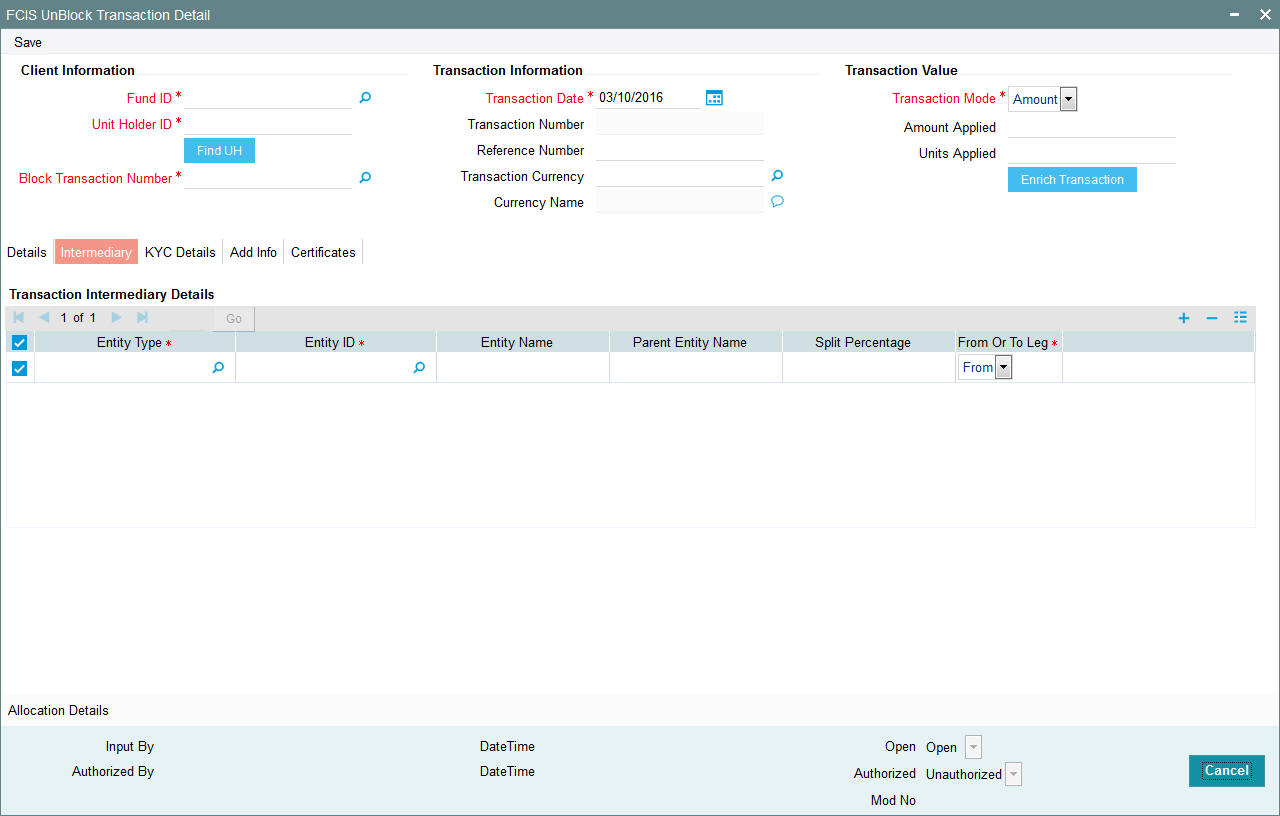
If an entity has been identified as an intermediary for the transaction, then you must identify the same in this section, along with the commission percentage split for an entity.
Entity Type
Alphanumeric; 1 Character; Mandatory
Select the entity type that has been identified as the intermediary for the transaction.
Entity ID
Alphanumeric; 12 Characters; Mandatory
For each entity type, specify the intermediary in this field. The name of the selected intermediary is displayed in the Entity Name field.
While entering a transaction, system will default the intermediary specified here. However, you can override the defaulted value.
Entity Name
Alphanumeric; 100 Characters; Optional
When you select the broker code, the name of the broker is displayed. However, you can amend this value.
Parent Entity Name
Alphanumeric; 100 Characters; Optional
When you select the broker code, the name of the parent broker for the selected broker is displayed. However, you can amend this value.
Split Percentage
Numeric; 5 Characters; Optional
Specify the percentage of total commission that is to accrue to the selected broker. The sum of all the percentages specified for any brokers identified for the transaction must equal one hundred percent.
From or To Leg
Mandatory
Select the from or to leg details from the drop-down list. The list displays the following values:
- From
- To
4.22.4 KYC Details Tab
Click on ‘KYC Details’ tab in the FCIS UnBlock Transaction Detail screen.
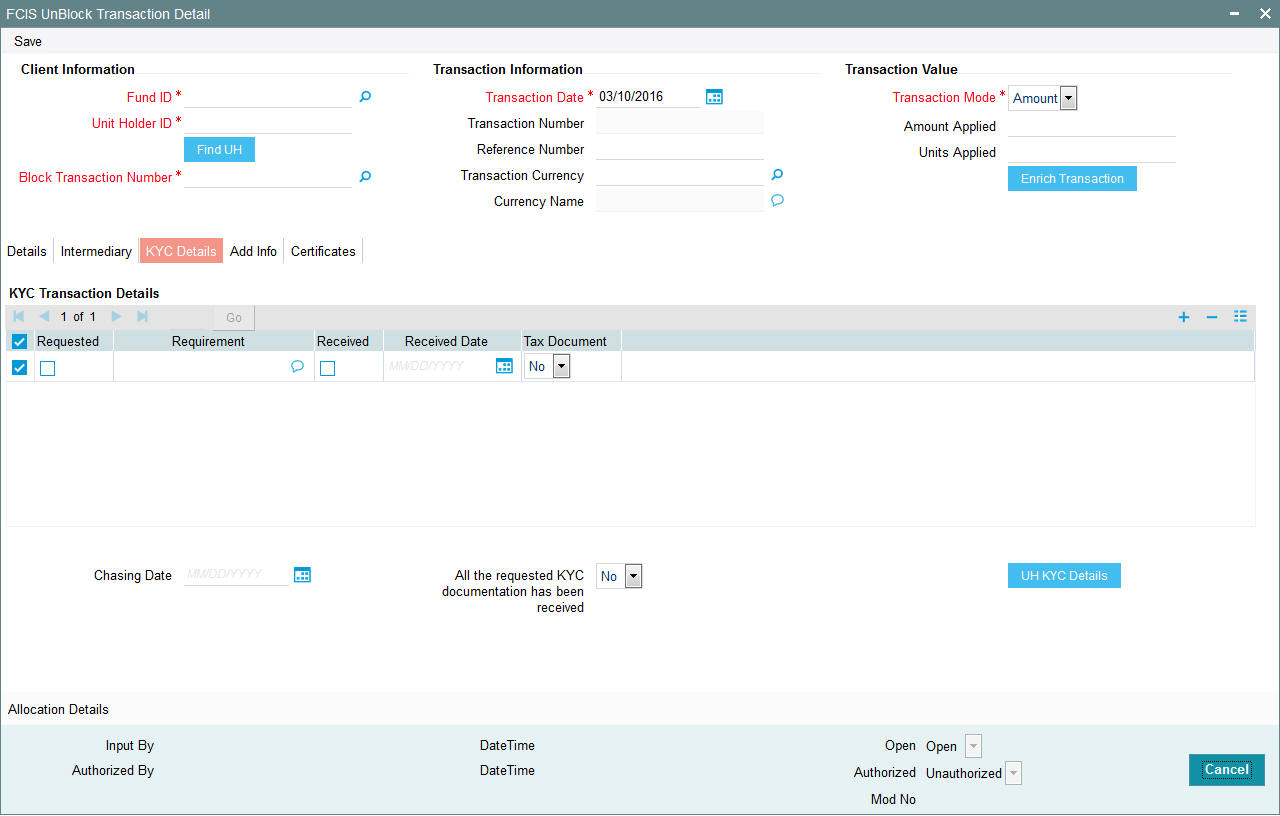
Requested
Optional
Check this box to indicate KYC details are requested.
Requirement
Alphanumeric; 255 Characters; Optional
Specify the list of KYC documents required for the unit holder.
Received
Optional
Check this box to indicate KYC details are received.
Received Date
Date Format; Optional
Specify the date on which the documents are received from the investor.
Tax Document
Optional
Select if tax document is required or not from the drop-down list. The list displays the following values:
- Yes
- No
Chasing Date
Date Format; Optional
Specify the date on which the document chasing is initiated, if the investor has not completed the KYC requirements.
All the requested KYC documentation has been received
Optional
Select if KYC is received or not from the drop-down list. The list displays the following values:
- Yes
- No
Clicking on ‘UH KYC Details’ button, the system displays all the KYC details available for the UH..
The details are populated from Unit Holder Maintenance screen (UTDUH).
Note
Transaction Status will not check the KYC Details to complete the transaction.
For further details on this screen, refer ‘KYC Details Tab’ in ‘Unit Holder Maintenance Detail’ screen (UTDUH) in Entities User Manual.
4.22.5 Add Info Tab
Click on ‘Add Info’ tab in the FCIS UnBlock Transaction Detail screen.
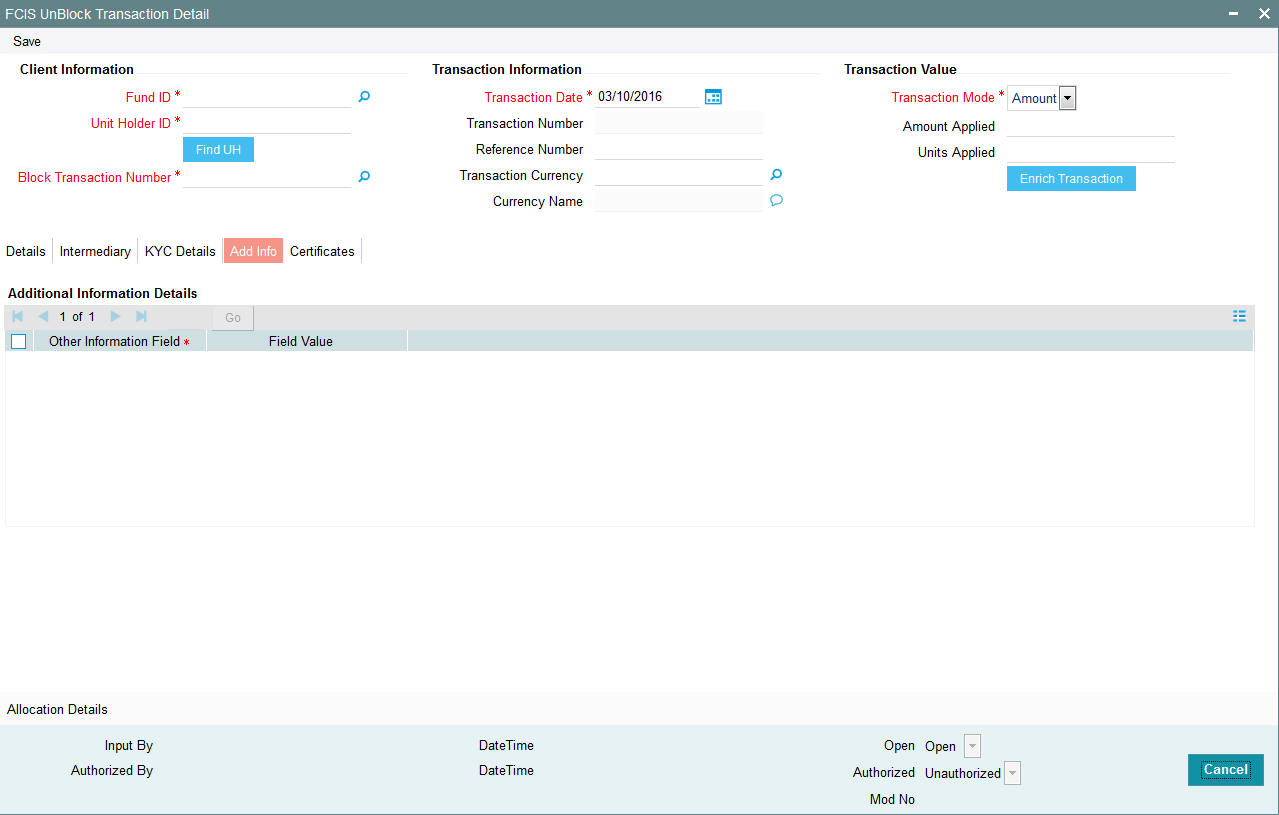
Other Info Field
Display
The system displays additional information, if any information heads have been maintained in the System Parameters, to be applicable for the segment.
Field Value
Display
The system displays the field value.
4.22.6 Certificates Tab
Click on the Certificates tab in the FCIS Block Transaction Details screen.
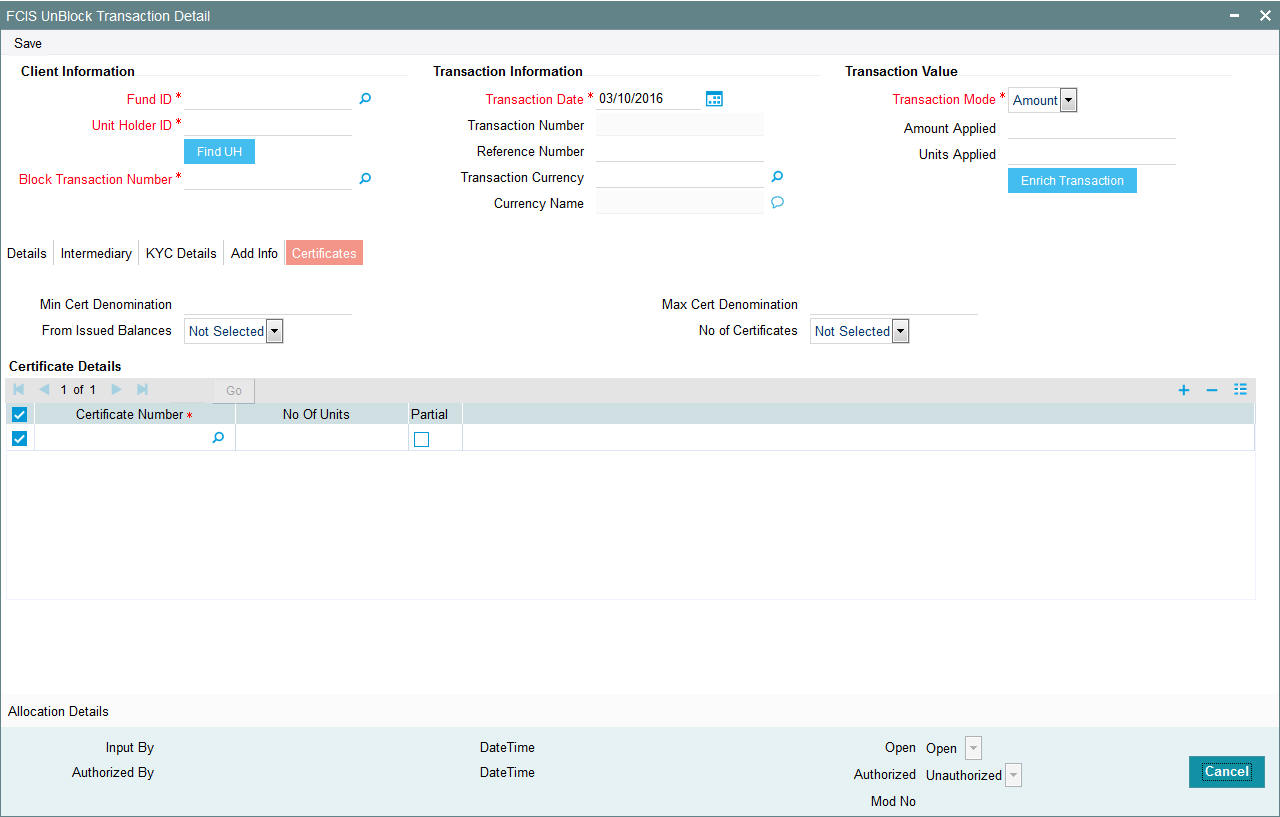
Min Cert Denomination
Numeric; 22 Characters; Optional
Specify the minimum certificate denomination details.
Max Cert Denomination
Numeric; 22 Characters; Optional
Specify the maximum certificate denomination details.
From Issued Balances
Optional
Select from issued balances details from the drop-down list. The list displays the following values:
- Yes
- No
- Both
Note
From issued balance field ‘Both Option’ is not applicable for the subscription transaction
No of Certificates
Optional
Select the number of certificates from the drop-down list. The list displays the following values:
- Single
- Multiple
Certificate Details
Certificate Number
Numeric; 10 Characters; Optional
Specify the certificate number. Alternatively, you can select the certificate number from the option list. The list displays all valid certificate number maintained in the system.
No of Units
Numeric; 27 Characters; Optional
Specify the number of units details.
Partial
Optional
Check this box if partial details to be selected.
4.22.7 Allocation Details Button
The following allocation details are displayed:
Allocation Details
The following Allocation details are displayed:
- Fund ID
- Allocation Date
- Allotted Units
- Unit Price
- Confirmed Units
- Settlement Amount Transaction Currency
- Gross Amount in FBC
- Net Amount in FBC
- Settlement Amount in Price Currency
- Rejected Units
- MMF Dividend Amount
- Tax Income Per Share
- EUSD Gain
Switch-In Allocation Details
The following Switch-in allocation details are displayed:
- To Fund ID
- Allocation Date
- Allotted Units
- Unit Price
- Confirmed Units
- Settlement Amount Transaction Currency
- Gross Amount in FBC
- Net Amount in FBC
- Rejected Units
Load Details
The following Load Details are displayed during the allocation:
- Fund ID
- Load ID
- Load Description
- From Entity Type
- To Entity Type
- From Entity
- To Entity
- Load Amount
- Load Amount in Fee Currency
Performance Fee Details
The following Performance Fee Details are displayed during the allocation:
- Link Transaction Number
- In Out Flag
- Element Identification
- Element Description
- Value
Transaction Component Details
The following Transaction Component Details are displayed during the allocation:
- Offer Price
- Bid Price
- Share Capital
- Income
- Fund Capital
- Share Premium
CGT Deduction Details
The following CGT Deduction Details are displayed during the allocation:
- Unit Holder/ Joint Unit Holder ID
- Unit Holder/ Joint Unit Holder Name
- Tax Amount
4.22.8 Saving the Transaction
At this stage, you can save the transaction by clicking the Save button at the bottom of the Transaction Information Section. The transaction is saved, and the system generated transaction number (and the reference number, if any) is displayed.
Note
If the Auto-authorization feature is enabled for the Save operation for the AMC ID, then the transaction is saved as an authorized transaction. If not, it is saved as an unauthorized transaction. In either case, the Transaction Number is generated and displayed when you invoke the Save operation.
4.23 Unblock Transaction Summary Screen
This section contains the following topics:
- Section 4.23.1, "Retrieving a Record in Unblock Transaction Summary Screen"
- Section 4.23.2, "Editing Unblock Transaction Record"
- Section 4.23.3, "Viewing Unblock Transaction Record "
- Section 4.23.4, "Deleting Unblock Transaction Record"
- Section 4.23.5, "Authorizing Unblock Transaction Record "
- Section 4.23.6, "Amending Unblock Transaction Record "
- Section 4.23.7, "Authorizing Amended Unblock Transaction Record "
4.23.1 Retrieving a Record in Unblock Transaction Summary Screen
You can retrieve a previously entered record in the Summary Screen, as follows:
Invoke the ‘FCIS Unblock Transaction Summary’ screen by typing ‘UTSTXN07’ in the field at the top right corner of the Application tool bar and clicking on the adjoining arrow button and specify any or all of the following details in the corresponding details.

- The status of the record in the Authorization Status field. If you choose the ‘Blank Space’ option, then all the records are retrieved.
- The status of the record in the Record Status field. If you choose the ‘Blank Space’ option, then all records are retrieved
- Transaction Number
- Fund ID
- Transaction Type
- Transaction Date
- Limit Order
- Payment Mode
- Maker ID
- Reference Number
- Unit Holder ID
- Transaction Mode
- Dealing Date
- Transaction Status
- AMC ID
- Communication Mode
Click ‘Search’ button to view the records. All the records with the specified details are retrieved and displayed in the lower portion of the screen.
Note
You can also retrieve the individual record detail from the detail screen by querying in the following manner:
- Press F7
- Input the Transaction Number
- Press F8
You can perform Edit, Delete, Amend, Authorize, Reverse, Confirm operations by selecting the operation from the Action list. You can also search a record by using a combination of % and alphanumeric value.
For example:
You can search the record for Fund ID by using the combination of % and alphanumeric value as follows:-
- Search by A% :- System will fetch all the records whose Transaction Number starts from Alphabet ‘A’. For example:- AGC17,AGVO6,AGC74 etc.
- Search by %7 :- System will fetch all the records whose Transaction Number ends by numeric value’ 7’ . For example: AGC17, GSD267, AGC77 etc.
- Search by %17%:- System will fetch all the records whose Transaction Number contains the numeric value 17 . For example: GSD217, GSD172, AGC17 etc
4.23.2 Editing Unblock Transaction Record
You can modify the details of FCIS Unblock Transaction record that you have already entered into the system, provided it has not subsequently authorized. You can perform this operation as follows:
- Invoke the FCIS Unblock Transaction Summary screen from the Browser.
- Select the status of the record that you want to retrieve for modification in the Authorization Status field. You can only modify records that are unauthorized. Accordingly, choose the Unauthorized option.
- Specify any or all of the details in the corresponding fields to retrieve the record that is to be modified.
- Click ‘Search’ button. All unauthorized records with the specified details are retrieved and displayed in the lower portion of the screen.
- Double click the record that you want to modify in the list of displayed records. The FCIS Unblock Transaction Detail screen is displayed.
- Select Unlock Operation from the Action list to modify the record. Modify the necessary information.
Click Save to save your changes. The FCIS Unblock Transaction Detail screen is closed and the changes made are reflected in the FCIS Unblock Transaction Summary screen.
4.23.3 Viewing Unblock Transaction Record
To view a record that you have previously input, you must retrieve the same in the FCIS Unblock Transaction Summary screen as follows:
- Invoke the FCIS Unblock Transaction Summary screen from the Browser.
- Select the status of the record that you want to retrieve for viewing in the Authorization Status field. You can also view all records that are either unauthorized or authorized only, by choosing the unauthorized / Authorized option.
- Specify any or all of the details of the record in the corresponding fields on the screen.
- Click ‘Search’ button. All records with the specified fields are retrieved and displayed in the lower portion of the screen.
- Double click the record that you want to view in the list of displayed records. The FCIS Unblock Transaction Detail screen is displayed in View mode.
4.23.4 Deleting Unblock Transaction Record
You can delete only unauthorized records in the system. To delete a record that you have previously entered:
- Invoke the FCIS Unblock Transaction Summary screen from the Browser.
- Select the status of the record that you want to retrieve for deletion.
- Specify any or all of the details in the corresponding fields on the screen.
- Click ‘Search’ button. All records with the specified fields are retrieved and displayed in the lower portion of the screen.
- Double click the record that you want to delete in the list of displayed records. The FCIS Unblock Transaction Detail screen is displayed.
- Select Delete Operation from the Action list. The system prompts you to confirm the deletion and the record is physically deleted from the system database.
4.23.5 Authorizing Unblock Transaction Record
- An unauthorized FCIS Unblock Transaction record must be authorized in the system for it to be processed. To authorize a record:
- Invoke the FCIS Unblock Transaction Summary screen from the Browser.
- Select the status of the record that you want to retrieve for authorization. Typically, choose the unauthorized option.
- Specify any or all of the details in the corresponding fields on the screen.
- Click ‘Search’ button. All records with the specified details that are pending authorization are retrieved and displayed in the lower portion of the screen.
- Double click the record that you wish to authorize. The FCIS Unblock Transaction Detail screen is displayed. Select Authorize operation from the Action List.
When a checker authorizes a record, details of validation, if any, that were overridden by the maker of the record during the Save operation are displayed. If any of these overrides results in an error, the checker must reject the record.
4.23.6 Amending Unblock Transaction Record
After a FCIS Unblock Transaction record is authorized, it can be modified using the Unlock operation from the Action List. To make changes to a record after authorization:
- Invoke the FCIS Unblock Transaction Summary screen from the Browser.
- Select the status of the record that you want to retrieve for authorization. You can only amend authorized records.
- Specify any or all of the details in the corresponding fields on the screen.
- Click ‘Search’ button. All records with the specified details that are pending authorization are retrieved and displayed in the lower portion of the screen.
- Double click the record that you wish to authorize. The FCIS Unblock Transaction Detail screen is displayed in amendment mode. Select Unlock operation from the Action List to amend the record.
- Amend the necessary information and click on Save to save the changes
4.23.7 Authorizing Amended Unblock Transaction Record
An amended FCIS Unblock Transaction record must be authorized for the amendment to be made effective in the system. The authorization of amended records can be done only from Fund Manager Module and Agency Branch module.
The subsequent process of authorization is the same as that for normal transactions.
4.23.7.1 Checking for Duplicate Transactions
At the time of saving the transaction details, the system checks for the Transaction Type – Fund ID – Unit Holder combination. If there are any existing transactions for the same combination that has been captured in the past ‘n’ days, the system will display you an warning message if you try to save another transaction with the same combination within those ‘n’ days. You need to specify this ‘n’ number of days which the system has to consider for validation.
The system performs the duplicate transaction validation:
For unauthorized transactions
If a parameter code called “DUPWARNINGLAG” and the value for the ‘n’ number of days has been maintained. The validation fails if the ‘n’ number of days is specified as zero.
For From and To Funds for Switch Transactions
4.23.7.2 Maintaining Parameter Code for Displaying Warning Messages
You need to maintain the parameter code “DUPWARNINGLAG” and the number of days as the Parameter Value in the Parameter Setup screen.
Refer to the chapter “Maintaining System Parameters” in Volume 1 of Fund Manager User Manual for further details on maintaining the parameters.
4.24 Consolidation Transaction Detail
This section contains the following topic:
- Section 4.24.1, "Invoking Consolidation Transaction Detail Screen"
- Section 4.24.2, "Details Tab"
- Section 4.24.3, "Intermediary Tab"
- Section 4.24.4, "KYC Details Tab"
- Section 4.24.5, "Add Info Tab"
- Section 4.24.6, "Certificates Tab"
- Section 4.24.7, "Allocation Details Button"
- Section 4.24.8, "Saving the Transaction"
4.24.1 Invoking Consolidation Transaction Detail Screen
To enter a consolidation transaction request into the system, perform the following sequence of steps:
Invoke the ‘FCIS Consolidation Transaction Detail’ screen by typing ‘UTDTXN08’ in the field at the top right corner of the Application tool bar and clicking on the adjoining arrow button. The Transaction Detail screen for consolidation transactions is displayed, with all the default information.
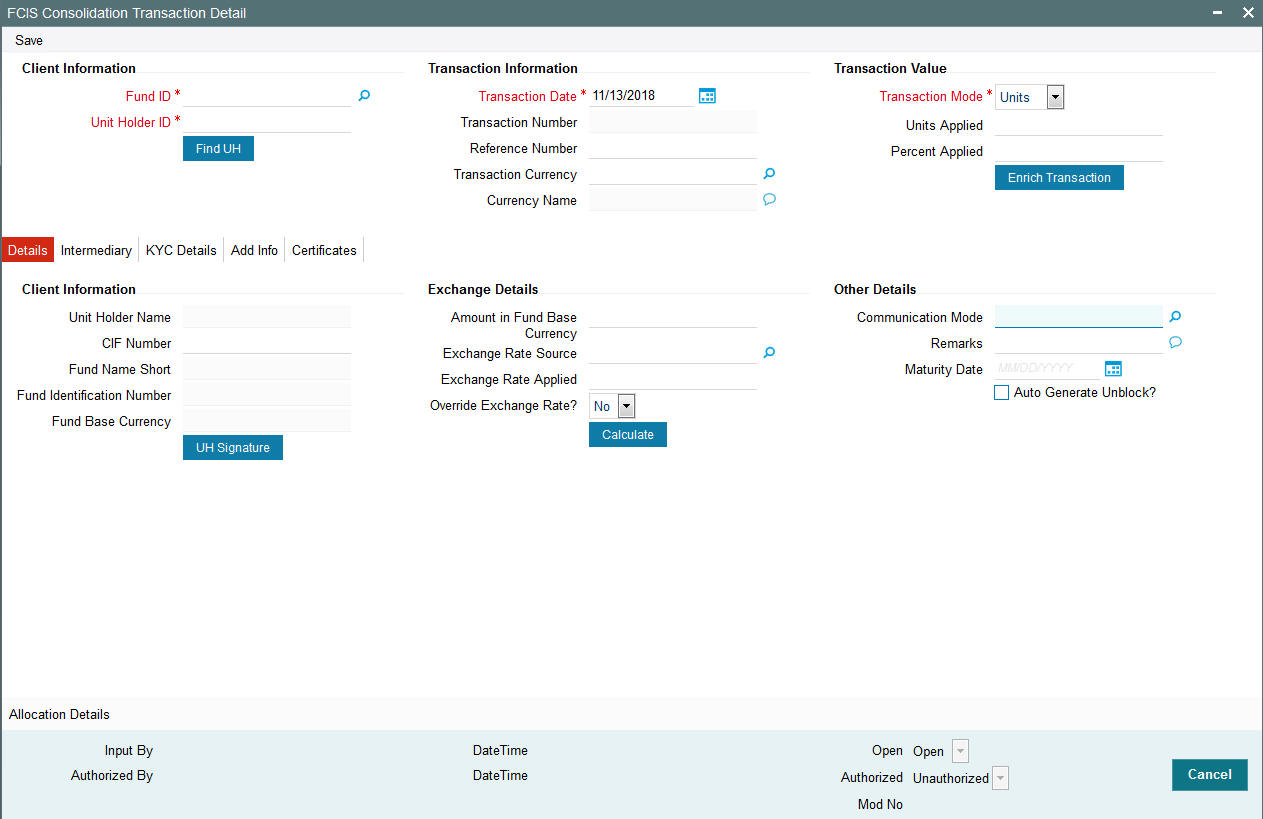
You can specify the following details:
Client Information
Fund ID
Alphanumeric; 6 Characters; Mandatory
Specify the fund ID in which the requested transaction is to be put through. Alternatively, you can select fund ID from the option list. The list displays all valid fund ID maintained in the system.
Unit Holder ID
Alphanumeric; 12 Characters; Mandatory
Specify the unit holder that has requested the transaction, in the Client Information section. Specify the CIF Number and then choose the required unit holder in the Unit Holder field, or else specify the ID of the unit holder in the Unit Holder field.
You must select a CIF or unit holder that is not restricted (or does not belong to a restricted category) for the fund into which the transaction is being entered. If not, the system does not allow the transaction to be saved.
You can also query unit holder ID by clicking ‘Find UH’ button.
Transaction Information
Transaction Date
Date Format; Optional
The transaction date is reckoned to be the application date by default. You can alter this and specify any date that is not designated as a holiday in the system. If you do specify a holiday, the system prompts you to specify a different date.
If you specify an earlier date, the fund that you choose for the transaction must be one for which backdating of transactions is allowed in the Transaction Processing Rules. The specified earlier date must also be within the backdating limit, as specified for the fund in the Transaction Processing Rules.
Transaction Number
Display
The system displays the transaction number.
Reference Number
Alphanumeric; 16 Characters; Optional
Specify the reference number for the transaction. If the reference number is designated to be system-generated for the agency branch, then the Reference Number field is locked and the number will be generated by the system when you save the transaction.
Transaction Currency
Alphanumeric; 3 Characters; Optional
Specify the currency in which the amount value for the transaction will be reckoned. Alternatively, you can select transaction currency from the option list. The list displays all valid transaction currency maintained in the system.
The currency you select here must be one that is a valid transaction currency designated for the selected fund in the Fund Transaction Currency rule.
Currency Name
Display
The system displays the name of the currency.
Transaction Value
Transaction Mode
Mandatory
Select the transaction mode from the drop-down list. Following are the options available in the drop-down list:
- Units
- Percent
Units Applied
Numeric; 27 Characters; Optional
Specify the units applied details.
You should specify the details in this field only if you have selected ‘Transaction Mode’ field as Units. Else, while clicking ‘Enrich Transaction’ button, the system will display an error message.
Percent Applied
Numeric; 27 Characters; Optional
Specify the percent applied details.
You should specify the details in this field only if you have selected ‘Transaction Mode’ field as Percent. Else, while clicking ‘Enrich Transaction’ button, the system will display an error message.
After entering all details in Transaction Information section click on ‘Enrich Transaction’ button. The list of transactions applicable for the Unit Holder selected is defaulted in UH and Fund section.
4.24.2 Details Tab
Click ‘Details’ tab in the FCIS Consolidation Transaction Detail screen.
You can specify the following details:
Client Information Section
CIF Number
Alphanumeric; 12 Characters; Optional
Specify the CIF number.
The system will display the following values:
- Unit holder name
- Fund Name Short
- Fund Identification Number
- Fund Base Currency
You can upload unit holder signature image by clicking ‘UH Signature’ button.
Exchange Details
Amount in Fund Base Currency
Numeric; 30 Characters; Optional
Specify the amount in fund base currency.
Exchange Rate Source
Alphanumeric; 6 Characters; Optional
Specify the exchange rate source. Alternatively, you can select the exchange rate source from the option list. The list displays all valid exchange rate source maintained in the system.
Exchange Rate Applied
Numeric; 21 Characters; Optional
The system displays the applied exchange rate.
Override Exchange Rate?
Optional
Select if exchange rate is to be overridden or not from the drop-down list. The list displays the following values:
- Yes
- No
Other Details
Communication Mode
Alphanumeric; 2 Characters; Optional
Specify the communication mode through which the transaction request was communicated. Alternatively, you can select mode of communication from the option list. the list displays all valid communication mode maintained in the system.
Remarks
Alphanumeric; 255 Characters; Optional
Specify remarks, if any.
Maturity Date
Date Format; Optional
If the fund in which the transaction is being put through is a closed-end fund, then specify the maturity date for the transaction in the Maturity Date field. This field is only applicable for AMCs that have opted for the maturity date facility.
Auto Generate Unblock?
Optional
Check this box to automatically generate unblock transactions.
After specifying all the necessary details, click ‘Calculate’ button to calculate the interest details. The system obtains the applicable exchange rate for the application date and computes the equivalent of the transaction value in the fund base currency. This value is displayed in the Amount in Fund Base Currency field. The applied exchange rate is also displayed in the Override Exchange Rate field.
4.24.3 Intermediary Tab
Click ‘Intermediary’ tab in the FCIS Consolidation Transaction Detail screen.

If an entity has been identified as an intermediary for the transaction, then you must identify the same in this section, along with the commission percentage split for an entity.
Entity Type
Alphanumeric; 1 Character; Optional
Select the entity type that has been identified as the intermediary for the transaction.
Entity ID
Alphanumeric; 12 Characters; Mandatory
For each entity type, specify the intermediary in this field. The name of the selected intermediary is displayed in the Entity Name field.
While entering a transaction, system will default the intermediary specified here. However, you can override the defaulted value.
Entity Name
Alphanumeric; 100 Characters; Optional
When you select the broker code, the name of the broker is displayed. However, you can amend this value.
Parent Entity Name
Alphanumeric; 100 Characters; Optional
When you select the broker code, the name of the parent broker for the selected broker is displayed. However, you can amend this value.
Split Percentage
Numeric; 5 Characters; Optional
Specify the percentage of total commission that is to accrue to the selected broker. The sum of all the percentages specified for any brokers identified for the transaction must equal one hundred percent.
From or To Leg
Optional
Select the from or to leg details from the drop-down list. The list displays the following values:
- From
- To
4.24.4 KYC Details Tab
Click on ‘KYC Details’ tab in the FCIS Consolidated Transaction Detail screen.
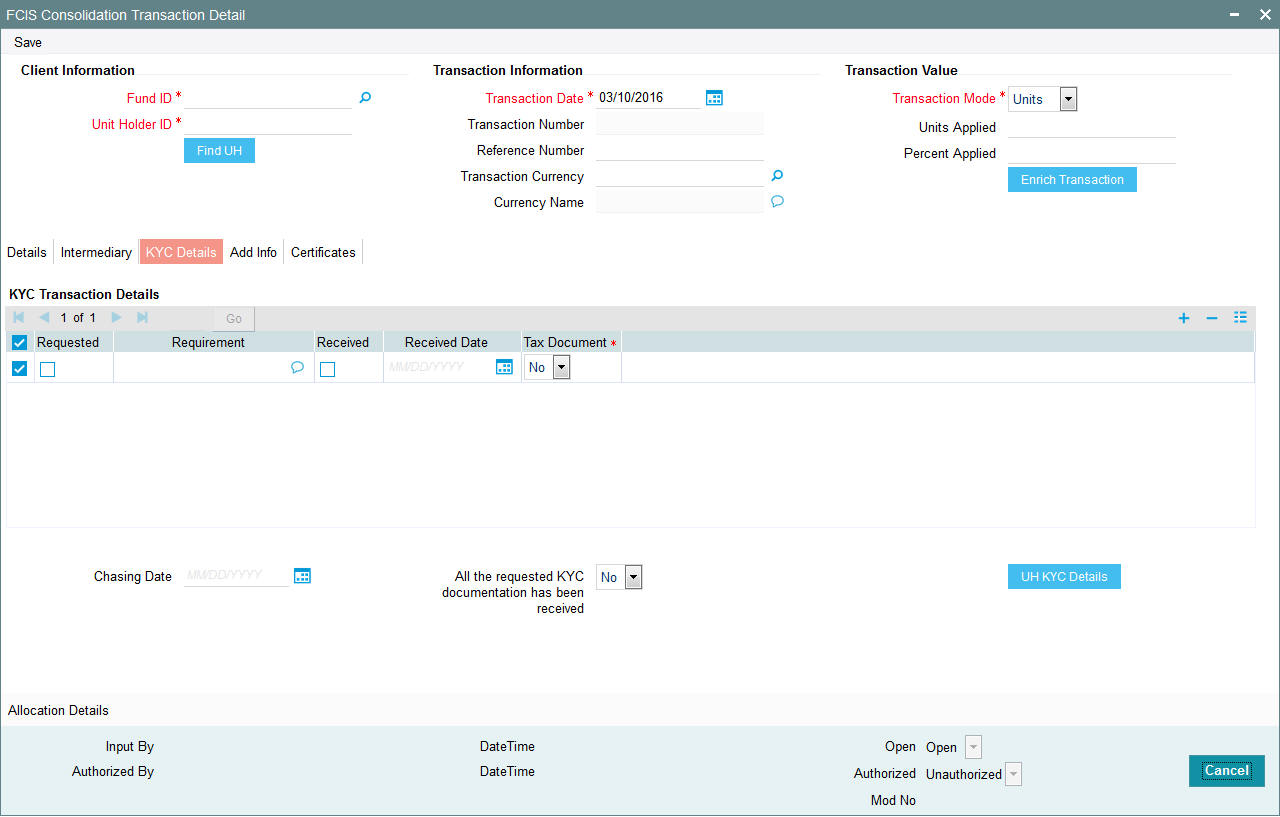
Requested
Optional
Check this box to indicate KYC details are requested.
Requirement
Alphanumeric; 255 Characters; Optional
Specify the list of KYC documents required for the unit holder.
Received
Optional
Check this box to indicate KYC details are received.
Received Date
Date Format; Optional
Specify the date on which the documents are received from the investor.
Tax Document
Optional
Select if tax document is required or not from the drop-down list. The list displays the following values:
- Yes
- No
Chasing Date
Date Format; Optional
Specify the date on which the document chasing is initiated, if the investor has not completed the KYC requirements.
All the requested KYC documentation has been received
Optional
Select if KYC is received or not from the drop-down list. The list displays the following values:
- Yes
- No
Clicking on ‘UH KYC Details’ button, the system displays all the KYC details available for the UH..
The details are populated from Unit Holder Maintenance screen (UTDUH).
Note
Transaction Status will not check the KYC Details to complete the transaction.
For further details on this screen, refer ‘KYC Details Tab’ in ‘Unit Holder Maintenance Detail’ screen (UTDUH) in Entities User Manual.
4.24.5 Add Info Tab
Click on ‘Add Info’ tab in the FCIS Consolidated Transaction Detail screen.
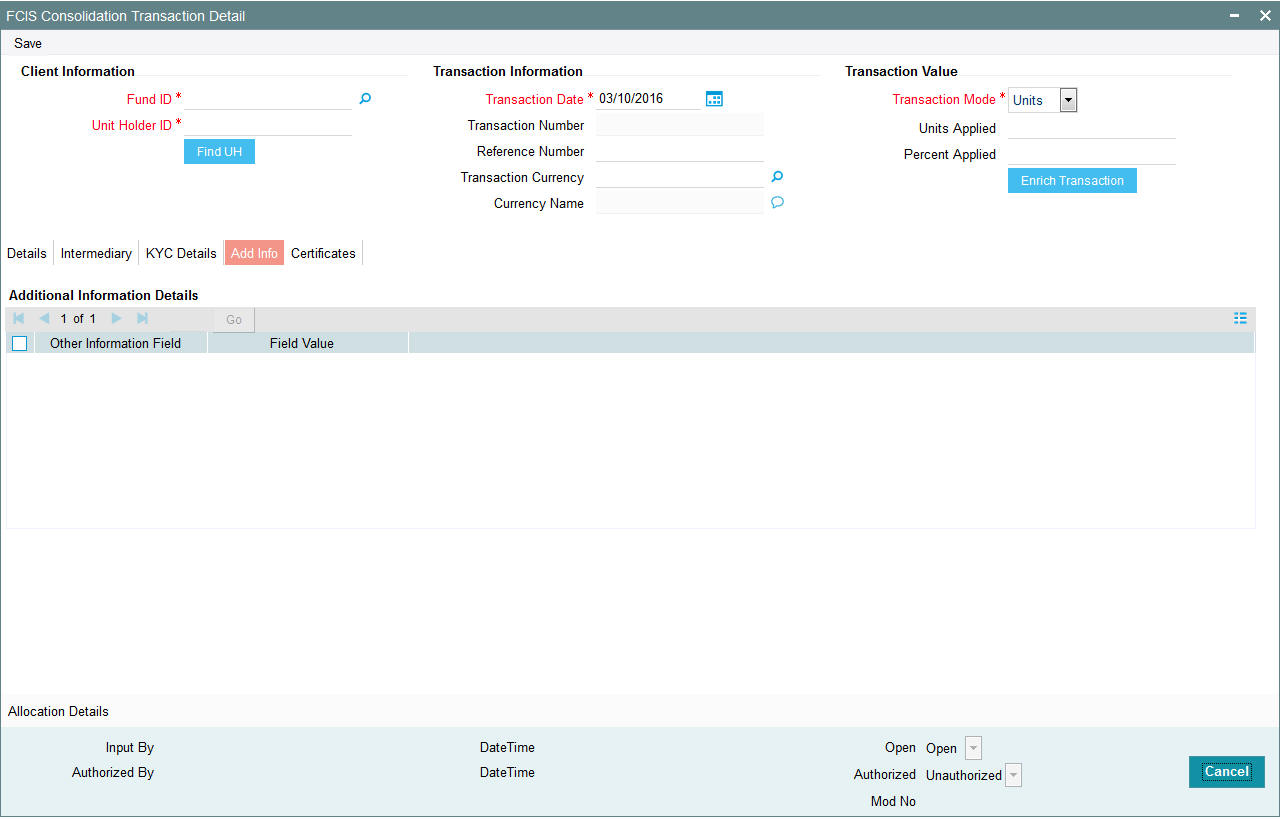
Other Info Field
Display
The system displays the additional information, if any information heads have been maintained in the System Parameters, to be applicable for the segment.
Field Value
Display
The system displays the field value.
4.24.6 Certificates Tab
Click on the Certificate tab in the FCIS Consolidation Transaction Details screen.

Min Cert Denomination
Numeric; 22 Characters; Optional
Specify the minimum certificate denomination details.
Max Cert Denomination
Numeric; 22 Characters; Optional
Specify the maximum certificate denomination details.
From Issued Balances
Optional
Select from issued balances details from the drop-down list. The list displays the following values:
- Yes
- No
- Both
Note
From issued balance field ‘Both Option’ is not applicable for the subscription transaction
No of Certificates
Optional
Select the number of certificates from the drop-down list. The list displays the following values:
- Single
- Multiple
Certificate Details
Certificate Number
Numeric; 10 Characters; Optional
Specify the certificate number. Alternatively, you can select the certificate number from the option list. The list displays all valid certificate number maintained in the system.
No of Units
Numeric; 27 Characters; Optional
Specify the number of units details.
4.24.7 Allocation Details Button
The following allocation details are displayed:
Allocation Details
The following Allocation details are displayed:
- Fund ID
- Allocation Date
- Allotted Units
- Unit Price
- Confirmed Units
- Settlement Amount Transaction Currency
- Gross Amount in FBC
- Net Amount in FBC
- Settlement Amount in Price Currency
- Rejected Units
- MMF Dividend Amount
- Tax Income Per Share
- EUSD Gain
Switch-In Allocation Details
The following Switch-in allocation details are displayed:
- To Fund ID
- Allocation Date
- Allotted Units
- Unit Price
- Confirmed Units
- Settlement Amount Transaction Currency
- Gross Amount in FBC
- Net Amount in FBC
- Rejected Units
Load Details
The following Load Details are displayed during the allocation:
- Fund ID
- Load ID
- Load Description
- From Entity Type
- To Entity Type
- From Entity
- To Entity
- Load Amount
- Load Amount in Fee Currency
Performance Fee Details
The following Performance Fee Details are displayed during the allocation:
- Link Transaction Number
- In Out Flag
- Element Identification
- Element Description
- Value
Transaction Component Details
The following Transaction Component Details are displayed during the allocation:
- Offer Price
- Bid Price
- Share Capital
- Income
- Fund Capital
- Share Premium
CGT Deduction Details
The following CGT Deduction Details are displayed during the allocation:
- Unit Holder/ Joint Unit Holder ID
- Unit Holder/ Joint Unit Holder Name
- Tax Amount
4.24.8 Saving the Transaction
At this stage, you can save the transaction by clicking the Save button at the bottom of the Transaction Information Section. The transaction is saved, and the system generated transaction number (and the reference number, if any) is displayed.
Note
If the Auto-authorization feature is enabled for the Save operation for the AMC ID, then the transaction is saved as an authorized transaction. If not, it is saved as an unauthorized transaction. In either case, the Transaction Number is generated and displayed when you invoke the Save operation.
4.25 Consolidation Transaction Summary Screen
This section contains the following topics:
- Section 4.25.1, "Retrieving a Record in Consolidation Transaction Summary Screen"
- Section 4.25.2, "Editing Consolidation Transaction Record"
- Section 4.25.3, "Viewing Consolidation Transaction Record "
- Section 4.25.4, "Deleting Consolidation Transaction Record"
- Section 4.25.5, "Authorizing Consolidation Transaction Record "
- Section 4.25.6, "Amending Consolidation Transaction Record "
- Section 4.25.7, "Authorizing Amended Consolidation Transaction Record "
4.25.1 Retrieving a Record in Consolidation Transaction Summary Screen
You can retrieve a previously entered record in the Summary Screen, as follows:
- Invoke the ‘FCIS Consolidation Transaction Summary’ screen
by typing ‘UTSTXN08’ in the field at the top right corner
of the Application tool bar and clicking on the adjoining arrow button
and specify any or all of the following details in the corresponding
details.
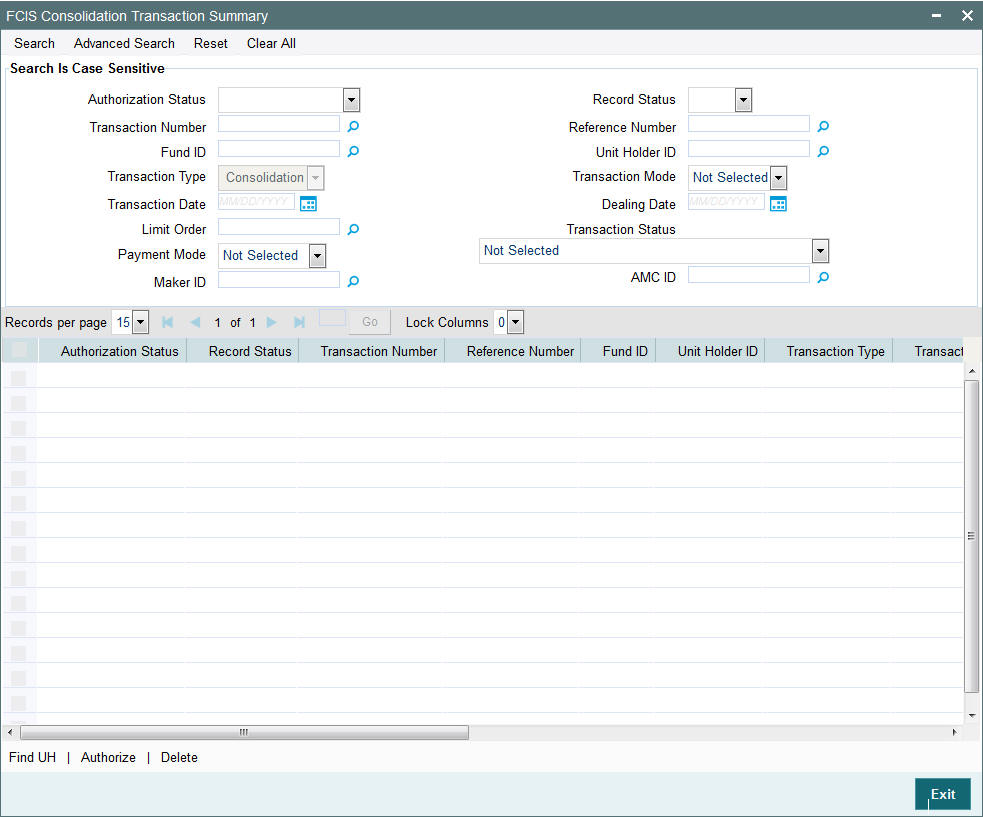
- The status of the record in the Authorization Status field. If you choose the ‘Blank Space’ option, then all the records are retrieved.
- The status of the record in the Record Status field. If you choose the ‘Blank Space’ option, then all records are retrieved
- Transaction Number
- Fund ID
- Transaction Type
- Transaction Date
- Limit Order
- Payment Mode
- Maker ID
- Reference Number
- Unit Holder ID
- Transaction Mode
- Dealing Date
- Transaction Status
- AMC ID
Click ‘Search’ button to view the records. All the records with the specified details are retrieved and displayed in the lower portion of the screen.
Note
You can also retrieve the individual record detail from the detail screen by querying in the following manner:
- Press F7
- Input the Transaction Number
- Press F8
You can perform Edit, Delete, Amend, Authorize, Reverse, Confirm operations by selecting the operation from the Action list. You can also search a record by using a combination of % and alphanumeric value.
For example:
You can search the record for Transaction Number by using the combination of % and alphanumeric value as follows:-
- Search by A%:- System will fetch all the records whose Transaction Number starts from Alphabet ‘A’. For example:- AGC17,AGVO6,AGC74 etc.
- Search by %7:- System will fetch all the records whose Transaction Number ends by numeric value’ 7’. For example: AGC17, GSD267, AGC77 etc.
- Search by %17%:- System will fetch all the records whose Transaction Number contains the numeric value 17. For example: GSD217, GSD172, AGC17 etc.
4.25.2 Editing Consolidation Transaction Record
You can modify the details of FCIS Consolidation Transaction record that you have already entered into the system, provided it has not subsequently authorized. You can perform this operation as follows:
- Invoke the FCIS Consolidation Transaction Summary screen from the Browser.
- Select the status of the record that you want to retrieve for modification in the Authorization Status field. You can only modify records that are unauthorized. Accordingly, choose the Unauthorized option.
- Specify any or all of the details in the corresponding fields to retrieve the record that is to be modified.
- Click ‘Search’ button. All unauthorized records with the specified details are retrieved and displayed in the lower portion of the screen.
- Double click the record that you want to modify in the list of displayed records. The FCIS Consolidation Transaction Detail screen is displayed.
- Select Unlock Operation from the Action list to modify the record. Modify the necessary information.
Click Save to save your changes. The FCIS Consolidation Transaction Detail screen is closed and the changes made are reflected in the FCIS Consolidation Transaction Summary screen.
4.25.3 Viewing Consolidation Transaction Record
To view a record that you have previously input, you must retrieve the same in the FCIS Consolidation Transaction Summary screen as follows:
- Invoke the FCIS Consolidation Transaction Summary screen from the Browser.
- Select the status of the record that you want to retrieve for viewing in the Authorization Status field. You can also view all records that are either unauthorized or authorized only, by choosing the unauthorized / Authorized option.
- Specify any or all of the details of the record in the corresponding fields on the screen.
- Click ‘Search’ button. All records with the specified fields are retrieved and displayed in the lower portion of the screen.
- Double click the record that you want to view in the list of displayed records. The FCIS Consolidation Transaction Detail screen is displayed in View mode.
4.25.4 Deleting Consolidation Transaction Record
You can delete only unauthorized records in the system. To delete a record that you have previously entered:
- Invoke the FCIS Consolidation Transaction Summary screen from the Browser.
- Select the status of the record that you want to retrieve for deletion.
- Specify any or all of the details in the corresponding fields on the screen.
- Click ‘Search’ button. All records with the specified fields are retrieved and displayed in the lower portion of the screen.
- Double click the record that you want to delete in the list of displayed records. The FCIS Consolidation Transaction Detail screen is displayed.
- Select Delete Operation from the Action list. The system prompts you to confirm the deletion and the record is physically deleted from the system database.
4.25.5 Authorizing Consolidation Transaction Record
- An unauthorized FCIS Consolidation Transaction record must be authorized in the system for it to be processed. To authorize a record:
- Invoke the FCIS Consolidation Transaction Summary screen from the Browser.
- Select the status of the record that you want to retrieve for authorization. Typically, choose the unauthorized option.
- Specify any or all of the details in the corresponding fields on the screen.
- Click ‘Search’ button. All records with the specified details that are pending authorization are retrieved and displayed in the lower portion of the screen.
- Double click the record that you wish to authorize. The FCIS Consolidation Transaction Detail screen is displayed. Select Authorize operation from the Action List.
When a checker authorizes a record, details of validation, if any, that were overridden by the maker of the record during the Save operation are displayed. If any of these overrides results in an error, the checker must reject the record.
4.25.6 Amending Consolidation Transaction Record
After a FCIS Consolidation Transaction record is authorized, it can be modified using the Unlock operation from the Action List. To make changes to a record after authorization:
- Invoke the FCIS Consolidation Transaction Summary screen from the Browser.
- Select the status of the record that you want to retrieve for authorization. You can only amend authorized records.
- Specify any or all of the details in the corresponding fields on the screen.
- Click ‘Search’ button. All records with the specified details that are pending authorization are retrieved and displayed in the lower portion of the screen.
- Double click the record that you wish to authorize. The FCIS Consolidation Transaction Detail screen is displayed in amendment mode. Select Unlock operation from the Action List to amend the record.
- Amend the necessary information and click on Save to save the changes
4.25.7 Authorizing Amended Consolidation Transaction Record
An amended FCIS Consolidation Transaction record must be authorized for the amendment to be made effective in the system. The authorization of amended records can be done only from Fund Manager Module and Agency Branch module.
The subsequent process of authorization is the same as that for normal transactions.
4.26 Split Transaction Detail
This section contains the following topic:
- Section 4.26.1, "Invoking Split Transaction Detail Screen"
- Section 4.26.2, "Details Tab"
- Section 4.26.3, "Intermediary Tab"
- Section 4.26.4, "KYC Details Tab"
- Section 4.26.5, "Add Info Tab"
- Section 4.26.6, "Certificate Tab"
- Section 4.26.7, "Allocation Details Button"
- Section 4.26.8, "Saving the Transaction"
4.26.1 Invoking Split Transaction Detail Screen
To enter a split transaction request into the system, perform the following sequence of steps:
Invoke the ‘FCIS Split Transaction Detail’ screen by typing ‘UTDTXN09’ in the field at the top right corner of the Application tool bar and clicking on the adjoining arrow button. The Transaction Detail screen for Split transactions is displayed, with all the default information..
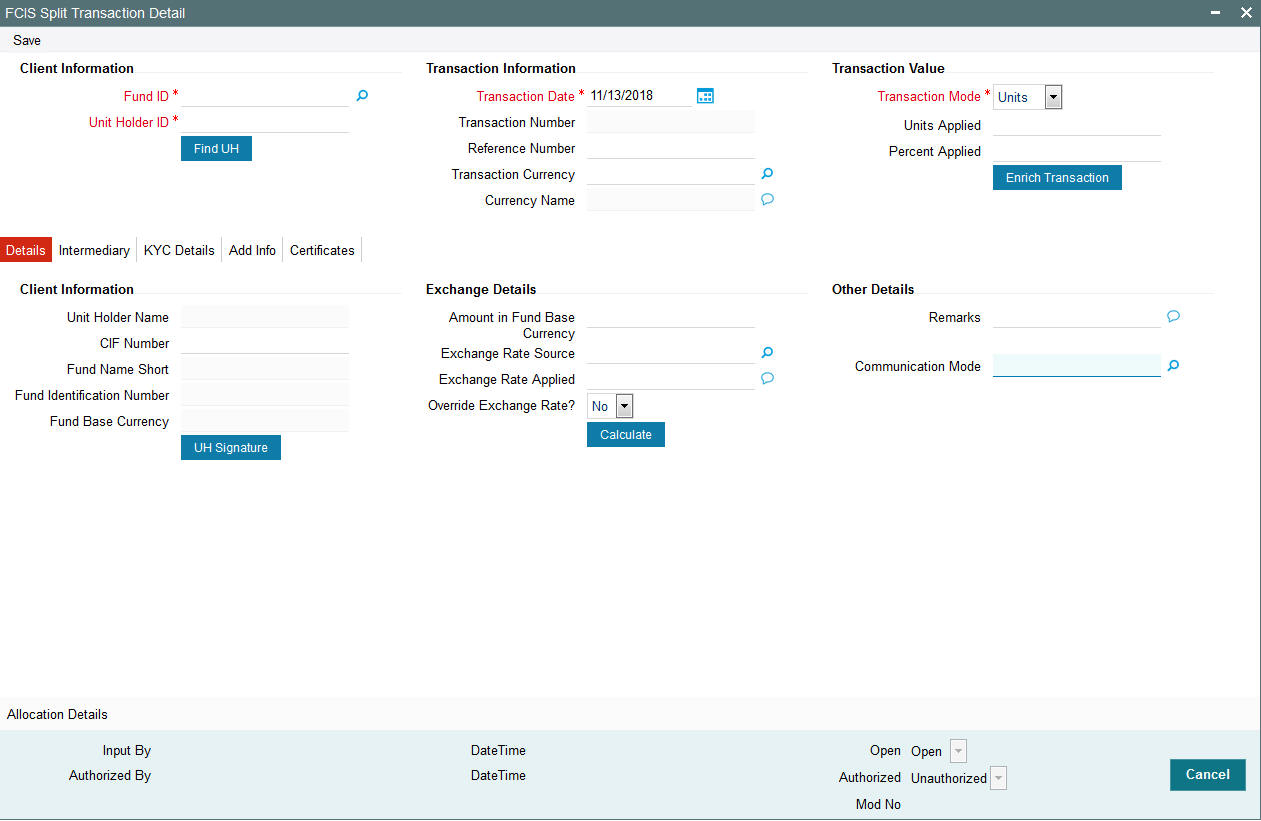
You can specify the following details:
Client Information
Fund ID
Alphanumeric; 6 Characters; Mandatory
Specify the fund ID in which the requested transaction is to be put through. Alternatively, you can select fund ID from the option list. The list displays all valid fund ID maintained in the system.
Unit Holder ID
Alphanumeric; 12 Characters; Mandatory
Specify the unit holder that has requested the transaction, in the Client Information section. Specify the CIF Number and then choose the required unit holder in the Unit Holder field, or else specify the ID of the unit holder in the Unit Holder field.
You must select a CIF or unit holder that is not restricted (or does not belong to a restricted category) for the fund into which the transaction is being entered. If not, the system does not allow the transaction to be saved.
You can also query for unit holder ID by clicking ‘Find UH’ button.
Transaction Information
Transaction Date
Date Format; Mandatory
The transaction date is reckoned to be the application date by default. You can alter this and specify any date that is not designated as a holiday in the system. If you do specify a holiday, the system prompts you to specify a different date.
If you specify an earlier date, the fund that you choose for the transaction must be one for which backdating of transactions is allowed in the Transaction Processing Rules. The specified earlier date must also be within the backdating limit, as specified for the fund in the Transaction Processing Rules.
Transaction Number
Display
The system displays the transaction number.
Reference Number
Alphanumeric; 16 Characters; Optional
Specify the reference number for the transaction. If the reference number is designated to be system-generated for the agency branch, then the Reference Number field is locked and the number will be generated by the system when you save the transaction.
Transaction Currency
Alphanumeric; 3 Characters; Optional
Specify the currency in which the amount value for the transaction will be reckoned. Alternatively, you can select transaction currency from the option list. The list displays all valid transaction currency maintained in the system.
The currency you select here must be one that is a valid transaction currency designated for the selected fund in the Fund Transaction Currency rule.
Currency Name
Display
The system displays the name of the currency.
Transaction Value
Transaction Mode
Mandatory
Select the transaction mode from the drop-down list. Following are the options available in the drop-down list:
- Units
- Percent
Units Applied
Numeric; 27 Characters; Optional
Specify the units applied details.
You should specify the details in this field only if you have selected ‘Transaction Mode’ field as Units. Else, while clicking ‘Enrich Transaction’ button, the system will display an error message.
Percent Applied
Numeric; 9 Characters; Optional
Specify the percent applied details.
You should specify the details in this field only if you have selected ‘Transaction Mode’ field as Percent. Else, while clicking ‘Enrich Transaction’ button, the system will display an error message.
After entering all details in Transaction Information section click on ‘Enrich Transaction’ button. The list of transactions applicable for the Unit Holder selected is defaulted in UH and Fund section.
4.26.2 Details Tab
Click ‘Details’ tab in the FCIS Split Transaction Detail screen.
You can specify the following details:
Client Information Section
CIF Number
Alphanumeric; 12 Characters; Optional
Specify the CIF number.
The system will display the following values:
- Unit Holder Name
- Fund Name Short
- Fund Identification Number
- Fund Base Currency
You can upload unit holder signature image by clicking ‘UH Signature’ button.
Exchange Details
Amount in Fund Base Currency
Numeric; 30 Characters; Optional
The system displays the amount in fund base currency.
Exchange Rate Source
Alphanumeric; 6 Characters; Optional
Specify the exchange rate source. Alternatively, you can select the exchange rate source from the option list. The list displays all valid exchange rate source maintained in the system.
Exchange Rate Applied
Numeric; 21 Characters; Optional
The system displays the applied exchange rate.
Override Exchange Rate?
Optional
Select if exchange rate is to be overridden or not from the drop-down list. The list displays the following values:
- Yes
- No
Other Details
Remarks
Alphanumeric; 255 Characters; Optional
Specify remarks, if any.
Communication Mode
Alphanumeric; 2 Characters; Mandatory
Specify the communication mode through which the transaction request was communicated. Alternatively, you can select mode of communication from the option list. the list displays all valid communication mode maintained in the system.
4.26.3 Intermediary Tab
Click ‘Intermediary’ tab in the FCIS Split Transaction Detail screen.
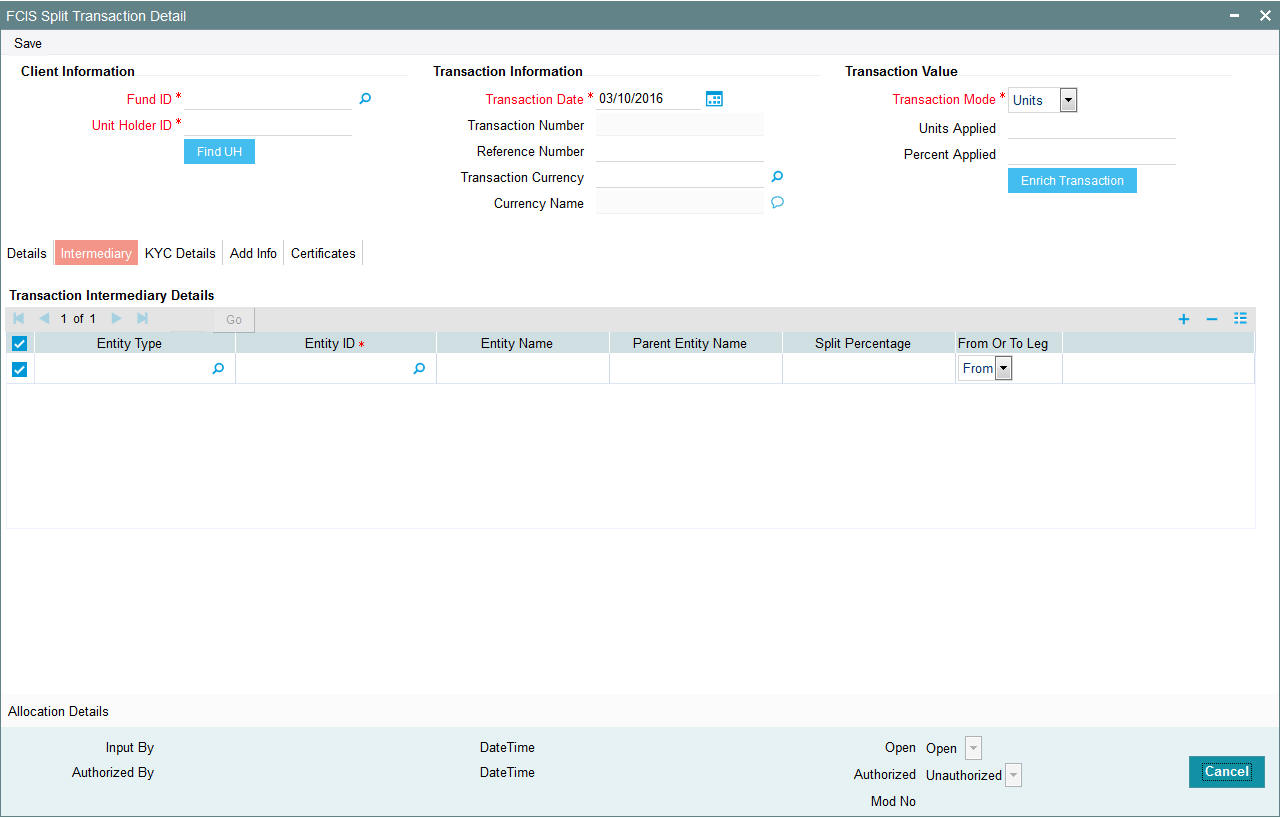
If an entity has been identified as an intermediary for the transaction, then you must identify the same in this section, along with the commission percentage split for an entity..
Entity Type
Alphanumeric; 1 Character; Optional
Select the entity type that has been identified as the intermediary for the transaction.
Entity ID
Alphanumeric; 12 Characters; Mandatory
For each entity type, specify the intermediary in this field. The name of the selected intermediary is displayed in the Entity Name field.
While entering a transaction, system will default the intermediary specified here. However, you can override the defaulted value.
Entity Name
Alphanumeric; 100 Characters; Optional
When you select the broker code, the name of the broker is displayed. However, you can amend this value.
Parent Entity Name
Alphanumeric; 100 Characters; Optional
When you select the broker code, the name of the parent broker for the selected broker is displayed. However, you can amend this value.
Split Percentage
Numeric; 5 Character; Optional
Specify the percentage of total commission that is to accrue to the selected broker. The sum of all the percentages specified for any brokers identified for the transaction must equal one hundred percent.
From or To Leg
Optional
Select the from or to leg details from the drop-down list. The list displays the following values:
- From
- To
4.26.4 KYC Details Tab
Click on ‘KYC Details’ tab in the FCIS Split Transaction Detail screen.
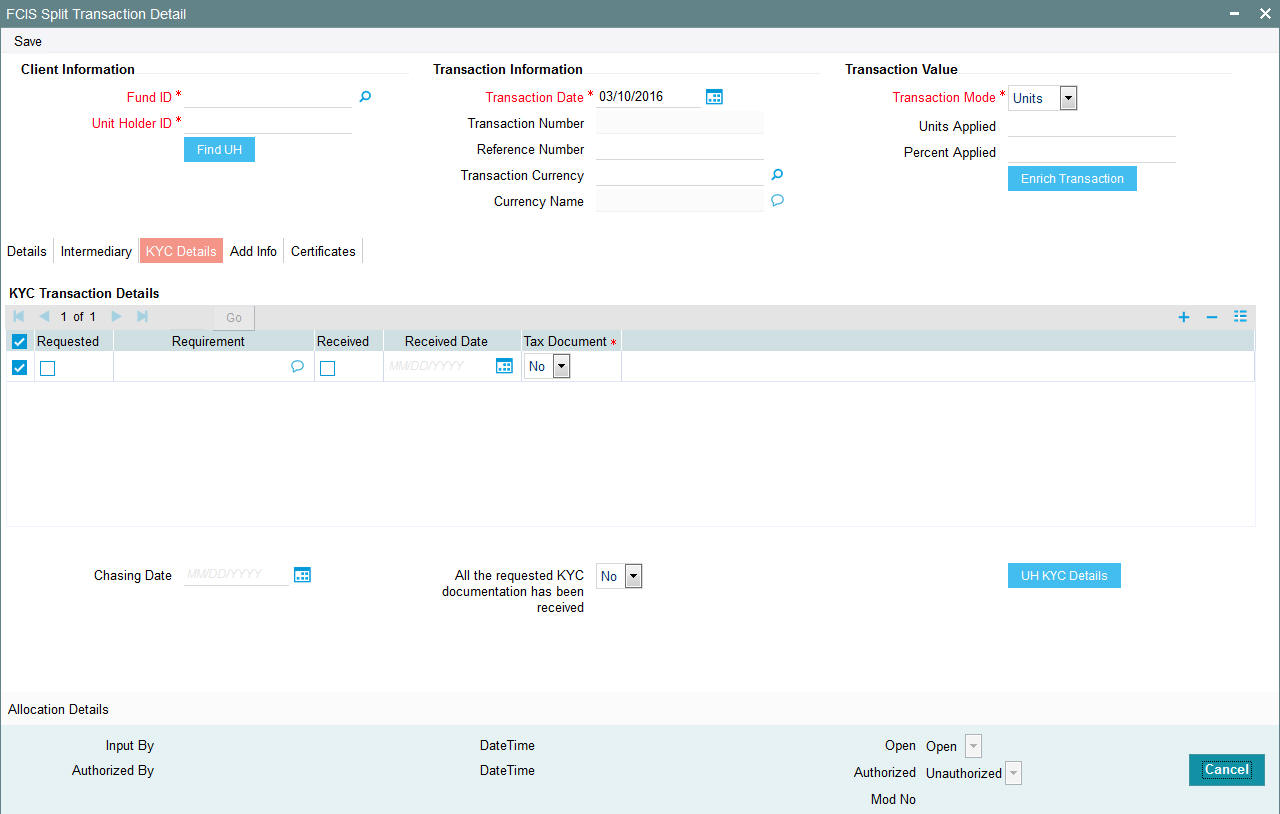
Requested
Optional
Check this box to indicate KYC details are requested.
Requirement
Alphanumeric; 255 Characters; Optional
Specify the list of KYC documents required for the unit holder.
Received
Optional
Check this box to indicate KYC details are received.
Received Date
Date Format; Optional
Specify the date on which the documents are received from the investor.
Tax Document
Mandatory
Select if tax document is required or not from the drop-down list. The list displays the following values:
- Yes
- No
Chasing Date
Date Format; Optional
Specify the date on which the document chasing is initiated, if the investor has not completed the KYC requirements.
All the requested KYC documentation has been received
Optional
Select if KYC is received or not from the drop-down list. The list displays the following values:
- Yes
- No
Clicking on ‘UH KYC Details’ button, the system displays all the KYC details available for the UH..
The details are populated from Unit Holder Maintenance screen (UTDUH).
Note
Transaction Status will not check the KYC Details to complete the transaction.
For further details on this screen, refer ‘KYC Details Tab’ in ‘Unit Holder Maintenance Detail’ screen (UTDUH) in Entities User Manual.
4.26.5 Add Info Tab
Click on ‘Add Info’ tab in the FCIS Split Transaction Detail screen.
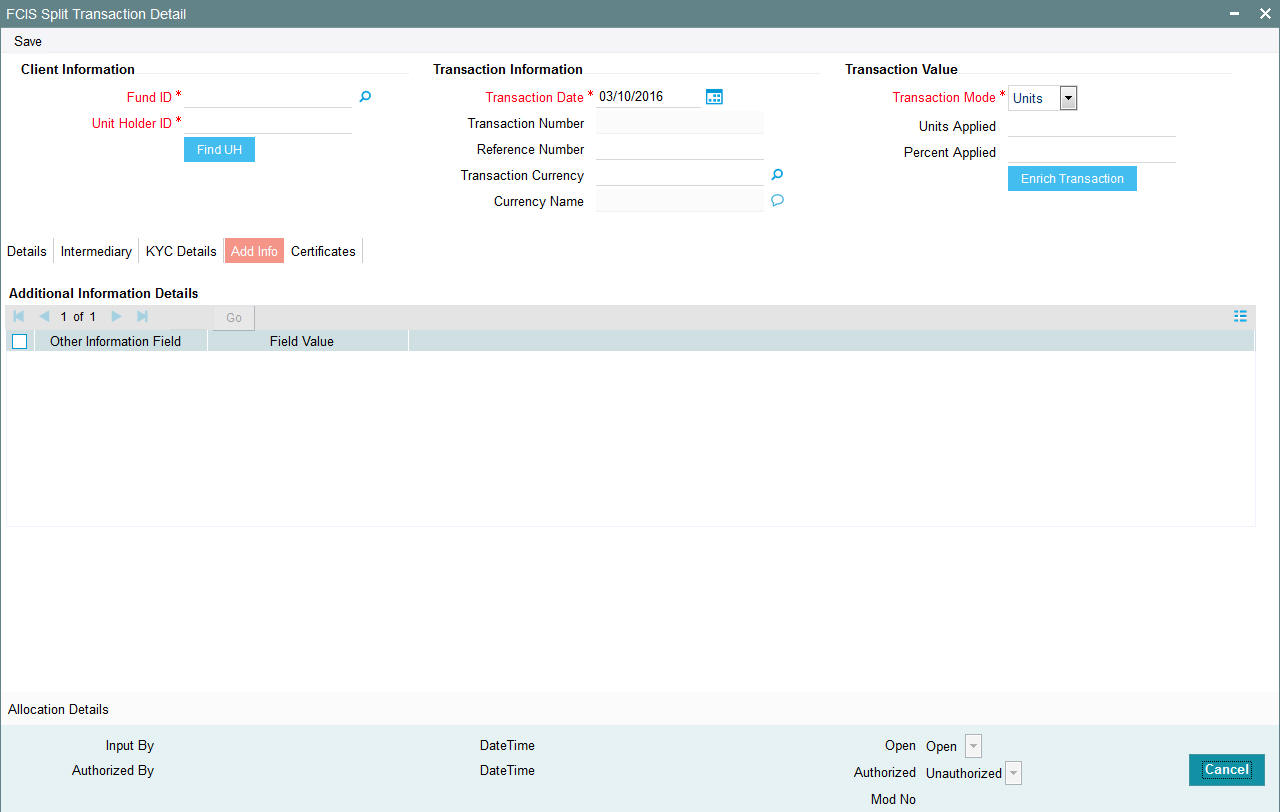
Other Info Field
Display
The system displays the additional information, if any information heads have been maintained in the System Parameters, to be applicable for the segment.
Field Value
Display
The system displays the field value.
4.26.6 Certificate Tab
Click on the Certificate tab in the FCIS Split Transaction Details screen.

Min Cert Denomination
Numeric; 22 Characters; Optional
Specify the minimum certificate denomination details.
Max Cert Denomination
Numeric; 22 Characters; Optional
Specify the maximum certificate denomination details.
From Issued Balances
Optional
Select from issued balances details from the drop-down list. The list displays the following values:
- Yes
- No
- Both
Note
From issued balance field ‘Both Option’ is not applicable for the subscription transaction
No of Certificates
Optional
Select the number of certificates from the drop-down list. The list displays the following values:
- Single
- Multiple
Certificate Details
Certificate Number
Numeric; 10 Characters; Optional
Specify the certificate number. Alternatively, you can select the certificate number from the option list. The list displays all valid certificate number maintained in the system.
No of Units
Numeric; 27 Characters; Optional
Specify the number of units details.
4.26.7 Allocation Details Button
Click Allocation Details button to invoke Allocation Details screen.
The following allocation details are displayed:
Allocation Details
The following Allocation details are displayed:
- Fund ID
- Allocation Date
- Allotted Units
- Unit Price
- Confirmed Units
- Settlement Amount Transaction Currency
- Gross Amount in FBC
- Net Amount in FBC
- Settlement Amount in Price Currency
- Rejected Units
- MMF Dividend Amount
- Tax Income Per Share
- EUSD Gain
Switch-In Allocation Details
The following Switch-in allocation details are displayed:
- To Fund ID
- Allocation Date
- Allotted Units
- Unit Price
- Confirmed Units
- Settlement Amount Transaction Currency
- Gross Amount in FBC
- Net Amount in FBC
- Rejected Units
Load Details
The following Load Details are displayed during the allocation:
- Fund ID
- Load ID
- Load Description
- From Entity Type
- To Entity Type
- From Entity
- To Entity
- Load Amount
- Load Amount in Fee Currency
Performance Fee Details
The following Performance Fee Details are displayed during the allocation:
- Link Transaction Number
- In Out Flag
- Element Identification
- Element Description
- Value
Transaction Component Details
The following Transaction Component Details are displayed during the allocation:
- Offer Price
- Bid Price
- Share Capital
- Income
- Fund Capital
- Share Premium
CGT Deduction Details
The following CGT Deduction Details are displayed during the allocation:
- Unit Holder/ Joint Unit Holder ID
- Unit Holder/ Joint Unit Holder Name
- Tax Amount
4.26.8 Saving the Transaction
At this stage, you can save the transaction by clicking the Save button at the bottom of the Transaction Information Section. The transaction is saved, and the system generated transaction number (and the reference number, if any) is displayed.
Note
If the Auto-authorization feature is enabled for the Save operation for the AMC ID, then the transaction is saved as an authorized transaction. If not, it is saved as an unauthorized transaction. In either case, the Transaction Number is generated and displayed when you invoke the Save operation.
4.27 Split Transaction Summary Screen
This section contains the following topics:
- Section 4.27.1, "Retrieving a Record in Split Transaction Summary Screen"
- Section 4.27.2, "Editing Split Transaction Record"
- Section 4.27.3, "Viewing Split Transaction Record "
- Section 4.27.4, "Deleting Split Transaction Record"
- Section 4.27.5, "Authorizing Split Transaction Record "
- Section 4.27.6, "Amending Split Transaction Record "
- Section 4.27.7, "Authorizing Amended Split Transaction Record "
4.27.1 Retrieving a Record in Split Transaction Summary Screen
You can retrieve a previously entered record in the Summary Screen, as follows:
- Invoke the ‘FCIS Split Transaction Summary’ screen by
typing ‘UTSTXN09’ in the field at the top right corner
of the Application tool bar and clicking on the adjoining arrow button
and specify any or all of the following details in the corresponding
details..

- The status of the record in the Authorization Status field. If you choose the ‘Blank Space’ option, then all the records are retrieved.
- The status of the record in the Record Status field. If you choose the ‘Blank Space’ option, then all records are retrieved
- Transaction Number
- Fund ID
- Transaction Type
- Transaction Date
- Limit Order
- Payment Mode
- Maker ID
- Reference Number
- Unit Holder ID
- Transaction Mode
- Dealing Date
- Transaction Status
- AMC ID
Click ‘Search’ button to view the records. All the records with the specified details are retrieved and displayed in the lower portion of the screen.
Note
You can also retrieve the individual record detail from the detail screen by querying in the following manner:
- Press F7
- Input the Transaction Number
- Press F8
You can perform Edit, Delete, Amend, Authorize, Reverse, Confirm operations by selecting the operation from the Action list. You can also search a record by using a combination of % and alphanumeric value.
For example:
You can search the record for Transaction Number by using the combination of % and alphanumeric value as follows:-
- Search by A% :- System will fetch all the records whose Transaction Number starts from Alphabet ‘A’. For example:- AGC17,AGVO6,AGC74 etc.
- Search by %7 :- System will fetch all the records whose Transaction Number ends by numeric value’ 7’ . For example: AGC17, GSD267, AGC77 etc.
- Search by %17%:- System will fetch all the records whose Transaction Number contains the numeric value 17 . For example: GSD217, GSD172, AGC17 etc.
4.27.2 Editing Split Transaction Record
You can modify the details of FCIS Split Transaction record that you have already entered into the system, provided it has not subsequently authorized. You can perform this operation as follows:
- Invoke the FCIS Split Transaction Summary screen from the Browser.
- Select the status of the record that you want to retrieve for modification in the Authorization Status field. You can only modify records that are unauthorized. Accordingly, choose the Unauthorized option.
- Specify any or all of the details in the corresponding fields to retrieve the record that is to be modified.
- Click ‘Search’ button. All unauthorized records with the specified details are retrieved and displayed in the lower portion of the screen.
- Double click the record that you want to modify in the list of displayed records. The FCIS Split Transaction Detail screen is displayed.
- Select Unlock Operation from the Action list to modify the record. Modify the necessary information.
Click Save to save your changes. The FCIS Split Transaction Detail screen is closed and the changes made are reflected in the FCIS Split Transaction Summary screen.
4.27.3 Viewing Split Transaction Record
To view a record that you have previously input, you must retrieve the same in the FCIS Split Transaction Summary screen as follows:
- Invoke the FCIS Split Transaction Summary screen from the Browser.
- Select the status of the record that you want to retrieve for viewing in the Authorization Status field. You can also view all records that are either unauthorized or authorized only, by choosing the unauthorized / Authorized option.
- Specify any or all of the details of the record in the corresponding fields on the screen.
- Click ‘Search’ button. All records with the specified fields are retrieved and displayed in the lower portion of the screen.
- Double click the record that you want to view in the list of displayed records. The FCIS Split Transaction Detail screen is displayed in View mode.
4.27.4 Deleting Split Transaction Record
You can delete only unauthorized records in the system. To delete a record that you have previously entered:
- Invoke the FCIS Split Transaction Summary screen from the Browser.
- Select the status of the record that you want to retrieve for deletion.
- Specify any or all of the details in the corresponding fields on the screen.
- Click ‘Search’ button. All records with the specified fields are retrieved and displayed in the lower portion of the screen.
- Double click the record that you want to delete in the list of displayed records. The FCIS Split Transaction Detail screen is displayed.
- Select Delete Operation from the Action list. The system prompts you to confirm the deletion and the record is physically deleted from the system database.
4.27.5 Authorizing Split Transaction Record
- An unauthorized FCIS Split Transaction record must be authorized in the system for it to be processed. To authorize a record:
- Invoke the FCIS Split Transaction Summary screen from the Browser.
- Select the status of the record that you want to retrieve for authorization. Typically, choose the unauthorized option.
- Specify any or all of the details in the corresponding fields on the screen.
- Click ‘Search’ button. All records with the specified details that are pending authorization are retrieved and displayed in the lower portion of the screen.
- Double click the record that you wish to authorize. The FCIS Split Transaction Detail screen is displayed. Select Authorize operation from the Action List.
When a checker authorizes a record, details of validation, if any, that were overridden by the maker of the record during the Save operation are displayed. If any of these overrides results in an error, the checker must reject the record.
4.27.6 Amending Split Transaction Record
After a FCIS Split Transaction record is authorized, it can be modified using the Unlock operation from the Action List. To make changes to a record after authorization:
- Invoke the FCIS Split Transaction Summary screen from the Browser.
- Select the status of the record that you want to retrieve for authorization. You can only amend authorized records.
- Specify any or all of the details in the corresponding fields on the screen.
- Click ‘Search’ button. All records with the specified details that are pending authorization are retrieved and displayed in the lower portion of the screen.
- Double click the record that you wish to authorize. The FCIS Split Transaction Detail screen is displayed in amendment mode. Select Unlock operation from the Action List to amend the record.
- Amend the necessary information and click on Save to save the changes
4.27.7 Authorizing Amended Split Transaction Record
An amended FCIS Split Transaction record must be authorized for the amendment to be made effective in the system. The authorization of amended records can be done only from Fund Manager Module and Agency Branch module.
The subsequent process of authorization is the same as that for normal transactions.
4.28 Reissue Transaction Detail
This section contains the following topic:
- Section 4.28.1, "Invoking Reissue Transactions Detail Screen"
- Section 4.28.2, "Details Tab"
- Section 4.28.3, "Intermediary Tab"
- Section 4.28.4, "KYC Details Tab"
- Section 4.28.5, "Add Info Tab"
- Section 4.28.6, "Certificate Tab"
- Section 4.28.7, "Allocation Details Button"
- Section 4.28.8, "Saving the Transaction"
4.28.1 Invoking Reissue Transactions Detail Screen
To enter a reissue transaction request into the system, perform the following sequence of steps:
Invoke the ‘FCIS Reissue Transaction Detail’ screen by typing ‘UTDTXN10’ in the field at the top right corner of the Application tool bar and clicking on the adjoining arrow button. The Transaction Detail screen for reissue transactions is displayed, with all the default information..
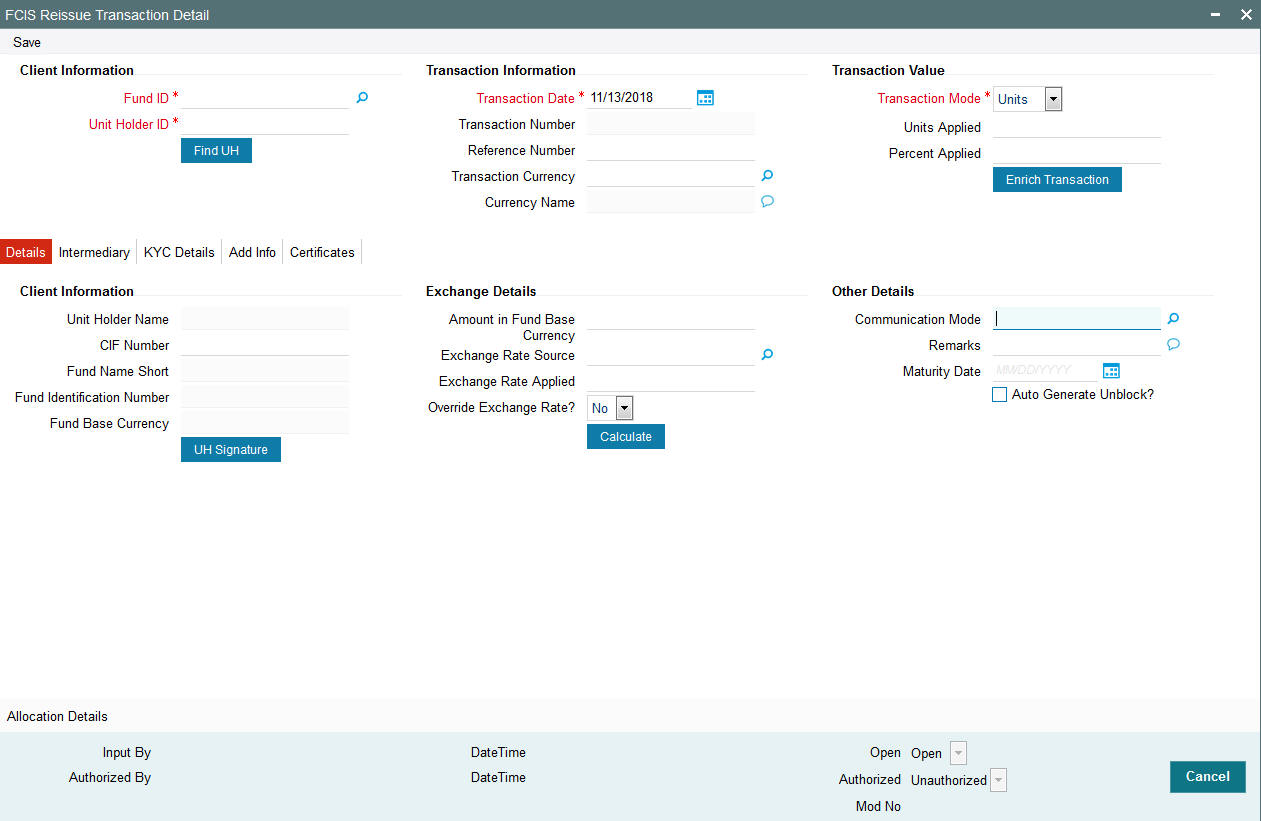
You can specify the following details:
Client Information
Fund ID
Alphanumeric; 6 Characters; Mandatory
Specify the fund ID in which the requested transaction is to be put through. Alternatively, you can select fund ID from the option list. The list displays all valid fund ID maintained in the system.
Unit Holder ID
Alphanumeric; 12 Characters; Mandatory
Specify the unit holder that has requested the transaction, in the Client Information section. Specify the CIF Number and then choose the required unit holder in the Unit Holder field, or else specify the ID of the unit holder in the Unit Holder field.
You must select a CIF or unit holder that is not restricted (or does not belong to a restricted category) for the fund into which the transaction is being entered. If not, the system does not allow the transaction to be saved.
You can also query unit holder ID by clicking ‘Find UH’ button.
Transaction Information
Transaction Date
Date Format; Mandatory
The transaction date is reckoned to be the application date by default. You can alter this and specify any date that is not designated as a holiday in the system. If you do specify a holiday, the system prompts you to specify a different date.
If you specify an earlier date, the fund that you choose for the transaction must be one for which backdating of transactions is allowed in the Transaction Processing Rules. The specified earlier date must also be within the backdating limit, as specified for the fund in the Transaction Processing Rules.
Transaction Number
Display
The system displays the transaction number.
Reference Number
Alphanumeric; 16 Characters; Optional
Specify the reference number for the transaction. If the reference number is designated to be system-generated for the agency branch, then the Reference Number field is locked and the number will be generated by the system when you save the transaction.
Transaction Currency
Alphanumeric; 3 Characters; Optional
Specify the currency in which the amount value for the transaction will be reckoned. Alternatively, you can select transaction currency from the option list. The list displays all valid transaction currency maintained in the system.
The currency you select here must be one that is a valid transaction currency designated for the selected fund in the Fund Transaction Currency rule.
Currency Name
Display
The system displays the name of the currency.
Transaction Value
Transaction Mode
Mandatory
Select the transaction mode from the drop-down list. Following are the options available in the drop-down list:
- Units
- Percent
Units Applied
Numeric; 27 Characters; Optional
Specify the units applied details.
You should specify the details in this field only if you have selected ‘Transaction Mode’ field as Units. Else, while clicking ‘Enrich Transaction’ button, the system will display an error message.
Percent Applied
Numeric; 27 Characters; Optional
Specify the percent applied details.
You should specify the details in this field only if you have selected ‘Transaction Mode’ field as Percent. Else, while clicking ‘Enrich Transaction’ button, the system will display an error message.
After entering all details in Transaction Information section click on button. The list of transactions applicable for the Unit Holder selected is defaulted in UH and Fund section.
4.28.2 Details Tab
Click ‘Details’ tab in the FCIS Reissue Transaction Detail screen.
You can specify the following details:
Client Information Section
CIF Number
Alphanumeric; 12 Characters; Optional
Specify the CIF number.
The system will display the following values:
- Unit holder name
- Fund Name Short
- Fund Identification Number
- Fund Base Currency
You can upload unit holder signature image by clicking ‘UH Signature’ button.
Exchange Details
Amount in Fund Base Currency
Numeric; 30 Characters; Optional
Specify the amount in fund base currency.
Exchange Rate Source
Alphanumeric; 6 Characters; Optional
Specify the exchange rate source. Alternatively, you can select the exchange rate source from the option list. The list displays all valid exchange rate source maintained in the system.
Exchange Rate Applied
Numeric; 21 Characters; Optional
The system displays the applied exchange rate.
Override Exchange Rate?
Optional
Select if exchange rate is to be overridden or not from the drop-down list. The list displays the following values:
- Yes
- No
Other Details
Communication Mode
Alphanumeric; 2 Characters; Optional
Specify the communication mode through which the transaction request was communicated. Alternatively, you can select mode of communication from the option list. the list displays all valid communication mode maintained in the system.
Remarks
Alphanumeric; 255 Characters; Optional
Specify remarks, if any.
Maturity Date
Date Format; Optional
If the fund in which the transaction is being put through is a closed-end fund, then specify the maturity date for the transaction in the Maturity Date field. This field is only applicable for AMCs that have opted for the maturity date facility.
Auto Generate Unblock?
Optional
Check this box to automatically generate unblock transactions.
After specifying all the necessary details, click ‘Calculate’ button to calculate the interest details. Click the Calculate button. The system obtains the applicable exchange rate for the application date and computes the equivalent of the transaction value in the fund base currency. This value is displayed in the Amount in Fund Base Currency field. The applied exchange rate is also displayed in the Override Exchange Rate field.
4.28.3 Intermediary Tab
Click ‘Intermediary’ tab in the FCIS Reissue Transaction Detail screen.
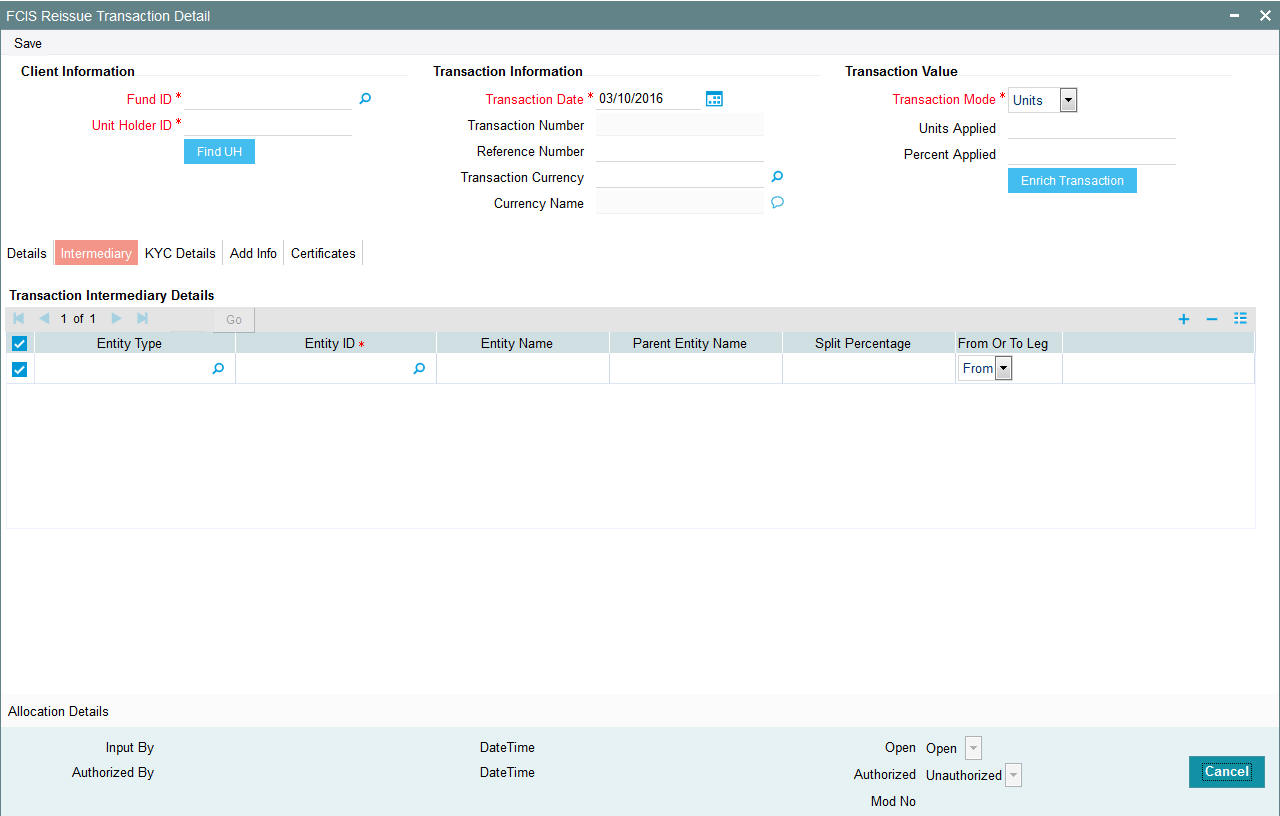
If an entity has been identified as an intermediary for the transaction, then you must identify the same in this section, along with the commission percentage split for an entity.
Entity Type
Alphanumeric; 1 Character; Optional
Select the entity type that has been identified as the intermediary for the transaction.
Entity ID
Alphanumeric; 12 Characters; Mandatory
For each entity type, specify the intermediary in this field. The name of the selected intermediary is displayed in the Entity Name field.
While entering a transaction, system will default the intermediary specified here. However, you can override the defaulted value.
Entity Name
Alphanumeric; 100 Characters; Optional
When you select the broker code, the name of the broker is displayed. However, you can amend this value.
Parent Entity Name
Alphanumeric; 100 Characters; Optional
When you select the broker code, the name of the parent broker for the selected broker is displayed. However, you can amend this value.
Split Percentage
Numeric; 5 Characters; Optional
Specify the percentage of total commission that is to accrue to the selected broker. The sum of all the percentages specified for any brokers identified for the transaction must equal one hundred percent.
From or To Leg
Optional
Select the from or to leg details from the drop-down list. The list displays the following values:
- From
- To
4.28.4 KYC Details Tab
Click on ‘KYC Details’ tab in the FCIS Reissue Transaction Detail screen.

Requested
Optional
Check this box to indicate KYC details are requested.
Requirement
Alphanumeric; 255 Characters; Optional
Specify the list of KYC documents required for the unit holder.
Received
Optional
Check this box to indicate KYC details are received.
Received Date
Date Format; Optional
Specify the date on which the documents are received from the investor.
Tax Document
Optional
Select if tax document is required or not from the drop-down list. The list displays the following values:
- Yes
- No
Chasing Date
Date Format; Optional
Specify the date on which the document chasing is initiated, if the investor has not completed the KYC requirements.
All the requested KYC documentation has been received
Optional
Select if KYC is received or not from the drop-down list. The list displays the following values:
- Yes
- No
Clicking on ‘UH KYC Details’ button, the system displays all the KYC details available for the UH..
The details are populated from Unit Holder Maintenance screen (UTDUH).
Note
Transaction Status will not check the KYC Details to complete the transaction.
For further details on this screen, refer ‘KYC Details Tab’ in ‘Unit Holder Maintenance Detail’ screen (UTDUH) in Entities User Manual.
4.28.5 Add Info Tab
Click on ‘Add Info’ tab in the FCIS Reissue Transaction Detail screen.
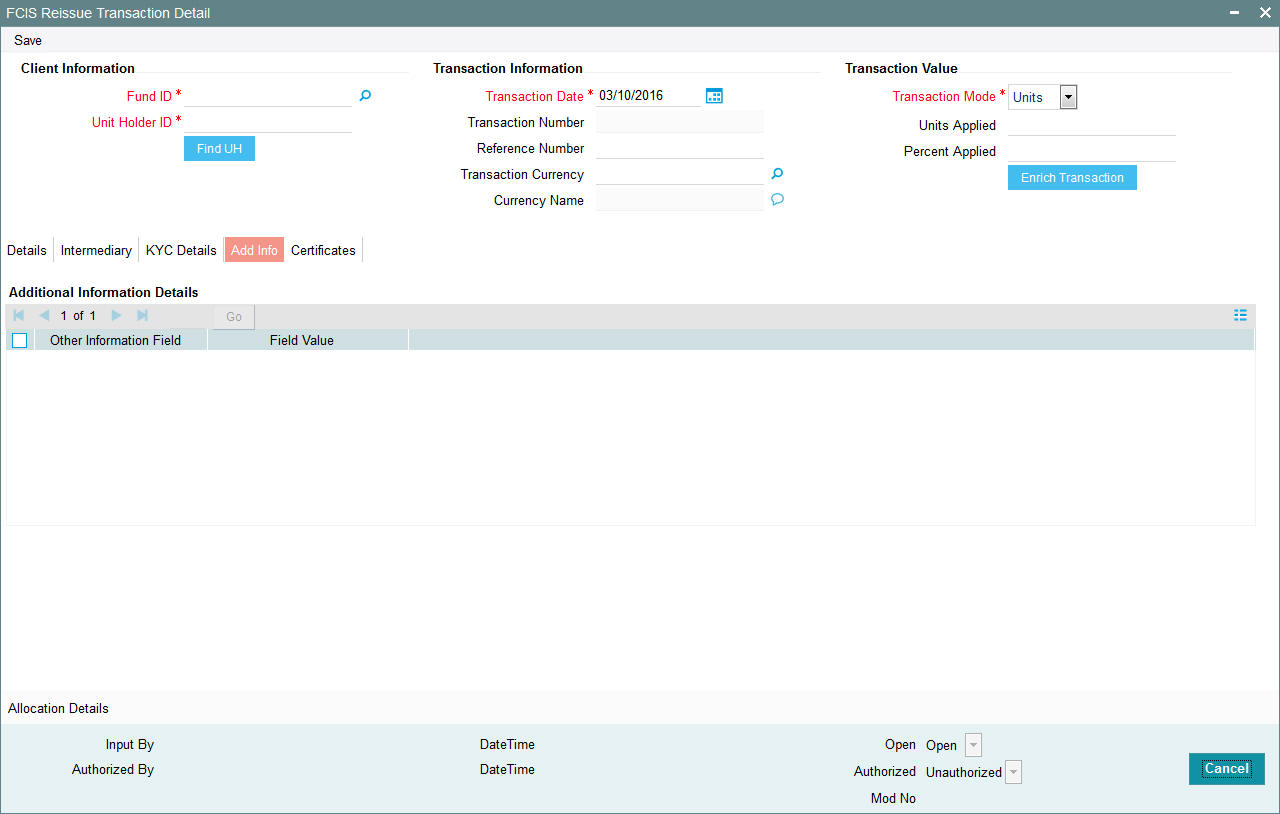
Other Info Field
Display
The system displays the additional information, if any information heads have been maintained in the System Parameters, to be applicable for the segment.
Field Value
Display
The system displays the field value.
4.28.6 Certificate Tab
Click Certificate tab in the FCIS Reissue Transaction Details screen.

Min Cert Denomination
Numeric; 22 Characters; Optional
Specify the minimum certificate denomination details.
Max Cert Denomination
Numeric; 22 Characters; Optional
Specify the maximum certificate denomination details.
From Issued Balances
Optional
Select from issued balances details from the drop-down list. The list displays the following values:
- Yes
- No
- Both
Note
From issued balance field ‘Both Option’ is not applicable for the subscription transaction
No of Certificates
Optional
Select the number of certificates from the drop-down list. The list displays the following values:
- Single
- Multiple
Certificate Details
Certificate Number
Numeric; 10 Characters; Optional
Specify the certificate number. Alternatively, you can select the certificate number from the option list. The list displays all valid certificate number maintained in the system.
No of Units
Numeric; 27 Characters; Optional
Specify the number of units details.
4.28.7 Allocation Details Button
The following allocation details are displayed:
Allocation Details
The following Allocation details are displayed:
- Fund ID
- Allocation Date
- Allotted Units
- Unit Price
- Confirmed Units
- Settlement Amount Transaction Currency
- Gross Amount in FBC
- Net Amount in FBC
- Settlement Amount in Price Currency
- Rejected Units
- MMF Dividend Amount
- Tax Income Per Share
- EUSD Gain
Switch-In Allocation Details
The following Switch-in allocation details are displayed:
- To Fund ID
- Allocation Date
- Allotted Units
- Unit Price
- Confirmed Units
- Settlement Amount Transaction Currency
- Gross Amount in FBC
- Net Amount in FBC
- Rejected Units
Load Details
The following Load Details are displayed during the allocation:
- Fund ID
- Load ID
- Load Description
- From Entity Type
- To Entity Type
- From Entity
- To Entity
- Load Amount
- Load Amount in Fee Currency
Performance Fee Details
The following Performance Fee Details are displayed during the allocation:
- Link Transaction Number
- In Out Flag
- Element Identification
- Element Description
- Value
Transaction Component Details
The following Transaction Component Details are displayed during the allocation:
- Offer Price
- Bid Price
- Share Capital
- Income
- Fund Capital
- Share Premium
CGT Deduction Details
The following CGT Deduction Details are displayed during the allocation:
- Unit Holder/ Joint Unit Holder ID
- Unit Holder/ Joint Unit Holder Name
- Tax Amount
4.28.8 Saving the Transaction
At this stage, you can save the transaction by clicking the Save button at the bottom of the Transaction Information Section. The transaction is saved, and the system generated transaction number (and the reference number, if any) is displayed.
Note
If the Auto-authorization feature is enabled for the Save operation for the AMC ID, then the transaction is saved as an authorized transaction. If not, it is saved as an unauthorized transaction. In either case, the Transaction Number is generated and displayed when you invoke the Save operation.
4.29 Reissue Transaction Summary Screen
This section contains the following topics:
- Section 4.29.1, "Retrieving a Record in Reissue Transaction Summary Screen"
- Section 4.29.2, "Editing Reissue Transaction Record"
- Section 4.29.3, "Viewing Reissue Transaction Record "
- Section 4.29.4, "Deleting Reissue Transaction Record"
- Section 4.29.5, "Authorizing Reissue Transaction Record "
- Section 4.29.6, "Amending Reissue Transaction Record "
- Section 4.29.7, "Authorizing Amended Reissue Transaction Record "
4.29.1 Retrieving a Record in Reissue Transaction Summary Screen
You can retrieve a previously entered record in the Summary Screen, as follows:
- Invoke the ‘FCIS Reissue Transaction Summary’ screen
by typing ‘UTSTXN10’ in the field at the top right corner
of the Application tool bar and clicking on the adjoining arrow button
and specify any or all of the following details in the corresponding
details.
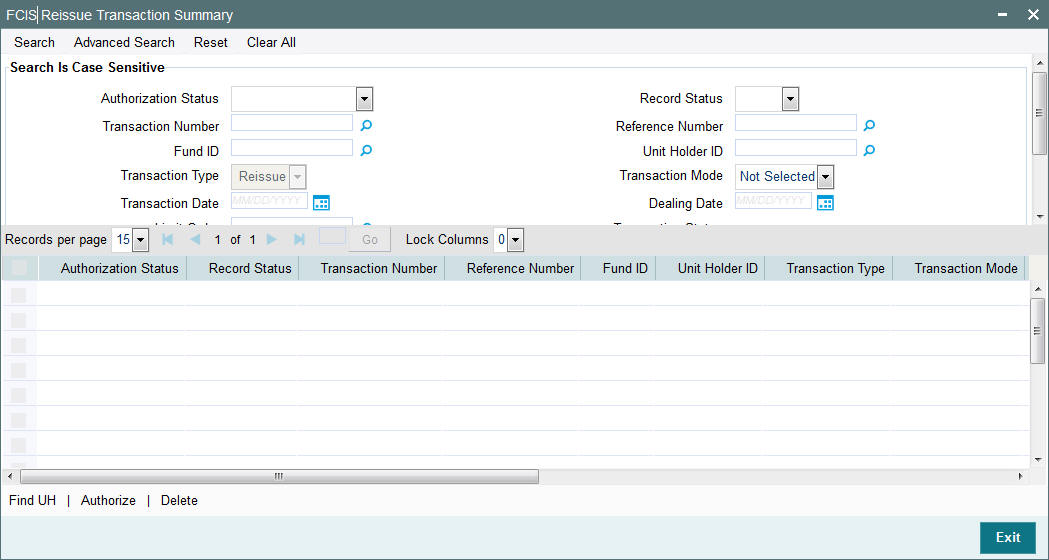
- The status of the record in the Authorization Status field. If you choose the ‘Blank Space’ option, then all the records are retrieved.
- The status of the record in the Record Status field. If you choose the ‘Blank Space’ option, then all records are retrieved
- Transaction Number
- Fund ID
- Transaction Type
- Transaction Date
- Limit Order
- Payment Mode
- Maker ID
- Reference Number
- Unit Holder ID
- Transaction Mode
- Dealing Date
- Transaction Status
- AMC ID
Click ‘Search’ button to view the records. All the records with the specified details are retrieved and displayed in the lower portion of the screen.
Note
You can also retrieve the individual record detail from the detail screen by querying in the following manner:
- Press F7
- Input the Transaction Number
- Press F8
You can perform Edit, Delete, Amend, Authorize, Reverse, Confirm operations by selecting the operation from the Action list. You can also search a record by using a combination of % and alphanumeric value.
For example:
You can search the record for Transaction Number by using the combination of % and alphanumeric value as follows:-
- Search by A%:- System will fetch all the records whose Transaction Number starts from Alphabet ‘A’. For example:- AGC17,AGVO6,AGC74 etc.
- Search by %7:- System will fetch all the records whose Transaction Number ends by numeric value’ 7’. For example: AGC17, GSD267, AGC77 etc.
- Search by %17%:- System will fetch all the records whose Transaction Number contains the numeric value 17. For example: GSD217, GSD172, AGC17 etc.
4.29.2 Editing Reissue Transaction Record
You can modify the details of FCIS Reissue Transaction record that you have already entered into the system, provided it has not subsequently authorized. You can perform this operation as follows:
- Invoke the FCIS Reissue Transaction Summary screen from the Browser.
- Select the status of the record that you want to retrieve for modification in the Authorization Status field. You can only modify records that are unauthorized. Accordingly, choose the Unauthorized option.
- Specify any or all of the details in the corresponding fields to retrieve the record that is to be modified.
- Click ‘Search’ button. All unauthorized records with the specified details are retrieved and displayed in the lower portion of the screen.
- Double click the record that you want to modify in the list of displayed records. The FCIS Reissue Transaction Detail screen is displayed.
- Select Unlock Operation from the Action list to modify the record. Modify the necessary information.
Click Save to save your changes. The FCIS Reissue Transaction Detail screen is closed and the changes made are reflected in the FCIS Reissue Transaction Summary screen.
4.29.3 Viewing Reissue Transaction Record
To view a record that you have previously input, you must retrieve the same in the FCIS Reissue Transaction Summary screen as follows:
- Invoke the FCIS Reissue Transaction Summary screen from the Browser.
- Select the status of the record that you want to retrieve for viewing in the Authorization Status field. You can also view all records that are either unauthorized or authorized only, by choosing the unauthorized / Authorized option.
- Specify any or all of the details of the record in the corresponding fields on the screen.
- Click ‘Search’ button. All records with the specified fields are retrieved and displayed in the lower portion of the screen.
- Double click the record that you want to view in the list of displayed records. The FCIS Reissue Transaction Detail screen is displayed in View mode.
4.29.4 Deleting Reissue Transaction Record
You can delete only unauthorized records in the system. To delete a record that you have previously entered:
- Invoke the FCIS Reissue Transaction Summary screen from the Browser.
- Select the status of the record that you want to retrieve for deletion.
- Specify any or all of the details in the corresponding fields on the screen.
- Click ‘Search’ button. All records with the specified fields are retrieved and displayed in the lower portion of the screen.
- Double click the record that you want to delete in the list of displayed records. The FCIS Reissue Transaction Detail screen is displayed.
- Select Delete Operation from the Action list. The system prompts you to confirm the deletion and the record is physically deleted from the system database.
4.29.5 Authorizing Reissue Transaction Record
- An unauthorized FCIS Reissue Transaction record must be authorized in the system for it to be processed. To authorize a record:
- Invoke the FCIS Reissue Transaction Summary screen from the Browser.
- Select the status of the record that you want to retrieve for authorization. Typically, choose the unauthorized option.
- Specify any or all of the details in the corresponding fields on the screen.
- Click ‘Search’ button. All records with the specified details that are pending authorization are retrieved and displayed in the lower portion of the screen.
- Double click the record that you wish to authorize. The FCIS Reissue Transaction Detail screen is displayed. Select Authorize operation from the Action List.
When a checker authorizes a record, details of validation, if any, that were overridden by the maker of the record during the Save operation are displayed. If any of these overrides results in an error, the checker must reject the record.
4.29.6 Amending Reissue Transaction Record
After a FCIS Reissue Transaction record is authorized, it can be modified using the Unlock operation from the Action List. To make changes to a record after authorization:
- Invoke the FCIS Reissue Transaction Summary screen from the Browser.
- Select the status of the record that you want to retrieve for authorization. You can only amend authorized records.
- Specify any or all of the details in the corresponding fields on the screen.
- Click ‘Search’ button. All records with the specified details that are pending authorization are retrieved and displayed in the lower portion of the screen.
- Double click the record that you wish to authorize. The FCIS Reissue Transaction Detail screen is displayed in amendment mode. Select Unlock operation from the Action List to amend the record.
- Amend the necessary information and click on Save to save the changes
4.29.7 Authorizing Amended Reissue Transaction Record
An amended FCIS Reissue Transaction record must be authorized for the amendment to be made effective in the system. The authorization of amended records can be done only from Fund Manager Module and Agency Branch module.
The subsequent process of authorization is the same as that for normal transactions.
4.30 Defaulting of Price Date in Transaction Screens
While entering a transaction in any of the Transaction Detail screens, you will have to select the fund in which the requested transaction has to be put through. Once you choose the fund from the option list, the field From Price Date will be displayed.
The table below gives you four sets of conditions that will determine the price date that will be updated in the field From Price Date.
Case |
Post Priced |
Forward Pricing |
Specific Fund Price Frequency |
Cut Off Basis |
Adhoc Price Date |
Case 1 |
Yes |
No |
NA |
NA |
NA |
Case 2 |
Yes |
Yes |
‘User Defined’ |
‘Cut Off Based on Price Date’ |
NA |
Case 3 |
Yes |
Yes |
‘User Defined’ |
‘Cut Off Based on Price Date’ |
Maintained |
Case 4 |
Yes |
Yes |
Any option other than ‘User Defined’ |
‘Cut Off as an Independent Calendar’ |
Maintained |
Note
When indicating the Adhoc Price Date you should have specified that the price entered is not meant for reporting alone, by not checking the box ‘For Reporting’.
NA, wherever present, denotes the field is Not Applicable given the set of conditions.
For each of the set of conditions given in the table above, the following will be the date that will be updated in the field From Price Date:
Case 1
The next scheduled price date.
Example
For a Fund A, which is post priced (pricing will be of a daily frequency), the system by default the price to the current available price date.
Case 2
The next user defined price date taking into account the number of cut off days specified.
Example
For a fund A, with the following set of maintenances, the allocation would be as follows:
Fund |
Forward Pricing |
Scheduled |
Pricing |
Fund B |
Yes |
14-Apr-04 |
2 |
17-Apr-04 |
|
||
19-Apr-04 |
|||
21-Apr-04 |
For a transaction captured on 12th, the field From Price Date in the subscription transaction will be updated with the date 14th April 2004.
For a transaction captured on 13th, the field From Price Date in the subscription transaction will be updated with the date 19th April 2004 as the 17th is an AMC holiday.
Note
For the transaction captured on the 13th in the above example, the default price date cannot be overridden to the adhoc date as it is not maintained but can be overridden to the 14th (the Scheduled Price Date), though it does not satisfy the pricing cut off limit.
Case 3
The next user defined price date taking into account the number of cut off days specified. You can change this price date and enter the Adhoc Price Date.Example
For a fund A, with the following set of maintenances, the allocation would be as follows:
Fund |
Forward |
Scheduled |
Pricing |
Adhoc Date (Subscription) |
Adhoc Cut-Off (days) |
Fund B |
Yes |
14-Apr-04 |
2 |
12-Apr-04 |
0 |
17-Apr-04 |
13-Apr-04 |
1 |
|||
19-Apr-04 |
15-Apr-04 |
2 - Flagged for reporting |
|||
21-Apr-04 |
16-Apr-04 |
3 |
Assume, 15th is a Fund holiday and 17th April, 2004 is a AMC holiday.
For a transaction captured on the 12th, the field From Price Date in the subscription transaction will be updated with the date 14th April 2004.
The above defaulted price date 14th April 2004, can be overridden to the Adhoc Date 12th April 2004.
For a transaction captured on 13th, the field From Price Date in the subscription transaction will be updated with the date 19th April 2004 as the 17th is an AMC holiday.
In the above transaction, the default price date can be overridden to the Adhoc Date, 13th April 2004 as it does not satisfy the cut-off days limit. But the 14th (the Scheduled Price Date) can be applied.
Case 4
The next scheduled price date taking into account the number of cut off days specified. You can change this price date and enter the Adhoc Price Date.
Refer to the chapter ‘Setting Up Fund Rules (II’) in Volume 2 of the Fund Manager User Manual.
For further information on the Transaction Detail screens, refer to the chapters ‘Processing Transaction Requests and Processing Transaction Requests (II)’ in Volume 2 of the Agency Branch User Manual.
4.31 Completing Transaction
A transaction is deemed as complete only after it is settled and the required KYC documents have been received from the investor, both at the unit holder level and at the transaction level.
Redemption and Switch Out transactions are allowed even if the linked subscription transactions are not complete. However, payment will not be allowed. If Redemption and Switch out transactions are settled and all the required KYC documents have been received, Completion of linked Subscription triggers the Completion of the Redemption or Switch out transaction.
A transaction can be redeemed or switched out only if the KYC/AML checks have been completed for the linked inflow transaction.
Completion is possible for IPO subscription, subscription, redemption, switch and transfer transactions.
Completion of a transaction is possible only under the following circumstances:
- Transaction has been allotted
- All the payments linked with the transaction are settled
- All KYC documents have been received from the investor at the unit holder level and at the transaction level.
- Transaction is confirmed in case of redemptions
- Linked inflow transaction is ‘Complete’ in case of redemptions or switch out transactions
You can perform the completion operation as follows:
- In the main menu, invoke the Transaction Input menu. For the required transaction type, choose the Summary option. The Transaction Summary screen is opened.
- In the Operation field, select the Completion option from the drop-down list.
- You can only complete records of transactions that have been allotted. Accordingly, the Status field is defaulted with ‘Allotted’ and you are not allowed to change this.
- To retrieve the transaction that is to be completed, specify any or all of the details of the transaction in the corresponding fields on the screen. All allotted transactions with the specified details are retrieved and displayed in the lower portion of the screen.
- To complete any single transaction that has been retrieved,
- In the displayed list, select the row of the transaction number and specify the date of completion in the Completion Date field.
- Check the Complete checkbox. Then click the Complete Transaction button to complete the operation.
Note
The completion date that you specify here should be less than or equal to the application date and should be greater than or equal to the transaction date, allocation date and the settlement date of the transaction.
In case the KYC list is incomplete for an unsettled transaction, Completion date is updated on settlement. A settled transaction can be marked as ‘Complete’ only after marking that all the requested KYC documents have been received.
If your installation has not requested for KYC checks, then the transaction will be automatically marked as completed in the following cases:
- Allocation happens before clearing/settlement – In this case, during clearing, the transaction is marked as completed and the Completion date is defaulted with the Clearing date.
- Allocation happens after clearing – In this case, during allocation, transaction is marked as completed and Completion date is defaulted with the Allocation date.
In case of Redemption transactions:
- Completion should be done through 'Confirm Redemption' after settling the transaction.
- Completion should be done through 'Completion' option in Transaction Summary Screen after marking that all KYC documents have been received.
4.32 Processing Back Data Propagation for Transactions
You can correct erroneous transactions as well as enter those that have been missed out and compute the effect these have on the current holdings of the unit holder through the back data propagation process. The following transactions are covered as part of this feature:
- IPO
- Subscription
- Redemption
- Normal Switch and Pseudo switch
- Transfer
- SI transactions
To facilitate this propagation process, two schema are used – the business (or normal) schema and the report schema. You are required to enter the correct data in the business schema for the required transactions and select these for propagation, again from the business schema. The transactions will be simulated in the report schema and the results can be viewed in the business schema.
Refer the chapter ‘Back Data Propagation’ in the Fund Manager User Manual for more details on the back data propagation process.
4.33 Auto Completion
This section contains the following topics:
4.33.1 Invoking Auto Completion Screen
You can update the transaction completion status of the transaction using ‘Auto Completion’ screen. For the transactions which are either cleared in payment or KYC process and you need to complete the transaction before the end of the day program, then run this batch to make the transaction complete.
You can invoke ‘Auto Completion’ screen by typing ‘UTDAUTCO’ in the field at the top right corner of the Application tool bar and clicking on the adjoining arrow button.
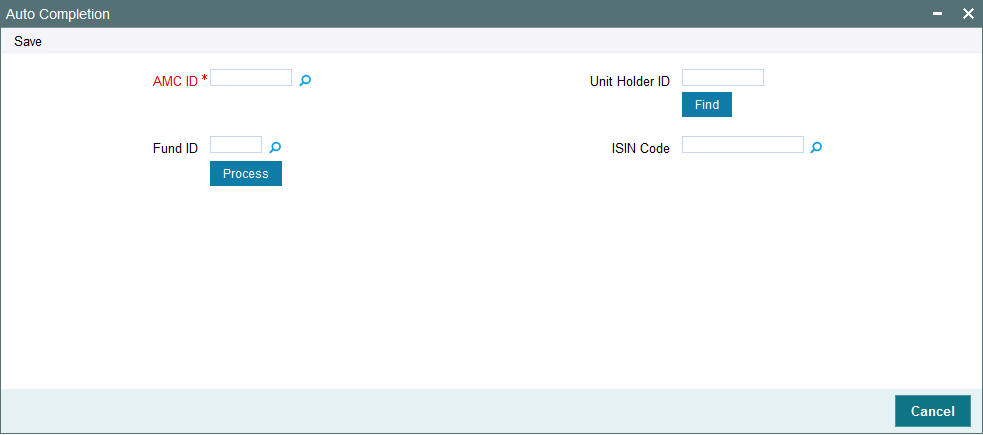
In order to process the Job, you need to input the following details.
AMC ID
Alphanumeric; 12 Characters; Mandatory
Specify the AMC ID of the transactions for which the status needs to be marked as completed. Alternatively, you can select AMC ID from the option list. The list displays all valid AMC ID maintained in the system.
Unit Holder ID
Alphanumeric; 12 Characters; Optional
Specify the unit holder ID of the transaction in case you want to mark the status as completed for a particular unit holder.
You can also query for unit holder ID by clicking ‘Find’ button.
Fund ID
Alphanumeric; 6 Characters; Optional
Specify the fund along with AMC in case all the transaction under that AMC and fund combination status needs to be marked as completed. Alternatively, you can select fund ID from the option list. The list displays all valid fund ID maintained in the system.
ISIN Code
Alphanumeric; 25 Characters; Optional
The system displays the ISIN code if you have specified the fund ID. Else specify the ISIN code.
If you specify the ISIN code, the system displays the fund ID and vice versa.