| Siebel CRM Assignment Manager Administration Guide Siebel 2018 E24725-01 |
|


 Previous |
 Next |
View PDF |
| Siebel CRM Assignment Manager Administration Guide Siebel 2018 E24725-01 |
|
Previous |
Next |
View PDF |
Siebel Assignment Manager allows you to copy position- and employee-specific columnar data so that you can replace one position or employee with another and have the position or employee data stay intact. For example, you might have a sales representative who has been working on an account or contact for several days but find that you need another person to take on that work.
To enable this feature, first configure an assignment object's user properties so that Assignment Manager can find the lists of columns in the position or employee team tables. Then, you submit a component job request so that Assignment Manager retains the position- or employee-specific data in the team table for the new person. During assignment processing, the data from one position (or employee) is copied to the extension columns for the new position (or employee) before deleting the original position (or employee).
The logic that Assignment Manager uses to copy position- or employee-specific data is as follows:
Checks to see whether the position or employee already exists in the account team.
If yes, then do nothing
If no, then skip to Step 2
Searches to find one of the following:
Any positions with position-specific data for the same rule group (or list of rule groups when merging sales forces) on the team.
Any employees with employee-specific data for the same rule group on the team.
If:
No, then do nothing
Yes, then do one of the following:
Find the position record that has the latest updated position-specific data, copy that position's data, and assign it to the new position
Find the employee record has the lasted updated employee-specific data, copy that employee's data, and assign it to the new employee
This topic is part of "About Configuring Siebel Assignment Manager to Copy Columns".
By default, the TM Account assignment object is configured to copy columnar position or employee data. However, you can make this feature available for other assignment objects by configuring user properties using Siebel Tools, then initiating a server component job to process the information.
To copy columns for positions or employees, perform the following tasks:
Copying columns, by doing one of the following:
Using Siebel Tools, you can configure assignment objects to copy position-specific or employee-specific data. Typically, you configure sales objects to copy position-specific data and you configure service objects to copy employee-specific data.
This task is a step in "Process of Configuring Siebel Assignment Manager to Copy Columns".
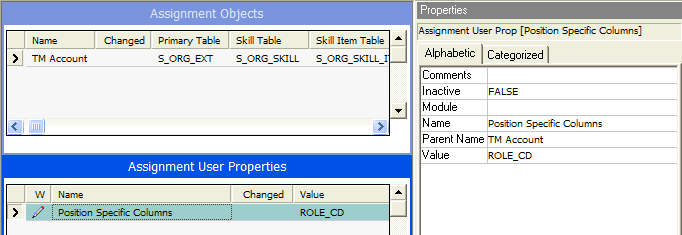
By default, the TM Account assignment object is predefined to copy position-specific data. Figure 10-1 shows the TM Account assignment object configured to copy only a single column, ROLE_CD.
Use the following procedure to add either the Position Specific Columns or Employee Specific Columns user property to an assignment object for which you want to enable copying of data.
To configure an assignment object to copy position- or employee-specific data
Start Siebel Tools.
In the Object Explorer, expand Workflow Policy Object, and then query for the object that you want to configure.
|
Tip: If Workflow Policy Object is not visible in the Object Explorer, then you can enable it by selecting View, then Options, then Object Explorer in the Development Tools Options dialog box. |
Lock the project for the object by choosing Tools, then Lock Project (or Alt+L).
The pencil icon appears in the W field to indicate that the project for the object is locked.
In the Object Explorer, expand Assignment Object, and then select Assignment User Prop.
In the Assignment User Properties window, choose Edit, then New Record.
In the new record, enter values for the relevant information.
In the Name field, type either Position Specific Columns or Employee Specific Columns.
In the Value field, type the names of the columns that you want copied.
For example, if you want to copy multiple columns, then type: ROLE_CD, ROW_ID.
In the Inactive field, click the drop-down arrow, and select FALSE.
After the assignment object is modified, you must run various server administration procedures to make sure that your configurations are recognized by Assignment Manager.
If you are using Batch Assignment, then start a new task.
If you are using Dynamic Assignment, then stop and restart the Workflow Monitor Agent.
If you are using Interactive Assignment, then stop and restart the Assignment Manager server component.
After the assignment object is configured, you can then instruct Assignment Manager to copy position- or employee-specific data using the GUI or by submitting a server component job from the Server Manager command-line interface (srvrmgr).
You can set up Siebel Assignment Manager to copy columnar position or employee data using the graphical user interface (GUI) or by submitting a server component job from the Server Manager command-line interface (srvrmgr). This topic explains how to copy columns using the GUI.
This task is a step in "Process of Configuring Siebel Assignment Manager to Copy Columns".
The following procedure assumes that the Position Specific Columns and Employee Specific Columns properties are preconfigured for the assignment object and the Copy Candidate Specific Data (CopyCandSpecData) parameter is set to Yes. For information about how to configure these properties and this parameter, see "Configuring Assignment Object Properties" and "Modifying the Siebel Assignment Manager Component Parameters", respectively.
To copy columns using the GUI
Navigate to the Administration - Server Management screen, and then the Jobs view.
In the Jobs list, click New.
A new record appears with a system-defined ID automatically generated with a status of Creating.
In the Requested Server field in the Job Detail subview, type the name of the Siebel Server on which you want to run the copy columns feature.
|
Note: Assignment Manager copies position- or employee-specific data only if the Use Key Value parameter value is set to either Rule Group or None. If None, then position-specific data is copied from any position in the ACCNT_POSTN table that was updated last, given every position in the team is for the same business reason. |
|
Tip: When merging sales forces in production mode, Assignment Manager takes into account the list of key values, that is, Assignment Manager gets the latest updated position in all the rule groups in the Replace Key Values list with position-specific data. |
After configuring an assignment object to copy columns, Siebel Assignment Manager can copy columnar position- and employee-specific data by initiating an Assignment Manager (AsgnSrvr) server component job from the Server Manager command-line interface (srvrmgr), using parameters described in Table 9-1.
This task is a step in "Process of Configuring Siebel Assignment Manager to Copy Columns".
For more information about using the Server Manager command-line interface, see Siebel System Administration Guide.
To copy columns using the Server Manager command-line interface
From the Server Manager command-line interface, submit an assignment request using the CopyCandSpecData parameter to instruct Assignment Manager to retain the position- or employee-specific data in the team table.
For example:
start task for comp asgnbatch with asgnobjname="Account", objwhereclause="where row_id='88-1FC68'", CopyCandSpecData="Y"
start task for comp asgnsrvr with asgnobjname="Account", objwhereclause="where row_id='88-1FC68'", CopyCandSpecData="Y"