Section - 2 : Configuring Documaker
Note: The information in this topic generally explains the required Documaker Server setup. It provides some examples so a knowledgeable Documaker administrator can apply the information to their installation and generate the documents and metadata for use with the Documaker Connector's Documaker source component.
Documaker Connector with the Documaker source reads a database table for rows containing document metadata and an operating system path to each document file. The Documaker source performs these tasks...
- Queries the database table for rows that have a status field that indicates those records have not been processed (STATUSCD column value of 0)
- Selects these rows with a maximum row count which equals as many records as it is configured to consider as a maximum sized batch
- Marks them with a status value (STATUSCD column) of 3 (in progress)
- Processes each of those records
Documaker Server must be configured to properly generate both the document files and the accompanying database records for the documents to be archived. The configuration of Documaker Server aligns with the configuration of your content management system so Documaker will provide the desired metadata/indexing elements.
Once this list of data elements is determined, you can configure Documaker Server to store the data elements in a database table for Documaker Connector. Documaker Server can store extra data in the table that is not used for indexing, but it must at least provide all the metadata elements which are mapped into the destination content management system.
Documaker Server reads the variable data for each document from a data extract input file or database. This file is supplied in either XML or CSV (comma-separated value) format. To use the data elements in Documaker Server, the data extract values are copied into Documaker global variables, also known as GVM variables or GVMs, using one of these methods:
- TRN_FIELDS INI option
- Ext2GVM rule
Once the data are in GVM variables, you use DAL scripting to control a recipient batch’s output print stream name and map the metadata in the GVM variables to database table columns. The Batch Banner and Transaction Banner processing DAL scripts insert the database rows.
Batch and transaction banner processing DAL is used since DAL scripts can be triggered for the different phases of output generation. The output print stream file name and location can be controlled as well as the post transaction processing step to map the GVM variables and any other static data to database table columns (using the DBPreVars DAL function) and finally insert database rows (using the DBAdd DAL function).
Making Index Data Available in Documaker GVM Variables
You can map Documaker extract input data, which are in XML format, into GVM variables using the Trn_Fields INI option via XPATH notation. This requires setting up the mapping with XPATH declarations and modifying or creating the associated TRNDFDFL.DFD (transaction) and RCBDFDFL.DFD (recipient batch) Data Formation Definition files.
DFD files are used by the Documaker data storage abstraction interfaces. The data can be ASCII files, database files, and so on. Documaker pulls the data from extract files (usually in XML or ASCII format) in batch processes and pushes them into the field names defined in the DFD file. This storage is then used as input to other batch processes.
Overall, these files control the storage and propagation of the data through the batch system. See the Documaker Administration Guide for configuration details. For more information, see Example XML Extract File.
You can also use the Ext2GVM rule to map the data. See the Rules Reference for more information on this rule.
Generating Database Table Rows and Writing the Document Files
You must create a database table and configure Documaker Server to both create the uniquely named recipient batch output print streams and to insert a row in the table with the name and location of the each output file. Each table row also contains the metadata fields needed for content management ingestion. The Batch Banner and Transaction Banner processing DAL scripts are used to write the output documents and to insert the database table rows referencing these documents.
Note: You can find examples of these scripts and other configuration files in Sample Applications and Files.
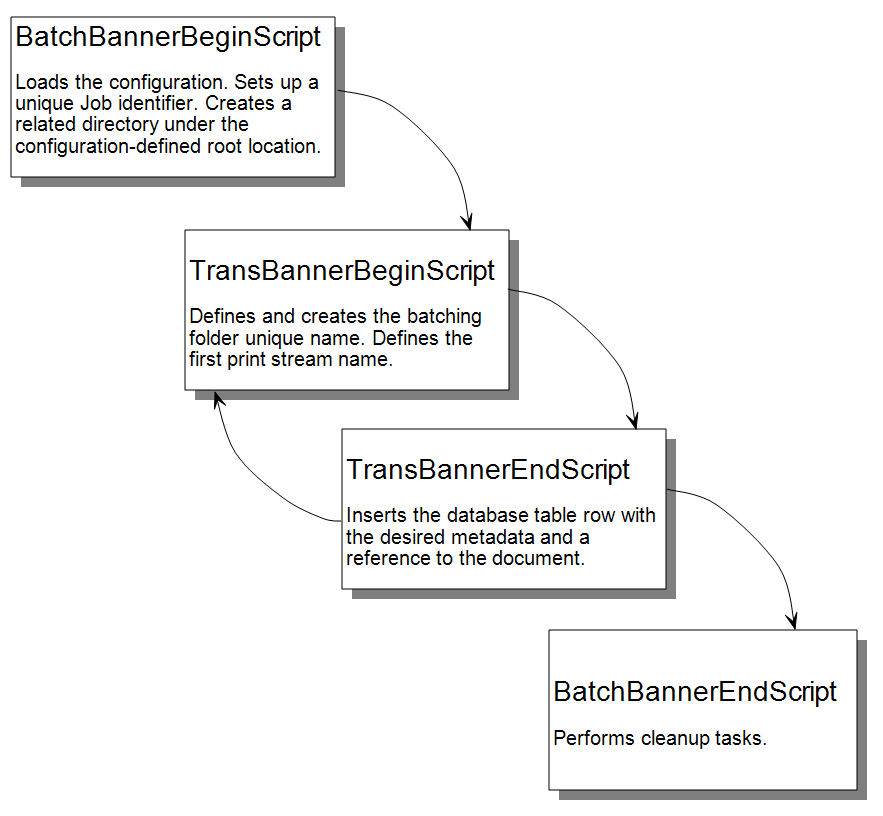
Batch Banner and Transaction Banner DAL processing each have a Begin and End phase with a separate script for each phase. The phases and scripts are run in this sequence:
Example INI Configuration
Enable the Batch and Transaction Banner scripts using the FSISYS.INI or FSIUSER.INI files. Typically, you enable the scripts for the chosen recipient batch output.
In the example implementation, Batch6 is the chosen output which is the FILE recipient’s batch and is associated with Printer6. Note that the EnableBatchBanner and EnableTransBanner settings are required in both the Printer control group and the Batch6 control group. Here is an example configuration snippet with the changes and additions (in italics) to write PDF output for Batch6 and enable the DAL scripting calls:
< BatchingByRecip >
Batch_Recip_Def = TRUE;"BATCH1";AGENT
Batch_Recip_Def = TRUE;"BATCH3";INSURED
Batch_Recip_Def = TRUE;"BATCH2";INSURED
Batch_Recip_Def = TRUE;"BATCH4";CLAIMANT
Batch_Recip_Def = TRUE;"BATCH4";OWNER
Batch_Recip_Def = TRUE;"BATCH4";LIENHOLDER
Batch_Recip_Def = TRUE;"BATCH6";FILE
DefaultBatch = ERROR
< Print_Batches >
BATCH1 = data\agent.bch
BATCH2 = data\insflat.bch
BATCH3 = data\insured.bch
BATCH4 = data\other.bch
BATCH5 = data\lienholder.bch
BATCH6 = data\file.bch
< Printer >
; Must generally enable banner processing for it to work.
EnableBatchBanner = Yes
EnableTransBanner = Yes
PrtType = PDF
< Printer6 >
Port = data\file.pdf
PrtType = PDF
AORDebug = No
AORExt = .pdf
AORFilesPerBatch = 1000
AORPath = c:\AOR\
;Enable a DAL library of scripts to be pre-loaded
< DalLibraries >
LIB = aor
;Enable the Banner and Transaction DAL Scripting
< BATCH6 >
EnableBatchBanner = Yes
EnableTransBanner = Yes
BatchBannerBeginScript = AOR_PREB
BatchBannerEndScript = AOR_POSTB
TransBannerBeginScript = AOR_PRET
TransBannerEndScript = AOR_POSTT
Printer = Printer6
Example DAL Script
As indicated above in the DalLibraries control group, LIB entry, Documaker looks in the AOR.DAL file for the scripts listed in the Batch6 control group. The AOR.DAL file is a library with the definitions of the Batch6 DAL scripts shown in Using DAL to Output to a Database Table.
As you can see in the file, scripts are provided for the Begin and End events at both the Transaction and Batch levels.
This DAL scripting requires Documaker Server to be configured to connect to a database and for the referenced table to exist in that database. The table schema must agree with what the DAL inserts into that table. You do this by performing the following steps:
- Creating the database table in the target database
- Setting up the Documaker Server INI configuration for the connection to that database with the table
- Setting the Documaker DFD (Data Format Definition) to contain all the field values you want mapped from GVM variables to the database table.
Example Database Table Definition
Each row of the table must include a minimum set of columns required by both Documaker Server and Documaker Connector to manage the list of output documents and the document output directory. The table schema must also include additional columns of customer-specific metadata used to archive the documents, none of which is shown below.
This table shows the minimum required columns of the table with their default column names. You can customize these column names and add your own columns in the Documaker Source configuration file. The following list does not include customer-specific metadata to be archived. In an actual implementation, you would expand this with additional columns to define your metadata. Keep in mind this list of columns must match the schema of your database table. For more information, see Using DAL to Output to a Database Table.
| Column | Type | Description |
|---|---|---|
| JOBID | VARCHAR(50) | The Documaker globally-unique job identifier which identifies a grouping of one or more Documaker transactions for a single import run. Imports (XML or V2) can contain one or more transactions. This column’s value is also used by default for the root directory folder of the output print stream. |
| TRANID | VARCHAR(50) | The Documaker transaction identifier for a transaction with one or more Documaker batches (recipient batches).
This column’s value is also in some implementations to map to the document title or name and for searching should identify the document type and purpose. |
| BATCHID | VARCHAR (50) | The Documaker batch identifier for a document, usually the same name as the recipient batch plus a counter. For example, BATCH6x2 where the counter is incremented as the specified maximum number of files per folder is reached. This columns value is also used by default to segment the transaction folder into sub-folders for each group of output files. |
| DOCID | VARCHAR (50) | The globally-unique document identifier. |
| NAME | VARCHAR (30) | The name of the document. |
| TYPE | VARCHAR (30) | The type of document. |
| TITLE | VARCHAR (255) | The title for the document. |
| AUTHOR | VARCHAR (50) | The author or owner of the document. |
| SECGROUP | VARCHAR (30) | The security group assigned to the document. |
| PFILE | VARCHAR (255) | A file URL or path to the document. |
| STATUSCD | INTEGER | This column contains the status of a document. The following values are supported:
0 – Not yet processed by Documaker Connector (new) 1 – Imported into content management (success) 2 – Import failed (failure) 3 – In process by Documaker Connector (in progress) The default is zero (0) |
| STARTTIME | TIMESTAMP | A time stamp that indicates at which time the document import process started. This column is updated by Documaker Connector. |
| ENDTIME | TIMESTAMP | A time stamp that indicates at which time the document import process ended. This column is updated by Documaker Connector. |
| RESULTDESC | VARCHAR (2000) | A description of the outcome of the import process; updated by Documaker Connector at the time of import. This column contains Success if the document import process is successful. Otherwise, it contains a description of the error. |
| RETENTION | TIMESTAMP | A time stamp that indicates when the document expires and can be removed from the table. This value is updated by Documaker Connector upon a successful import, based on the value of the source.documaker.retention.time configuration property which indicates the number of days after import when the document expires. |
Documaker INI Setup for the Example Database Connection
Documaker Server is configured to access a database and a particular table in the Documaker configuration INI file (FSISYS.INI or FSIUSER.INI). Documaker uses the Open DataBase Connectivity (ODBC) interface API to the database.
Here is an example:
< DBHandler:ODBC >
Class = ODBC
Server = OracleXE10g
; SubClass = ORA
CreateTable = No
CreateIndex = No
; Debug = Yes
UserID = ~ENCRYPTED 1-S6rx_NR_wt2hsjXScy0
PassWd = ~ENCRYPTED 1-S6rx_NR_wt2hsjXScy0
; Database Table reference, this case a table named AOR
< DBTable:AOR >
DBHandler = ODBC
Note: The lines that begin with a semicolon (;) are comments and are not processed.
In these example settings, Documaker Server connects via ODBC to a database server called OracleXE10g with an encrypted user ID and password. In this database, Documaker Server is configured to use a table called AOR (Archive Of Record).
Note: You can find more information on ODBC database access configuration in the Documaker Administration Guide.