Accounting Settings
The Oracle Enterprise Communications Broker offers support for RADIUS, an accounting, authentication, and authorization (AAA) system. In general, RADIUS servers are responsible for receiving user connection requests, authenticating users, and returning all configuration information necessary for the client to deliver service to the user.
You can configure your Oracle Enterprise Communications Broker to send call accounting information to one or more RADIUS servers. This information can help you to see usage and QoS metrics, monitor traffic, and even troubleshoot your system.
Configure an Accounting Server
Use the following procedure to configure an accounting server to receive accounting detail from the Oracle Enterprise Communications Broker (OECB). You can also edit and delete existing accounting servers with this procedure,.
- Network Access Server (NAS) IP address (the IP address of the OECB SIP proxy).
- NAS ID. If you enter a value, the OECB sends the NAS ID to the remote server.
If you have more than one OECB pointing to the same accounting server, you can use the NAS ID to identify which OECB generated the record.
Configuring Accounting
- Click the accounting icon. The system displays the Modify Accounting Settings dialog.
-
Enabled—Enable the generation of accounting records by clicking the checkbox or retain the default of disabled.
- enabled | disabled
-
Generate Start—Retain the default value ok if you want the CDR Start record to be generated once the system receives an OK message in response to an INVITE. (A CDR Start record informs the accounting server that a SIP session has started.) Other values include:
- None—Start message should not be generated.
- Invite—Start message should be generated once the Oracle Enterprise Communications Broker receives a SIP session INVITE.
-
Generate Interim—Retain the default value, Re-invite Response, to cause the
Oracle Enterprise Communications
Broker to transmit an Interim message. (An Interim message indicates to the accounting server that the SIP session parameters have changed.) Other values include:
- OK—Start message is generated when the Oracle Enterprise Communications Broker receives an OK message in response to an INVITE.
- Re-invite—Interim message is generated when the Oracle Enterprise Communications Broker receives a SIP session reINVITE message.
- Re-invite Cancel—Interim message is generated when the Oracle Enterprise Communications Broker receives a SIP session reINVITE, and the Reinvite is cancelled before the Oracle Enterprise Communications Broker responds to it.
- Unsuccessful-Attempt—Interim message is generated when a SIP session set-up attempt from a preference-ordered list of next-hop destinations is unsuccessful. The interim message contains: the destination IP address, the disconnect reason, a timestamp for the failure, and the number that was called.
-
Enable file output—Enable the system to generate local files containing accounting records by clicking the checkbox or retain the default of disabled.
- enabled | disabled
- File Path—Specify where, on the system, you want the system to store accounting record files by typing in a valid path.
- File rotate time—Set how often in minutes you want to rotate the stored files; the Oracle Enterprise Communications Broker overwrites the oldest file first. The minimum rotation time is 2 minutes; the default is 60 minutes. This parameter defaults to 0, and leaving it set to the default means that the Oracle Enterprise Communications Broker does not rotate (or push) the files.
- Max files—Set the maximum number of files to be stored on the Oracle Enterprise Communications Broker at one time. You can configure the Oracle Enterprise Communications Broker to store as few as one file or as many as 4096. The default is 5.
FTP Push
In addition to local and RADIUS server storage, the Oracle Enterprise Communications Broker provides you with the ability to send accounting files to an FTP server. The information sent to the FTP server is the same as is stored locally.
The FTP push feature is used to copy local CDR files to a remote FTP server on a periodic basis. This feature is configured by defining push receivers which contain standard login and FTP server credentials of the remote machine. At the time interval (file rotate time), the Oracle Enterprise Communications Broker closes the current file and pushes the files that are complete and have not yet been pushed, including the just-closed fille to the FTP server.
Push receiver configurations must include:
- The server’s IP address and port
- Remote path of where to upload the accounting files
- Account login credentials
The FTP push configuration creates and pushes accounting files using the following criteria:
- The maximum accounting file size, after which the system creates a new file, is 1000000 bytes.
- The number of files the system creates before it begins to overwrite files (oldest file first) is 5.
- The amount of time between system file push to the FTP server is 60 minutes.
FTP Push Configuration

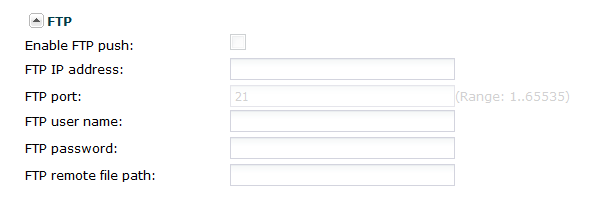
- Enable FTP push —Check the checkbox to enable FTP push.
- FTP-address—Set the IP address of this STP server.
-
FTP-port—Set the port of this service:
- Minimum: 0
- Maximum: 65535
- Default: 21
- FTP-user—Set the username you must use to login to this FTP server.
- FTP-password—Set the password you must use to login to this FTP server.
- FTP-remote-path—Set the path on this FTP server on which you want to save your accounting files.


