1. Welcome to Configuration User Guide
This user guide is designed to help you quickly get acquainted with the many functions routinely executed everyday in Oracle Banking Virtual Account Management.
This section contains the following topics:
1.1 External DDA System
The transactions into virtual account through transaction journal service, results in posting entries to real account. The external DDA system interacts with the external DDA for posting entries and calling out other services on DDA.
1.1.1 External DDA System Summary
The summary screen provides a list of configured external DDA system. You can configure an external DDA system using the External DDA System Maintenance
1.1.1.1 How to reach here:
Virtual Account Management > Configuration > External DDA System > View External DDA System
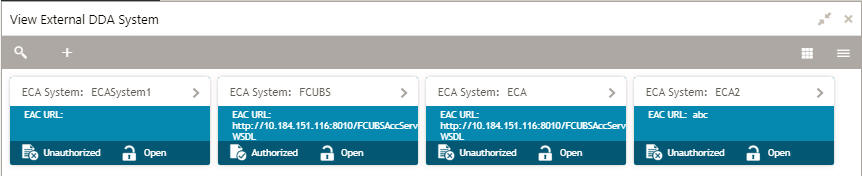
Field |
Description |
ECA System |
Displays the ECA system details. |
EAC URL |
Displays the EAC URL details. |
Status |
Displays the status of the record. |
1.1.2 External DDA System Maintenance
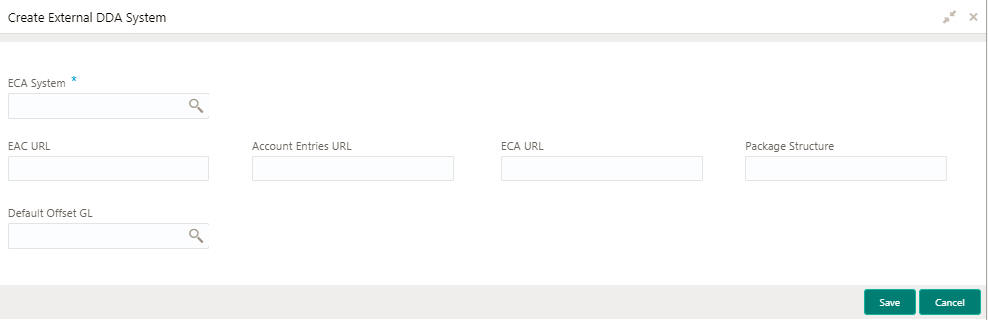
The maintenance screen allows you to configure an external DDA system.
1.1.2.1 How to reach here:
Virtual Account Management > Configuration > External DDA System > View External DDA System
1.1.2.2 How to configure an external DDA system:
- In the Create External DDA System screen, provide the required details:
- ECA System: Click Search to view and select the require ECA system.
- EAC URL: Enter the EAC URL details.
- Account Entries URL: Enter the account entries URL details.
- ECA URL: Enter the ECA URL details.
- Package Structure: Enter the package structure details.
- Default Offset GL: Click Search to view and select the default offset GL.
- Click Save. You can view the configured external DDA system details in the External DDA System Summary.
1.2 Entity Mask Configuration
You can configure entity mask ID for a bank.
1.2.1 Entity Mask Configuration Summary
The summary screen provides a list of configured entity mask ID. You can configure entity mask ID using the Entity Mask Configuration Maintenance
1.2.1.1 How to reach here:
Virtual Account Management > Configuration > Entity Mask Configuration > View Entity Mask Configuration
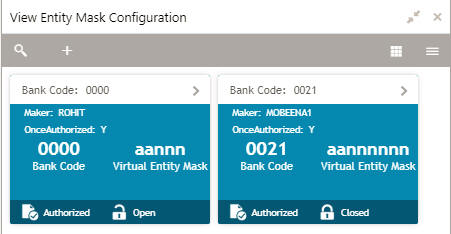
Field |
Description |
Bank Code |
Displays the code of the branch associated with the bank. |
Maker |
Displays the name of the user who has configured the bank details. |
Once Authorized |
Indicates if the record is authorized once or not. |
Virtual Entity Mask |
Displays the virtual entity mask details. |
Status |
Displays the status of the record. |
1.2.2 Entity Mask Configuration Maintenance
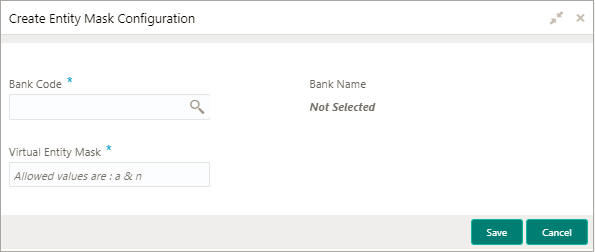
The maintenance screen allows you to configure entity mask ID for a bank.
1.2.2.1 How to reach here:
Virtual Account Management > Configuration > Entity Mask Configuration > View Entity Mask Configuration
1.2.2.2 How to configure an entity mask:
- In the Create Entity Mask Configuration screen, provide the required details:
- Bank Code: Click Search to view and select the required bank code.
- Bank Name: Based on the Bank Code selected the information is auto-populated.
- Virtual Entity Mask: Enter the virtual entity mask.
You can input a combination of alpha and/or numeric characters. You can
enter up to a maximum of 12 characters. You can use the following identifiers
to define the mask:
- b: User input alpha characters
- n: User input numbers
- Click Save. You can view the configured entity mask details in the Entity Mask Configuration Summary.
1.3 Branch Parameters
You can configure branch level parameters for a virtual account.
1.3.1 Branch Parameters Summary
The summary screen provides a list of configured branch parameters. You can configure a branch level parameter using the Branch Parameters Maintenance.
1.3.1.1 How to reach here:
Virtual Account Management > Configuration > Branch Parameters > View Branch Parameters
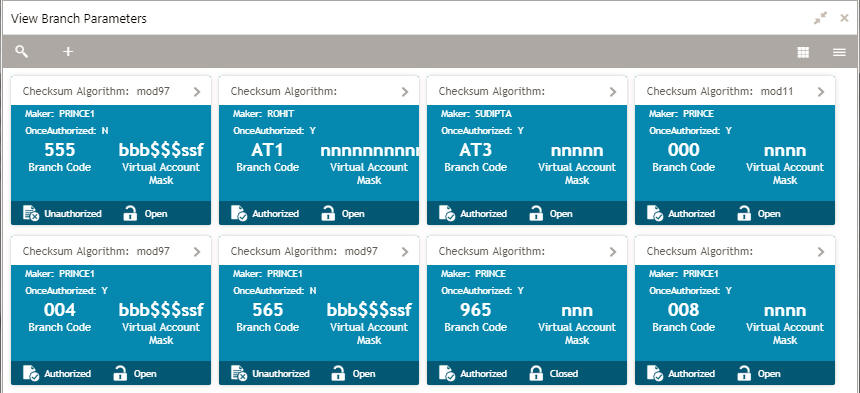
Field |
Description |
Checksum Algorithm |
Displays the checksum algorithm of the bank. |
Maker |
Displays the name of the user who created the record. |
Once Authorized |
Indicates if the record is authorized once or not. |
Bank Code |
Displays the code of the branch associated with the bank. |
Virtual Account Mask |
Displays the virtual account mask details. |
Status |
Displays the status of the record. |
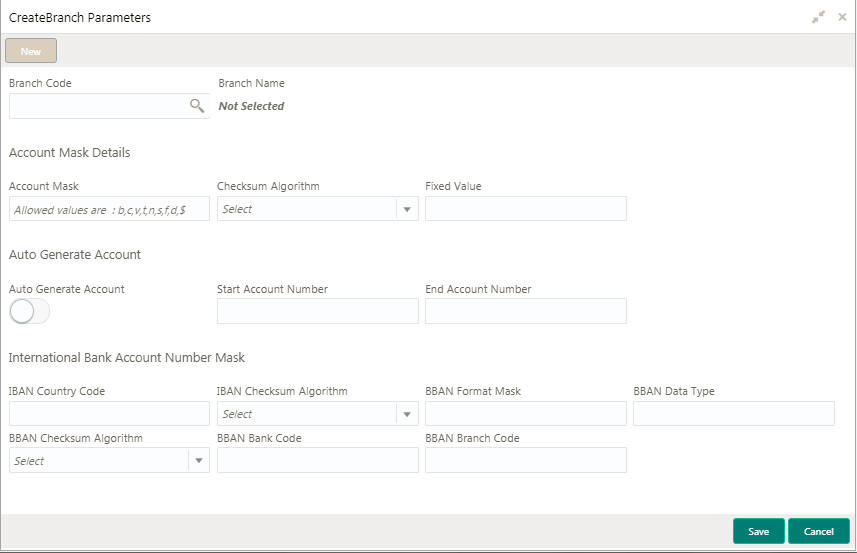
1.3.2 Branch Parameters Maintenance
The maintenance screen allows you to configure branch level parameters.
1.3.2.1 How to reach here:
Virtual Account Management > Configuration >Branch Parameters > Create Branch Parameters
1.3.2.2 How to configure branch parameters:
- In the Create Branch Parameters screen, provide the required details:
- Branch Code: Click Search to view and select the required branch code.
- Branch Name: Based on the Branch Code selected the information is auto-populated.
Account Mask Details
- Account Mask: Enter the account mask details.
- Checksum Algorithm: Select one of the required checksum algorithm
from the dropdown list:
- Modulo 97: If selected, can have only numeric account mask.
- Modulo 10: If selected, can have mask of length 10.
- Modulo 11: If selected, can have either numeric or alphanumeric account mask. In case of numeric, D is appended to the account mask by the system and in case of alpha numeric, user must manually input D at the end of the mask.
- Modulo 11: With weights this can have mask with size not more than 13.
- Fixed Value: Enter a fixed value, if virtual account mask contains character f. This field supports maximum of one alphanumeric character.
Auto Generate Account
- Auto Generate Account: By default, this is disabled. If enabled, system automatically generates numeric account numbers based on the range provided.
- Start Account Number: Enter a start number for the account, if the auto generate account is enabled.
- End Account number: Enter an end number for the account, if the auto generate account is enabled.
International Bank Account Number Mask
- IBAN Country Code: Displays a system default country code of the branch. The system validates the country code is an ISO country code, the country code of the branch, and the length of the character is 2.
- IBAN Checksum Algorithm: Select the IBAN checksum algorithm from the dropdown list.
- BBAN Format Mask: Enter the BBAN format mask details. You can
enter a maximum length of 30 characters. The mask must be one of the
following characters:
- b - BBAN Bank Code
- s - BBAN Branch Code
- z - Virtual Account Number
- l - Virtual Account Number
- d - BBAN Check Digit
- i - Real Customer Number
- h - 1, as there is no joint holder
- t - Virtual Account Code
- BBAN Data Type: Enter the BBAN data type details. The list
displays the following character set:
- n- Number
- a- Alphabet
- c- Alphanumeric
- BBAN Checksum Algorithm: Select the BBAN checksum algorithm from the dropdown list.
- BBAN Bank Code: Enter the BBAN bank code details.
- BBAN Branch Code: Enter the BBAN branch code details.
- Click Save. You can view all the configured branch parameters in the Branch Parameters Summary.
1.4 Bank Parameters
You can configure bank level parameters for a virtual account.
1.4.1 Bank Parameters Summary
The summary screen provides a list of configured bank parameters. You can configure a bank level parameter using the Bank Parameters Maintenance.
1.4.1.1 How to reach here:
Virtual Account Management > Configuration > Bank Parameters > View Bank Parameters
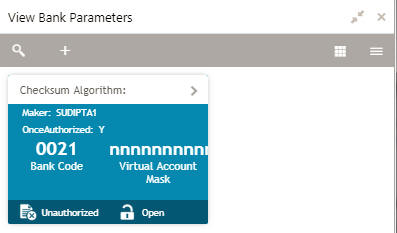
Field |
Description |
Checksum Algorithm |
Displays the checksum algorithm of the bank. |
Maker |
Displays the name of the user who created the record. |
Once Authorized |
Indicates if the record is authorized once or not. |
Bank Code |
Displays the code of the branch associated with the bank. |
Virtual Account Mask |
Displays the virtual account mask details. |
Status |
Displays the status of the record. |
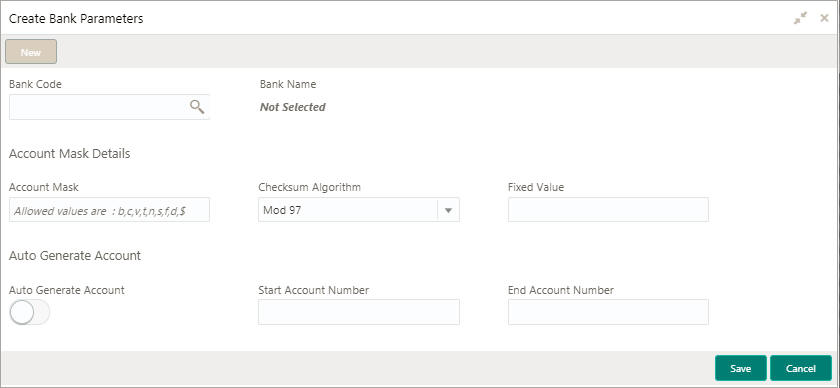
1.4.2 Bank Parameters Maintenance
The maintenance screen allows you to configure bank level parameters.
1.4.2.1 How to reach here:
Virtual Account Management > Configuration > Bank Parameters > Create Bank Parameters
1.4.2.2 How to configure bank parameters:
- In the Create Bank Parameters screen, provide the required details:
- Bank Code: Click Search to view and select the required bank code.
- Bank Name: Based on the Bank Name selected the information is auto-populated.
Account Mask Details
- Account Mask: Enter the account mask details.
- Checksum Algorithm: Select one of the required checksum algorithm
from the dropdown list:
- Modulo 97: This can have only numeric account mask.
- Modulo 10: This can have mask of length 10.
- Modulo 11: This can have either numeric or alphanumeric account mask. In case of numeric, D is appended to the account mask by the system and in case of alpha numeric, user must manually input D at the end of the mask.
- Modulo 11: With weights this can have mask with size not more than 13.
- Fixed Value: Enter a fixed value, if virtual account mask contains character f. This field supports maximum of one alphanumeric character.
Auto Generate Account
- Auto Generate Account: By default, this is disabled. If enabled, system automatically generates numeric account numbers based on the range provided.
- Start Account Number: Enter a start number for the account, if the auto generate account is enabled.
- End Account number: Enter an end number for the account, if the auto generate account is enabled.
- Click Save. You can view the configured bank parameters in the Bank Parameters Summary.