9 Administering Pricing Design Center
This chapter provides an overview of basic Oracle Communications Pricing Design Center (PDC) administration tasks.
PDC Administrator Tasks
A PDC administrator is responsible for the day-to-day tasks of maintaining and managing PDC and its users. You perform the following tasks as a PDC system administrator:
Managing PDC Security
Oracle WebLogic Server includes a security architecture that provides a secure foundation for applications. PDC depends on the WebLogic Server security framework to secure its resources and servers. Managing PDC security involves the following:
-
Managing security realms: Configuring new security realms, changing the default security realm, and deleting security realms.
-
Managing users and groups: Defining users and assigning them to a group that can be authenticated in a security realm.
-
Managing security providers: Managing security providers that provide security services to applications to protect WebLogic Server resources.
-
Managing security policies: Managing security policies that specify who can access a WebLogic Server resource.
The Wssp1.2-2007-Https-BasicAuth.xml security policy secures the connection between the PDC Web service API and the client applications using one way secure sockets layer (SSL). You can also add custom security policies to secure the PDC Web service API using WebLogic Server Administration Console.
See the WebLogic Server Administration Console Help for more information on managing security realms, managing users and groups, managing security providers, and managing security policies.
Monitoring PDC
Monitoring your system regularly ensures fast recognition and resolution of problems or issues. You can use WebLogic Server Administration Console to monitor the following:
-
The PDC domain
-
The PDC administration server and managed servers
See the WebLogic Server Administration Console Help for more information.
Managing PDC
Managing PDC involves managing the following:
-
The PDC database
-
The WebLogic server on which PDC is installed
Managing the PDC Database
To manage the PDC database and perform administrative tasks, see the Oracle Database Server documentation.
Managing the PDC WebLogic Server
Managing the WebLogic server on which PDC is installed involves:
-
Starting and stopping PDC
-
Starting and stopping the PDC administration server and managed servers
See the WebLogic Server Administration Console Help for more information on managing the WebLogic server on which PDC is installed.
Managing the PDC Transformation Process
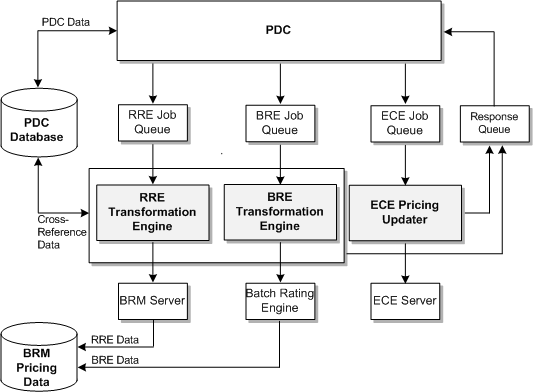
Pricing and setup components configured in PDC must be published to Oracle Communications Billing and Revenue Management (BRM) subscription and rating engines, referred to as the target engines. During the publication process, the data is transformed into the format used by the BRM subscription and rating engines. The rating engines include BRM real-time rating engine (RRE), BRM batch-rating engine (BRE), and Oracle Communications Billing and Revenue Management (BRM) Elastic Charging Engine (ECE).
The PDC transformation process for pricing and setup components involves the following steps:
-
Using the PDC GUI application or the ImportExportPricing utility, you submit the pricing and setup components that you want to publish.
-
PDC validates the pricing and setup components.
-
PDC creates a transformation job for each target engine.
-
The job dispatcher puts the transformation job in the appropriate target engine work item queue.
-
The transformation engine or the ECE Pricing Updater associated with that queue retrieves the PDC components from the job dispatcher (see "About the Transformation Engines" and "About the ECE Pricing Updater").
-
The transformation engine or the ECE Pricing Updater converts the PDC components into the format required by the target engine (see "About the Target Engine Load Utilities" and "About the ECE Pricing Updater").
-
The transformation engine calls the load utility in the BRM server and Batch Rating Engine to load the PDC components into the respective databases, and ECE Pricing Updater loads the PDC components into ECE.
-
The transformation engine updates the tables in its cross-reference database.
-
The transformation engine or the ECE Pricing Updater sends the status to the job dispatcher, which notifies the PDC server.
-
The PDC server updates the status of the changeset.
Figure 9-1 illustrates the PDC transformation process for the ECE and BRM integration.
About the Transformation Engines
PDC uses transformation engines to convert pricing and setup components into the XML format required by the target engines.
The following transformation engines are included with PDC and are installed when you install the BRM Integration Pack:
-
RRETransformationEngine: This transformation engine supports the BRM real-time rating engine.
-
BRETransformationEngine: This transformation engine supports the BRM batch rating engine.
The transformation engines use information in the BRM_Integration_Pack_home/apps/transformation/TransformationConfiguration.xml file (where BRM_Integration_Pack_home is the directory in which you installed BRM Integration Pack) to connect to their target engine, to the cross-reference database, to the PDC server, and to the log files of the target engine.
About the Target Engine Load Utilities
After converting pricing and setup components into the appropriate XML format, the RRE and BRE transformation engines call their associated load utilities to load the components into the respective databases. The load utilities are as follows:
-
loadpricelist: The RRE transformation engine uses this utility to load pricing and setup components into the target BRM database. To connect to the target database, this utility uses the Infranet.properties file. For more information, see the BRM documentation.
-
LoadIfwConfig: The BRE transformation engine uses this utility to load pricing and setup components into the target BRM database. To connect to the target database, this utility uses the LoadIfwConfig.reg file. For more information, see the BRM documentation.
About the ECE Pricing Updater
The ECE Pricing Updater loads pricing and setup components into ECE automatically when you publish pricing and setup components in PDC for its target engine. The ECE Pricing Updater is packaged with ECE. For more information, see the ECE documentation.
Troubleshooting Transformation Errors
See "Troubleshooting Pricing Design Center" for information about troubleshooting transformation errors.
Starting the Transformation Engines
The transformation engines do not automatically start when you start the PDC server. You must manually start them by running the following scripts:
-
For real-time rating: BRM_Integration_Pack_home/Transformation/apps/bin/startRRETransformer
-
For batch rating: BRM_Integration_Pack_home/Transformation/apps/bin/startBRETransformer. This script is optional if you are using ECE for usage rating.
When you run the scripts, at the command prompt, enter the key password to decrypt the encrypted passwords in the BRM_Integration_Pack_home/apps/transformation/TransformationConfiguration.xml file and start the transformation engines.
Status of the Transformation Engines
If you suspect that a transformation engine has stopped running, use standard system commands to check the status of the transformation engine process.
Following are the names of the BRM transformation engine processes:
-
For real-time rating: oracle.communications.brm.pdc.server.transformation.rre.RRETransformationEngine
-
For batch rating: oracle.communications.brm.pdc.server.transformation.bre.BRETransformationEngine
Changing Encrypted Passwords in the Configuration Files
The passwords for the WebLogic Server domain, PDC user, transformation cross-reference database, migration cross-reference database, and BRM database are stored in the following configuration files as encrypted text:
-
ImportExportConfiguration.xml: This file is used to configure the ImportExportPricing utility. See the discussion about the ImportExportPricing utility in PDC User's Guide.
-
SyncPDCConfiguration.xml: This file is used to configure the SyncPDC utility. See the discussion about configuring SyncPDC in PDC User's Guide.
-
TransformationConfiguration.xml: This file is used by the transformation engines to connect to their target engine.
-
MigrationConfiguration.xml: This file is used to configure the MigrateBRMPricing utility. See the discussion about configuring MigrateBRMPricing in PDC Pricing Migration Guide.
To change the encrypted passwords in the configuration files, see the following topics:
Note:
You cannot change an encrypted password directly in the configuration file. You must encrypt the new password manually and update the entry in the appropriate configuration file.-
Changing the Encrypted Transformation Cross-Reference Database Password
-
Changing the Encrypted Migration Cross-Reference Database Password
Changing the Encrypted WebLogic Server Domain Password
To change the encrypted WebLogic Server domain password:
-
Go to the PDC_home/apps/bin directory, where PDC_home is the directory in which the PDC software is installed.
-
Run the following command:
encryptThe Enter Password prompt appears.
-
Enter the new password for the WebLogic Sever domain.
The Enter Key Password prompt appears.
-
Enter the password PDC uses for accessing the PDC alias key in the keystore (PDC_home/apps/conf/pdc.jks).
The Enter Keystore Password prompt appears.
-
Enter the password used for accessing the keystore.
The command window displays the new password for the WebLogic Server domain in encrypted form. For example:
FJwT2BlHcws
-
Copy the encrypted password.
-
Open the PDC_home/apps/bin/ImportExportConfiguration.xml file in a text editor.
-
Search the file for the following text:
<adminPassword>AdminPassword</adminPassword>
-
Replace AdminPassword with the copied encrypted password.
-
Save and close the file.
-
Go to the BRM_Integration_Pack_home/apps/bin directory.
-
Run the following command:
encryptThe Enter Password prompt appears.
-
Enter the new password for the WebLogic Sever domain.
The Enter Key Password prompt appears.
-
Enter the password PDC uses for accessing the PDC alias key in the keystore (BRM_Integration_Pack_home/apps/conf/pdc.jks).
The Enter Keystore Password prompt appears.
-
Enter the password used for accessing the keystore.
The command window displays the new password for the WebLogic Server domain in encrypted form. For example:
FJwT2BlHcws
-
Copy the encrypted password.
-
Open the BRM_Integration_Pack_home/apps/syncpdc/SyncPDCConfiguration.xml file in a text editor.
-
Search the file for the following text:
<pricingServer>
<adminPassword>AdminPassword</adminPassword>
</pricingServer>
-
Replace AdminPassword with the copied encrypted password.
-
Save and close the file.
-
Open the BRM_Integration_Pack_home/apps/transformation/TransformationConfiguration.xml file in a text editor.
-
Search the file for the following text:
<pricingServer>
<password>AdminPassword</password>
</pricingServer>
-
Replace AdminPassword with the copied encrypted password.
-
Save and close the file.
-
Open the BRM_Integration_Pack_home/apps/migration/MigrationConfiguration.xml file in a text editor.
-
Search the file for the following text:
<pricingServer>
<adminpassword>AdminPassword</adminpassword>
</pricingServer>
-
Replace AdminPassword with the copied encrypted password.
-
Save and close the file.
Changing the Encrypted Transformation Cross-Reference Database Password
To change the encrypted transformation cross-reference database password:
-
Go to the BRM_Integration_Pack_home/apps/bin directory.
-
Run the following command:
encryptThe Enter Password prompt appears.
-
Enter the new password for the transformation cross-reference database.
The Enter Key Password prompt appears.
-
Enter the password PDC uses for accessing the PDC alias key in the keystore (BRM_Integration_Pack_home/apps/conf/pdc.jks).
The Enter Keystore Password prompt appears.
-
Enter the password used for accessing the keystore.
The command window displays the new password for the transformation cross-reference database in encrypted form. For example:
FJwT2BlHcws
-
Copy the encrypted password.
-
Open the BRM_Integration_Pack_home/apps/syncpdc/SyncPDCConfiguration.xml file in a text editor.
-
Search the file for the following text:
<xrefDatabase>
   <password>CrossRefPassword</password>
</xrefDatabase>
-
Replace CrossRefPassword with the copied encrypted password.
-
Save and close the file.
-
Open the BRM_Integration_Pack_home/apps/transformation/TransformationConfiguration.xml file in a text editor.
-
Search the file for the following text:
<xrefDatabase>
   <password>CrossRefPassword</password>
</xrefDatabase>
-
Replace CrossRefPassword with the copied encrypted password.
-
Save and close the file.
-
Open the BRM_Integration_Pack_home/apps/migration/MigrationConfiguration.xml file in a text editor.
-
Search the file for the following text:
<xrefDatabase>
   <password>CrossRefPassword</password>
</xrefDatabase>
-
Replace CrossRefPassword with the copied encrypted password.
-
Save and close the file.
Changing the Encrypted Migration Cross-Reference Database Password
To change the encrypted migration cross-reference database password:
-
Go to the BRM_Integration_Pack_home/apps/bin directory.
-
Run the following command:
encryptThe Enter Password prompt appears.
-
Enter the new password for the migration cross-reference database.
The Enter Key Password prompt appears.
-
Enter the password PDC uses for accessing the PDC alias key in the keystore (BRM_Integration_Pack_home/apps/conf/pdc.jks).
The Enter Keystore Password prompt appears.
-
Enter the password used for accessing the keystore.
The command window displays the new password for the migration cross-reference database in encrypted form. For example:
FJwT2BlHcws
-
Copy the encrypted password.
-
Open the BRM_Integration_Pack_home/apps/migration/MigrateConfiguration.xml file in a text editor.
-
Search the file for the following text:
<migrateDatabase>
   <password>MigrationCrossRefPassword</password>
</migrateDatabase>
-
Replace MigrationCrossRefPassword with the copied encrypted password.
-
Save and close the file.
Changing the Encrypted PDC User Password
To change the encrypted PDC user password:
-
Go to the PDC_home/apps/bin directory.
-
Run the following command:
encryptThe Enter Password prompt appears.
-
Enter the new password for the PDC user that has to be encrypted.
The Enter Key Password prompt appears.
-
Enter the password PDC uses for accessing the PDC alias key in the keystore (PDC_home/apps/conf/pdc.jks).
The Enter Keystore Password prompt appears.
-
Enter the password used for accessing the keystore.
The command window displays the new password for the PDC user in encrypted form. For example:
FJwT2BlHcws
-
Copy the encrypted password.
-
Open the PDC_home/apps/bin/ImportExportConfiguration.xml file in a text editor.
-
Search the file for the following text:
<pdcPassword>PDCUserPassword</pdcPassword>
-
Replace PDCUserPassword with the copied encrypted password.
-
Save and close the file.
-
Go to the BRM_Integration_Pack_home/apps/bin directory.
-
Run the following command:
encryptThe Enter Password prompt appears.
-
Enter the new password for the PDC user that has to be encrypted.
The Enter Key Password prompt appears.
-
Enter the password PDC uses for accessing the PDC alias key in the keystore (BRM_Integration_Pack_home/apps/conf/pdc.jks).
The Enter Keystore Password prompt appears.
-
Enter the password used for accessing the keystore.
The command window displays the new password for the PDC user in encrypted form. For example:
FJwT2BlHcws
-
Copy the encrypted password.
-
Open the BRM_Integration_Pack_home/apps/syncpdc/SyncPDCConfiguration.xml file in a text editor.
-
Search the file for the following text:
<pdcPassword>PDCUserPassword</pdcPassword>
-
Replace PDCUserPassword with the copied encrypted password.
-
Save and close the file.
-
Open the BRM_Integration_Pack_home/apps/migration/MigrationConfiguration.xml file in a text editor.
-
Search the file for the following text:
<pdcPassword>PDCUserPassword</pdcPassword>
-
Replace PDCUserPassword with the copied encrypted password.
-
Save and close the file.
Changing the Encrypted BRM Database Password
To change the encrypted BRM database password:
-
Go to the BRM_Integration_Pack_home/apps/bin directory.
-
Run the following command:
encryptThe Enter Password prompt appears.
-
Enter the new password for the BRM database.
The Enter Key Password prompt appears.
-
Enter the password PDC uses for accessing the PDC alias key in the keystore (BRM_Integration_Pack_home/apps/conf/pdc.jks).
The Enter Keystore Password prompt appears.
-
Enter the password used for accessing the keystore.
The command window displays the new password for the BRM database in encrypted form. For example:
FJwT2BlHcws
-
Copy the encrypted password.
-
Open the BRM_Integration_Pack_home/apps/transformation/TransformationConfiguration.xml file in a text editor.
-
Search the XML file for the following line:
<bredatabase>
<password>breDBPassword</password>
</bredatabase>
-
Replace breDBPassword with the copied encrypted password.
-
Save and close the file.
Changing the SQL and EclipseLink Log Level for PDC
To change the EclipseLink log level for PDC:
-
Navigate to the MW_home/oracle_common/common/bin directory, where MW_home is the directory in which the Oracle Middleware components are installed.
-
Start the WebLogic Scripting Tool (WLST) by running the following command:
./wlst.sh -
Connect to the server on which you want to change the logging level by running the following command:
connect(UserName,Password,'t3://hostname:port')
-
Go to the custom settings by running the following command:
custom()Note:
'custom()' can take a few minutes to execute, approximately 5 minutes. -
Go to TopLink by running the following command:
cd('TopLink') -
List the sessions at this level by running the following command:
ls()For example:
drw-TopLink:Name=Development-JobDispatcher#1.2.0.0.0file_/scratch/ri-user-1/data/pdc_domain/servers/AdminServer/tmp/WL_user/JobDispatcher_1.2.0.0.0/7qjzil/APP-INF/lib/jobdispatcher_entities.jar_default,Type=Configuration
drw-TopLink:Name=Development-pricingui#V2.0file/scratch/ri-user-1/data/pdc_domain/servers/AdminServer/tmp/_WL_user/pricinguiV2.0/jztz5c/APP-INF/lib/pricing_entities.jar_default,Type=Configuration
drw-TopLink:Name=Session(JobDispatcher#1.2.0.0.0file/scratch/ri-user-1/data/pdcdomain/servers/AdminServer/tmp/_WL_user/JobDispatcher1.2.0.0.0/7qjzil/APP-INF/lib/jobdispatcher_entities.jar_default)
drw-TopLink:Name=Session(pricingui#V2.0file_/scratch/ri-user-1/data/pdc_domain/ser vers/AdminServer/tmp/WL_user/pricinguiV2.0/jztz5c/APP-INF/lib/pricing_entiti es.jar_default)
-
Go the session by running the following command:
cd('session')
For example:
cd('custom:/TopLink/TopLink:Name=Session(pricingui#V2.0file_/scratch/ri-user-1/data/pdc_domain/servers/AdminServer/tmp/_WL_user/pricingui_V2.0/jztz5c/APP-INF/lib/pricing_entities.jar_default) -
Change the SQL and EclipseLink log level (as appropriate) by running the following command:
set('CurrentEclipseLinkLogLevel',newLevel)
Refer to Table 9-1 for a list of the different log levels and a brief description for each level.
Table 9-1 EclipseLink Log Levels
Level Description OFF
This setting disables the generation of the log output. You may want to set logging to OFF during production to avoid the overhead of logging.
SEVERE
This level enables reporting of failure cases only. Usually, if the failure occurs, the application stops.
WARNING
This level enables logging of issues that have a potential to cause problems. For example, a setting that is picked by the application and not by the user.
INFO
This level enables the standard output. The contents of this output is very limited. It is the default logging level if a logging level is not set.
CONFIG
This level enables logging of such configuration details as your database login information and some metadata information. You may want to use the CONFIG log level at deployment time.
FINE
This level enables logging of the first level of the debugging information and SQL. You may want to use this log level during debugging and testing, but not at production.
FINER
This level enables logging of more debugging information than the FINE setting. For example, the transaction information is logged at this level. You may want to use this log level during debugging and testing, but not at production.
FINEST
This level enables logging of more debugging information than the FINER setting, such as a very detailed information about certain features (for example, sequencing). You may want to use this log level during debugging and testing, but not at production.
ALL
This level currently logs at the same level as FINEST.
Backing Up and Restoring PDC
This section describes the tasks that you can perform to back up and restore your PDC system.
To prevent any data loss and minimize the impact of software or hardware failure, back up your system immediately after installing or updating the system. Repeat the backup process whenever you make any changes in the data or in the configuration files.
If you do not back up the PDC system regularly, you need to reinstall and reconfigure PDC if the system is corrupted due to operational or system errors. Reinstalling and reconfiguring eliminates any chance of recovering and reprocessing data processed by the PDC system at the time of the error.
To perform a complete backup of your PDC system, make a complete offline copy of the following:
-
The WebLogic server domains directory; by default, MW_home/user_projects/domains/PDC. For instructions, see "Backing Up a Directory".
-
The PDC installation directory and its content: PDC_home. PDC_home contains the PDC keystore. For instructions, see "Backing Up a Directory".
-
The Oracle Inventory (oraInventory) directory. Open the /etc/oraInst.loc (Linux) file or the /var/opt/oracle/OraInst.loc (Solaris) file to find the default location of the oraInventory directory. For instructions, see "Backing Up a Directory".
-
BRM Integration Pack and its content: BRM_Integration_Pack_home. This pack includes the keystore for BRM Integration Pack. For instructions, see "Backing Up a Directory".
-
The PDC directory and its content: PDC_BRM_home. For instructions, see "Backing Up a Directory".
-
The PDC database schema. Make a complete offline backup of your PDC database schema using the appropriate backup tools for your schema version.
For example, on the machine on which the PDC users are created, run the Oracle database export (exp) utility to export the data in the PDC database to a file and then store it in a safe location. You can later run the import (imp) utility to import the data from the file into the PDC database when you restore PDC. See your database documentation for more information on performing full database backups.
-
The transformation cross-reference database schema. Make a complete offline backup of your transformation cross-reference database schema using the appropriate backup tools for your schema version.
For example, on the machine on which the PDC users are created, run the Oracle database export (exp) utility to export the data in the transformation cross-reference database to a file and store it in a safe location. You can later run the import (imp) utility to import the data from the file into the transformation cross-reference database when you restore PDC. See your database documentation for more information on performing full database backups.
-
The migration cross-reference database schema if you installed the migration utility. Make a complete offline backup of your migration cross-reference database schema using the appropriate backup tools for your schema version.
For example, on the machine on which the PDC users are created, run the Oracle database export (exp) utility to export the data in the migration cross-reference database to a file and store it in a safe location. You can later run the import (imp) utility to import the data from the file into the migration cross-reference database when you restore PDC. See your database documentation for more information on performing full database backups.
-
The PDC database.
Make a complete offline backup of your PDC database using the appropriate backup tools for your database version and ensure that the backup is completely valid and usable. The backup must contain both the database definition and all the database contents. See your database documentation for more information on performing full database backups.
Important:
Store this backup in a safe location. The data in these files will become necessary if you encounter any issues or during system failure.Backing Up a Directory
To back up a directory:
-
Go to the directory for which you want to create a backup.
-
Copy the content of the directory to a new directory:
cp -R DirectoryName NewName
where NewName is the name for the new directory.
-
Create an archive of the entire directory:
tar cvf NewName.tar NewName
A compressed TAR file, of all copied files, is created with the extension tar (for example, weblogic_domain_bkp.tar).
-
Store the backup copy in a safe location (for example, in a different file system outside of PDC).
Restoring a Complete System Backup
To restore a complete PDC system backup:
-
On the machine in which PDC is installed, delete or rename the damaged directories:
-
To delete, run the following command:
rm -r Directory_Name
-
To rename, run the following command:
mv Directory_Name
-
-
Retrieve the backup tar files.
-
Extract the backup copy of the directories from the tar files:
tar xvf Directory_Name.tar
The command recreates the directories in your restored installation directory.
-
Import the following schemas into a Oracle database or databases in the restored machine or in another machine:
-
PDC database schema
-
Transformation cross-reference database schema
-
Migration cross-reference database schema (if applicable)
For example, if you have exported the data into a file by using the Oracle database export (exp) utility, run the Oracle database import (imp) utility to import the data from the file into a Oracle database. See your database documentation for more information.
-
-
Ensure that PDC is connected to the database or databases in which the schemas that you imported in step 4 are available by updating the database connection details in the following files:
-
BRM_Integration_Pack_home/apps/syncpdc/SyncPDCConfiguration.xml
-
PDC_home/apps/bin/ImportExportConfiguration.xml
-
BRM_Integration_Pack_home/apps/migration/MigrationConfiguration.xml
-
BRM_Integration_Pack_home/apps/transformation/TransformationConfiguration.xml
-
-
Start all PDC processes.
-
Verify that the PDC configuration and the PDC data are recovered.