2 About Creating Product Offerings
This chapter describes concepts that you should understand before using Oracle Communications Pricing Design Center (PDC) to create product offerings.
Before reading this chapter, you should have a basic understanding of PDC. See "About Pricing Design Center" for more information.
About Product Offerings
You create product offerings to define the services you offer and how much to charge for those services. Your billing system evaluates billable actions (called events) based on the product offerings to determine how much to charge for the use of your services.
About Events
An event is an action that is recognized by your billing system and recorded in the system's database. For example, when a customer makes a mobile phone call, an event is generated that contains information about that phone call, such as the time the call was made, the origin and destination of the call, and the duration of the call. An event can also be system-generated, such as monthly subscription fees that are applied to accounts. The billing system uses the data it collects about events to calculate how much to charge customers for them.
To determine the cost of an event, your billing system performs the following actions:
-
Measures the event based on the information in the applicable charge offer (see "About Measuring Events"). For example, it might measure the duration of a phone call in minutes.
-
Applies a charge to the resulting measurement based on specifications in the applicable charge offer or discount offer (see "About Applying Charges to Events").
-
Adds the charge to the customer's account balance (see "About Balance Elements").
See "About Configuring Setup Components" for more information about configuring events in PDC.
About Measuring Events
Before your billing system can apply a charge to an event, it must measure the event. To enable your billing system to measure events, you configure ratable usage metrics (RUMs), which specify the units to measure and how to calculate the measurement.
You can base a measurement on any data captured in an event, such as how long a event lasted or the number of bytes downloaded during a event.
Common types of event measurements include the following:
-
Duration: Length of an event in units such as seconds or minutes
-
Occurrence: Number of events generated during a specified period
-
Volume: Size of an event in units such as kilobytes or megabytes
Typically, a single RUM is used to measure an event. But you can also use multiple RUMs to measure an event.
About Applying Charges to Events
After measuring an event, your system must apply a charge to the measurement. To determine the charge to apply, you can use attributes or quantities (or both).
Charges Based on Attributes
An attribute is a characteristic of an event, such as:
-
Date and time a customer connected to your Web site
-
Type of movie downloaded, such as classic, action, or comedy
-
Origin and destination of a call
-
Quality of service, such as standard or premium
Different pricing can be associated with different values of the same attribute. For example, Figure 2-1 shows how two 10-minute calls can be priced differently based on the day they occurred.
Figure 2-1 Charges Based on the Day an Event Occurs
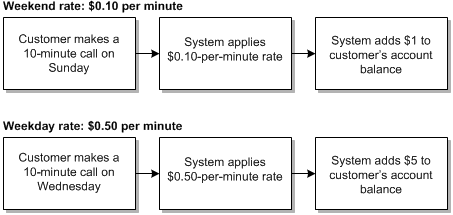
Description of ''Figure 2-1 Charges Based on the Day an Event Occurs''
You can also base pricing on the attribute values.
For example, the values of the event attribute that stores the call destination might be associated with the following charges:
-
If the call destination is France, use the Calls to Europe charge.
-
If the call destination is Ghana, use the Calls to Africa charge.
To implement attribute-based charges, you can use zones, selectors, and time periods. See "About Zone Models", "About Value Maps", "About Selectors", and "About Time Models" for more information.
Charges Based on Quantities
You can vary pricing for events by basing your charges on the following quantities:
-
Usage, such as the number of minutes in a phone call. For example:
-
10 cents per minute for the first 30 minutes
-
5 cents per minute for any time over 30 minutes
-
-
Balance, such as the number of loyalty points accrued or the number of faxes sent during one billing cycle. For example:
-
$1 per fax for the first 10 faxes
-
50 cents per fax for the next 90 faxes
-
No charge for any faxes after the 100th fax
-
You can also base discounts on quantities. For example, you could take 10% off a call's normal per-minute pricing for any time over 60 minutes and 20% off for any time over 120 minutes.
To implement quantity-based charges, you specify quantity ranges. See "About Quantity Ranges in Pricing" for more information.
About Balance Elements
A balance element represents one of the following:
-
A currency or noncurrency asset of economic value, such as U.S. dollars or included minutes
-
A counter that tracks items such as dollars spent or minutes talked
Balance elements are specified when you configure pricing in a charge and are debited, credited, increased, or decreased when the charge offer is used to rate an event. For example, a charge of one dollar per minute for a phone call affects the US Dollars balance element.
Before creating any charge offers, you should configure currency balance elements for the system currencies and account currencies that you support.
Typically, you create noncurrency balance elements to track noncurrency account balances (such as minutes, bytes, loyalty points, and frequent flyer miles) as the need arises for particular charge offers.
See "About Configuring Setup Components" for information about configuring balance elements in PDC.
About Product Offerings
A product offering represents the services available to your customers and the price of those services. A service is a commodity, such as a mobile phone line or an Internet connection, that your customers can purchase and use.
To determine how much to charge for your services, your billing system uses data collected about them (such as the length of a phone call or the number of bytes downloaded) to calculate their economic value. The criteria on which the billing system bases its calculations are specified in a product offering.
In PDC, a product offering consists of the following components:
-
Charge Offers and Discount Offers: Contain the criteria that the billing system uses to determine the cost of a service. For example, a charge offer for a mobile phone service might include criteria for calculating the following charges:
-
A setup charge
-
A monthly subscription charge
-
Usage charges for phone calls
A discount offer for a mobile phone service might include criteria for calculating the following discounts:
-
50% off the monthly charge for the first 6 months
-
25% off for usage over 750 minutes
-
Reduction in usage charges if the subscriber has included minutes
See "About Charge Offers" and "About Discount Offers" for more information.
-
-
Bundles: Contain one or more charge offers, discount offers, or both. You can reuse charge offers and discount offers in multiple bundles.
For example, you might mix and match charge offers and discount offers for a mobile phone service to create the following bundles:
-
Bundle A: Basic Voice
-
Charge Offer A: $300 setup fee
-
Charge Offer B: $50 monthly fee
-
Charge Offer C: $0.50 per minute for all minutes over 300 per month
-
Discount Offer A: 25% off usage over 750 minutes per month
-
-
Bundle B: Promotional Voice
-
Charge Offer A: $300 setup fee
-
Charge Offer D: $20 monthly fee
-
Charge Offer E: $1 per minute for all minutes over 300 per month
-
Discount Offer A: 25% off usage over 750 minutes per month
-
Discount Offer B: No setup fee if the service is purchased before a specified date
-
Discount Offer C: 50% off monthly fee for the first 6 months
-
All offers in a bundle must be associated with the same service.
See "About Bundles" for more information.
-
-
Packages: Contain one or more bundles. You use packages to offer services to customers. For example, if your company provides Internet access and VOIP (voice over Internet protocol), you might create the following packages:
-
A package that offers only Internet access. This package would contain one or more Internet access bundles, such as a high-speed Internet access bundle and a mobile Internet access bundle. For example, see the Premium Internet package in Figure 2-2.
-
A package that offers only VOIP. This package would contain one or more VOIP bundles, such as a standard calling plan bundle and an international calling plan bundle. For example, see the International VOIP package in Figure 2-2.
-
A package that offers Internet access and VOIP. This package would contain at least one Internet access bundle and at least one VOIP bundle. For example, see the Internet + VOIP Double-Play package in Figure 2-2.
A product offering contains one or more packages. To subscribe to your services, a customer purchases a package.
See "About Packages" for more information.
-
Example of a Product Offering
Figure 2-2 shows how a product offering is organized.
Figure 2-2 Organization of a Product Offering
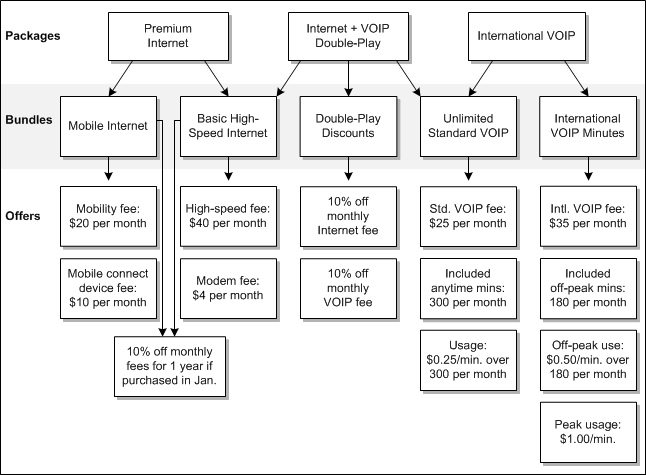
Description of ''Figure 2-2 Organization of a Product Offering''
Charge offers and discount offers are specified at the lowest level. Therefore, to set up a product offering, you start by creating charge offers and discount offers. See "About Charge Offers" and "About Discount Offers" for more information.
Sample Product Offerings
PDC includes sample product offerings for a broadband service and for a telco service in the PDC_home/apps/samples/data directory, where PDC_home is the directory in which you installed PDC.
For information about importing the sample product offerings into PDC, see the post-installation section of PDC Installation and System Administration Guide.
About Charge Offers
Charge offers determine the price of one or more events associated with a service.
This section provides an overview of the information required to configure charge offers. For information on how to create charge offers, see the PDC Help.
Charge Offer Types
PDC supports the following charge offer types, which represent different types of fees:
-
Item: Contain only a one-time purchase fee. After an item charge offer is used by a billing system, it usually no longer needs to be stored in the database.
For example, a promotional t-shirt, an installation charge, and a setup charge are all item products.
-
Subscription: Contain fees for any type and combination of events, including one-time, recurring, usage, rollover, remittance, and fold. These fees apply only to the subscriber who owns the charge offer.
-
System: Contain fees that apply to all subscribers who use a particular service. System charge offers are not owned by subscribers. They can contain only usage charges.
Use system charge offers when you do not want to re-create the same charge multiple times in your product offering. For example, use a system charge offer to charge a default usage rate of $0.10 per minute for mobile phone usage when other mobile phone offers are not valid.
Making a Charge Offer Applicable to a Service
When creating a charge offer, you can associate it with a specific service. That is the only service to which the charge offer applies.
Multiple charge offers can be associated with the same service.
After you associate a charge offer with a service, PDC uses the service-event map to limit the events to which the charge offer can apply.
Note:
If you create a charge offer that does not apply to a specific service, associate the charge offer with Account. For example, you might do this for late charges or for coupons. The charge offer can then be used to rate any event associated with Account in the service-event map.About the Service-Event Map
Before you can create charge offers, you must set up a service-event map. The map lists all the services to which charge offers can apply. For each service, the map specifies which events can have charges configured for that service. The map also specifies the RUMs to use for each service-event combination.
For events that do not apply to a specific service, you map those events to Account in the service-event map.
Note:
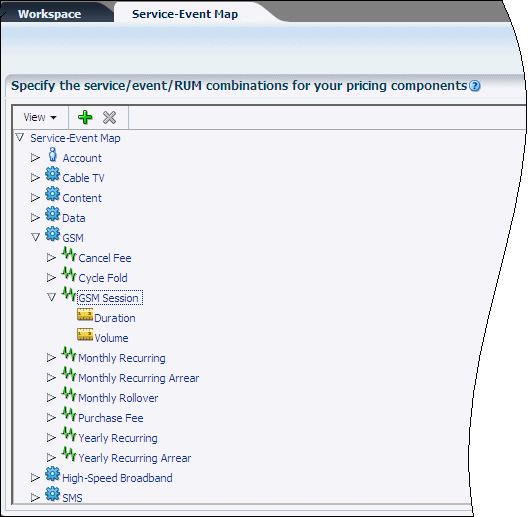
Remittance charges can be associated only with accounts. Therefore, you map remittance events to Account in the service-event map. See "About Charge Categories" for information about remittance charges.For example, in Figure 2-3, the events Cancel Fee, Cycle Fold, GSM Session, Monthly Recurring, and Monthly Recurring Arrear are mapped to the GSM service. The RUMs, Duration and Volume, are mapped to the GSM Session event.
See "About Configuring Setup Components" for information about configuring the service-event map.
Specifying When a Charge Offer Can Be Purchased
You can make a charge offer available for purchase as follows:
-
Always available
-
Available from a future date forward
-
Available until a future date
-
Available for a specified period in the future
To be added to a bundle, a charge offer must have a purchase period that is the same as or greater than the bundle's purchase period. See "Specifying When a Bundle Can Be Purchased" for more information.
Using Provisioning Tags to Configure Special Charges
In Oracle Communications Billing and Revenue Management (BRM), provisioning tags implement extended rating attributes (ERAs), which provide special charges or discounts based on a specific attribute of a service or an account, such as a telephone number. For example, a provisioning tag could specify that a charge offer discounts the following:
-
Calls to friends and family
-
Calls to mobile numbers within a closed user group
-
Calls made on a subscriber's birthday
For telco services, you can also use provisioning tags to configure service extensions and supplementary services, such as call forwarding and call blocking.
See "About Configuring Setup Components" for information about importing provisioning tags into PDC.
Setting the Priority of Charge Offers
When multiple charge offers apply to the same service-event pair, your billing system can consider the charge offers in the order of their priority, which you specify.
If a portion of the event remains unrated after the billing system applies all the charges in the charge offer with the highest priority, each subsequent priority charge offer is analyzed until the entire event is rated.
Restricting the Ownership of Charge Offers
You can specify the minimum and maximum number of charge offers that a customer can purchase at one time. For example, if a charge offer includes an item such as a t-shirt, you might want to limit the number of t-shirts that can be purchased simultaneously.
You can also specify the minimum and maximum number of charge offers that a customer can own at one time. For example, if a charge offer provides an email service, you might want to limit the number of email login names that a customer can own.
Enabling Partial Purchase of Charge Offers
If your system permits customers to purchase only part of a charge offer, you can specify whether a charge offer qualifies for partial purchase.
For example, if a charge offer gives customers 300 minutes of off-peak calls for $30, customers might be permitted to purchase half that amount for half the price.
Adding Charges to Charge Offers
To enable your billing system to determine the price of a service, you configure charges for events associated with the service. A charge contains detailed information about how to calculate the cost of a particular event. Your billing system uses this information to determine the impact of the credit, debit, or counter balance to apply to a subscriber's account when that event occurs. A charge offer can include charges for multiple events.
For example, to charge purchase, monthly account, and usage fees for a mobile phone service, you might configure charges for the following types of events:
-
Purchase
-
Monthly subscription
-
Session
Whether the preceding charges are configured in the same charge offer or in separate charge offers depends on the services you offer and how you manage your business and your customers. For example, you might change your pricing often, provide sponsored services, or provide numerous types of discounts. Before you finalize a product offering, test it against some discounting and customer management scenarios to determine whether your charge offers are organized in a way that best supports your business.
You can add charges to a charge offer as follows:
-
New Charge: Enables you to create a charge.
-
Existing Charge: Enables you to reuse a charge that was created for another charge offer. You can reuse a charge in either of the following ways:
-
Share the charge with other charge offers and charge selectors. Changes made to the charge affect all the components that share it.
-
Use a copy of the charge. Copying enables you to modify a charge in ways that are not applicable to the components using the original charge.
-
-
Existing Charge Selector: Adds a prioritized list of preconfigured charges to the charge offer. When the event to which the charge selector applies occurs at run time, your billing system selects a charge from the list based on the value of one or more of the event, service, or subscriber (account) attributes. This mechanism enables you to charge different fees for the same event without creating multiple charge offers. See "About Selectors" for more information.
The following sections provide an overview of the information required to configure charges:
For more information, see the PDC Help.
Specifying Charge Details
When creating a charge, you must specify the information described in this section.
For more information, see the PDC Help.
About Charge Categories
You must specify a category for each charge. The charge category helps determine which events the charge can be configured for.
PDC supports the following charge categories:
-
One-time: Nonrecurring charges, such as setup or cancellation fees.
-
Recurring: Ongoing charges that are not generated or affected by usage, such as a monthly subscription fee.
-
Usage: Charges for the use of a service, such as telephone calls or Internet sessions.
-
Rollover: Charges that extend the validity of unused balances to succeeding cycles. For example, included minutes are often rolled over.
-
Remittance: Charges that calculate the manner in which you share revenue with third parties, such as resellers or service providers. For example, you could pay them a percentage of your subscriber fees or a flat amount per subscriber. This category is available only for charge offers that apply to accounts.
-
Fold: Charges used to zero-out a balance or convert one balance into another. For example, you could configure a fold charge to zero-out unused included hours at the end of each month or convert frequent flyer miles to a dollar amount. Fold charges must be associated with an existing charge selector whose event matches the fold event (see "About Selectors").
About Charge Types
The charge type is the event to which the charge applies. The service to which the charge offer applies and the charge category determine which charge types are available for selection. See "About Events" for more information.
About Associating Pricing Profiles with Charges
A pricing profile tells PDC which features to support in its user interface. The charge category and charge type determine which profiles are available for selection. See "Working with Profiles" for more information.
About Measuring Charges
In each charge, you must specify the RUM to use to measure the applicable event (see "About Measuring Events"). When you create or modify a charge, the charge type determines which RUMs are available for selection.
About Charge Currencies
The currency specified for a charge, such as U.S. dollars or euro, is the only currency balance element that you can select when configuring pricing for the charge (see "About Balance Elements").
By default, charges use the system currency. If necessary, you can select an alternative currency for a charge when you create the charge.
About Using Extended Pricing Features
Extended pricing features (such as impact categories, time periods, price overrides, and price selectors) enable you to use the same charge to apply different prices based on various attributes of the event, such as where and when it occurred (see "Charges Based on Attributes").
One-time, recurring, usage, and remittance charges support extended pricing features.
About Cycle Settings for Recurring Charges
The following options apply only to recurring charges:
-
In-Advance Billing: Use the in-advance billing option to specify how many months or days to charge customers for in their first bill.
For example, if a customer purchases an offer on May 1 and the offer's $10 monthly fee is billed three months in advance, the total charge in the customer's first bill is $30. The total charge in the next (June) bill is $10, but from an accounting perspective, the $10 fee applies to August, not to June.
-
Cycle Alignment: The cycle alignment option enables you to apply recurring charges in either of the following ways:
-
On the product purchase date. For example, if the billing date is the 1st of the month and the charge offer is purchased on January 10, the charge is applied on the 10th of every month (for the interval January 10 to February 10, February 10 to March 10, and so on).
-
On the customer's current billing date (default). Using the previous example, the charge is prorated and applied on January 10 for the interval January 10 to February 1. For subsequent cycles, the charge is applied on the billing date (for the interval February 1 to March 1, March 1 to April 1, and so on).
-
About Prorating Recurring Charges and Rollovers
Customers typically purchase and cancel charge offers at some point in the middle of a billing cycle. When you set up recurring charges and rollovers in PDC, you can specify whether the charge or rollover amounts are prorated for the first and last billing cycles based on the number of days in the cycles that the charge offer is owned.
For recurring charges, you can specify whether to charge the full amount, prorate the charge, or apply no charge.
For rollovers, you can specify whether to roll over the entire amount, prorate the rollover amount, or not roll over any of the available balance.
About Charge Date Ranges
The charge date range is the period during which a charge is effective. By default, this period starts immediately and never ends.
You can modify the default date range and add more date ranges. Adding date ranges enables you to make structural changes to a charge for different time periods.
For example, if you plan to add an impact category to the charge in January, you can change the current date range to end January 1 (end dates are exclusive) and add a date range that starts January 1 (start dates are inclusive) and never ends. The charge information from the preceding range is copied into the new range, where you can add the impact category.
PDC supports the following types of charge date ranges:
-
Fixed: Specifies a period that starts and ends on particular dates. For example:
-
Immediately through 6/1/2012
-
6/1/2012 through 1/1/2013
-
1/1/2013 through never ends
Fixed date ranges cannot overlap.
-
-
Relative: Begins at a time relative to the time the charge is purchased and continues for a specified length of time, such as days, hours, minutes, or seconds. The purchase date is the day the charge offer is added to the account.
Relative date ranges are primarily used as price incentives. For example, you might offer a broadband Internet connection for $49 for the first six months and then raise the price to $99.
Unlike fixed date ranges, relative date ranges can overlap. For example, a usage charge for a mobile phone service might contain the following relative date ranges:
-
3000 included minutes: Starts Immediately until 90 days after start
-
Unlimited included SMS messages: Starts Immediately until 30 days after start
-
$0.15 per SMS message: 30 days after start and never ends
-
The pricing profile associated with a charge determines which types of date ranges can be used for the charge (fixed, relative, or both). A charge can have multiple instances of both types.
When a charge has multiple date ranges, a Date Range list appears at the top of the charge tab to enable you to display the Charges tree and pricing details for each date range. By default, the current fixed date range is displayed.
Figure 2-4 Charge Date Range List with Relative Ranges
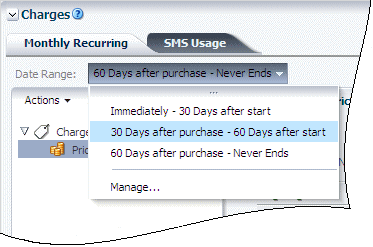
Description of ''Figure 2-4 Charge Date Range List with Relative Ranges''
Configuring Pricing in Charges
After you enter the details for a charge (see "Specifying Charge Details"), you can configure pricing for the charge. Before configuring pricing, however, you should understand the concepts described in this section.
For more information, see the PDC Help.
About the Pricing Table
The pricing table is used to configure the pricing of an event associated with a charge. Each row in the table represents a balance impact. Simple charges that do not use extended pricing features contain only one pricing table. Charges that use extended pricing features contain multiple pricing tables, though only the table or tables associated with the pricing instance selected in the Charges tree are displayed (see "About the Charges Tree").
Figure 2-5 shows an example of the pricing table for a charge.
Each row in the pricing table is a debit, credit, or counter balance impact. The information required for each impact depends on the charge category and the pricing profile associated with the charge.
About Effective Periods for Pricing
By default, pricing takes effect immediately and never ends.
Some pricing profiles, however, support multiple effective periods for pricing. This enables you to implement future price changes for a charge without creating multiple versions of the charge. Instead, a copy of the pricing is created within the same charge for each effective period and is modified as necessary.
When pricing has multiple effective periods, a list of the periods appears above the pricing table (see Figure 2-5). Selecting a period in the list displays the pricing table for that period. By default, the table for the current period is displayed.
Note:
To implement price changes for a charge whose profile does not support multiple pricing effective periods, you must create multiple versions of the charge itself and revise the pricing in each version. See "About Charge Date Ranges" for more information.About Quantity Ranges in Pricing
To configure volume-based pricing, such as pricing based on amount of usage or frequency of occurrence, you can add quantity ranges and configure different prices for each range.
For example:
-
Pricing for a telephony service might contain the following quantity ranges based on the total duration of calls during a month: 0 to 500 minutes, 500 to 1000 minutes, and 1000 minutes and up.
-
Pricing for a media streaming service might contain the following quantity ranges based on the total volume of data downloaded during a month: 0 to 6 GB, 6 to 36 GB, and 36 GB and up.
Important:
If you enable ECE to generate midsession rated events, note that each midsession event marks the end of a subsession of the network session. For the subsequent subsession, the network session's duration and volume counters are reset to 0. Therefore, if you use midsession rated events, do not base your pricing on cumulative duration or volume across an entire network session.For more information, see the discussion about midsession rated events in ECE Concepts.
About Minimum Charges
You can set a minimum charge for each balance element impacted by a pricing instance. Minimum charges are configured per price tier (see "About Price Tiers") and effective period.
About the Charges Tree
The Charges tree shows the hierarchical structure of a charge.
You use the Charges tree to add extended pricing features, such as impact categories and time periods, to a charge (see "About Using Extended Pricing Features"). When you select a pricing node in the tree, its corresponding pricing table is displayed (see "About the Pricing Table"). When you add or select another node in a branch, read-only information about that node is displayed.
Each date range in a charge has a Charges tree. For charges that do not use extended pricing features, the tree is usually hidden because only one pricing instance needs to be created, and that is done in a single pricing table. You can display the tree by clicking the Restore Pane arrow in the lower-left corner of the Pricing Details section.
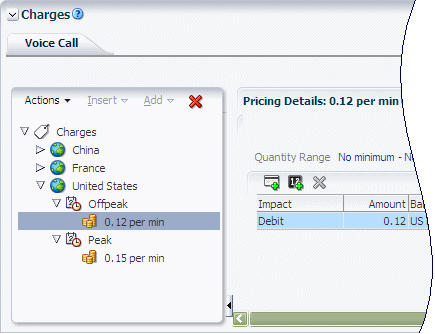
Figure 2-6 shows an example of a Charges tree.
To create charges that use extended pricing features, you add elements such as impact categories, time periods, and pricing to the tree. For example, in Figure 2-6, the Charges tree contains three impact categories (China, France, and United States). The United States impact category contains two time periods (Offpeak and Peak). Under each time period is a pricing leaf node. When you select a pricing leaf node, an editable version of its associated pricing table, price selector, or price override appears.
The Charges tree is typically used to configure usage charges, but it supports all charge categories except folds and rollovers. The pricing profile associated with a charge determines which elements can be added to the tree and the order in which they can be added.
For some rating systems, multiple RUMs within a charge are supported with separate charge trees for each RUM.
Figure 2-7 shows a charge with multiple charge trees, each representing the charge for a different RUM, in this case, Occurrence and Volume.
Figure 2-7 Multiple Charge Trees for Multiple RUMs
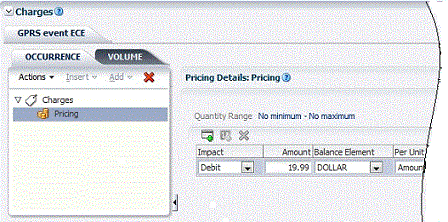
Description of ''Figure 2-7 Multiple Charge Trees for Multiple RUMs''
When you select the charges node, the RUM rounding details are displayed.
To add or remove a RUM, you must add or remove the RUM from the charge details.
About Impact Categories
You use impact categories to enable the same charge to apply different pricing based on the values of various event attributes (see "Charges Based on Attributes"). For example, to configure different pricing for calls made to different countries, you add impact categories for each destination country to the charge. When a call occurs, the pricing associated with the impact category for that call's destination is applied to the call. For example, to charge usage for a mobile phone service, you might create the following impact categories:
-
Impact Category: Bolivia
Balance Impact: .10 per minute -
Impact Category: France
Balance Impact: .05 per minute
PDC supports impact categories for the following components:
-
Zones: Zone impact categories are used as follows:
-
Base zone impact categories are used as the results of rules in zone models and in Usage Scenario (USC) selectors.
-
Derived zone impact categories are used as the results of rules in USC selectors and Access Point Name (APN) selectors. They are considered derived because the rules in USC and APN selectors use additional attributes to remap base zone impact categories to different zone impact categories. For example, a USC selector rule might specify that if the base zone impact category is China and the usage type is Friends & Family, the selector returns the Friends & Family derived zone impact category.
To create derived zone impact categories, you must select the Derived Only option in the Impact Categories for Zones table.
See "About Zone Models" and "About Selectors" for more information.
-
The available impact categories depend on the pricing profile associated with the charge or selector (see "Working with Profiles"). For example, if a profile supports zoning, the available impact categories are determined by the selected zone and, optionally, the selected USC and APN selectors.
You can group multiple impact categories into a single group node to apply the same pricing to all of them.
See "About Configuring Setup Components" for information about configuring impact categories in PDC.
About Time Periods
To charge different prices for the same service depending on the day and time the service is used, add time periods to a Charges tree. Time periods are blocks of day and time combinations. For example, you might add the following time periods:
-
Peak: Monday–Friday 8:00 a.m. to 5:00 p.m.
-
Off-peak: Monday–Friday 5:00 p.m. to 8:00 a.m. and all day Saturday and Sunday
Time periods are defined in time models. To add time periods to a tree, you select a time model and then select one or more of its time periods. The available time models depend on the pricing profile associated with the charge.
Time periods can be grouped and ungrouped.
A different time model can be used for each impact category in the charge.
See "About Time Models" for more information.
About Charge Pricing
You can add the following types of pricing to a charge:
-
Pricing: Enables you to create one or more balance impacts. By default, each new pricing instance is named Pricing. You can use the pricing name in the discount filter to filter a charge when the charge is associated with the Online Usage pricing profile
-
Price Selector: Adds a prioritized list of preconfigured pricing to the charge. When the event to which the charge applies occurs at run time, your billing system selects a pricing instance from the list based on the value of one or more event, service, or subscriber attributes. This mechanism enables you to charge different prices for the same event without creating multiple pricing instances. See "About Selectors" for more information.
-
Price Override: Enables you to replace the balance impact of a record imported from another system or to adjust the balance impact by a specified percentage or a fixed amount.
About Fold Charge Pricing
A fold charge is used to zero-out a balance, such as unused included minutes or to convert one balance to another.
A fold is configured using a charge selector. The event for the charge selector must be the Fold event. After you have configured the charge selector, select it in the charge offer.
The pricing in a fold charge should have a debit for the balance that you are converting and one or more credits for the balances that you are converting to.
Figure 2-8 shows the pricing for a fold that zeros-out Included Minutes.
Figure 2-8 Fold Pricing to Zero-Out a Balance
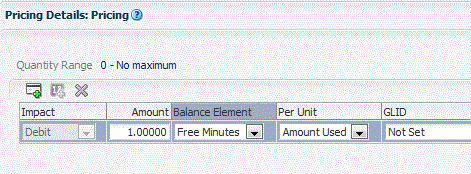
Description of ''Figure 2-8 Fold Pricing to Zero-Out a Balance''
Figure 2-9 shows the pricing for a fold that converts Frequent Flyer Miles balance to US Dollar balance, $1 for each frequent flyer mile.
Figure 2-9 Fold Pricing to Convert One Balance to Another
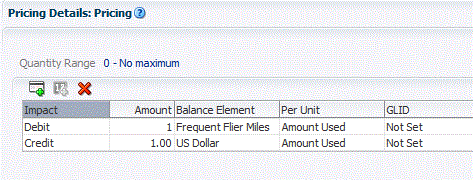
Description of ''Figure 2-9 Fold Pricing to Convert One Balance to Another''
About Price Tiers
By default, each charge has at least one price tier. A price tier contains the pricing for a single RUM (see "About Measuring Events"). To configure pricing for multiple RUMs within a charge, you first select the desired RUMs when you create the charge. Then within the charge, you configure different pricing for each RUM. When a charge contains multiple price tiers, each tier appears in its own tab.
Figure 2-10 shows a charge that contains two price tiers, Volume and Duration.
Figure 2-10 Volume and Duration Price Tiers

Description of ''Figure 2-10 Volume and Duration Price Tiers''
When you create a charge, price tiers for all the RUMs listed in the charge when it is created are automatically included in any pricing added to the charge.
To add or remove a RUM from an existing charge, you must add or remove the RUM from the charge details.
Note:
Multiple price tiers are not supported in all rating systems. In these cases, multiple RUMs within a charge are supported with separate charge trees for each RUM (see "About the Charges Tree").About Modifying Pricing without Inadvertently Affecting Other Components
When you use an existing charge, any changes you make to the charge, including price changes, will affect all the charge offers and charge selectors where the charge is used. To avoid the unintended consequences of changing prices in a reusable charge, you use the Change Price feature to specify which of those components you want your changes to affect.
-
Change the original charge. This affects every component that uses the charge that contains the modified pricing.
-
Make a copy of the charge and change the copy. This affects only the charge offer or charge selector that contains the charge with the modified pricing. All other components that use the charge continue to use the previous version of the charge.
About Conditional Balance Impacts
A conditional balance impact is a balance impact that credits or debits a customer's balance only when the customer uses a charge offer for the first time within a specified period; for example, the first time in a day or the first time in two days. For example, you can use conditional balance impacts to grant daily included minutes to a customer, instead of using recurring events.
You can align the start time of the conditional balance impact period with the start time of the associated charge offer, the start of a calendar day, or the event occurrence. You can also specify whether the balance is available from the start time of the period or from the time the event occurs.
Conditional balance impacts can only be used with charge offers that are associated with a service, not with the charge offers associated with an account.
The following example shows how to configure conditional balance impacts for granting daily included minutes.
In this example:
-
The customer is granted 40 included minutes at $5 per day.
-
The included minutes are valid for a day.
-
The customer is not charged on the days that the offer is not used.
To configure conditional balance impacts for granting daily included minutes:
-
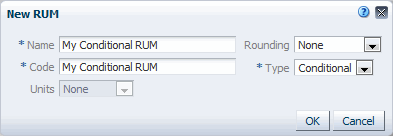
Create a RUM of type Conditional for the desired service and usage event. See the discussion about creating a new RUM configuration in the PDC Help.
Figure 2-11 shows a RUM of type Conditional.
-
Create a charge offer. See the discussion about creating a charge offer in the PDC Help.
-
Add a new charge to the charge offer. When you add the charge, ensure that you select the following values:
Charge Category: Usage
Pricing Profile: Convergent Usage
Measured By: The RUM that you created in step 1. Optionally, you can select additional RUMs.
See the discussion about adding a new charge in the PDC Help.
-
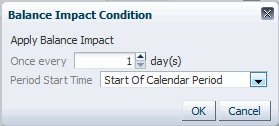
Configure conditional balance impacts to grant 40 minutes at $5 per day on the days the charge offer is used.
Figure 2-12 shows the conditions configured for granting daily included minutes.
Figure 2-12 Conditions for Granting Daily Included Minutes
Description of ''Figure 2-12 Conditions for Granting Daily Included Minutes''
Figure 2-13 shows the validity period for the conditional balance impact.
Figure 2-13 Validity Period for a Conditional Balance Impact

Description of ''Figure 2-13 Validity Period for a Conditional Balance Impact''
Figure 2-14 shows the conditional balance impacts used in this example for granting daily included minutes.
Figure 2-14 Conditional Balance Impacts for Granting Daily Included Minutes

Description of ''Figure 2-14 Conditional Balance Impacts for Granting Daily Included Minutes''
See the discussion about configuring conditional balance impacts in the PDC Help.
About Discount Offers
A discount offer contains one or more discounts (see "About Discounts"). Discount offers are separate, purchasable items similar to a charge offers. You can include discount offers with charge offers in bundles.
This section provides an overview of the information required to configure discount offers. For more information, see the PDC Help.
Note:
Configuration information that is common to both charge offers and discount offers is documented in "About Charge Offers".Discount Offer Types
When creating a discount offer, you must specify its type. PDC supports the following discount offer types:
-
Subscription: Contain discounts that apply only to the subscriber that owns the discount offer.
-
System: Contain discounts that can apply to all subscribers of the specified service. System discount offers are not owned by subscribers.
Applying Multiple Discount Offers to a Charge
The same charge or portion of a charge can be eligible for multiple discount offers. When this occurs, your billing system uses the following discount offer attributes to determine how to apply the discount offers to the charge:
-
Priority: To control the order in which multiple discount offers are applied to a charge, you can assign a priority number to each discount offer. Offers with higher priority numbers are applied before those with lower priority numbers.
-
Mode: To specify whether a discount offer is applied to the original charge amount or only to the amount that remains after previous discount offers have been applied, you can assign one of the following modes to the discount offer:
-
Original Charge: The discount offer is applied to the original charge amount, regardless of whether that amount was reduced by previous discount offers.
-
Remaining Charge: The discount offer is applied to whatever charge amount remains after previous discount offers are applied.
-
Remaining Charge and Quantity: The discount offer is applied only to the part of the charge and quantity that has not been used as the basis for a previous discount offer. Discount offers with this mode can be used only if part of the charge has not yet been evaluated for a discount.
This mode is for discount offers that consume noncurrency balance elements or that discount currency charges, not for discount offers that grant balance elements.
-
For example:
-
A bundle includes two discount offers that apply to a mobile phone service. The offer with the higher priority gives a 10% discount. The other offer gives a 20% discount.
For a $10 call, the 10% discount is processed first because it has a higher priority. This results in a $1 discount, which reduces the charge amount to $9.
-
If the second discount offer is set to Original Charge, the 20% discount is applied to the entire original charge amount ($10). This results in a second discount of $2, for a total charge of $7.
-
If the second discount is set to Remaining Charge, the 20% discount is applied only to the remaining $9 charge. This results in a second discount of $1.80, for a total charge of $7.20.
-
If the second discount is set to Remaining Charge and Quantity, it cannot be applied because the entire original charge was the basis for the first discount. The total charge for the call is $9.
-
-
Another bundle includes the following discount offers for a mobile phone service: a discount offer for 50 included minutes and a discount offer for 20% off all minutes.
The customer makes a 100-minute call at $0.10 a minute for a total charge of $10. The first discount offer has a higher priority, so it is processed first. The offer determines that there are 50 minutes that can be provided for free and provides them.
-
If the second discount offer is set to Original Charge, the 20% discount applies to the entire 100-minute call, even though there was no charge for the first half. The discount is 20% of $10. This results in another discount of $2. The total charge for the call is $3.
-
If the second discount offer is set to Remaining Charge, it applies only to the remaining $5 charge, resulting in a total charge of $4.
-
If the second discount offer is set to Remaining Charge and Quantity, the customer gets 20% off the remaining portion of the call (50 minutes) because the first discount did not evaluate that part of the charge. The total charge for the call is $4.
-
About Mutually Exclusive Discount Offers
When creating a discount offer, you can establish a mutually exclusive relationship between that discount offer and other specified discount offers. When the current discount offer and any of its mutually exclusive discount offers are applicable to the same event, only the current discount offer can be used to discount the event.
Note:
To exclude a billing-time discount, you must also exclude the counter discount associated with the billing-time discount (see "About Billing-Time Discounts").You use discount offers to set up mutually exclusive run-time relationships between discount offers. Such relationships govern the application of discount offers.
To set up mutually exclusive purchase relationships between discount offers, you use packages (see "Restricting Discounts in Packages"). Such relationships govern the ownership of discount offers.
About Discounts
Each discount offer contains one or more discounts. A discount can do the following:
-
Reduce the charges associated with billable events.
For example, you could offer a bundle called VOIP Plus that includes basic VOIP service with 300 included peak and 500 included off-peak minutes for a $100 setup fee, a $40 monthly fee, and usage charges. The bundle already contains one discount (the bonus minutes) but you can add another promotional discount to the bundle that reduces the charges even more:
-
50% off the monthly fee for the first 6 months
-
Waiver of the setup fee (a 100% discount)
-
25% off usage charges
-
-
Grant or consume nonmonetary balance elements, such as included minutes or loyalty points.
When you grant balance elements, discounts and charge offers can work together:
-
In a charge offer, you use recurring charges to grant the free balance elements. For example, you can configure a charge offer to grant 100 minutes each week or 500 minutes on a one-time basis.
-
You then use discount offers to consume the free balances and to reduce the charge based on the amount consumed.
-
-
Track usage or spending by using counters.
For example, when you set up billing-time discounts, you can use a discount to update a counter balance, such as a balance that tracks total downloaded megabytes. You use a second discount to apply a percentage off based on the total counter balance. See "About Billing-Time Discounts" for more information.
The following sections provide an overview of the information required to configure discounts. For more information, see the PDC Help.
Note:
Configuration information that is common to both charges and discounts is documented in "Adding Charges to Charge Offers".About Discount Categories
You must specify a category for each discount. PDC supports one-time, recurring, and usage discounts.
For recurring discounts, note the following:
-
Although a charge offer cannot contain both cycle forward and cycle arrears charges, a discount offer can contain both types of cycle discounts as long as their frequency (monthly, yearly, and so on) is the same.
-
The same recurring discount can be applied to multiple charge offers that support different services as long as each charge offer contains a charge for the type of recurring event supported by the discount.
See "About Charge Categories" for more information about these categories.
About Discount Profiles
A discount profile tells PDC which discount features to support in its user interface. PDC includes a profile for standard discounts and a profile for billing-time discounts.
See "Working with Profiles" for more information about discount profiles.
About Billing-Time Discounts
Billing-time discounts are determined at the end of the billing cycle. This enables you to grant discounts based on the aggregation of a balance element during a billing cycle. For example, you can create a billing-time discount to do the following:
-
Reduce a usage charge by $10 if the total usage charge for the billing cycle is more than $100.
-
Grant 10 included minutes if the total minutes used during the billing cycle is more than 500.
-
Grant a free month of service if a customer has subscribed to the service for 12 months.
Billing-time discounts are granted based on balances accumulated by a standard discount that uses a counter. The standard discount increments the counter when usage occurs to track the total amount of a balance element used during a specified period.
To create a billing-time discount, you set up the following items:
-
A noncurrency balance for the counter to track. Include this balance in the package (see "Tracking Balances by Service").
For example, you might create a Dollars Spent balance. As charges occur during a billing period, they impact that balance instead of the US Dollars balance. At the end of the billing cycle, the billing-time discount uses the amount in the Dollars Spent balance minus the applicable discount to calculate the impact of the US Dollars balance.
-
Two discounts:
-
A standard discount that increments a counter to track the accumulation of a balance, such as total fees charged or total units consumed (minutes, text messages, bytes, and so on). For example, if the billing-time discount is based on total monthly charges, create a discount that updates the counter when charges are applied. The incremented counter balance is always a noncurrency balance regardless of whether the aggregated amount is a charge or a nonmonetary unit.
-
A billing-time discount that uses the counter balance as a basis for granting the discount. For example, 10% off all usage for the month or 1000 bonus points for every year of subscription. The calculated discount is applied to the appropriate account balance, such as the currency balance or bonus points balance.
-
To create billing-time discounts, use the Billing-Time Discounting profile (see "About Default Pricing Profiles").
About Applying Discounts Retroactively
Some billing systems recalculate charges to apply rate changes or corrections retroactively. For such systems, you can specify whether a discount that was active when a charge was originally calculated but is now inactive or canceled can be included in retroactive calculations as follows:
-
Never stop applying the discount
-
Do not apply the discount if it is canceled
-
Do not apply the discount if it is inactive
-
Do not apply the discount if it is inactive or canceled
About Snowball Discounts
A snowball discount is a type of shared billing-time discount that distributes a percentage discount to all accounts in a discount sharing group.
To implement a snowball discount, you use two discounts:
-
A standard discount that increments a counter when accounts incur usage.
-
A billing-time discount that calculates and distributes the discount based on the counter balance. In PDC, you designate this a snowball discount.
The percent granted to each account can be distributed evenly or based on how much usage each account accrues.
See "About Billing-Time Discounts" and "About Discount Sharing" for more information.
About Discount Date Ranges
A discount date range is the period during which a discount is effective. By default, this period starts immediately and never ends.
Unlike charge date ranges, discount date ranges must be absolute; they cannot be relative.
See "About Charge Date Ranges" for more information about absolute date ranges and how to customize them.
About Discount Rules
A discount rule specifies how to calculate and apply a discount. A discount can have one or more rules. For example, when you use multiple RUMs to measure an event, you configure the discount rule for each RUM to calculate and apply the discount using each RUM configured for that event.
When a discount contains multiple rules, each rule appears in its own tab as shown in Figure 2-15.
Figure 2-15 Multiple Rule Tabs in a Discount Offer

Description of ''Figure 2-15 Multiple Rule Tabs in a Discount Offer''
When you create multiple discount rules, the first rule that you create appears in the Rule 1 tab, the second rule appears in the Rule 2 tab, and so on. You cannot change the default name of a rule tab. Therefore, the sequence in which you create the rules is important because they are evaluated in numerical order.
Each discount rule contains the following elements:
-
Rule conditions:
-
Discount filter
-
Discount trigger
-
Discount mode
-
-
Pricing
This section provides an overview of the information required to configure discount rules. For more information, see the PDC Help.
About Discount Filters
A discount filter specifies criteria that a charge or a portion of a charge must satisfy to be eligible for the discount. For example, a discount might apply only to calls made on weekends or during December. The default filter, Currency Charges, applies to all charges that impact a currency balance.
If a discount has multiple filters, it applies to all charges that satisfy the criteria of at least one of those filters. When you use multiple RUMs to measure an event, you configure the discount filter for each RUM and specify the RUM as a criteria for applying the discount.
Conditions can be defined by specific values (such as a time period from a specified time model) or by expressions (see "About Discount Expressions"). The default value for most criteria is a dot followed by an asterisk (.*), which means that any value is valid.
The ability to create filters depends on the profile associated with a discount (see "About Discount Profiles"). By default, you can create filters for standard discounts but not for billing-time discounts. A filter can be reused by other discounts.
About Discount Triggers
A discount might require usage or balances to reach certain levels before the discount is applied. In that case, you create a discount trigger to specify one or more conditions, such as the following, that must be met before the discount can be applied:
-
A specified charge amount must be reached, such as $50 of usage.
-
Usage must be less than a particular value, such as the number of international call minutes must be less than 120.
-
A specified quantity must be reached, such as a discount for the first 100 minutes and another discount for the second 100 minutes.
-
A specified number of events must occur, such as a discount for the first 100 downloads.
-
A combination of conditions must be met, such as the bytes used in a GPRS session must be greater than 1 MB and the session must last longer than 60 minutes.
-
A balance must have an available amount, such as included minutes, that can be consumed.
A trigger condition consists of the following items:
-
Expression: Results in a value to compare with the preset Value decimal. See "About Discount Expressions" for more information.
-
Operator: Specifies how the result of the expression is compare with a value. Valid operators are greater than, greater than or equal to, less than, less than or equal to, equal to, and not equal to.
-
Value: Specifies the decimal to compare with the result of the expression.
For example, you could configure the following trigger condition:
-
Expression: Charge (the total charge of the event)
-
Operator: Is greater than
-
Value: 0.0
If a trigger includes multiple conditions, all conditions must be met for the discount to be applied. For example, the trigger for a GPRS discount can include conditions specifying that the total charge must be greater than $5 and the total quantity of received data must be greater than 10,000 bytes.
A discount can have only one trigger. A trigger can be reused by other discounts. Not every discount requires a condition to trigger it. For such discounts, you use the default Always Trigger trigger.
Applying Multiple Discount Rules to a Charge
The same modes that determine how multiple discount offers apply to a charge are used to determine how multiple discount rules apply to a charge:
-
Original Charge
-
Remaining Charge
-
Remaining Charge and Quantity
See "Applying Multiple Discount Offers to a Charge" for more information about these modes.
By default, a discount rule inherits the discount mode from the discount offer that contains the rule, but you can change the mode of the discount rule.
The following example shows how discount offer and discount rule modes interact:
Discount Offer 1: any mode
Discount Rule A: any mode; 10% off if charge is $0 through $50
Discount Offer 2: Original Charge mode
Discount Rule B: 20% off; Remaining Charge mode
Discount Rule C: 10% off; Remaining Charge mode
The account incurs a charge of $100.
The following rules apply:
-
Discount Rule A applies to charges up to $50, so only $50 is considered for discounting. The discount is $50 * 10% = $5.
-
Discount Offer 2 is for the original charge, so it ignores previous discounting and applies to the original charge of $100.
-
Discount Rule B is for the remaining charge, because it is the first discount in Discount Offer 2, it applies to the original charge. The discount is $100 * 20% = $20.
-
Discount Rule C is for the remaining charge, because it applies to the charge that remains in Discount Offer 2 after Discount Rule B is applied. The discount is $80 * 10% = $8.
The final charge is (($100 - $5) - $20) - $8 = $67.
About Discount Pricing
For each discount rule, you configure pricing to specify which balances are impacted by the rule and how they are impacted.
Discount pricing can be used in multiple discount rules.
This section provides an overview of the information required to configure discount pricing. For more information, see the PDC Help.
About Discount Quantity Ranges
To vary a discount based on the amount of usage or frequency of occurrence, you can create discount quantity ranges and assign different pricing to each range. For example, a discount for a mobile phone service might contain the following quantity ranges:
-
0 through 500: No discount
-
500 through 1000: 10% off
-
1000 through No Maximum: 15% off
Each range has its own pricing (see "About Configuring Discount Balance Impacts"). The ranges and their tables appear sequentially in the discount rule.
Gaps are not allowed between ranges, so the end value of one range always matches the start value of the next range. If you leave a gap between quantity ranges, PDC automatically creates a range to fill in the gap.
With one exception, the start and end values of all quantity ranges must be a decimal. The exception is that a discount expression can be used to specify the end value of the last quantity range (see "About Discount Expressions"). Typically, the expression references a balance, such as the number of included minutes.
About Selecting Discount Quantity Ranges
To use one or more discount quantity ranges to calculate a discount, PDC selects the ranges as follows:
-
Evaluates the quantity range expression (see "About Discount Expressions").
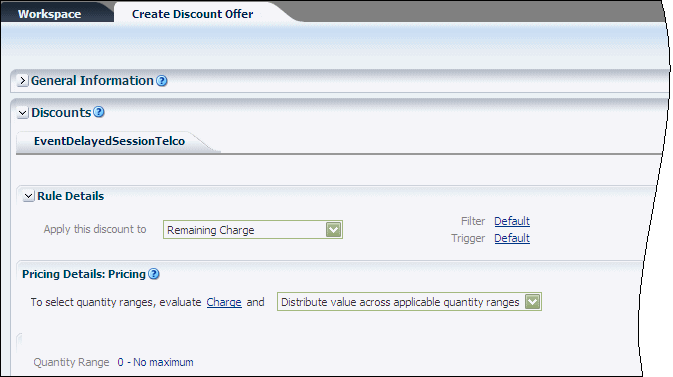
The quantity range expression is specified at the top of the Pricing Details section in a discount rule. For example, in Figure 2-16, the quantity range expression is Charge. For more information, see the PDC Help.
Figure 2-16 Location of the Quantity Range Expression in a Discount Rule
Description of ''Figure 2-16 Location of the Quantity Range Expression in a Discount Rule''
-
Uses the absolute value of the expression result and the specified selection type to select one or more quantity ranges. (As shown in Figure 2-16, the selection type is specified at the top of the Pricing Details section in a discount rule.)
PDC provides the following selection types:
-
Pick the quantity range containing the value: Only the pricing in the range containing the result value is used to determine the discount. For example, if the value is 750, the ranges are applied as follows:
-
The 0–500 range does not qualify.
-
The 500–1000 range qualifies. The discount pricing configured for this range is applied to the entire result.
-
The 1000–No Maximum range does not qualify.
-
-
Distribute value across applicable quantity ranges: The result is distributed across the ranges, and the pricing in each range is applied to the amount of the result that intersects that range. For example, if the value is 700, the ranges are applied as follows:
-
The 0–500 range qualifies. The discount pricing configured for this range is applied to the portion of the result that falls within this range.
-
The 500–1000 range qualifies. The discount pricing configured for this range is applied to the portion of the result that falls within this range.
-
The 1000–No Maximum range does not qualify.
When multiple discount quantity ranges qualify, each range is applied to the proportion of the quantity range basis that intersects with the range.
For this selection type, the discount base expression is typically either StepCharge or StepQuantity (see and "About Discount Expressions").
-
-
About Configuring Discount Balance Impacts
The pricing table is used to specify which balances are affected by the discount and how the balances are impacted. For example, you can specify that a customer's balance of included minutes be debited by the length of a call and that charges for usage not covered by included minutes be discounted by 10%.
Figure 2-17 shows an example of the pricing table in a discount. Each row in the table is a balance impact.
Figure 2-17 Pricing Table for a Discount

Description of ''Figure 2-17 Pricing Table for a Discount''
When you set up a discount balance impact, you enter information such as the following:
-
Impact: Specifies how the balance element is affected by the discount. For example:
-
Select Debit to reduce a noncurrency balance. For example, after charging a customer for a call, use a discount impact to debit any available included minutes along with another impact to credit the corresponding currency amount to the charge.
-
Select Credit to add noncurrency balance elements (such as loyalty points for calls of a certain duration) or to credit currency charges (such as to apply a 10% discount).
-
Select Increase or Decrease to increment or decrement a counter. See "About Billing-Time Discounts" for more information about counters.
-
-
Amount: Specifies the discount percentage or amount. This value is applied to the value of the discount base expression (see ) to compute the discount.
When the discount is a percentage, the percentage is multiplied by the value of the base expression to determine the balance impact. For example, a discount percentage is 10 and the base expression refers to a balance of $120. The 10% discount is calculated on $120, which results in a balance impact of $12.
When the discount is an absolute amount, that amount can be one of the following:
-
The actual amount to apply to the account balance. For example, to grant 100 included minutes as a birthday bonus, the amount is 100.
-
An amount that should be applied to portions of the usage. For example, to grant 10 frequent flyer miles for every hour of usage, the amount is 10 and the unit is 60 (assuming the balance element is minutes).
-
An amount that should equal the usage. For example, to consume one free minute for every minute used, the amount is 1 and the unit is 1.
-
-
Balance Element: Specifies the balance element that is impacted, such as currency or included minutes. You can specify any noncurrency balance element defined in your system or the currency balance element specified for the charge.
-
Per Unit: Specifies how to apply the balance element amount to the value of the discount base expression (as a percentage, as an absolute value, or incrementally; that is, for every x number of the result value).
When you apply the amount incrementally, you can specify whether to round the final increment down. It cannot be rounded up.
-
What to Discount: Specifies the discount base expression. This expression determines the basis of the discount calculation. The basis can be the total charge or quantity of an event, the total charge or quantity in a discount quantity range, a balance, a variable, or a query result. The discount is applied to the result of the base expression multiplied by the amount per unit, and the resulting balance impact is applied to the account balance. See "About Discount Expressions" for more information.
When the discount mode is Remaining Charge and Quantity, the discount basis is preset, and you cannot change it.
-
Amount Is Valid: For credit and counter (increase/decrease) balance impacts, specifies when the discount is available, such as from the time the event occurs, from the first time the balance element is consumed by a subscriber's usage, from a specified date to a specified date, for a period relative to the event occurrence, and so on.
-
Apply To: Specifies whether the discount should be applied to the balances of the account that generates the event (the discount user) or the account that owns the discount. Typically, the discount user is also the discount owner. But in discount sharing and charge sharing, the account that generates the event can be different from the account that owns the discount. See "About Discount Sharing" for more information.
In the expanded version of the pricing table, you can also specify the general ledger ID and impact category for each balance impact.
About Discount Expressions
A discount expression is a mathematical formula that your billing system evaluates to produce a value. You can use expressions to define the following discount components:
-
Trigger condition (see "About Discount Triggers")
-
End value of the last quantity range (see "About Discount Quantity Ranges")
-
Quantity range basis (see "About Selecting Discount Quantity Ranges")
-
Discount basis (see "About Configuring Discount Balance Impacts")
To help you create discount expressions, PDC provides a discount expression builder. PDC supports the following special elements in discount expressions:
-
Charge: Specifies the total charge of an event or part of an event.
-
Quantity: Specifies the total quantity in an event, such as the number of minutes talked or megabytes downloaded.
-
StepCharge: (For discount base expressions only) Specifies the portion of the charge that corresponds to a quantity range.
-
StepQuantity: (For discount base expressions only) Specifies the portion of the event quantity that corresponds to a quantity range.
For example, suppose the event quantity is 20 minutes and the quantity range is from 0 to the remaining balance of included minutes. If the remaining balance of included minutes is 10, the portion of the event quantity that falls within the quantity range is 10.
-
Balance[balance_element]: Specifies the account balance for a particular balance element, such as frequent flyer miles or included minutes.
The balance element in the discount base expression can be different from the balance element that is impacted. For example, to add bonus points based on minutes used, the base expression refers to a counter balance for the total minutes used, but the discount impacts the bonus points balance.
When the base expression references a specific balance element, it always refers to a balance of the account that owns the discount.
-
Function["function_name"]: Specifies an iScript function or a ECE pre-rating extension that retrieves the data required for the discount. The iScript function or a ECE pre-rating extension is used to base a discount on an amount that is not directly available to the billing system by performing a database query. For example, a function can retrieve the total charges for the 10 most frequently called numbers during the billing cycle.
-
Round: Specifies whether to round up or truncate the element value. If the digit to the right of the specified precision is equal to or greater than 5, the last significant digit is rounded up to the next highest digit. Otherwise, all digits to the right of the specified precision are truncated. For example, if the expression is Round(Charge; 2) and the Charge is 1.131, the Charge is rounded to 1.13.
-
Round Up: Specifies whether to round up the element value. If the digits to the right of the specified precision are non-zero, the last significant digit is always rounded up to the next highest digit. For example, if the expression is Round Up(Charge; 2) and the Charge is 1.151, the Charge is rounded to 1.16.
-
Round Down: Specifies to truncate the element value to the specified precision. For example, if the expression is Round Down(Charge; 2) and the Charge is 1.159, the Charge is rounded to 1.15.
-
Round Bankers: Specifies whether to round up to a nearest even number or truncate the element value. If rounding up the digit at the specified precision results in an even number, the digit at the specified precision is rounded up and the digits to its right are truncated. Otherwise, the digits to the right of the specified precision are truncated. For example, if the expression is Round Bankers(Charge; 2) and the Charge is 1.159, the charge is rounded to 1.16. If the Charge is 1.149, the Charge is rounded to 1.14.
A discount expression can include one or more individual elements such as decimal constants, standard arithmetic operators, and other discount expressions.
When the discount is an absolute amount that is applied regardless of the usage level, the base expression can be any positive number because you do not need to calculate the discount. For example, to apply a promotional discount of 50 included minutes for the first six months, the quantity range expression is 1, and the base expression is 1. The discount amount (50 included minutes) is then applied directly to the specified balance.
For more information, see the PDC Help.
About Using Temporary Balance Elements in Discounts
Temporary balance elements are used to pass values between multiple discounts for a single event. Typically, you use temporary balance elements to create temporary balances when you need the results of one discount to calculate another discount for the same event.
For example, consider a discount awards 5 SMSs if the amount of data transferred in a data usage event exceeds 1 megabyte and the session duration exceeds 30 minutes. In this situation, Discount 1 would determine the amount of data sent or received and store it in Temporary Balance A. Discount 2 would determine the duration of the session and store it in Temporary Balance B. Discount 3 would grant 5 SMSs if the data in Temporary Balance A exceeds 1 megabyte and the session length in Temporary Balance B exceeds 30 minutes.
Unlike other balances, temporary balances are maintained only while a single event is being discounted. If multiple standard discounts are applied to a single event, the temporary balance is maintained until all the discounts are processed.
For billing-time discounts, temporary balances are maintained only while a single discount is processed.
You can create temporary balance elements by using the PDC UI. See the discussion about creating balance elements in the PDC Help for more information.
About Sharing Discounts or Charges
Some billing systems enable accounts to share discounts or charges by joining groups that consist of an owner account and one or more member accounts. In BRM, a sharing group can be one of the following types:
-
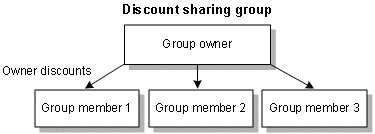
Discount sharing group: The owner shares its discounts with the members. Figure 2-18 shows a group owner providing discounts to three group members:
See "About Discount Sharing" for more information.
-
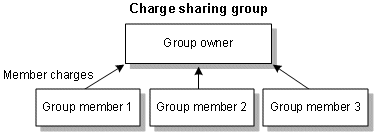
Charge sharing group: The owner assumes charges that are incurred by the members. Figure 2-19 shows a group owner receiving charges from three group members:
See "About Chargeshare Offers" for more information.
About Discount Sharing
Discount sharing occurs when an account shares its discounts with other accounts. For example, a group of employees might share a pool of included minutes in their company's mobile phone account, or a parent might purchase discounts on her email service and want those discounts to apply to her children's email services as well.
To share discounts in BRM, you create discount sharing groups in Customer Center or a third-party client application. You set up the discounts in PDC.
PDC supports shared discounts by enabling a discount to apply either to the account that generates the event (the discount user), to the account that owns the discount, or to both. See the discussion on Apply To in "About Configuring Discount Balance Impacts" for more information.
With discount sharing, you sometimes need several discounts to specify how balance elements are granted or consumed for each account. For example, to offer 20% discount on usage to each member account when the total usage for all member accounts exceeds 1,000 minutes, you set up a discount with a counter to track the usage for each account and another discount to apply the percentage off based on the aggregated usage recorded in the counter balance.
About Chargeshare Offers
Charge sharing enables an account to sponsor the charges of other accounts. The owner account in a charge sharing group receives the balance impact of sponsored charges incurred by the member accounts. For example, charge sharing enables a company to pay for all of its employees' mobile phone services or a parent to pay for his child's SMS and email services.
To share charges in BRM, you create charge sharing groups in Customer Center or a third-party client application. You then set up chargeshare offers and chargeshares in PDC to determine how charges are shared among the members of the charge sharing groups.
A chargeshare uses rules that contain filters to determine whether an event qualifies for charge sharing, triggers to specify conditions that must be met before the chargeshare applies, and pricing to determine the charge sharing amounts and balance impacts.
Setting up chargeshare offers and chargeshares is similar to setting up discount offers and discounts. See "About Discount Offers" for more information.
About Zone Models
You use zone models to charge for calls based on their origin and destination. PDC supports the following types of zone models:
-
Standard: A zone model based on the origin and destination numbers of a call. It contains rules that associate a pair of origin and destination numbers with a zone impact category (see "About Impact Categories").
To specify origin and destination numbers, you must include an international access code (the code used to dial out of the country in which the phone number is located). Optionally, you can also include a country code (the code used to dial in to the country in which the phone number is located), an area code, a region code, a city code, a phone number prefix, and so on, up to and including the entire phone number.
Figure 2-20 shows zone rules associated with the same impact category.
Figure 2-20 Multiple Zone Rules Associated with the Same Impact Category

Description of ''Figure 2-20 Multiple Zone Rules Associated with the Same Impact Category''
-
Geographical: A zone model based on the distance between the origin and the destination of a call. Geographical zone models include the following:
-
Zone rules that associate a distance with a zone impact category.
-
A list of area codes. Each area code is associated with one or more pairs of longitude and latitude coordinates.
When a customer makes a call, your billing system uses the data in the area code list to compute the distance between the origin number and the destination number. The billing system then assigns an impact category to the call event by using the zone rule whose distance most closely matches the computed distance.
Geographical zone models are useful in the following situations:
-
Customers are located close to the border between two area codes. For example, if a customer in one area code calls a person two blocks away in another area code, you do not want to charge for a long-distance call.
-
The distance covered by an area code is very large and you want to use several rates within the same area code. You do this by associating different pairs of latitude and longitude coordinates with the same area code in a geographical zone model.
-
When creating charges associated with profiles that support zoning, users must select a zone model to get a list of impact categories that can be added to the charge. For example, Figure 2-21 shows how the selected zone model determines which impact categories are available.
Figure 2-21 Using Zone Models to Select Impact Categories
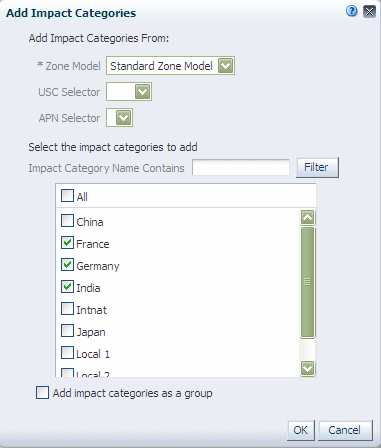
Description of ''Figure 2-21 Using Zone Models to Select Impact Categories''
Note:
Optionally, users can also select a USC or APN selector to provide enhanced zone impact categories. See "About Selectors" and "About Impact Categories" for more information.Alternate Zone Models
In both standard and geographical zone models, each rule results in the application of a zone impact category and, optionally, an alternate zone model (see the rules in Figure 2-20). Alternate zone models enable you to define more granular zone rules and reuse them in multiple zone models.
For example, in a zone model for calls that originate in the U.S., you might include a rule with the following parameters:
-
Origin: 011
-
Destination: 00
-
Impact Category: 00 General
-
Alternate Zone Model: US to 00 Country Codes
In this example, the alternate zone model might contain rules for various combinations of calls from the U.S. (011 international access code) to numbers with the 00 international access code and a particular country code, such as 00 44 for calls to the U.K., 00 91 for calls to India, and so on).
When a call is made from the U.S. to a 00 international access code in this example, your billing system first checks to see whether the country code of the destination number matches a rule in the alternate zone model. If it does, the billing system uses the impact category associated with the rule in the alternate zone model to calculate the call's charge. If it does not, the billing system uses the 00 General impact category to calculate the charge.
See "About Configuring Setup Components" for more information about configuring zone models.
About Value Maps
A value map is a hierarchical structure that associates names with values.
You use value maps in charge selectors to group event attribute values into manageable categories. For example, to apply the same charge to all calls made from the San Francisco Bay Area to Los Angeles, you might use a California Area Codes value map that includes the following values:
-
Northern California
-
San Francisco Bay Area
-
408
-
415
-
510
-
650
-
707
-
-
-
Southern California
-
Los Angeles
-
213
-
323
-
-
Instead of creating charge selector rules for all possible combinations of those area codes, you associate the California Area Codes value map with the charge selector and then create only one rule in which San Francisco Bay Area is the origin call value and Los Angeles is the destination call value.
Note:
In PDC, value maps are used only with charge selectors (see "About Selectors").See "About Configuring Setup Components" for information about configuring value maps.
About Selectors
A selector is a series of rules that associates the values of event attributes, service attributes, account attributes, or custom rules to a result. Different selectors have different types of results. Selectors can be used in charge offers to determine the price of an event.
When an event occurs, the selector rules are evaluated in order of priority. The first rule that applies to the event determines which result is returned by the selector.
For example, when the rating engine calculates the cost of a telephone call, a charge selector can determine which charge to use based on call origins and destinations.
You can create the following types of selectors:
-
Charge selector: Determines the charge to use based on the values of specified event attributes, service attributes, account attributes, or custom rules.
-
Discount selector: Determines the discount to use based on the values of specified event attributes, service attributes, account attributes, or custom rules. You can use a discount selector instead of a discount in a discount offer.
-
Generic selector: Determines the result name based on the values of specified event attributes, service attributes, account attributes, or custom rules.
-
Price selector: Determines the appropriate pricing to use based on the values of specified event, service, or account attributes.
You can use a price selector instead of a pricing instance in a charge offer.
-
Usage Scenario (USC) selector: Determines a new impact category based on the zone impact category and specific event attributes, such as differentiated network services, or custom rules, such as Friends & Family.
-
Access Point Name (APN) selector: Determines a new impact category based on the zone impact category and access point name that applies to the event.
When creating a selector, you choose the attributes to be used in the rules. Each rule then uses the same fields, and you must specify a value for all the fields in every rule. For some rules, the value of a field might not be relevant, so you can use a wildcard to indicate that any value is acceptable.
The sequence of the rules is important, so you can reorder them as necessary. The rules tables include a search mechanism to make it easy to find a rule.
In all selectors except charge selectors, rules have an effective period. By default, the period starts immediately and never ends. You can modify and add effective periods.
For information about creating selectors, see the PDC Help.
About Time Models
You use time models to charge different prices for the same service depending on the day and time the service is used.
A time model is a set of time periods. Each time period contains one or more time segments. A time segment represents a particular time, such as a day of the week or a range of several hours.
Depending on the pricing profile associated with the time model, you can define time segments by using months, days of the month, days of the week, time of day, and a calendar of special days. For example, Figure 2-22 shows an Offpeak and a Peak time period whose time segments are defined by days of the week and time of day.
Figure 2-22 Peak and Off-Peak Time Periods in a Time Model
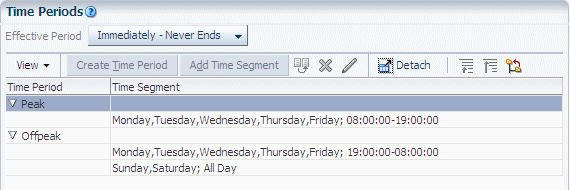
Description of ''Figure 2-22 Peak and Off-Peak Time Periods in a Time Model''
To use a time model in a charge, you add its time periods to a Charges tree (see "About the Charges Tree"). If the Charges tree contains multiple impact categories, you can add time periods from a different time model to each impact category. You can then associate a different pricing instance with each time period in the tree.
About the Effective Period of a Time Period
By default, a time period is immediately and forever effective. To add effective periods to a time period, you specify only the start date of the new period. That date becomes the end date of the previous period. The end date of the final effective period is always Forever.
About Special Day Calendars
A special day calendar is a set of dates, such as holidays, for which you want to charge special prices for your services. Each date must be one of the following types:
-
Fixed: A specific date valid only in one year, such as May 8, 2011, for Mother's Day in the U.S.
-
Recurring: A date that is valid every year, such as July 4 for Independence Day in the U.S.
Figure 2-23 shows a special day calendar that has fixed and recurring dates.
To configure pricing for special days in a charge, you associate a special day calendar with a time model. You must then configure at least one time period that applies to the special days. The time model should cover all 24 hours of the special days.
Note:
The same time period cannot apply to both regular days of the week and special days. If you configure a time period that applies to both, the time model will receive a validation error.The same calendar can be associated with multiple time models, but you can also create different calendars for different time models.
For more information, see the PDC Help.
About Bundles
A bundle is a set of charge offers, discount offers, or both. Bundles are typically used to group offers that you want to sell together.
Each bundle is associated with a single service. Only offers that apply to that service can be included in the bundle. For example:
-
A package that provides only Internet access includes only Internet access bundles (such as cable and premium cable).
-
A package that provides Internet access and VOIP includes at least two bundles, one for Internet access and one for VOIP.
-
A package that provides VOIP and cable TV includes at least two bundles, one for VOIP and one for cable TV.
Figure 2-24 shows bundles that are associated with a single service.
Figure 2-24 Bundles Are Always Associated with a Single Service
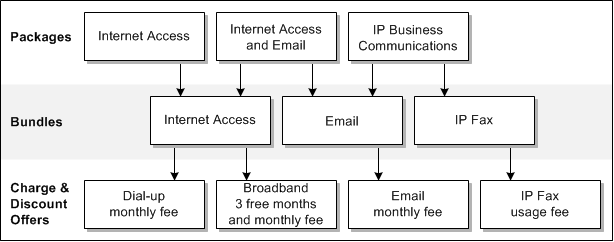
Description of ''Figure 2-24 Bundles Are Always Associated with a Single Service''
One bundle can contain any number of charge and discount offers, and two different bundles can contain the same offer. Grouping offers in different ways in different bundles adds flexibility to your pricing structure without requiring you to create additional charge or discount offers.
Before creating bundles, you should understand the concepts described in this section. For more information, see the PDC Help.
Making a Bundle Applicable to a Service
When creating a bundle, you can associate it with a specific service. That is the only service to which the offers in the bundle apply.
If you create a bundle that does not apply to a specific service, associate the bundle with Account. For example, you might do this to create a bundle for late charges or for coupons. The offers in the bundle can then be used to rate any event associated with Account in the service-event map (see "About the Service-Event Map"). Each account can own only one bundle that applies to Account.
Specifying When a Bundle Can Be Purchased
By default, the time period during which a bundle can be purchased starts immediately and never ends. You can change the default start date, end date, or both.
To be added to a bundle, an offer must have a purchase period that is the same as or greater than the bundle purchase period. If the purchase period of an offer in a bundle exceeds the bundle purchase period, the bundle purchase period overrides the offer purchase period. See "Specifying When a Charge Offer Can Be Purchased" for information about charge offer purchase periods.
Billing Customers on Bundle Purchase
Usually, you bill a customer at the end of the customer's billing cycle. On-purchase billing, however, enables you to bill a customer immediately for a purchase, even if the customer's billing cycle has not ended.
When you create a bundle, you can flag it for on-purchase billing. When a customer purchases the bundle, a bill is generated immediately for the purchase fees associated with the bundle.
Note:
On-purchase billing works with purchase fees only, not with recurring, usage, or cancellation fees.See "Billing Customers on Package Purchase" for more information.
Aligning Validity of Balance Impacts on First Use
When you create a bundle, you can flag it to synchronize the start date of all balance impacts whose validity period starts on first usage. This ensures that all such balance impacts in the bundle's charge offers are set to the same validity period when one of them is activated for the first time.
Permitting CSRs to Customize Bundles
If your customer service representatives (CSRs) can discount or change the effective period of charges in bundles at purchase time, you can specify whether to prohibit, allow, or require such modifications in a particular bundle.
For example, if customer input is required to set the date on which an offer's purchase fee is applied, you can specify that a bundle must be modified.
About Offer Quantities
You can configure bundles to provide more than one of the same charge offer or discount offer.
For example, if a bundle for a cable service includes a charge offer that provides one set-top box and you want to include three set-top boxes with the cable service, enter 3 for the charge offer in that bundle.
About Charge Offer and Discount Offer Status at Purchase
When you add a charge offer or discount offer to a bundle, you also specify whether the offer is active or inactive at the time of purchase. For example, an offer might be inactive at purchase so that the purchase or first month's fee is not applied until you get confirmation that the hardware was received and successfully configured.
By default, offers are active.
For offers with inactive status, you can specify a reason for that status.
About the Effective Periods of Offers in Bundles
Charge offers and discount offers have the following effective periods:
-
The period specified in each offer that defines when the offer is generally available for purchase.
-
The periods specified in a bundle that define when the offers in the bundle are effective.
The effective periods specified in a bundle take precedence over the effective periods specified in the offers themselves.
Setting the Effective Periods of Offers in Bundles
In bundles, you set the effective period of offers by specifying the start and end times of the offer and of the offer's cycle and usage charge periods.
-
Offer start and end times: Specify when a customer can use the service or benefit from the discount. The offer start time is when the purchase fee is charged. It is also the earliest time that the offer's fees can begin to accumulate in an account balance.
-
Recurring and usage charge periods: Specify when recurring and usage events can be charged or discounted. These periods must not begin before the offer start time.
You can set start times as follows:
-
Immediately: (the default) The offer or charge is effective and can be activated immediately. The purchase fee is charged as soon as the offer is added to the account.
-
Relative to Purchase: The purchase fee is charged when the offer is added to the account, but the customer cannot use the service or benefit from the discount until the relative period ends.
When a charge offer's charge period has a relative start time, the events are not rated and the fees are not charged until the relative period ends, even if the service has been activated. This option enables you to waive subscription or usage fees for a period of time.
When a discount offer's charge period has a relative start time, the discount is not applied to cycle or usage fees until the relative period ends.
-
First Usage: The offer is activated and the purchase fee is charged when the customer first uses the service, such as by making a phone call. The charge periods also begin at that time.
You can set the end times as follows:
-
Never: (the default) After it is activated, the offer is effective indefinitely, and its recurring and usage fees can be charged or discounted indefinitely.
-
Relative to Start: After the relative period ends, the offer is not effective and the recurring or usage fees are not charged or discounted.
If the offer end time specified in the bundle is earlier than the recurring or usage charge end time, the offer end time overrides the charge end time.
Specifying Discounts in Bundles
In addition to adding discount offers to a bundle, you can reduce one-time and recurring charges in charge offers by specifying a flat percentage discount for each charge category in the bundle itself. For example, in Figure 2-25, all charges in the offer are discounted by 10%.
Figure 2-25 Flat Percentage Discounts Applied to Charges in a Bundle
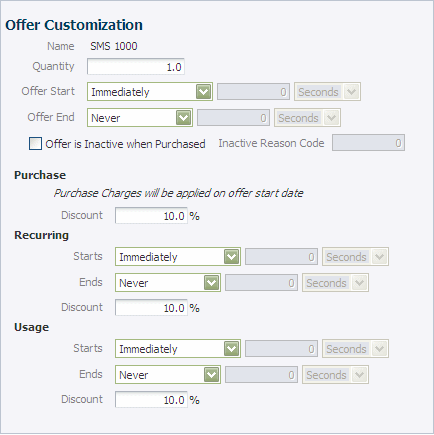
Description of ''Figure 2-25 Flat Percentage Discounts Applied to Charges in a Bundle''
When you discount a charge category in a bundle, the discount applies to all charge types that apply to the charge category. For example, you might have a charge offer that charges for two recurring charges; Monthly Fee and Included Minutes. If you specify a percentage discount for recurring charges in the bundle, the discount applies to both recurring charges. To discount only the Monthly Fee charge, you must make the balance impact for the monthly fee discountable and the balance impact that grants Included Minutes nondiscountable.
Unlike discount offers, discounts configured in bundles cannot be tracked in the general ledger because they are not associated with a general ledger (G/L) ID. In addition, unlike discount offers, bundle-configured discounts are difficult to display on a customer's bill because they are not separate items.
Note:
Because of the limitations associated with discounts configured in bundles, Oracle recommends that you use discount offers instead. See "About Discount Offers" for more information.Creating Dependencies for Bundles
You can set up the following dependent relationships between bundles:
-
Prerequisite: Specifies that an account must own a particular bundle to be able to purchase another particular bundle. A prerequisite can include bundles for different services. For example, to own a GPRS bundle, an account might be required to own a GSM bundle.
-
Mutually Exclusive: Sets up a mutually exclusive relationship between two bundles so that if an account owns one of the bundles, it cannot own the other. For example, if you set up a mutually exclusive relationship between a Corporate Voice bundle and a Residential Voice bundle, customers who purchase one cannot purchase the other.
Transitioning between Bundles
You can configure rules for transitioning from one bundle to another. PDC provides the following types of transitions:
-
Upgrade to a bundle that is typically more expensive and has more features
-
Downgrade to a bundle that is typically less expensive and has fewer features
Transition rules enable you to limit the bundles that customers can transition to and remain fully provisioned.
While transitioning from one bundle to another, your customers retain their devices, such as phone numbers, and their services.
Note:
Transitioning between bundles affects only the charge offers and discount offers related to the service to which the bundle applies; the service itself remains the same. To define a transition that adds a new service, you create a transition for a package (see "Transitioning between Packages").About Packages
A package (sometimes known as a plan or a service plan) is a collection of bundles. You use packages to offer your services to customers. For example, if your company sells Internet access, email, and IP fax service, you might offer the following packages:
-
A package that sells only Internet access (dial-up or broadband)
-
A package that sells Internet access and email
-
A package that sells email and IP fax service
Figure 2-26 shows how you can include bundles and the services to which they apply in a variety of packages.
Figure 2-26 A Bundle Can Be Included in Multiple Packages

Description of ''Figure 2-26 A Bundle Can Be Included in Multiple Packages''
A package can contain any number of bundles, and two different packages can share the same bundle. By grouping bundles into packages, you simplify the choices presented to customers.
In addition to bundles that apply to services, a package can contain one bundle that applies to the customer's account instead of to a service. See "Making a Bundle Applicable to a Service" for more information.
Before creating a package, you should understand the concepts described in this section. For more information, see the PDC Help.
Billing Customers on Package Purchase
Usually, you bill a customer at the end of the customer's billing cycle. On-purchase billing, however, enables you to bill a customer immediately for a purchase, even if the customer's billing cycle has not ended.
When you create a package, you can flag it for on-purchase billing. When a customer purchases a package that is flagged for on-purchase billing, a bill is generated immediately for the purchase fees associated with the package.
Note:
On-purchase billing works with purchase fees only. It does not work with recurring, usage, or cancellation fees.See also "Billing Customers on Bundle Purchase" for more information.
Adding Bundles to Packages
To add a bundle to a package, you must first add a service to the package. For example, the package content shown in Figure 2-27 includes the GSM, SMS, and Voice services.
Figure 2-27 Add Services to a Package and Then Add Bundles to the Services
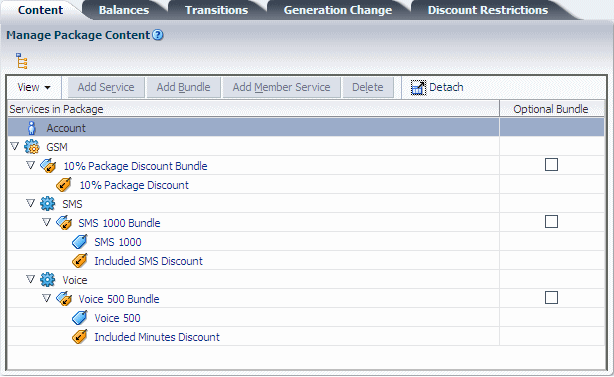
Description of ''Figure 2-27 Add Services to a Package and Then Add Bundles to the Services''
After adding services to the package, you add bundles to the services. For example, the package contents shown in Figure 2-27 includes the following bundles:
-
10% Package Discount Bundle
-
SMS 1000 Bundle
-
Voice 500 Bundle
Note:
The content of a package always contains an Account node. To add an account bundle to the package, you use that node. See "Making a Bundle Applicable to a Service" for more information.Grouping Services
In packages, you can combine services into service groups, which are sets of services associated with a subscription, such as telephony and text messaging services associated with a wireless connection.
To create a service group, you add a service that represents the subscription (the subscription service) and then add member services to that service. The subscription service can be a service that subscribers use, such as telephony or broadband Internet access, or it can be a representational service with no associated usage fees.
Service groups provide the following benefits:
-
Member services can benefit from discounts owned by the subscription service.
-
Member services can be associated with the devices owned by the subscription service.
-
Customers can purchase services as a group.
To group services, you add a service that represents the group to the package (the subscription service) and then add member services to that service. Together, the subscription service and member services form a service group.
For example, in Figure 2-27, the GSM service is a subscription service, and SMS and Voice are its member services.
Grouped services usually apply to a particular device, such as a cable box. An account can contain multiple service groups.
To subscribe to a service group, customers subscribe to its subscription service.
Tracking Balances by Service
A balance is the amount of a balance element that a customer owes to your company or that your company owes to a customer. A balance can also be a quantity tracked by a counter. (See "About Balance Elements" for more information about balance elements.)
Often, purchasing and using a service affects multiple balances. For example, a mobile phone service might have an impact on two balances: US Dollars and Minutes.
Balance groups are collections of balances for various balance elements, such as currency, minutes, bytes, and frequent flyer miles, that apply to one or more services.
By default, a package contains one balance group: the account balance group. Balances for every service in the package share that balance group, which means that balances such as included minutes are shared among all services.
To track and control the allocation and consumption of balances for specific services, you can create multiple balance groups and assign services to their own balance groups, or group sets of services by balance group.
If you do not create additional balance groups, balances for every service in the package share the account balance group. This means that balances such as included minutes are shared among all services. By creating a balance group for each service, you can control the allocation and consumption of balances by an individual service.
For example, consider a family of four that has a mobile phone service for each family member. The bundle for each service includes 300 minutes. If the package has only the default account balance group, all four family members' included minutes go into the same account balance, which would contain 1200 included minutes. One teenager could then use 1000 minutes, leaving only 200 minutes to be shared by the other three family members.
To avoid that situation, you could create a package with two mobile phone services in the same bundle for the parents (because they know how to share) and an optional add-on package in its own balance group. When the parents purchase add-on packages for the children, each child's included minutes are tracked separately as sub-balances in the included minutes balance element.
You can set different credit limits for the same balance element in each balance group. For example, the parents might request a credit limit of $10 on the US Dollars balance element in each child's balance group to control overage charges but request a $100 credit limit on the US Dollars balance in the balance group for their mobile phone services. See "Applying Credit Limits to Balance Elements" for more information.
In service groups, the subscription service and member services typically belong to the same balance group so that they share their balances. See "Grouping Services" for more information.
Applying Credit Limits to Balance Elements
A credit limit is the maximum amount of a balance element that can accumulate in a balance group. When a credit limit is reached, businesses typically deny customers access to the services associated with the balance group. For example, you might set a credit limit of $100 for a telephony package and deny service when customers who reach that limit try to place a call.
You set credit limits for balance elements in packages.
About Credit Thresholds and Floors
You can use credit thresholds to notify customers when they are approaching the credit limit of a balance. A credit threshold specifies the balance total that triggers a notification to the customer. You can specify the threshold in the following ways:
-
As a fixed value, such as $100 or 30 minutes.
-
As a percentage of the credit limit, such as 90%. For example, if the credit limit is $100 and the threshold is 90%, the threshold amount is reached when the customer has a balance of $90 (that is, when the customer has used 90% of the balance).
The credit floor is the starting point for a credit threshold and is the lowest number that the balance can be (that is, the number that represents no use of the balance).
For currency balances, the credit floor is 0.
For noncurrency balance elements, such as prepaid hours, you must specify a credit floor. You can use a negative number for the floor. For example, suppose you give 100 prepaid hours and set the credit limit to 0. When the credit limit is reached, the customer has no hours remaining and cannot use the service. To notify the customer when only 10 hours remain, set the credit threshold and floor as follows:
-
Set the credit floor to -100. This number indicates none of the balance has been used.
-
Set the credit threshold to 90%.
The threshold is reached at 90% of -100 hours (that is, when the customer has 10 prepaid hours left).
The credit threshold can be triggered both when a balance is increasing and when it is decreasing. You can customize your billing system to perform different actions in each case. For example, if the credit threshold is crossed when the balance is increasing, service could be turned off. If the threshold is crossed when the balance is decreasing, service could be restored.
Specifying the Order in Which Sub-Balances Are Consumed
You might need to use consumption rules to manage sub-balances.
In a balance group, balances for the same type of balance element are combined into a sub-balance. For example, an account that owns two charge offers that each include 300 minutes has a starting included minute balance of 600 minutes, providing the services are associated with the same balance group and have the same validity period for the included minutes.
When portions of a balance element are valid at different times, however, BRM creates multiple sub-balances for that balance element in the balance group. For example, a balance group might include 300 minutes that are valid only for the current billing cycle and 1000 minutes that never expire. Because the included minutes have different validity periods, they are tracked in different sub-balances.
When a customer uses a service, BRM must know which sub-balance to use first. To specify the order in which sub-balances are consumed, you use consumption rules. The rules are based on the start and end times of the sub-balances.
As shown in Figure 2-28, you associate consumption rules with balances in packages.
Figure 2-28 Consumption Rules for Balance Groups
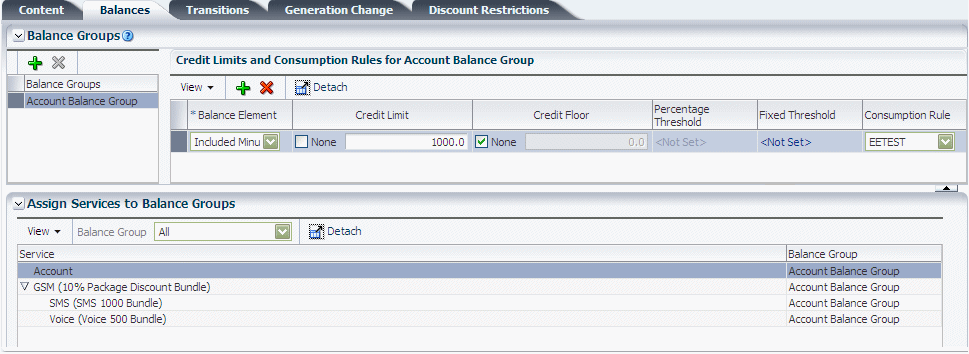
Description of ''Figure 2-28 Consumption Rules for Balance Groups''
For example, you can specify whether a subscriber with the following minute sub-balances uses the Anytime Minutes or the rollover Anytime Minutes first:
-
100 Anytime Minutes that are valid March 1 to April 30
-
50 rollover Anytime Minutes that are valid February 1 to March 30
If the minute balance is associated with a rule that says to consume the sub-balance that expires first, the 50 rollover Anytime Minutes are used first.
If the minute balance is associated with a rule that says to consume the sub-balance with the latest start time, the 100 Anytime Minutes are used first.
For more information, see the PDC Help.
Transitioning between Packages
You can configure rules for transitioning from one package to another. Each transition rule applies to a particular service. The package being transitioned to and the package being transitioned from must both contain that service, though each package can contain additional services that the other package does not contain.
PDC provides the following types of transitions:
-
Upgrade to a package that is typically more expensive and has more features. For example, a customer might transition from a package that provides Internet and cable TV services to a package that provides Internet, cable TV, and VOIP services. That transition adds a service and a bundle and possibly changes the bundles for the existing services.
-
Downgrade to a package that is typically less expensive and has fewer features.
Transitions enable you to limit the packages that customers can switch to while remaining fully provisioned. When transitioning to a designated package, your customers retain their devices, such as phone numbers, and their services.
Defining Generation Changes
A generation change enables you to transition customers between 2G (second generation) and 3G (third generation) wireless packages and services. Packages are called 2G or a 3G depending on whether the wireless service they provide runs on a 2G or 3G wireless network.
When creating a 2G or 3G package, you can set up generation change rules to specify which packages can replace the package when it is transitioned to a different generation.
For generation changes, the packages do not have to provide the same service.
Note:
The same package cannot be used in both a transition rule and a generation change.Restricting Discounts in Packages
When creating a package, you can prohibit specified discount offers from being owned or purchased while the package is owned.
If an exclusion relationship exists between a discount and a package, a customer can own the discount or the package, but not both. Further, the customer cannot own any discounts associated with the package if the customer owns the excluded discount.
Creating CSR Packages in BRM
This section applies only to BRM users.
In BRM, packages provide services not only to customers, but also to CSRs. CSR packages serve the following purposes:
-
They control access to Customer Center.
-
They enable customer management events to be recorded, including information about the CSR who generated the event. This information can be helpful when researching customer complaints.
To create a CSR package, you use PDC to create a package that has the following attributes:
-
Uses the admin_client service. That service provides access to Customer Center users.
-
Includes no bundles.
You then add the CSR package to the CSR - New package list (see "About Package Lists").
About Package Lists
A package list is a group of packages that is usually offered to a single type of customer. For example, you might create the following package lists:
-
A package list that includes packages for customers above a certain age.
-
A package list that includes packages for customers in a particular location, such as Canada.
-
A package list that includes promotional discounts offered for a limited time.
You can create any number of package lists for your system, and each package list can contain any number of packages. Different package lists can contain the same package.
The package list does not have to include all your packages. You can create packages and not include them in a package list until you need them. Or you can offer one set of packages to one group of potential customers and another set of packages to another group.
To make a package available for customers to purchase, you must include the package in a package list.
Note:
For implementations covering a large geographic area, you might need package lists containing regional product offerings, each with variations in the pricing structure.Specifying the Package List Segment and Type
The package list segment identifies the customer segment that the package list is offered to, and the package list type identifies the type of packages that are added to the package list.
The package list segment and type determines the package list name in Customer Center when the package list is used in BRM. For Customer Center, by default, the package list segment must be CSR. The package list type can be either New or Add-on. For example:
-
The CSR-New package list contains packages that register customers and add the services and bundles in the packages to the new accounts.
-
The CSR-Add-on package list contains packages that add services and bundles to existing accounts.
The package list segment and type are case sensitive and together uniquely identify package lists in Customer Center. For example, CSR-New and CSR-new are two different package lists.
Specifying the Package List Status
You can assign the following statuses to a package list:
-
Active: Use this status to indicate that customers can purchase packages in the list as soon as the list is added to your system.
-
Inactive: Use this status to indicate that the list is not visible to customers and customers cannot purchase packages from the list.
About Setting Up a Product Offering
When setting up a product offering, consider the following:
-
Which services your company offers and how much to charge for them. For example, you should decide the following:
-
The types of fees to use for a service, such as a flat monthly fee, hourly usage fees, or both
-
The rates to charge for monthly fees, hourly usage, setup, and so forth
-
Which discounts to offer
-
Whether to offer special pricing options, such as sponsored rates
-
-
How to implement your services and their associated balance elements, events, G/L IDs, and tax codes in PDC. See "Prerequisites for Creating a Product Offering" for more information.
-
How to structure your product offering. For example, determine how many packages and bundles to create and the charge offers and discount offers that make up the packages.
Tip:
Because product offerings are built by setting up relationships among packages, bundles, charge offers, and discount offers, it is helpful to draw a diagram of your product offering before you create it in PDC. For example, see "Example Product Offering".
After planning your product offering, you use PDC to create it. Because charge offers and discount offers are the basic units of a product offering, they are created first. See "About Using PDC to Create Product Offerings" for more information.
Prerequisites for Creating a Product Offering
Before you create a product offering, you must complete the following tasks. See "About Configuring Setup Components" for information about configuring these items in PDC.
-
Create services and events
You might need to add or modify services before you create your product offering. In addition, you must configure a list of events to track for each service. If you add services, you might need to create events to track the services.
-
Collect account attribute data
To structure pricing, you might want to use account information, such as the location of a customer and the type of account (such as Premium or Standard).
-
Define RUMs for events
Before your billing system can apply a charge to an event, it must measure the event. To enable your billing system to measure events, you configure RUMs, which specify the units to measure and how to calculate the measurement.
-
Map event types to services
Each charge offer applies to a particular service. When you create a charge offer, you select events related to that service to configure charges for. To prevent you from selecting an event that does not occur for a service, PDC uses the service-event map.
-
Create balance elements
Charges require balance elements. Use PDC to add or modify balance elements.
-
Define impact categories
You use impact categories to specify that a particular group of balance impacts in a charge should be used. If you plan to base charges on the values of event attributes, you must define some impact categories.
-
Configure zones
Set up value maps and zone models.
-
Define tax codes and tax suppliers
To calculate taxes, you must define tax codes and tax suppliers.
-
Create G/L IDs
You use G/L IDs to collect general ledger information from your database and to export it to your accounting application. You must decide how to track the revenue for each type of charge and create the appropriate G/L IDs.
-
Define provisioning tags
If you use charge offer or discount offer provisioning, you must define provisioning tags.
-
Configure time models and special day calendars
You use time models and special day calendars to charge different prices for the same service depending on the day and time the service is used.
Example Product Offering
The example product offering in Figure 2-29 offers three services: Internet Access, Email, and Mobile Phone.
Figure 2-29 Example Product Offering for Three Services
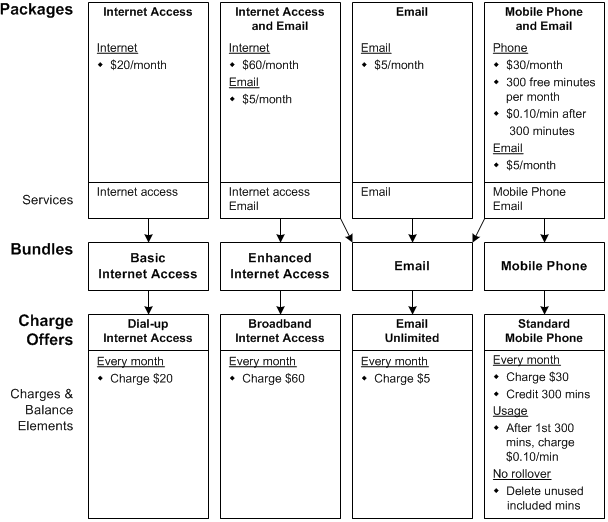
Description of ''Figure 2-29 Example Product Offering for Three Services''
Note the following points about the organization of the product offering in Figure 2-29:
-
The offer contains two charge offers that have different monthly fees for Internet access. These charge offers are used by different bundles.
-
Two of the packages include two bundles; the other two packages include only one bundle each.
About Using PDC to Create Product Offerings
With PDC, you can perform the following tasks:
-
Configure setup components, which contain data used to create pricing components. Setup components include balance elements, impact categories, RUMs, the service-event map, and special day calendars.
See "About Configuring Setup Components" for more information.
-
Create and modify pricing components, which are elements that define product offerings. Pricing components include charges, discounts, chargeshares, charge offers, discount offers, chargeshare offers, bundles, packages, package lists, time models, and selectors.
-
Configure complex charges for your services based on event attributes and quantities, impact categories, time periods, special dates, and prioritized selection rules.
-
Set credit limits and discounts.
-
Reuse charges and discounts, charge and discount offers, bundles, and packages so that you do not need to re-create them for each pricing component that references them.
-
Create and modify pricing components in draft form in your private workspace before submitting them to public view.
Note:
When you start PDC, the Workspace page is open by default. You use this page to manage the setup and pricing components in your changesets. For more information, see "About Changesets" and the PDC Help. -
Use the ImportExportPricing utility to export setup components from PDC into XML files and to import setup components from XML files into PDC. See "Importing and Exporting Pricing and Setup Components" for more information.
See "Example of Using PDC to Create a Product Offering" for more information.
Who Uses PDC?
Generally, the services you offer and how you charge for them are defined by your marketing and finance personnel. The product offering is typically created by operations personnel using PDC. You should outline, in detail, your entire pricing structure before you use PDC to implement it.
About Using the XML Pricing Interface to Create a Product Offering
As an alternative to using PDC, you can create and modify product offerings in an XML file and then use the ImportExportPricing utility to do the following:
-
Import an entire or partial product offering configured in an XML file into the PDC database.
The utility creates any new pricing components and modifies any changed components in the PDC database.
-
Export an entire or partial product offering from the PDC database into an XML file for editing.
If you export the data into an XML file that contains pricing components, the utility overwrites the entire XML file.
To create or modify a product offering in an XML file, you use a text editor or an XML editor. The XML product offering must follow the format specified in the appropriate XML Schema Definition (XSD) file. See "ImportExportPricing" for more information.
You can also use the ImportExportPricing utility to move a product offering from a PDC database to another PDC database.
See "Importing and Exporting Pricing and Setup Components" for more information.
Example of Using PDC to Create a Product Offering
When you are ready to use PDC to create a product offering, the product offering should be planned, and all necessary prerequisites, such as balance elements, G/L IDs, and RUMs, should be in place. See "About Setting Up a Product Offering" for more information.
The following procedure provides a high-level example of how to use PDC to create a product offering:
-
Start by creating an active changeset to contain the components of the product offering.
The following example shows an active changeset named Fall Offerings in the Open Changesets section of the Workspace page:
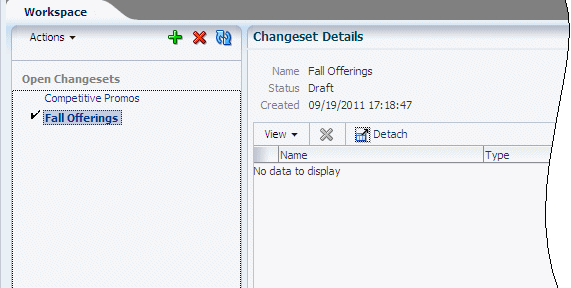
Description of the illustration ''usr_use_pdc_chg_set_1.gif''
See "About Changesets" for more information.
-
Then create charge offers.
The following example shows a charge offer named Voice 500 being created in the Create Charge Offer page:
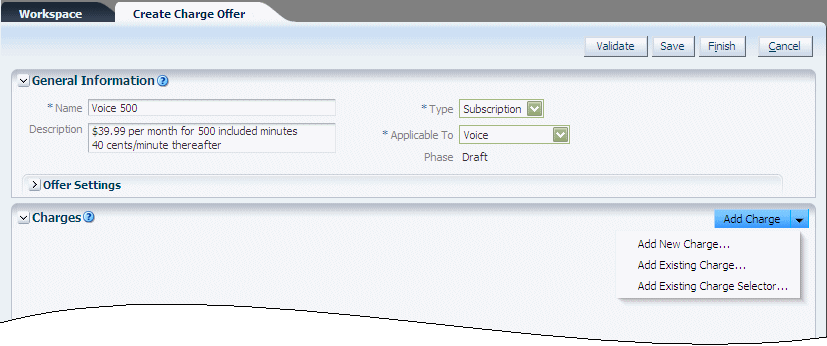
Description of the illustration ''usr_use_pdc_chg_offer_1.gif''
See "About Charge Offers" for more information.
-
After specifying general information for the charge offer, add charges to specify the cost of the events associated with the service to which the charge offer applies.
The following example shows a monthly service charge being created for the Voice 500 charge offer:
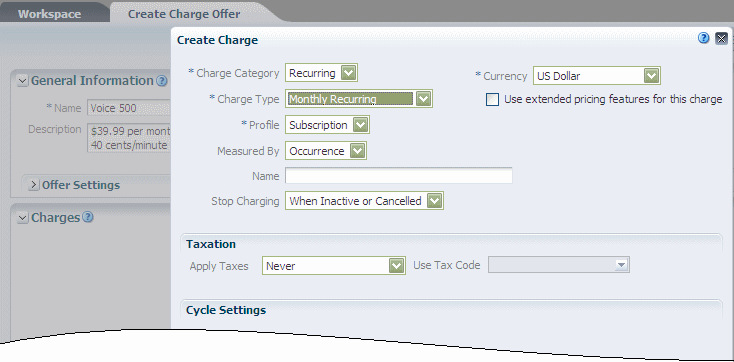
Description of the illustration ''usr_use_pdc_chg_offer_2.gif''
See "Adding Charges to Charge Offers" for more information.
-
Configure balance impacts for each charge.
The following example shows a balance impact for the Nat impact category and Offpeak time period in a usage charge for the Voice 500 charge offer:
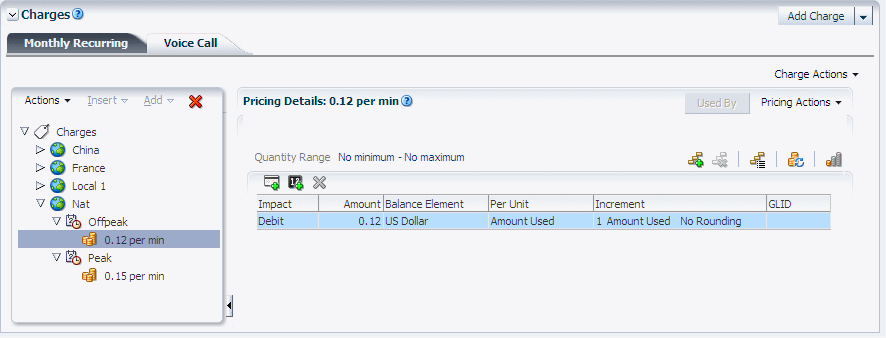
Description of the illustration ''usr_use_pdc_chg_offer_3.gif''
See "Configuring Pricing in Charges" for more information.
-
Optionally, create discount offers for the service.
The following example shows a discount offer named Included Minutes Discount being created in the Create Discount Offer page:
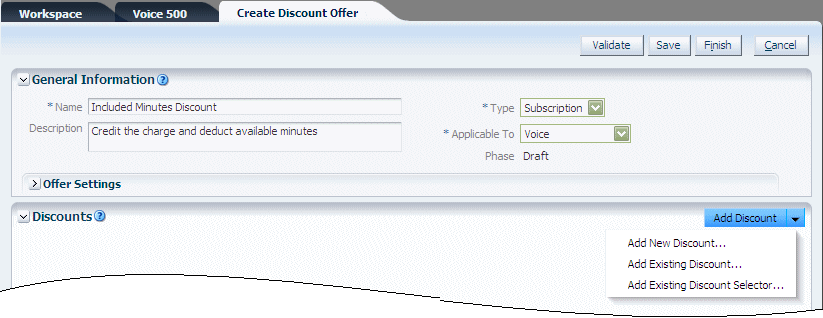
Description of the illustration ''usr_use_pdc_dsct_offer_1.gif''
See "About Discount Offers" for more information about creating discount offers.
-
After specifying general information for the discount offer, add discounts to reduce the cost of events associated with the service to which the discount offer applies.
The following example shows a usage discount being created for the Included Minutes Discount discount offer:
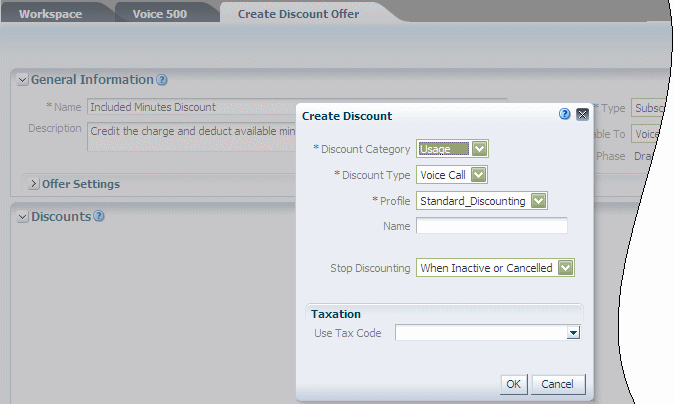
Description of the illustration ''usr_use_pdc_dsct_offer_2.gif''
See "About Discounts" for more information.
-
In each discount, configure rules and balance impacts:
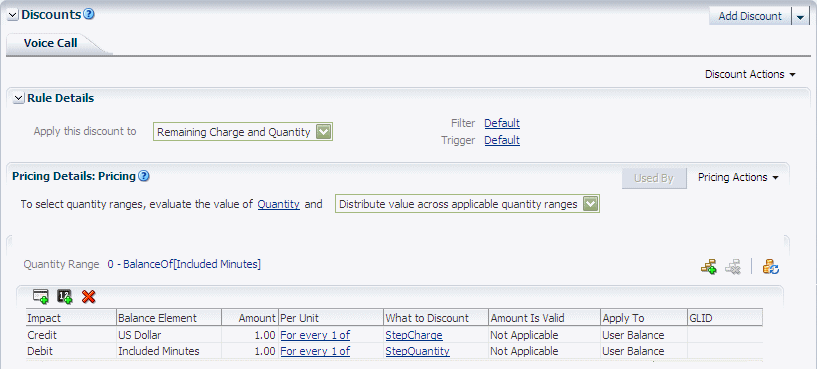
Description of the illustration ''usr_use_pdc_dsct_offer_3.gif''
See "About Discount Rules" and "About Discount Pricing" for more information.
-
When the charge offers and discount offers are finished, create bundles and add the offers to them.
In the following example, the Voice 500 charge offer and the Included Minutes Discount discount offer have been added to Voice 500 Bundle:
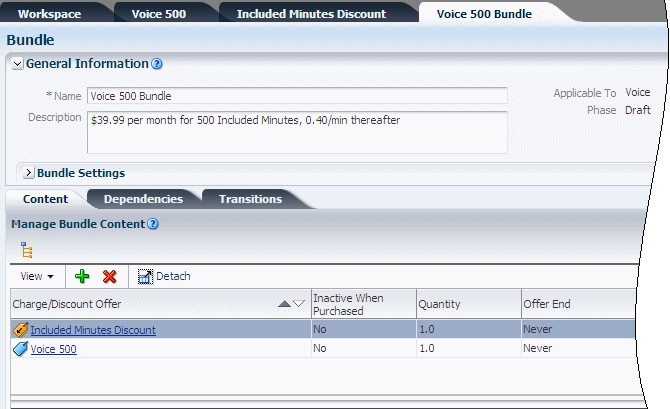
Description of the illustration ''usr_use_pdc_bundle.gif''
See "About Bundles" for more information.
-
Then create packages, specify the services they provide, and add bundles for those services to the packages.
In the following example, Voice 500 Bundle has been added to a package that provides voice and SMS services for mobile phone users:
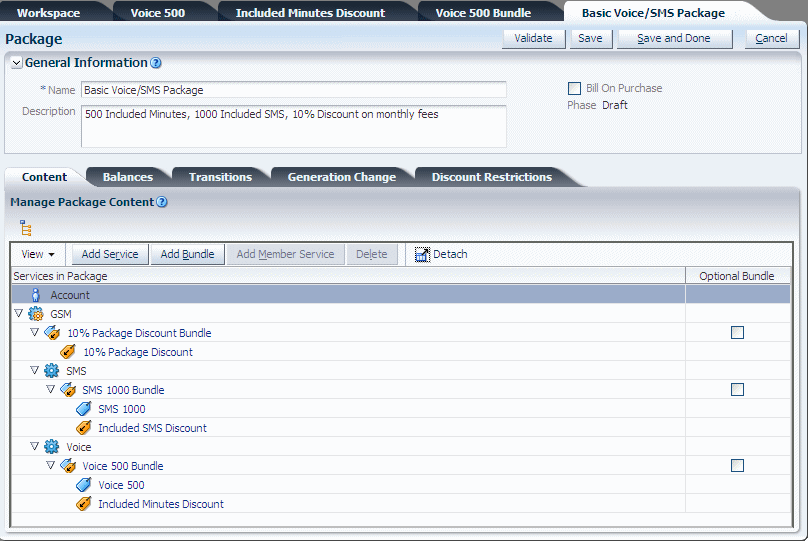
Description of the illustration ''usr_use_pdc_pkg.gif''
See "About Packages" for more information.
-
After creating packages, add them to one or more package lists.
In the following example, Basic Voice/SMS Package has been added to the new CSR package list:
Description of the illustration ''usr_use_pdc_pkg_list.gif''
See "About Package Lists" for more information.
-
After creating all the components in the product offering, validate the changeset that contains them, fix any validation errors, and then submit the changeset to a rating engine.
For example, the components shown in this procedure are part of the Fall Offerings changeset shown in the following figure:
Description of the illustration ''usr_use_pdc_chg_set_2.gif''
For information about validating changesets, see the PDC Help.
See "About Changesets" for information about submitting changesets.
-
Test the product offering by creating accounts that use your new package, generating activity, and running billing to ensure that the account balances are correctly impacted.
About Changesets
In PDC, you create and modify all setup and pricing components in the context of a changeset, which is a group of pricing components. Each user has one or more changesets, which only the user can access. As shown in Figure 2-30, changesets are listed and displayed in the user's workspace, which is the page that appears by default when PDC starts. When you select a changeset in a changeset list, its components are listed in the Changeset Details section of the page.
Figure 2-30 Selected Changeset Displayed in the Changeset Details Section of Workspace Page

Description of ''Figure 2-30 Selected Changeset Displayed in the Changeset Details Section of Workspace Page''
If you do not have a changeset, PDC automatically creates one for you when you log in. This changeset becomes your active changeset. When you create a setup or pricing component, a draft of the new component is added to your active changeset. When you modify a component, the updated component remains in the changeset in which it was created. If you have multiple changesets, only one can be active, but you can designate a different changeset as your active changeset at any time.
Changeset States and Statuses
Changesets can have the following states:
-
Open: Contains draft versions of new and modified pricing components. You can edit, validate, and submit open changesets.
-
Submitted: Has been submitted for publication to a billing system and is undergoing transformation (see "About Publishing Pricing Components").
-
Closed: Has been successfully transformed.
Changesets can have the following statuses:
-
Invalid: An open changeset that failed validation.
Before the components in a changeset can be published to a billing system, PDC must validate them to ensure that they are correctly configured for that billing system. Components that are incorrectly configured receive validation errors. For more information, see the PDC Help.
-
Pending: A submitted changeset that is waiting for its transformation to be completed. Components in pending changesets are read only.
-
Successful: A changeset whose components have been transformed into the appropriate format and published to the database of the target engine.
-
Failed: A submitted changeset that contains one or more pricing components that failed transformation.
When a changeset is submitted, the Pending and Successfully Submitted links are displayed in the Workspace task pane. You can view the list of the pending or successfully submitted changesets by moving the mouse over the Pending or Successfully Submitted link.
About Publishing Pricing Components
To publish the setup or pricing components in a changeset to a billing system, you submit the changeset. You must submit an entire changeset; you cannot submit only some of its components.
When a changeset is initially submitted, the status of its components is changed from Draft to Promoted.
If the submission is successful, the components are transformed into the appropriate format and published to the database of the target engine associated with the components' pricing profile (see "Working with Profiles"). The changeset is then closed and removed from your workspace. You no longer have access to it. You can, however, access its promoted pricing components by using the PDC search functionality.
If the submission fails:
-
The changeset status changes from Pending to Failed.
-
The Changeset Details section of the Workspace page lists the errors that caused the failure. An error tab is displayed for each transformation engine to which the changeset was submitted.
If the failure was due to a system error, you must check the load utility log and correct the error.
If the failure was due to a pricing setup error, you can fix the changeset.
If you choose to fix it, PDC performs one of the following operations, based on its analysis of the errors:
-
Resubmits the failed changeset.
-
Removes the failed changeset from your workspace and adds a new open changeset containing only the unpublished components. The new changeset includes a history of its predecessor changesets and a list of the errors that caused the original changeset to fail. After fixing the errors, resubmit the changeset.
-
Tip:
To see the latest status of a changeset, right-click the changeset name in the Workspace page and choose Refresh.If you submit your last open changeset, PDC creates another open changeset for you.
About Importing Components into Changesets
You can import components from an XML file into a new or an existing open changeset. The imported components can be immediately submitted for publication.
For more information about using changesets, see the PDC Help.
About Exporting Components from Changesets
To share your changesets with other users, you can export the components from a changeset into an XML file.
Optionally, you can include all the components referenced by the components in the exported changeset, whether or not the components are part of that changeset.
