2. Managing Oracle Banking Corporate Lending Process Management
2.1 Application Category
The entire process of corporate lending middle office function depends mainly based on the loan type or the application category to which the loan application belongs to. The Corporate Lending process will be driven based on the Application Category maintenance for every life cycle combination. Following features are supported as part of the Application category maintenance:
- Ability to capture the BPMN process for an application category and lifecycle combination and define the list of stages and corresponding data segments for the combination.
- Capture the list of products that are allowed for an application category such that appropriate product can be used as part of loan origination process that caters to customer needs.
- For a combination of an application category and lifecycle:
- Capture the list of mandatory and non-mandatory documents and checklist that are required at every stage level
- Capture the list of advices that needs to be generated and list of clauses that needs to be specified at every stage level
- Ability to capture the multiple Investigation agencies for various external checks
2.1.0.1 How to reach here:
Corporate Lending > Maintenance > Application Category
2.1.0.2 How to configure an application category:
- In the Application Category screen, provide the required details:
- Application Category: Enter the code of the application category.
- Description: Enter additional information about the application category.
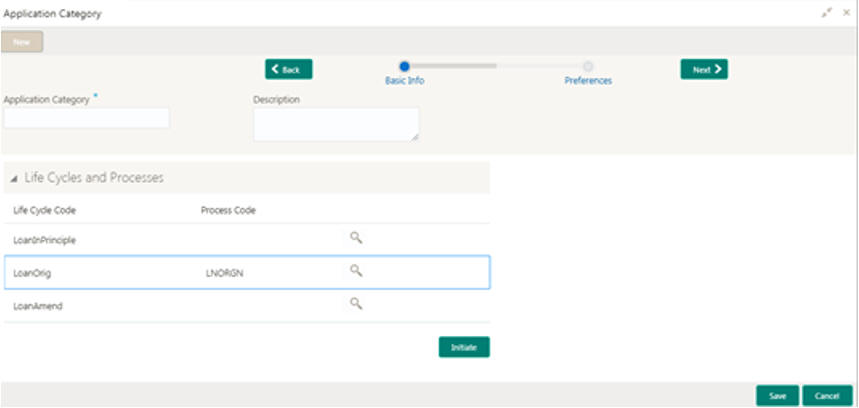
Life Cycle and Processes
- Lifecycle: System defaults the list of supported lifecycle.
- Process code: Enter the BPMN process code that must be mapped to the life cycle. The adjoining list fetches and display all valid process codes maintained in the system.
- Click Initiate to begin the lifecycle process.
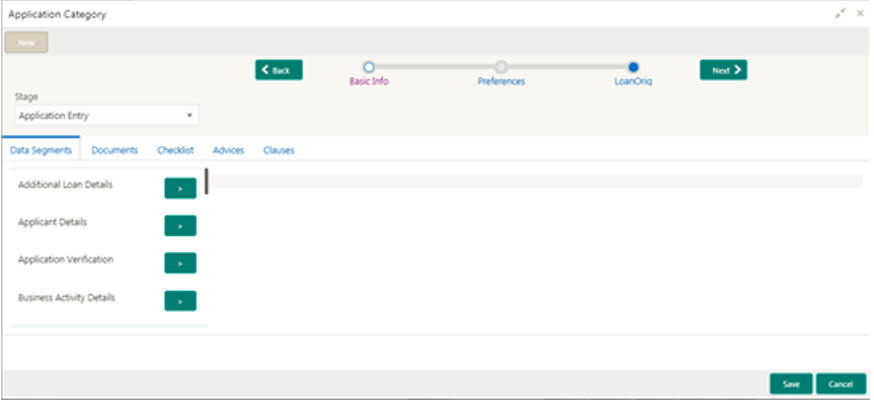
Stage
- Select a stage wise attribute configured for a lifecycle. The list of stages defined for a process code is provided in the dropdown list. You can select a stage and define the set of data segments that are required for a stage and its corresponding documents, checklist and advices.
- Data Segments: Select the required data segments listed for the stage and specify if the data segment is mandatory or non-mandatory.
- Documents: Select the required documents at every stage. The adjoining list fetches and displays all valid document IDs maintained in the system.
- Checklist: Enter the checklists that must be validated as part of every stage and specify if the checklist is mandatory or non-mandatory.
- Advices: Select the required advice must be mapped for the stage. The adjoining list fetches and displays all valid advices maintained.
- Click Add Clause to provide the clause code, clause name and clause description details.
Mapped Products
- Product Code: Enter the product code that needs to be mapped for the application category. System will allow to map multiple product codes and appropriate product code can be selected as part of loan origination process that caters to customer needs.
Agency Preferences
- Agency Code: Enter the agency code that is required for field investigation. The adjoining list fetches and displays all valid agency codes maintained in the system.
- Agency Description: System default the description of the selected agency code.
- Verification Type: Enter the type of verification. The valid options are Address, Business and Collateral.
- Holiday Preferences: Provide information about the handling holiday
preferences if the maturity date, schedule date or revision date falls
on a holiday. Holidays can be either on a local holiday or currency holiday.
Select one of the options, if the date falls on a holiday:
- Ignore Holidays
- Provide the preferences for movement of Maturity/Schedule/Revision date
- Provide the Holiday Preferences:
- Holiday Treatment Type: System displays the type of holiday treatment as Payment Schedule, Revision Schedule and Maturity Date.
- Ignore Holidays: No holiday treatment is considered if the maturity date, schedule date or revision date falls on holiday. System processes the entries on the specified date.
- Holiday Check: Enter the basis of holiday check, if you have indicated that the holiday should not be ignored for the loan contract.
- Move Across Months: If selected, allow movement of schedule date, maturity date or rate revision date of the contract across months, if you have indicated that the holiday should not be ignored for the loan contract. If you have chosen to move the schedule date/maturity date of a contract falling due on a currency holiday, either forward or backward to a working day and it crosses over into a different month, the schedule date/maturity date is moved to the next month only if you indicate so in this field.
- Schedule Movement: If selected, indicates the movement of schedule date, maturity date or rate revision date either move forward to a next working day or move backward to the previous working date.
- Click Save. You can view the configured application category details in the Application Category View screen. After maintaining the application category, you can either go ahead and create a corporate loan.
2.2 Data Segments
Provides information about the usage of data segments that are configured at each stage. Every data segment can be configured as a mandatory or non-mandatory at Application Category maintenance based on the application category defined. Each data segment has the following action buttons:
- Back: System will move the task to the previous segment.
- Next: System will move the task to the next screen. If mandatory fields are not entered, system will display error.
- Save and Close: You can save and close the task and reopen it to work later.
- Cancel: You will be able to cancel the task window and return to dashboard. The data input will not be saved.
2.2.1 Applicant Details
Allows capturing the basic details such as client name, address, mailing address, communication preference and so on, of the customer who is applying for the loan. These are static information can should be captured for each drawdown. Once the user has selected the lifecycle and application category this segment will be invoked for details capturing. This data segment contains certain PII (Personally Identifiable Information) fields and the corresponding field information will be masked in the data segment if the user identification has PII disabled at User maintenance level. Following fields are identified as PII fields in the Applicant Details data segment:
- Address Line 1
- Telephone Number
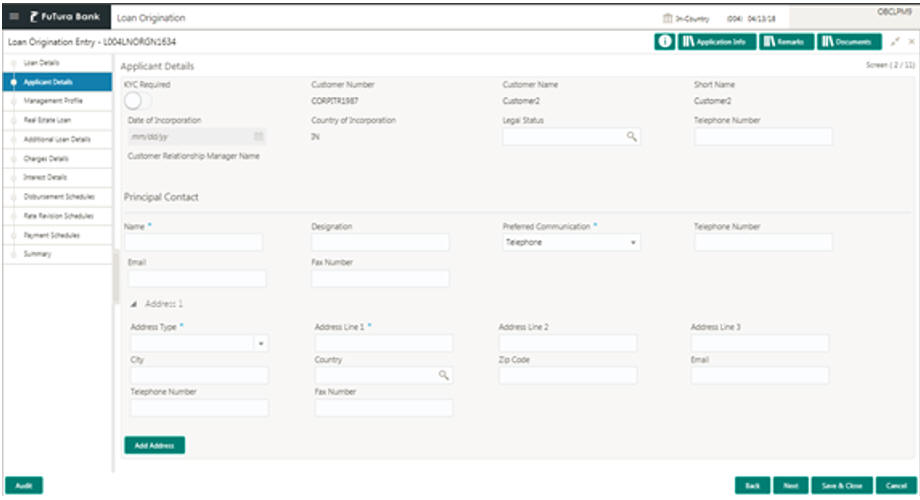
2.2.1.1 How to provide application details:
- In the Loan Origination screen, click Application Details tab and provide the required details:
- KYC Required: If selected, invokes service to on-boarding team to perform KYC and confirm back with the desired result.
- Customer Number: Display the unique customer number. User need to input the number in case of new customer and choose respective number in case in existing customer.
- Customer Name: System allows capturing the full and registered name of the customer.
- Short Name: Enter the customer short name.
- Country of Incorporation: Enter the Country name where the customer is incorporated.
- Date of Incorporation: Enter the date of customer incorporation.
- Legal Status: Enter the legal status of the customer. Alternatively, you can select the status from the option list. The list displays legal status maintained by the bank.
- Customer Relationship Manager Name: Enter the name of Relationship manager managing the account or loan of this customer. Relationship manger's user ID will be updated in this field. Alternatively, you can select the ID from the option list.
- Principal Contact Name: Enter the name of the principal contact person of the client who can be contacted if required.
- Designation: Enter the designation of the principal contact person.
- Telephone Number: Enter the telephone number of the principal contact person.
- Email: Enter the Email ID of the principal contact person.
- Fax Number: Enter the Fax number of the principal contact person.
- Preferred Communication: Enter the mode of communication with principal contact person. User can choose multiple options too.
- Address Type: Enter the different type of client's address for record or communication purpose. User can add more than one type address as applicable and required.
- Address Line 1-3: Enter the customer's address.
- City: Enter the customer's city.
- Country: Enter the list of country from where user will have an option to select the correct county from the displayed list.
- Zip Code: Enter the ZIP code of customer's city.
- Email: Enter the Email ID which is available for selected type of address.
- Telephone Number: Enter the telephone number which is available for selected type of address.
- Click Next to continue the procedure.
2.2.2 Director Details/Management Profile Details
Allows user to capture details of Directors and Management details of the customer detailing Name, Address, Mailing address, Contact details, Communication details, Shareholdings percentage and so on of the customer. This is a multi-entry segment. You will be able to update multiple profiles. These are static information can should be captured for each drawdown. This data segment contains certain PII (Personally Identifiable Information) fields and the corresponding field information will be masked in the data segment if the user identification has PII disabled at User maintenance level. Following fields are identified as PII fields in the Applicant Details data segment:
- Director Name
- Director Identification Number
- Address Line 1
- Telephone Number

2.2.2.1 How to provide management profile details:
- In the Loan Origination > Management Profile Details tab and provide the required details:
- Director Name: Enter the name of Director of the company.
- Tax Identification Number: Enter the unique identification number of Director.
- Nationality: Select the Nationality of the Director Specify the list of country from where user will have an option to select the correct county form the displayed list.
- Share Holding %: Select the percentage of share each of the Directors is holding.
- Address Line 1-3: Enter the Director's official address.
- City: Enter the customer's city.
- Country Name: Select the list of country from where user will have an option to select the correct county form the displayed list.
- Zip Code: Enter the ZIP code of customer's city.
- Telephone Number: Enter the telephone number which is available for selected type of address.
- Email: Enter the Email ID which is available for selected type of address.
- Mailing address is different: Captures the different address details
of the Director or Management if the mailing address is not same as above
details. If Yes is selected, the following fields are enabled:
- Address Line 1-3: Enter the Director's official address.
- City: Enter the customer's city.
- Country Name: Select the list of country from where user will have an option to select the correct county form the displayed list.
- Zip Code: Enter the ZIP code of customer's city.
- Click Management Profile tab to continue the procedure.
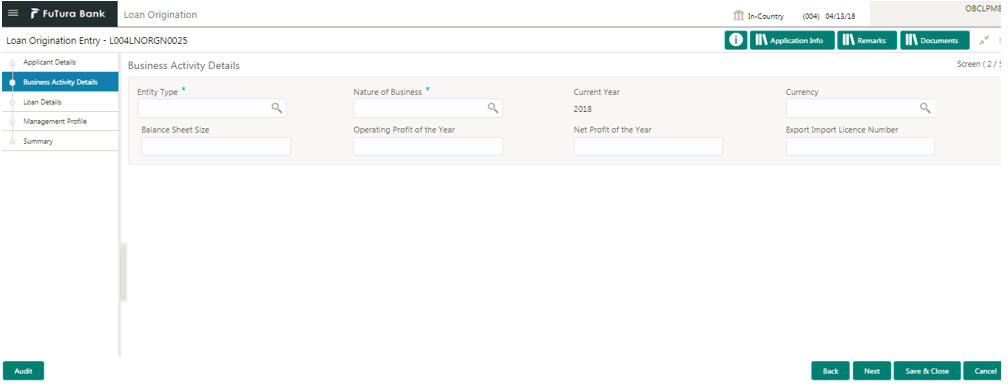
2.2.3 Business Activity Details
Allows you to capture the nature and activity of the business for the customer who has requested for the loan. You can update details as entity type, nature of business, current profit and loss, current balance sheet size and so on. This information can be used by Relationship Manger or credit manager which will help then to determine the terms and condition on which loan can be granted.
2.2.3.1 How to provide business activity details:
- In the Loan Origination > Business Activity Details tab and provide the required details:
- Entity Type: Select the entity type of the customer from the dropdown list.
- Nature of Business: Select the core activity/ nature of Business of the customer from the dropdown list.
- Current Year: Enter current year for which the details are updated in this segment
- Currency: Select a currency from the dropdown list.
- Balance Sheet Size: Enter the current year balance sheet size in figures.
- Operating Profit of the Year: Enter the current year operating in figures.
- Net Profit of the Year: Enter the current year net profit in figures.
- Export Import License Number: Enter the export import license number of the customer.
- Click Next to continue the procedure.
2.2.4 Loan Details
Allows you to capture the basic loan details which the customer has made a request. Segment will contain details as loan currency, Amount, purpose, tenor and so on to be updated. This segment is most basic detail for any process which will be followed by the product.
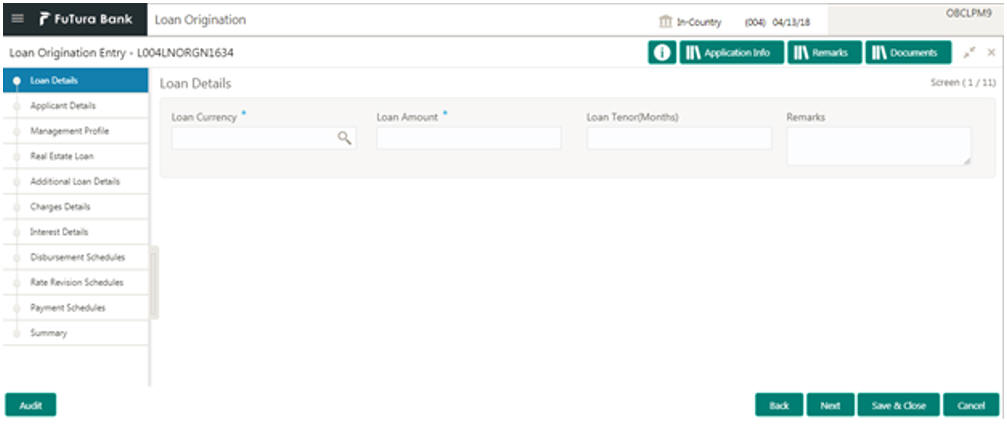
2.2.4.1 How to provide loan details:
- In the Loan Origination > Loan Details tab and provide the required details:
- Loan Currency: Select the currency in which the loan is required by customer.
- Loan Amount: Enter the amount of the loan required by customer.
- Loan Tenor (Months): Enter the loan tenor in months as requested by customer.
- Remarks: Free text field to input comments by user.
- Click Next to continue the procedure.
2.2.5 Trade Details
Allows you to capture the basic of LC details or Purchase Order details. Segment will contain details as LC details, LC reference numbers, LC amount, Expiry date and so on. Generally this segment will be used if the customer is availing the trade loan.
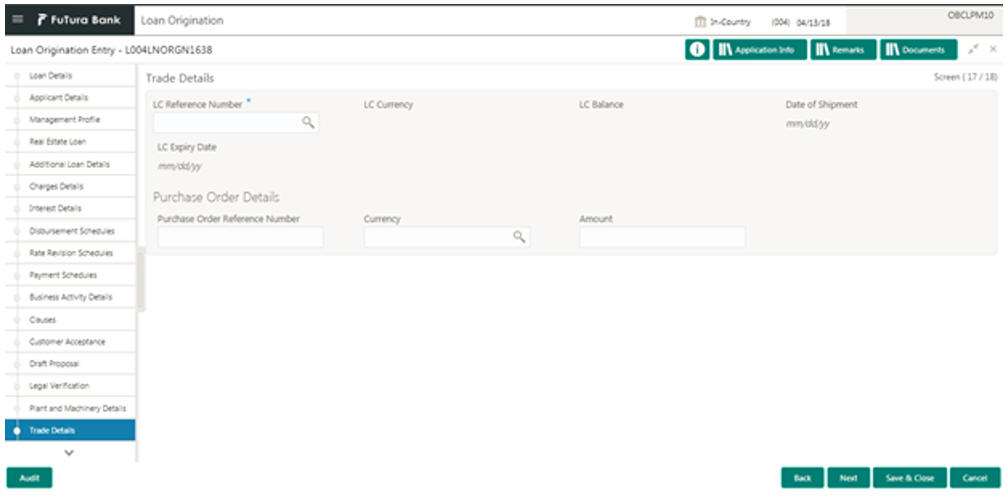
2.2.5.1 How to provide trade details:
- In the Loan Origination > Trade Details tab and provide the required details:
- LC Reference Number: Select the LC reference number provided by the customer.
- LC Currency: Select the currency of the LC from the dropdown list.
- LC Balance: Enter the loan tenor in months as requested by customer.
- Date of Shipment: Select the date on which good will be shipped by seller to customer.
- LC Expiry Date: Select the date on which LC will be expiring.
Purchase Order Details
- Purchase Order Reference number: Select the unique reference number of purchase order.
- Currency: Select the currency of the purchase order from the dropdown list.
- Amount: Enter the amount of the purchase order.
- Click Next to continue the procedure.
2.2.6 Real Estate Loan
Allows you to capture the Real estate details or property details of the client. These details can be used by relationship and credit manager to understand the credit worthiness as well as the collateral details of the customer. This segment can be used while providing real estate loans.
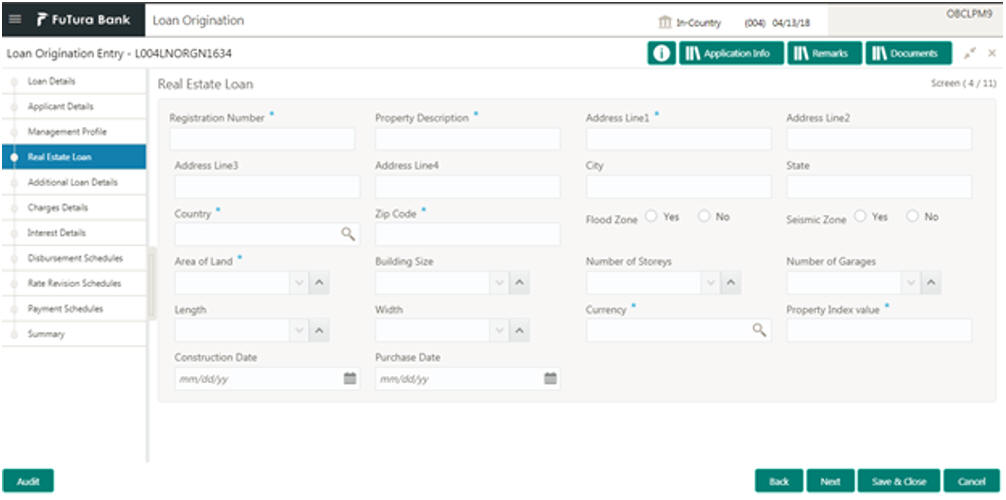
2.2.6.1 How to provide real estate loan details:
- In the Loan Origination > Real Estate Loan tab and provide the required details:
- Registration Number: Enter the registration number or unique reference number of the property.
- Property Description: Enter additional information about the property.
- Address 1-4: Enter the address of the property.
- City: Enter the city of the property.
- State: Enter the state in which the property is located.
- Country: Enter the list of country from where user will have an option to select the correct county form the displayed list.
- Zip Code: Enter the ZIP code of the location where property is located.
- Flood Zone: You can select the required option, if the property is situated in and around flood zone.
- Seismic Zone: You can select the required option, if the property is situated in and around Seismic zone.
- Area of Land: Select the total area in which property is located.
- Building Size: Select the total building size of the property.
- Number of Stories: Select the total number of stories of the property.
- Number of Garages: Select the total number of garages if any in the property.
- Length: Select the total length of the property.
- Width: Select the total width of the property.
- Currency: Select a currency from the dropdown list.
- Property Index Value: Capture the Property index value for the collateral.
- Construction Date: Select the construction date of the property.
- Purchase Date: Select the purchase date of the property.
- Click Next to continue the procedure.
2.2.7 Plant and Machinery Details
Allows you to capture the plant and machinery details provided by the client. These details can be used by relationship and credit manager to evaluate the collateral details of the customer. This segment can be used while providing equipment finance.
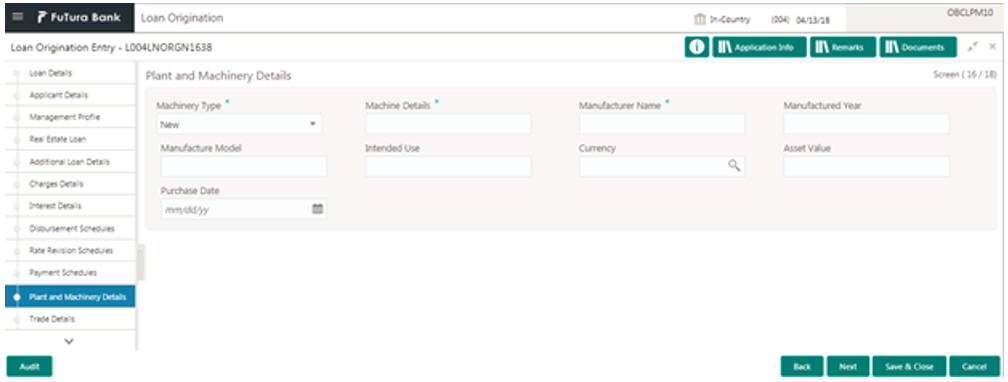
2.2.7.1 How to provide plant and machinery details:
- In the Loan Origination > Plant and Machinery Details tab and provide the required details:
- Machinery Type: Enter the type of the machinery - New or Used.
- Machine Details: Enter additional information about the Machine.
- Manufacturer Name: Enter the Manufacturer name of the machinery.
- Manufactured Year: Select the date of the manufacturing of the machinery.
- Manufacture Model: Enter the model number of the machinery.
- Intended Use: Enter the purpose of use of the machinery.
- Currency: Select a currency from the dropdown list.
- Asset Value: Enter the total value of the machinery.
- Purchase Date: Select the date of purchase of machinery from the dropdown calendar.
- Click Next to continue the procedure.
2.2.8 Additional Loan Details
Allows you to capture additional details about the loan applied by the customer. Additional details are required to further processing of the loan. This segment captures details as Loan value date, Tenor maturity date and type.
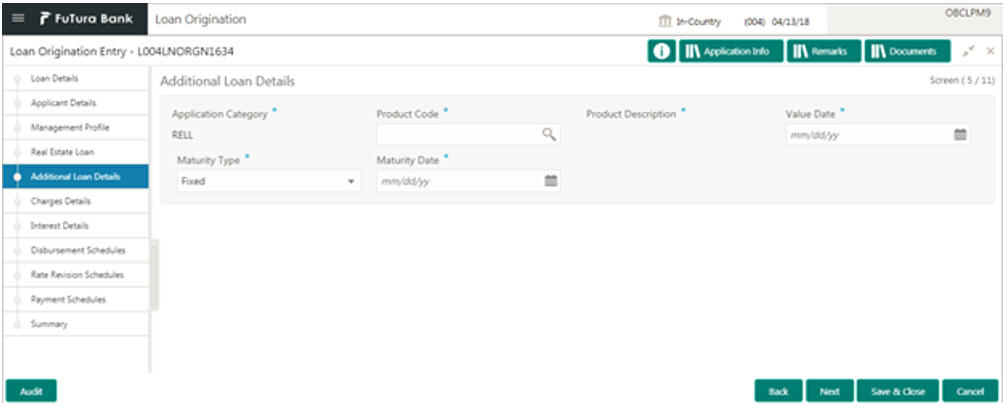
2.2.8.1 How to provide additional loan details:
- In the Loan Origination > Additional Loan Details tab and provide the required details:
- Application Category: Enter the application category. This is derived from the application entry stage.
- Product Code: Select a product code. This product code is defined at application category state. One application category can support multiple product code. These codes are the mapping of the product process on of the back office application.
- Product Description: Display the default description of the product code.
- Value Date: Select the Value/Drawdown/Effective date of the loan. System defaults the date as per Application date and however the user will be allowed to modify as per the requirement.
- Maturity Type: Select the type of maturity of the loan. The different
type of types are defined below which a user will be able to select.
- Fixed: If Maturity type is selected as Fixed, the Maturity Date field is enabled to update.
- Notice: If Maturity type is selected as Notice, the Notice Day field is enabled to update.
- Call
- Maturity Date: Select the maturity date of the loan.
- Notice: User will be able to specify the number of the day(s) of the notice period.
- Notice Frequency: Select frequency of the notice period. Example: Day(s), Week(s), Month(s), Year(s)
- Click Next to continue the procedure.
2.2.9 Interest Details
Allows you to capture the type of the interest rate and the margin to be charged from the customer for the loan. This segment captures various types of rates offered to the customer. This data segment can be used for Loan Origination and Loan Restructuring process and In principal approval. The rate details (Rate code, rate type, rate sub type) maintained for the component will be defaulted to the loan application.
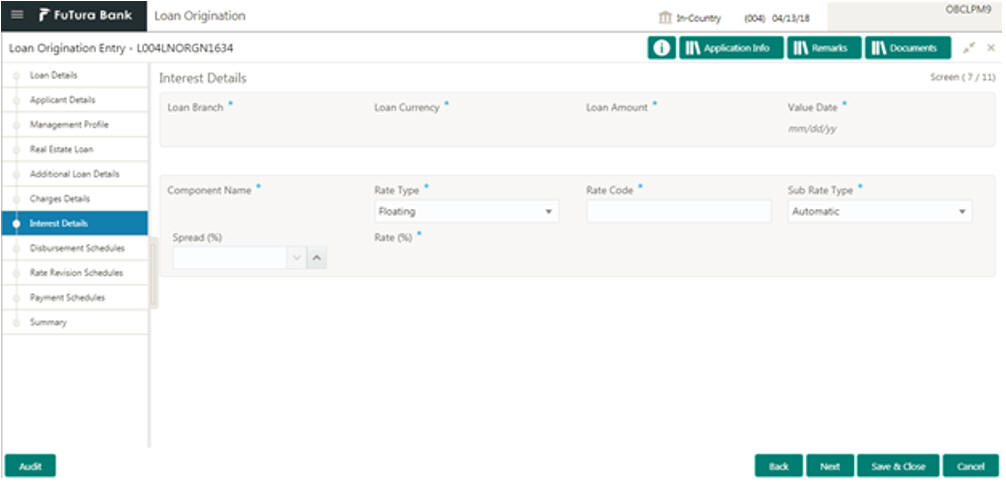
2.2.9.1 How to provide interest details:
- In the Loan Origination > Interest Details tab and provide the required details:
- Loan Branch: Display the Home branch for the Loan.
- Loan Currency: Display the currency in which the loan is required by customer.
- Loan Amount: Display the amount of the loan required by customer.
- Value Date: Display Value/Drawdown/Effective date of the loan.
- Component Name: Enter a name for the component.
- Rate Type: User need to specify the rate type. The options available
are:
- Floating Rate: These rates are dynamic in nature and changes on certain frequency and event. A floating interest rate, also known as a variable or adjustable rate. Example: LIBOR, HIBOR and so on.
- Fixed Rate: A fixed interest rate is an interest rate on a liability, such as a loan or mortgage that remains the same either for the entire term of the loan or for part of the term.
- Special Rate: Any other rate maintained by bank or the department can be used.
- Rate Code: Correspondent rate code will be displayed as the user selects the rate type.
- Sub Rate Type: Based on the Rate type user will be allowed to select
the corresponding Rate sub type as below:
- Floating
Automatic: The rate revision will be applied automatically the once the rates are changed in the market.
Periodic: User will be able to define the periodicity of the rate change for that particular rate type. One the value date the rate changes will be applied on the loan. - Fixed
User Input: User will have option to input rate in interest.
Standard: User will be using the Standard rate maintained by the bank.
Treasury: User will be able to input the rates derived from treasury.
Agency: Rates published by any Agency can be used at this segment. - Special
Fixed Rate: User will be able to input a fixed interest rate which remains the same either for the entire term of the loan or for part of the term.
Flat Amount: If the interest to be charged at flat amount then this option can be used.
- Floating
- Spread (%): Select the spread for the rate.
- Rate (%): Display the default rate derived in case fixed/floating selected as rate type. System will allow inputting rate if the sub rate type is Special rate or User Input.
- Amount: Enter the flat amount provided by the user. This field is enabled, if you select Special rate and sub type as flat amount.
- Click Next to continue the procedure.
2.2.10 Fee, Charges and Commission Details
Allows you to capture various type of fee, charges and commission details which a customer has to pay. Relationship or Credit manager decides on the amount of fee to be charged, Also there is a provision for waiver. User can capture if any fee, charges or commission to be waived off.
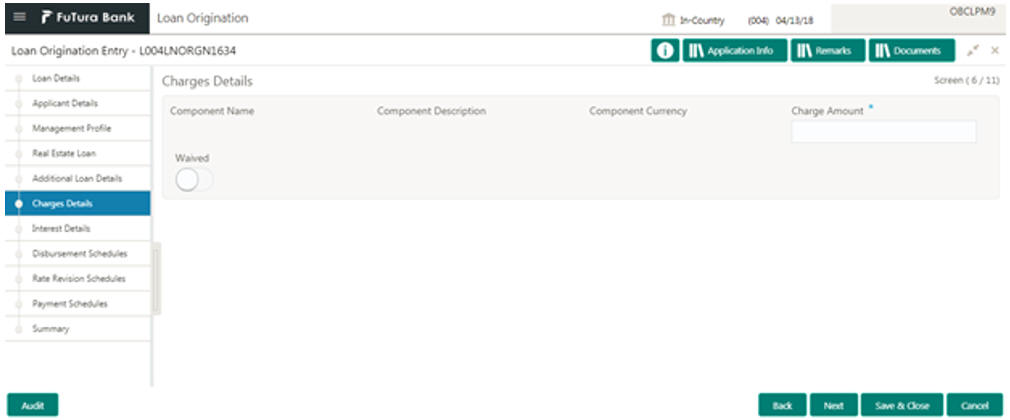
2.2.10.1 How to provide charges details:
- In the Loan Origination > Charges Details tab and provide the required details:
- Component: Enter the Component Name basically the type of fee to be captured. It's a free Text field.
- Component Description: Enter additional information about the component.
- Component Currency: Select the currency in which the fee, commission will be charged.
- Charge Amount: Enter the amount in which the fee, commission will be charged.
- Waived: You can make if any fee or charges to be waived.
- Click Next to continue the procedure.
2.2.11 Payment Schedules
Helps to capture the prepayment schedules for the loan which includes the components such as principal, main interest and penalty components, if any. For every prepayment component, user can capture the schedule frequency, unit, schedule count, liquidation mode and start date of the payment.
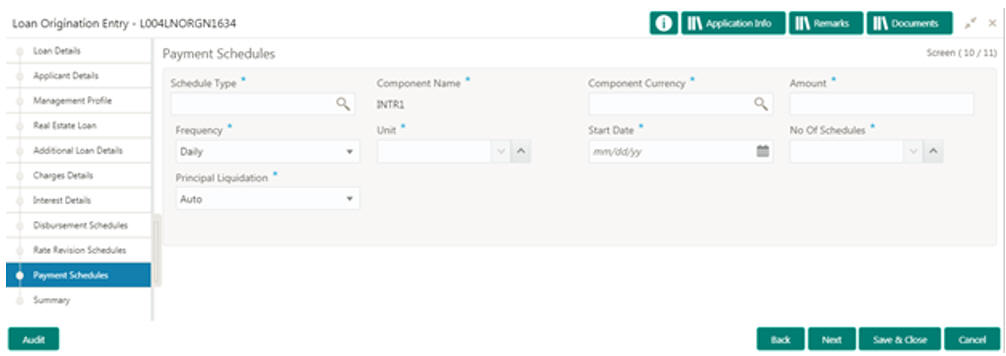
2.2.11.1 How to provide payment schedules:
- In the Loan Origination > Payment Schedules tab and provide the required details:
- Schedule Type: Schedule type will default 'P - Payment' for prepayment schedules.
- Component Name: Select the component (Principal/Interest) for which the schedule to be defined.
- Component Currency: System will default the currency for the selected component based on the product set up.
- Amount: Enter the flat amount to be paid for the component for the defined frequency.
- Frequency: Select the frequency of schedule from the dropdown list.
- Unit: Enter the no of times the payment to be made for the defined frequency.
- Start Date: Select the start date of the payment schedule for the defined frequency
- No of Schedules: Enter the no of schedules for the defined frequency.
- Principle Liquidation: Select the liquidation mode (auto/manual) from the dropdown list.
- Click Next to continue the procedure.
2.2.12 Disbursement Schedules
This segment allows user to capture details of loan disbursement. In Addition it also captures the settlement details required for processing of the loan. This segment captures details as Amount, Percentage, Mode of payment, Settlement account details of disbursement. This data segment will be used for Loan Origination and Loan Restructuring process.
2.2.12.1 How to provide disbursement schedules:
- In the Loan Origination > Disbursement Schedules tab and provide the required details:
- Schedule Date: Select a date on which the disbursement to be scheduled.
- Disbursement Currency: Enter the currency of the amount that needs to be disbursed.
- Total Disbursement Amount: Enter total amount to be disbursed.
- Amount to Disburse: Enter the amount to be disbursed as part of the schedule, Example: If USD10,000,000.00 is total disbursement amount and client needs only USD5,000,000.00 as of value date. In this case "Amount to be Disburse" will be updated as USD5,000,000.00.
- Already Disbursed Amount: In case of split disbursement, system display the amount that is disbursed already. In the above example customer has drawn USD5,000,000.00 and he request for remaining amount to be drawn. While capturing the details of next drawdown "Already Disburse Amount" will be displayed with USD5,000,000.
- Percentage of Disbursement: Select the percentage of the disbursement amount. Either Amount to Disburse or Percentage (%) of Disbursement can be provided in this field.
- Split Sequence Number: Select the sequence number of drawdown split. System will default the sequence no on click of '+'
- Split Percentage: Select the percentage of split amount that much be settled to the specified account.
- Split Amount: Enter the split amount that needs to be settled to the specified account.
- Payment Mode: The mode how the amount will be transferred to customer
will be updated. System accepts three types of payment mode:
- Customer's Account
- Draft
- Cheque
- Settlement Account Number: Select the settlement account number where the drawdown proceeds will be credited.
- Settlement Account Branch: Indicate the branch of the settlement account number.
- Settlement Account Currency: Indicate the currency of the settlement account branch.
2.2.13 Facility/Collateral Details
Helps to capture the credit lines and collaterals that the prospective borrower wish to associate as part of the corporate loan that is availed. This data segment can be used for below purposes
- Linkage of existing collaterals and credit lines
- Creation/Linkage of new collaterals to enhance the credit lines
- Creation of credit lines for new customers
Linkages of existing credit lines and collaterals can be made as part of Linkages tab. Any new collaterals or credit lines can be captured as part of Creation tab. The captured details has to be handed off to CAMS origination process for Facility/Collateral creation.
2.2.13.1 How to provide collateral details:
- In the Loan Origination > Collateral Details tab and provide the required details:
- Liability ID: Based on the Customer Identification number, field
Liability ID will be defaulted.
- Linkages
- Facilities
- CAM Initiation Required: If selected, specify when the captured details are required to be handed off to CAMS origination system for new facility/collateral creation. The loan application status will be marked as 'CAM Initiation in Progress' and will be handed off to CAM origination system for collateral / facility creation. Based on response from CAM system, the application will be moved back for the Corporate Relationship Manager to link the newly created facility/collateral ID details under Linkage tab.
- Credit Appraisal Required: If selected, specify if the loan application has to be moved to Credit committee for Credit appraisal. The loan application has to be moved to Credit Appraisal, where the Credit committee can either approve (or) reject (or) request for new facility/collateral creation (or) provide another Facility/Collateral ID to utilize for the loan.
Note
You can select this checkbox when there is some discrepancy in the existing Facility/Collateral details:
- If the provided facility/credit lines are in the stage of breaching the expiry date
- If the provided facility/collateral are not sufficient for the requested loan
- If any new facility/collateral is required for the requested loan
System prompts the user to select the checkbox if the condition prevails:
- If Loan amount breaches the Credit line amount
- If Credit line expires prior to loan maturity date
- If loan tenor, rate and charges to be verified and confirmed by credit committee
Link Facility
- Facility ID: Enter the Credit line/Facility ID. The adjoining option list displays all valid liability numbers maintained in the limits system for the Customer Number. Select the appropriate one.
- Facility Category: System displays the facility category of the selected facility ID.
- Facility Currency: System displays the currency code of the selected facility ID.
- Facility Branch: System displays the branch of the selected facility ID.
- Start Date: System displays the start date of the selected facility ID.
- Expiry Date: System displays the expiry date of the selected facility ID.
- Line Currency: System displays the line currency of the selected facility ID.
- Line Amount: System displays the line amount of the selected facility ID.
- Available Amount: System displays the available amount of the selected facility ID.
- Utilized Amount: System displays the utilized amount of the selected facility ID.
- Linkage Percentage: Select the percentage of amount that needs to be linked to the loan for the given facility ID.
- Utilization Order: Select the order in which the utilization happens. The system utilizes the linkage in ascending order.
Collaterals
- Collateral ID: Select the collateral ID. The adjoining option list displays all valid collaterals maintained in the limits system for the customer number.
- Collateral Category: System displays the collateral category of the selected collateral ID.
- Collateral Type: System displays the collateral type of the selected collateral ID.
- Collateral Currency: System displays the currency code of the selected collateral ID.
- Collateral Amount: System displays the value of the collateral of the selected collateral ID.
- Available From: System displays the date from which the collateral is available for the selected Collateral ID.
- Purpose of Facility: Enter the purpose for facility creation or remarks, if any.
- Available Amount: System displays the available amount of the selected collateral ID.
Business Nature
Allows you to capture the business nature and activity of the customer who has requested for the facility creation. Use can update details as entity type, nature of business, current profit and loss, Current balance sheet size and so on. This information can be used by credit manager to determine the maximum credit line amount that can be granted.
- Entity Type: Enter the entity type of the customer.
- Nature of Business: Enter the core activity/ nature of Business of the customer.
- Current Year: Select current year for which the details are updated in this segment
- Balance sheet size: Enter the current year balance sheet size in figures.
- Operating Profit of the year: Select the current year operating profit in figures.
- Net Profit of the Year: Select the current year Net profit in figures.
Collaterals
- Collateral Category: Enter the category of the collateral that needs to be created. The adjoining option list displays all valid collateral categories maintained. Select the appropriate one.
- Collateral Type: Enter the type of the collateral that needs to be created. The adjoining option list displays all valid collateral types maintained. Select the appropriate one.
- Collateral Description: Enter the description of the collateral in free formatted text.
- Collateral Currency: Enter the currency in which the collateral needs to be created in the system.
- Owner Estimated Value: Enter the estimated value of the collateral in figures, as mentioned by the customer.
- Available From: Select the date from which the Collateral is available to Customer.
- Purpose of Collateral: Select the date from which the Collateral is available to Customer.
- Click Next to continue the procedure.
2.2.14 Rollover Preferences
Is captured for specifying the rollover preferences. When a loan contract is opted for rollover (or) renewal, system will process the rollover based on the rollover mechanism and rollover method specified in this data segment. This will be a non-mandatory data segment and if no preferences is specified at data segment level, system will default the preferences specified either from application category or from product.
2.2.14.1 How to provide rollover preferences:
- In the Loan Origination > Rollover Preferences tab and provide the required details:
- Amount Type: Select the amount type that needs to be rolled-over.
An outstanding principal can be opted to rollover along with or without
outstanding interest using this field. The options available are:
- Principal
- Principal + Interest
- Principal + (Interest-Tax)
- Currency: Select a currency from the dropdown list.
- Special Amount: Enter the Special amount. Special amount field is used when the customer opts to specify an amount that is different from the outstanding principal + interest.
- Treat Special Amount as: Enter the manner in which the special amount
to be treated. If the principal of the new loan is meant to be a special
amount then it is required to indicate the manner in which the special
amount is to be treated. The options available are:
- Rollover Amount
The special amount specified will be considered as a Rollover amount for the newly renewed loan. For example, if the outstanding amount is 20,000 and the special amount is given as 25,000 the additional 5000 gets added to the loan. If the outstanding amount is 30,000 and the special amount is given as 25,000 the additional 5000 gets liquidated. - Liquidation Amount
The special amount specified will be considered as the amount to be liquidated. For example, if the outstanding amount is 20,000 and the special amount is given as 25,000 you are not allowed to rollover. If the outstanding amount is 30,000 and the special amount is given as 5,000 the additional 5000 gets liquidated and only 25,000 is rolled over. - Maximum Rollover Amount
The special amount specified will be considered as the maximum amount to be rolled over. For example, if the outstanding amount is 20,000 and the special amount is given as 25,000 you can rollover the entire outstanding amount. If the outstanding amount is 30,000 and the special amount is given, as 25,000 only 25,000 will be rollover and the remaining 5000 is liquidated. - Ignore
By choosing the 'Ignore' option, you can choose not to treat the special amount in any specific manner.
- Rollover Amount
- Liquidate Overdue Schedules: At the time of rolling over a contract with overdue schedules, you may either liquidate the overdue schedules prior to rollover or include the overdue amount (for the schedules not liquidated) as part of the rolled over amount. Select the 'Liquidate Overdue Schedules' option to liquidate the overdue schedules before rolling over a contract.
- Maturity Type: Enter the Maturity Type for the rolled over loan.
The maturity type specified for the old loan apply to loan being rolled
over by default. However, you can change the maturity type using this
field. The options available are:
- Fixed
- Call
- Notice
- Maturity Date: Select the maturity date for the rolled over loan.
- Click Next to continue the procedure.
2.2.15 Holiday Preferences
Is considered for handling holiday preferences if the maturity date or schedule date or revision date falls on a holiday. Holiday could be either on a local holiday or currency holiday. You can select one of the following options if the date falls on a holiday:
- Ignore Holidays
- Specify the preferences for movement of Maturity/Schedule/Revision date
2.2.15.1 How to provide holiday preferences:
- In the Loan Origination > Holiday Preferences tab and provide the required details:
- Holiday Treatment Type: System display the type of holiday treatment as - Payment Schedule, Revision Schedule and Maturity Date.
- Ignore Holidays: No holiday treatment will be considered if the maturity date or schedule date or revision date falls on holiday. System will process the entries on the specified date.
- Holiday Check: Enter the basis of holiday check, if you have indicated
that the holiday should not be ignored for the loan contract. The options
available are:
- Local branch
- Currency
- Both
- Cascade Schedules: Enter the due date arrived at, the holiday treatment is considered as the start date for the due dates for the subsequent schedules.
- Move Across Month: If selected, allows movement of schedule date/maturity date/rate revision date of the contract across months, if you have indicated that the holiday should not be ignored for the loan contract. If you have chosen to move the schedule date/maturity date of a contract falling due on a currency holiday, either forward or backward to a working day and it crosses over into a different month, the schedule date/maturity date is moved to the next month only if you indicate so in this field.
- Schedule Movement: If selected, indicates the movement of schedule date/maturity date/rate revision date either move forward to a next working day or move backward to the previous working date.
- Click Next to continue the procedure.
2.2.16 Statement Preferences
Helps to indicate the loan statement generation preferences for a loan contract.
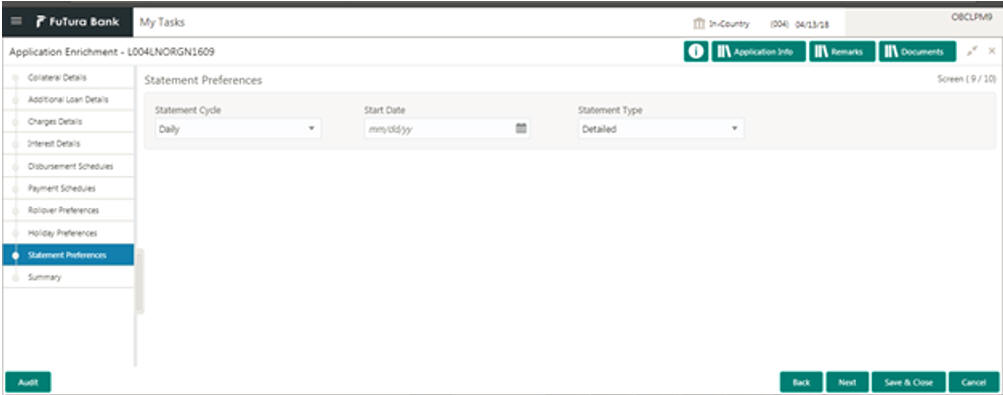
2.2.16.1 How to provide statement preferences:
- In the Loan Origination > Statement Preferences tab and provide the required details:
- Statement Cycle: Enter the frequency of statement generation.
- Start Date: Select the start date of the frequency for the generation of the statement.
- Statement Type: Enter the statement type to indicate if the loan statement report to be generated in a detailed or summary format.
- Click Next to continue the procedure.
2.2.17 Credit Appraisal
Any exemption raised as part of Facility/Collateral data segment due to insufficient credit lines, the loan application is marked for Credit appraisal. This data segment helps the credit committee to verify the credit lines and collaterals furnished by the applicant and take prompt action based on the evaluation.
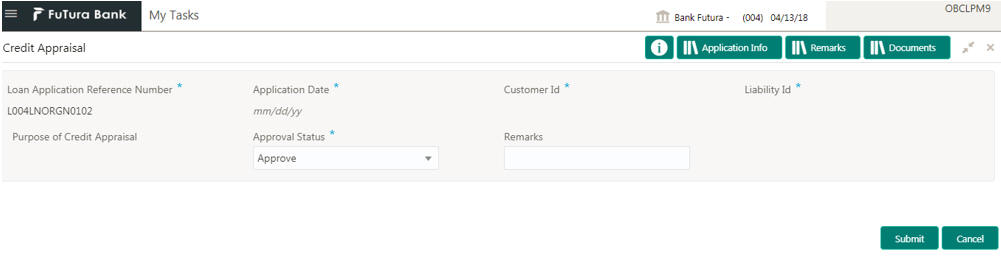
2.2.17.1 How to provide credit appraisal:
- In the Loan Origination > Credit Appraisal tab and provide the required details:
- Loan Application Reference Number: System displays the loan application reference no for which the credit appraisal is requested for.
- Application Date: System displays the date of the loan application
- Customer ID: System displays the Customer ID of the loan application.
- Liability ID: System displays the liability number of the Customer.
- Purpose for Credit Appraisal: System displays the remarks specified by Relationship Manager while marking for Credit appraisal and the list of override messages prompted by the system in Collateral/Facility linkage screen during credit exemption.
- Approval Status: User can select any of the following options as
part of approval process
- Approve: Approve the loan application to proceed further
- Reject: Reject the loan application and move back to Enrichment stage
- Mark for CAMS: Handoff the request to CAMS origination system for amendment
- Remarks: Enter additional information while accessing the loan application
- Click Next to continue the procedure.
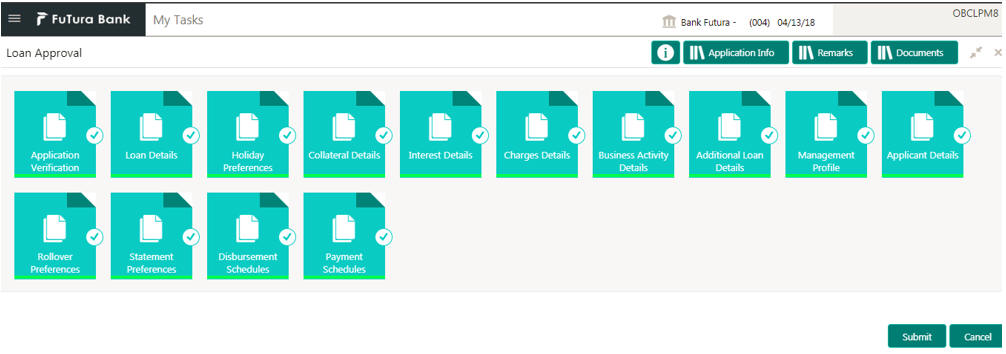
2.2.18 Application Verification
Helps to verify the loan details captured in previous data segments. The details captured in various data segments are displayed as summary tile view, which verifier can click and view the details. The details are not allowed to modify in this data segment. However user can capture his comments under 'Remarks' field and either approve the application to proceed further or send the application back to previous stage if the information provided is not adequate or satisfactory. Following options are supported as exit criteria in this data segment:
- Approve: Approve the application task and proceed to next stage
- Mark for Correction: Reject the application to move back to previous stage for modification
- Reject: Reject the application and send notification to Customer
- Cancel: Close the screen and retain the task in the same stage
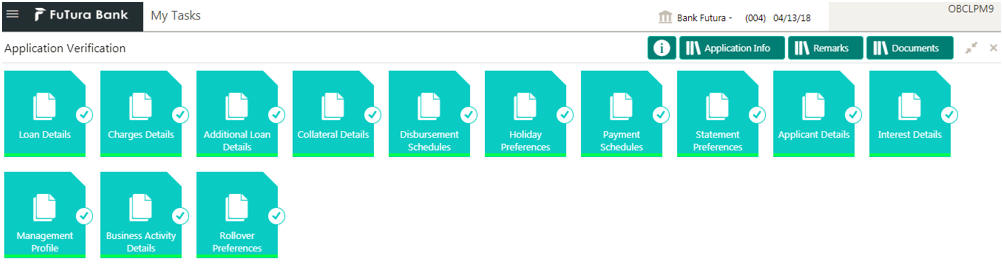
2.2.18.1 How to provide application verification:
- In the Loan Origination > Application Verification tab and verify the uploaded documents by clicking Documents and Checklist icon.
- Click Submit.
2.2.19 Legal Verification
Helps the legal officer to verify the legal documents, evaluate the legal constraints associated with the applicant, add the respective clauses and capture his remarks.
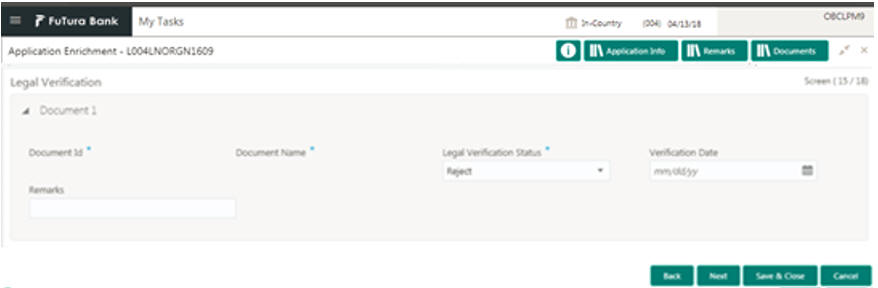
2.2.19.1 How to provide legal verification:
- In the Loan Origination > Legal Verification tab and provide the required details:
- Document ID: Enter the document ID details.
- Document Name: Enter the name of the document.
- Legal Verification Status: Select a legal verification status from
the dropdown list:
- Approve: Approve the loan application
- Reject: Reject and move the application to enrichment stage for legal modification
- Cancel: Reject the application and send reject notification to customer
- Validation Date: Select the legal opinion date from the dropdown calendar.
- Remarks: Enter additional information about the legal verification, if any.
- Click Next to continue the procedure.
2.2.20 Loan Approval
Helps the loan officer to approve the loan application. The loan officer has to verify the loan application, analyses the eligibility of the Credit lines and collateral, verify the applicant business nature and approve the loan application. The details captured in various data segments are displayed as summary tile view. User can click and view the loan details. The details are not allowed to modify in this data segment. However user can capture his comments under 'Remarks' field and can either approve or reject the application. Following options are supported as exit criteria in this data segment:
- Approve: Approve the application and generate sanction advice
- Mark for Correction: Reject the application to move back to previous stage for modification
- Reject: Reject the application and send notification to Customer
2.2.20.1 How to provide loan approval:
- In the Loan Origination > Loan Approval tab, OBCLMO supports both single and multi-level approvals. Business rules can be configured in BPMN process flow to have single or multi-level approval
- Click Submit.
2.2.21 Customer Acceptance
Captures the acknowledgement details given by the customer post loan sanctioning. Based on acknowledgement received through mail or letter, user can capture the acknowledgement details and update the Customer acceptance status.
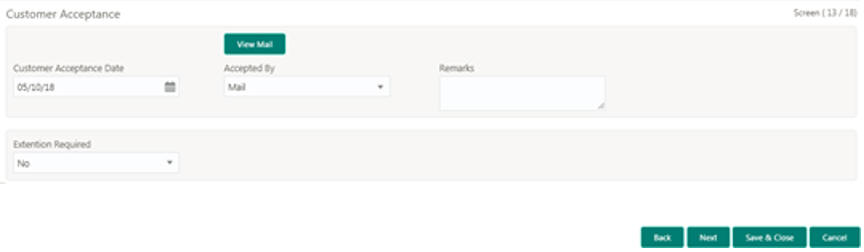
2.2.21.1 How to provide customer acceptance:
- In the Loan Origination > Customer Acceptance tab and provide the required details:
- Customer Acceptance Date: Select the date of acceptance from customer from the dropdown calendar.
- Acceptance By: Select the mode of acceptance for customer from the dropdown list.
- Remarks: Enter additional information about the customer acceptance.
- Extention Required: Select extention required from the dropdown list.
- Click Next to continue the procedure.
2.2.22 Draft Proposal Approval Details
Allows you to verify and input all the details captured for draft proposal captured in various data segment such as Client name, Loan Amount, currency, tenor, Company profile, Collateral requirements, fee and charges details, also with interest details. The details captured in various data segments are displayed as summary tile view, the details of each tile can be viewed by a click on the tile. The user will have option to either verify and approve or reject the application. He can also input his new details as per the approval.
Following options are supported as exit criteria in this data segment:
- Approve: Approve the application task and proceed to next stage.
- Reject: Rejects the application and takes the application to enrichment stage.
- Cancel Application: Cancel the application and send notification to Customer.
- Cancel: Close the screen and retain the task in the same stage.

2.2.22.1 How to provide draft proposal:
- In the Loan Origination > Draft Proposal tab and provide the required details:
Loan Details
- Loan Currency: Select the currency in which the loan is required by customer.
- Approved Loan Amount: Enter the amount of the loan required by customer. Also, you will be able to input minimum and maximum loan amount which can be offered to customer.
- Loan Tenor (Months): Select the loan tenor in months as requested by customer. Also, you will be able to input minimum and maximum loan tenor which can be offered to customer.
- Proposal Validity: Select a proposal validity.
Interest Details
- Rate Type: Select a rate type from the dropdown list. The options
available are:
- Floating Rate
- Fixed Rate
- Special Rate
- Sub Rate Type: Based on the Rate type user will be allowed to select
the corresponding Rate sub type as below:
- Floating: Automatic/Periodic
- Fixed: User Input, Standard, Treasury and Agency
- Special: Fixed Rate/Flat Amount
- Rate: Enter the rate of the loan. Also, you will be able to input minimum and maximum rate.
- Margin: Enter the margin of the loan. Also, you will be able to input minimum and maximum margin.
- Interest payment Frequency: Enter the frequency of schedule from the drop down list.
- Schedule of Principal: Defines when the Principal has to be paid
by the borrower. User will have two options to choose from. If user has
selected amortize then he will get the LOV to define the schedule amortization
or if he selects Bullet then he will have to update the final payment
date in the segment.
- Amortize: Select the frequency of schedule from the dropdown list.
- Bullet: Select the date on which the principal payment will be made.
Fee Details
- Fee: Select the fee details.
- Fee Type: Enter the fee which is applicable for the customer.
- Fee Rate: Enter the fee rate which is applicable for the customer. Either of fee rate or fee amount can be updated by the user.
- Click Next to continue the procedure.
2.2.23 Restructuring Amendment Details
Allows you to capture the financial amendment details for restructuring. This data segment will be required to capture only if the Restructuring type is selected as 'Amendment' and Amendment type as 'Financial'. In case of non-financial amendment like schedule, linkages, settlement details, and so on., or financial amendments like Interest details, payment schedules, and so on you can modify the details in the respective data segments once the details are fetched from OBCL. Based on the Loan contract reference no captured as part of 'Restructuring Entry Details' data segment, the corresponding Loan details, Interest details and Schedule details are fetched from OBCL and populated in the respective data segments. In addition following details are amended as part of this data segment.
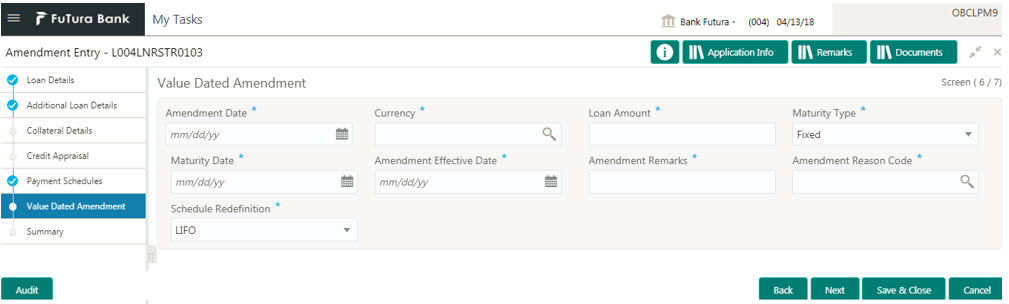
2.2.23.1 How to provide value dated amendment details:
- In the Loan Origination > Value Dated Amendment tab and provide the required details:
- Amendment Date: Select the Amendment date. System will populate the current system date.
- Currency: Select a currency from the dropdown list.
- Loan Amount: Enter the change in principal amount. This field will refer the additional disbursement of Principal.
- Maturity Type: Select the maturity type (Fixed/Call) of the amended loan.
- Maturity Date: Select the new maturity date of the loan from the dropdown calendar.
- Amendment Effective Date: Select an amendment effective date from the dropdown calendar.
- Amendment Remarks: Enter additional information about the value dated amendment.
- Amendment Reason Code: Select the amendment reason code. Reason Code LOV to make a service call to OBCL to fetch list of all reason codes
- Schedule Redefinition: Select the redefinition basis as LIFO (or) Pro-rate.
- Click Next to continue the procedure.
The captured details along with other amendments specified in respective data segments will be handed off to OBCL as part of VAMI service - for value dated amendment and CAMD service - for contract amendment.
2.2.24 Summary View
Summary screen provides at the end of every configured stage. The details captured in various data segments are displayed as summary tile view. User can click on data segment tile view to view the details. The details are not allowed to modify from here. However user can capture his comments under 'Remarks' field and either approve the application to proceed further or send the application back to previous stage if the information provided is not adequate or satisfactory.
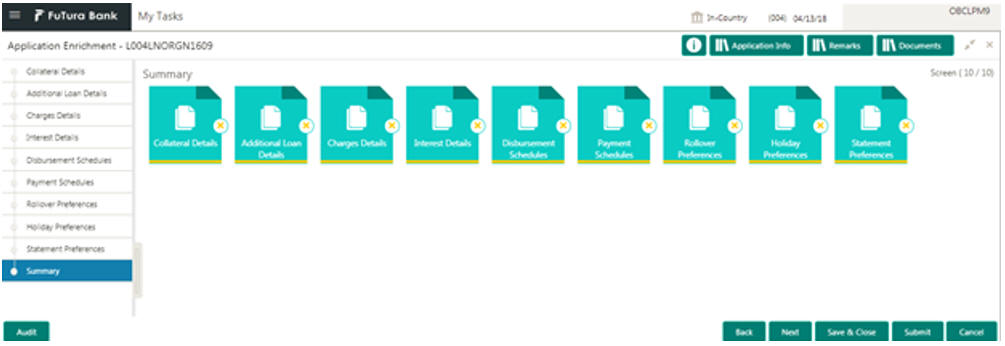
You can perform the following actions in the summary view:
- Back: System will move the task to the previous segment
- Save and Close: You can save and close the task and reopen it to work later.
- Cancel: You will be able to cancel the task window and return to dashboard. The data input will not be saved.
- Submit: System will submit the task by displaying the outcome screen to proceed further to next stage.
2.3 Advices
Provides various BIP Advices that are available for the OBCLMO process. Following advices are supported.
2.3.1 Loan Initiation Advice
This advice is associated with Loan origination Enrichment stage for PROCEED outcome.
- Contents of the Advice: The contents of the report are discussed under the following heads:
- Header: The header carries the report title, run date and time, branch name, branch address, Loan application reference, applicant name and customer address.
- Body of the Report: The following details are displayed in the report:
Field
Description
Loan Application Reference
Loan Application reference No
Customer ID
Customer No of the applicant
Customer Name
Name of the applicant
Application Category
Application Category of the loan
Loan Amount
Loan amount of the application
Loan Currency
Currency of the loan amount
Application Initiation Date
Date on when application is initiated
2.3.2 Loan Sanction Advice
This advice is associated with Loan origination approval stage for PROCEED outcome.
- Contents of the Advice: The contents of the report are discussed under the following heads:
- Header: The header carries the report title, run date and time, branch name, branch address, Loan application reference, applicant name and customer address.
- Body of the Report: The following details are displayed in the report:
Field
Description
Loan Application Reference
Loan Application reference Number
Customer ID
Customer Number of the applicant
Customer Name
Name of the applicant
Application Category
Application category of the loan
Loan Amount
Loan amount of the application
Loan Currency
Currency of the loan amount
Loan Tenor
Tenor of the loan
Loan Purpose
Purpose of the loan
Maturity Type
Type of maturity
Loan Maturity Date
Maturity date of the loan
Interest Rate Code
Interest rate details of the loan
Rate
Rate of the loan
Spread
Spread details
Interest Payment Frequency
Frequency of the interest payment
Disbursement Date
Date of disbursement / Value date
2.3.3 Loan Rejection Advice
This advice is associated with Loan origination Enrichment / Approval / Acceptance stage for REJECT outcome.
- Contents of the Advice: The contents of the report are discussed under the following heads:
- Header: The header carries the report title, run date and time, branch name, branch address, Loan application reference, applicant name and customer address.
- Body of the Report: The following details are displayed in the report:
Field
Description
Loan Application Reference
Loan Application reference Number
Customer ID
Customer No of the applicant
Customer Name
Name of the applicant
Application Category
Application category of the loan
Loan Amount
Loan amount of the application
Loan Currency
Currency of the loan amount
Loan Tenor
Tenor of the loan
Loan Initiation Date
Loan Application Date
2.3.4 Draft Approval Advice
This advice is associated with In-Principal Approval stage for PROCEED outcome.
- Contents of the Advice: The contents of the report are discussed under the following heads:
- Header: The header carries the report title, run date and time, branch name, branch address, Loan application reference, applicant name and customer address.
- Body of the Report: The following details are displayed in the report:
Field
Description
Loan Application Reference
Loan Application reference Number
Customer ID
Customer Number of the applicant
Customer Name
Name of the applicant
Application Category
Application category of the loan
Loan Amount
Loan amount of the application
Loan Currency
Currency of the loan amount
Loan Tenor
Tenor of the loan
Loan Purpose
Purpose of the loan
Maturity Type
Type of maturity
Loan Maturity Date
Maturity date of the loan
Interest Rate Code
Interest rate details of the loan
Rate
Rate of the loan
Spread
Spread details
Interest Payment Frequency
Frequency of the interest payment
2.4 Dashboards
OBCLMO dashboards provide various information to the Relationship Managers for their easy access and processing.
2.4.1 Assets at Risk
Display the performance of the asset as a pie-chart. The asset performance will be derived in the system based on the borrower's repayment. This widget will make a service call to backend product processor to fetch the asset performance details. This widget will display the total value of the holding asset and percentage wise status. A sample of the asset performance is illustrated:
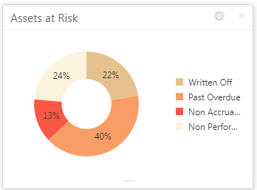
The following details are displayed in the widget:
- Total value of the asset in currency
- Percentage of status in each pie
The bank user can perform the following actions on the asset:
- On click of each pie, customer category wise total asset value will be displayed as bar chart.
- On click of each bar, summary view of the Corporate lending loan contracts will be shown for the Transaction Branch, Currency, Customer Category and Loan status combination.
- You are allowed to click on a loan contract to view the entire loan details.
2.4.2 Loans Maturing
Display the total loan value that are getting matured in the subsequent no of weeks as a Graph matrix.

On click of dotted matrix, system will display the total Loan value that are getting matured for the week starting with date. For example, system will display the total value of say 10 M USD maturing for the week starting 23rd April 2018. This implies the total value of all the loans that are maturing from 23rd to 29th April 2018.
Further bank user can click on it to get the summary view listing all the loans that are getting matured for the week. User will be allowed to click on a loan contract to view the entire loan details.