| Oracle® Retail Store Operations Cloud Service User Guide Release 17.0 E88477-05 |
|

 Previous |
 Next |
| Oracle® Retail Store Operations Cloud Service User Guide Release 17.0 E88477-05 |
|
Previous |
Next |
This chapter covers shelf replenishment. The following topics are covered:
Overview: Introduction to Shelf Replenishment.
Functionality: Shelf Replenishment, Shelf Adjustment, Item Substitution, and Receive on Shop floor.
The replenishment process attempts to ensure that the shop floor inventory is set at a level best suited for enticing customers to buy a product and to prevent empty shelves. Shelf replenishment functionality within SOCS is related to the movement of goods from the back room to the shop floor and shop floor to back room. For example, when a user sees that a certain soda quantity is low, the user can initiate a replenishment process so that more of the soda is moved from the back room. Similarly, if there is excess stock on the shop floor, SOCS supports processes to move inventory to the back room. Some of the processes require capacity setup and some form of plan-o-gram sequenced data, while others do not.
Shelf replenishment-related processing within SOCS includes the following features:
Six different replenishment methods:
Capacity algorithm based on stock level percentages
Sales based
Gap empty shelf scanning
Display stock replenishment
Receiving on the shop floor
Automatic
The system can calculate the optimal quantity of inventory on what should be held on the shop floor to prevent empty shelves
On demand generation of pick lists with real-time data
Store employees are driven to replenish the most urgently needed items first
Optional item location guidance when picking items by back room micro sequence
Formal or informal picking dialog
Ad hoc update shop floor and back room process to balance and correct inventory positions
Optional substitution when lacking inventory
Within day partial or end of day full replenishment pick lists for user efficiency
Capacity replenishment uses shop floor capacity and back room inventory positions to calculate a pick list optimized to keep shelves on the shop floor well stocked. The user only has to indicate how many cases they want to replenish and which items by selecting the product group. This method is focused on those retailers and items which have a well defined plan-o-gram.
The capacity-based replenishment method is best used by retailers who have a structured shop floor where it is easy to define capacity, items are fairly static, and multiple units are on the shop floor. This is especially useful for grocery retailers and mass merchandise retailers. The structured shop floor is important to this method since there is an inherent cost involved with the need to understand how much capacity exists on the shop floor. A dynamic environment with continuously changing assortments or single item counts often is too costly to maintain the plan-o-gram shop floor capacity.
Capacity based requires the user to define product group components using the product group dialog which will be used to generate the pick list.
Gap scanning is focused on those retail environments who want to have a very simple easy to use shop floor replenishment system. The user is able to scan items on the shop floor which become a back room pick list for someone to pick items on and bring to the shop floor.
Sales-based shelf replenishment is based on a process that records all sales coming into the store. The sold item is added to the pick list based on merchandize hierarchy. Similar to the ad hoc scanning process, this does not require plan-o-gram information. Sales-based shelf replenishment is especially well suited for fashion retailers who have constantly changing assortments and have many low, or even single instance items like special shoe sizes or undergarments.
Display Stock is a replenishment method specifically geared towards single unit items that are used to sell to customers and are related to each other by style. The process allows a user to scan the items they have on the shop floor. SOCS will generate a pick list for those styles and differentiator combination not represented on the shop floor.
The Display List type shelf replenishment helps the user to scan a list of items available on the shelf and create a list and compare it with the product group and identify the gap and replenish. The product group dialog allows the user to select the diff through which the replenishment would be done. The Display list method requires the user to define outside of the product group components to also define the differentiator. The combination of differentiator and product group used with a scanned list will provide the user with a list of items that were not scanned.
Business Case example: A handbag retailer displays all the colors within a style for purses. Susan finds the perfect burgundy colored purse, picks it up from the shop floor, and goes to a sales counter. The sales associates on the sales floor do not notice that that particular color/model is not displayed anymore. Jane looked at a magazine and really wanted to have the featured red colored purse, but when shopping for that specific purse she does not see it on the shop floor and assumes it has sold out or was never carried. She decides to walk out of the store without a purchase and look at a different purse vendor who may have the red colored purse.
This scenario could easily have been resolved by the sales associate scanning periodically the items that are displayed on the shop floor and generating a list of missing items in inventory using the display replenishment methods.
Shop floor receiving will allow the receiving associate to indicate if they are receiving in the back room or directly on the shop floor. This method is most often used with those retailers that have daily deliveries and move delivered quantities directly to the shop floor since most of the delivered quantities are just in time deliveries as is the case in the grocery environment.
The automatic option will refresh the store shop floor quantities based on capacity and available inventory for a specific merchandise selection. This feature can be used by those retailers who have a process where the store is brought back into a refreshed state at the end of the day and do not want to run manual or calculated pick lists. Another possible scenario could be when a large refresh is required due to significant plan-o-gram changes or when initially configuring a store.
Replenishment of shop floor
This operation will help a retailer to move goods from the back room to the shop floor. This is done to achieve a better fill rate at the store; the more shelf space is utilized, the better sales. This is possible even if a retailer is not using sequencing.
Moving items to the back room
Moving of Items from Shop floor to the Back room is possible. It helps a retailer to move extra goods from the shop floor, which could be an outcome of receiving the delivery at the shop floor itself or incorrect movement of goods. For example, if a retailer receives a delivery at the shop floor but there is not enough space to keep the full delivery, then the retailer can use this functionality to move the goods to the back room which are not required for that moment on shop floor. Secondly, if due to manual intervention there has been a movement of goods from the back room to the shop floor and the shop floor cannot accommodate that much quantity, the retailer can push back the excess quantity to the back room.
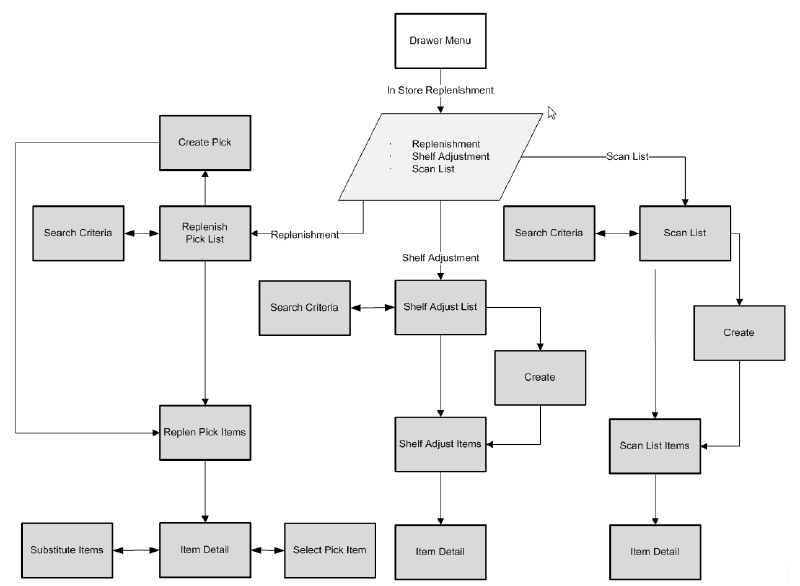
The user can access the In Store Replenishment dialog from the drawer menu on the SOCS.
The In Store Replenishment module in SOCS contains Replenishment, Shelf Adjustment and Scan List features.
This section describes the available screens for:
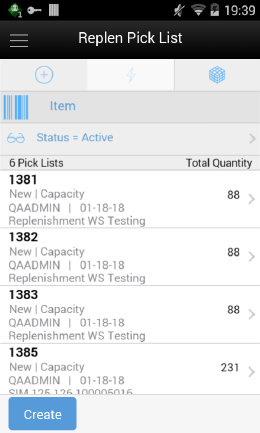
The Replenishment Pick List screen can be accessed from the In Store Replenishment menu. When the user accesses this screen, the system will by default list the New and In Progress pick list.
The Replenishment Pick List screen allows the user to create a new pick list by selecting the Create button. All types of replenishment lists are displayed with the total quantity to pick. When the user selects a replenishment list the system takes the user to the Replenishment Pick Items screen. If the user creates a new replenishment list, the user is brought to the Create Replenishment screen.
The user can filter the list by selecting the pair of glass and providing the filter criteria.
The following fields are shown in the list for the user to identify the pick list:
ID -The unique replenishment id created by the system.
Total number of quantity in the pick list.
Status of the pick.
Pick Type
Four types of in store replenishment methods can be defined here: Capacity, Sales, Display and Gap.
Updated User, Create Date and the Description of the pick.
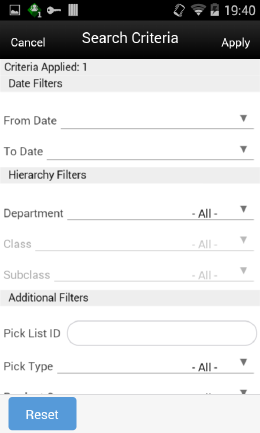
The Replenishment List Search Criteria screen can be accessed from selecting the eye glasses from the Replenishment Pick List screen. This helps to limit the search on Replenishment Pick List screen through date, hierarchy, and various additional filters which includes search fields Pick List Id, Pick type, Product Group, Mode, Scan List, Item and so on.
After applying the search criteria, the user is taken back to the Replenishment List screen with the results filtered based on the given criteria.
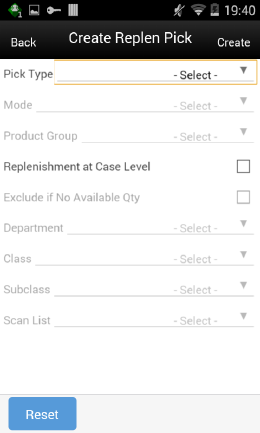
The Create Replenishment Pick screen is used to create a new shelf replenishment pick list based on various criteria specified by the user. This screen is accessed by selecting the Create button from the Replenishment Pick List screen.The user is able to create four different types of shelf replenishment lists: Capacity, Sales, Display, and Gap based replenishment lists.Based on the replenishment list type selected, some fields will display while others will not.
Capacity (Algorithm Based on Stock Level Percentages)
Capacity-based replenishment is dependent on the capacity defined for an item in sequencing at the shop floor. A user can choose to replenish within the day or end of the day. The difference between the capacity quantity and the actual stock on the shop floor becomes the suggested quantity to replenish. If the user chooses to replenish the stock within the day, the user also has an option to enter a quantity to replenish taking into account the manpower availability. If the user chooses to replenish at the end of the day, it is assumed that the user will have sufficient manpower and be able to replenish the full deficit.
Capacity-based replenishment uses the difference of the shop floor capacity and the shop floor quantity to calculate the gross need of how many units need to move to the shop floor. This need is constrained by several factors, how many units are present in the back room and how many units does the user actually have time to pick and move to the shop floor.
Capacity-based replenishment uses a specific algorithm to define the optimal method to replenish the shop floor quantity:
The total capacity equals the sum of capacity for all shop floor locations.
The Out of stock % equals the total capacity minus the shop floor quantity divided by the total capacity times 100.
Calculation:
The Gross Need Units equals the total capacity minus the shop floor quantity.
The item list is sorted in the order of percentage Out of stock.
The Net Need calculation uses the total capacity, total max fill percentage, and the mode.
The total available replenish quantity equals the back room plus the delivery bay stock. This step is only used when checking available stock on hand.
The fill quantity equals the Net Need or the total available, whichever is smaller.
The Within day fill will create a list until units replenished meet the within day fill quantity.
The End of day fill will create a list with all items needing replenishment.
Sales Based
Sales-based replenishment uses a concept in which the shop floor is intact and accurate every morning. As units are sold, new units will take their place. Often if a unit is sold out, because of limited availability, a substitution will be used to replenish. When the substitute is sold, the substitute will be replenished. The advantage of this type of method is sequencing is not required, since everything replenished is based on sold units.
A user can choose to replenish within the day or at the end of the day. If the user chooses to replenish within the day, they have an option to enter the quantity they have time to replenish. This replenishment quantity is restricted by the quantity entered by the user, and is pro-rated. If the user chooses to replenish at the end of the day, it assumes sufficient manpower will be able to replenish the suggested quantity.
This method is mostly used by fashion retailers who have no defined capacity and many items that are single size/color/style items. It often is used in conjunction with substitution to allow them to keep the shop floor looking filled by substituting the sold unit with one that is in the back room.
|
Note: This method will often be used with the option to ignore available inventory. This allows "out of stock" items on the replenishment list to be substituted. |
Gap Scanning (Empty Shelf Scanning)
The Gap scanning method replenishment is the easiest method of all the various types of shelf replenishment. With this method, the user scans the goods that need replenishment and a replenishment list is created from the units scanned.
The system uses this replenishment list to move the goods from the back room to the shop floor based on back room availability. The reason to have a separate process between scanning and generating is that one user can create a list and another user can execute the shelf replenishment allowing for distribution of workload.
Since this process does not have a dependency with either sales or capacity, it gives an advantage to the retailer to move goods without any complex setup.
Display (Sales Floor/ Shop Floor)
The shelf replenishment method of Display stock replenishment is fully based on the idea that if a customer does not see the item on the shop floor, they do not know the item exists.
This method provides a way to reduce the inefficiency of receiving new styles in the back room, and not having full knowledge of what is displayed and what should be moved from the back room to the shop floor.
The generic process is the user will scan all display stock items, and then compare them against a product group with all the styles available for that department. The user will then identify what is the differentiator needing to be displayed on the floor. Often this is color.
Because this type of method is often used in a fashion setting, it does not require sequencing or capacity at all. Capacity need is always one item per primary differentiator.
A product group is required to set up with all the items on a shelf. The following table is an example which shows six items with various colors and sizes. In order for the comparison between shop floor display and back room, all of the items need to be set up in the product group.
Next, a shelf adjustment list needs to be created by scanning the items on display. For this example, the user only has item 124 on the display shelf.
| Item ID | Diff 1 | Diff2 |
|---|---|---|
| 123 | Black | S |
| 124 | Black | M |
| 125 | Black | L |
| 234 | Red | S |
| 235 | Red | M |
| 236 | Red | L |
While creating the product group, the user selected to sort by the color. Since the scanned item is black, the sorting is by color. The system will try to find a different color available in the back room. After the comparison between the two lists, SOCS tells the user item 236 needs to be replenished.
|
Note: The suggested red item to be replenished will depend on available back room inventory and the sort of the second differentiator. If Diff 2 had been defined differently, such as L = 10, M = 08, and S = 06, then item 234 would have been recommended instead for replenishment. |
This screen is accessed by selecting a replenishment list from the Replenishment Pick List screen or when creating a new pick. The users need proper permissions to reach this screen. Selecting an item from the pick items will take the user to the Item Detail screen.
The user can access the footer menu by selecting the ellipsis button and perform various functions like viewing the Information of the pick, Default the pick quantity with the actual quantity, confirm the pick, save, cancel and go back and delete the pick.
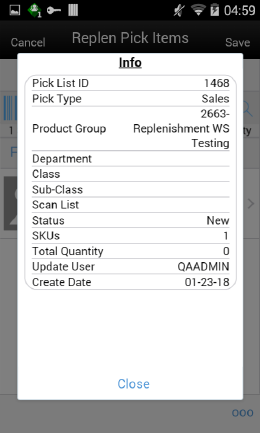
The Replenishment Info screen is accessed by selecting info option from the Replenishment Pick Items screen.
This screen provide the information about the pick which includes the Pick List Id, Pick type, Product Group, hierarchy info, scan list and so on.
This is an informational popup screen and it is read only.
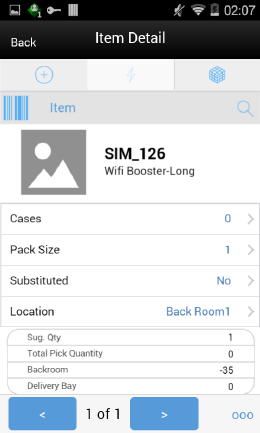
This item detail screen is accessed by selecting an item or when scanning an item from the Replenishment Pick Items screen.
User may also scan the same item or a different item from this screen. The information will be retained for the replenishment pick list the user is currently working in, until they leave the replenishment pick list. The user will select Save from the Replenishment Pick Items screen to permanently save the item information. There is no Save on the Item Detail screen.
Scanning or entering an item on this screen will refresh this screen for the item scanned/entered.
The substituted field displays whether an item has substitute item(s) associated with it and if selected it also allows the user to navigate to the substitute items screen to add substitute items.
The user can access the footer menu by selecting the ellipsis button to reset the item or go to substitute items screen.
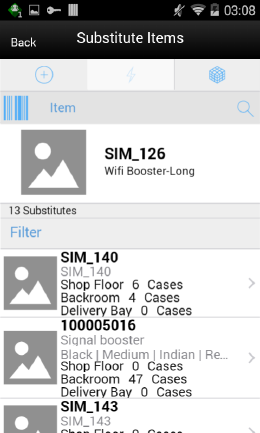
The Substitute Items screen is used to find a substitute item when the requested item has no inventory. The Substitute Items screen can be accessed from the Replenishment Item Detail screen by tapping the Substituted field. Using item substitution helps maintain a better fill rate within different areas of the store. The substitutions can be recommended by corporate or they can be ad hoc picked depending on system settings. Depending on security permissions, the user can be restricted to just the corporate items or be free to select anything they want.
SOCS allows the user to indicate whether the inventory is received on the shop floor directly. The edit container screens in DSD Receiving and Transfer Receiving dialogs support to receive inventory on the shop floor. The user can mark the check box Receive on shop floor. You can refer the screens in the respective sections for more details.
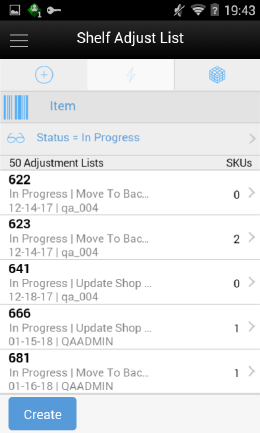
The Shelf Adjust List screen will list the Shelf Adjustment lists that are In Progress.
The user can access this screen by selecting the Shelf Adjustment menu from the In Store Replenishment menu which is available on the drawer menu.
The list includes the Move to Back Room, Update Shop Floor and Update Back Room types of shelf adjustment.
The user can find the Shelf Adjustment Id, total number of items, current status, type, and the date for the each adjustment list on this screen.
The Create button on this screen takes the user to the Create Shelf Adjust Screen to create a new shelf adjustment list.
The user can filter the list using the search criteria screen by selecting the eye glasses.
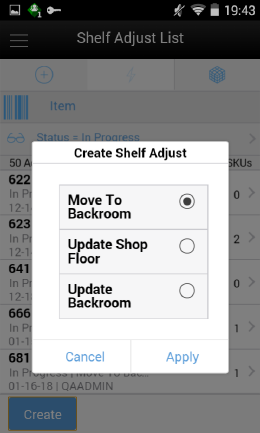
The Create Shelf Adjust popup screen appears when the user creates a new Shelf Adjust by selecting the Create button on the Shelf Adjust List screen.
The user has to select the Shelf Adjust type to create and select the apply button to create a new list. After applying the system creates a new shelf adjustment and takes the user to the Shelf Adjust Items screen.
The user can create any of the following types of shelf adjustment:
Move to Back Room:
When this list is created, the quantities scanned will be moved from the shop floor to the Back room. The quantity scanned will be subtracted from the Shop floor and added to the Back Room inventory
Update Shop Floor:
When the list is created, the quantities scanned will update the current available Stock On Hand on the Shop floor and replace the current quantity.
Update Back Room:
When the list is created, the quantities scanned will update the current available SOH in the Back Room and replace the current quantity.
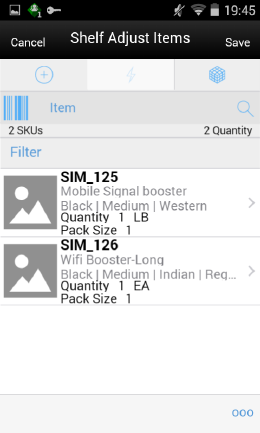
This screen is accessed by selecting a Shelf adjust list from the Shelf Adjust List screen or when creating a new shelf adjustment. The users need proper permissions to reach this screen. Selecting an item from the shelf adjust items will take the user to the Item Detail screen.
The user can access the footer menu by selecting the ellipsis button and perform various functions like viewing the Information of the shelf adjust, confirm the shelf adjustment, save, cancel and go back or delete.
The list displays the following fields with the image if configured.
Item Id, Description, Scan quantity, UOM and Pack Size.
The list also shows the following icons:
Remove Item (trash can icon) - Selecting Remove Item will flag the item in the list of items for removal.
Remove Item will be displayed upon swiping a line item from the list of items in the Shelf Adjust Items screen.
User must have the Edit Shelf Adjustment security permissions to re-move items from a shelf adjustment.
The shelf adjustment must be in edit mode to remove an item.
Restore Item (circle arrow/undo icon) - Restore Item button will only be displayed for items marked for removal.
The Shelf Adjust Info screen is accessed by selecting info option from the Shelf Adjust Items screen.
This screen provides the information about the shelf adjust which includes the Shelf Adjust Id, status, type, SKUs, total quantity, create date, update date and update user.
This is an informational popup screen and it is read only.
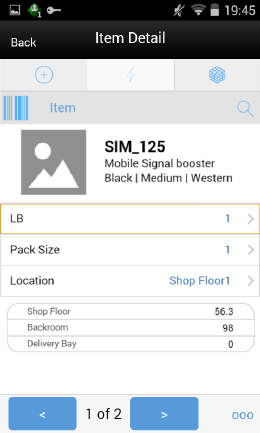
The user is directed to the Item Detail screen upon tapping on an item from the Shelf Adjust Items screen.
User will also go to this screen when adding a valid item by scanning/entering from the Shelf Adjust Items screen.
User may also scan the same item or a different item from this screen. The information will be retained for the shelf adjustment the user is currently working in, until they leave the shelf adjustment. The user will select Save from the Shelf Adjustment Items screen to permanently save the item information. There is no Save on the Item Detail screen.
Editable field are displayed at the top with chevrons and non-editable fields are grouped at the bottom of the pane.
Scanning or entering an item on this screen will refresh this screen for the item scanned/entered.
The screen will be in edit mode when all of the following conditions are met.
The user has Edit Shelf Adjustment permissions.
The shelf adjustment is in 'New' status.
The screen will be in view only mode when one or more of the following conditions are met:
The user has no Edit Shelf Adjustment permissions.
The shelf adjustment is in 'Completed' status.
The user can access the footer menu by selecting the ellipsis button to reset the item or Remove/Restore the item.
If the item is flagged to remove, the item will appear "grayed out" or disabled (just the header information).
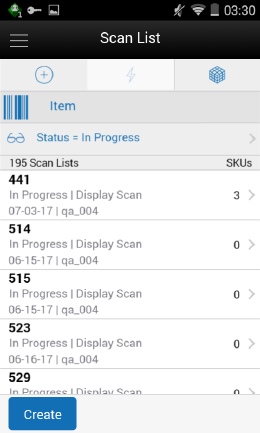
The user can access the Scan List by selecting the Scan List option from the In Store Replenishment menu available on the drawer menu.
The user must have proper permissions to access this screen.
The list displays the Display and Gap Scan type of Scan List.
The user can create a new scan list by selecting the Create button and the system will take the user to the Scan List Items screen for adding the items.
If the user is selecting the particular scan list record from the list, the system will take the user to the Scan List Items screen with the items listed.
The user can filter the scan list records using the search criteria screen by selecting the eye glasses and applying the search criteria.
The screen provides the header level information such as Id, status of the scan list, type and the total SKUs of the each scan list.
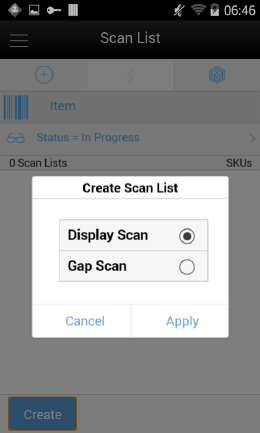
The Create Scan List screen is accessed when the user selects the Create button on the Scan List screen to create a new scan list.
The user can create any of the below types of Scan List by selecting the option and applying. After Applying the system creates a new scan list of the selected type and takes the user to the Scan List Items screen.
Display Scan:
This list is intended for the user to scan the shop floor display items. The list of scanned items will be compared when generating a pick list.
Gap Scan:
For Gap Scanning, the user will scan gaps on the shelf. When the list is complete, the user can save it and have it executed.
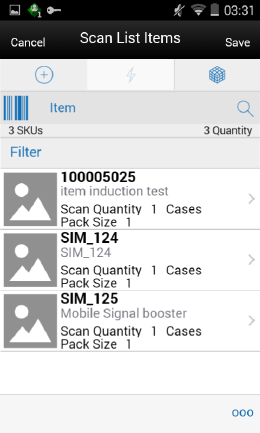
The user can access the Scan List Items screen by selecting a scan list from the Scan List screen or when creating a new scan list after applying the selection on the Create Scan List screen.
This screen displays the items that are in the scan list.
The list displays the following fields with the image if configured.
Item Id, Description, Scan quantity, UOM and Pack Size.
The list also shows the following icons:
Remove Item (trash can icon) - Selecting Remove Item will flag the item in the list of items for removal.
Remove Item will be displayed upon swiping a line item from the list of items in the Scan List Items screen.
User must have the Edit Scan List security permissions to re-move items from an Item Scan List.
The Scan List must be in edit mode to remove an item.
Restore Item (circle arrow/undo icon) - Restore Item button will only be displayed for items marked for removal.
The user can access the footer menu by selecting the ellipsis button and perform various functions like viewing the Information of the scan list, Create a pick, confirm the scan list, save, cancel to go back or delete.
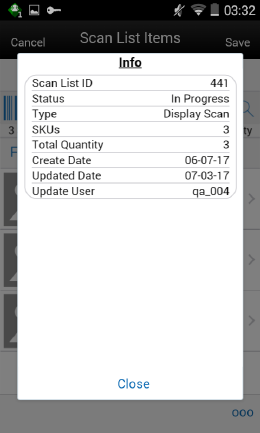
The Scan List Info screen can be accessed by the user by selecting the Info option from the footer menu on the Scan List Items screen.
This screen provides the information about the scan list which includes the Scan List Id, current status of the scan list, type of the scan list, SKUs, total quantity, create date, last update date and user.
This is an informational popup and view only.
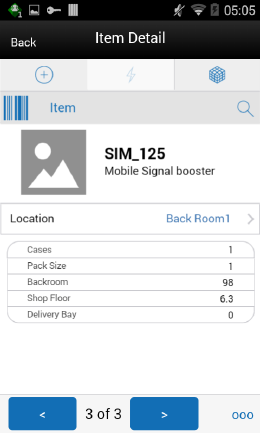
The scan list item detail screen can be accessed from the scan list items screen when selecting an item or when entering/scanning a new item to the list.
User may also scan the same item or a different item from this screen. The information will be retained for the item scan list the user is currently working in, until they leave the transaction. The user will select Save from the Scan List Items screen to permanently save the item information. There is no Save on the Item Detail screen.
For this screen to be in edit mode, the user must have proper permissions.
This screen will be in view only mode if the status of the scan list is completed.
The user can use the arrow buttons on the bottom to navigate items.
The user can access the footer menu by selecting the ellipsis button on the bottom and Remove the item, Restore the item if flagged to remove and reset item.
The following table describes the most common functional processes on the mobile.
| Vertical | Replenishment Method | Complexity | Use Case | Item Scan | Pick List Generate | Product Group | Likely Use Back Room/ Shop Floor | Plan-O-Gram |
|---|---|---|---|---|---|---|---|---|
| All | Gap Scan | Simple | - Scan items
- Pick |
Yes | No | No | No | No |
| All | Gap Scan | Medium | - Scan items
- Generate pick list - Pick |
Yes | Yes | No | Yes | Optional |
| All | Update Shop Floor | Simple | - Scan items
- Complete updates to shop floor |
Yes | No | No | Yes | Optional |
| All | Update Back Room | Simple | - Scan items
- Complete updates to back room |
Yes | No | No | Yes | Optional |
| Fashion | Fashion List | Medium | - Scan items
- Generate pick list based on product group - Action pick list |
Yes | Yes | Yes | Yes | No |
| Grocer Hard Line | Assisted Generation | High | - Set parameters
- Create product group - Action within/end of day pick list - Pick |
No | Yes | Yes | Yes | Yes |
| Fashion | Sales | Medium | - Set up product group- Action within/end of day pick list- Pick | No | Yes | Yes | No | No |
| Fashion | Sales | Simple | - Use merch hierarchy- Action within/end of day pick list- Pick | No | Yes | No | No | No |
| Grocer | Receive Shop Floor | Medium | - Receive transaction
- Indicates receive shop floor - Update shop floor to max capacity, move rest to back room |
No | No | No | Yes | Optional |
| Fashion | Auto Shop Floor Update | Simple | - Set up product group
- Schedule product group - End of day, auto update shop floor to capacity |
No | No | Yes | Yes | No |
Description of columns in preceding table:
Vertical: Type of item vertical.
Complexity: Difficulty of execution.
Use Case: High-level steps.
Item scan: Scan a list of items.
Pick List Generate: Generate a pick list or not.
Product Group: Is product group setup required?
Likely use back room/shop floor quantities: does this replenishment method track inventory at the back room and shop floor or not.
Plan-o-gram: This indicates if capacity is required to be set up. Plan-o-gram integration reduces the need to maintain this manually in SOCS.