| Oracle® Retail Store Operations Cloud Service User Guide Release 17.0 E88477-05 |
|

 Previous |
 Next |
| Oracle® Retail Store Operations Cloud Service User Guide Release 17.0 E88477-05 |
|
Previous |
Next |
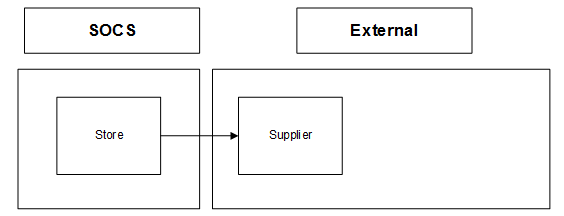
The return's process in SOCS supports the retailer with the reverse logistics flow. A reverse logistic flow means that inventory is shipped out of the store to a supplier or warehouse for redistribution or disposal. This particular workflow only supports shipping inventory back to the supplier.
Some examples around reverse logistics:
Regulatory when product has to be destroyed because of recalls.
Return of inventory to the vendor of items that are nearing their expiration date.
Return inventory back to the supplier because of malfunctions or poor quality.
RTV Request
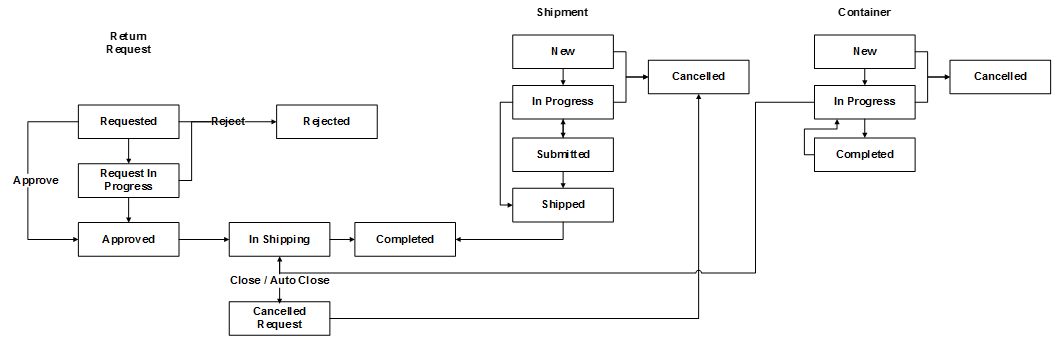
A Return Request is a return to vendor that comes into SOCS from an external system. A Return Request is a request for items to be returned. The user accesses the return request from the external system on the mobile application. The items, quantities requested to be returned and reasons (for RTV) will be listed. The user can enter in return quantity approved for the items and can also reject the request if needed. The system can be configured to allow the user to add additional items to the return request. The system allows for items to be removed on a return request that were not initially added during the session. After the session has been saved, the quantity for the item is set to zero, similar to original requested items. Once the request has been accepted, the items are shipped to the supplier.
RTV Shipment
If the store plans to return items to the vendor, it can be done by creating an RTV shipment to the vendor. The items, quantities to be returned and reasons (for RTV) will be added to the shipment and it can be dispatched.
To create an RTV shipment, a supplier must be identified for the return; this can be done by entering in the Supplier ID or using the widget to look up a supplier.
The Supplier must allow for returns. This is an indicator that is defined at the supplier level. The next validation will be to check the system setting 'DSD Delivery Supplier for RTV.' This configuration (if set to Yes) requires that the supplier must also be a DSD Supplier (indicator on the supplier) in order to create the RTV. Lastly, if the system is configured to use Multiple Sets of Books, then the supplier is limited to the same operating unit as that of the store.
Items along with reasons can be added to the return. For Return to Vendors, the system allows a mix of available and unavailable inventory status items on the return; therefore, all reasons for the Return to Vendor type will be listed. All items on the return must be sourced by the supplier designated on the RTV. Authorization Number, which is required for certain suppliers, would need to be entered before dispatching.
Features:
RTV Request and RTV shipment support shipping to the supplier.
User can initiate a return from SOCS by creating a shipment to the supplier.
A single RTV shipment supports multiple containers.
An RTV shipment can be tracked at the Container and Shipment levels.
Container hierarchy limitations.
BOL includes container details.
Support for multiple users working on different containers within the same shipment.
Each item has one or more reason codes explaining the reason it is shipped back.
BOL captures shipment purpose, tracking ID, shipment method, destination information, and container information.
Approval or rejection of externally-generated RTV requests.
Authorization Return ID.
Not after date facilitates the user to ship the shipment before the shipment is expired.
Supplier-level RTV restrictions when creating an RTV.
Damaged item process:
Two customers return DVD players that are not working. The POS transaction identifies them as damaged. This automatically associates the items to an unavailable bucket in SOCS.
The retailer creates a return to vendor for two DVD players which were damaged. They will be sent back to the vendor with a reason of Damaged using unavailable inventory.
Recall process:
SOCS receives communication from the vendor requesting 100 units of chicken to be returned back to the supplier.
The store user will create the RTV shipment on the SOCS and enters the quantity to be returned; in this case, the store returns 99 units, packs the goods in a container, confirms the container and dispatches the shipment.
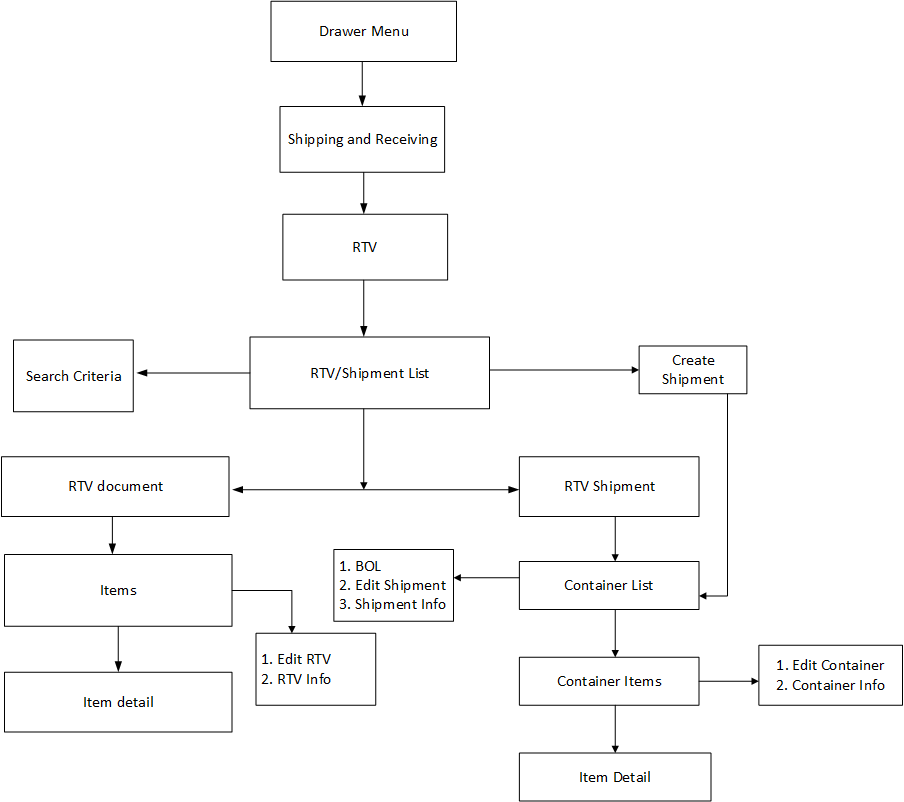
The RTV and RTV shipment flows exist under the Shipping/Receiving menu. From the RTV List screen, the user can filter the records as needed. Both RTV requests and shipments are accessed from the RTV List screen.
This section describes the available screens.
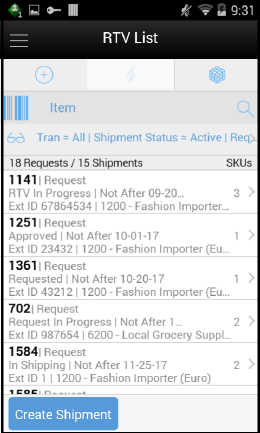
The RTV List screen displays a list of externally generated RTV requests and RTV Shipments for the store the use has logged into. The RTV List screen is accessible by clicking RTV from within the Shipping and Receiving menu. The system defaults to all RTV requests and Shipments which are in 'Active' status. The Active statuses for an RTV request are any of the following statuses:
Request In Progress
Approved
Requested
The Active statuses for an RTV Shipment are any of the following statuses:
New
In Progress
Submitted
A Filter option is also available to further filter on the return and shipment records.
The user can get into the details of a request or a shipment by tapping on it. The user can also create a new shipment and filter records from the RTV List screen.
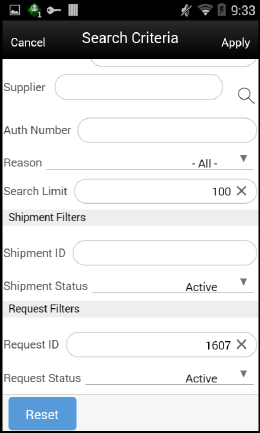
The Search Criteria screen is used to narrow down the list of RTV Requests and Shipments displayed on the RTV List screen. The user can access this dialog by tapping on the eye glasses on the RTV list screen. This screen has three sections:
Common Criteria
Shipment Specific Criteria
Request Specific Criteria
The list of criteria displayed is dependent on what the user selects in the 'Search for' drop-down which has options: All, Requests, Shipments. If the user has to search for shipments, the user has to select 'Shipment' from this drop-down and the search criteria applied would be 'Common search criteria' AND 'Shipment specific search criteria'. In this scenario, the Request specific criteria would not be visible to the user. If the user has to search for both shipments and requests together, the user has to select 'All' from 'Search for' drop-down and the search criteria applied would be ('Common search criteria' AND 'Shipment specific search criteria') OR ('Common search criteria' AND 'Request specific search criteria').
The result of the search is displayed in the RTV List screen.
There are pre-defined searches available as well: Active Request, Active Shipment, Active Request and Shipment.
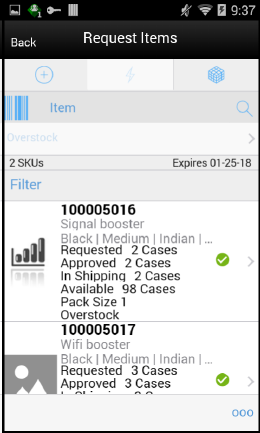
SOCS subscribes to RTV Requests from external systems that requests the store to send items back to vendor. The user accesses the Request Items screen by selecting a request from the RTV List screen. This screen displays the list of items present in the RTV request and gives a summary of the various quantities of each item such as:
Requested quantity
Approved quantity
In Shipping quantity
Shipped quantity
Available quantity of the item at the source store (if the inventory to be returned has to come from Available inventory)
Unavailable quantity of the item at the source store (if the inventory of the item has to come from Unavailable inventory)
If sub-buckets is turned on, then the Unavailable field displays the stock for the item that is associated with the specific sub-bucket for the shipment reason code selected for the item.
Whether the screen is editable or not depends on the user's security permission, status of the request, Not after date. User must also have return reason code data permissions for all items on the request. User can also add additional items (belonging to the same supplier in the request) to be returned depending on the permissions set for him. Inactive/delete/discontinued status items can be added to the RTV.
The item image for the line items is displayed per configuration.
Line items appear in a list and selecting a line item navigates to the item details of that item. If an item has been changed in the current session, it is indicated by a bar on the left of the item. Scrolling in the list of items displays a filter. The filter can be used to narrow down the list of items. Filtering can occur by item ID, description and reason.
Scanning or entering an item in the scan bar navigates the user to the Item Detail screen for that item. Approved Quantity may be updated depending on the scan mode.
Footer Menu
The Footer menu is accessed from the ellipsis footer menu on the Request Items screen. The menu functions include the following:
Info: Accesses the Info popup.
Notes: will access the notes dialog to capture notes.
Edit RTV: This menu option will allow the user to enter Auth number, and so on.
Default Qty: This menu option will allow the user to default the requested quantity to the Approved quantity field for all the items in the request.
Accept: This menu option will allow the user to accept and approve the quantities to be returned. The request moves to 'Approved' status and the system will reserve inventory for the items to be returned.
Save: Saves the request in 'Request In Progress' status to be completed later.
Saving a request does not publish any message nor does it reserve any inventory; it simply saves it.
Reject: This option allows the user to reject the request and moves the request to 'Rejected' status.
Shipment: This menu option will allow the user to ship the items in the approved request or view the shipment and container details if they exist. Security exists to create, view and edit the shipment.
Close RTV: This menu option will allow the user to close the RTV request. After closing an 'Approved' RTV, for the items on return, reservation would be removed and will be moved to available or unavailable depending on where it was reserved from. A message is published to the merchandising system on the inventory reversal.
Back: This menu option will allow the user to leave the screen. This is available when the screen is in view only mode.
Cancel: Exits the screen; changes made in that session are not saved.
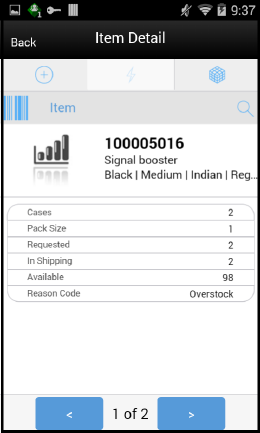
The Item Detail screen is the screen the user goes to when selecting or scanning an item from the Request Items screen. Scanning or entering an item on this screen in the scan bar updates the approved quantity per the scan mode and refreshes the Item Detail screen for the item and quantity scanned.
The approved quantity can be edited and updated manually if permissions allow.
Whether the screen is editable or not depends on the user's security permission, Status of the request, Not After Date. User must also have return reason code data permissions for all items on the request.
The user can add items (belonging to the same supplier in the request) to be returned depending on the permissions set for him.
The item information, including the image (which is system configured), displays in the header. The bottom portion of the screen contains information fields for reason code, disposition, sub-bucket (if system configured), and the stock on hand pertaining to the bucket in which the stock is coming from, Requested quantity, In shipping and Shipped quantity. The list of locations where the item is present is also displayed in this screen, if the item is sequenced.
The Footer menu, ellipsis button, contains a reset function as well as Remove and Restore functions. The user can page through existing items on the adjustment using the arrows on the bottom.
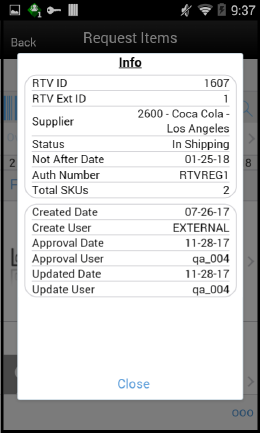
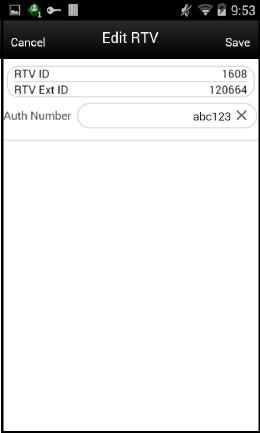
The Info screen is an informational popup that contains read-only information about the header level of the request. Details include:
RTV ID
RTV External ID (ID generated by the external system that has created the request)
Status
Not After Date
Auth Number
Total SKUs
Created Date
Create User
Approval Date
Approval User
User who has rejected the request
Rejected Date
Close Date
User who has closed the request
The user can add or edit the Auth Number of the request using this screen. The user accesses this screen from the Request Items screen by selecting the Edit RTV menu option in the Footer menu and needs the necessary permission to edit request details. The Status and the Not After Date are considered in order to display this screen. The status of the request must be either Requested or Request In progress, and the Not After Date must be today or later.
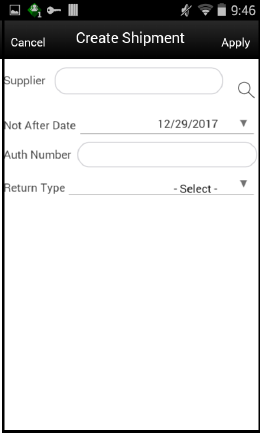
This screen enables you to create a shipment from SOCS in order to send back items to a vendor.
Access the RTV Create Shipment popup by tapping on the 'Create Shipment' button on the RTV List screen.
Select the supplier through the Supplier Lookup option or you can type in the Supplier ID, if known.
The Not After Date is defaulted from a parameter.
The Auth Number can be entered while creating the shipment. If not, it can be entered later while dispatching the shipment.
Select a Return Type, that is, the reason for the return. This can be configured to the business needs; some examples could be damaged goods, Invalid delivery, Seasonal.
When done, select Apply to create the RTV shipment for the supplier.
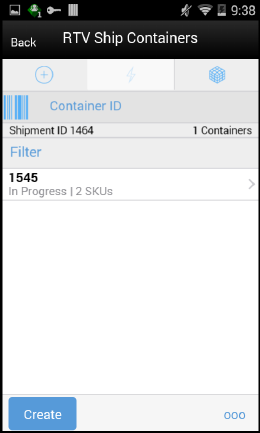
The RTV Ship Containers screen displays the list of containers for a shipment or displays an empty list of containers if the shipment is new. The screen is accessed by opening a shipment from the RTV List screen or by tapping on the 'Create Shipment' button from the RTV List screen. This is the first screen displayed in a shipment flow.
The details of a container such as Tracking ID, Total SKUs and Status are available in this screen. You can identify a container by entering or scanning Internal Container ID, SSCC ID, Tracking ID or GS1 data bar. If the system finds the container, you will be navigated to the Container Items screen where the list of items inside the container are shown.
The filter present in this screen can be used to narrow down the list of containers. Filtering can occur by Container ID (Internal ID, SSCC ID), Tracking ID and Status.
The ellipsis in the lower right hand corner accesses the Footer menu which contains all of the functions that can be performed on a shipment.
Submit
The shipment can be saved to 'In Progress' status to continue edits later or it may be set to Submitted or Dispatched. Submitting is possible when the store setting Dispatch Validate is configured for 'Ship Submit'.
Submitting sets the shipment to a Submitted status and does not allow for edits; there are no updates to inventory at this point. You can only Cancel Submit or Dispatch.
Dispatch
When the shipment is dispatched, the RTV reserved quantity for the source location will decrease in addition to the stock on hand. If no shipping quantities are identified the transaction should be cancelled.
Footer Menu
The menu functions include the following:
Info: Accesses the Info popup.
Notes: Accesses the notes dialog to capture notes.
Create: Creates a new container in the shipment.
Edit Shipment: Accesses the Edit Shipment screen where details can be added/updated.
Submit: Submit performs validation for 'In Progress' shipments and locks the shipment for additional edits. The shipment will be ready for dispatch. This menu option is only available when the store parameter 'RTV Shipment Dispatch Validate' is set equal to Ship Submit.
Cancel Submit: Reverses the Submit and moves the shipment back to 'In Progress'.
Dispatch: Performs validation and dispatches the shipment. No further changes are allowed. The shipment is now ready to be physically shipped out of the store.
Close Shipment: Allows you to close the rtv shipment. If there are items within these containers, reservation would be removed and will be moved to available or unavailable depending on where it was reserved from. A message is published to the merchandising system on the inventory reversal.
Delete: Marks the shipment to 'Canceled' status.
Back: Exits the shipment.
External Printing: Displays the External Printing popup to select a printer for the pre-shipment notice and manifest documents.
The Shipment Info screen is accessed by clicking the Info menu option in the RTV Ship Container screen footer menu. This screen is a view only screen and lists details about the return shipment such as:
Supplier
Not After Date
Auth Number
Return Type
Total number of containers
Total SKUs
Create Date/User
Submit Date/User
Dispatch Date/User
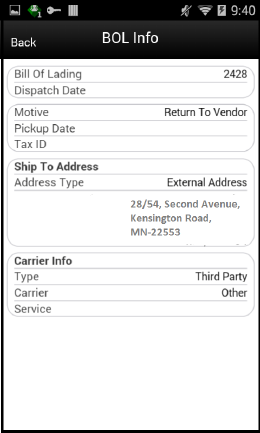
The BOL Info screen is an informational screen that contains read-only information about the carrier details for the shipment. This screen is view only and the details are managed on the Edit Shipment screen. Details include:
BOL ID
Dispatch Date
Auth Number
Motive
Pickup Date
Ship to Address
Carrier Type
Carrier
Carrier Service
Carrier Address (if entered)
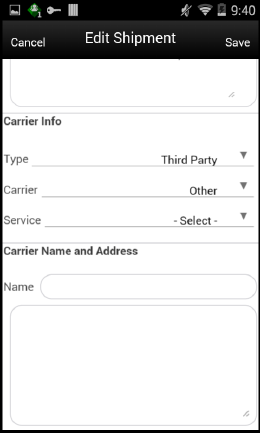
The Edit Shipment screen is used to enter details for the shipment including transportation details. Details include:
Not After Date
Auth Number
Return Type
Tax ID
Motive
Pickup Date
Ship to Address
Carrier Type: Default based on the store parameter 'RTV shipment Carrier Default' but can be modified if necessary. For carrier types of Third Party, the Service will need to be selected.
Carrier
Carrier Service
Carrier Address
The Carrier information is locked down once the container has been confirmed. At that time, the Adjust Carrier button will be available to move the containers back to 'In Progress' to make changes to the carrier and other shipment details.
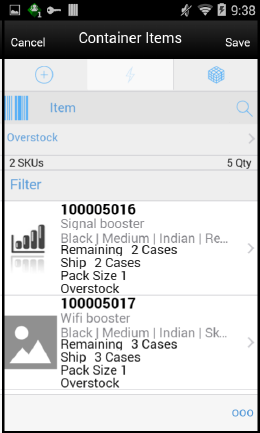
The RTV Shipment Container Items screen can be reached once the user taps on a container from RTV Ship Container screen. Many functions can be performed through this screen:
Add items to a container with reason codes for each item.
Items and quantities can be defaulted from an approved RTV document.
Item can be added to the container manually which are not on the original RTV document. UOM is selected at the Mode bar of the screen and hence applies to all the items on the container. Toggling the UOM at the Mode bar will change the UOM and convert the quantity at the line item level.
The user may choose to add notes to the container.
The user can save, confirm, and delete a container from this screen.
Hierarchy limitation for the container can be defined from this screen.
Footer Menu
The menu functions include the following:
Info: Accesses the Info popup.
Notes: Accesses the notes dialog to capture notes.
Edit Container: Allows the user to enter Container ID, weight, package size, tracking id, and so on. See Edit Container story for additional details.
Default Item: Allows the user to pull approved items from approved RTV documents to the shipment. This option is only available for shipments created for a return request.
Adjust: Allows the user to move the container back to an editable state after it has been confirmed. User needs the necessary permission to adjust a container.
Confirm: Allows the user to complete the container with no further edits. Appropriate security permission is necessary to confirm a container. The status of the container moves to 'Completed' status.
Save: This menu option will be available on the menu when the screen is in edit mode.
Cancel: Exits the screen without saving the changes made, if any. This option will be available when the screen is in edit mode.
Back: This allows the user to exit the screen. This menu option will be available on the menu when the screen is view only.
Delete: This option will allow the user to cancel the container. Reserved inventory is relieved appropriately and any RTV documents associated will set back the remaining quantities. Appropriate security permission is necessary to delete a container.
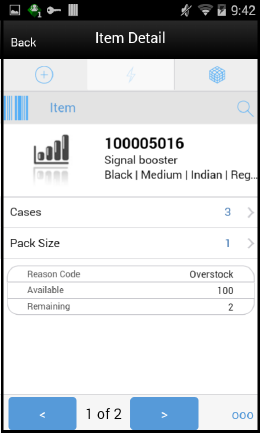
The Item Detail screen is used when selecting or scanning an item from the Container Items screen. Scanning or entering an item on this screen in the scan bar updates the quantity per the scan mode and refreshes the item detail screen for the item and quantity scanned. The quantity can be edited and updated manually if permissions allow.
The item information includes the image that is system configured to display in the header. The bottom portion of the screen contains information fields showing:
Inventory Quantity
Remaining Quantity
Ship Quantity
Reason Code
Sub-Bucket (if sub-buckets are enabled, for unavailable inventory only) pertaining to the bucket stock is coming from
The Footer menu (ellipsis button), contains a Reset function as well as Remove and Restore functions. The user can page through existing items in the container using the RTV Container Default Item navigating arrows on the bottom.
This screen allows the user to pull approved items from approved RTV requests to the shipment. This screen is accessed from the RTV Ship Container Items screen of an approved request and this is only available for shipments created for a request.
The screen defaults items into the RTV Ship Container Items screen through the 'Apply Item' and 'Apply Item and Quantity' options. Apply item will default selected items to the container, while Apply Quantity will default the selected items and the corresponding remaining quantities.
Items that fall under the frozen container hierarchy will only be applied to the container. Also, only the items that has reason codes for which the user has data permissions would be applied. The container hierarchy is frozen using the 'Limit Items To' feature in the Edit Container screen.
The remaining quantity column informs the user about the quantity on the document that is not shipped yet, and can be used. The remaining quantity is not reduced until a container is confirmed for shipping.
The Container Info pop-up appears when a user clicks the Info menu option on the Footer menu of RTV Container Items screen. The Info (Container) is an informational popup containing read-only information about the header level of the container.
Details include:
ID
Container ID
Shipment ID
RTV ID
Status
Supplier
Create Date/User
Updated Date/User
Approve Date/User
Total SKUs/Remaining/Quantity
Package Type/Weight/Tracking ID
Container Hierarchy Limit
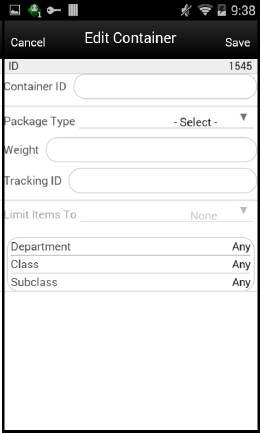
The Edit Container screen is used to enter details for the container including transportation details. Access to this screen is from the Footer menu on the Container Items screen. Details include: ID, Container ID, Package Type, Weight, Tracking ID, and container restriction by hierarchy. The inventory status and the container restriction by hierarchy are locked down once the first item has been added to the container.
Limit Items to (Hierarchy Restriction)
If the user wants to set up the container to restrict the container to hold the same type of items, they can set up the container to restrict by department, class, and subclass. The user does not select the actual department, but rather sets the hierarchy level they want to restrict by. When the first item is added to the container, the department, class, and/or subclass is set for the container based on the hierarchy the item is part of. The container detail screen will display the hierarchy that is locked in. Any items added subsequently must match the hierarchy of the first item. For example, if the restriction was set up to limit items to the same department and the first item added was for the Women's Department, only items that match the Women's Department can be added to the container, but it will not matter which class and subclass the item is in since the hierarchy level is set at Department.
The hierarchy level is auto defaulted depending on the permission the user has been given.
If manifesting has been configured, the package type and weight may be required by the carrier selected for the shipment before the user can confirm the container.
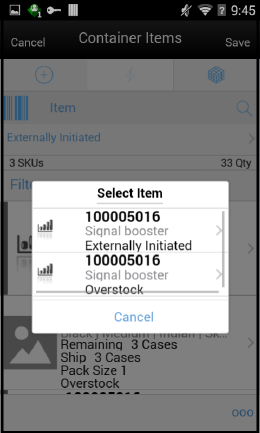
An Item may exist more than once in the request/shipment when the same item has been added with different reason codes.
For example, ItemA is added to the request/shipment with reason codes 'Overstock' and as well as 'Externally Initiated'.
The Select Item popup is used when the user scans/enters an item that exists on the transaction more than once. The list will display all instances of the scanned item along with all the different reason codes for which the item has been added. The user will be able to select any item-reason code combination for the item scanned. If the user wish to select a new reason code which is not used already, he can do so too.
When a return document is saved or updated from the RTV shipment, the system moves the items from either Available or Unavailable (non-sellable) inventory, based on the inventory status, and moves it to the Reserved bucket within unavailable inventory. The Return to Vendors uses the RTV Reserved bucket. Upon dispatching of the return, the Reserved buckets will be relieved and the stock on hand will be decremented. If sub-buckets are turned on, the appropriate sub-bucket associated with the return reason will be updated when returning from unavailable inventory.
Example 1: Return to Vendor using Available Inventory
Item Lookup before:
Store A:
Total SOH = 706
Available SOH = 706
Total Unavailable SOH = 0
RTV Reserved = 0
The user creates an RTV to move inventory from Store A to the Vendor using available inventory.
The user enters a return quantity of 6 and clicks Approve.
A quantity of 6 is placed into the reserved bucket in both EICS and Merchandising. Merchandising is updated through sending a mod message.
The retail ordering system takes into account the saved (reserved) quantity when replenishing the item through its regular ordering (auto-replenishment) process.
Total SOH - Non sellable (Adjustment Unavailable Qty) - Transfer reserved quantity - RTV reserved quantity - Customer Reserved Qty = Available Quantity
Store A:
Total SOH = 706
Available SOH = 700
Total Unavailable = 6
RTV Reserved = 6
|
Note: Unavailable is a total of all sub-buckets. |
Modify Return Qty to 8 and click Dispatch.
Item Lookup:
Total SOH = 698
Available = 698
Unavailable = 0
Reserved Qty = 0
Example 2: Return to Vendor using Unavailable Inventory
Item Lookup before:
| Item Lookup | Database |
|---|---|
| Total SOH = 800 | RTV_Quantity =0 |
| Available = 700 | Nonsellable (Adjust Unavail) = 100 |
| Unavailable = 100 | |
| Nonsellable = 100; Sub-bucket: Trouble 75, Admin 25 | |
| RTV Qty = 0 |
The user creates a shipment and enters a return quantity of 10 (unavailable) and clicks Save.
| Item Lookup | Database |
|---|---|
| Total SOH = 800 | RTV_Quantity =10 |
| Available = 700 | Nonsellable (Adjust Unavail) = 90 |
| Unavailable = 100 | |
| Nonsellable = 90; Sub-bucket: Trouble 65, Admin 25 | |
| RTV Qty = 10 |
|
Note: The available quantity will still display as 700 on the UI and reports. |
Modify Return Qty to 12 and click Dispatch.
Item Lookup:
Total SOH = 788
Available =700
Unavailable = 88
Nonsellable = 88; Sub-bucket: Trouble 63, Admin 25
RTV Qty = 0