| Oracle® Retail Enterprise Inventory Cloud Service User Guide Release 18.0 F13734-03 |
|

 Previous |
 Next |
| Oracle® Retail Enterprise Inventory Cloud Service User Guide Release 18.0 F13734-03 |
|
Previous |
Next |
The Inventory Management section of EICS focuses on managing and reviewing inventory events. It focuses on these areas:
EICS provides the ability to authorize stock counts.
Portions of the stock count functionality, such as the setup of product groups, schedules, and authorizations, are performed in EICS only. You can configure and execute different types of stock counts such as cycle or annual counts, ad hoc counts, or counts that are based on inventory position or problems like negative stock on hand. Merchandising and individual level counting require setup and scheduling utilizing product groups, with the exception of Ad Hoc counts. The Ad Hoc count allows you to decide which items to count by scanning from the shelf immediately.
Most of these counts can be scheduled to be executed repetitively on certain dates reducing the need for daily or weekly count management.
Because a variance percentage can be set, items within tolerance can, but do not have to be authorized individually.
After the stock count/recount process has taken place, or the third-party results file has been imported, the next step in the process is to authorize the stock count. This is the final step that allows you to make any last minute corrections.
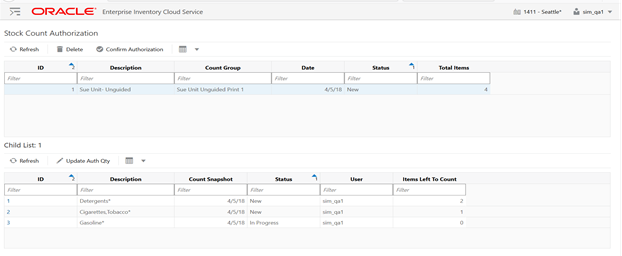
You can access the Stock Count Authorization screen in EICS by selecting Stock Count Authorization located within the Inventory Management option.
This screen contains two portions. The first portion shows the list of master stock counts in 'Stock count' or 'Re-count' types and that are in New, In Progress, and Completed status.
You can select the stock count from the master stock count list and confirm the authorization by selecting the Confirm Authorization option. Note that proper permission is required to access the Confirm Authorization button.
If there are no records with a type of 'Authorize' and a status of New or In Progress, the Confirm Authorization button is disabled.
When confirmed, the system confirms the stock count for all child stock counts in the master count and defaults to the last counted quantity to the authorized quantity field.
Upon selecting Confirm Authorization, all records with a type of 'Authorize' and a status of New or In Progress will be authorized.
Once it is authorized, the stock count becomes view only and no quantities can be changed.
On the master stock counts portion, the system displays the list with the Id, Description, Count Group, Stock Count Date, Status and the Total Items.
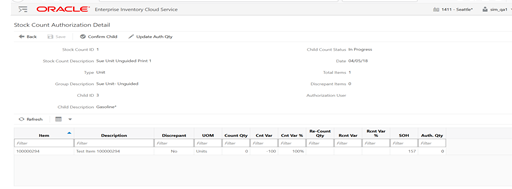
When you select a particular master stock count, the system displays the child list of the selected master stock count on the second portion and allows you to select the child stock count to go to the Stock Count Authorization Detail screen (Figure 9-2).
Select the Update Auth Qty button both in this screen and the Stock Count Authorization Detail screen to auto-fill all Authorized Qty with the last count quantity:
These records only display the primary location of the item and have rolled up all packs quantities to the primary item if the packs are notional.
The Auth quantity will default from the "counted" / re-counted quantity.
The variance columns will be based on the rolled up quantity.
You can access this screen by selecting a child stock count from the child list on the Stock Count Authorization screen.
On the header portion of this screen, the system displays the Master Stock count Id, Description, Date, Type, Group Description, Child Id, Child Description, Total Items, Discrepant Items and the User.
On the Stock Count Authorization Detail screen, you can enter authorized quantities for both discrepant and non-discrepant items for any type of Stock Count (Unit and Amount, Unit, Problem Line, Ad hoc).
If the Child Stock Count being entered to authorize contains items that have been previously authorized in a different stock count location, the auth qty will be defaulted with the most recent previously authorized qty but you can still modify it.
Each time an item is authorized it will override the previously entered authorization qty.
You can enter an authorized quantity that represents the quantity for the item in all of its locations that will be compared against the snapshot. Note this means there will only be one authorization quantity per item regardless of how many locations the item exists in.
For UIN required items, the Auth Quantity field is non editable. Changing the quantity has to be done through the UIN management screens.
On this screen, you can confirm the child count by selecting the Confirm Child button. This button is visible only when the child count is in 'New' or 'In-Progress' state. Upon selecting this button all authorized quantity is saved and the child count is confirmed. When you confirm the child count the system moves the status of Unit/Problem/Ad hoc child count to Completed. If any authorized quantity fields are blank for Unit/Problem Line, the item is left as 'not counted', UNLESS Stock count null quantity=0 parameter is set to Yes.
If any of the authorization qty fields are blank for any type of Unit and Amount a message is displayed.
Upon selecting Confirm Authorization, all records with a type of 'Authorize' and a status of New or In Progress will be confirmed and exported to merchandising system in one file.
Once a record has been confirmed, the 'Auth User:' field on the Stock Count Detail, Re-count and Stock Count Authorization screens will display with the user that selected the Confirm button. Any child count that has been confirmed will no longer be editable.
EICS automatically triggers the exporting results function so the results are exported to merchandising system.
Once the last child count is confirmed, a flat file is sent to the merchandising system. You are prompted that confirming this last child moves the entire count to Authorize Completed and no further action can be taken.
You will be able to view the authorized quantities when entering the authorization screen. After Confirm Authorization is selected, the Stock Count Authorization Detail screen (Figure 9-2) is view only. Once exported, EICS will complete the stock count process by writing inventory adjustments in EICS and send all Authorized Quantities for the entire stock count record (discrepant and non-discrepant items) back to merchandising system. The stock count status is set to "Completed" and no further changes will be allowed in EICS.
On this screen you can select the Update Auth Qty button to auto-fill all Authorized Qty with the last count quantity:
The Authorized Qty field will update with the rolled up quantity of the packs and components.
The variance columns will be based on the rolled up quantity.
When you re-enter a stock count in authorize that has or has not been completed the SOH should remain constant and that of the last snapshot.
Upon selecting Confirm Authorization, the system will adjust the SOH to the Authorization Quantity entered for the Item.
If the 'Updating Stock on Hand' parameter is set to 'Discrepant Items,' the system will only update the SOH for discrepant items that were counted.
If the 'Updating Stock on Hand' parameter is set to 'All Items,' the system will adjust the SOH for both discrepant and non-discrepant items that were counted.
An Inventory Adjustment record will automatically be created to adjust the inventory to the Quantity entered for the item.
You are prompted if some items are not assigned an Authorized Quantity when the Confirm Authorization button is clicked.
If you select OK and the Stock Count Null = 0 parameter is set to No, all items without an Authorization Quantity will have their SOH left as it is, with no adjustments made. The item will be considered 'not counted' in this case.
If you select OK and the Stock Count Null = 0 parameter is set to Yes, all items without an Authorization Quantity will have their SOH set to the last counted quantity. This would be 0 if no physical count quantity was entered.
If you select Cancel, you will be returned to the Authorization screen without confirming the count. Any quantities that were entered by you will remain on the screen.
When the Confirm button is pressed for the last child count needing authorization, the status for the Stock Count will change to Completed. At this point, the Stock Count will be read-only.
You can enter data into the Authorized Quantity field for both discrepant and non-discrepant items.
You can auto-fill the authorized qty field by selecting the Update Auth Qty button.
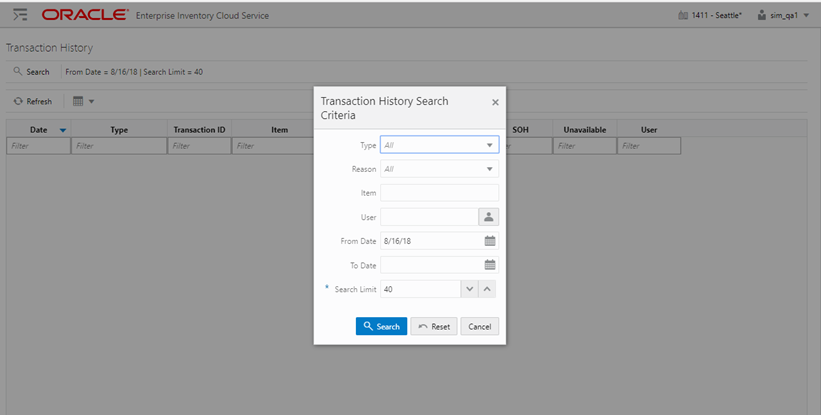
The Transaction History Lookup functionality provides users with the ability to view information about existing transactions which have an impact to an items stock on hand. The Transaction History is a lookup screen is accessed under the Inventory Management menu option of the application.
The Transaction History dialog initially directs you to a search criteria screen to select filter criteria for the records to be displayed before presenting the list of transactions. The default for the search is all transactions for today for your store. Additional search criteria include From and To Date, Type of Transaction (that is, Customer Order Delivery, Inventory Adjustment, and so on), Reason, Item, and User.
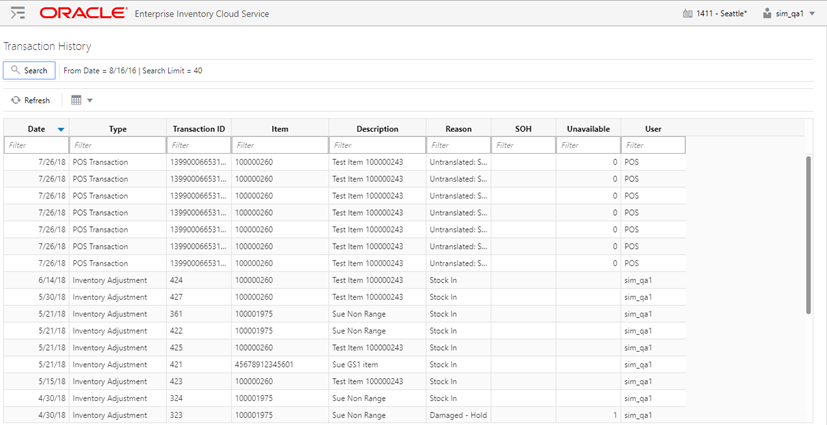
The Transaction History is a read-only screen which displays all transactions, per the selected search criteria, in the system for your store that have an impact on the stock on hand. Each time a transaction is created which updates inventory to a final state, it gets written to the transaction history. It does not include the saved transactions (reserved inventory), rather it includes the transactions which are completed.
The following fields are listed for each record:
Date: The date for which the history record was created.
Transaction Type: The type of the original transaction such as Direct Delivery, Stock Count, and so on.
Transaction ID: The Transaction ID that is associated with the original transaction.
Item: The Item ID.
Description: The description associated with the Item ID.
Reason: Reasons associated with history record.
The reason is either a hard-coded description or an actual Inventory Adjustment reason code.
Stock on Hand and Unavailable: show the stock movement of up or down for the transaction.
User: The user that created the original transaction.
You can select a record in the transaction history to go to the dialog for the actual transaction. Once finished with that record, you can return to the Transaction History screen. This functionality is available for Stock Count Authorization.
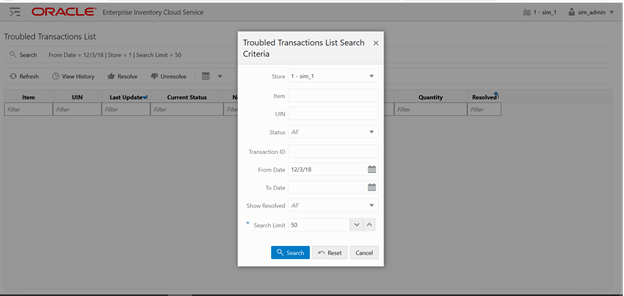
The Troubled Transactions List screen is an admin screen for the supervisor or the store user to reconcile the transactions with UIN and that are in trouble. The Troubled Transactions List dialog screen is accessed under the Inventory Management menu option of the application.
The Troubled Transactions List dialog initially takes you to a search criteria screen to select filter criteria for the records to be displayed before presenting the list of troubled transactions. The default for the search is all the troubled transactions for today for your store. Additional search criteria include From and To Date, Transaction Id, Item, UIN, Status, Resolution status (Resolved, Unresolved).
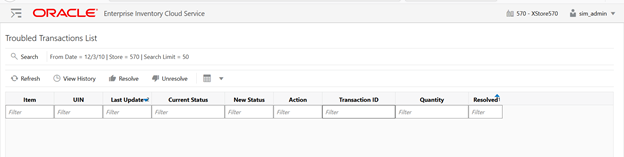
The Troubled Transactions List is a screen which lists all the UIN and Received Unit Adjustment troubled transactions that exist in the system.
Upon selecting the menu, the system initiates the search criteria screen automatically and the list screen displays the transactions per the given search criteria.
You can also manually mark a record as resolved if no update needs to occur.
The screen allows multi selection of records to move to the resolution status.
You can view the history of the UIN by selecting the View History button which takes you to the UIN History screen.
From this screen with the proper privilege, you can view the UIN History for an item.
With the proper privilege, yo can update the status of the UIN resolution record to Resolve or Unresolved if it is already in resolved status.
The following fields are listed for each record:
Item: The Item ID present in the troubled transaction.
UIN: Displays the UIN of the item that was sold or returned.
Last Update: The last updated date of the exception record.
Current Status: The status of the UIN at the time the exception was raised. This could be different than the current status in the system, that is, was In Receiving when the Update process tried to process, but the receipt has been completed so now the UIN is in In Stock status.
New Status: The proposed new status the system tried to update the UIN to.
Action: The action within the UIN Update Status Web Service. This could also be RUA for those exceptions generated from Receiver Unit Adjustments.
Transaction ID: Displays the unique identifier of the transaction that will tie back to the external system.
Quantity: For adjustments this will hold the adjustment quantity. The value will be prefaced with - to indicate the negative numbers and no prefix in case of positive numbers.
Resolved: Displays a Yes/No value for those records that have been resolved/not resolved within the system.
You can select a record from the list and move it to 'Resolved' or 'Unresolved' status by selecting the Resolve/Unresolve buttons.
If you select a record and the View History button, the system goes to the UIN History screen.
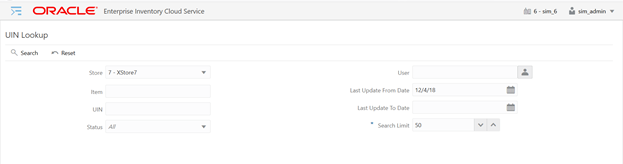
The UIN Lookup dialog is used to perform a UIN inquiry from the system. This can be accessed under the Inventory Management menu option of the application. You can search the UINs based on the several criteria for the current store, other stores or all the stores.
The UIN Lookup screen allows you to give the search criteria such as Store, Item, UIN, Status, User and date range to find the UINs.
The current store is the default selection and you can change the store or select 'All' for inquiring all the stores.
Entry of item number or UIN is required. Either input the item number and search for the UINs associated to that item or enter the UIN.
If the item number and the UIN is entered, the system checks for the UIN details corresponding to the entered item number and if found the system goes to the UIN History screen directly.
If only the UIN is entered and if the system has found only one item containing that UIN, the system goes directly to the UIN History screen.
If the system finds more than one item containing the same entered UIN, the system displays a select item popup to select the item.
If only the item number is entered and the UIN is left blank, the system checks for all the UINs associated to the entered item number.
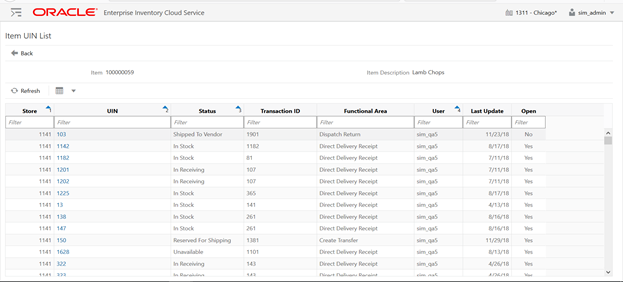
If the system finds multiple UIN records for the given criteria, the system goes to the Item UIN List.
If the system finds more than one UIN records based on the given input on the UIN Lookup, the Item UIN List with the list of UINs is displayed.
The item information is shown on the header portion and in the list, the system displays the Store, UIN, Status of the UIN, Recent Transaction information, user, last update date and the current status whether it is in Open or Closed with an Yes/No indicators.
Open UINs should consist of UINs that are in the following statuses:
In Stock
In Receiving
Reserved for Shipping
Unavailable
Customer Order Reserved
Closed UINs should consist of UINs that are in the following statuses:
Sold
Customer Order Fulfilled
Shipped to Store
Shipped to Warehouse
Shipped to Finisher
Shipped to Vendor
Removed from Inventory
Missing
The UIN on this screen is a link to the UIN History screen to view the history of the UIN.
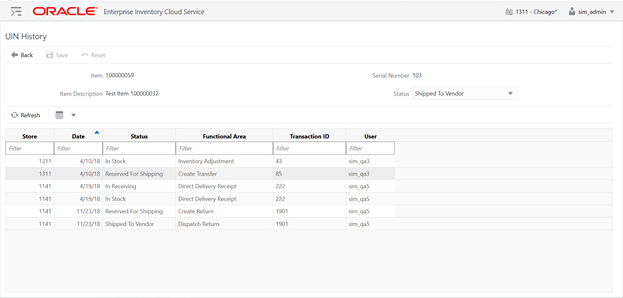
You can access the UIN history screen either via the Item UIN List upon selecting an UIN or by selecting the View History option on the Troubled Transactions List.
This screen displays the Item and UIN information on the header.
The list on this screen contains the Store, Date on which the status change occurred in the system, updated status on the occurrence, corresponding functional area for which the transaction occurred, transaction id and the user.
You can change the status of the UIN by selecting the correct status from the Status drop down on the header and select Save.
Select UIN Lookup and provide the search criteria to go to the Item UIN List or UIN History screens.
If there are multiple records, the system displays the Item UIN List and, upon selecting the UIN link, takes you to the UIN History screen.
You can get to the UIN History screen from the Troubled Transactions List by selecting View History.