| Oracle® Retail Enterprise Inventory Cloud Service User Guide Release 19.3 F44222-02 |
|

 Previous |
 Next |
| Oracle® Retail Enterprise Inventory Cloud Service User Guide Release 19.3 F44222-02 |
|
Previous |
Next |
The lookup features provides a robust system for searching information. You are able to search for items and UINs.
The Item Lookup functionality in the desktop application provides the business user with the ability to view information related to an item. The system provides real-time information on inventory positions and other item detail information.
The following information about an item is available:
Merchandise Hierarchy
Status
Primary Supplier
Item Attributes, Ordering Attributes, CFAs
Price Information
Stock on Hand and Non-sellable Inventory
Pack / Component Details
Deliveries
Related Items
Stock Locator
UDA
RFID Locations
Item Locations
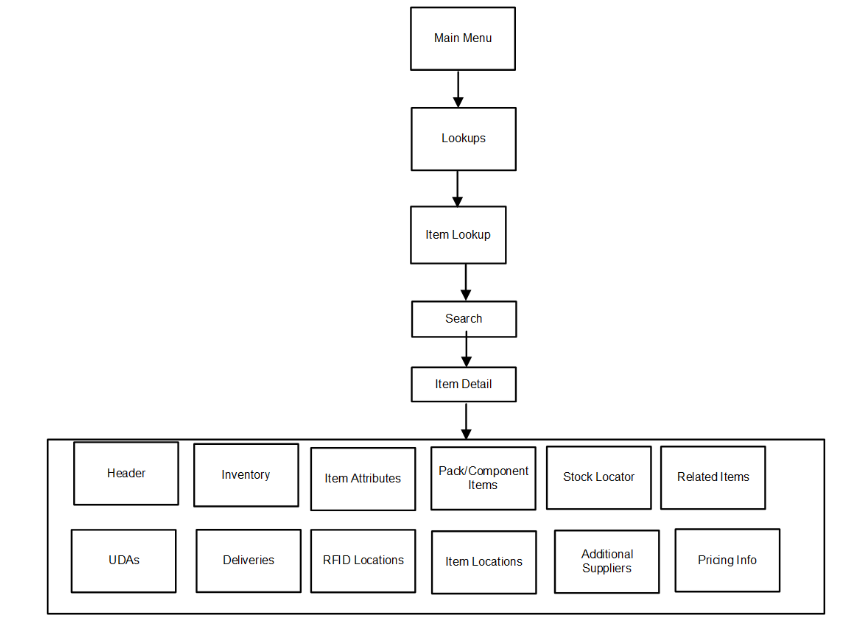
This is a screen flow for the Item Lookup functionality. Selecting Item Lookup from the Main Menu\ Lookups directs to the Item Lookup screen. From Item Lookup, you can search for items and view different details about the item, via the Item Detail screen. An item's information is presented in the Item Detail screen as different sections. The list of sections that are available in the Item Detail screen are as follows:
Header
Inventory
Item Attributes
Related Items
UDAs
Pack Items
Component Items
Stock Locator
Deliveries
Item Locations or RFID Locations
Additional Suppliers
Pricing Info
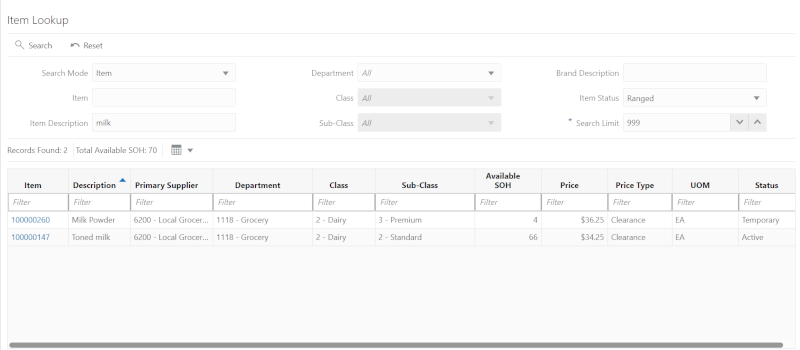
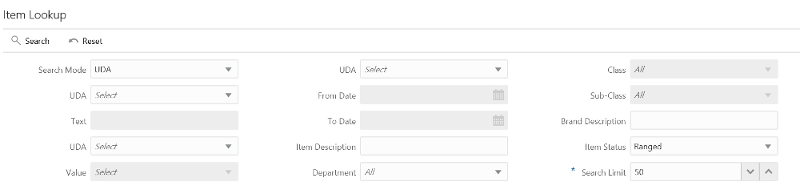
When navigating to Item Lookup, you are taken to a blank list screen where no item results are displayed. You are presented with various search criteria to lookup for the item. You can enter the search criteria to find the items. After applying the search criteria, the results are listed on the screen. The screen displays the search criteria depending on the Search Mode. You can choose to find items by item number, supplier, warehouse, UDA, Inventory Status, or style. Depending on which search mode is selected, the search criteria fields change. All search modes, with the exception of searching by style, have common search criteria consisting of item description, brand, item status, search limit, department, class, and sub-class. If item Id is used to lookup the item, the system ignores all other search criteria entered and searches for the item entered. When the user enters the screen, the cursor will be on Item field by default which enables the user to scan/enter Item ID and hit enter to initiate the search.
If the search results in a single item, the system takes you automatically to the Item Detail screen of the item. If more than one item is found, the list of items are displayed and you can click on an item to view the details of the item in the Item Detail screen.
The number of items returned by the search is displayed in 'Records Found' field just above the grid. The Total Available SOH field displayed next will show the summation of the Available SOH for all items that are listed on Item Lookup based upon the entered search criteria. There will be different UOMs added together because items returned by the search may have different UOMs hence there will be no UOM listed for the Total Available SOH field.
The details of the item such as Item ID, Item Description, Primary supplier, Department, Class, Sub-class, Available SOH, Price, Price Type and UOM are displayed in this screen in order to provide basic information about the items. The pricing related information (Price and Price Type) are displayed only when the system configuration parameter 'Display Price in Search Result - Operations' is set to 'Yes'. The Reset button displayed in the screen resets the values in the Search criteria fields and clears the search results currently displayed.
This field holds an item description, which you enters to search. You can search on partial description as well, meaning that as long as the Item Description contains what is entered in this field, results are returned. This search criterion can be used for any other search type except when searching by Style.
This field holds the brand, where you enter to search. Enter in a brand for the item. The system returns all items for the brand specified. This search criterion can be used for any other search type except when searching by Style.
This field allows you to select from a list of available Departments for the selected group. This search criterion can be used for any other search type except when searching by Style.
This field allows you to select from a list of available classes for the selected department. This field is only enabled if a department has been selected. This search criterion can be used for any other search type except when searching by Style.
This field allows you to select from a list of available sub-classes for the selected department/class. This field is only enabled if a department and class has been selected. This search criterion can be used for any other search type except when searching by Style.
This field is a drop down listing all the various statuses of an item and enables you to lookup for items in a particular status. List of values include 'Ranged', 'Active', 'Discontinued', 'Deleted', 'Inactive', 'Temporary' (Ranged in the Inventory system and not yet approved in the Merchandising system), 'All Items'.
Selecting Ranged, the system will return items in the 'store' in statuses Active, Discontinued, Deleted, Inactive, Temporary.
Selecting Active, the system will return items in the store in status 'Active'. Same case with Discontinued, Deleted, Inactive, Temporary statuses as well.
Selecting All Items, it returns items in all statuses from Item master table. This can be used if you want to include 'Non-ranged' items.
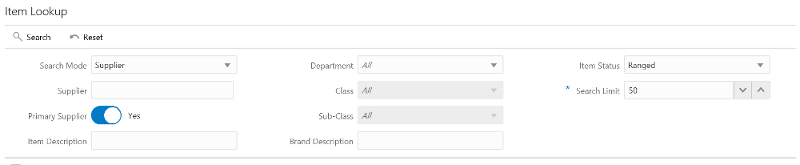
This field holds a supplier number, which you enter to search. You can search for items by primary and non-primary suppliers.
The Primary Supplier switch determines whether to display all items supplied by the entered supplier (based on the Supplier or Supplier Name search fields) or only display items where the entered supplier is the primary supplier for that item: If the indicator is on, the system only displays items where the entered supplier is the primary supplier of the item. This is the default.
If the indicator is off, it displays all items supplied by the supplier ID that was entered in the search criteria field, regardless of whether or not the entered supplier is the primary supplier. In this case, you may see items in the search results that have a different supplier ID and name than what was entered in the search criteria. This means the item is supplied by the entered supplier, but has a different primary supplier.
You can search on a style item ID. The Item Description, Brand, Department, Class, and Sub-Class search options do not display when the Style Search option is selected. Enter a style item (style is where the item level is above the transaction level), and the system returns all the transaction level children that are related to the style parent/grandparent.
Example:
Enter Style ID
10001001 Shirt Item level 1, tran level 2
Search Returns
10001011 Shirt 1, green shirt item level 2, tran level 2
10001012 Shirt 2, blue shirt item level 2, tran level 2
10001013 Shirt 3, red shirt item level 2, tran level 2
This field allows you to search by available or unavailable inventory status. The system returns all items that match the status selected by you. If Available is selected, the system returns the items that have available inventory. If Unavailable is selected, the system returns the items that have non-sellable unavailable inventory. This search feature gives you a way to search for items that have unavailable inventory which might need further action. It can be especially useful when looking up items when creating inventory adjustments.
This field allows you to continue to filter down by sub-bucket. Sub-buckets are only an option if the system is configured to use sub-buckets. The Inventory Status must be selected as Unavailable for the Sub-bucket filter to be enabled. The system returns all items that match the selected Inventory Status and Sub-bucket.
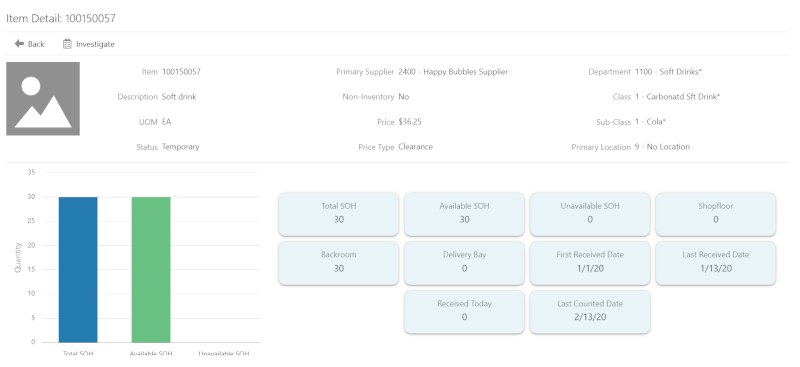
Selecting an item from the search results on the Item Lookup screen brings you to the Item Detail screen. The header shows the Item Number, Description, Unit of Measure, and item image if configured to show images. Additional header information includes the item Status, Primary Supplier, Non-Inventory item or not, Price and Price Type, Department, Class, Sub-class and Primary Location of the item. A bar graph is also displayed to show the inventory status of the item. The header also gives information about the Total SOH, Available SOH, Unavailable SOH, Shopfloor and Delivery Bay quantity, First Received Date, Last Received Date, Last Counted Date and the units received today.
This section also has an option to add the item to an Investigate Item Basket. If one or more item baskets exist in 'In Progress' status with a type of 'Investigate' for the user's store, the item will be added to the newest item basket. Otherwise, a new 'Investigate' item basket will be created. The item basket will be 'static' and available in the Item Basket dialogs of both the desktop and mobile.
Below the header, various sections are listed which display the details of an item such as inventory, item attributes, stock locator, and so on.
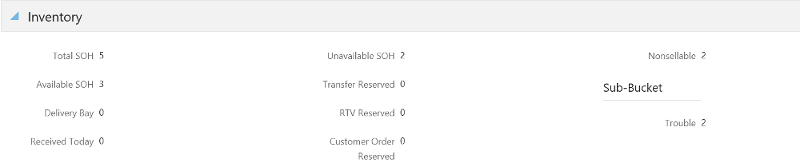
This is the Stock on Hand Details for an item. It was accessed by clicking on the Inventory section from the Item Detail screen within Item Lookup. This screen shows all the various stock on hand buckets including total SOH, available SOH, shopfloor, backroom, delivery bay, unavailable SOH, transfer reserved, RTV reserved, customer order reserved, nonsellable and the list of sub-buckets with the respective inventory.
|
Note: The shopfloor and backroom buckets are only displayed when the parameterDisplay Shopfloor/Backroom quantity= Yes.
The delivery bay bucket is only displayed when the parameter called Sub-bucket details will only display when the system is configured for sub-buckets. |
Total Stock on Hand = Available + Unavailable
Unavailable = Transfer Reserved + RTV Reserved + Non-sellable + Customer Order
|
Note: SOH and any reference to inventory will not be available for non-inventoried consignment or concession items. |
Available = Shopfloor + Backroom + Delivery Bay
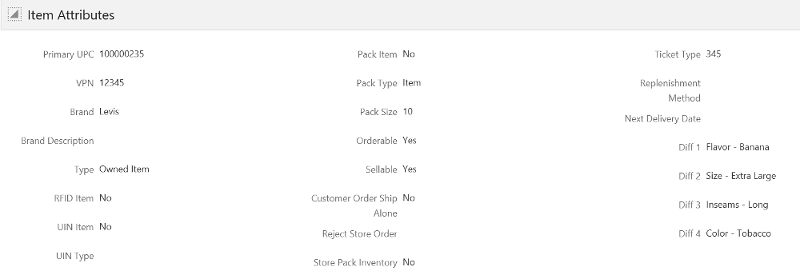
Item Attributes is accessed by selecting the Item Attributes menu option from Item Detail. It displays the item attributes for the item at your store.
Additional information may also be helpful to view about an item. The following are some additional item attributes available on this screen.
Status: Item status as the location.
VPN: Vendor product number for the primary supplier of the item.
UPC: UPC for the item.
Brand: Brand of the item.
Type: Indicates the type of item whether it is Owned/Consignment/Concession.
Owned - If the item is company owned
Consignment - If the item is a consignment item (purchase type indicator in RMS is set to 's' for this item)
Concession - If the item is a concession item (purchase type indicator in RMS is set to 'c' for this item)
Pack Item: Yes/No; indicates if the item is a pack item.
Pack Type: indicates the pack type of the item.
Pack Size: This field holds the pack size (number of items in a supplier case) of this item:
The pack size is populated from the item/supplier/country record for the primary supplier.
For non-ranged items, this value is pulled from the master item data, for the default supplier.
Ticket Type: Merchandising suggested ticket type code/format.
Orderable: Yes/No; indicates if the item can be ordered.
Sellable: Yes/No; indicates if the item is sellable.
UIN Item: Yes/No; indicates if the item is a serialized item.
UIN Type: Indicates whether it is a serial number item or auto generated serial number item. Displayed only for a UIN item.
Reject Store Order: Reject the item request if the item is a store order replenishment item and it does not fall within the replenishment dates. Reject Store Orders should display Yes/No if the store orders replenishment method is store orders. In all other cases it should display NULL.
Replenishment Method: The replenishment method setup for this item in the merchandising system
Store Pack Inventory: Yes/No; indicates tells the system when an item will only be sold and tracked as a pack.
Customer Order Ship Alone: Yes/No; tells the system if an item needs to be shipped alone in customer order deliveries or not.
Next Delivery Date
Differentiators
Custom Flexible Attributes
Non-inventory: Yes/No; indicates if the item is flagged as non-inventory.
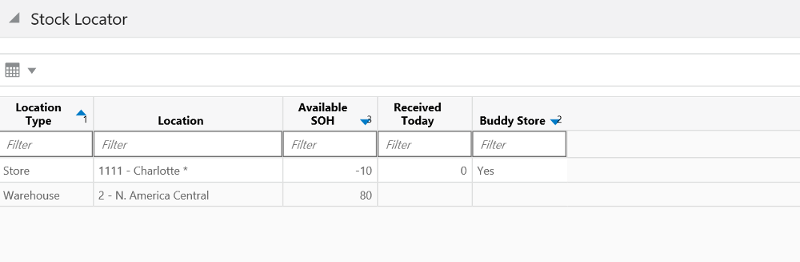
The Stock Locator details are accessed by clicking on Stock Locator from Item Detail. This section shows stock on hand for the item at other locations, which could be stores and warehouses. If transfer zones are used, only the stores within the transfer zone and the stores in null transfer zone should appear. If no transfer zone is associated, all the stores will be listed. The stores listed must have the logged in store present in its shipping network in order to be listed in this screen. Warehouses will only display the available SOH. Access Warehouse Inventory permission is needed to view the warehouse inventory. The locations are ordered first by buddy stores (Yes) at the top and second by available SOH (greatest at the top).
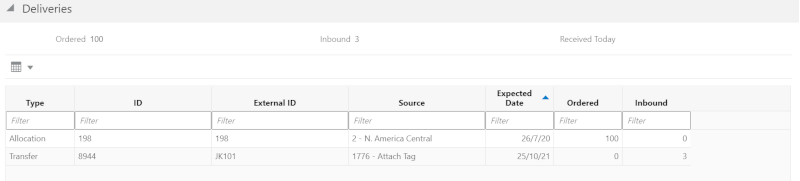
The Deliveries screen is accessed by selecting Deliveries from Item Detail. All quantities are in the SUOM.
The header contains:
Ordered: Displays the total quantity remaining on the order. (Transfers + Purchase Orders)
Inbound: Is the total shipped quantity from transfers, allocations, and POs on an ASN that have not been received yet.
Received Today: Is the total received quantity for the current date.
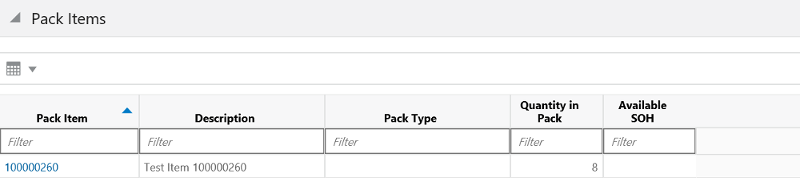
Clicking the Pack Items section on Item Detail displays the packs that exist for the item. The Pack option is available even if the item is not part of a pack. If it is not part of a pack, no content is displayed for the item. All quantities are in the SUOM.
Clicking on a pack item ID navigates you to the item detail for that item. You can return to the original item.
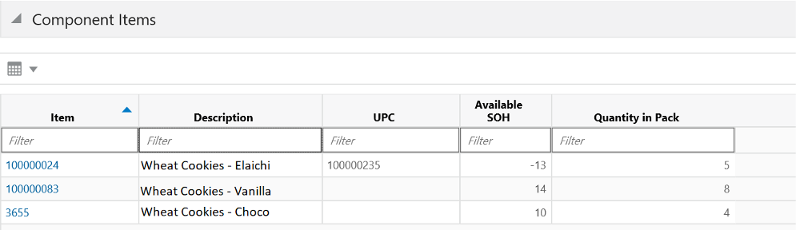
Clicking on the Components section on Item Detail displays the components that exist for the pack item. The section is only available for those items which are a Pack item. All quantities are in the SUOM.
Clicking on a component item ID navigates you to the item detail for that item. You can return to the original item.
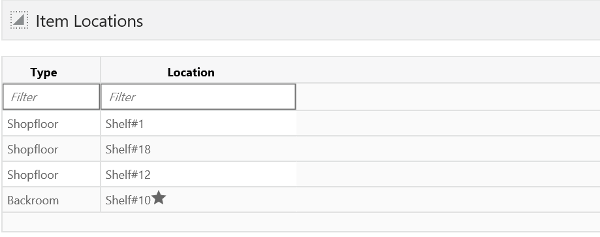
Clicking on the Item Locations section on Item Detail displays the sequenced locations that exist for the item. The Item Locations section is only displayed when the system is configured for Display Sequence Fields = Yes.
The macro locations with the area are displayed. If the location is a primary location, it is indicated with a star.
|
Note: If an item is RFID, this information will not be displayed. |
Clicking on the UDAs section displays the UDA information for the item at your store. The list is ordered by UDA.
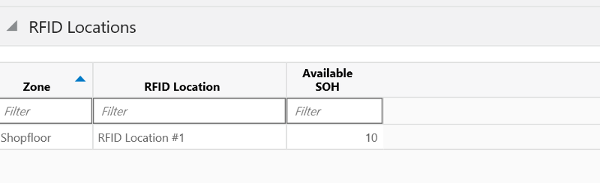
Selecting the RFID Locations from the Item Detail screen displays the RFID Location wise inventory. This menu is available only if the item is RFID tag enabled item.
RFID Locations are defined in the RFID solution and uploaded into system.
The inventory positions shown here are the accumulated numbers of the tags present in the location.
The Related Items section is accessed by selecting the Related Items menu option on the Item Detail screen. The Related Items screen displays the related items for the item at your store. All quantities are in the SUOM. The related item types of cross sale, up sale, substitute, and style are listed. There is a type filter at the top of the screen allowing you to filter by the type of related item. All items display, even if they are not ranged to the store.
Only Active related items are listed, where today's date is within the effective date and end date for the related item. If there is no effective date, the item is assumed to be active.
If you select a related item record in the list, you navigate to the Item Detail screen for that item. You are then in the details for that item. There is not a way to navigate back to the original item.
|
Note: The Substitute item types are used within the Customer Order Picking and Shelf Replenishment Picking dialogues when a substitute item is allowed. |
The Additional Suppliers section is accessed by selecting the Additional Suppliers menu option on the Item Detail screen. This section displays the additional suppliers for the item at your store.
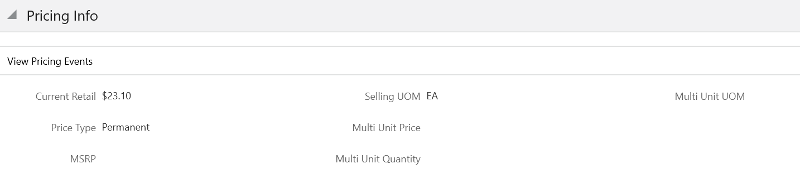
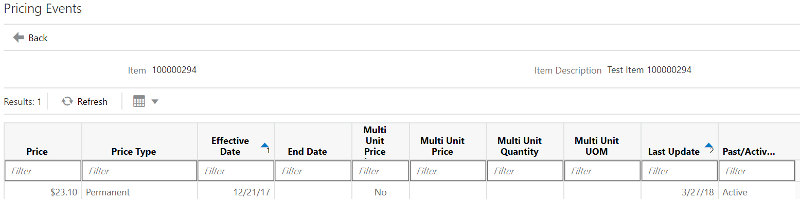
The Pricing Info section is accessed by selecting the Pricing Info menu option on the Item Detail screen. This section displays the price related information for the item. Clicking on the Pricing Events button takes you to the screen which displays the list of Pricing Events for the item.
Depending on configuration, it can show future and historical or historical only prices.
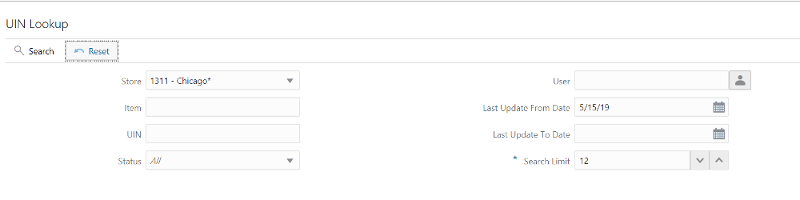
The UIN Lookup dialog is used to perform a UIN inquiry from the system. This can be accessed under the Inventory Management menu option of the application. You can search the UINs based on the several criteria for the current store, other stores or all the stores.
The UIN Lookup screen allows you to give the search criteria such as Store, Item, UIN, Status, User and date range to find the UINs.
The current store is the default selection and you can change the store or select 'All' for inquiring all the stores.
Entry of item number or UIN is required. Either input the item number and search for the UINs associated to that item or enter the UIN.
If the item number and the UIN is entered, the system checks for the UIN details corresponding to the entered item number and if found the system goes to the UIN History screen directly.
If only the UIN is entered and if the system has found only one item containing that UIN, the system goes directly to the UIN History screen.
If the system finds more than one item containing the same entered UIN, the system displays a select item popup to select the item.
If only the item number is entered and the UIN is left blank, the system checks for all the UINs associated to the entered item number.
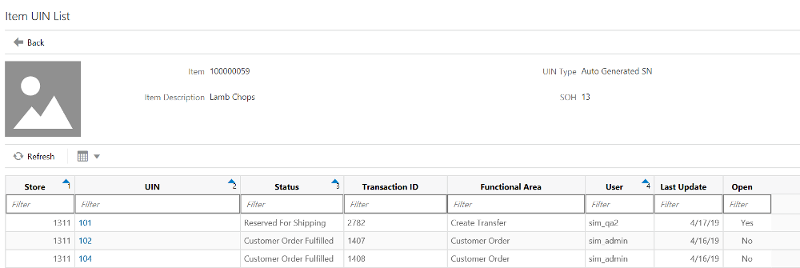
If the system finds multiple UIN records for the given criteria, the system goes to the Item UIN List.
If the system finds more than one UIN records based on the given input on the UIN Lookup, the Item UIN List with the list of UINs is displayed.
The item information is shown on the header portion and in the list, the system displays the Store, UIN, Status of the UIN, Recent Transaction information, user, last update date and the current status whether it is in Open or Closed with an Yes/No indicators.
Open UINs should consist of UINs that are in the following statuses:
In Stock
In Receiving
Reserved for Shipping
Unavailable
Customer Order Reserved
Closed UINs should consist of UINs that are in the following statuses:
Sold
Customer Order Fulfilled
Shipped to Store
Shipped to Warehouse
Shipped to Finisher
Shipped to Vendor
Removed from Inventory
Missing
The UIN on this screen is a link to the UIN History screen to view the history of the UIN.
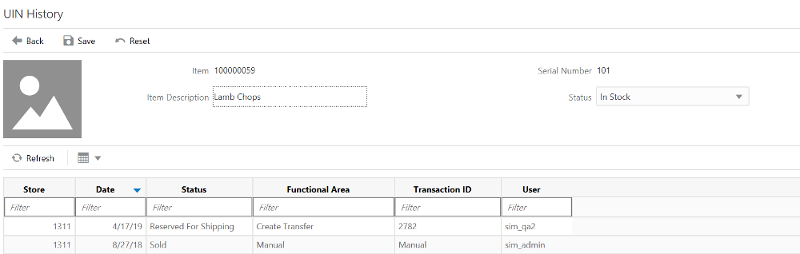
You can access the UIN history screen either via the Item UIN List upon selecting an UIN or by selecting the View History option on the Troubled Transactions List.
This screen displays the Item and UIN information on the header.
The list on this screen contains the Store, Date on which the status change occurred in the system, updated status on the occurrence, corresponding functional area for which the transaction occurred, transaction id and user.
You can change the status of the UIN by selecting the correct status from the Status drop down on the header and select Save.
Select UIN Lookup and provide the search criteria to go to the Item UIN List or UIN History screens.
If there are multiple records, the system displays the Item UIN List and, upon selecting the UIN link, takes you to the UIN History screen.
You can get to the UIN History screen from the Troubled Transactions List by selecting View History.
The Supplier Lookup functionality in the desktop application provides the business user with the ability to view information related to a supplier.
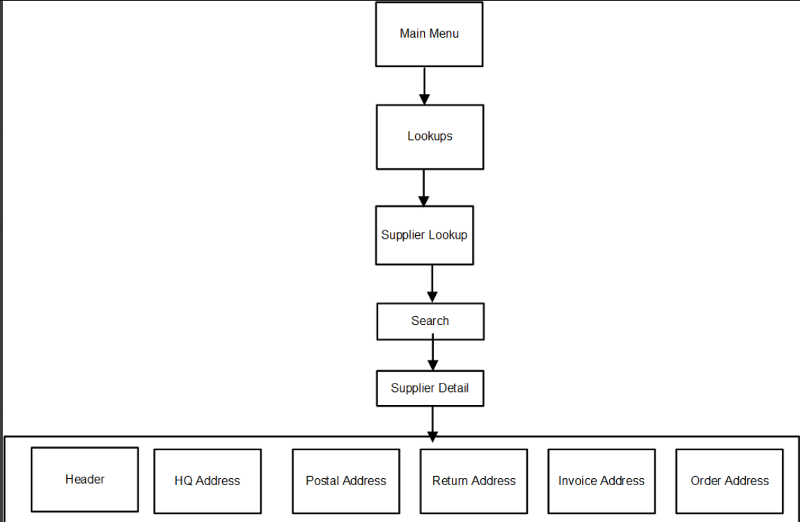
This is the screen flow for the Supplier Lookup functionality. Selecting Supplier Lookup from the Main Menu/Lookups directs you to the Supplier Lookup screen. From Supplier Lookup screen, you can search for suppliers and view different details about the supplier, via the Supplier Detail screen.
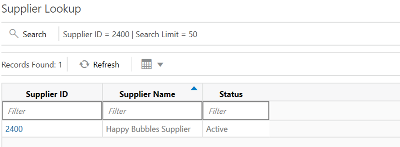
When navigating to Supplier Lookup, you are taken to a screen where all the active suppliers are displayed by default. You are also presented with various search criteria to lookup for a supplier. You can enter the search criteria to find the suppliers.
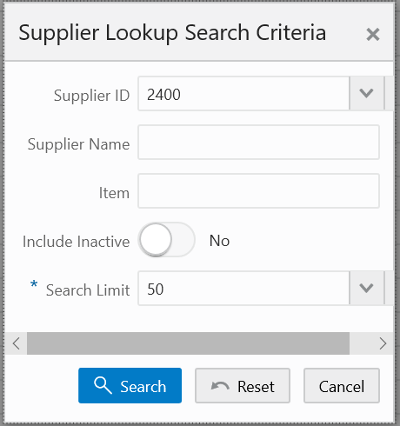
You will get this dialogue by clicking on Search from the Supplier Lookup screen. This dialogue displays a few search criteria which helps you to lookup a supplier.
After applying the search criteria, the results are listed on the Supplier Lookup screen.
If the search results in a single supplier, the system takes you automatically to the Supplier Detail screen of the supplier. If more than one supplier is found, the list of suppliers are displayed in the Supplier Lookup screen and you can click on a supplier to view the details of the supplier.
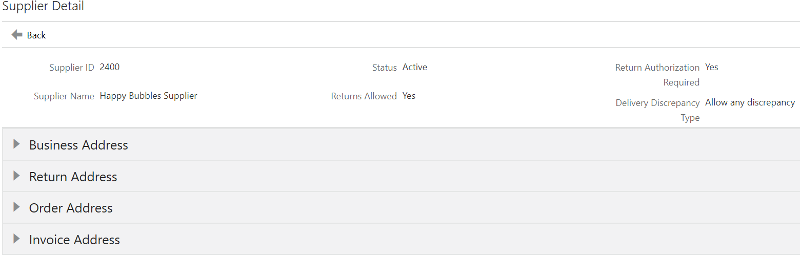
A Supplier's information is presented in the Supplier Detail screen as different sections.
Header
The header details includes details of the supplier such as ID, Name, Status, Returns allowed or not, Authorization required or not and the Delivery Discrepancy Type.
Various Address types including Business Address, Return Address, Invoice Address and so on.
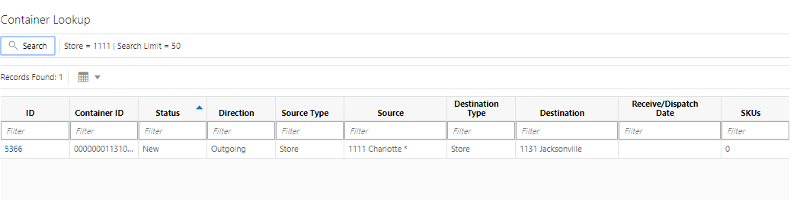
The Container Lookup functionality in the desktop application provides the business user with the ability to view information related to a container. Some of the information that can be accessed from the screen includes the associated Shipment ID, ASN, Source Type/Source ID, Destination Type/Destination ID, Expected Date, Receive Date, Update Date/User, details of the items present in the container, and so on.
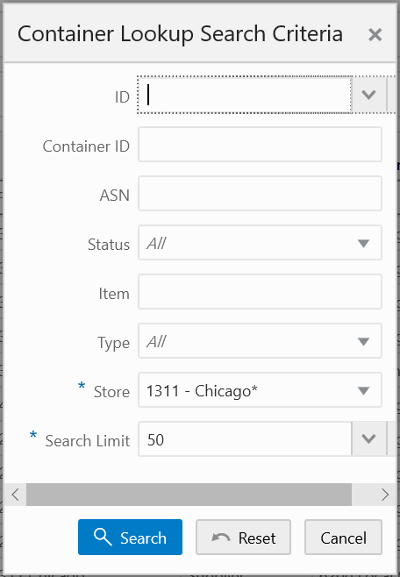
When navigating to Container Lookup, you are taken to a screen where all the containers for the store are displayed by default. You are also presented with various search criteria to lookup for a container.
You will get this dialogue by clicking on Search from the Container Lookup screen. This dialogue displays a few search criteria which helps you to lookup for a container.
After applying the search criteria, the results are listed on the Container Lookup screen.
If the search results in a single container, the system takes you automatically to the Container Detail screen of the container. If more than one container is found, the list of containers are displayed in the Container Lookup screen and you can click on a ID link to view the details of it.
This dialogue allows the user to also find and view containers not specific shipped to their store.
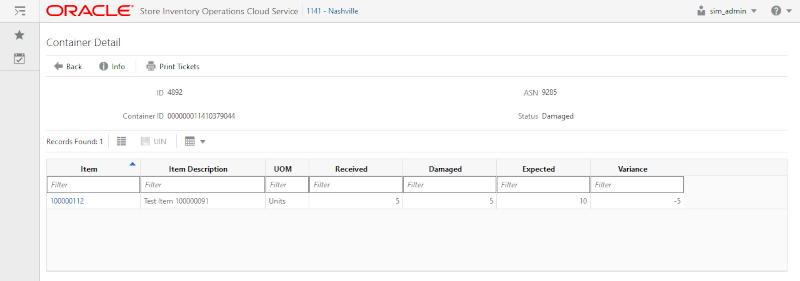
A Container's information is presented in the Container Detail screen as header and detail sections. The header section contains the primary details of the container and the detail section consists of the items added to the container.
Header Section
The header details includes details of the container such as associated Shipment ID, ASN, Source Type/Source ID, Destination Type/Destination ID, Expected Date, Receive Date, Update Date/User, Adjusted container or not, Receive on Shopfloor (Yes/No), Damage Reason, SSCC, Tracking ID and so on.
Detail Section
The Detail section displays the list of items in the container and the details of the item which includes the Received/Damaged/Expected Quantity and Variance. By selecting an item and clicking on UIN icon, the user can view the list of UINs added if the item is a Serial number item. Also, the Extended attributes of the item can also be viewed by clicking on the Extended Attributes icon.
From the container detail screen, the user can print the tickets by selecting the Print Tickets option.
Upon selecting the print tickets button, the user is taken to the Print Tickets popup for the user to provide the ticketing attributes to print the tickets for the current container items.
When the user selects to print the tickets from the container detail screen, the system pops up this screen to provide the ticketing details.
On this screen, the user can select the ticketing attributes such as format type, what format to be applied and to which printer the tickets to be submitted to print.
Also, on this screen, the system displays the quantity field to indicate how the total quantity is derived and the print date for the user to know when it will be printed.
Upon selecting the print button, the system submits the print request to the printer service for the printing of tickets.
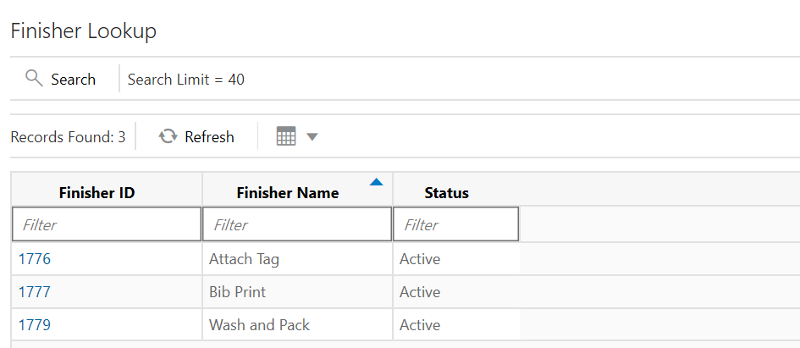
The Finisher Lookup functionality in the desktop application provides the business user with the ability to view information related to a finisher. The user can access the Finisher Lookup screen through Main Menu - Lookups - Finisher Lookup. The user must have proper security permission (Access Finisher Lookup) for this option to exist.
When the user first enters the screen, active finishers will be displayed by default. After performing a search, the list of finishers per the search criteria entered will be displayed in this screen. User can click on a finisher and it will take the user to the detail screen for the selected finisher.
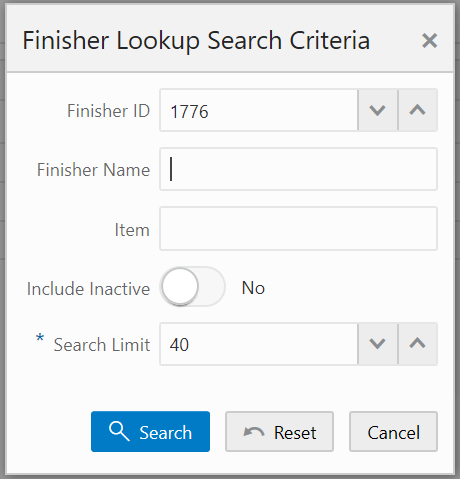
The user can access the Finisher Lookup Filter dialogue by clicking on Search button from the Finisher Lookup screen. This dialogue enables the user to enter various search criteria to lookup for the finisher(s) that he needs. After performing the search, the list of finishers per the search criteria entered will be displayed in the Finisher Lookup screen. If one result is found, the user is taken to the Finisher Detail for that finisher. The result returned should adhere to MSOB rules.
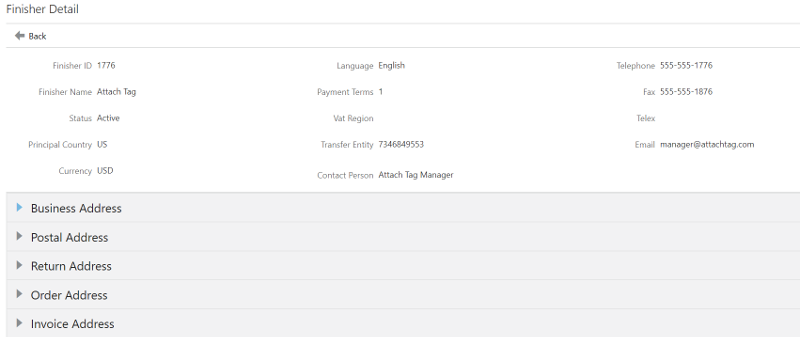
The user will be taken to the Finisher Detail screen upon selecting a finisher from the search results on the Finisher Lookup screen. The Finisher Detail screen will consist of primary details of the finisher in the header and other details such as Addresses as sections below the header. A section will exist for every address type for the finisher being looked up. Expanding a section will display respective details right below. Types of addresses and the number of types of addresses may vary per finisher. Everything within the screen is view only.
Item Scan Number Lookup dialog in the desktop application helps the retailers particularly the telecom retailers to maintain the multiple identification numbers of an equipment or item.
Many mobile phone manufacturers produce phones that supports more than one SIM slot and one unit is associated with multiple unique identification numbers. In the Retail world, this leads to allow the users at different point solution to scan any of these unique identification numbers on the unit to identify the product.
The system will support to identify the item or equipment by scanning any of the unique identification numbers associated to the product and tracking of the status of the unit is done by the primary identification number that is present in the system.
The system also has the capability to capture any additional information or attributes of the unit.
The creation and update of ISN data can be done via web services or using the desktop application UI.
ISN Lookup can be accessed from Lookups menu on the desktop application. When accessing the ISN Lookup screen, the system displays the search criteria screen initially to do provide the criteria to search.
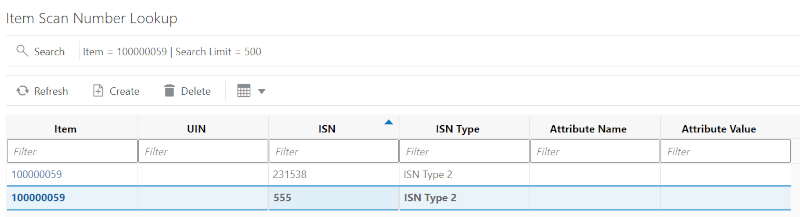
The ISN Lookup screen allows the user to search the Item Scan Number data for an item or do an inquiry for the known ISN. On this screen, the user can only view or manage ISN data for one item at a time. This screen allows the user to create new or delete the ISN data of an item.
On this screen the user can also create a new ISN by selecting the Create option.
The system displays the following fields:
Item: Item Id of the ISN data user looking for. The user can select the link on the item to go to the Item Detail screen.
UIN: This holds the Unique Identification number/Serial number of the item. The system maintains the inventory status of the unit based on the primary UIN only. All other unique identification numbers are in reference to the UIN.
ISN: This field holds the other reference unique identification number that is, ISN.
ISN Type: This field displays the type of ISN.
Attribute Name and Attribute Value: -These are value pair where the value is corresponding to the name. Attribute details are captured from the external system and read only on this dialog.
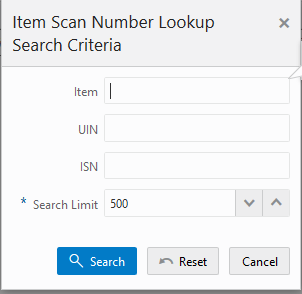
This search criteria screen is loaded automatically when the Item Scan Number Lookup is accessed. It can also be accessed by clicking the Search button on the Lookup screen. The user can filter on various search criteria. After applying the criteria, the user will be returned to the ISN Lookup screen with the ISN data.
The user must enter at least one valid search criteria to continue the search.
If the system finds more than one item based on the ISN search, it prompts the user to refine the search by entering the actual item number to search for.
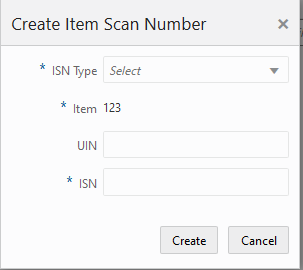
The user can create new ISN for the inquired item by selecting the Create button on the ISN Lookup screen.
If the user has provided the item in the search, the item number is defaulted otherwise it allows the user to enter the item.
On this screen, the user can select the ISN type, enter the UIN and the ISN to create a new ISN record for the item.
The ISN Type drop-down displays the list of ISN Types available in the system. The list is populated from the ISN Type screen where the user creates/manages various ISN types. The system has three pre-defined ISN types 1 to 3 for the retailer to fit to represent the unique identifiers based on the industry. For example, the telecom retailer could use the ISN type 1 and ISN type 2 for any unique identification number of the mobile devices. The user can also create more ISN Types through the ISN Type screen.
The system saves the record upon selecting the Create button.