| Oracle® Retail Enterprise Inventory Cloud Service Administration Guide Release 19.5 F55424-02 |
|

 Previous |
 Next |
| Oracle® Retail Enterprise Inventory Cloud Service Administration Guide Release 19.5 F55424-02 |
|
Previous |
Next |
This section covers the following topics:
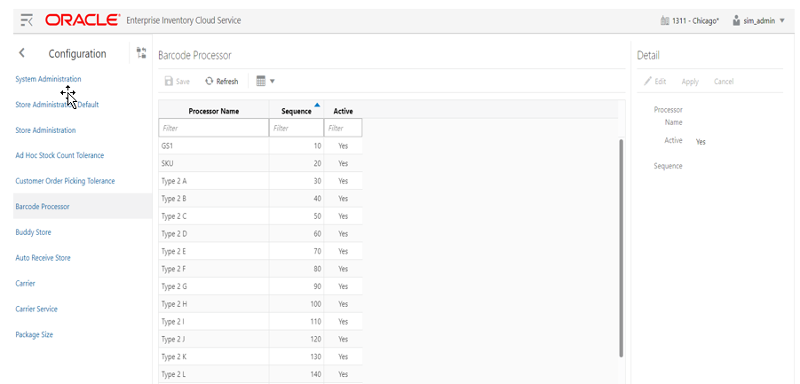
Barcode Processors are used within EICS to scan items. When the application takes a barcode (or manual entry of one), it passes it along to the barcode processors to extra the correct sku number from the barcode in order to retrieve the item. This form allows the control of which barcode processors the application uses and what order they are used in. The barcode processor form is located under Configuration Barcode Processor.
The above screen picture shows the list and detail panel in display mode.
List Buttons
Save: Persists currently altered information.
Refresh: Refreshes the screen with currently persisted information.
Filter: Enable or disable the filtering row in the table.
Barcode Processor Attributes
Processor Name: The name of the processor. This does not alter how the processor works. For example, Type 2 E will continue to parse Type 2 E, even if it is renamed to Type 2 K.
Sequence: Sequence indicators the order the barcode processors will attempt to analyze the item scanned. It starts with the lowest sequence number and proceeds upward. Items will be returned by the first barcode processor that finds a valid item within the barcode.
Active: Yes, indicates that the barcode processor is active and will be used when scanning items.
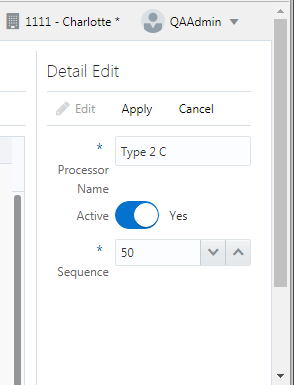
Detail Panel
Detail Buttons
Edit: Places the detail information displayed into edit mode.
Apply: Applies the current data to the barcode processor and updates the list information.
Cancel: Places the panel back into display mode without applying the information.
Table 7-1 Barcode Processors
| Barcode Processor | Description |
|---|---|
|
SKU |
Parses the data scanned as a direct sku number or Universal Identification Number. |
|
GS1 |
Parses the data scanned as a GS1 (Global Standards One) seeking out item number within. |
|
Type 2 A-L |
Barcode processor parses the data as a Universal Product Code (Type 2), otherwise known as random weight barcodes. There is a whole series of available code patterns from sub-type A to sub-type L. |
|
UPC E |
Parses the data scanned as a Universal Product Code (Type E), a six- digit barcode. |
|
VPN |
Parses the data scanned is a Vendor Product Number. |
|
RFID |
Parses the data as Radio Frequency Identification (RFID) tag. |
|
RFID GTIN-12 |
Parses the data as Radio Frequency Identification (RFID) GTIN-12 tag. |
|
RFID GTIN-13 |
Parses the data as Radio Frequency Identification (RFID) GTIN-13 tag. |
|
ISN |
Parses the data as Item Scan Number (ISN) seeking out the IMEI number. |
|
Note: Any changes to the Barcode Processor configuration require EICS server restart. You can request a server bounce by contacting Oracle Support via a Service Request on My Oracle Support. |
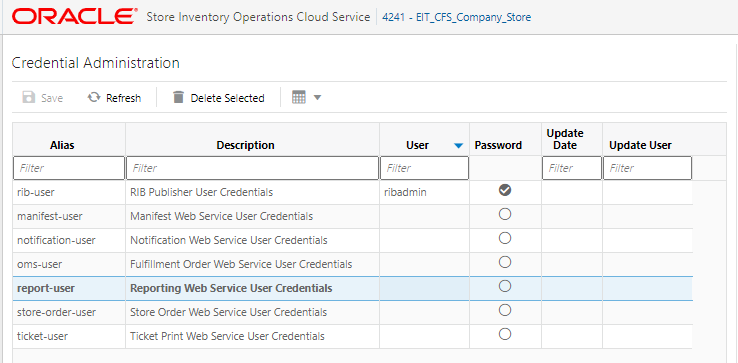
The Credential Administration screen is used to setup integration credentials to connect with external/third-party systems.
To access this screen, user need to be assigned the following role/permission:
IDCS or OCI IAM app roles: <SIOCS Primary APP>.admin_users
Security Permission: Access Credential Administration
List Buttons
Save: Persists currently altered information.
Refresh: Refreshes the screen with currently persisted information.
Delete Selected: Delete the user and password value for the records selected from database.
Filter: Activates the filter dialog allowing the user to filter information.
List Attributes
Alias: The alias for the user.
Description: The description of the user.
User: The user name.
Password: Displays whether a password has been set currently for the user.
Update Date: The last update date.
Update User: The user who updated the record last.
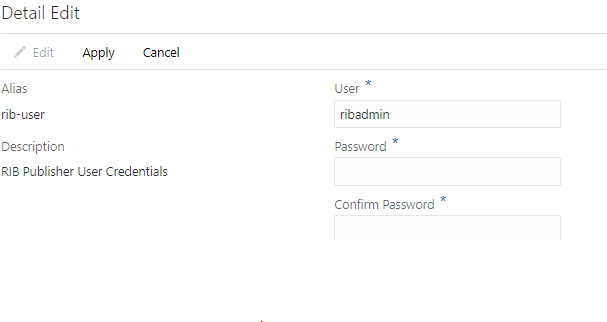
Detail Panel
Detail Buttons
Edit: Places the detail information displayed into edit mode.
Apply: Applies the current data to the credential admin and updates the list information.
Cancel: Places the panel back into display mode without applying the information.
Detail Attributes
Alias: Shows the alias for the user. Pre-defined read only field.
Description: Displays the user description. Pre-defined read only field.
User: Field to enter user name.
Password: Field to enter password for the user.
Confirm Password: Field to enter password one more time in order to make sure the user has entered the right password.
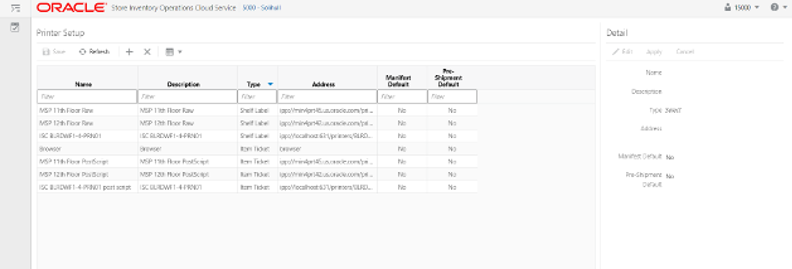
The Printer's screen is used to configure printers. The user can add, view, edit, and delete a printer as well as assign a network address for each printer. They can also indicate whether the printer is the default printer for manifest printing or pre-shipment printing.
List Buttons
Save: Persists currently altered information.
Refresh: Refreshes the screen with currently persisted information.
+: Add a new printer to configuration. It clears out the detail panel so the user can enter new printer information.
x: Remove a printer from configuration. A dialog confirmation warning will occur prior to deletion of the record.
Filter: Activates the filter dialog allowing the user to filter information.
Printer Attributes
Name: The name of the printer.
Description: Longer name for the printer.
Type: The type of the printer. Valid values are: Item Ticket, Shelf Label and Postscript.
Address: The address of the printer.
Manifest Default: Yes, if this is the default printer for manifest printing, otherwise No.
Pre-Shipment Default: Yes, if this is the default printer for pre-shipment printing, otherwise No.
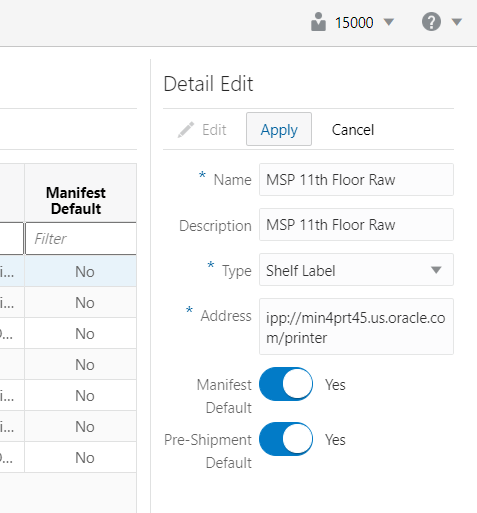
Detail Panel
Detail Buttons
Edit: Places the detail information displayed into edit mode.
Apply: Applies the current data to the printer and updates the list information.
Cancel: Places the panel back into display mode without applying the information.
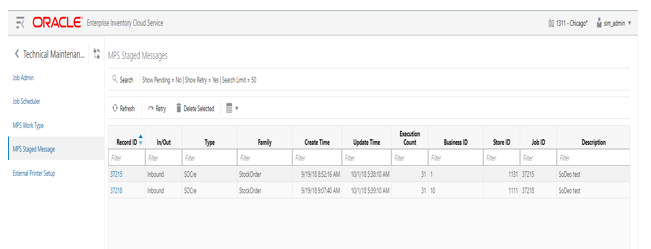
The MPS Staged Message administration form is used to monitor the messages in the Message Processing System queue. Each message contains the detailed information being transmitted between EICS and an external system.
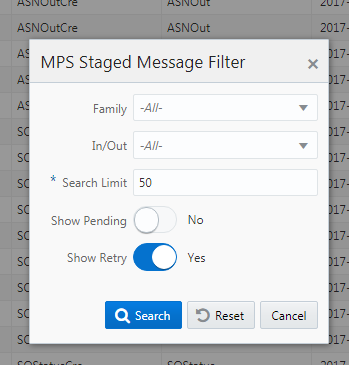
Filter Bar
Search: This is a button that displays a filtering dialog.
Description: A non-labeled text field follows the Filter button that displays what criteria are currently selected to filter the staged message table.
Filter Dialog Attributes
Family: Limits the search results to only those messages in the specified family.
In/Out: Indicates if the message is inbound to EICS or outbound to an external system.
Search Limit: Limits the number of messages found to the specified limit or less.
Show Pending: If true, only messages that are pending will be displayed.
Show Retry: If true, only messages that are in retry will be displayed.
Filter Dialog Buttons
Search: Executes a search for staged messages based on the selected criteria and refreshes the list table with that information.
Reset: Results the filter dialog back to its default settings.
Cancel: Closes the dialog without taking any action.
List Buttons
Refresh: Refreshes the staged message list with current information.
Retry: If a staged message is selected, selecting this button will retry the processing of the staged message.
Delete Selected: If a stage message is selected, selecting this button will attempt to delete the message.
Filter: Activates the filter dialog allowing the user to filter information.
List Attributes
Record Id: A unique identifier assigned to the stage message.
In/Out: Indicates if the message is inbound to EICS or outbound to an external system.
Type: Type of message within a family. For example, most families of messages have a create, modify, and delete type of message.
Family: Describes the family that the message belongs to. This will align with a MPS Work Type scheduled to process this family of messages.
Create Time: The timestamp of the first time the message was created.
Update Time: The timestamp of the last time the message was updated.
Execution Count: The number of times the system has attempted to process the message.
Business ID: A business identifier associated to the message. More than one message may carry a business identifier, and so this can be used to associate messages that may be related to the same activity.
Store ID: The identifier of the store associated to the message.
Job ID: The job identifier is a server-generated sequence number used for grouping related messages. If a message is singular with no other related messages, then its record identifier and job identifier will be identical. For messages, that must be executed sequentially together as a group, they will be assigned the same job identifier but different record identifiers.
Description: A brief formatted description of the staged message that gives some indication of the contents within.
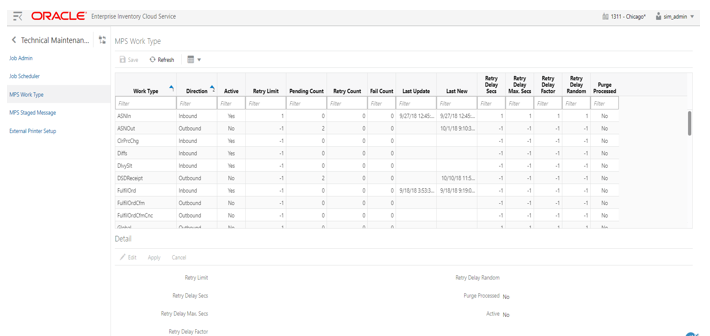
The MPS Work Type administration form is used to configure the MPS work types. MPS stands for Message Processing System and each work type represents an external inbound or outbound message family or grouping to be delivered to another system. These work types do not represent the messages themselves (see MPS Staged Message) but the working queue that handles the processing of these external messages.
List Buttons
Save: Persists currently altered information.
Refresh: Refreshes the screen with currently persisted information.
Filter: Activates the filter dialog allowing the user to filter information.
List Attributes
Work Type: The work type is the name of the message queue being worked on.
Direction: Indicates if the message queues is inbound to EICS or outbound to an external system.
Active: Yes, indicates the work type is currently active and attempting to process messages. No indicates it has been disabled.
Retry Limit: The number of times to attempt to process a single message before marking it as failed.
Pending Count: Number of messages pending processing.
Retry Count: Number of times the system as attempted to process the message. Zero times means processing has not been attempted yet.
Fail Count: Number of messages that have failed to be processed.
Last Update: The timestamp of the last time a staged message record was updated in the database for this specific work type.
Last New: The timestamp of the last time a staged message record was created in the database for this specific work type.
Retry Delay Secs: The delay in seconds between retries.
Retry Delay Max Secs: The maximum delay in seconds between retries.
Retry Delay Random: The factor used to limit the range of retry delay randomization.
Purge Processed: Indicates if automatic purging of messages that are processed successfully is enabled.
Detail Panel
Detail Buttons
Edit: Places the detail information displayed into edit mode.
Apply: Applies the current data to the work type and updates the list information.
Cancel: Places the panel back into display mode without applying the information.
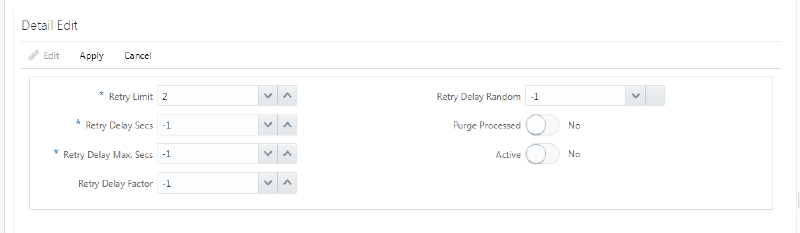
Detail Attributes
Retry Limit: The number of times to attempt to process a single message before marking it as failed. Zero indicates it should only be attempted once and will not be retried. A positive value indicates how many attempts to process the message should be made in addition to the original attempt.
Retry Delay Seconds: The number of seconds between attempts to process a message. Zero indicates no delay whereas a value of 30 indicates 30 seconds between attempting to process the message. This value does not represent an absolute value as it used with other parameters below to produce a calculated message time delay.
Retry Delay Max Seconds: This is the maximum number of seconds for a delay between processing messages. This caps the maximum value for the calculated delay.
Retry Delay Factor: This attribute produces an increased delay between each retry of a failed message in the queue. It is a decimal value starting at 1.0 and increasing. If you enter 1.0, it means there will be no increase in the retry delay seconds during repeated attempts to process a message. A value of 1.5 indicates that the retry delay seconds will be 150% of the retry delay seconds on retry.
A linear delay of 1.0 can be used but may result in messages reaching their retry limit prior to any issues being resolved. A value of 1.5 or larger will produce an increased delay that may allow time for other dependent messages that could be holding up execution to arrive.
Retry Delay Random: Defines the amount of the delay to increase or decrease by a random amount. It accepts values from 0.0 to 1.0. A value of 0.0 disables random variation of the delay. A value of 0.5 indicates the calculated delay may be randomly altered by up to 50% of its value whereas 1.0 indicates it could be randomly altered up to 100% of its value. It is recommended to use at least some small random variation to improve message throughout as this will reduce resource convention and help avoid timing issues.
Notes: The parameters are applied to retries in the following manner. The retry delay seconds is first increased by the retry delay factor, then the retry delay max seconds is applied, and finally the random delay is added or subtracted to determine the final number of seconds to wait between message processing attempts.
Purge Processed: Switch to enable/disable automatic purge of messages that are processed successfully.
Active: Switch to enable/disable a work type.
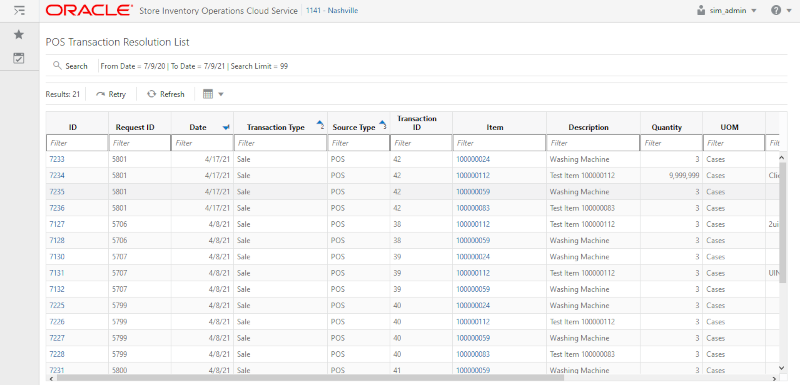
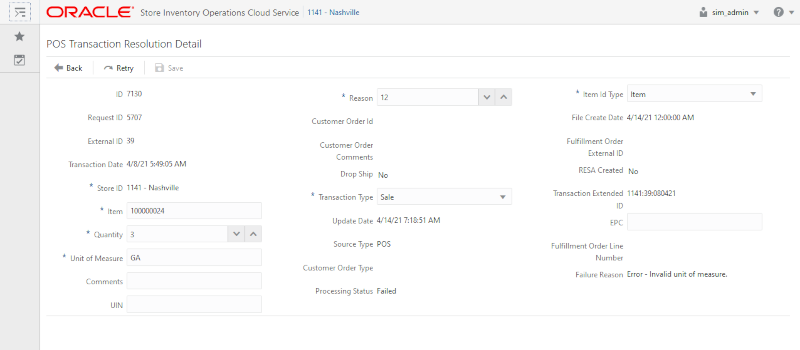
The POS Transaction Resolution dialog is used to view the list of Troubled POS transactions that are not processed in the system due to various data issues in the inbound data. The interface allows the user to edit the unrestricted data fields to rectify the data and let the system to process the transaction and resolve.
This dialog is mostly used by technical members to resolve the POS transactions that are in trouble.
Based on the nature of the field and to maintain the integrity of the data, the system allows the user to modify certain fields and update the transactions.
The POS Transaction Resolution List screen appears when the user selects the POS Transaction Resolution menu from the Admin/Technical Maintenance.
When the user enters this screen, the system set the search criteria to current date and displays the current day failed transactions that can be resolved.
The user can select the search option to refine the search by providing the search criteria.
The retry option allows the user to retry processing a selected transaction. The user must select a row and the system will process the complete transaction of the selected block id.
Selecting the link on the item will take the user to the item detail screen for that item.
On this screen, the list shows the details of the transaction for the user to know and act.
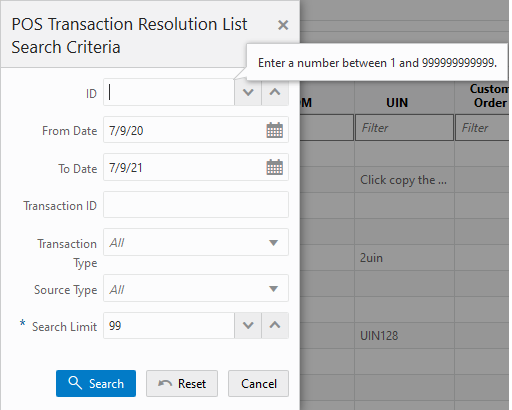
This search criteria screen can be used to filter the records based on the given criteria.
By default, the system sets the date range for the current day and allows the user to set various criteria to search the failed POS transactions. The data on the list screen is shown based on the criteria provided.
On the POS Transaction Resolution Detail screen, the system displays the transaction attributes of the selected transaction and allows the user to edit certain values and update the transaction.
Once the transaction is updated, the system will automatically retry and process it successfully if the system finds the transaction without any error.
The user must enter all the required fields on this screen.
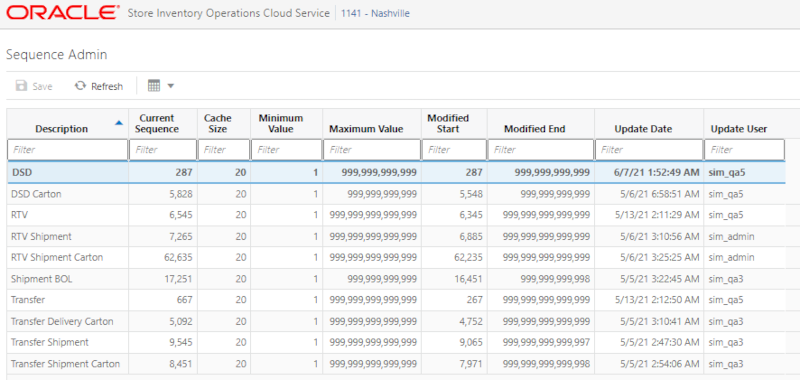
The Sequence Administration screen is intended to be used for initial implementation between integration systems to split the sequence ranges between integrated applications.
If sequence reaches maximum value, the retailer would need to make decision if need to cycle the sequence and raise service request to have oracle DBA to alter the sequence.
To access this screen, user need to be assigned the following role/permission:
IDCS or OCI IAM app roles: <SIOCS Primary APP>.admin_users
Security Permission: Access Sequence Admin
List Buttons
Save: Persists currently altered information.
Refresh: Refreshes the screen with currently persisted information.
List Attributes
Description: Description of the Sequence.
Current Sequence: The last currently used number written to Database Disk (Including the sequence caching size).
Cache Size: The number of sequences kept in DB cache.
Minimum Value: The minimum value the sequence can become.
Maximum Value: The maximum value the sequence can become.
Modified Start: Retailer specified start number for the sequence.
Modified End: Retailer specified end number for the sequence.
Update Date: The last update date.
Update User: The last update user.
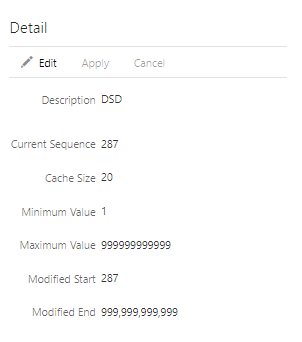
Detail Panel
Detail Buttons
Edit: Places the detail information displayed into edit mode.
Apply: Applies the current data to the work type and updates the list information.
Cancel: Places the panel back into display mode without applying the information.
Detail Attributes
Description: Description of the sequence.
Current Sequence: The last currently used number written to Database Disk (Including the sequence caching size).
Cache Size: The number of sequences kept in DB cache.
Minimum Value: The minimum value the sequence can become.
Maximum Value: The maximum value the sequence can become.
Modified Start: Retailer specified start number for the sequence.
Modified End: Retailer specified end number for the sequence.