| Oracle® Retail Enterprise Inventory Cloud Service Administration Guide Release 22.1.103.0 F52084-02 |
|

 Previous |
 Next |
| Oracle® Retail Enterprise Inventory Cloud Service Administration Guide Release 22.1.103.0 F52084-02 |
|
Previous |
Next |
This chapter covers the following topics:
Oracle Cloud Infrastructure Object Storage, is an internet-scale, high-performance storage platform that offers reliable and cost-efficient data durability.
File Transfer Service (FTS) for the Store Inventory Cloud Services is available as JSON REST services. These APIs allows you to manage uploading and downloading files to Object Storage.
Access to files is through a Pre-Authenticated Request (PAR), which is a URL that requires no further authentication to upload or download to the application's object storage. To retrieve a PAR, you must use the appropriate FTS services.
The FTS APIs enables external application to import files to and export files from Object Storage used by the solutions.
These APIs provides following services:
Ping to check FTS Service health
List storage prefixes
List files in object storage
Move files from object storage
Delete Files from object storage
Request Upload PAR
Request Download PAR
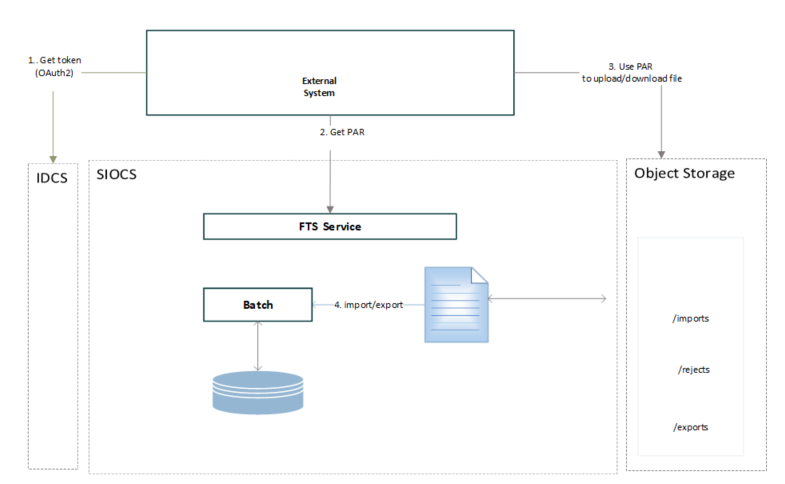
The general process flow below describes how the external solution application interacts with FTS service for transferring files to cloud solution service:
The external application gets an Oauth2 token from IDCS.
The external application makes a FTS request with the Oauth2 token to request Pre-Authentication.
Once the PAR is received, the external application uploads a file to object storage using the URL included within the response.
The file uploads to application object storage and will be processed by cloud application batches.
In addition to public FTS endpoints, the SIOCS cloud application also provides a File Transfer Service User Interface to view files in cloud solution object storage, to upload and download file interactively once logged into the SIOCS client application. Refer to File Transfer Service UI section for details.
To interact with FTS you must use the REST APIs provided. The endpoints URLs are relative to cloud solution integration base URL, and endpoints also include the object storage bucket name which is allocated for your environment for file services.
The Cloud service base URL follows the format:
https://{cloud App LB}/{tenant-subnamespace}/sim-int-services/internal
For example:
https://XXXXXX/zzzz-siocs/sim-int-services/internal/
For each customer environment, logical containers (buckets) are created in Object Storage for storing objects used by the cloud application. The bucket name is used for all files moving between the Oracle Cloud and your local systems.
The bucket name will be similar to: rgbu_rex_cnprod_<subnamespace>-<customerName>-<env>
The table below lists the API end points for different file operations. See FTS API Specifications for details.
Table 10-1 FTS Endpoints
| Service | Method | FTS Endpoint URLs |
|---|---|---|
|
|
GET |
{Service Base URL}/fts/ping |
|
|
GET |
{Service Base URL}/fts/{Bucket Name}/listprefixes |
|
|
GET |
{Service Base URL}/fts/{Bucket Name}/listfiles |
|
|
POST |
{Service Base URL}/fts/{Bucket Name}/movefiles |
|
|
POST |
{Service Base URL}/fts/{Bucket Name}/delete |
|
|
POST |
{Service Base URL}/fts/{Bucket Name}/upload |
|
|
POST |
{Service Base URL}/fts/{Bucket Name}/download |
|
Note: The example in this section uses curl command line tools. You may also use Postman to test the FTS REST APIs for testing purpose. Refer to Test FTS API using Postman. |
FTS APIs use OAuth2.0 for authorization. SIOCS provisioning process creates a client credential application in IDCS, the FTS Client ID and Client Secret will be supplied to you when your service is provisioned.
Client ID
Supplied to you when your service is provisioned.
Your IDCS Admin user may also find the secret by log into IDCS, under Oracle Cloud Service.
For example, for the client application name RGBU_SIOCS_{env}_FTS_INT,
the client ID will be: RGBU_SIOCS_{env}_EICS_FTS_INT_APPID
(where {env} can be STG1, PROD1, and so on.)
Client Secret
Supplied to you when your service is provisioned.
Your IDCS Admin user may also find the secret by logging into IDCS, under Oracle Cloud Service.
OAuth Scopes for FTS
Custom environment specific scope.
The scope pattern that is used in the FTS IDCS application creation template is rgbu:siocs:integration-{env}
For example:
rgbu:siocs:integration-STG1
IDCS OAuth2 Token URL
IDCS token URL to obtain Oauth2 token.
Example IDCS_TOKENT_URL:
https://idcs-XXXXXXXX.identity.oraclecloud.com/
Using the above URL,
IDCS_TOKENT_URL = {IDCL_BASE_URL}/oauth2/v1/token
The following is required in headers for making OAuth2.0 enabled REST Services.
FTS Client ID and Client Secret which are supplied to you when your service is provisioned created for FTS Client Credential App.
An access token using the Client ID and secret from IDCS
Example: get access Token Use Curl
export ACCESS_TOKEN="$(curl -u <Client ID>:<Secret> -H 'Content-Type: applica-tion/x-www-form-urlencoded;charset=UTF-8' --request POST https://<IDCS_BASE_URL>/oauth2/v1/token -d 'grant_type=client_credentials&scope=<Scope>' | jq -r '.access_token')"
In above example, substitute the variables with proper values for your environment. See FTS Client ID and Client Secret section for obtaining Credential Client ID and Client Secret.
|
Note: You need to have curl and jq client tool installed on your client machine for using curl for testing. |
For example:
export ACCESS_TOKEN="$(curl -u RGBU_SIOCS_ZZZZ_EICS_FTS_INT_APPID:<secret> -H 'Content-Type: applica-tion/x-www-form-urlencoded;charset=UTF-8' --request POST https://idcs-ZZZZ/oauth2/v1/token -d 'grant_type=client_credentials&scope=rgbu:siocs:integration-X' | jq -r '.access_token')"
Each call to FTS Endpoint should contain the following Request headers:
Content-Type: application/json
Accept: application/json
Accept:-Language: en
Authorization: Bearer {ACCESS_TOKEN}
Before calling FTS API, you need to get the ACCESS_TOKEN use step Retrieving Access Client Token.
First you need to get the ACCESS_TOKEN use step Retrieving Access Client Token, then you may call the endpoint List Prefixes as below:
Sample Request:
curl --request GET https://XXXXXX/ZZZZZ-siocs/siocs-int-services/internal/fts/vvvvv-siocs/listprefixes -H 'content-type: application/json' -H 'Accept: application/json' -H 'Accept-Language: en' -H "Authorization: Bearer ${ACCESS_TOKEN}"
Sample Response:
{"values":["archives","rejects","imports","exports"]}
First get the ACCESS_TOKEN use step Retrieving Access Client Token, then call the endpoint Request Upload PAR as below:
Sample Request:
curl --request POST https://XXXXXX/ZZZZZ-siocs/siocs-int-services/internal/fts/vvvvv-siocs /upload -H 'content-type: application/json' -H 'Accept: application/json' -H 'Accept-Language: en' -H "Authorization: Bearer ${ACCESS_TOKEN}" -d "{\"listOfFiles\": [{\"storagePrefix\": \"imports\",\"fileName\": \"EXTPC_1.dat\"},{\"storagePrefix\": \"imports\",\"fileName\": \"RFID_1.dat\"}]}"
Sample Response:
{"par-List":[{"id":"zzzzzzz/:imports/EXTPC_1.dat","name":"EXTPC_1.dat","accessUri":"https://objectstorage.us-ZZZ-siocs/o/imports/EXTPC_1.dat","accessType":"ObjectWrite","timeExpires":"2022-02-13T21:39:40.265Z","timeCreated":"2022-02-13T21:34:40.329Z","objectName":"imports/EXTPC_1.dat"},{"id":"ZZZZ:imports/RFID_1.dat","name":"RFID_1.dat","accessUri":"https://zzzz-siocs/o/imports/RFID_1.dat","accessType":"ObjectWrite","timeExpires":"2022-02-13T21:39:40.411Z","timeCreated":"2022-02-13T21:34:40.472Z","objectName":"imports/RFID_1.dat"}]}
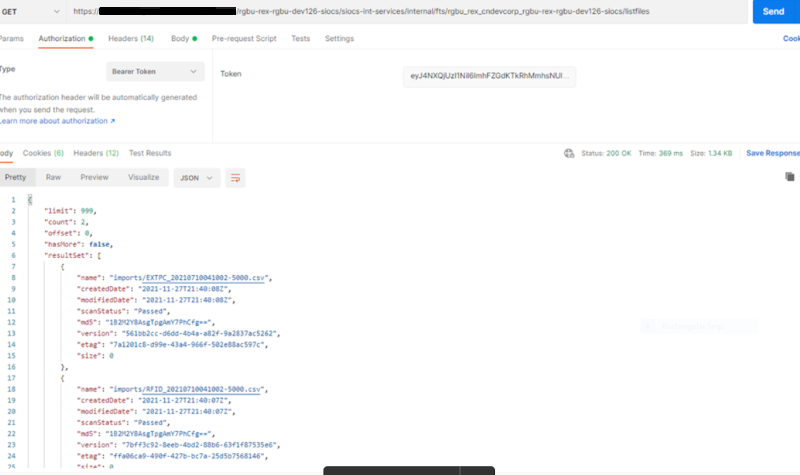
First get the ACCESS_TOKEN using step Retrieving Access Client Token, then call the endpoint List Files as below:
Sample Request:
curl --request GET https://ZZZZZ-siocs/siocs-int-services/internal/fts/rgbu_rex_cndevcorp_rgbu-rex-rgbu-dev125-siocs/listfiles?contains=RFID -H 'content-type: application/json' -H 'Accept: application/json' -H 'Accept-Language: en' -H "Authorization: Bearer ${ACCESS_TOKEN}"
Sample Response:
{"lim-it":999,"count":1,"offset":0,"hasMore":false,"resultSet":[{"name":"imports/RFID_1.dat","createdDate":"2022-02-13T21:35:26Z","modifiedDate":"2022-02-13T21:35:26Z","scanStatus":"Passed","scanDate":"2022-02-13T21:35:56.187Z","md5":"xxxx==","version":"xxxxx","etag":"zzzzzzz","size":75}]}
First get the ACCESS_TOKEN using step Retrieving Access Client Token, then call the endpoint List Files as below:
Sample Request:
curl --request GET https://ZZZZZZZ-siocs/siocs-int-services/internal/fts/rgbu_rex_cndevcorp_rgbu-rex-rgbu-dev125-siocs/listfiles?contains=RFID -H 'content-type: application/json' -H 'Accept: application/json' -H 'Ac-cept-Language: en' -H "Authori-zation: Bearer ${ACCESS_TOKEN}"
Sample Response:
{"lim-it":999,"count":1,"offset":0,"hasMore":false,"resultSet":[{"name":"imports/RFID_1.dat","createdDate":"2022-02-13T21:35:26Z","modifiedDate":"2022-02-13T21:35:26Z","scanStatus":"Passed","scanDate":"2022-02-13T21:35:56.187Z","md5":"xxxxx==","version":"xxxxx","etag":"ZZZZZ","size":75}]}
First get the ACCESS_TOKEN using step Retrieving Access Client Token, then call the endpoint Request Download PAR as below:
Sample Request:
curl --request POST https://ZZZZZZ-siocs/siocs-int-services/internal/fts/rgbu_rex_cndevcorp_rgbu-rex-rgbu-dev125-siocs/download -H 'content-type: application/json' -H 'Accept: application/json' -H 'Accept-Language: en' -H "Authorization: Bearer ${ACCESS_TOKEN}" -d "{\"listOfFiles\": [{\"storagePrefix\": \"imports\",\"fileName\": \"RFID_1.dat\"}]}"
Sample Response:
{"par-List":[{"id":"i91P0nFIIsgj05qrUH2ibTZ2npmbTdq1TKsGtWOerAYaE6/MYZE7840lR/QEhaFk:imports/RFID_1.dat","name":"RFID_1.dat","accessUri":"https://objectstorage.us-phoenix-1.oraclecloud.com/p/ZG89KsLS_5SY7D2p7nVQt8KfJ6rLJ40FSmI97zASLRK2VrsICbvoRP0bgoQGxk3S/n/ZZZZZ-siocs/o/imports/RFID_1.dat","accessType":"ObjectRead","timeEx-pires":"2022-02-13T23:07:00.962Z","timeCreated":"2022-02-13T23:02:01.105Z","objectName":"imports/RFID_1.dat"}]}
curl -o <destinationFileName> -X GET <PAR>
For example:
curl -o RFID_1_download.dat -X GET https://ZZZZZ-siocs/o/imports/RFID_1.dat
This section describes the general steps for an external solution application to transfer batch data files from external system to cloud application object storage.
The data to be processed can be provided as a single data file, or a zip file contains multiple data files.
The application batch imports the inbound data files from Object Storage, after the files have passed an anti-virus and malware scan. Once the files are downloaded from Object Storage, the batch process deletes the files from Object Storage to ensure it is not re-processed in next batch run. Rejected records are placed in the rejects file when applicable.
Table 10-2 Supported Import Data Files
| File Name | Description | File Layout |
|---|---|---|
|
Initial Inventory Import File |
The file is processed by Initial Inventory Import Batch. For additional details, see the Batch chapter in Oracle Retail Enterprise Inventory Cloud Service Administration Guide. |
File name prefix: EXTSTK_* See Batch File Layout Specifications within Oracle Retail Enterprise Inventory Cloud Service Administration Guide for details. |
|
ReSA Import File |
The file is processed by Retail Sale Audit Import Batch. For additional details, see the Batch chapter in Oracle Retail Enterprise Inventory Cloud Service Administration Guide. |
Zip Filename Format SIMT_< YYYYMMDDHH24MISS>.zip See Batch File Layout Specifications within Oracle Retail Enterprise Inventory Cloud Service Administration Guide for details. |
|
Third Party Stock Count Import File |
The file is processed by Third Party Stock Count Import Batch. For additional details, see the Batch chapter in Oracle Retail Enterprise Inventory Cloud Service Administration Guide. |
Zip Filename Format STK_<YYYYMMDDHH24MISS>.zip See Batch File Layout Specifications within Oracle Retail Enterprise Inventory Cloud Service Administration Guide for details. |
|
Third Party Price Import File |
The file is processed by Third Party Price File Import Batch. For additional details, see the Batch chapter in Oracle Retail Enterprise Inventory Cloud Service Administration Guide. |
Zip Filename Format EXTPC_<YYYYMMDDHH24MISS>.zip See Batch File Layout Specifications within Oracle Retail Enterprise Inventory Cloud Service Administration Guide for details. |
|
RFID Import File |
The file is processed by Third Party RFID Import Batch. |
Zip Filename Format RFID_<YYYYMMDDHH24MISS>.zip See Batch File Layout Specifications within Oracle Retail Enterprise Inventory Cloud Service Administration Guide for details. |
To upload data files to object storage, the external solution application needs to perform following steps:
The external application gets the Oauth2 token from IDCS.
The external application makes an FTS request with the Oauth2 token to requesting Pre-Authentication.
Once the PAR is received, the external application uploads the file to object storage using the URL included within the response.
Files uploaded to application object storage will be processed by cloud application batches.
The following describes the supported export data files which are supported by cloud application. These export data files are available for external solution applications to download.
For retailer to download the export data files from application object storage, perform the following steps:
The external solution application gets the Oauth2 token from IDCS.
The external solution application calls the FTS service with the Oauth2 token to list the available export files in Object Storage which are generated by cloud app.
The external solution application calls the FTS service with the Oauth2 token, requesting Pre-Authentication to download files from object storage used by cloud app.
Once the PAR is received, the file is downloaded using the URL included within its response. A PAR is valid for 10 minutes. A download can take longer than 10 minutes but it must be started within 10 minutes of the PAR being received.
SIOCS provides an UI which is used to upload or download a file, or view a list of files in object storage.
To access this screen, the application user needs to be assigned the Access File Transfer Service security permission.
To gain access to the upload/download operations, the application user also needs to be assigned to sim_admin_users group in IDCS.
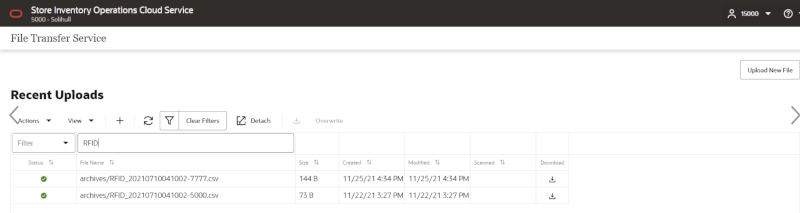
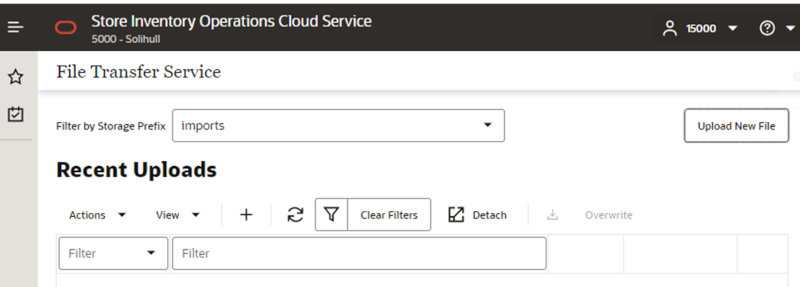
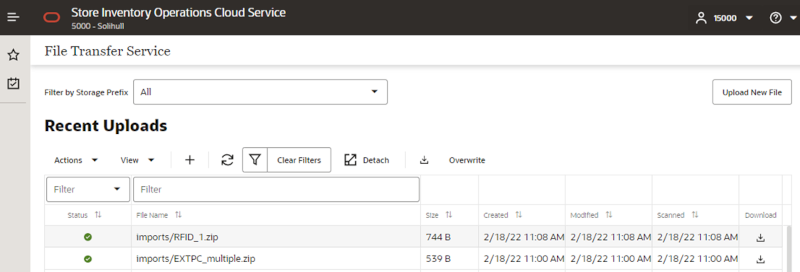
The main form lists the recently uploaded files.
Actions:
To filter the files by store prefix, select a file storage prefix.
To filter by file name by choosing the Actions choice selector on the screen.
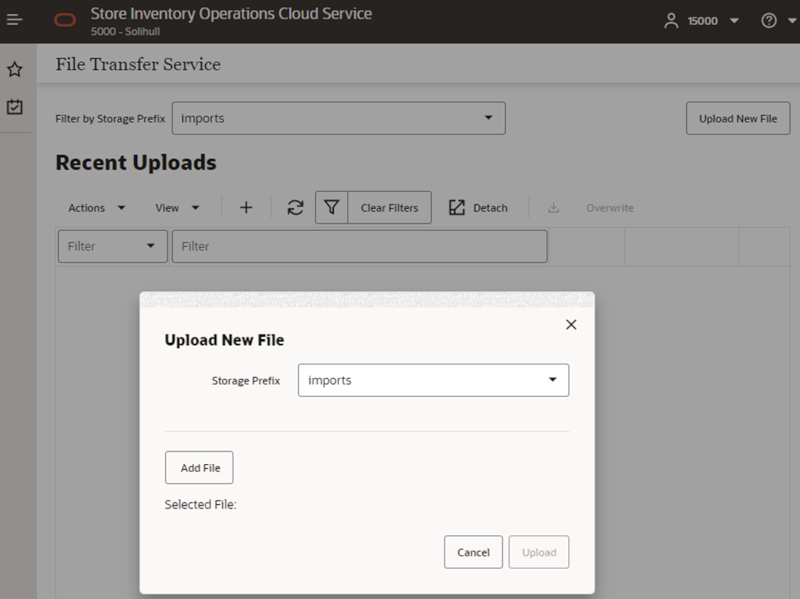
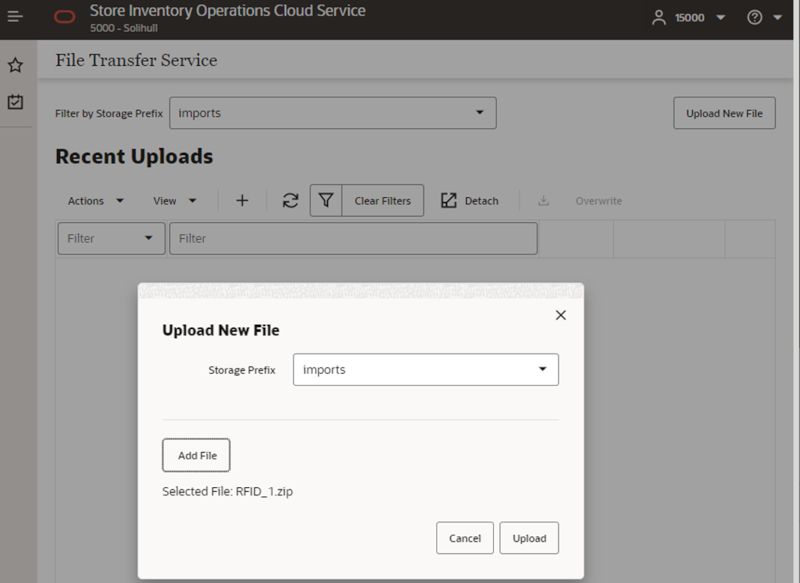
To upload new files, click Upload New File button:
In the Upload New File popup dialog, choose storage prefix Imports and click Add File button.
Next, choose files from your client machine, then click Upload:
Once the uploaded file has passed a virus scan, the file is ready for a cloud application batch to import the file from object storage into the application.
|
Note: The uploaded import data files will be processed by scheduled batch import job. You may run adhoc import batch job for testing purpose, if choose so, make sure to run the adhoc job outside of job schedule window for the select batch (or disable the job schedule for the selected batch. Once the adhoc job is completed, you will need to re-enable the batch schedule for the batch). |
This section describe FTS API specifications.
Returns the status of the service, and provides an external health-check.
| Method | GET |
|---|---|
| Endpoint | {Service Base URL}/fts/ping |
| HTTP Header | See Common Request Headers in making FTS API Call Common Headers. |
| Parameters | [ { "name": "pingMessage", "description": "Optional value to be included in the ping response.", "in": "query", "required": false, "schema": { "type": "string" } } ], |
| Request Body | None |
| Response | "200": {
"description": "OK - The service operation produced a successful response." }, "400": { "description": "Bad Request - The path params or query params or body was not valid for this operation." } |
Returns a list of the known storage prefixes. These are analogous to directories, and are restricted to predefined choices per service. SIOCS has list of pre-defined storage prefixes: import, exports, rejects and archives.
| Method | GET |
|---|---|
| Endpoint | {Service Base URL}/fts/{Bucket Name}/listprefixes |
| HTTP Header | See Common Request Headers in making FTS API Call Common Headers. |
| Parameters | [
{ "name": "bucketName", "description": "Bucket identifier.", "in": "path", "required": true, "schema": { "type": "string" } } ], |
| Request Body | None |
| Response | A JSON array of strings containing the known prefixes.
{ "200": { "description": "OK - The service operation produced a successful response." }, "400": { "description": "Bad Request - The path params or query params or body was not valid for this operation." } } |
Returns a list of the files within a given storage prefix.
| Method | GET |
|---|---|
| Endpoint | {Service Base URL}/fts/{Bucket Name}/listfiles |
| HTTP Header | See Common Request Headers in making FTS API Call Common Headers. |
| Parameters | {
"name": "bucketName", "description": "Bucket identifier.", "in": "path", "required": true, "schema": { "type": "string" } }, { "name": "prefix", "description": "The object filter in object storage.", "in": "query", "required": false, "schema": { "type": "string" } }, { "name": "contains", "description": "The object filter in object storage.", "in": "query", "required": false, "schema": { "type": "string" } }, { "name": "scanStatus", "description": "The object filter in object storage.", "in": "query", "required": false, "schema": { "type": "string" } }, |
| {
"name": "offset", "description": "The object filter in object storage.", "in": "query", "required": false, "schema": { "type": "integer" } }, { "name": "limit", "description": "The object filter in object storage.", "in": "query", "required": false, "schema": { "type": "integer" } }, { "name": "sort", "description": "The object filter in object storage.", "in": "query", "required": false, "schema": { "type": "string" } } ], |
|
| Request Body | None |
| Response | A JSON resultSet containing array of files. For each file, there is metadata including: name, size, created and modified dates, scan status and date, scan output message.
{ "200": { "description": "OK - The service operation produced a successful response." }, "400": { "description": "Bad Request - The path params or query params or body was not valid for this operation." } |
Moves one or more files between storage prefixes, while additionally allowing the name to be modified.
| Method | POST |
|---|---|
| Endpoint | {Service Base URL}/fts/{Bucket Name}/movefiles |
| HTTP Header | See Common Request Headers in making FTS API Call Common Headers. |
| Parameters | [
{ "name": "bucketName", "description": "Bucket identifier.", "in": "path", "required": true, "schema": { "type": "string" } } ] |
| Request Body | {"listOfFiles": [ {"currentPath": { "storagePrefix": "string", "fileName": "string"}, "newPath": { "storagePrefix": "string", "fileName": "string" } } }} |
Deletes one or more files.
| Method | POST |
|---|---|
| Endpoint | {Service Base URL}/fts/{Bucket Name}/delete |
| HTTP Header | See Common Request Headers in making FTS API Call Common Headers. |
| Parameters | [
{ "name": "bucketName", "description": "Bucket identifier.", "in": "path", "required": true, "schema": { "type": "string" } } ] |
| Request Body | A JSON array of files to be deleted. One or more pairs of storagePrefix and filename elements can be specified within the array. Required: true{ " {"listOfFiles": [ [ { " {"storagePrefix": "string", "fileName": "string" } ]} |
| Response | A JSON array of each file deletion attempted and the result.
{ "200": { "description": "OK - The service operation produced a successful response." }, "400": { "description": "Bad Request - The path params or query params or body was not valid for this operation." |
Request PAR for uploading one or more files.
| Method | POST |
|---|---|
| Endpoint | {Service Base URL}/fts/{Bucket Name}/upload |
| HTTP Header | See Common Request Headers in making FTS API Call Common Headers. |
| Parameters | [
{ "name": "bucketName", "description": "Bucket identifier.", "in": "path", "required": true, "schema": { "type": "string" } } ] |
| Request Body | A JSON array of files to be uploaded. One or more pairs of storagePrefix
and filename elements can be specified within the array. Required: true { "listOfFiles": [ { "storagePrefix": "string", "fileName": "string" } ] } |
| Response | A parList containing an array containing elements corresponding to the request
including the PAR accessUri and name of file. { "parList": [ { "id": "string", "name": "string", "accessUri": "string", "objectName": "string", "accessType": "string", "timeExpires": "2021-09-07T16:35:27.390Z", "timeCreated": "2021-09-07T16:35:27.390Z" } ] } Response Status: { "200": { "description": "OK - The service operation produced a successful response." }, "400": { "description": "Bad Request - The path params or query params or body was not valid for this operation." } |
Request PAR for downloading one or more files.
| Method | POST |
| Endpoint | {Service Base URL}/fts/{Bucket Name}/download |
| HTTP Header | See Common Request Headers in making FTS API Call Common Headers. |
| Parameters | [
{ "name": "bucketName", "description": "Bucket identifier.", "in": "path", "required": true, "schema": { "type": "string" } } ] |
| Request Body | A JSON array of files to be downloaded. One or more pairs of storagePrefix and filenames can be specified within the array. Required: true
{ "listOfFiles": [ { "storagePrefix": "string", "fileName": "string" } ] } |
| Response | A parList containing an array containing elements corresponding
to the request including the PAR accessUri and name of file. "parList": [ { "id": "string", "name": "string", "accessUri": "string", "objectName": "string", "accessType": "string", "timeExpires": "2021-09-07T16:35:27.390Z", "timeCreated": "2021-09-07T16:35:27.390Z" } ] } Response Status: { "200": { "description": "OK - The service operation produced a successful response. " |
The FTS APIs enable a third party solution application to upload data files into cloud solution object storage. Once the data files are in object storage, the cloud solution batch pulls the data files from object storage and processes the data files and loads the data into the cloud solution system.
The data must reside in one file per location containing all RFIDs for a location (store ore warehouse). Any RFID the store scanners did not find are marked as not present at the store.
The RFID importer first sets the present attribute to 'N' for all existing RFID tags at the location thereby removing them from inventory. It then set the present attribute to 'Y' (yes) for each RFID tag in the import.
CREATE and DELETE are the only two valid actions for RFID, CREATE indicates "present in store" and DELETE indicates "absent from store", the only states an EPC has.
If an EPC in the data file has DELETE type, and exists in database, the process marks the EPC as not present.
If an EPC in the data file has CREATE type, the process inserts or updates in RFID table and mark as present.
Each file contains RFID information for a single store, store/item/action date uniquely identify a RFID record.
Table 10-4 Third Party RFID CSV File Fields
| Field Name | Description | Required | Type |
|---|---|---|---|
|
ACTION |
CREATE and DELETE are the only two valid actions for RFID |
Yes |
VARCHAR2(20) |
|
EPC |
Electronic product code (SGTIN-96). |
Yes |
VARCHAR2(256) |
|
ITEM_ID |
Identifier of the item/sku. |
Yes |
VARCHAR2(25) |
|
LOCATION_ID |
Location identifier. |
Yes |
NUMBER(10) |
|
LOCATION_TYPE |
Location Type, 1 - store, 2 - warehouse. |
Yes |
NUMBER(2) |
|
ZONE_ID |
The zone within the location that the RFID is located. |
No |
NUMBER(15) |
|
EVENT_DATE |
The timestamp of the RFID read. |
No |
TIMESTAMP(6) |
Sample CSV File:
RFID_{YYYYMMDDHHMMSS}_{LOC}_{LOC_TYPE}.csv
"REPLACE","1111111111111111111111","100637113",5000,1,1001,
"03-07-2021 0:00"
"REPLACE","1111111111111111111112","100637148",5000,2,1022,
"05-10-2021 0:00"
Create CSV file: ext_rfid _<YYYYMMDDHHMMSS>.csv
It is expected that the RFID provider to ensure the record uniqueness (A unique record is identified by store/item/effective date time), within a file, each record must be unique. The record action is denoted by action type, only one dataset action is allowed. EICS only support CREATE OR DELETE as dataset action for third party rfid, UPDATE type is not supported, use replace for updating a record.
Split the Data into multiple files. EICS loads the data in parallel from multiple files. Loading files from multiple files in parallel provides performance advantage than loading from a single file. It is recommended to file provider to split the data into multiple files to load data efficiently in parallel loading, each file contains single store is recommended.
Compress the data files. If data file contains large datasets, it is recommended that compress the load files individually, when loading the data file. Use EICS System Configuration Console to specify the file suffix (for example, zip).
Overview
The FTS APIs enable a third party solution application to upload data files into cloud solution object storage. Once the data files are in object storage, the cloud solution batch pulls the data files from object storage and processes the data files and loads the data into the cloud solution system.
Third Party Pricing Import provides a generic pricing interface for retailer which are capable of providing pricing data for EICS from a third party application. This third party pricing import provides an alternative for importing promotion data into EICS.
Table 10-5 Third Party Price Import Batch
| Field Name | Description | Required | Type |
|---|---|---|---|
|
RECORD_ACTION |
CCREATE, UPDATE, DELETE |
Yes |
CHAR(20) |
|
ITEM_ID |
The unique alphanumeric value for the transaction level item. |
Yes |
CHAR(25) |
|
STORE_ID |
The number that uniquely identifies the store. |
Yes |
Number(10) |
|
EFFECTIVE_DATE |
The date on which the price change went effect.yyyy-mm-dd hh:mm:ss.ffffffffffor example 2021-04-09 11:00:00.000000000 |
Yes |
Timestamp |
|
END_DATE |
Promotion or clearance price end date. For price change with an end date, if the clearance indicator is 'Y', the end date is for clearance end date; otherwise the end date is promotional ending date. yyyy-mm-dd hh:mm:ss.fffffffff for example 2021-04-09 11:00:00.000000000 |
No |
Timestamp |
|
PRICE_TYPE |
The item price type. Valid values: 200- Clearance 201- Promotional 202- Regular |
Yes |
NUMBER(3) |
|
PROMOTION_NAME |
Promotion name. |
No |
CHAR (160) |
|
SELLING_UNIT_RETAIL |
Contains the current single unit retail in the selling unit of measure. |
Yes |
NUMBER(20,4) |
|
SELLING_UOM |
Contains the selling unit of measure for an items single-unit retail. |
Yes |
CHAR (4) |
|
SELLING_UNIT_RETAIL_CURRENCY |
Contains the selling unit retail currency. |
Yes |
CHAR (3) |
|
MULTI_UNITS |
Contains the current multi-units. If the record is being written as a result of a change in the multi-unit retail, then this field contains the new multi-units. |
No |
NUMBER(12,4) |
|
MULTI_UNIT_RETAIL |
Contains the current multi-unit retail in the selling unit of measure. |
No |
NUMBER(20,4) |
|
MULTI_UNIT_RETAIL_CURRENCY |
Contains the multi-unit retail currency. |
No |
CHAR (3) |
|
MULTI_UNIT_SELLING_UOM |
Contains the selling unit of measure for an items multi-unit retail. |
No |
CHAR (4) |
|
CREATE_DATETIME |
Contains the record creation date. yyyy-mm-dd hh:mm:ss.fffffffff for example 2021-04-09 11:00:00.000000000 |
No |
Timestamp |
|
REC_ID |
The id of the record. |
Yes |
NUMBER(15) |
|
RETAIL_CHANGE_IND |
Indicates whether the retail changed with this price change. Valid values are: 0 - retail price not changed 1 - retail price changed |
No |
NUMBER(6) |
|
MULTI_UNIT_IMPACT |
Indicates if the Price Change has impact to Multi Unit retail. Valid value are: AU - Multi Unit information is added or updated R - Multi Unit information is removed N - Multi unit information is not changed. |
Yes |
CHAR (4) |
|
PRICE_EVENT_ID |
The id of the price event. |
No |
NUMBER(15) |
Sample CSV File:
EXTPC_{YYYYMMDDHHMMSS}_{LOC}_{LOC_TYPE}.csv
Example file name: EXTPC_20210710041002_5000_S.dat
REPLACE,100637113,5000,2021-04-09 11:00:00,,202,,149.99,USD,EA,,,,,2021-04-07 11:00:00,1,1,N,9999
It is expected that the pricing provider will ensure the record uniqueness (A unique record is identified by store/item/effective date time), within a file. Each record must be unique. The record action is denoted by action type, only a dataset action is allowed for unique store/item/date.
For example, for store 5000, item A, a price on date 2018 Dec 10 00:00:00 record in the file can be one of the following (CREATE, DELETE). The same record with more than one dataset action will be rejected. EICS only supports CREATE OR DELETE as dataset action for third party pricing.
To end a clearance price for a store and item, the pricing provider can either include the end date on the clearance item record; or send a new price record (regular or promotional).
The same file cannot have two records with this combination store/item/effective with different price type, if clearance need to be on today, then this file should only have a single record for clearance type. To end the clearance (for example, tomorrow), the file needs either to mark the end date for that clearance or needs to include a regular price record with a different effective date (for example, tomorrow).
In EICS, there is no client UI which requires or uses the promotion, clearance or price change identifier. For data import integration backend processing, the record is uniquely identified by item/store/effective date time and price type external pricing change identifier has no meaning to our system. Promotion name is used in EICS as context type, therefore it is included in the integration interface.
Split the Data into Multiple Files. EICS loads the data in parallel from multiple files. Loading files from multiple files in parallel provides performance advantage overloading from a single file. It is recommended to file provider to split the data into multiple files to load data efficiently in parallel loading. Each file contains single store is recommended.
The FTS APIs enable a third party solution application to upload data files into cloud solution object stor-age. Once the data files are in object storage, the cloud solution batch pulls the data files from object storage and processes the data files loading the data into the cloud solution system.
Most Oracle Retail customers implement Retail Merchandising Foundation Cloud Service (RMFCS) followed by SIOCS. In some instances, SIOCS is implemented prior to RMFCS. In those cases, there is a need for importing initial inventory data for a store or group of stores from legacy or non-Oracle/third-party systems during the implementation phase.
This enhancement addresses a specific use case of initial inventory upload when stores are brought live on SIOCS by seeding initial inventory without any validations.
This batch is meant to be used ONLY during implementation. It is designed for optimal upload to rewrite SOH. This batch will not perform any validations. It should not to be used after the one-time inventory upload.
|
Note: UINs must be uploaded only once. Unlike stock on hand, UINs are state driven and control the stock on hand. Only new UINs in the flat file will be considered for stock on hand update. As such, if UINs already exist, they will not reflect into the new SOH. |
The Initial Inventory Import batch is used to wipe out the existing SOH data for items in a store and override it with the new SOH data from the third-party/non-Oracle/legacy systems.
The data gets imported via a flat file.
<EXTSTK _<date YYYYMMDDHH24MISS >.zip
The zip file can contain one or more files from same or different stores:
EXTSTK_<date in YYYYMMDDHH24MISS format>.dat
Batch Job Definition Name
InitialInventoryImport_OpsJob
Batch Job Parameters
<File name>
If not specified, then the data file in incoming directory are processed.
File Error Handling
The batch job will be marked as failed if file staging fails. The staging process is all or none, so if an error occurs during the batch import process, none of the transactions in the file will be staged. The user will need to rerun the batch using the same file after resolving the errors.
For all invalid records in the file such as Unit UOM items with decimal quantity, items that are not ranged to the store, item records with negative quantity, and an error record will be inserted in the BATCH_DATA_ERROR table for each invalid record.
Key Tables
The FTS APIs enable a third party solution application to upload data files into cloud solution object stor-age. Once the data files are in object storage, the cloud solution batch pulls the data files from object storage and processes the data files loading the data into the cloud solution system.
This batch imports the stock count quantities when a stock count is setup in SIOCS and physical counting is conducted by a third party. The batch updates the stock count counted or recounted quantities. Invalid records during the import are saved in the rejected item table.
When the stock count is set up as auto-authorize Unit and Amount Stock Count, the rejected items are processed and attempts are resolution are taken (such as ranging items and adding them to the stock count). In addition, the authorization process occurs and the stock on hand quantities for the items are updated. In addition, a Unit and Amount Stock Counts Export file is generated as a result of stock count auto authorization. See Appendix: Unit and Amount Stock Counts Export within the Oracle Retail Enterprise Inventory Cloud Service Administration Guide for details.
Each job run will pick number of files (defined by Maximum Job Instances Per Batch) in system configuration and process them in multi-threads. The number of files to be processed is default to 20. The value can be configured via system configuration screen.
Customer can set the job scheduler to be run multiple times per day by changing the schedule intervals.
<file prefix>_<date YYYYMMDDHH24MISS >.zip
Where file prefix value is STK.
Example:
STK_20180129133250.zip
The zip file can contain one or more files from same or different stores:
Data File Name Format:
<file prefix>_<date in YYYYMMDDHH24MISS format>_<loc id>.dat
Where file prefix value is STK and loc id is the store identifier.
Example:
STK_20180129133250_1111.dat
Pipe-delimited (|) file contains store count data for a store and stock count ID as shown below.
Table 10-7 Third Party Stock Count Import File
| Record Name | Field Name | Field Type | Default Value | Description |
|---|---|---|---|---|
|
FHEAD |
Record Descriptor |
Char(5) |
FHEAD |
File head marker |
|
Store Number |
Char(10) |
Store number file was uploaded for. It is assumed only one store is passed in per file. (Required) |
||
|
Stock Count ID |
Number(12) |
Unique identifier for item. Assumption is application will always take first stock count ID listed. (Required) |
||
|
FDETL |
Record Descriptor |
Char(5) |
FDETL |
Detail record marker. |
|
Stock Count Date |
Date(14) |
Indicates date/time item was physically counted by the third party. (YYYYMMDDHH24MISS) For example, 20180129134600 (Required) Note: If not using timestamp, use 00 for time. |
||
|
Area Number |
Char(10) |
10-digit code indicating where in the store the item is located. (Optional) |
||
|
UPC or Item Number |
Char(25) |
25-digit universal product code. (Required) |
||
|
Count Quantity |
Number (12,4) |
Quantity counted for item, required. This field must allow for decimals when counting in UOM other than each. (Required) |
||
|
UIN(Item Serial Number) |
Char(128) |
Unique identification serial number for item, required if current item requires serial number. |
||
|
FTAIL |
Record Descriptor |
Char(5) |
FTAIL |
File tail marker. |
The following is a sample Third Party Stock Count Import File:
FHEAD|5000|1074|FDETL|20180129235959|1|100665085|1|ItemSerialNum1234|FDETL|201180129140000|1|100665085|1|ItemSerialNum9999|FDETL|20180129000000|1|100665085|1||FTAIL|
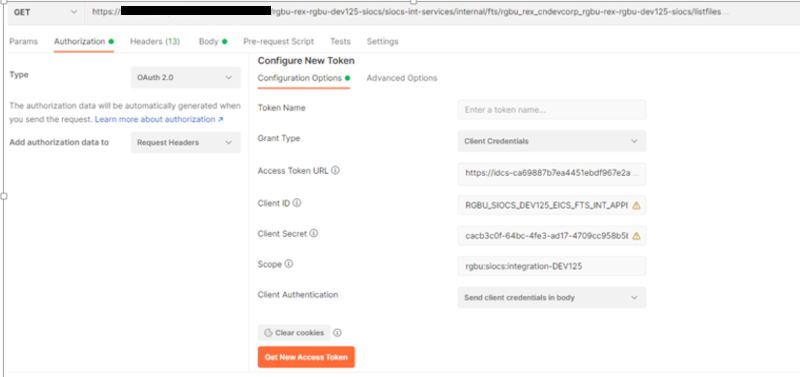
OAuth tokens can also be obtained by REST client tools like postman for testing purposes.
When using Postman testing, fill in the required details:
Authorization: OAuth 2.0
Access Token URL: https://{IDCS_BASE_URL}/oauth2/v1/token
Client ID: Client if of the OAuth
Client Secret: Client secret of OAuth Client app
Grant Type: client_credentials
Scope: The scope pattern that is used in the FTS IDCS app creation template is rgbu:siocs:integration-{env}{env index}