WORKSPACE SETUP
This Workspace Setup includes following topics:
In order to implement the DIGX architecture, we will create separate projects for different framework components in Eclipse (with JDK 8)
Why separate projects? : Ensures high extensibility and loose coupling between different components of the system. Also, in later stages, sustenance becomes easier and it helps developers also to effectively maintain the ever-growing code.
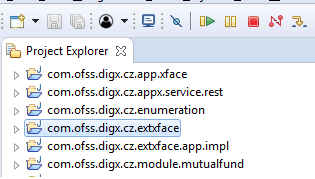
Moving on, let’s create the following projects as shown in the Figure 2:

Basic Setup
Create a new workspace in Eclipse and launch that workspace.
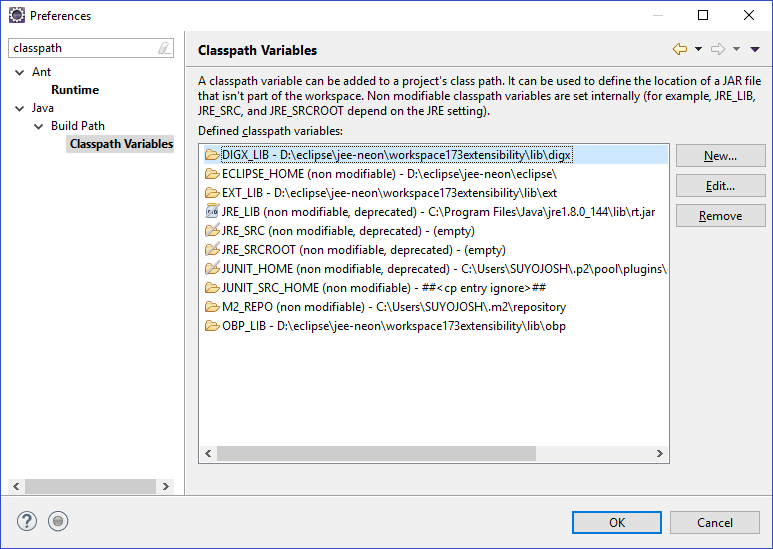
Go to Window > Preferences. Go to Java > Build Path > Classpath Variables. Set following variables there
|
Classpath Variable |
Description |
|---|---|
|
DIGX_LIB |
Refers to the base location of OBDX libraries |
|
Refers to the base location of OBP libraries |
|
|
EXT_LIB |
Refers to the base location of external libraries |
The screen will look like this.

DTO (xface) Project
Create a Java Project with the project name ‘com.ofss.digx.cz.app.xface’. Now create a package in that project with the name ‘com.ofss.digx.cz.app.<module_name>.dto’ .
This package consists of Data Transfer Object classes, also referred as Plain Old Java Objects or POJO. All the request as well as response DTO classes are created under this project. The Request DTO classes in this project extend DataTransferObject present in OBP libraries whereas the Response DTO classes extend BaseResponseObject.
Project dependencies for xface project:
Not needed.
Classpath variables:
Extend the following classpath variables to the jars found in OBDX_Installer:
|
Classpath Name |
Jars to extend |
|---|---|
|
DIGX_LIB |
com.ofss.digx.app.xface.jar com.ofss.digx.appcore.dto.jar com.ofss.digx.infra.jar |
|
OBP_LIB |
com.ofss.fc.appcore.dto.jar com.ofss.fc.infra.jar |
REST endpoint
Create a Java Project (Note: No need to create Dynamic Web Project from 18.1 onwards) with the project name ‘com.ofss.digx.cz.appx.service.rest’. Now create a package in that project with the name ‘com.ofss.digx.cz.appx.<module_name>’ .
This package contains the endpoint class to take requests and send responses back to server. The REST classes usually contain JAX-RS annotations and URIs which help them to locate themselves whenever a request is made through a REST call.
All the classes in this project extend AbstractRESTApplication and also have a default interface class prefixed with ‘I’ before the name of the corresponding REST implementation class. For instance, Account REST class will have IAccount Interface class in the same the package of this project.
Project Dependencies for REST Project
Add the following projects (to be created later) in the Java build path of this project:
com.ofss.digx.cz.app.xface, com.ofss.digx.cz.module.<module_name>
Classpath Variables
Create the following classpath variables (left column) and extend them to the jars (names on the right side column). Note that these libraries can be found in the OBDX Installer folder and the exact location of each jar can be found in the section 8 (last part) of this document.
|
Classpath Name |
Jars to extend |
|---|---|
|
DIGX_LIB |
com.ofss.digx.appcore.jar com.ofss.digx.appcore.dto.jar com.ofss.digx.common.jar com.ofss.digx.datatype.jar com.ofss.digx.enumeration.jar com.ofss.digx.infra.audit.jar com.ofss.digx.infra.jar com.ofss.digx.infra.crypto.jar com.ofss.digx.app.xface.jar com.ofss.digx.appx.core.rest.jar com.ofss.digx.module.<Module Name>.jar (Based on which module service you are going to consume) |
|
EXT_LIB |
All jersey2 libraries found in OBDX installer folder |
|
OBP_LIB |
com.ofss.fc.appcore.dto.jar com.ofss.fc.appcore.jar com.ofss.fc.enumeration.jar com.ofss.fc.infra.jar |
Module
Create a new Java project with this name. This project contains the vital business logic, extension points, constraints, security checks like authorization and access control. The following packages need to be created inside this project:
- com.ofss.digx.cz.app.<module_name>.service : Add the Service Interface and Implementation class in this package. The name of Service class should be same as the name of the REST class created in the REST project. For instance, this package will have classes named IAccount.java and Account.java which are same as the REST class name for Account. This service class extends AbstractApplication of the DIGX framework.
- com.ofss.digx.cz.app.<module_name>.service.ext: Contains classes for extensions and executors. Each Service classes will have their own extension points. Refer mock workspace for more detail.
- com.ofss.digx.cz.app.<module_name>.assembler: Create <module_name>Assembler class inside this package. All Assembler classes extends AbstractAssembler.
- com.ofss.digx.cz.domain.<module_name>.entity: This package should include Entity class for the module. The name of entity class to be created should be same as REST as well as Service class names. For instance, it will have Account.java entity class for Account service and REST classes. Also known as Domain classes, they extend AbstractDomainObject taken from OBP libraries.
- com.ofss.digx.cz.app.<module_name>.assembler: Add a domain assembler class with the name <module_name>DomainAssembler in this package.
- com.ofss.digx.cz.domain.<module_name>.entity.policy: Add the business policy classes in this package to ensure the validation of business constraints added in these classes. Refer workspace attached with this document for more detail. Classes in this project are again one of the must-haves as far as enforcement of any system validation is concerned.
- com.ofss.digx.cz.domain.<module_name>.entity.repository: Contains repository class (<module_name>Repository.java ) which invokes Repository adapter classes described in the next point. This class extends AbstractDomainObjectRepository of DIGX framework.
- com.ofss.digx.cz.domain.account.entity.repository.adapter: Add repository adapter interfaces, Local and Remote Repository Adapter classes in this project. If you are writing for the Account service, the naming convention of these classes should be I<module_name>RepositoryAdapter, Local<module_name>RepositoryAdapter, Remote<module_name>RepositoryAdapter respectively.
With this ends the package structure for service classes. The implementation of this project takes maximum time and involves majority of the DIGX service layer handling. It is therefore a very crucial part to look for while developing a REST API in DIGX.
Project dependencies for module project:
Add the following projects in the Java build path of this project:
com.ofss.digx.cz.adapter, com.ofss.digx.cz.app.xface
Classpath variables:
Extend the following classpath variables to the jars found in OBDX_Installer:
|
Classpath variable name |
Jars to extend |
|---|---|
|
DIGX_LIB |
com.ofss.digx.framework.domain.jar com.ofss.digx.infra.jar com.ofss.digx.appcore.jar com.ofss.digx.common.jar com.ofss.digx.datatype.jar com.ofss.digx.adapter.jar com.ofss.digx.module.alerts.jar com.ofss.digx.module.approval.jar com.ofss.digx.module.party.jar com.ofss.digx.enumeration.jar com.ofss.digx.module.common.jar com.ofss.digx.appcore.dto.jar |
|
OBP_LIB |
com.ofss.fc.framework.domain.jar com.ofss.fc.enumeration.jar com.ofss.fc.datatype.jar com.ofss.obp.patch.jar com.ofss.fc.infra.jar com.ofss.fc.appcore.dto.jar com.ofss.fc.appcore.jar com.ofss.fc.framework.dto.jar |
Adapter
Create a Java Project with name com.ofss.digx.cz.extxface which contains all the Adapter Interfaces in this project. This project is required if you are creating new adapter interfaces. Within this project create a package with the name com.ofss.digx.cz.extxface.<module_name>.adapter. Now include the adapter interface for the adapter implementation class for your module. For example, in case of Account module, name of the interface created should be IAccountAdapter.
Project dependencies for adapter project:
Add the following projects in the Java build path of this project:
com.ofss.digx.cz.app.xface
Classpath Variables
Extend the following classpath variables to the jars found in OBDX_Installer:
|
Classpath Name |
Jars to extend |
|---|---|
|
DIGX_LIB |
com.ofss.digx.infra.jar |
Adapter Impl
Create a project with name com.ofss.digx.cz.extxface.<Host Name>.impl This project will contain implementation classes for all the adapter interfaces created in the com.ofss.digx.cz.adapter project for required host. Create a package named com.ofss.digx.cz.extxface.<module_name>.adapter.impl and add the following classes:
- <module_name>AdapterFactory.java : Factory class to generate Adapter instances for every getAdapter request call. Returns either mock adapter or adapter to call host interface
- <module_name>Adapter.java: A very essential Adapter class for a specific module which is entitled to call external host system
- <module_name>MockAdapter.java: In case a call to host system needs to be skipped and local mocked data needs to be fetched, this adapter class can be used
Project dependencies for adapter impl project:
Add the following projects in the Java build path of this project:
com.ofss.digx.cz.adapter
com.ofss.digx.cz.app.xface
com.ofss.digx.cz.module.<module_name>
Classpath Variables
Extend the following classpath variables to the jars found in OBDX_Installer:
|
Classpath Name |
Jars to extend |
|---|---|
|
DIGX_LIB |
com.ofss.digx.appcore.dto.jar com.ofss.digx.infra.jar com.ofss.digx.adapter.jar com.ofss.digx.datatype.jar |
|
OBP_LIB |
com.ofss.fc.framework.dto.jar |
Database Scripts to be Added
There are few places where we decide which classes to be invoked in runtime. These are the possible database configurations done in an ideal case. Please add the following entries in the DIGX_FW_CONFIG_ALL_B table: (Account Service taken as an example and in accordance with the workspace example)
INSERT INTO digx_fw_config_all_b (PROP_ID, CATEGORY_ID, PROP_VALUE, FACTORY_SHIPPED_FLAG, PROP_COMMENTS, SUMMARY_TEXT, CREATED_BY, CREATION_DATE, LAST_UPDATED_BY, LAST_UPDATED_DATE, OBJECT_STATUS, OBJECT_VERSION_NUMBER) VALUES ('ACCOUNT_CZ_REPOSITORY_ADAPTER', 'repositoryadapterconfig', 'com.ofss.digx.domain.account.entity.repository.adapter.RemoteAccountRepositoryAdapter', 'N', null, 'Adapter repository adapter class', 'ofssuser', sysdate, 'ofssuser', sysdate, 'Y', 1);
INSERT INTO digx_fw_config_all_b (PROP_ID, CATEGORY_ID, PROP_VALUE, FACTORY_SHIPPED_FLAG, PROP_COMMENTS, SUMMARY_TEXT, CREATED_BY, CREATION_DATE, LAST_UPDATED_BY, LAST_UPDATED_DATE, OBJECT_STATUS, OBJECT_VERSION_NUMBER) VALUES ('ACCOUNT_CZ_ADAPTER_FACTORY', 'adapterfactoryconfig', 'com.ofss.digx.app.account.adapter.impl.AccountAdapterFactory', 'N', null, 'adapter factory class', 'ofssuser', sysdate, 'ofssuser', sysdate, 'Y', 1);
INSERT INTO digx_fw_config_all_b (PROP_ID, CATEGORY_ID, PROP_VALUE, FACTORY_SHIPPED_FLAG, PROP_COMMENTS, SUMMARY_TEXT, CREATED_BY, CREATION_DATE, LAST_UPDATED_BY, LAST_UPDATED_DATE, OBJECT_STATUS, OBJECT_VERSION_NUMBER) VALUES ('ACCOUNT_CZ_ADAPTER_MOCKED', 'adapterfactoryconfig', 'false', 'N', null, 'Flag to decide to go to Mocked adapter or Remote', 'ofssuser', sysdate, 'ofssuser', sysdate, 'Y', 1); |
SOAP Client
This is a project that will contain stubs that will be used to invoke Host services. This can contain stubs generated by importing the WSDL published by host. This is an optional project and depends on the kind of host integration pattern followed.
Deployment
Package customized code in library EAR:
Once all the classes are created and implemented, generate the required ear deployments. The following two EARs need to be created: com.ofss.digx.cz.appx.service.rest.ear and obdx.app.cz.domain.ear.
To generate an EAR in eclipse, we need to create an Enterprise Application Project and include the required project/s during the creation. I am adding screenshot for creating com.ofss.digx.cz.appx.service.rest.ear , similar changes can be made for second EAR as well.
Steps to generate EAR in Eclipse:
Create an Enterprise Application Project (EAP) from the “New” option. Give details as mentioned in the Figure 3 and click on Next button

Select all the projects created above. Do not check the ‘Generate application.xml deployment descriptor’ option as this EAR will be deployed as a library.

Click on Finish to create the EAR.
Inject customized REST into com.ofss.digx.appx.service.rest.ear:
- Open com.ofss.digx.appx.service.rest.war
- Create customization.resources file under WEB-INF/classes
- Add an entry of newly created REST class in this file
- Add a new servlet entry in web.xml with URL mapping /cz/v1/*
- Re-package this web application
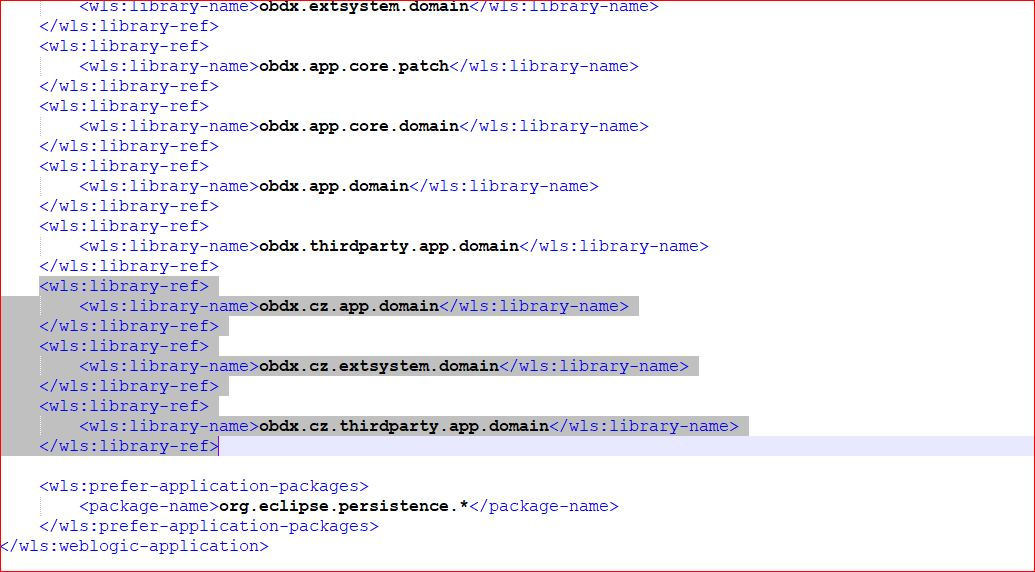
- In META-INF/weblogic-application.xml, add library reference to library ear

Deploying application in Weblogic
The two EARs created in the previous step should be deployed in the existing deployment setup. Please deploy the com.ofss.digx.appx.service.rest.ear as an application and obdx.app.cz.domain.ear as library.
Test the Application
Once the application is up, please go to the deployments section of the Weblogic Server. In the control option, you’ll find the option to test the application. Just to verify, check whether the context-root of the custom application is changed to digx/cz. The request URL for testing this application will be –s
http://<hostname>:<port>/digx/cz/v1/application.wadl