POST INSTALLATION STEPS
Once Installation is successful and no errors are observed, proceed with below set of steps.
Login Weblogic Admin console.
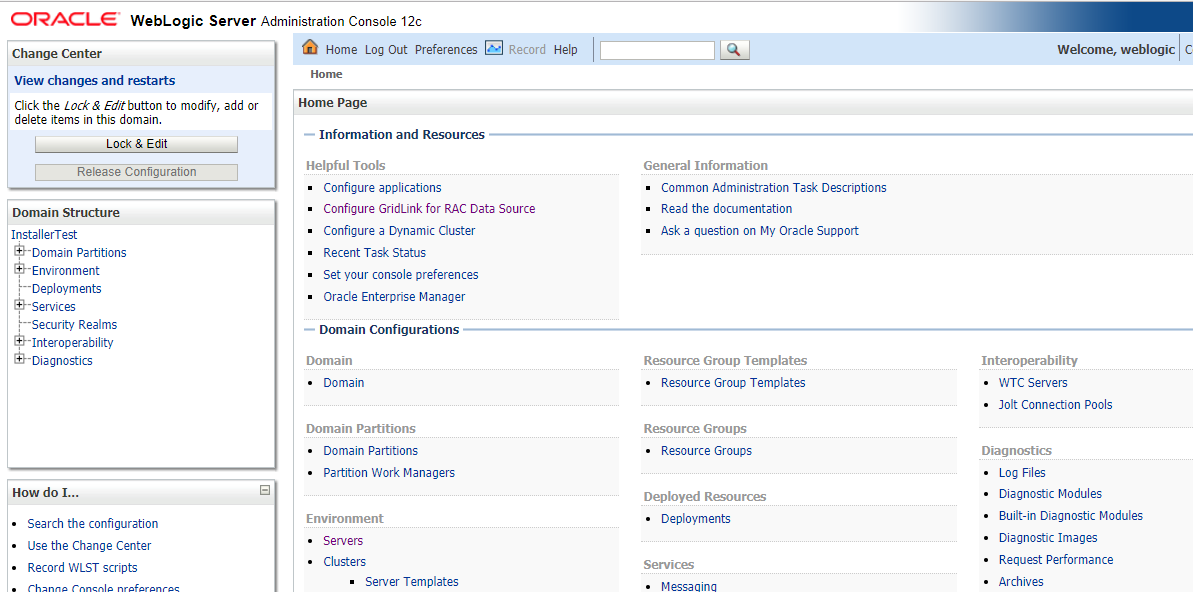
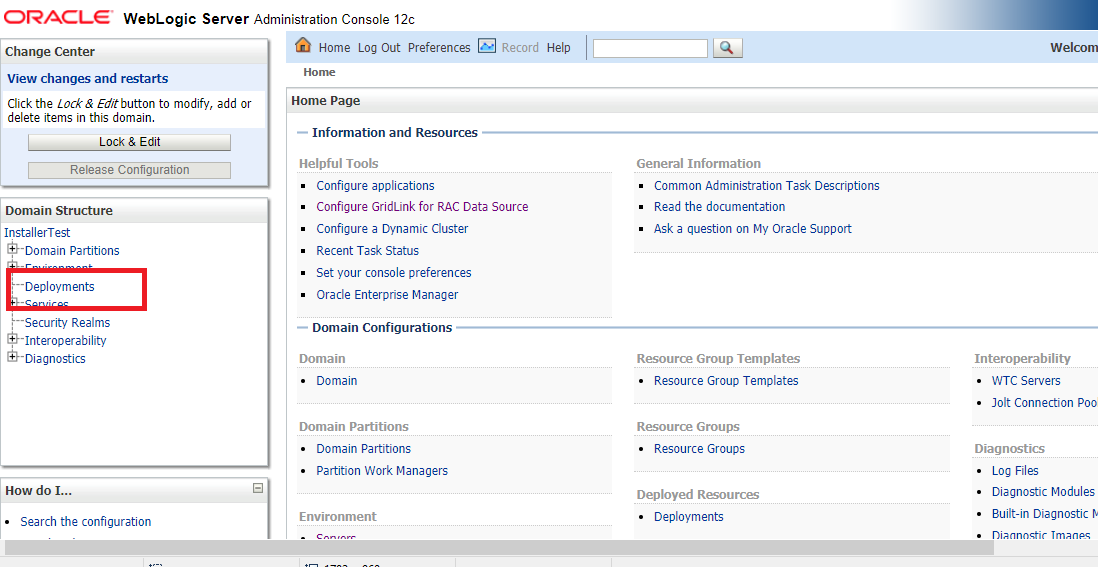
In the left panel of the Console, Click on Deployments, A table in the right pane displays all deployed Enterprise Applications and Application Modules.
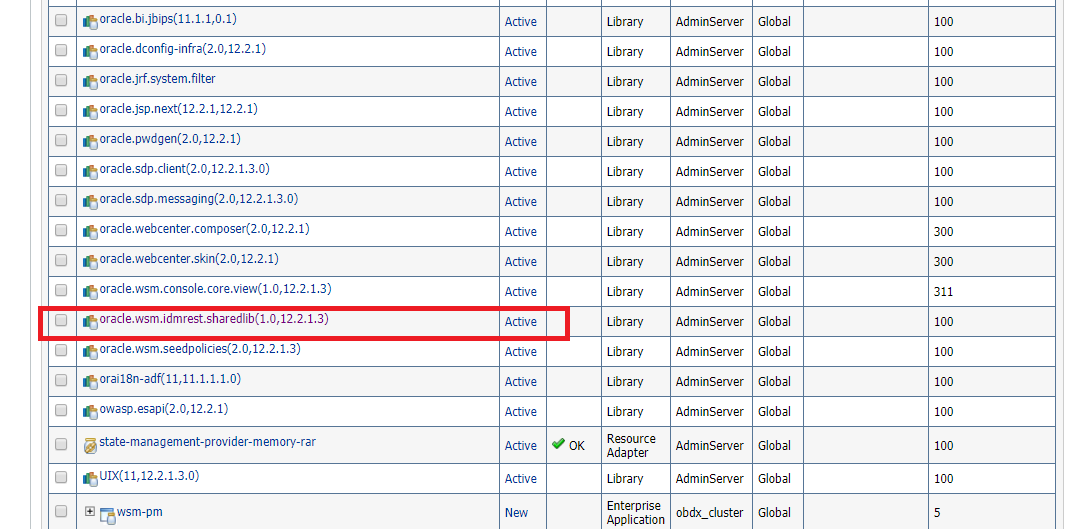
In the table, locate the oracle.wsm.idmrest.sharedlib(1.0,12.2.1.3) library to re-target and click on its name.
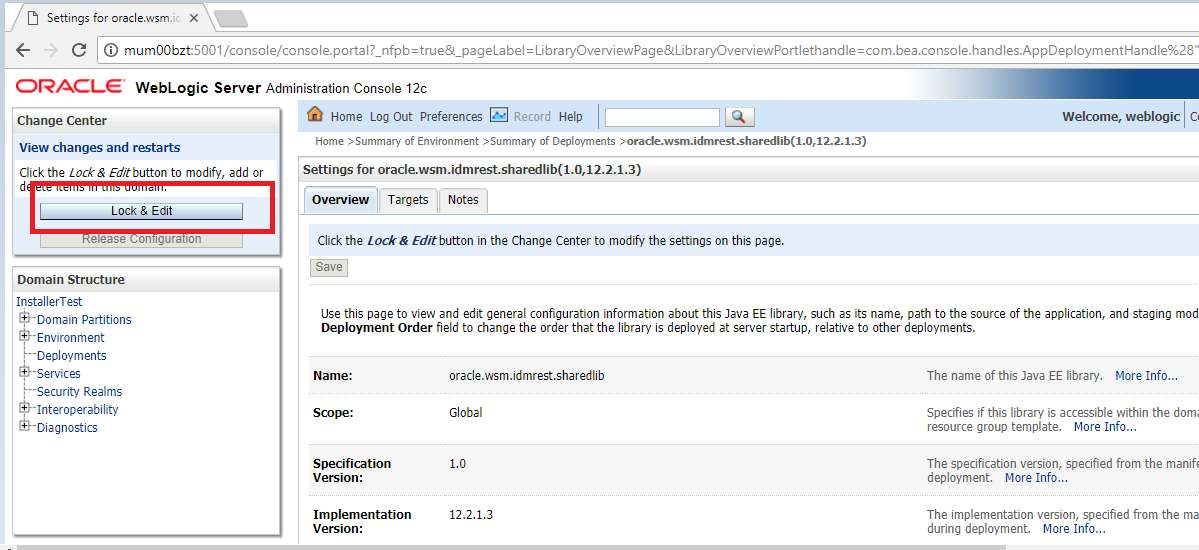
Click on Lock & Edit
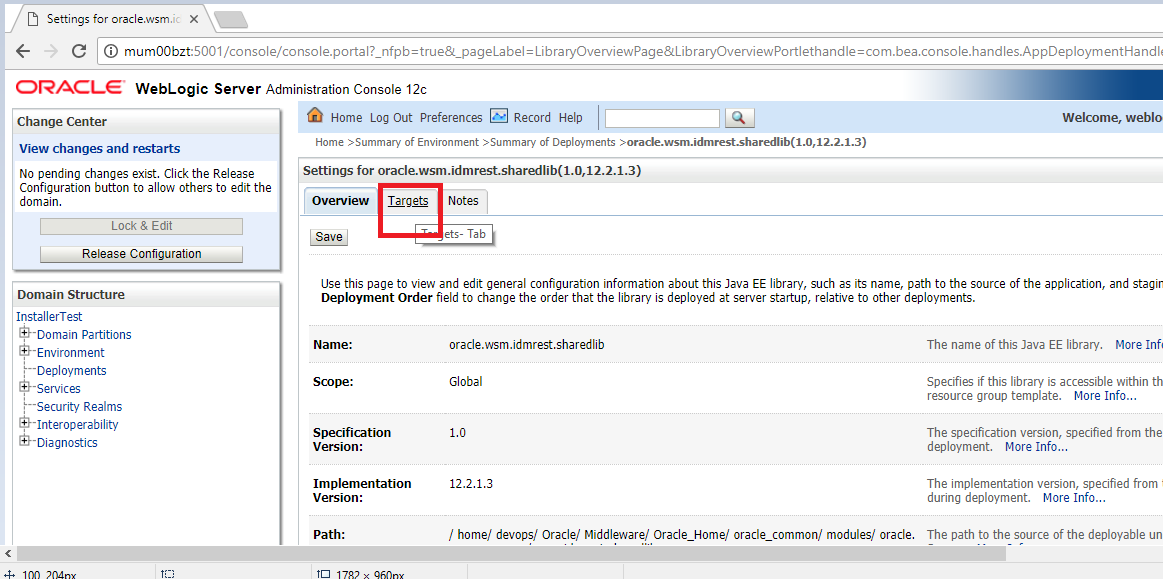
Click on Targets Tab
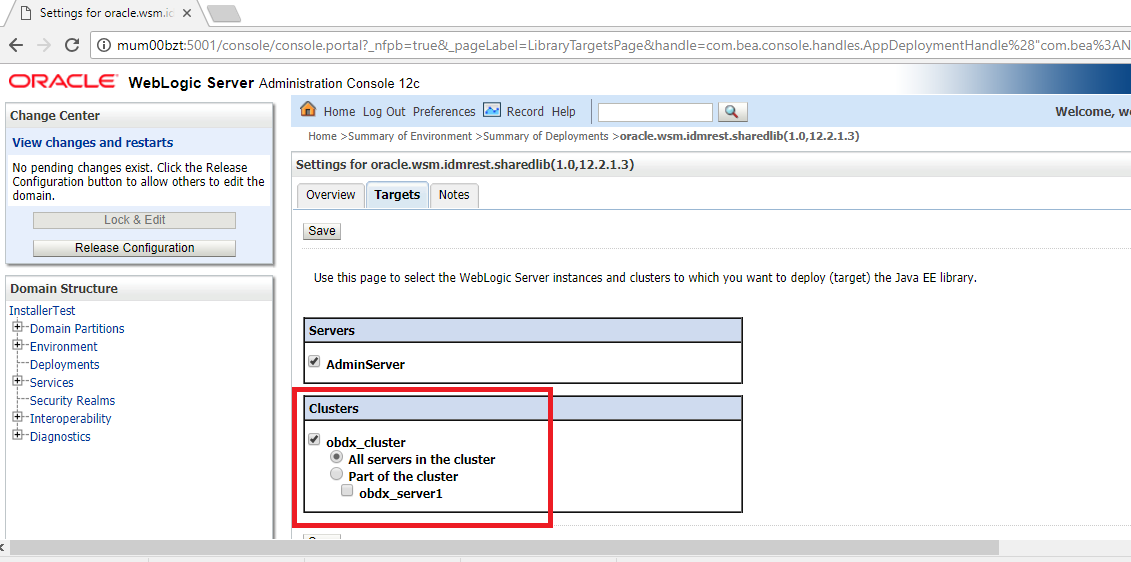
In the Servers box, select Cluster if it is not already selected and click Save.
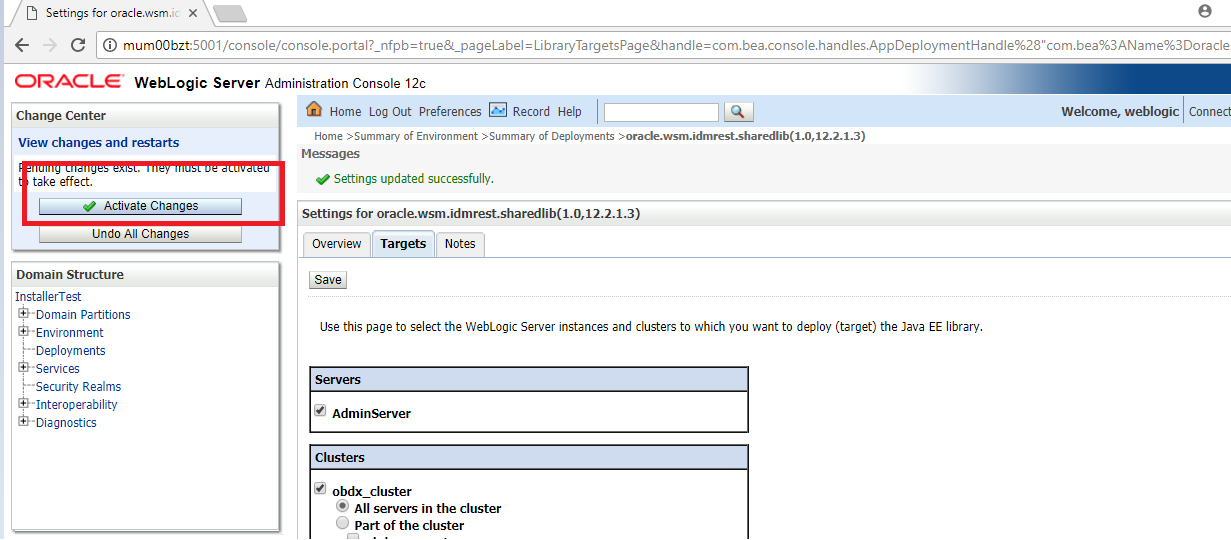
Click on Activate Changes.
Click on Home Tab.
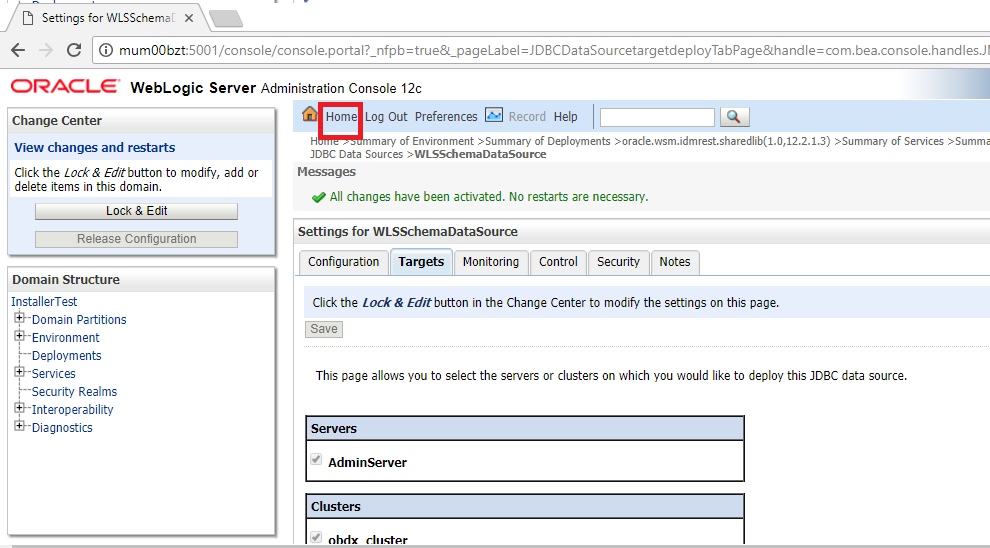
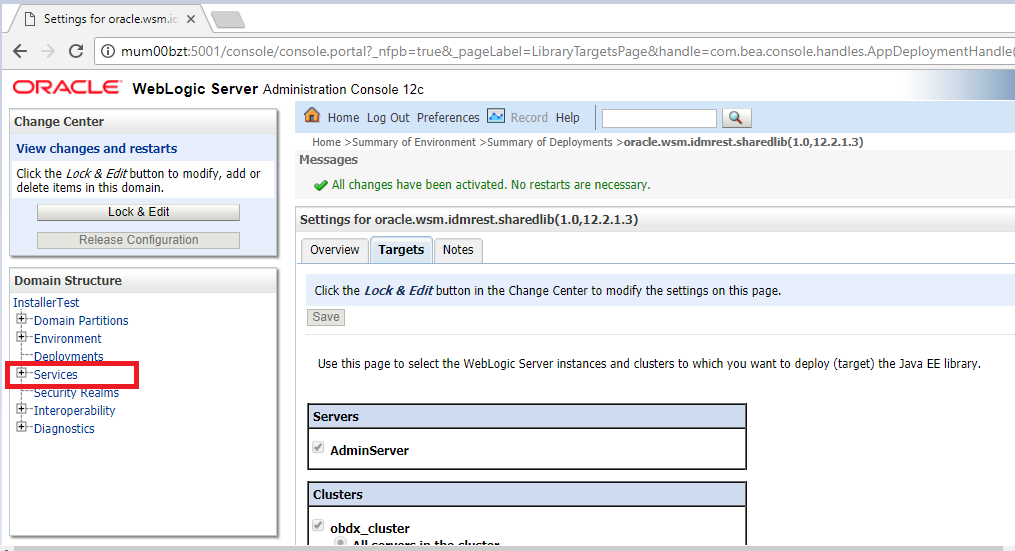
In the left panel of the Console, Click on Services.
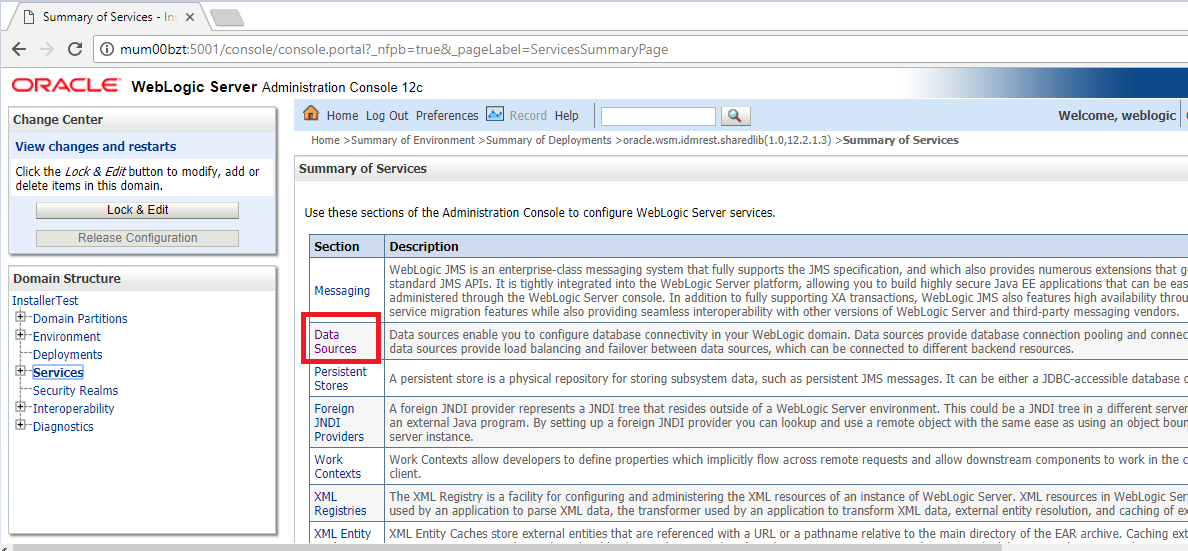
Click on Data Sources.
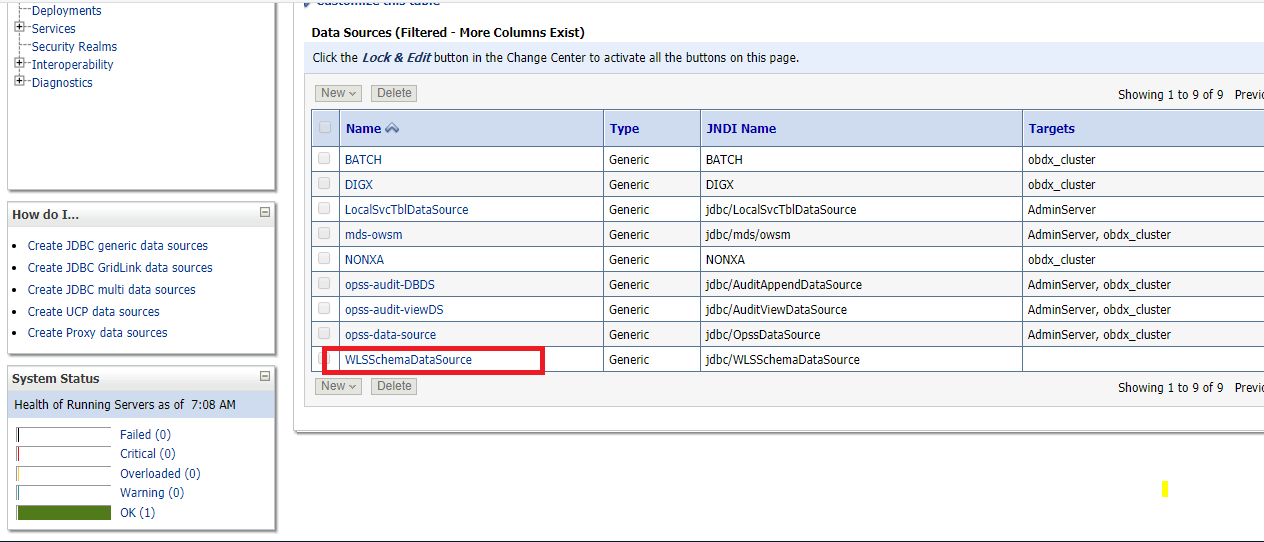
Locate WLSSchemaDataSource to change target ,click on its name.
Click on Targets Tab.
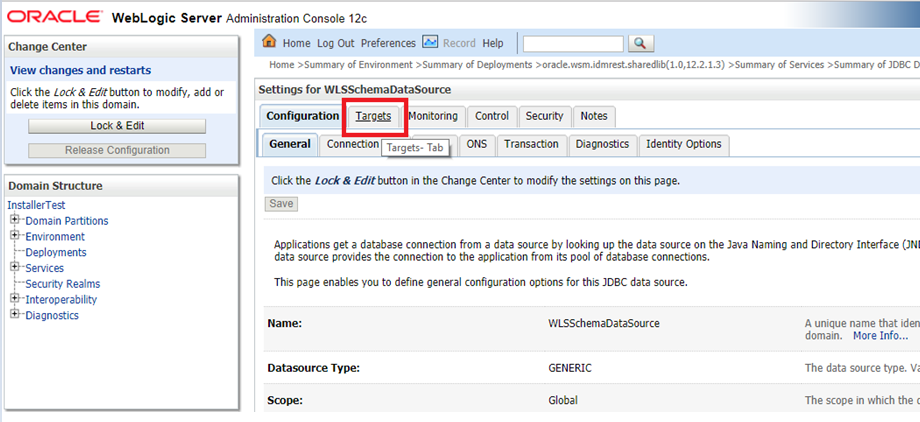
Click on Lock & Edit
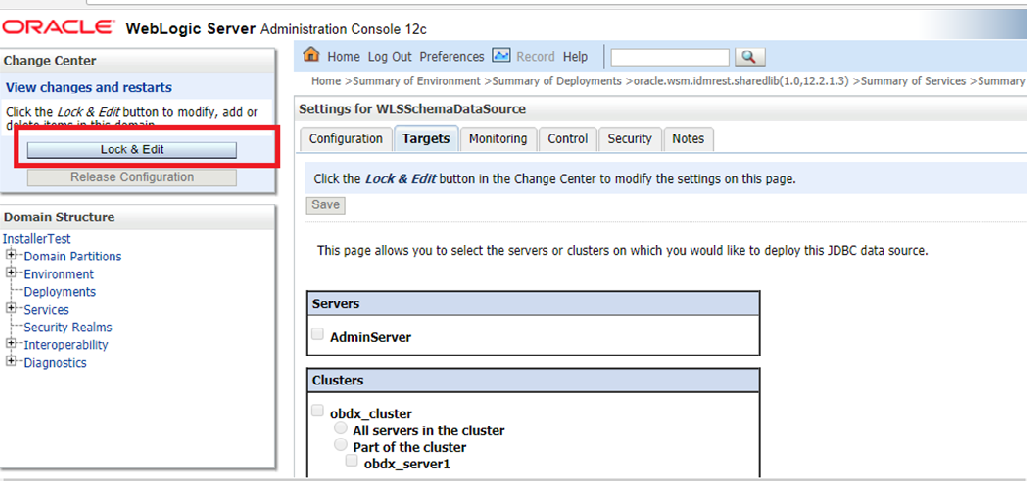
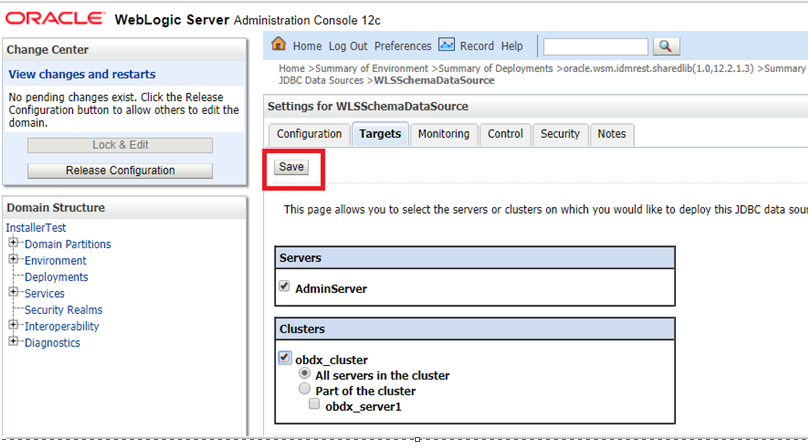
In the Servers Box, select AdminServer & OBDX Cluster and Click on Save.
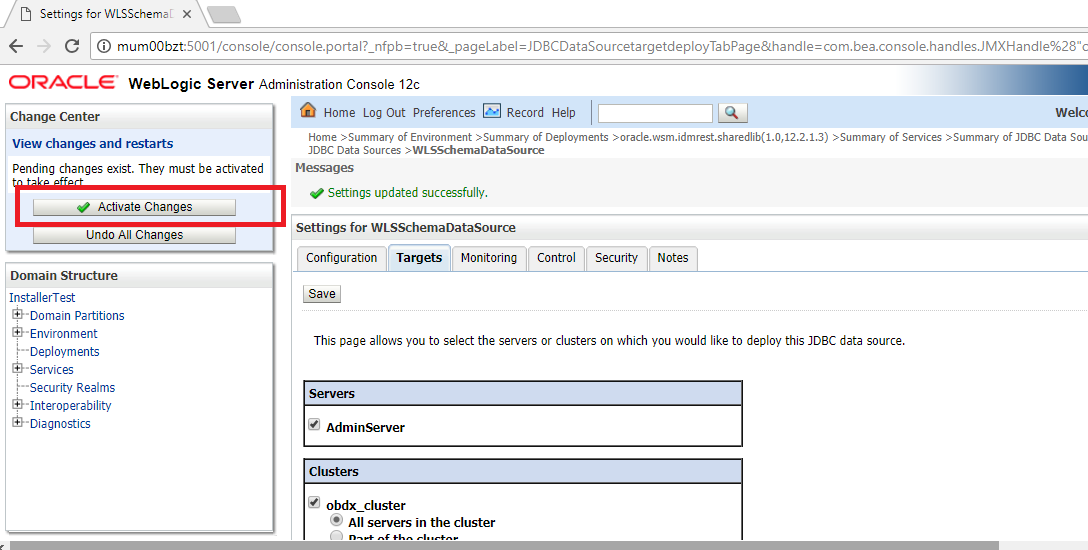
Click on Activate Changes.
Outbound credential mappings
Login Weblogic Admin Console. Click on Deployments.
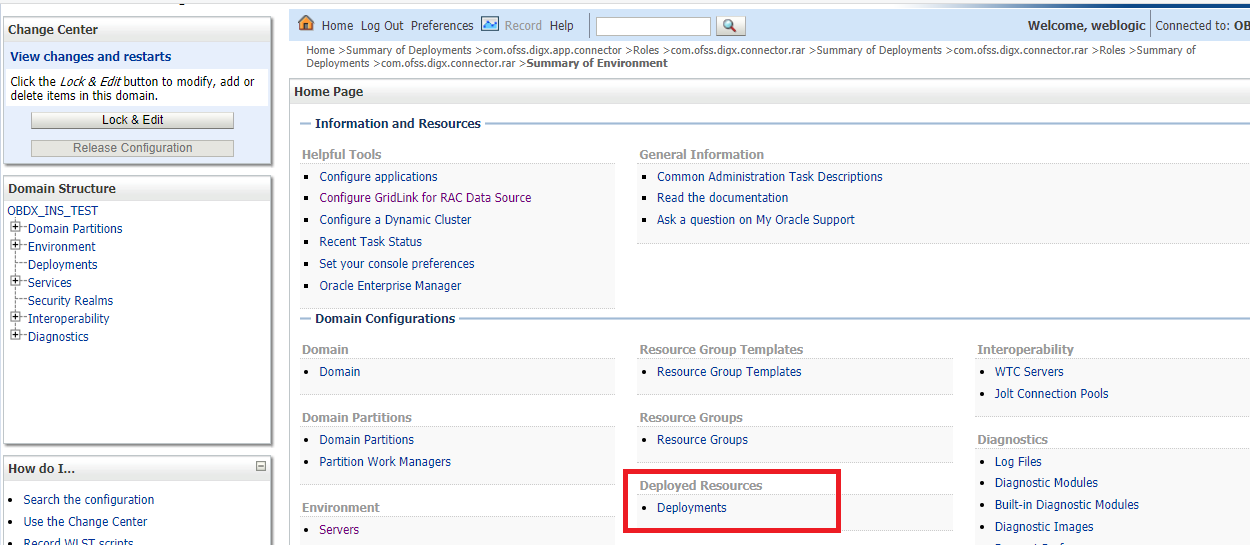
Click on com.ofss.digx.app.connector > com.ofss.digx.connector.rar.
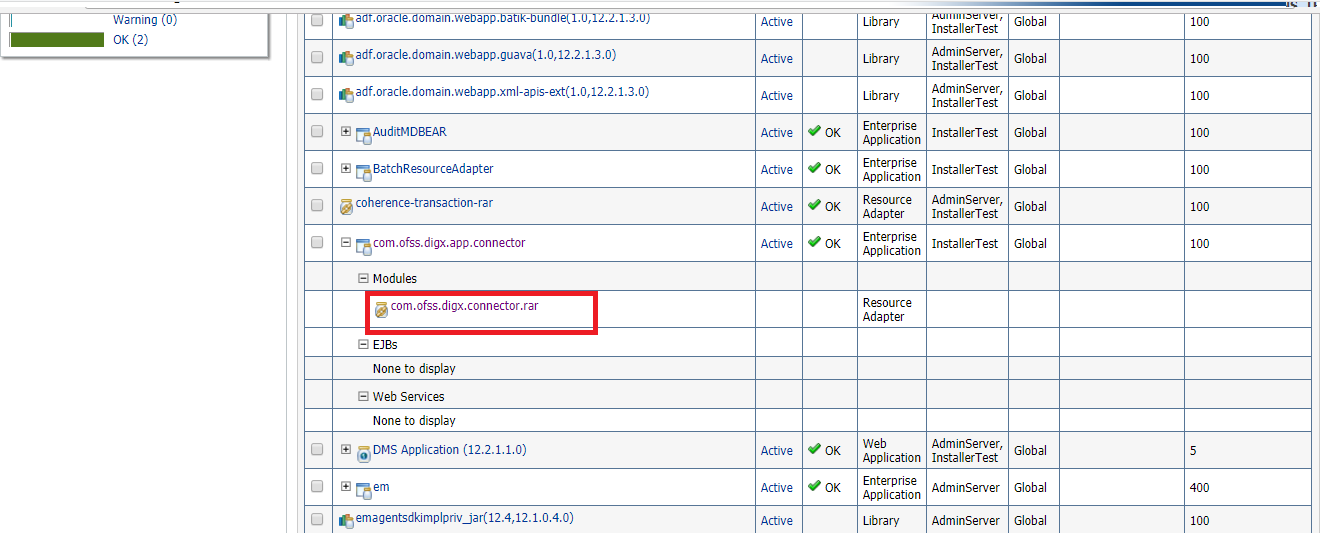
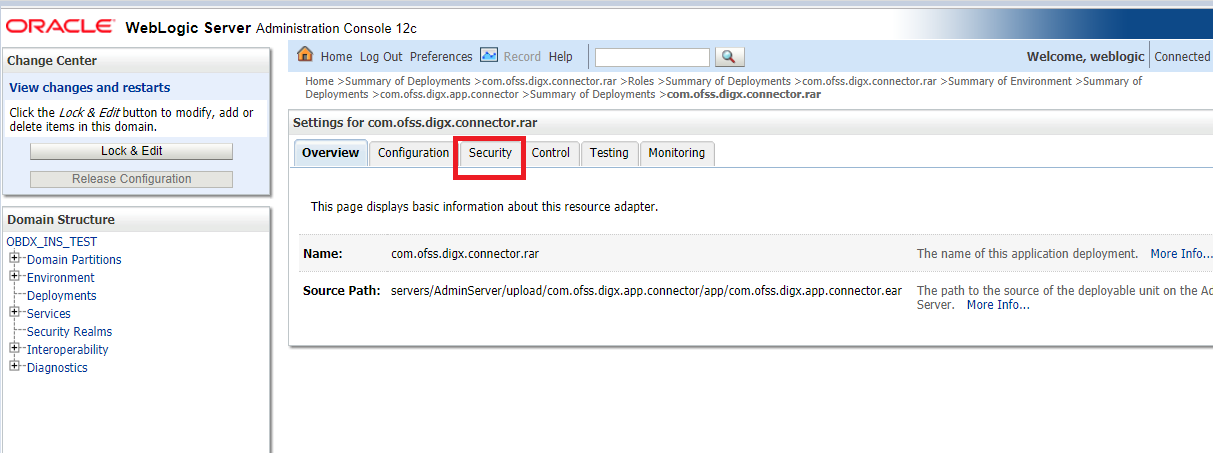
Click on Security Tab > Outbound Credential Mappings.
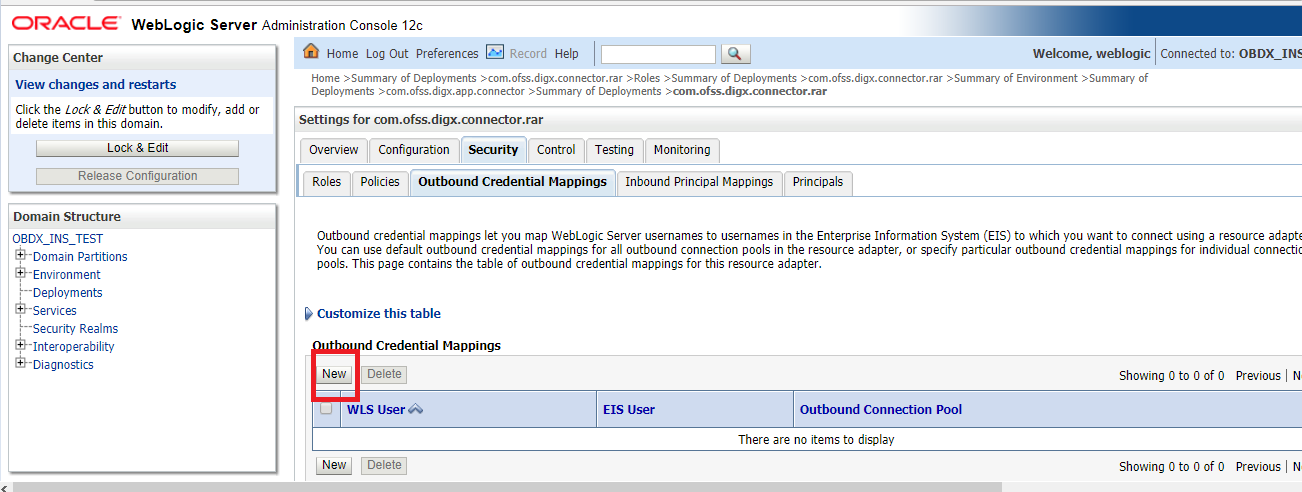
Click on New.
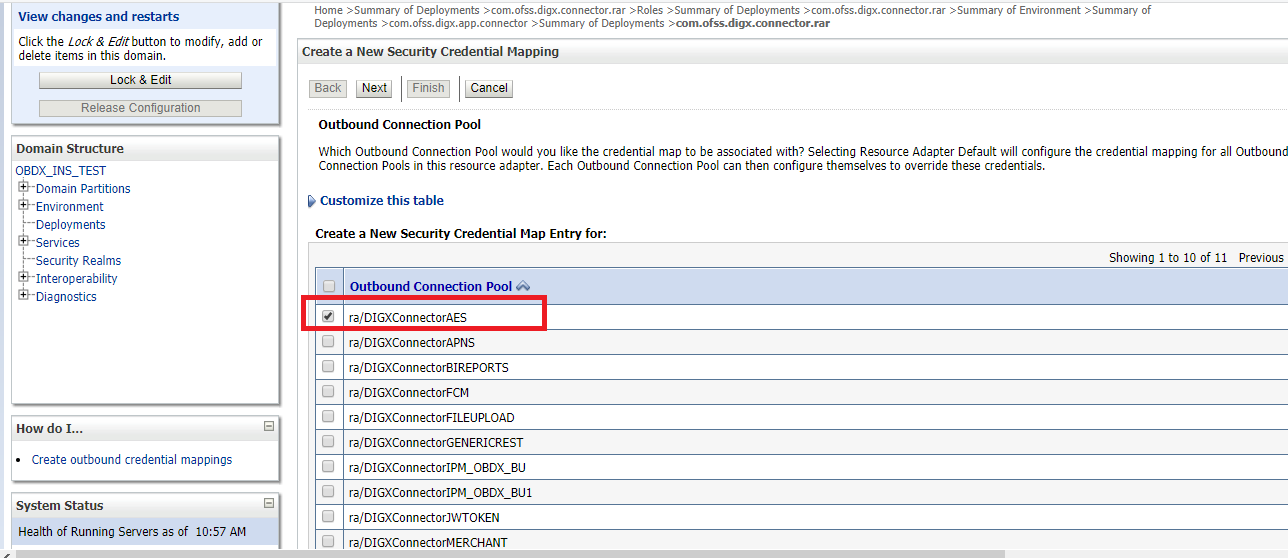
Select ra/DIGXConnectorAES > Next.
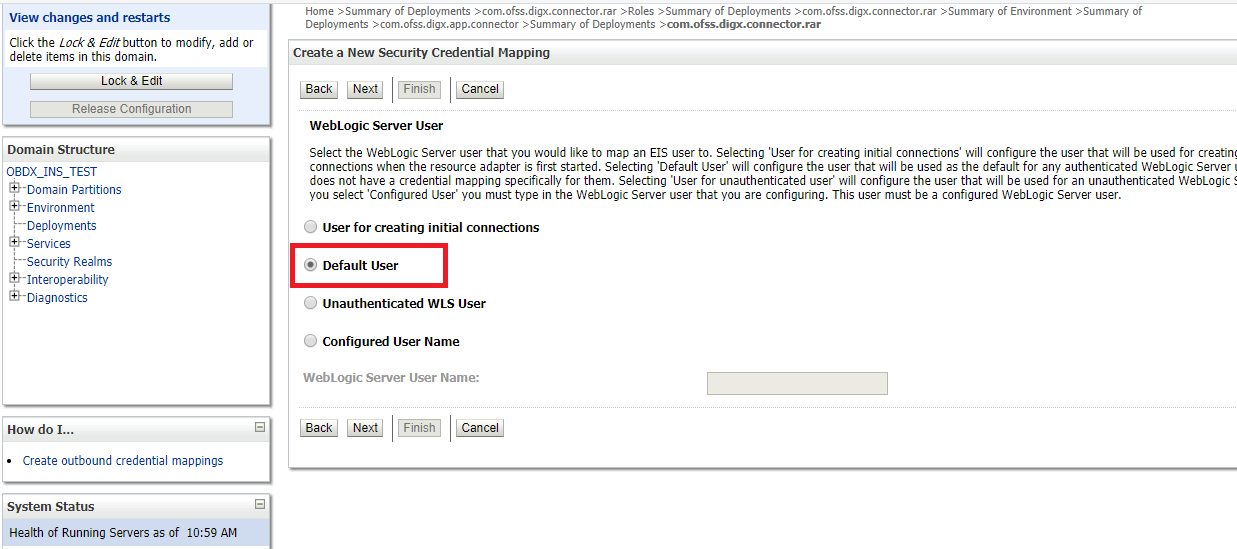
Select Default User > Next.
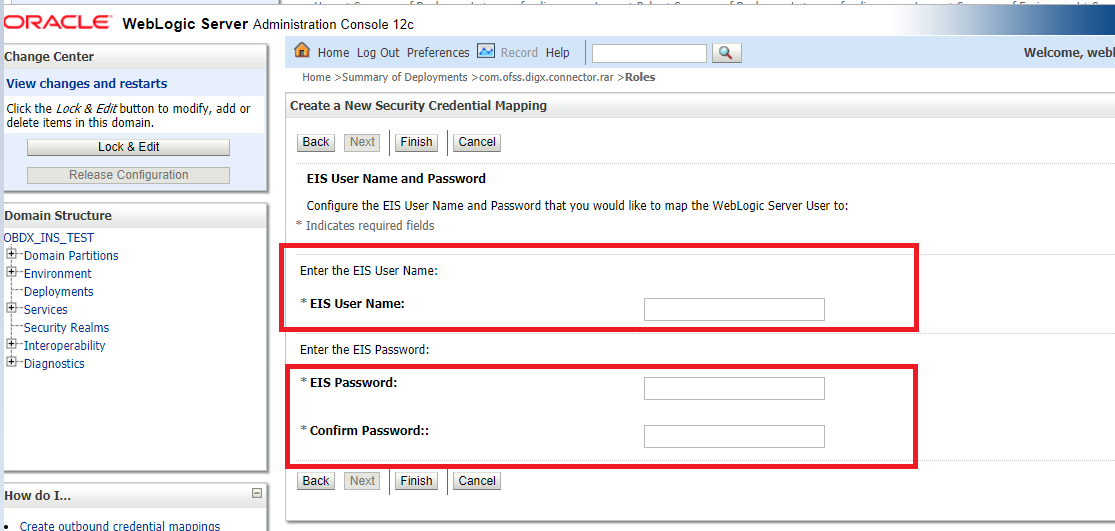
Enter “EIS User Name” should be set to AES_KEY
Enter “EIS Password” . Password should be any 16 characters.
Click ‘Finish’
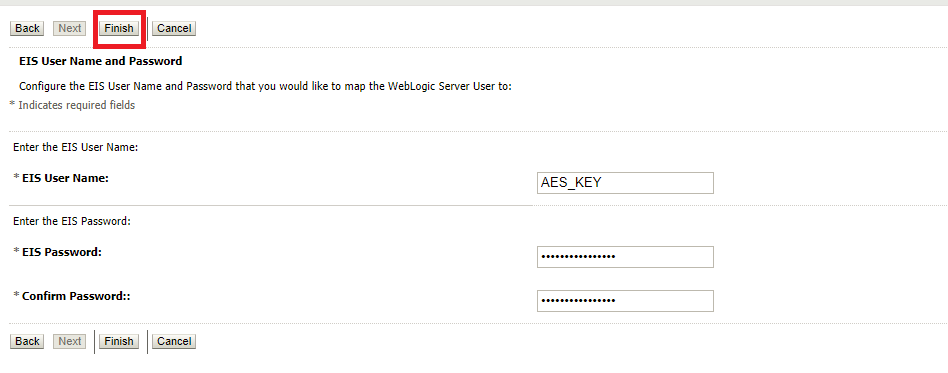
Check AES_KEY mapping is created successfully

Apply JRF Template
To apply JRF template follow below steps.
- To do this, ensure that the Admin Server is running. Login to the EM (Enterprise Manager) Console using the following URL:
http://<hostname>:<admin_port>/em
Note: EM console would be available on same hostname and port which was used for Weblogic Admin Console for OBDX domain (created via installer), just replace the “/console” with “/em”.
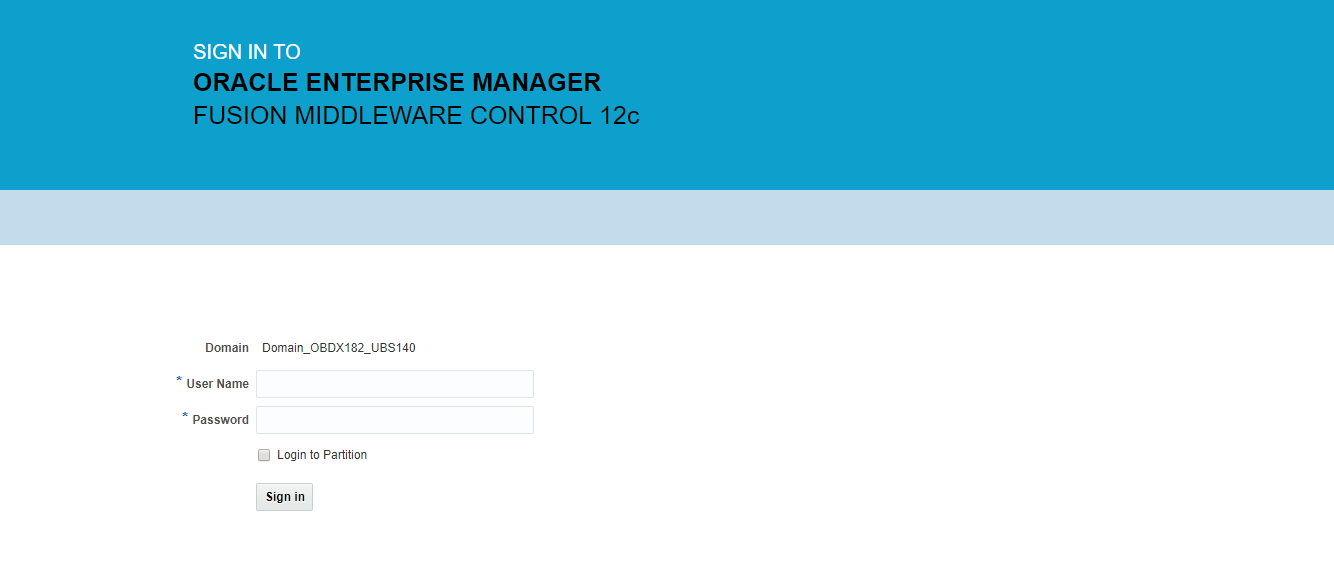
- Enter Weblogic administrator username and password (same used for Weblogic administrator console login)
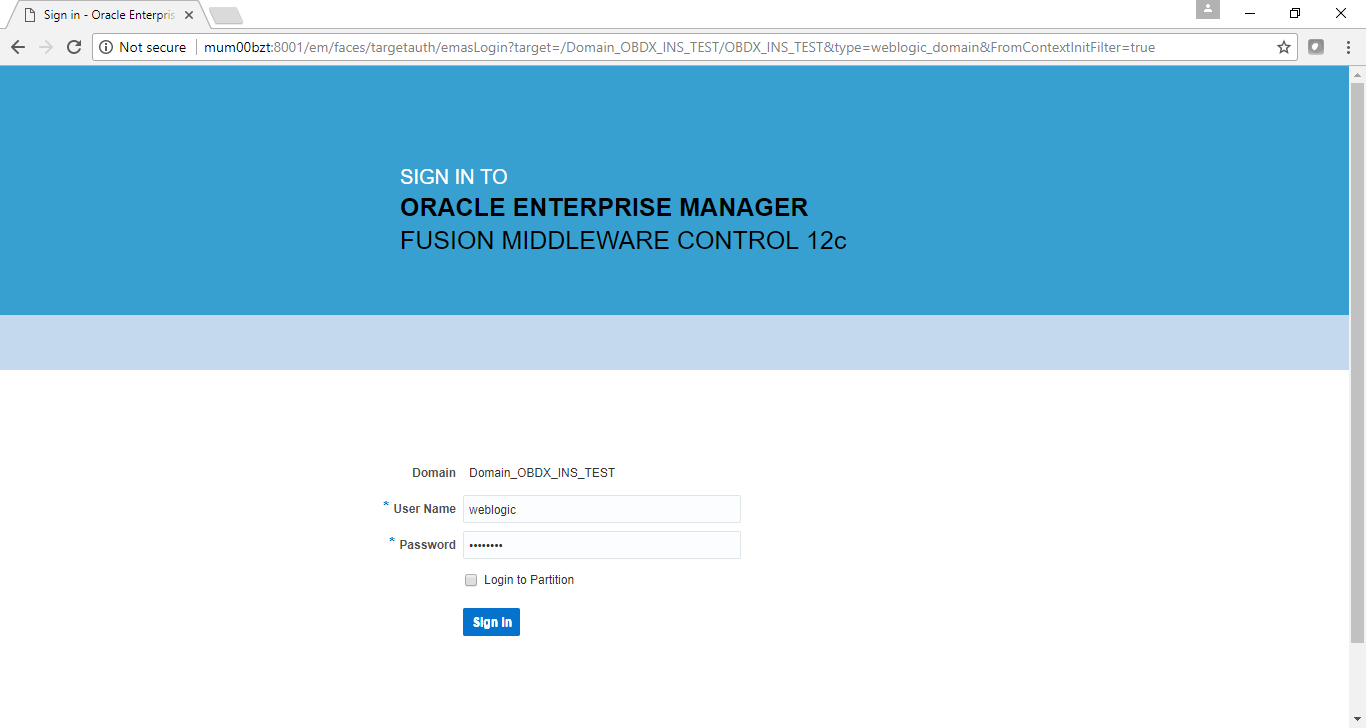
- Click on Sign In
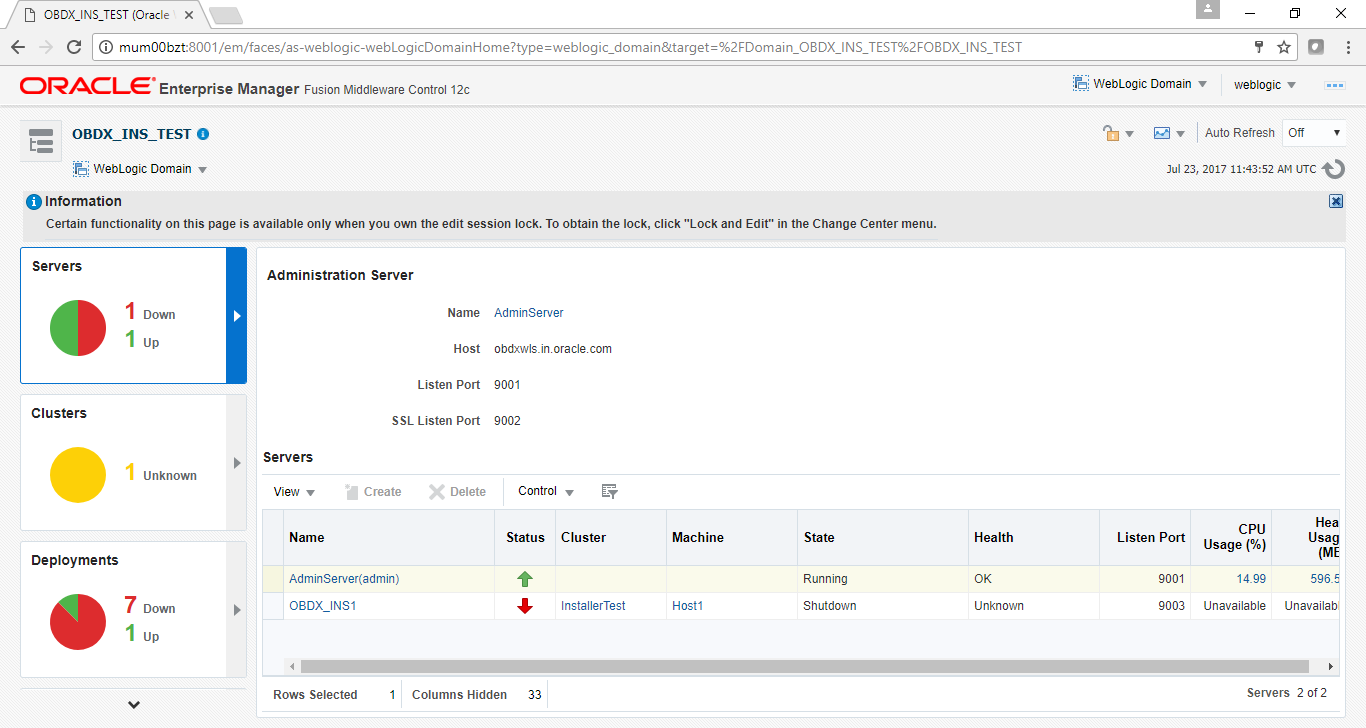
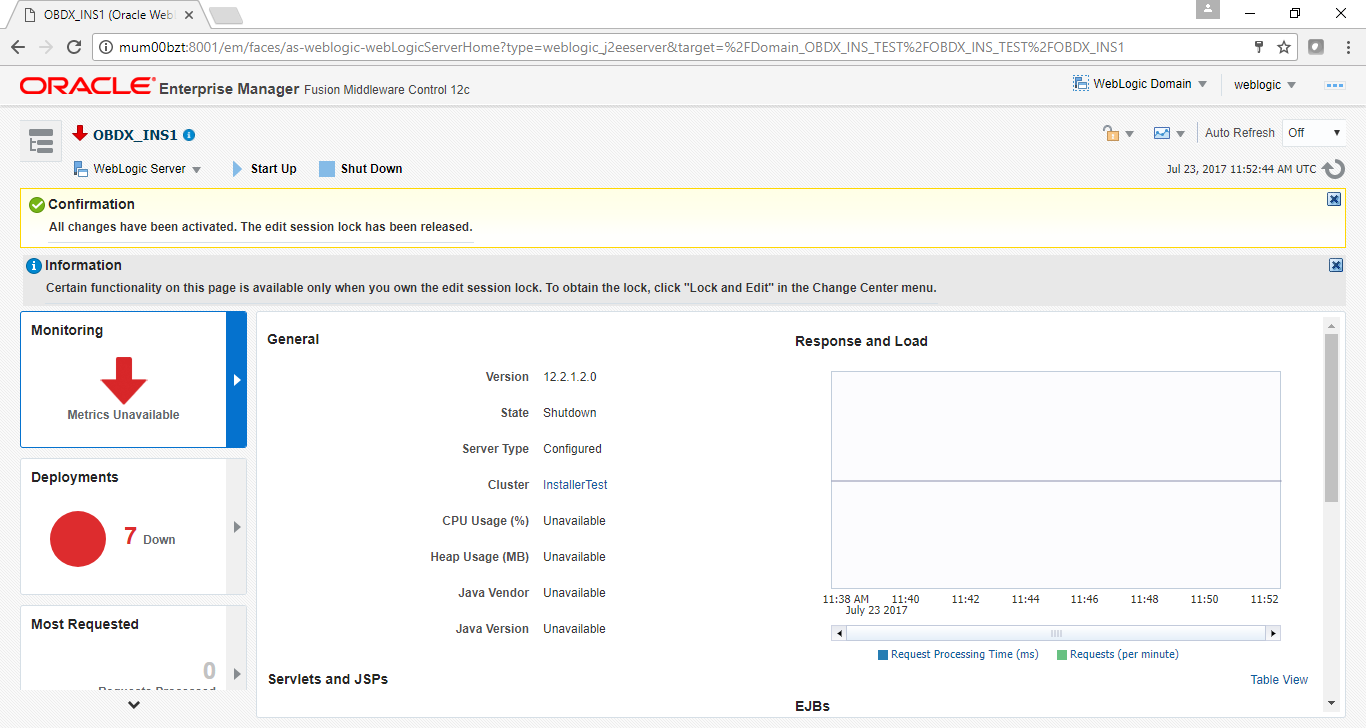
- Click on the Managed Server (as highlighted below).

Note: Depending on installer.properties, Managed server will differ from above screenshot.
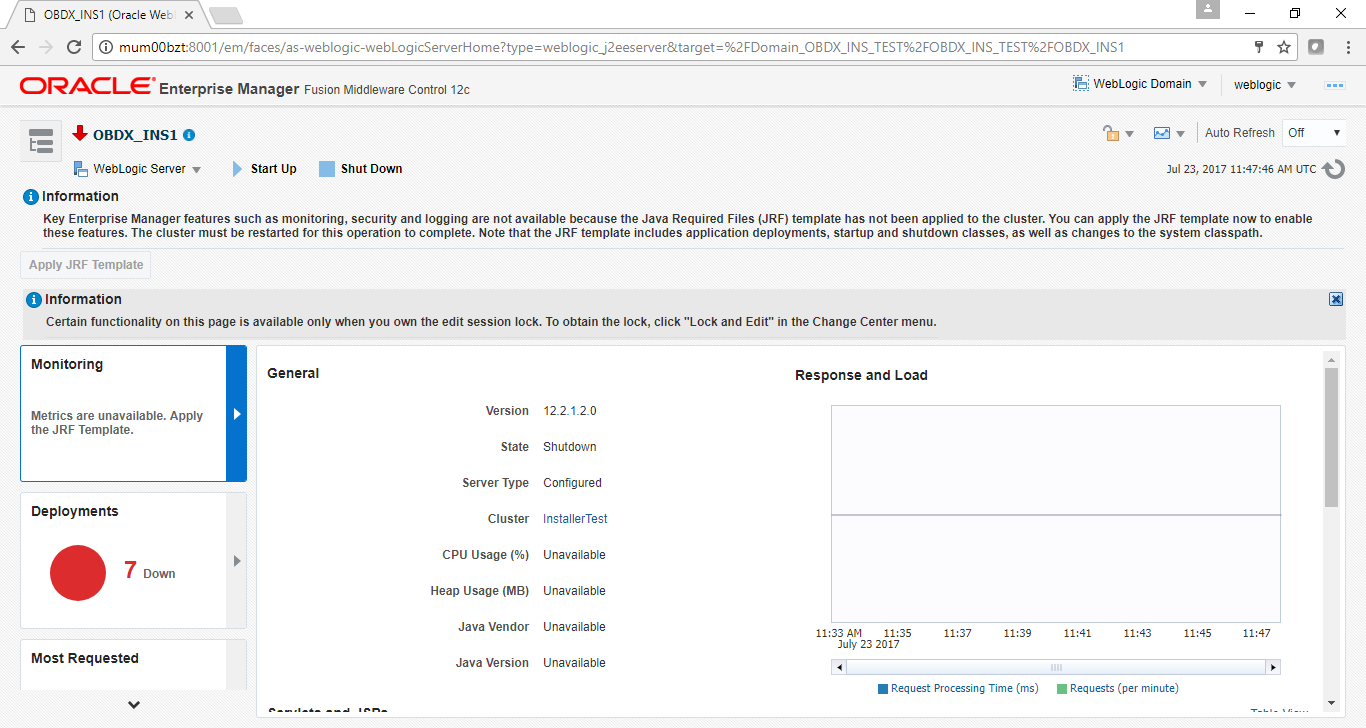
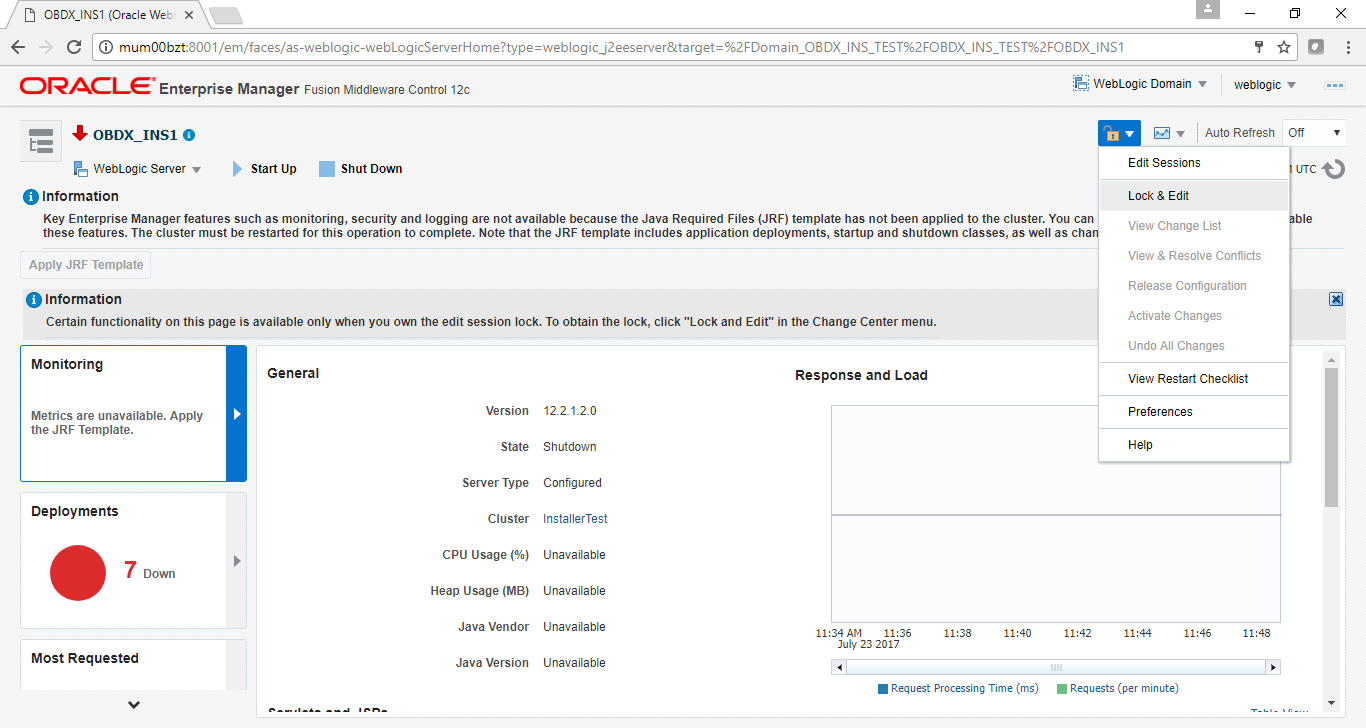
- Click on “Lock and Edit” option (as shown in screenshot).
You will see below screen stating the edit session confirmation
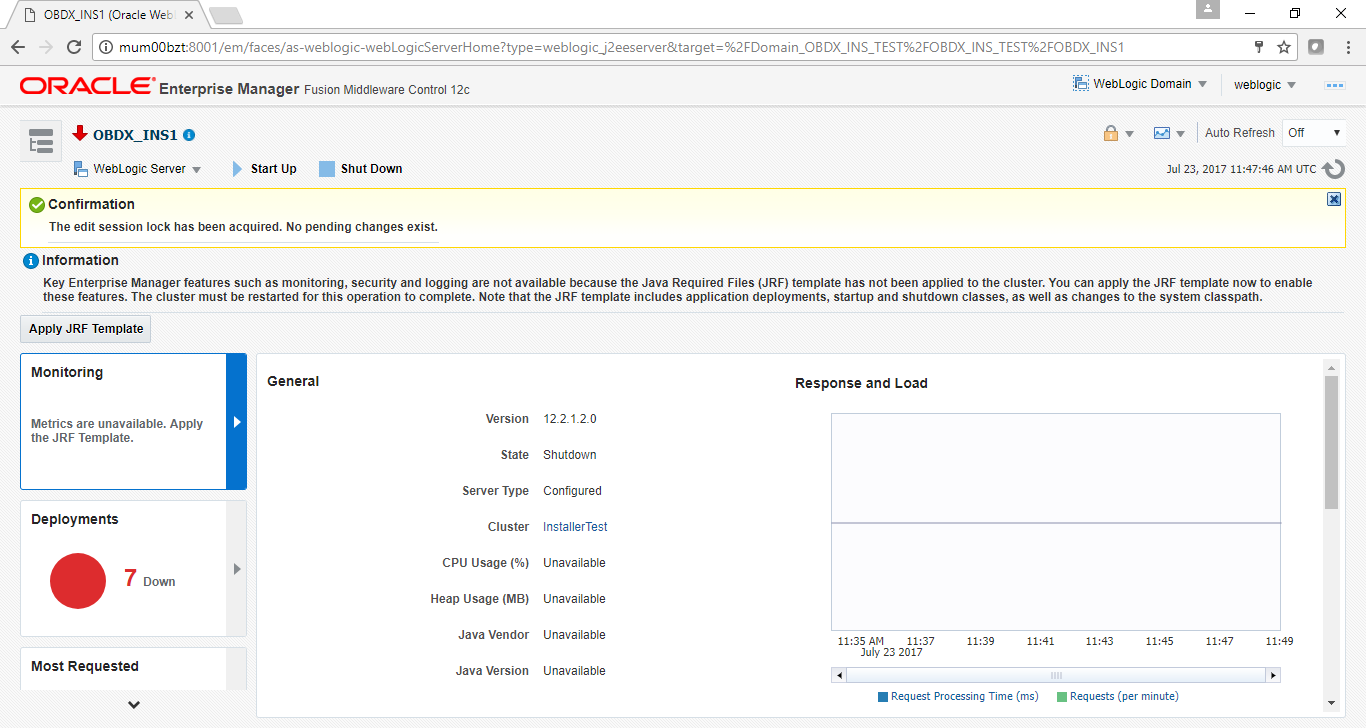
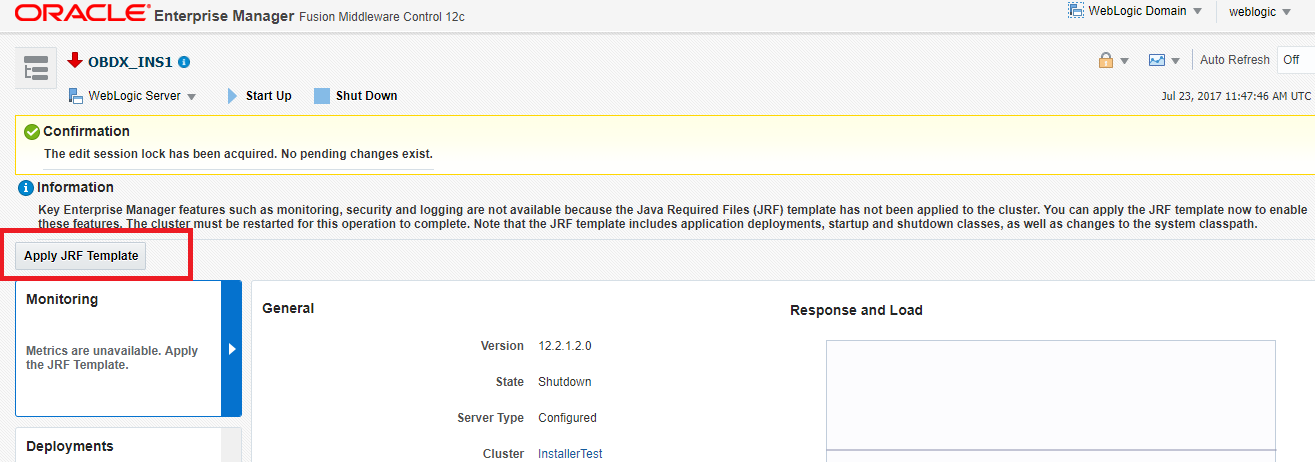
- Click on “Apply JRF Template” option (as shown in screenshot).
Is JRF successfully applied, you will get below Confirmation.

- Click on “Activates Changes” option (as shown in screenshot).
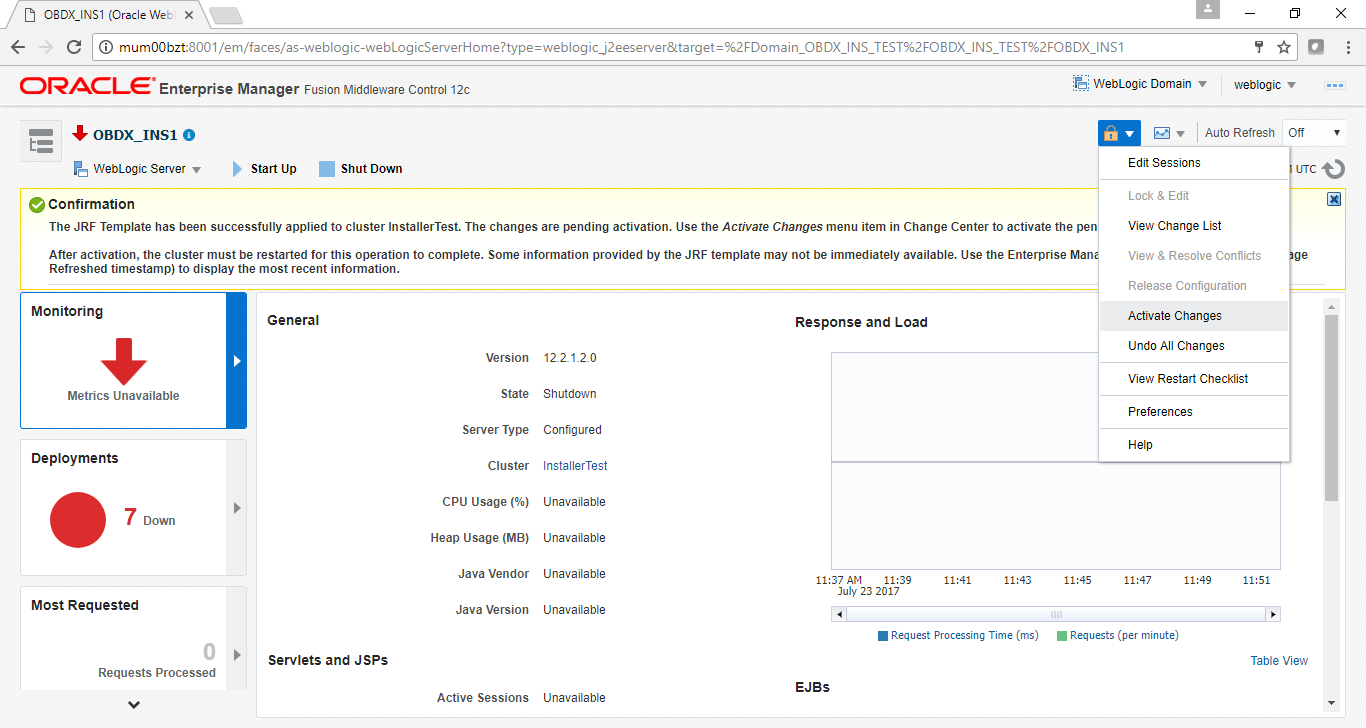
Post activation you will receive below Confirmation.
Configure User Lockout attributes in Weblogic
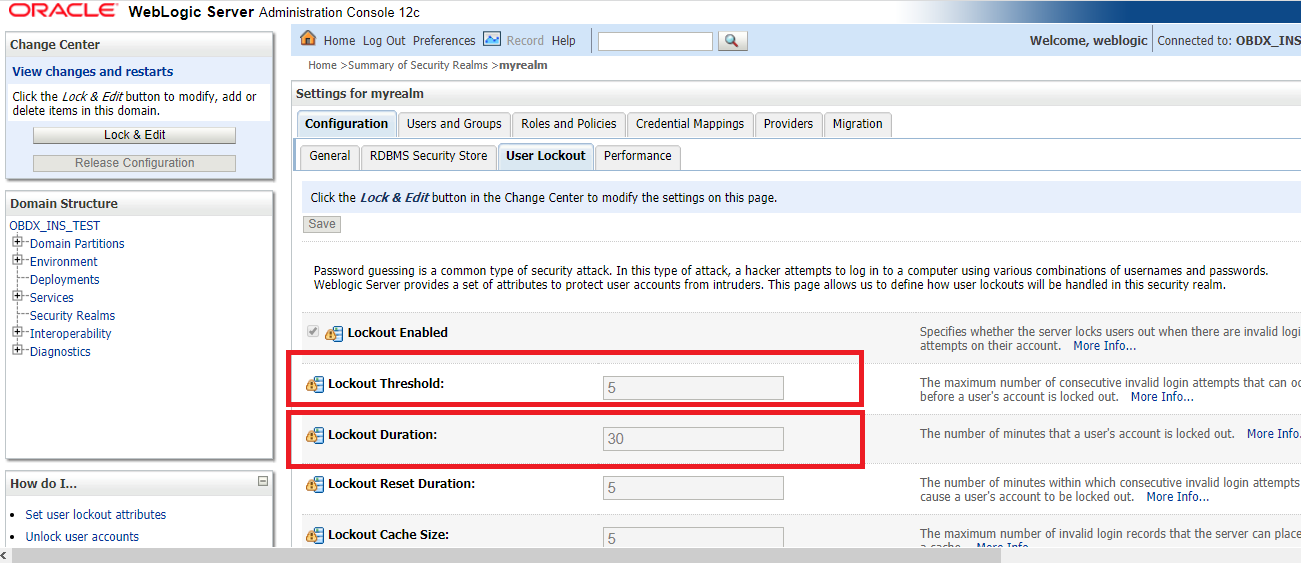
The User Lockout attributes in Weblogic under Home>Security Realms>myrealm need to be in sync with the Password Policy Maintained in LDAP or DBAuthenticator.In case of DBAuthenticator it has to be in sync with Password Policy Maintenance in OBDX.
Check for below values & change accordingly.
- Lockout Threshold : It should be equal to Invalid attempts of Password Policy Maintenance.
- Lockout Duration : It should be equal to property under prop_id "USER_LOCK_PERIOD" maintained in DIGX_FW_CONFIG_ALL_B table.
In case of OUD or other LDAP it needs to be sync with the Password Policy configured in LDAP. For e.g.: Refer to below values configured in OUD.

Once the values are available, make appropriate change in respective highlighted configuration.
Save and Activate Changes
Restart AdminServer
OBDX Application logging
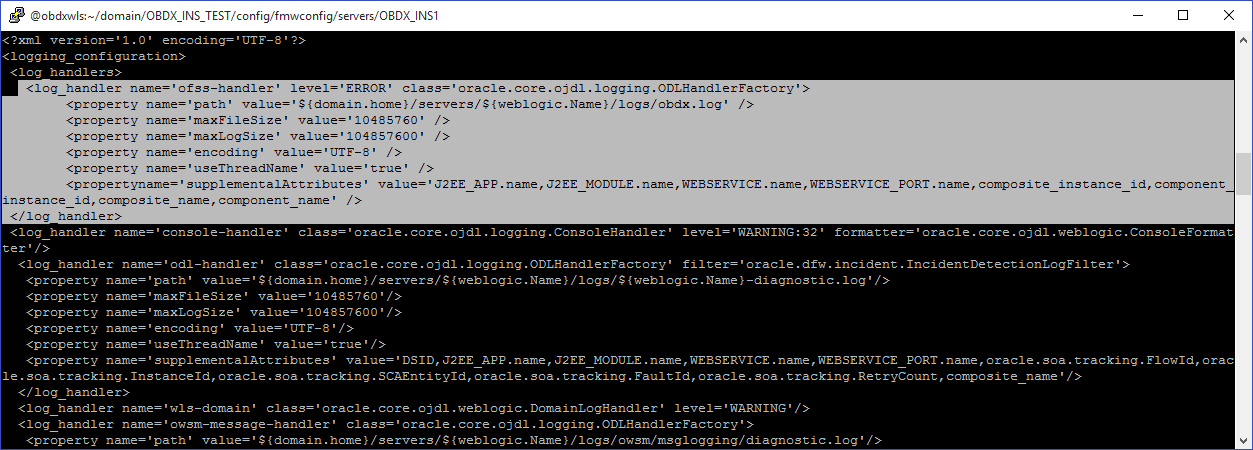
To enable OBDX activation logging make below change to logging.xml present at ${domain.home}/config/fmwconfig/servers/${ManagedServer}.

Open logging.xml and make a new entry under <log_handlers> tag using below code template:
<log_handler name='obdx-handler' level='<LOGLEVEL>' class='oracle.core.ojdl.logging.ODLHandlerFactory'>
<property name='path' value='<path for OBDX log>/<OBDX log filename>' />
<property name='maxFileSize' value='<The maximum size in bytes for each log file>' />
<property name='maxLogSize' value='<The maximum size in bytes for the entire log>' />
<property name='encoding' value='<encoding>' />
<property name='useThreadName' value='true' />
<property name='supplementalAttributes' value=’<supplementalAttributes>' />
</log_handler>
Below is a sample implementation for log_handlers file.
<log_handler name='obdx-handler' level='ERROR' class='oracle.core.ojdl.logging.ODLHandlerFactory'>
<property name='path' value='${domain.home}/servers/${weblogic.Name}/logs/obdx.log' /><property name='maxFileSize' value='10485760' />
<property name='maxLogSize' value='104857600' />
<property name='encoding' value='UTF-8' />
<property name='useThreadName' value='true' />
<property name='supplementalAttributes' value='J2EE_APP.name,J2EE_MODULE.name,WEBSERVICE.name,WEBSERVICE_PORT.name,composite_instance_id,component_instance_id,composite_name,component_name' />
</log_handler>
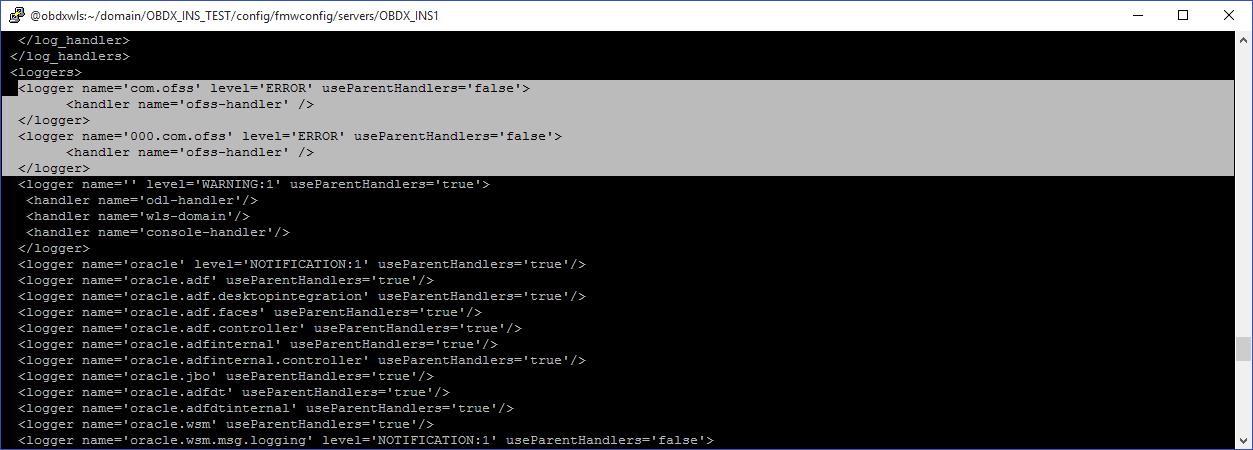
Add loggers under <loggers> tag using below template:
<logger name='com.ofss' level='ERROR' useParentHandlers='false'>
<handler name='obdx-handler' />
</logger>
<logger name='#BANKCODE#.com.ofss' level='ERROR' useParentHandlers='false'>
<handler name='obdx-handler' />
</logger>
Note: Replace the #BANKCODE# with bank code.
Below is a sample implementation for loggers file
<logger name='com.ofss' level='ERROR' useParentHandlers='false'>
<handler name='obdx-handler' />
</logger>
<logger name='000.com.ofss' level='ERROR' useParentHandlers='false'>
<handler name='obdx-handler' />
</logger>
Eclipselink logging
To modify eclipselink logging make changes in <INSTALLATION_HOME>\config\META-INF\persistence.xml using below link :
https://wiki.eclipse.org/EclipseLink/Examples/JPA/Logging

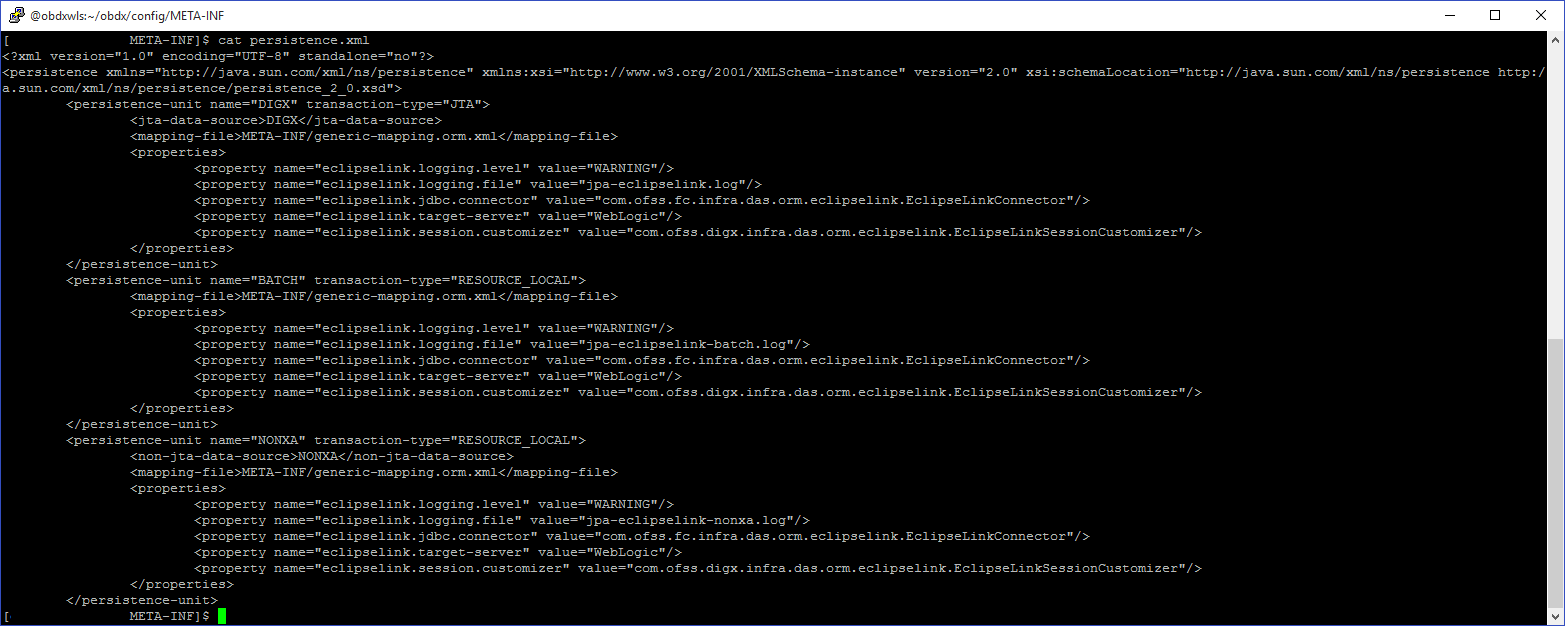
Change logging level during runtime
To change OBDX application logging level at runtime (when OBDX application is up and running) do following steps.
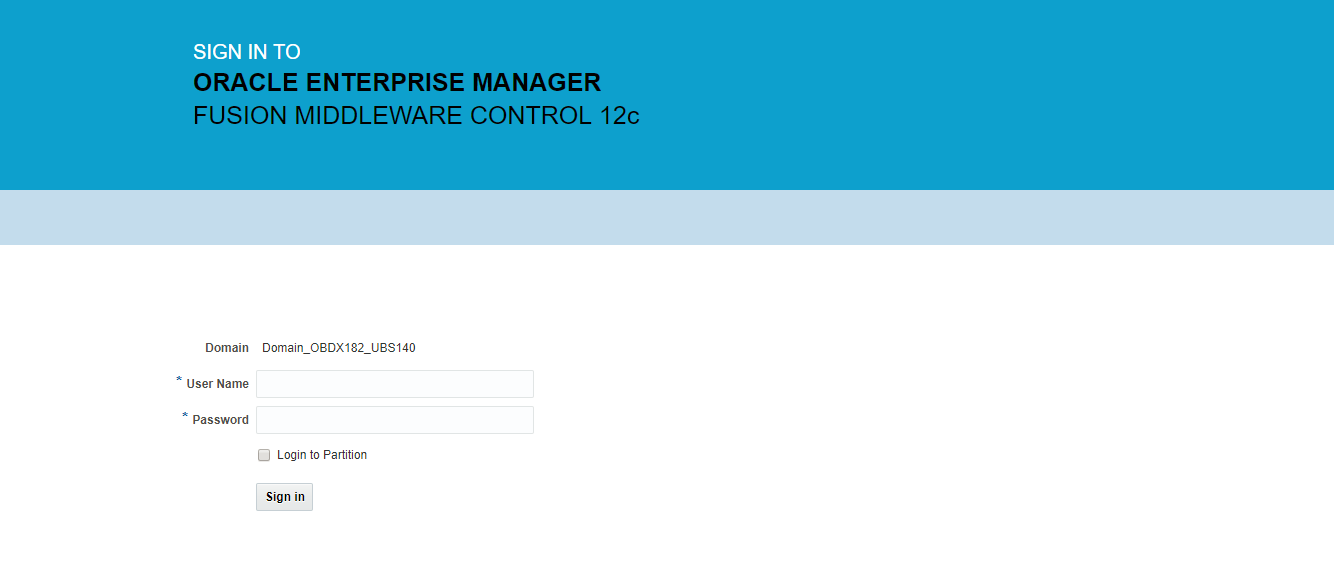
To do this, ensure that the Admin Server is running. Login to the EM (Enterprise Manager) Console using the following URL:
http://<hostname>:<admin_port>/em
Note: EM console would be available on same hostname and port which was used for Weblogic Admin Console for OBDX domain (created via installer), just replace the “/console” with “/em”.
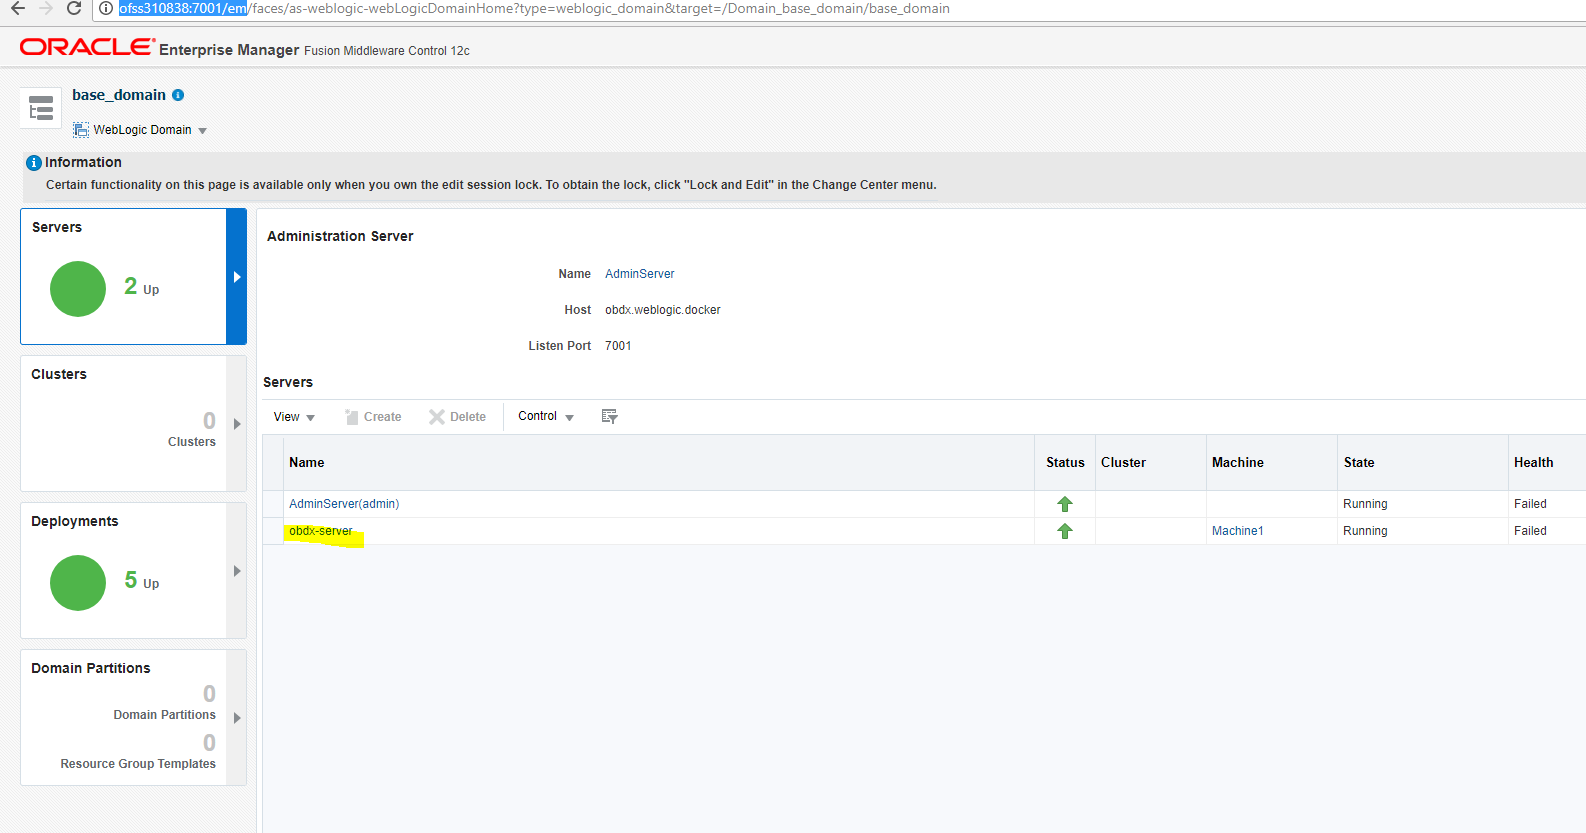
- Click on obdx-server
Note: Depending on installer.properties, Managed server will differ from above screenshot.
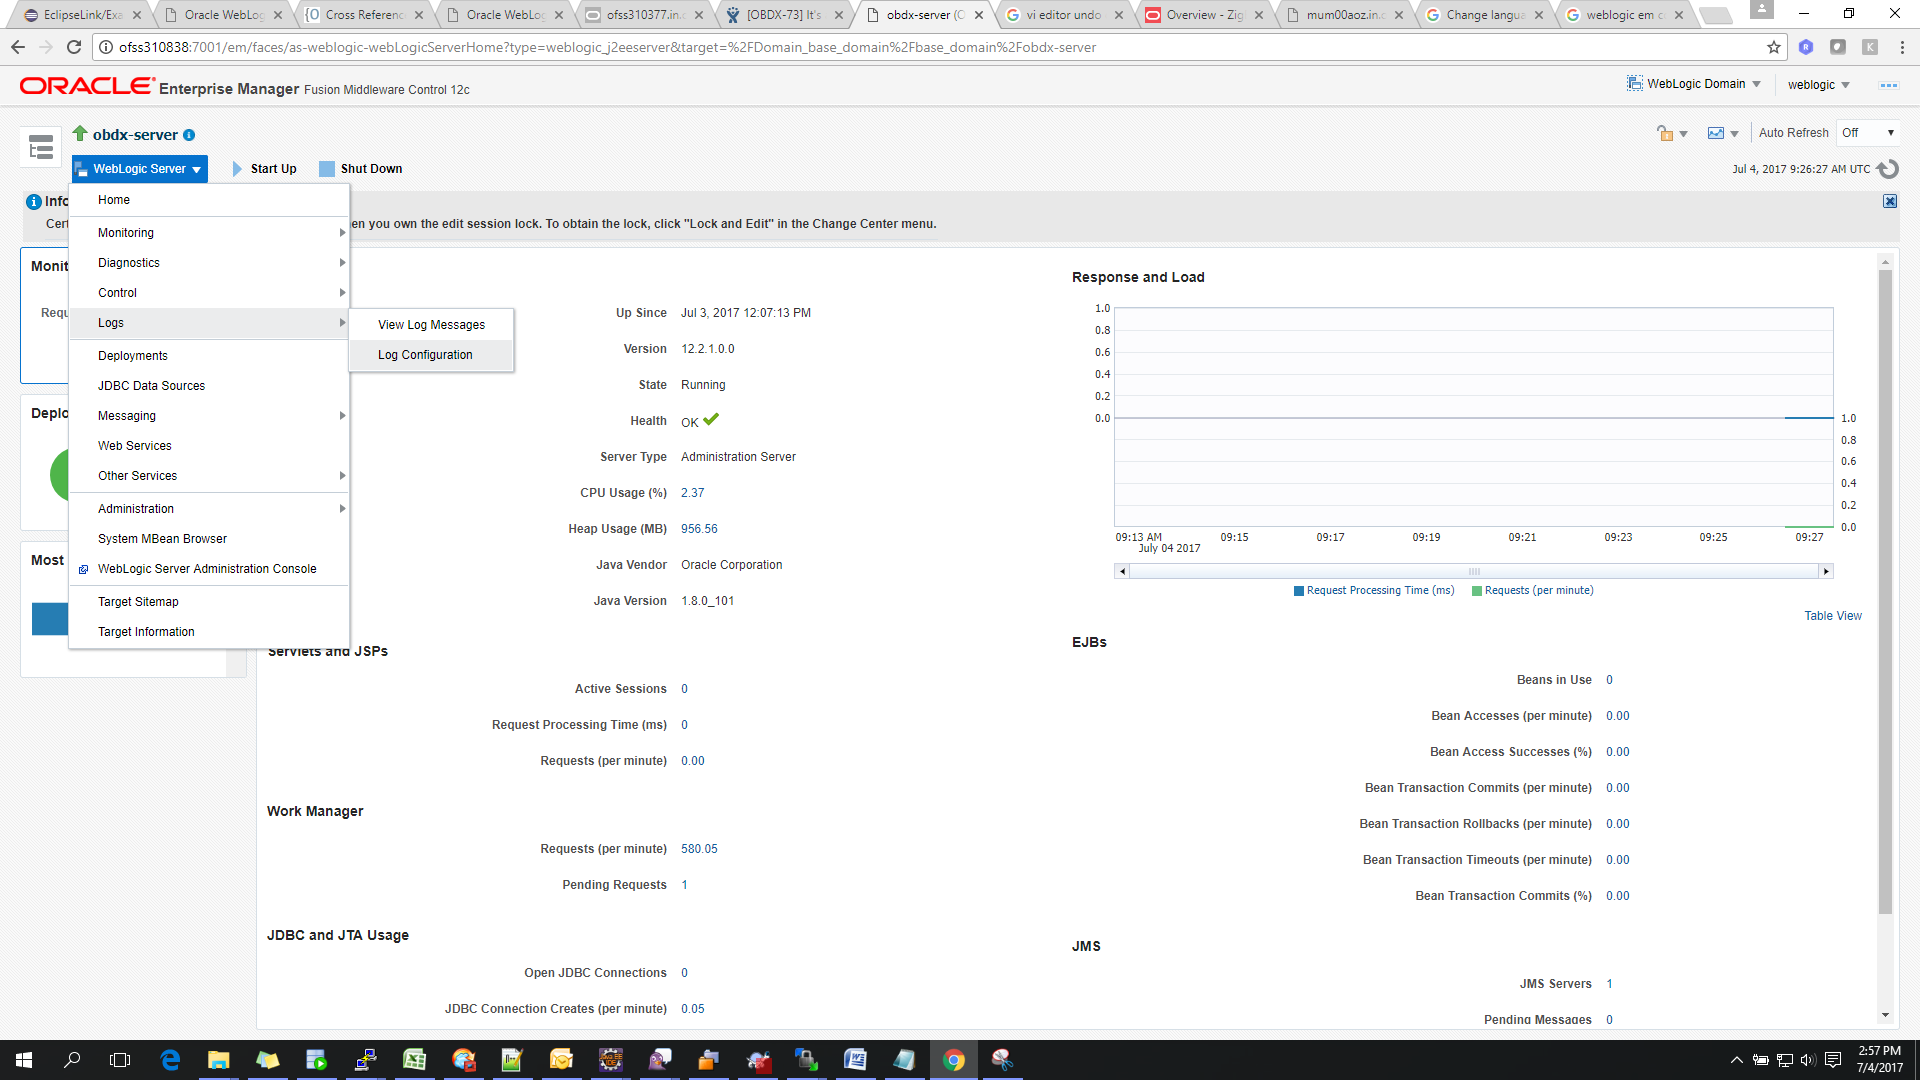
- In Weblogic Domain menu click on Logs -> Logs Configurations
- Select the logger and change the logging level and then click on apply.
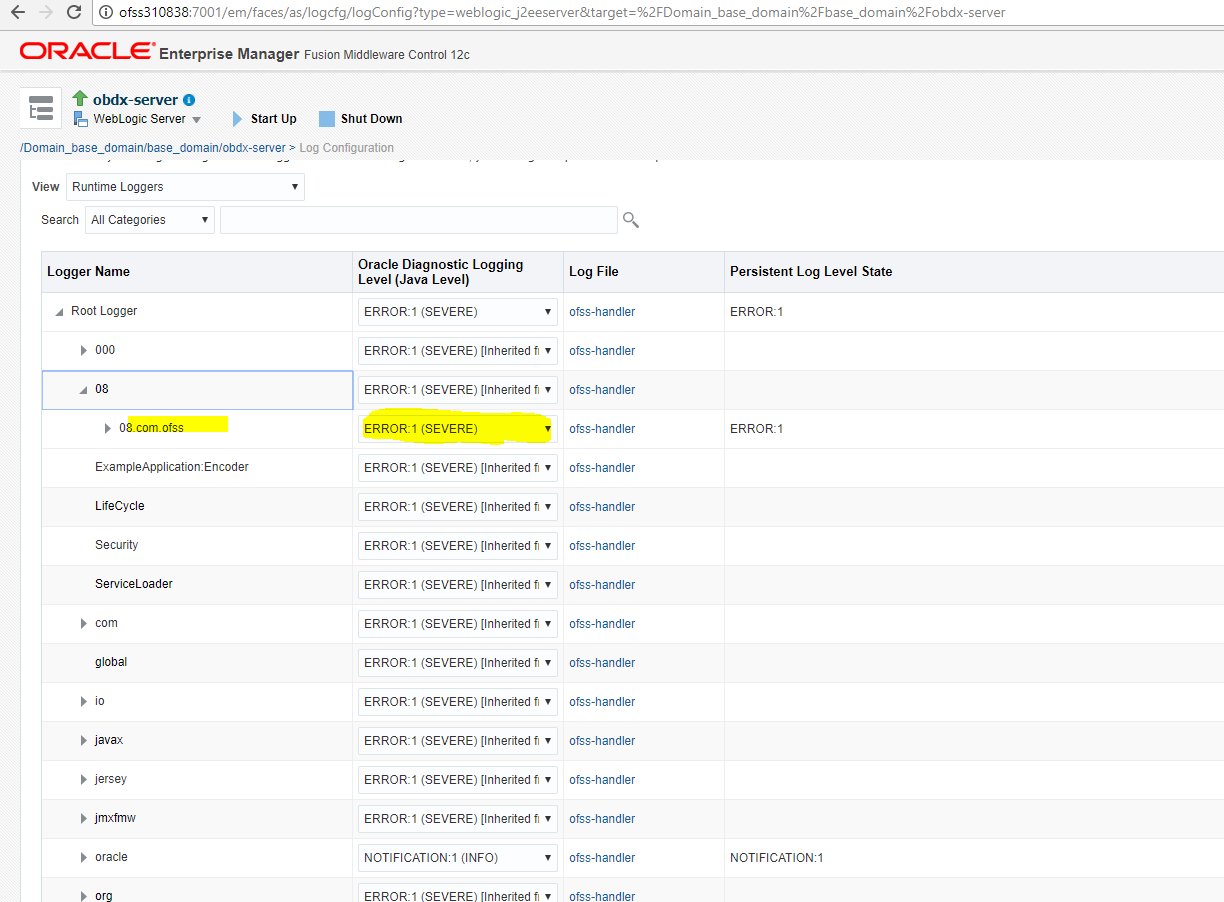
Note: Logger name should be defined in logging.xml.
Oracle FLEXCUBE Universal Banking (OBDX with UBS)
If during installer execution Oracle FLEXCUBE Universal Banking (OBDX with UBS) is selected, then below steps needs to be done manually.
Foreign Server
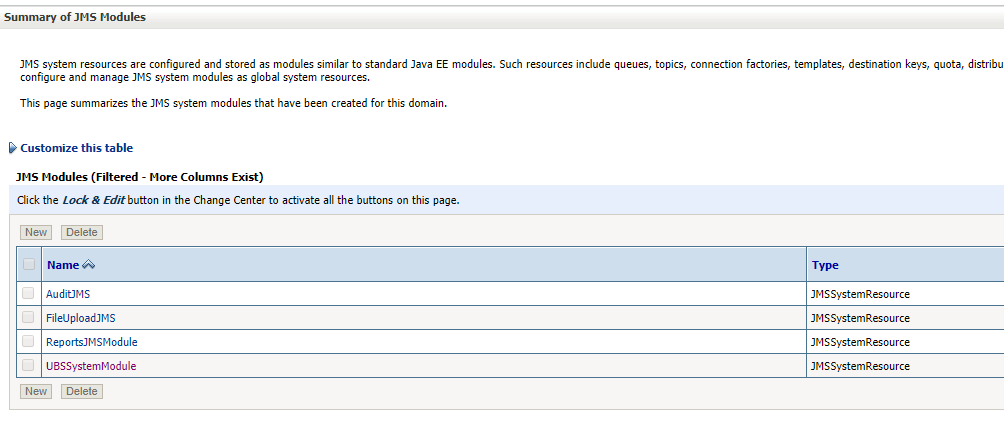
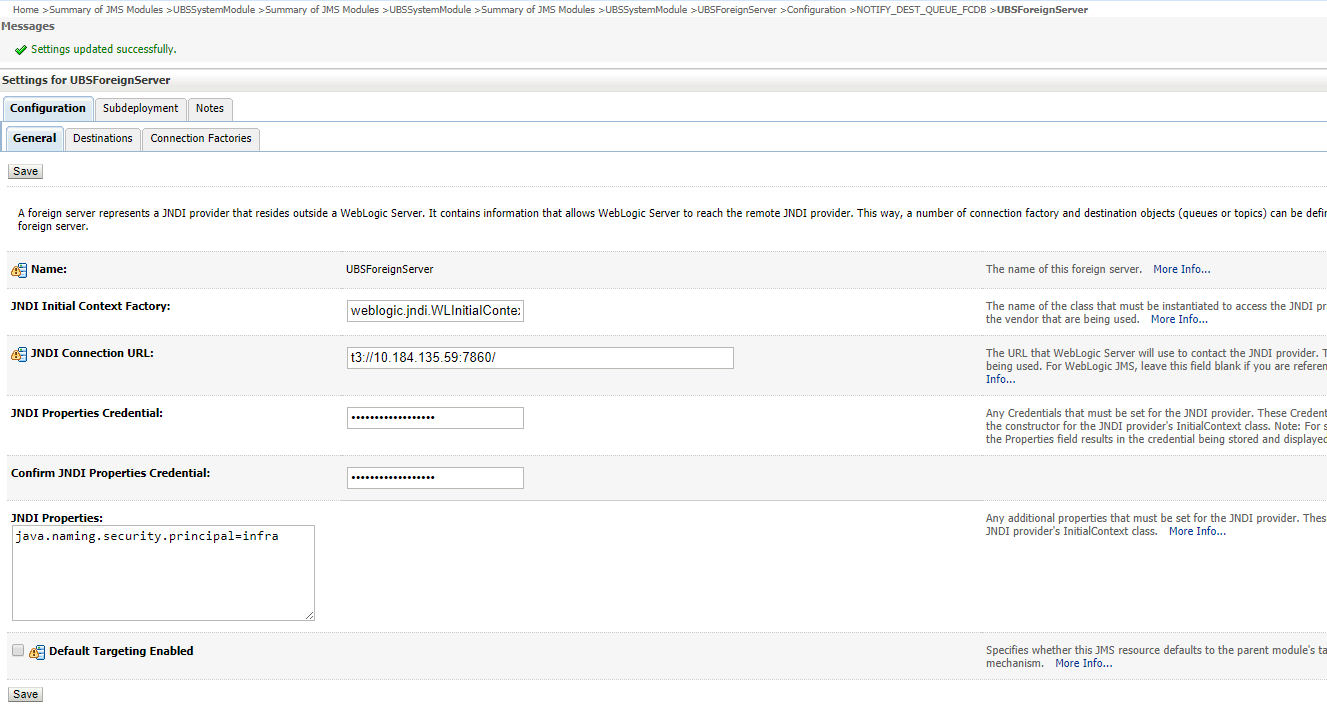
- Login into Weblogic Admin console (OBDX domain created using installer) and Browse to Summary of JMS Modules > UBSSystemModule (as shown below).

Click on UBSForeignServer
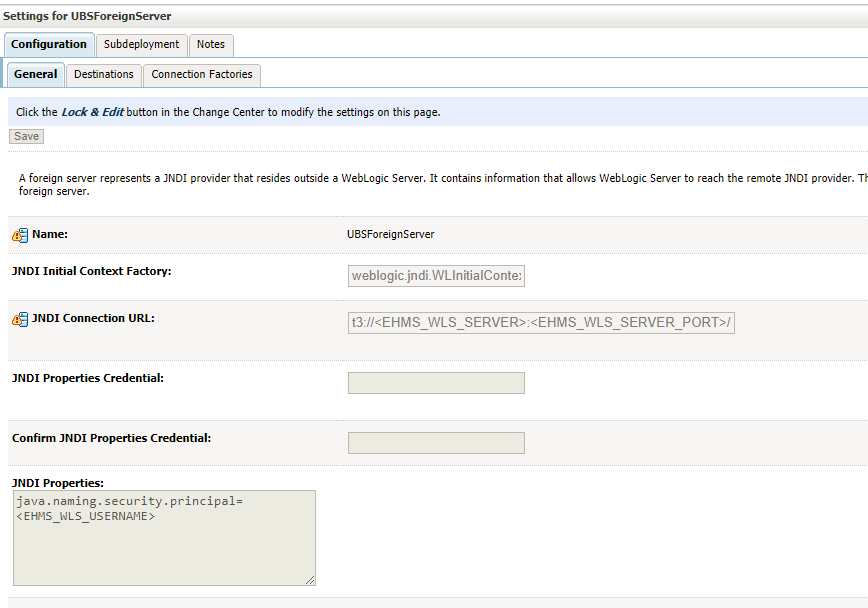
- Click on Lock & Edit.
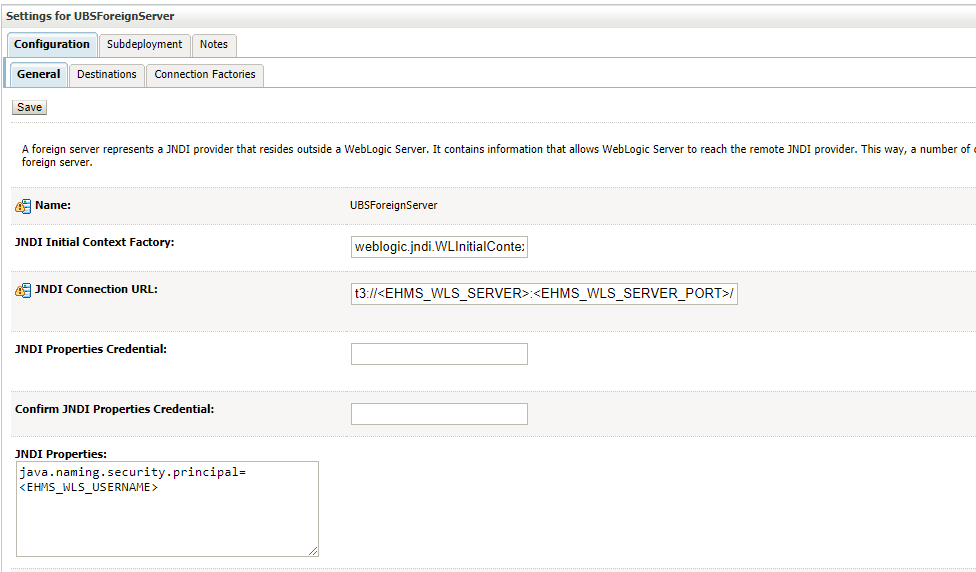
Set below configurations with:
JNDI Connection URL – Replace <EHMS_WLS_SERVER> with hostname or IP address of UBS HOST Weblogic server and <EHMS_WLS_SERVER_PORT> with port number of UBS HOST Weblogic Managed server (where NOTIFY_DEST_QUEUE and NOTIFY_DEST_QUEUE_FCDB are mapped).
JNDI Properties Credential – Password for username set in JNDI properties
Confirm JNDI Properties Credential – Confirm password for username set in JNDI properties
JNDI Properties – Value to be set as “java.naming.security.principal==<EHMS_WLS_USERNAME>”, where
username is the login user of UBS Weblogic Admin Console (user which created the primary local queues for UBS).
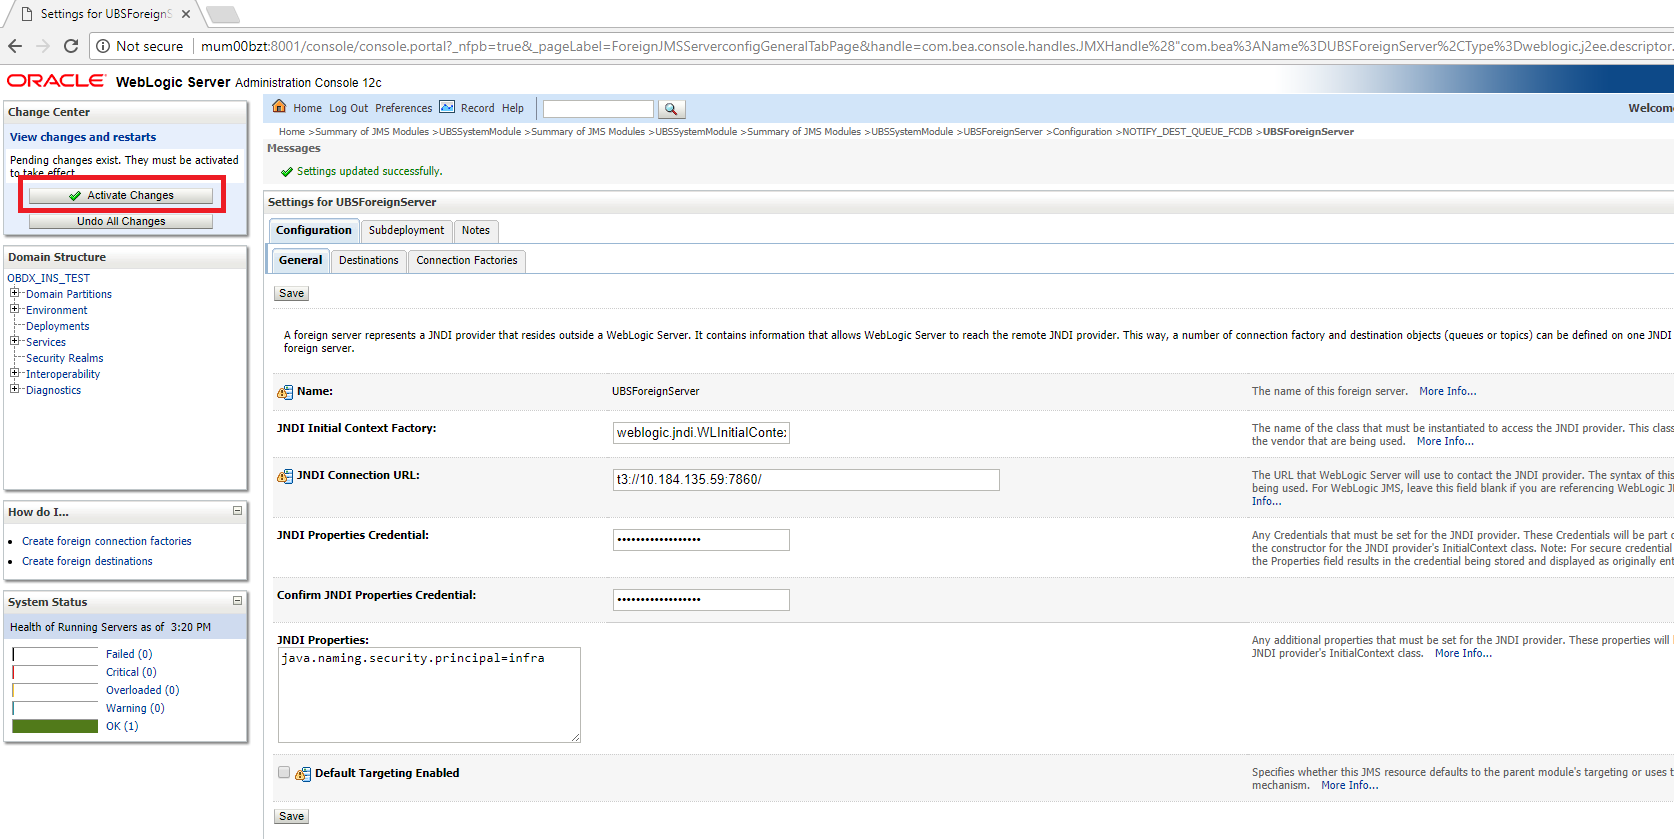
- Click on Save.
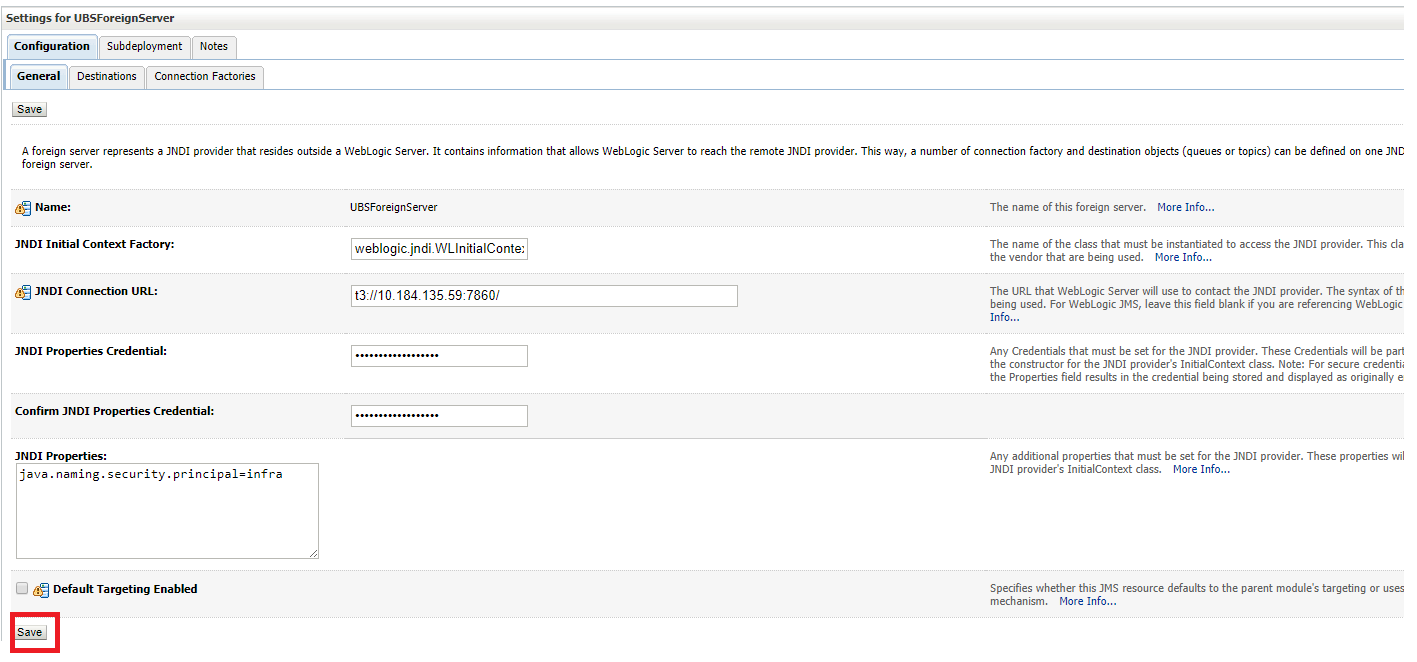
- Click on Activate Changes
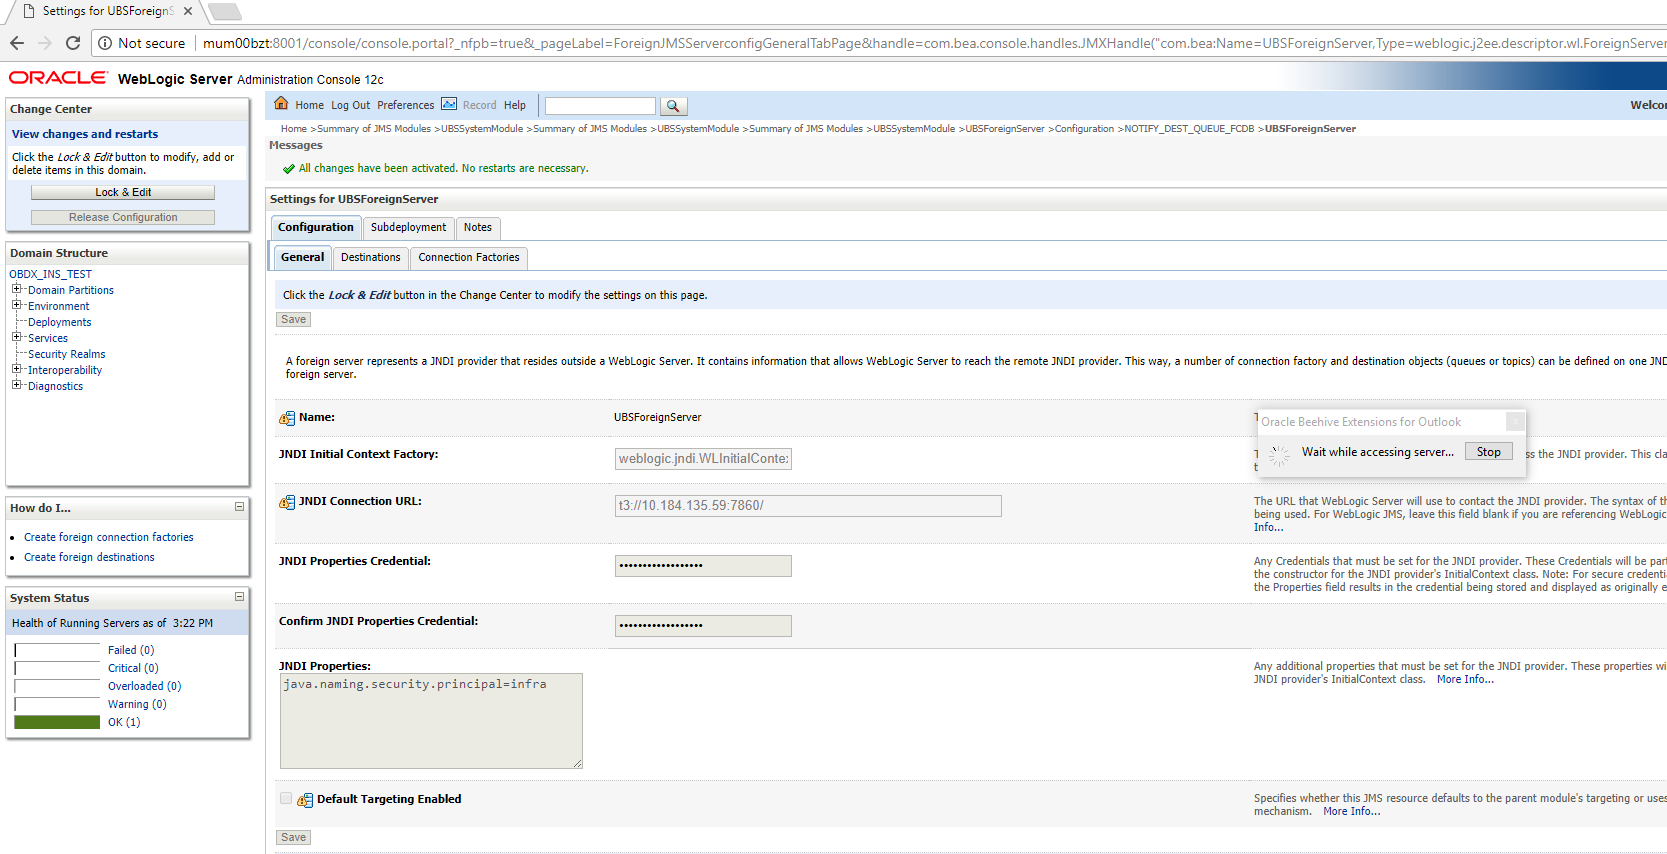
Deployment of notification MDB application
Before deployment of obdx.externalsystem.ubs.notification.mdb.ear application, kindly perform below steps:
- Open the obdx.externalsystem.ubs.notification.mdb.ear (EAR file is available <OBDX INSTALLER DIR>/installables/app/components/ubs/deploy/obdx.externalsystem.ubs.notification.mdb.ear) using any archiving tools (i.e.: 7-zip)
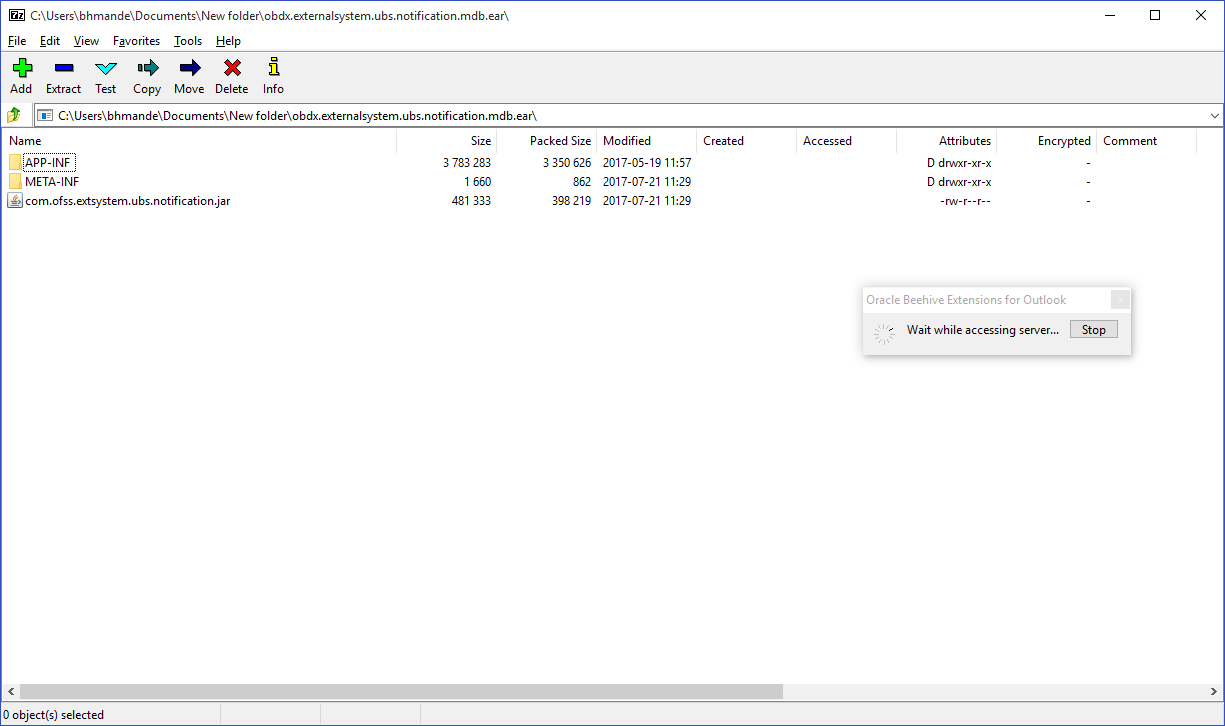
- Double click on com.ofss.extsystem.ubs.notification.jar
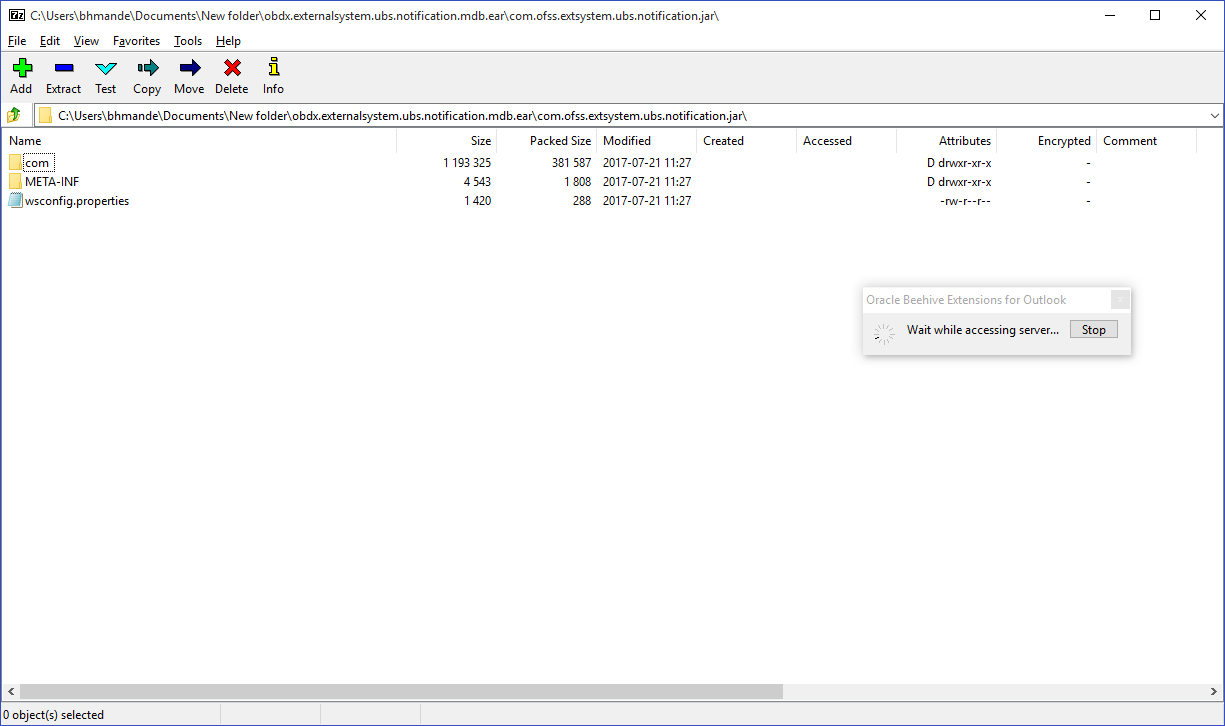
- Open the wsconfig.properties to edit.
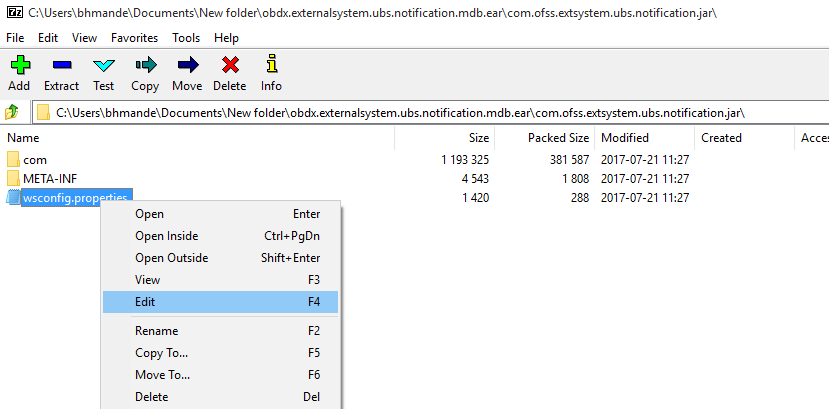

- Change the URL for AlertProcessorService.url,FileProcessedNotifProcessorService.url and AlertProcessorService.targetUnit(Note the hostname and port should be of OBDX managed server created by installer. Entity ID should be OBDX_BU for Base entity)


- Save changes.
- Click OK.
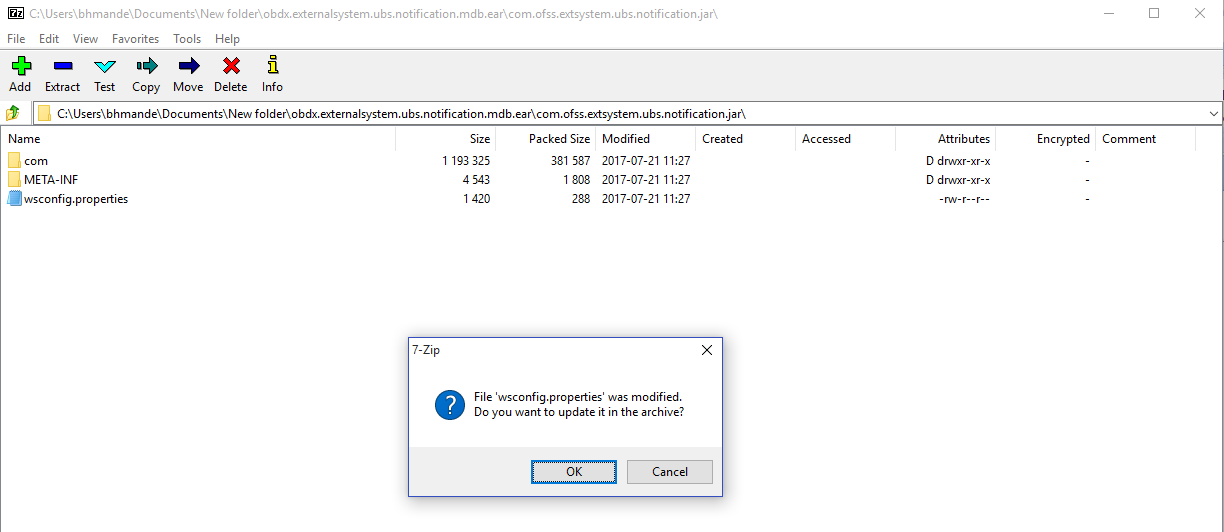
- Navigate back to obdx.externalsystem.ubs.notification.mdb.ear

- Click OK
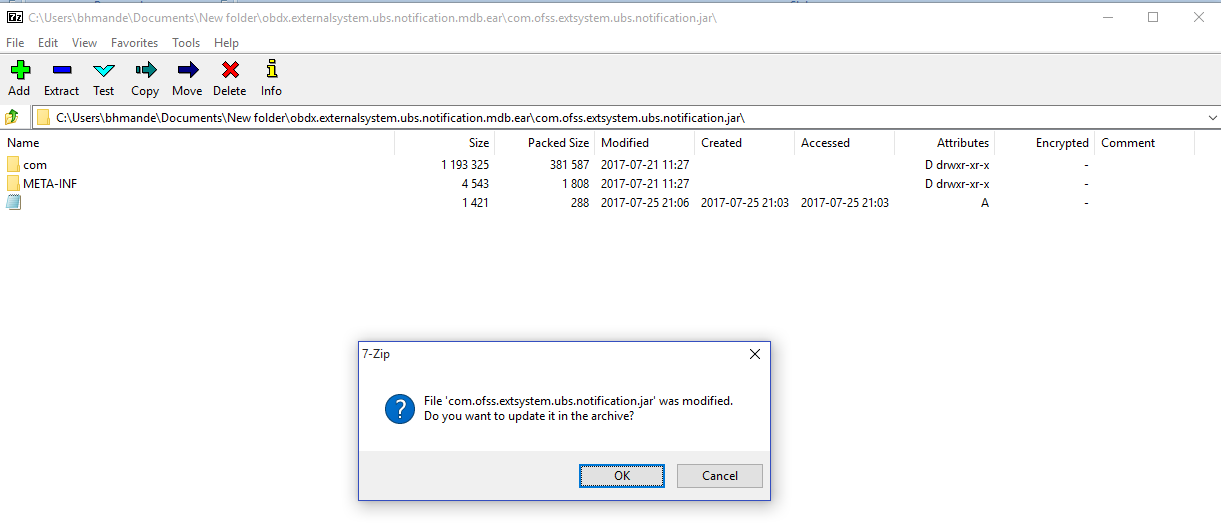
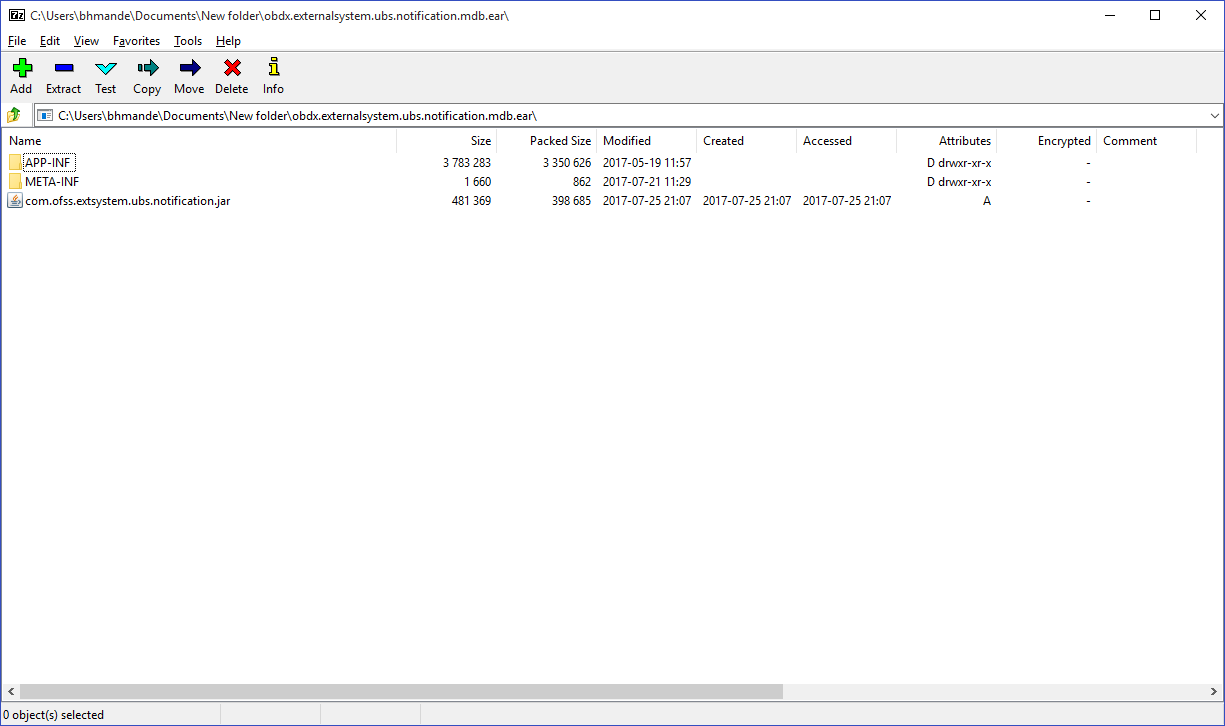
Deploy the updated obdx.externalsystem.ubs.notification.mdb.ear using below steps.
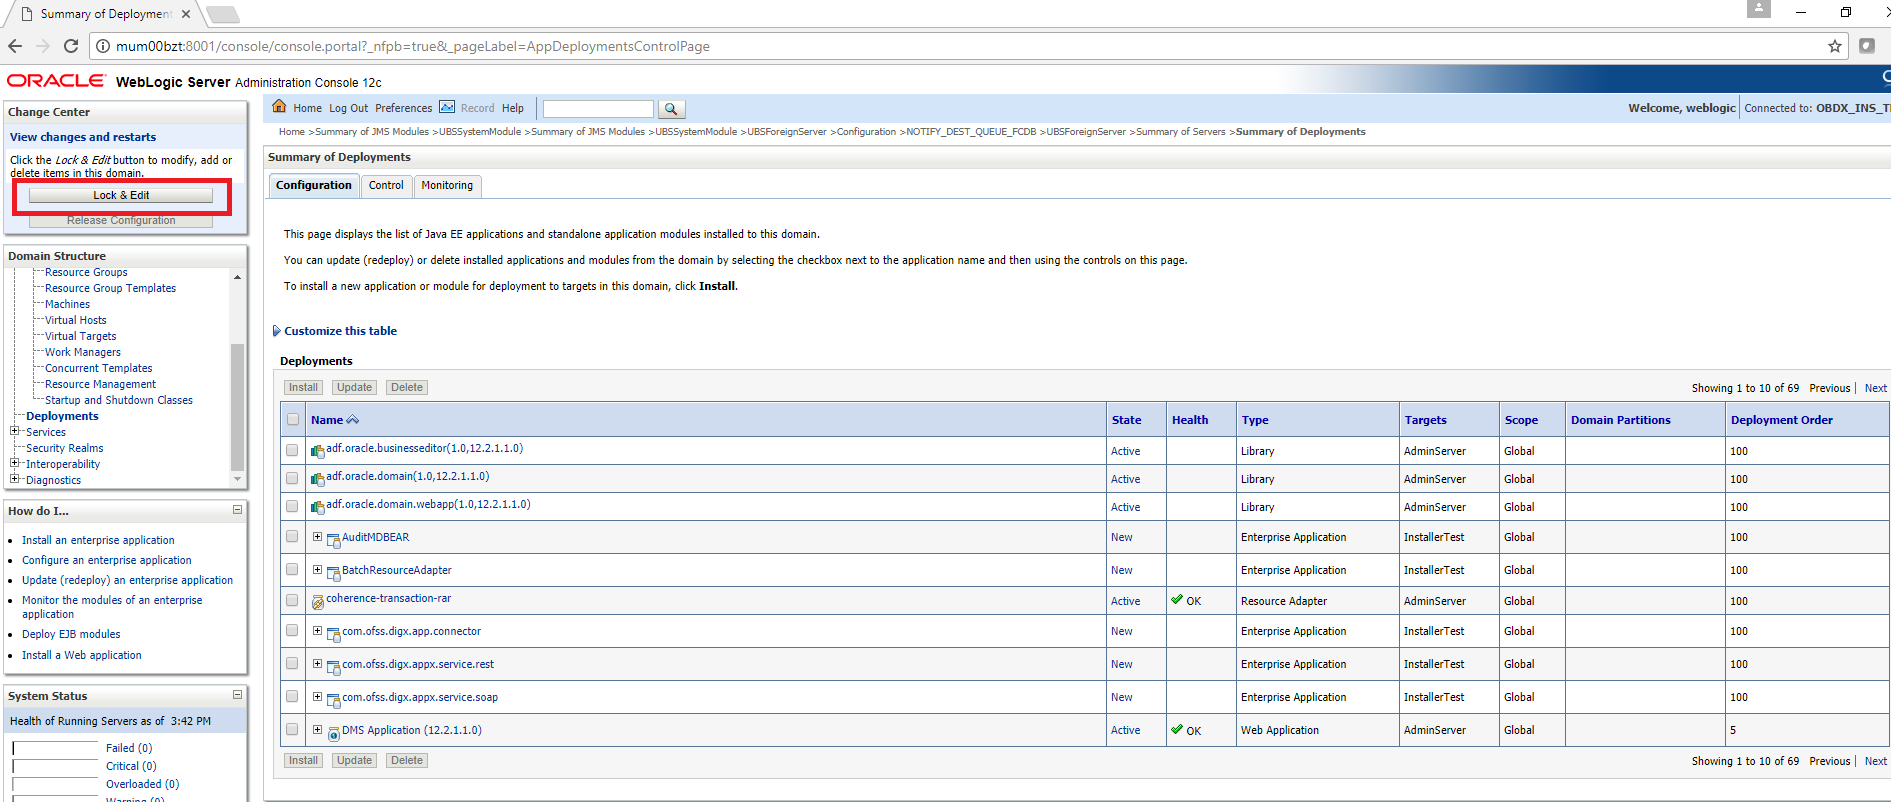
- Login into Weblogic Admin Console (OBDX domain created using installer) and navigate to Deployments.
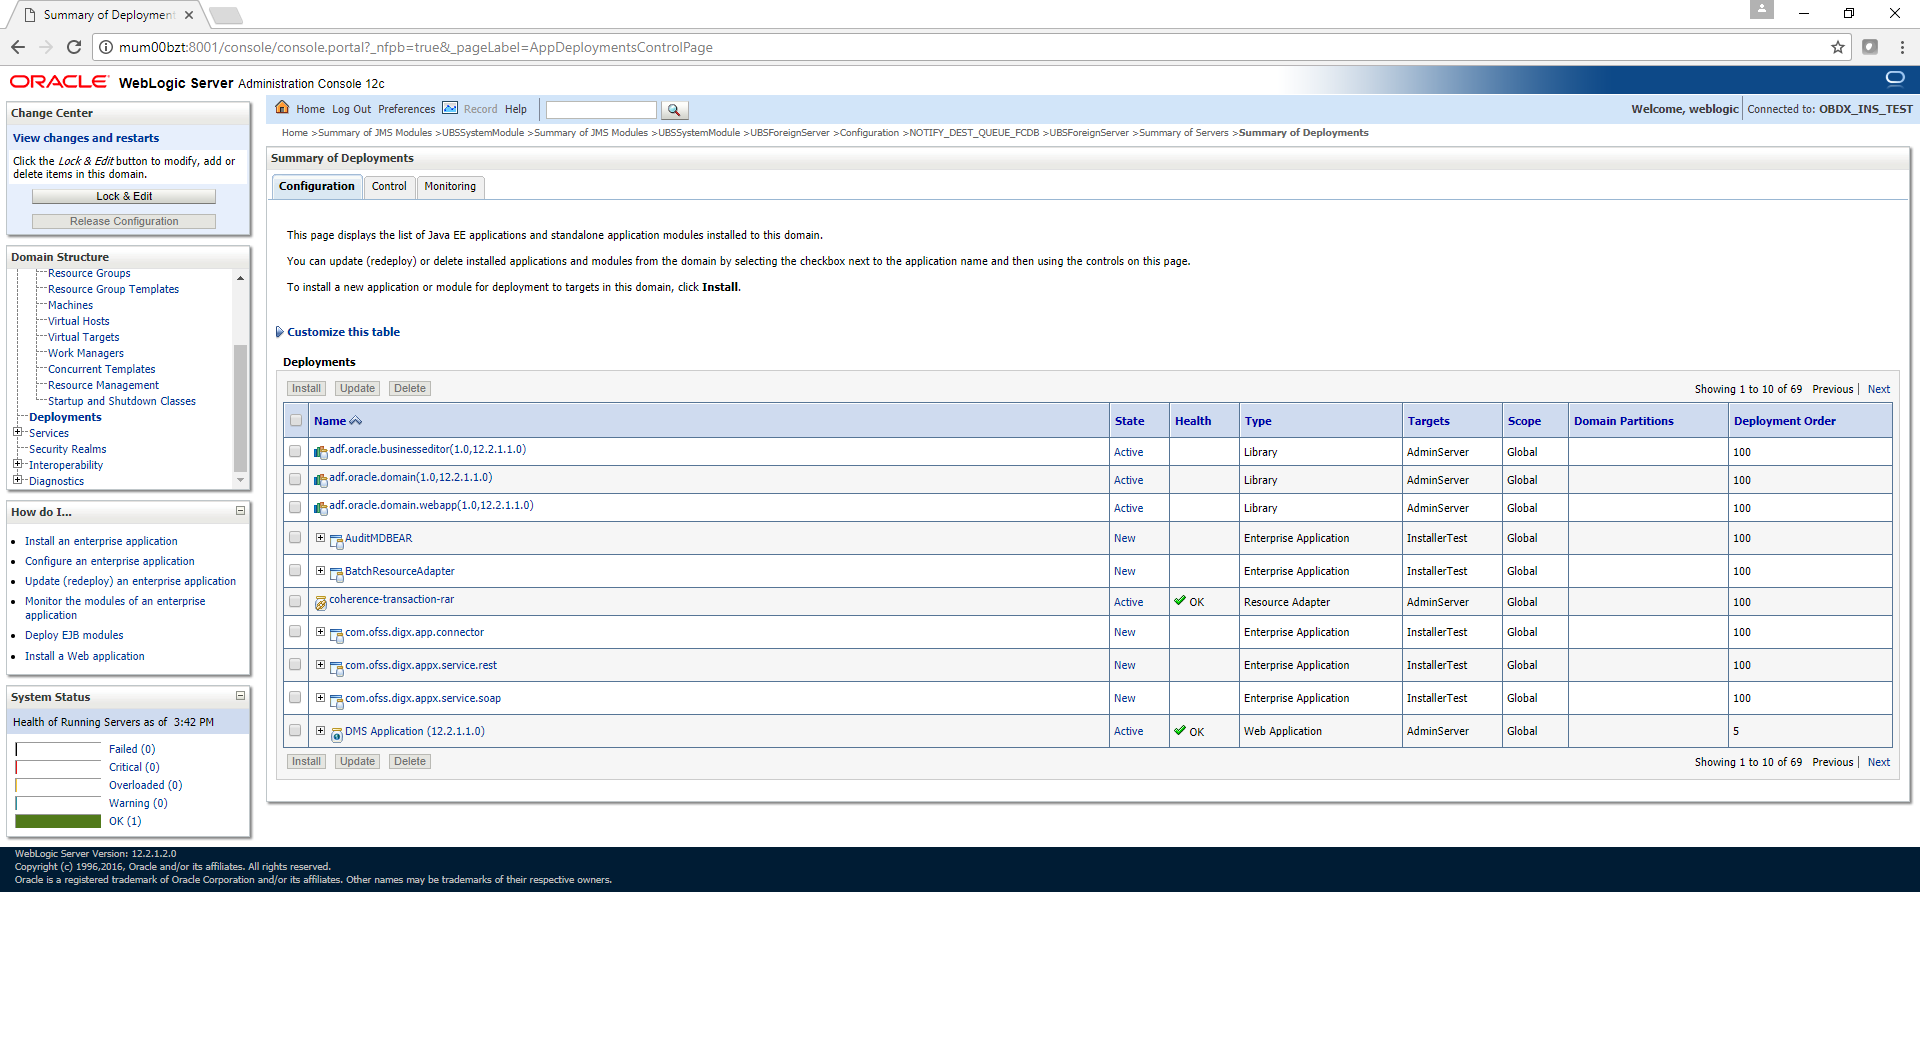
- Click Lock & Edit
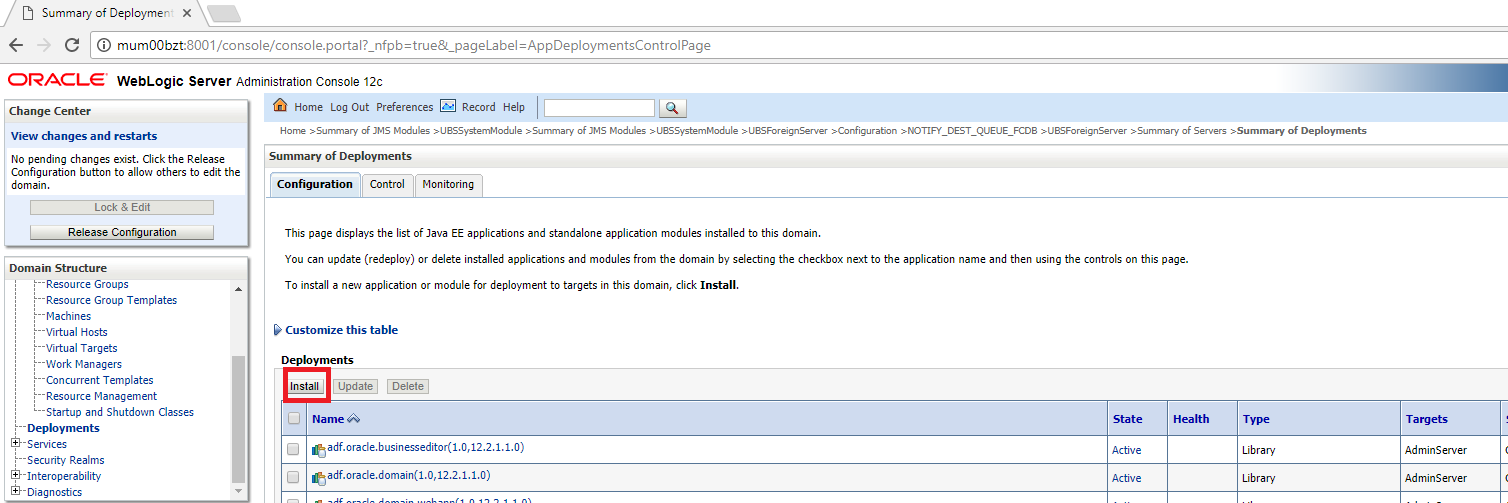
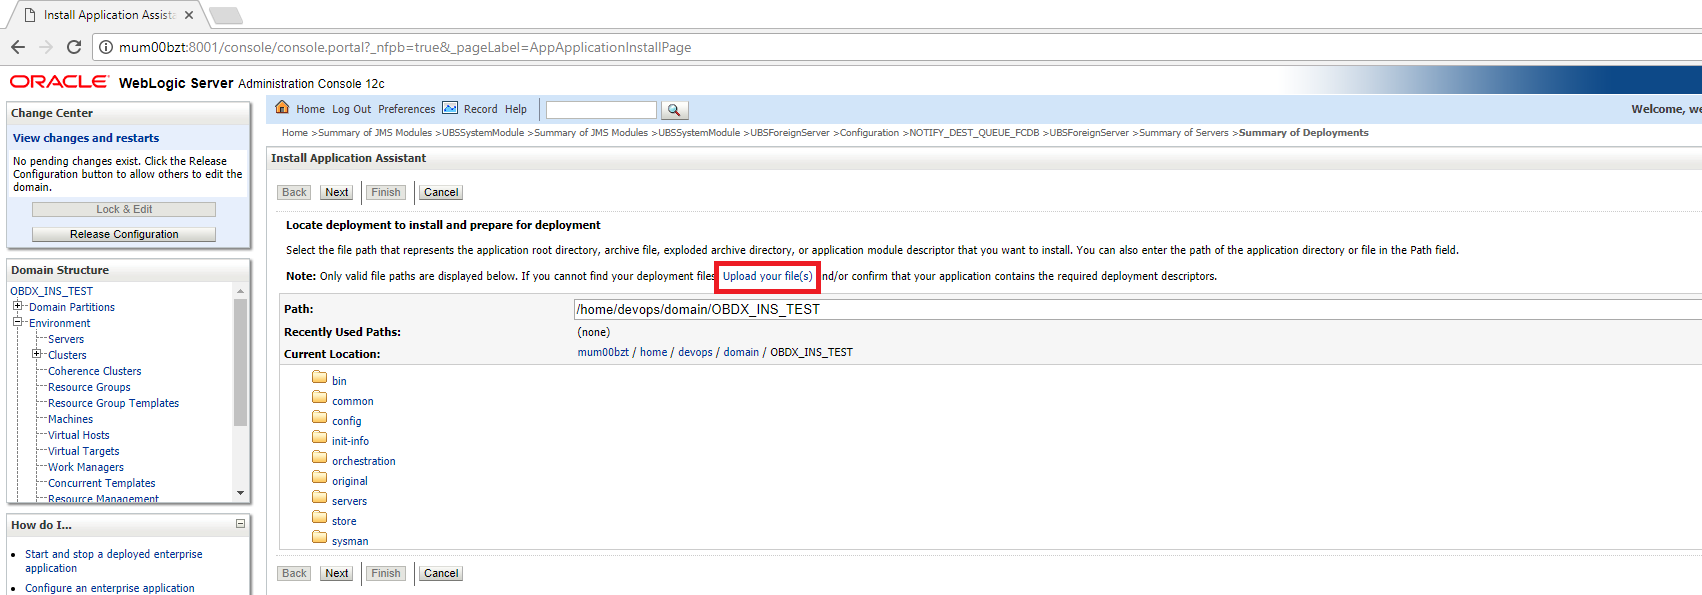
- Click on Install
- Click on Upload your file(s)
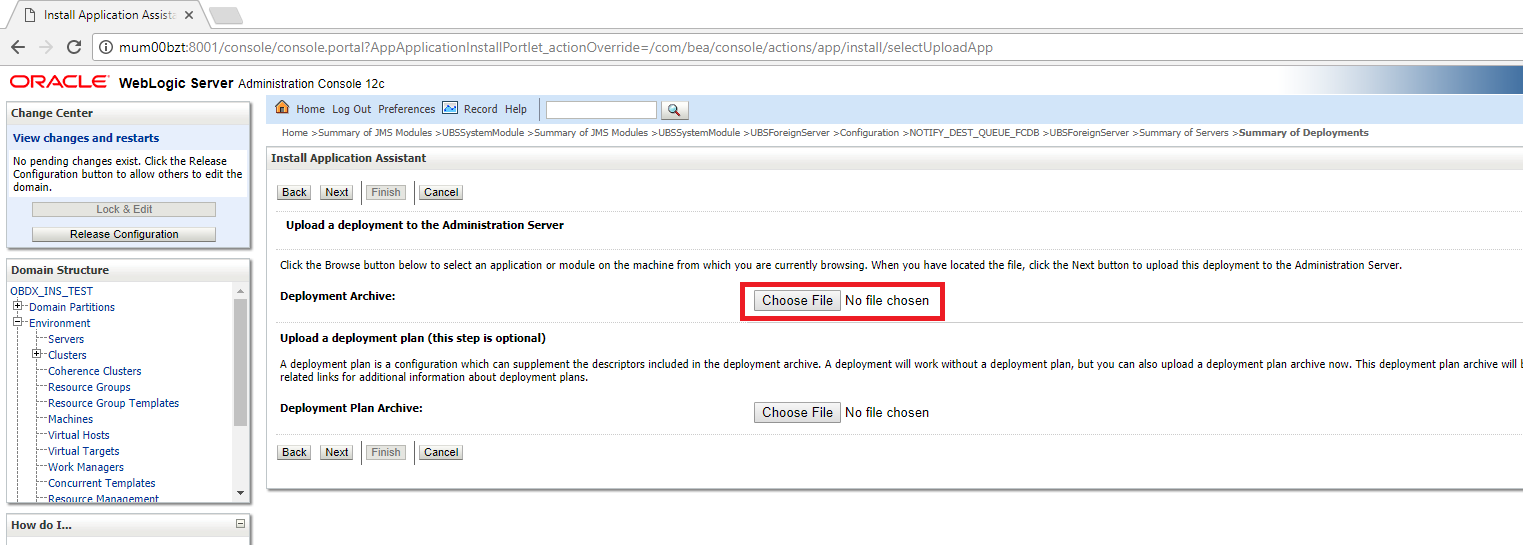
- Click on Choose File under Deployment Archive.
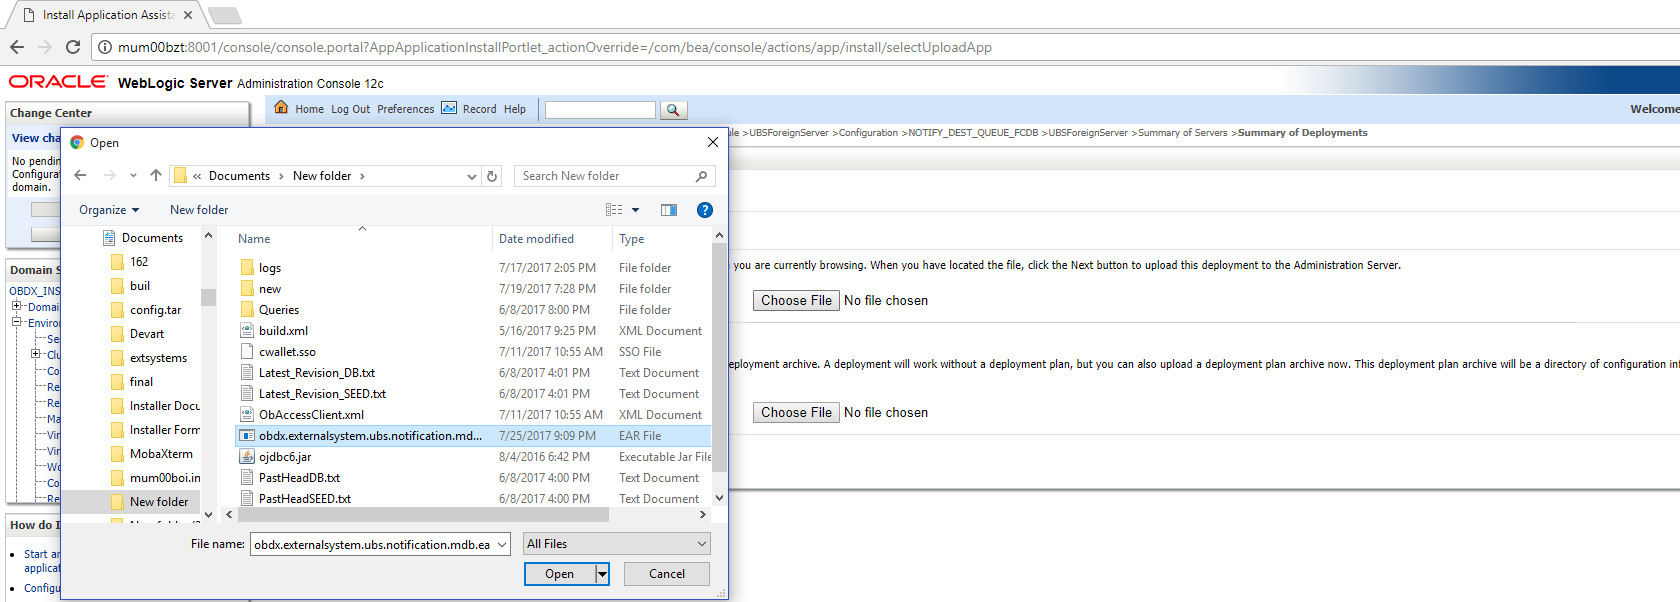
- Navigate to customized obdx.externalsystem.ubs.notification.mdb.ear and click Open
- Click Next

- Click Next

- Select “Install this deployment as an application” and click Next
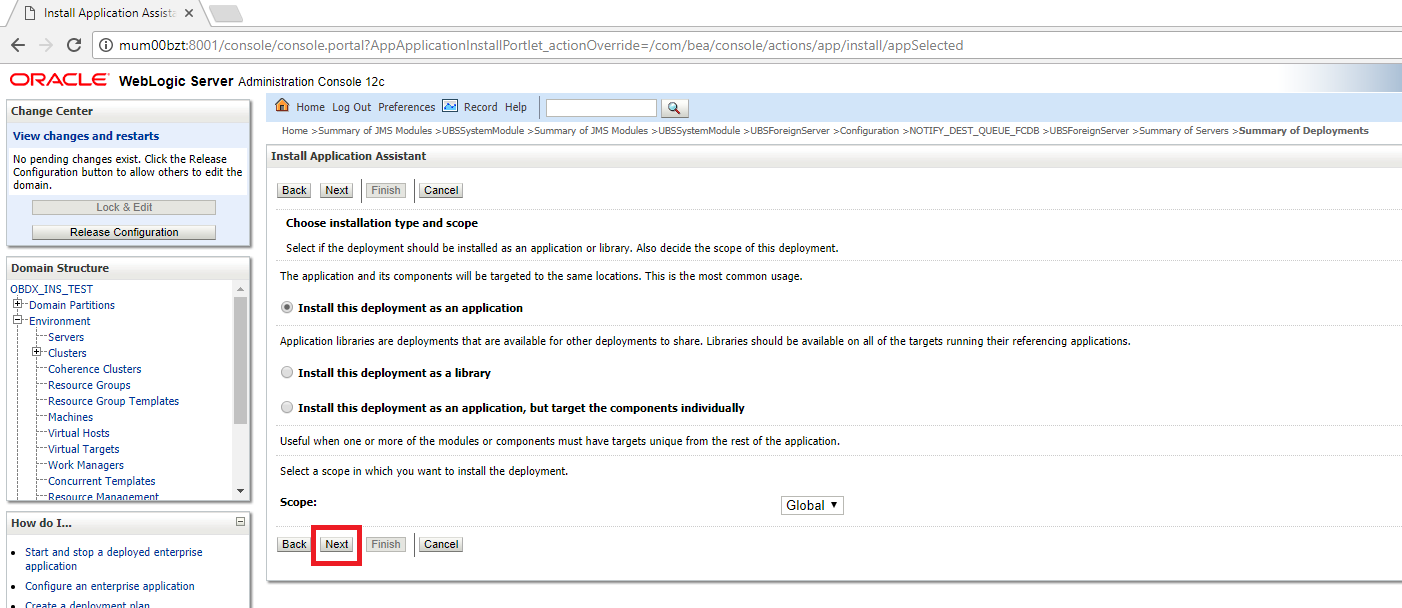
- Select Cluster as target and click Next
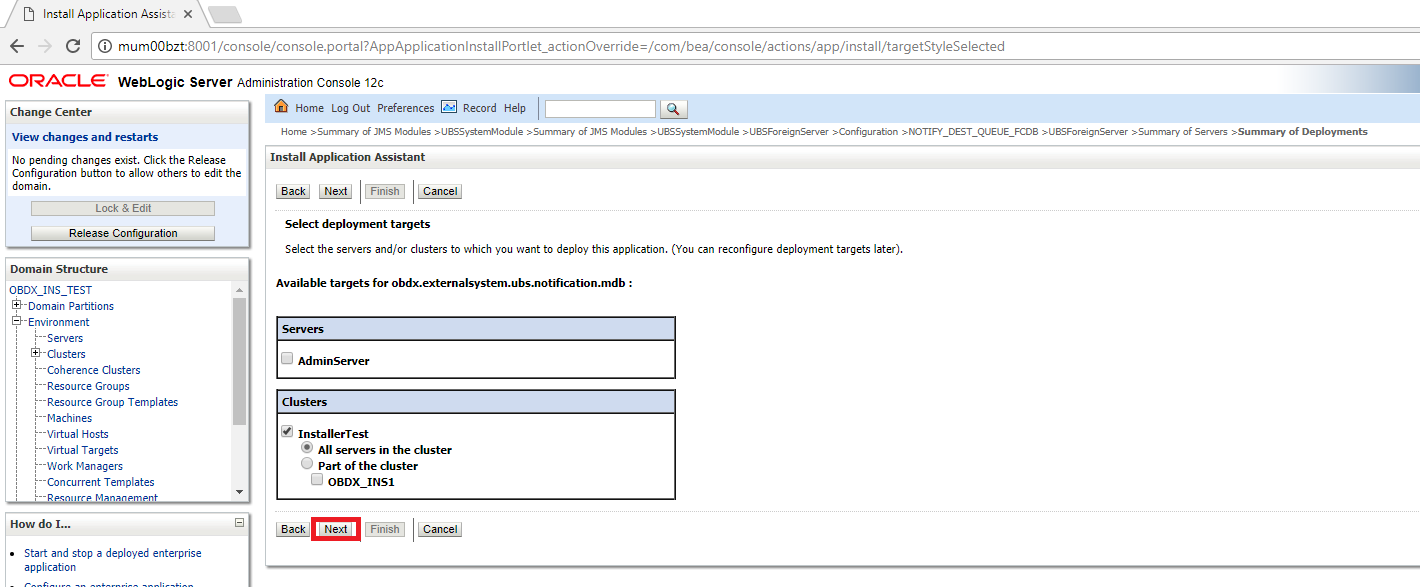
- Click Next
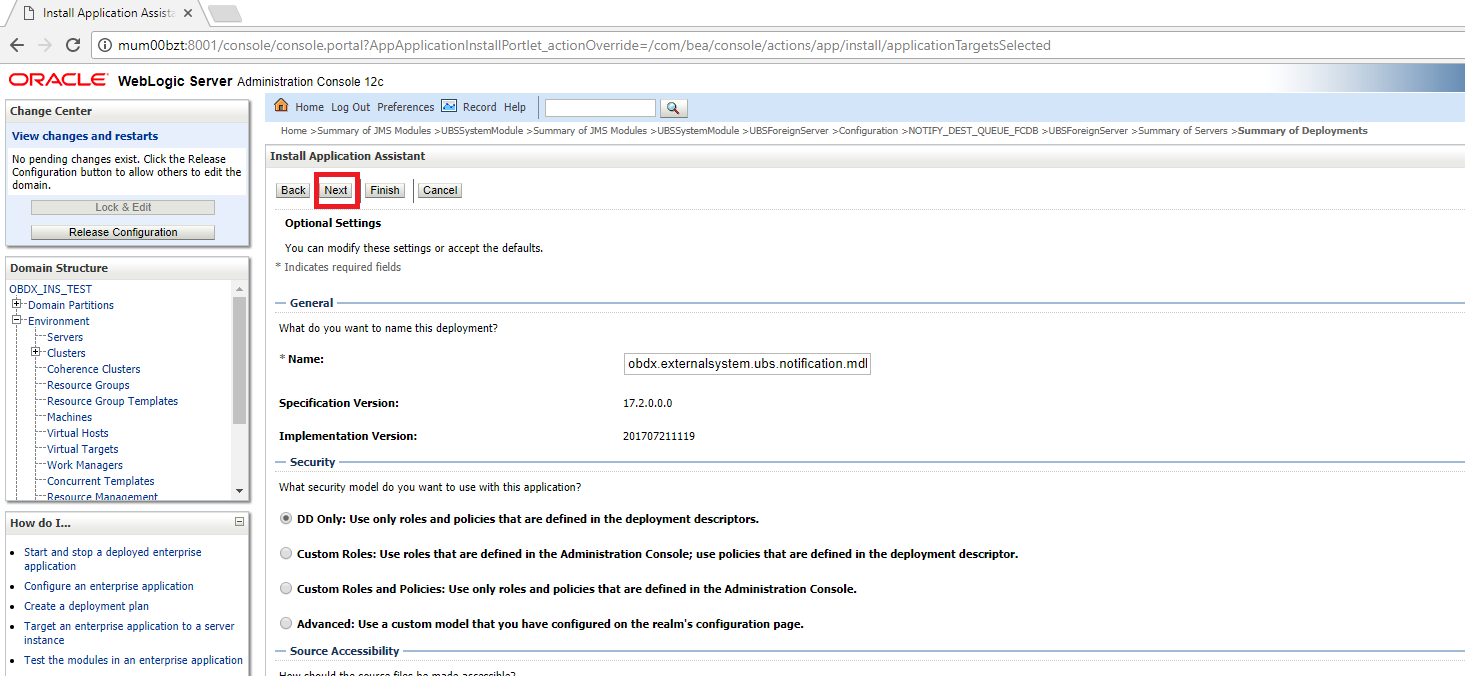
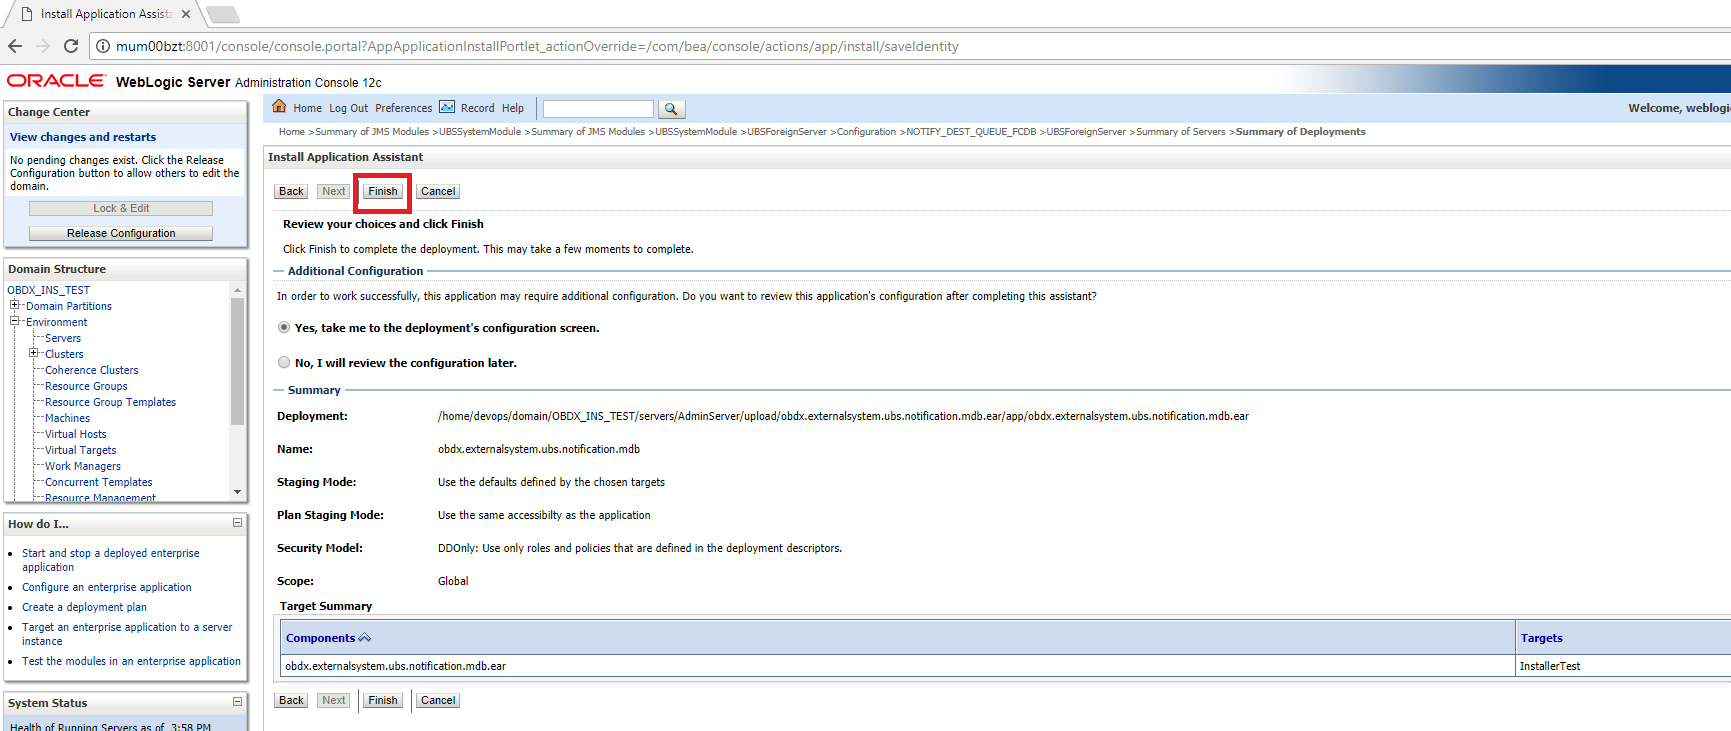
- Click Finish.
- Click Save.
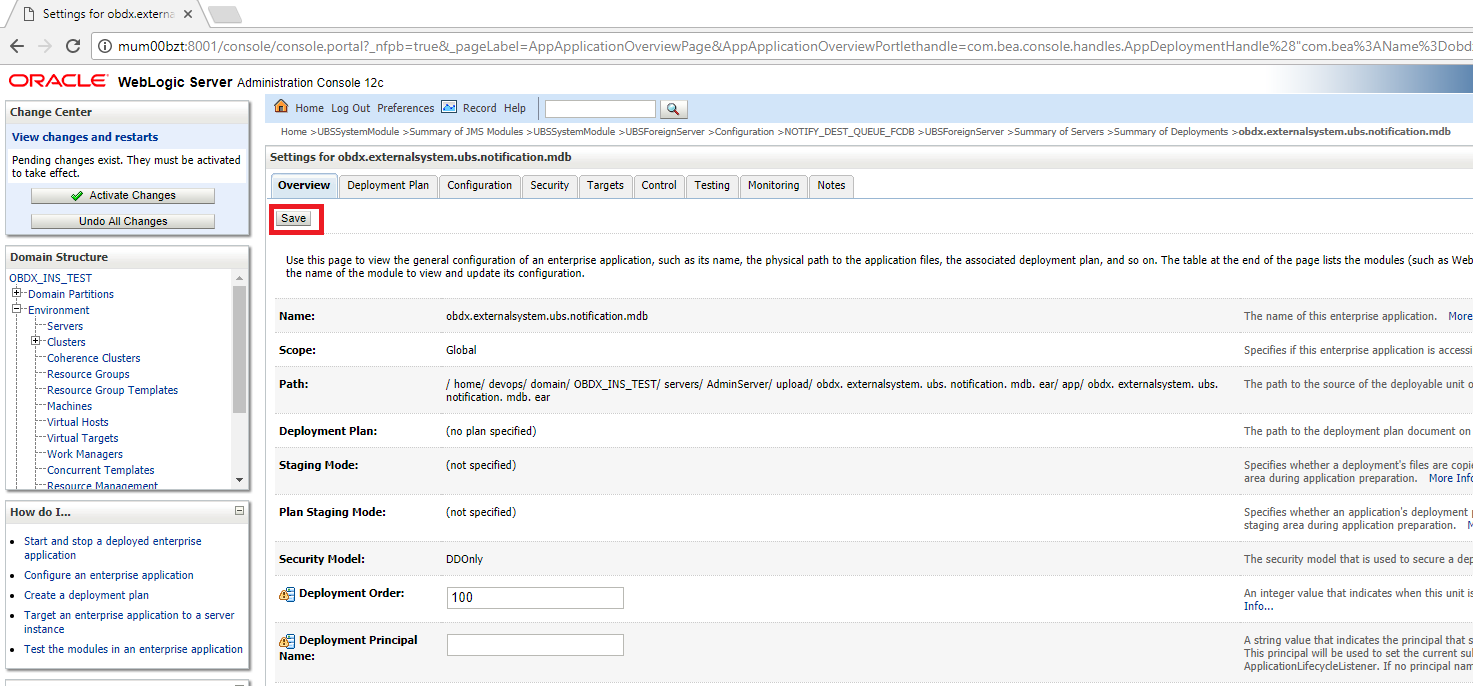
- Click Activate Changes
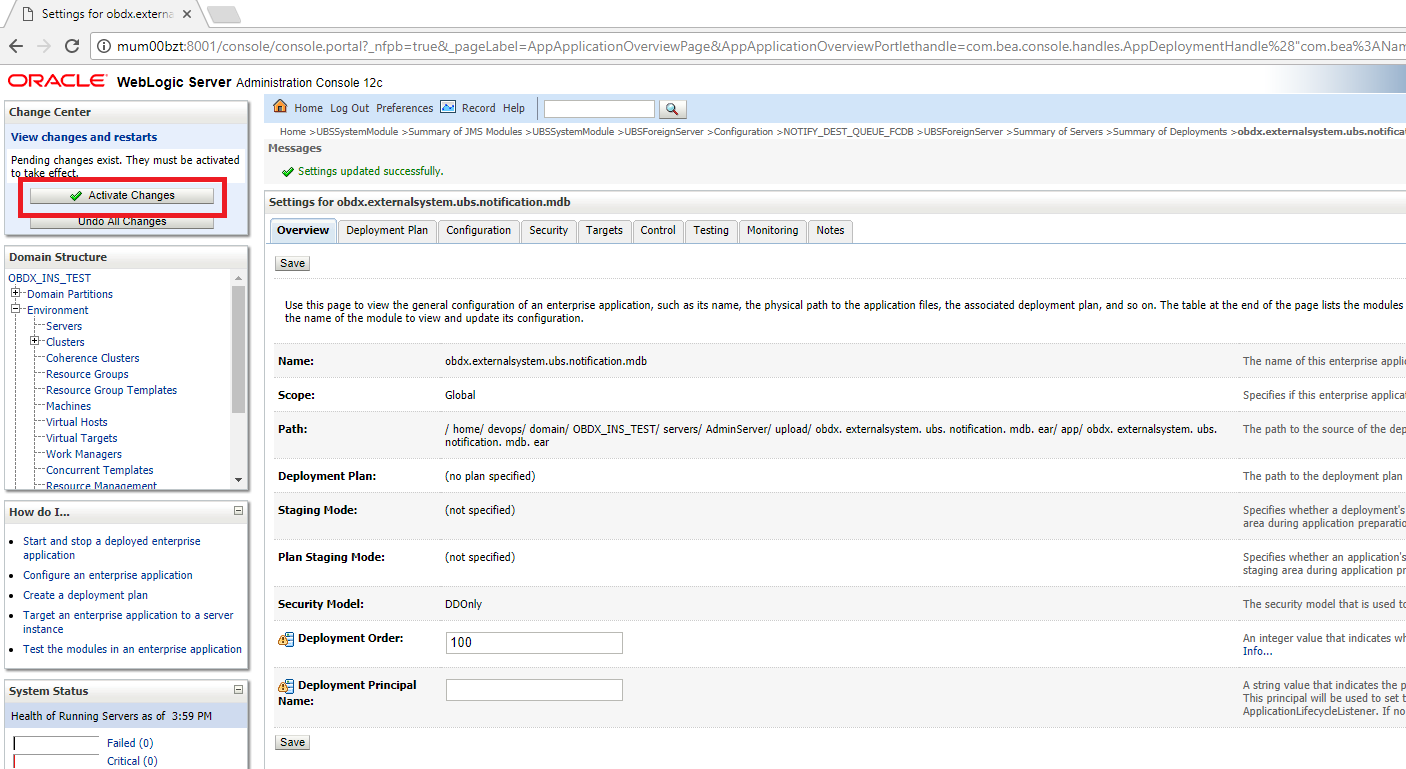
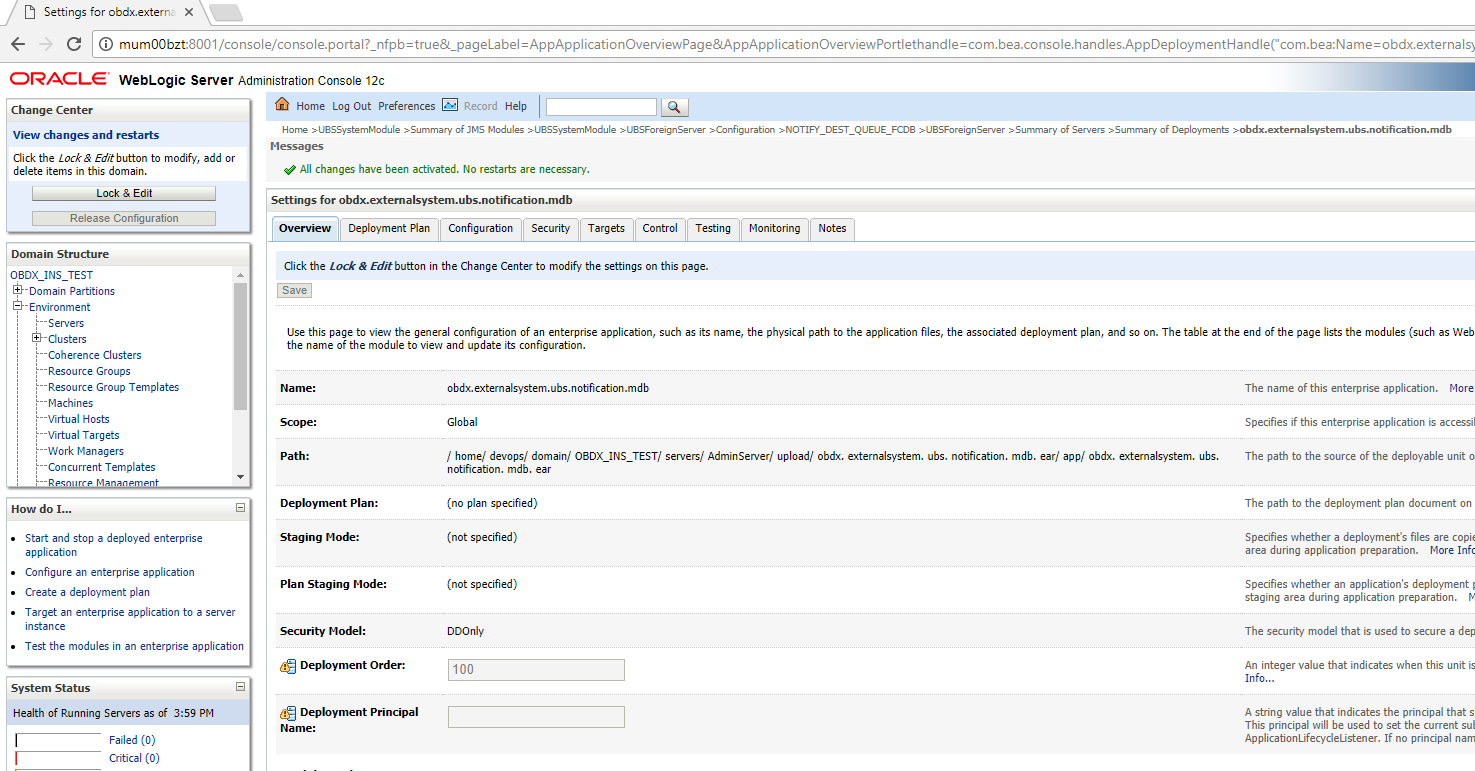
Oracle FLEXCUBE Universal Banking with Oracle Banking Payments (OBDX with OBPM)
If during installer execution Oracle FLEXCUBE Universal Banking with Oracle Banking Payments (OBDX with OBPM) is selected, then below steps needs to be done manually.
Foreign Server
- Login into Weblogic Admin console (OBDX domain created using installer) and Browse to Summary of JMS Modules > OBPMSystemModule > OBPMForeignServer (as shown below):
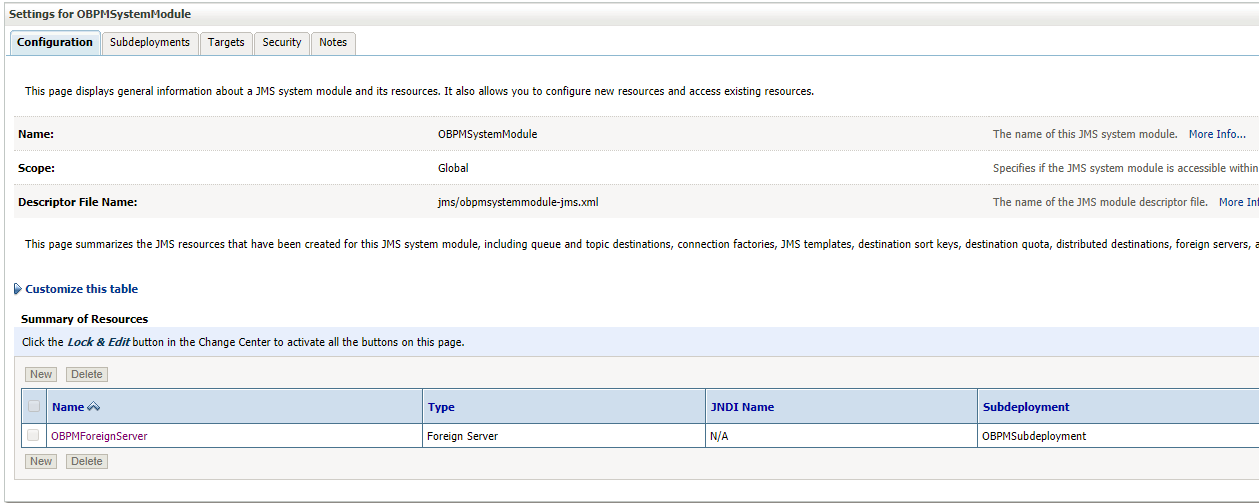
Refer to earlier steps mentioned for UBS HOST UBSForeignServer and make similar changes in OBPMForeignServer.
Deployment of notification MDB application
Before deployment of obdx.externalsystem.obpm.notification.mdb.ear application, make changes similar to obdx.externalsystem.ubs.notification.mdb.ear before deployment.
Fileupload with UBS
Refer below document for File upload configuration with UBS
Oracle Banking Digital Experience File Upload Report Configuration
Origination with UBS
Refer below document (section 5 and 6) for enabling Origination with UBS
Oracle Banking Digital Experience UBS Origination Setup and Configuration.docx
OBDX with OBP![]() Oracle Banking Platform Base (Installation with Oracle Banking Platform)
Oracle Banking Platform Base (Installation with Oracle Banking Platform)
Refer below document (section 5.2 OUD configurations in OBP) for User Authentication required for integration with OBP
Oracle Banking Digital Experience OBP Base Setup and Configuration
OBDX US LZN with OBP US LZN (Installation with Oracle Banking Platform US LZN)
Once OBP Base setup and configuration is complete, refer below document to apply LZN Installer required for integration with OBP 2.5.0.2 US LZN.
Oracle Banking Digital Experience OBP US LZN Setup and Configuration
OBDX with OFSLL (Installation with Oracle Services Lending and Leasing)
Refer below document for OFSLL Installer required for integration with OFSLL
Oracle Banking Digital Experience OFSLL Setup Configuration
OFSLL supports social media integration. Refer Oracle Banking Digital Experience Origination Social Media Integration document.
OHS
OHS server needs to be configured for all FLAVOR’s as a mandatory activity.
To configure OHS server follow steps mentioned in below document before proceeding further.
Oracle Banking Digital Experience OHS User Interface Configuration.
