OBDX UI Extensions Configurations Guide
This document includes following topics:
- OBDX Component Extension
- Segment & JSON context Extension
- OBDX Validation Extension
- Calling Custom REST Services
1. OBDX Component Extension
This documentation will guide you on how to override existing OBDX components
Pre-requisites
- To override existing component you need following artifacts
- ViewModel
- Html
- Model (optional)
- Resource bundle
- Partial (optional)
- Every extensible component must have module name and unique component name within its module.
Steps
- If you want to add new component place that component in <CHANNEL_ROOT_PATH>/extensions/components. It follow the same structure which is present in components folder. Same thing is applicable for the existing components. If you want to change anything then copy that component and place it in extensions/components folder with the same structure.
- If resource bundle needs to be changed for corresponding component then place related resource bundle in <CHANNEL_ROOT_PATH>/extensions/resources location. Structure remain same for <CHANNEL_ROOT_PATH>/resources and <CHANNEL_ROOT_PATH>/extensions/resources folder.
- You need to make entry of your component and partial in <CHANNEL_ROOT_PATH>/extensions/extension.json file
This entry is in two parts.
- Add entry of your component, in array, named as components “{moduleName}/{componentName}”
- If your component requires partial then add its name, in array, named as partials. “folder-name/file-name”
Sample extension.json
{
"components": ["loans/loan-calculations"], "partials": [“account-access/casa-account-access”]
}
2. Segment & JSON context Extension
- For every application you can override following two properties
- User Type: Type of user
- Context: folder location from which json will be picked
To evaluate this two parameters there are respective functions in <CHANNEL_ROOT_PATH>/extensions/override/extensions.js file
evaluateUserType function,
Arguments ( roles: [], defaultSegment : String )
roles[] (array) will contain all the roles mapped to the user defaultSegment (string) will contain system evaluated default segment
Return Value
(String,), Should return string representing what is the segment for respective component (possible values: ANON | CORPADMIN | RETAIL | CORP | ADMIN)
Description
If you want to change user type for your application, you can do so by implementing this function and return required user type for your application.
evaluateContext function,
Arguments
( segment , roles ) roles[] (array) will contain all the roles mapped to the user segment (string) will contain evaluated user segment
Return Value
(String) Should return string representing what is the context for respective component (Possible values: index | retail | corporate | admin | corp-admin or any custom value)
Description
This function will set context for your components to fetch json artifacts from correct folder. Return possible value and then json will be fetch from respective location. Using this you can specify menu for your context.
Note:
• Core functionality of Framework Elements like (header, dashboard, menu etc.) are not available for the modification. You can customize menu options.
• If any component is present in <CHANNEL_ROOT_PATH>/extensions/components will take precedence over the <CHANNEL_ROOT_PATH>/components.
• All components available under component folder are available for the extension
• If menu.json is to be changed and other are not changed, irrespective of the change, all files/folders within the base role, for example json/retail need to be copied for new role even if one file is changed. This is because when you change the context, using evaluateContext function above, the root for JSON lookup changes, that is why all the JSON files are then looked up from whatever value is being returned from the evaluateContext method. So, all the JSON files need to be present in new directory.
How to create/modify menu.json for new Context
Basic structure of your menu.json file should be as follows
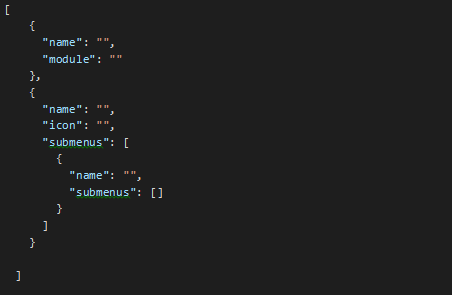
All your entries will go in array named as “default”
There are two types of entries
- Single Menu Option
- Nested Menu Option
- Single Menu Option
Here you can specify following options
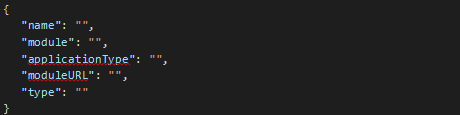
| name | name of the component you want to load |
|---|---|
| module | module name of the component |
Note: Also add component specific configurations wherever required. Please refer out of the box “menu.json” for each segment. For example below entries are required for some specific components only.
| applicationType (optional) | it is component specific configuration |
|---|---|
| moduleURL (optional) | it is component specific configuration |
| type (optional) | it is component specific configuration |
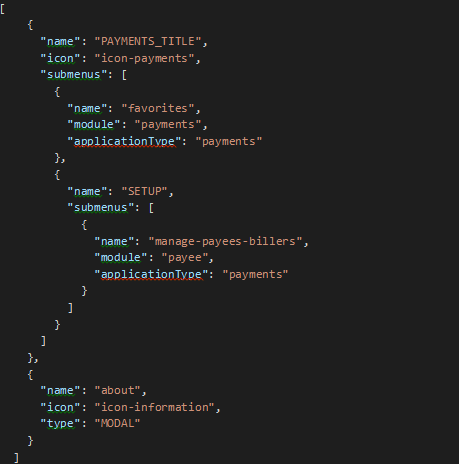
- Nested Menu Option
This option you can use to group related menus together.
Following JSON denotes 1 menu group

In above JSON name is, key in resource bundle icon is,
name of icon from OBDX font. This icon will be the icon you want along with the name.
submenus [] will contain entries same as entry you will do for Single menu option
Sample menu.json
3. OBDX Validation Extension
All the validation available in the application are maintained in <CHANNEL_ROOT_PATH>/framework/js/base-models/validations/obdx-locale.js. Implementer can override and add new validations in the application without changing this file.
An extension hook is given at
For OBDX 18.1 at <CHANNEL_ROOT_PATH>/extensions/validations/obdx-locale.js
From OBDX 18.2 onwards <CHANNEL_ROOT_PATH>extensions\override\obdx-locale.js
In this file Implementer can add or override validations.
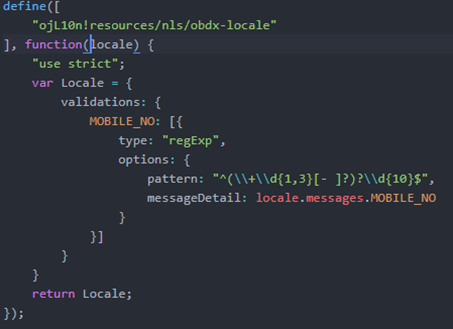
For Example: If you need to change the pattern which validate Mobile Number. Add updated pattern in this file as below.
4. Calling Custom REST Services
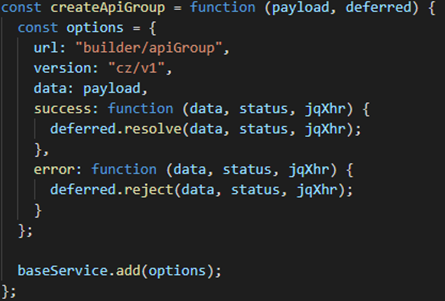
In implementation if any new services are written by implementer it has been directed to change the context root for new REST to digx/cz/v1.
For supporting it from the UI![]() User Interface, implementer has to pass cz/v1 in the version field of the AJAX setting from his model.
User Interface, implementer has to pass cz/v1 in the version field of the AJAX setting from his model.
For example see the snippet below: