OFSLL SETUP CONFIGURATION GUIDE
This document includes following topics:
- Introduction
- Prerequisites
- Installation
- Pre Installation
- Preference
- Steps of Installation
- Database configuration
- System Configuration
- Additional (functional) Configurations
- Disclosure configurations
- Promo code maintenance
- Dealer maintenance
- Social Media Integration
- Product configuration
- Admin Maintenance
Introduction
The purpose of the OBDX OFSLL Installation Guide is to provide a step by step overview on the installation process of the solution.
It Includes:
- Installation of OBDX 18.2.0.0.0 OFSLL with Oracle’s own Core Banking and Origination Products.
- Advanced Configurations (Post installation)
Prerequisites
OBDX 18.2.0.0.0 with OBP![]() Oracle Banking Platform BASE flavor should be installed through OBDX Installer. This installation will be henceforth referred to in this manual as ‘OBDX18.1 Base’.
Oracle Banking Platform BASE flavor should be installed through OBDX Installer. This installation will be henceforth referred to in this manual as ‘OBDX18.1 Base’.
For OBDX 18.2 Base installation, refer documents
- User Manual Oracle Banking Digital Experience Installer Pre-Requisite Setup
- User Manual Oracle Banking Digital Experience Installation Guide
Installation
Pre Installation
OBDX18.2.0.0.0 Base wi;th OBP flavor should be installed through installer.
Steps of installation
Download and extract. Post extraction ‘OBDX_LZNInstaller’ folder would be available.
Ensure before installation following sub-directories are available
- app
- db
- ui
Application deployment
The ‘app’ directory will have 3 artifacts to be deployed on the OBDX 18.2.0.0.0 Base Application server. Depending upon the user authenticator i.e., OUD or DB Authenticator either “obdx.app.rest.ear” or “obdx.app.rest.idm.ear” must be deployed.
- obdx.app.rest.ear
- Un-deploy ‘obdx.app.rest.ear’ Enterprise Application from OBDX 18.2 Application Server. This artifact had been deployed as a part of OBDX 18.2 Base Installation.
- Deploy ‘obdx.app.rest.ear’ artifact as an Enterprise Application.
- obdx.lz.us.app.domain.ear
- Deploy this artifact as a library.
- obdx.lz.us.extsystem.domain.ear
- Deploy this artifact as a library.
Note: First shut down the application server. Go to deployments. Un-deploy the REST application project of the OBDX 18.2.0.0.0 Base and deploy REST application project of the OBDX 18.2.0.0.0 US LZN, two libraries (ii & iii) and an application (iv) as mentioned above. All other libraries of OBDX 18.2.0.0.0 Base are required for OBDX OFSLL setup. Do not remove them. Start the application server.
Steps to Un-deploy library/application
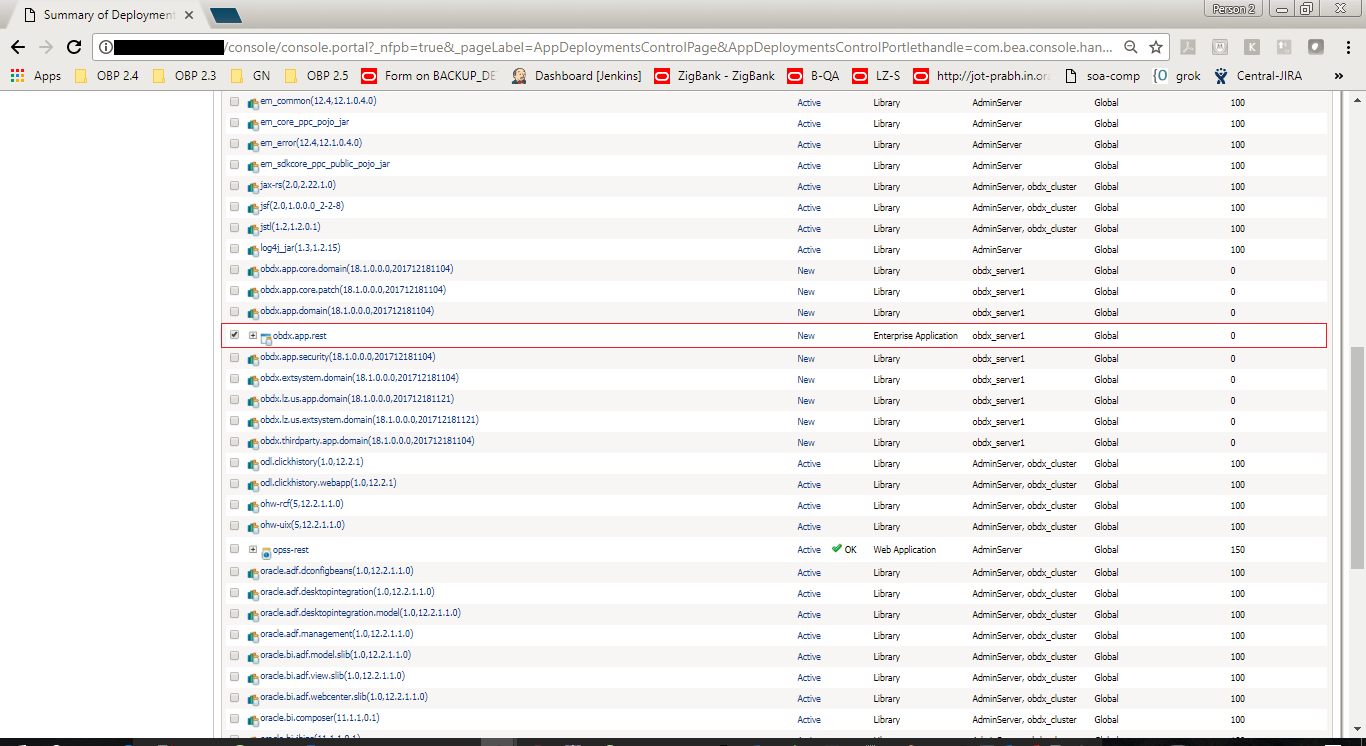
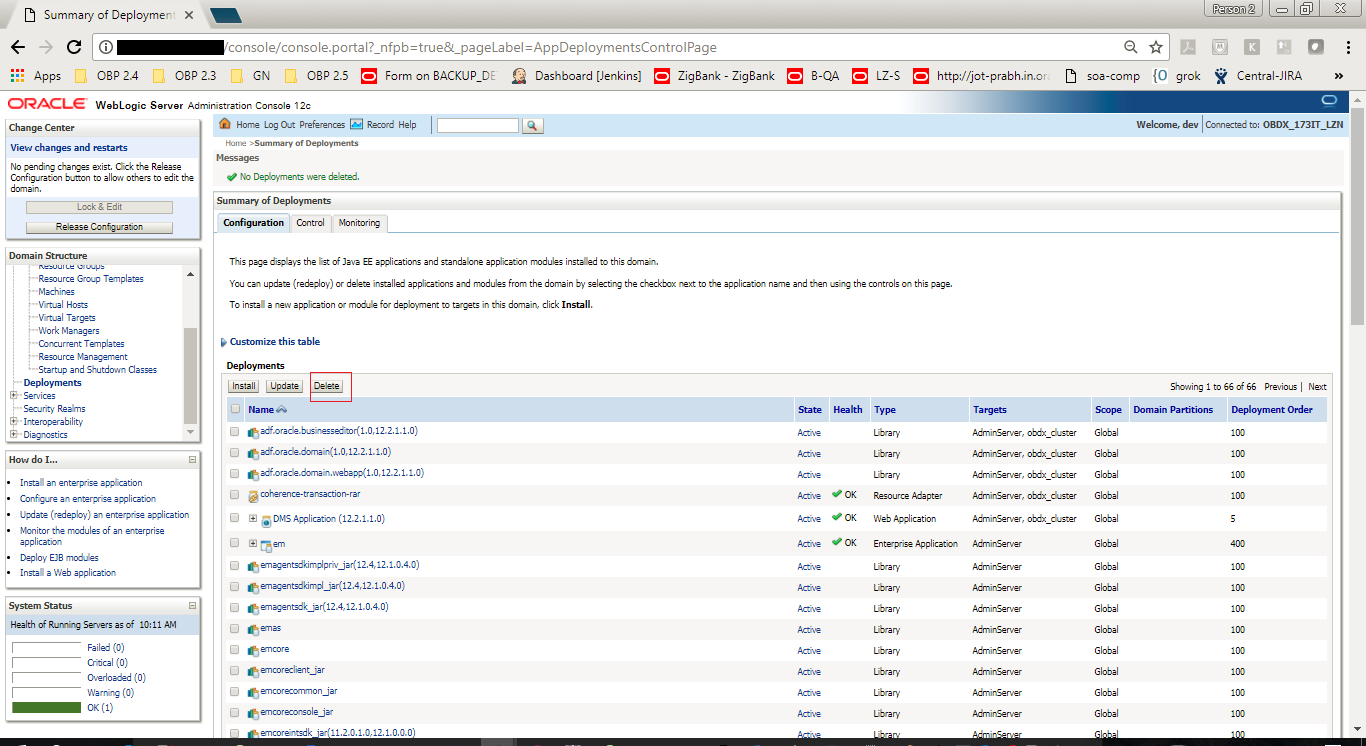
- Login into Weblogic Server. Go to Deployments. Select the library / application and click on delete.
- Confirm delete.
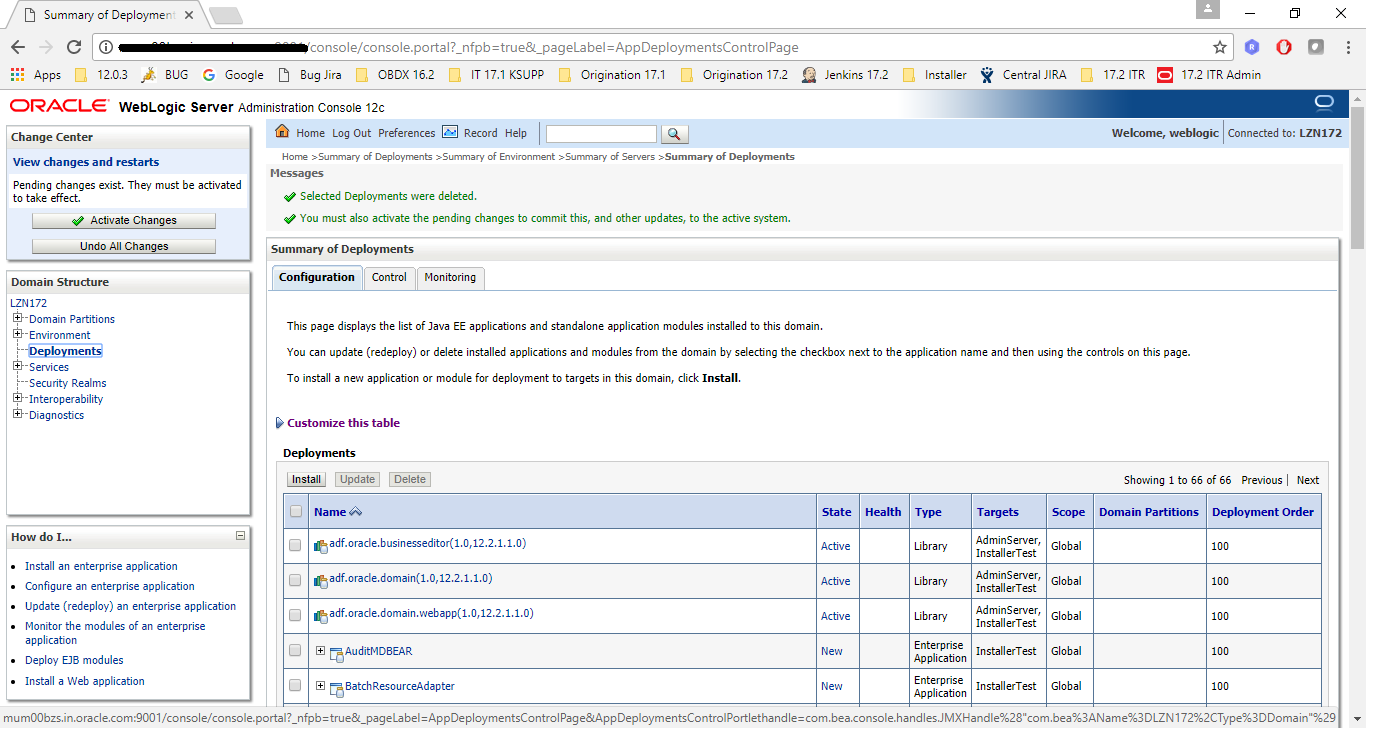
- Success message will be displayed.
Steps to Deploy library / application:
- Click on install to deploy library / application. Click on Upload Button.
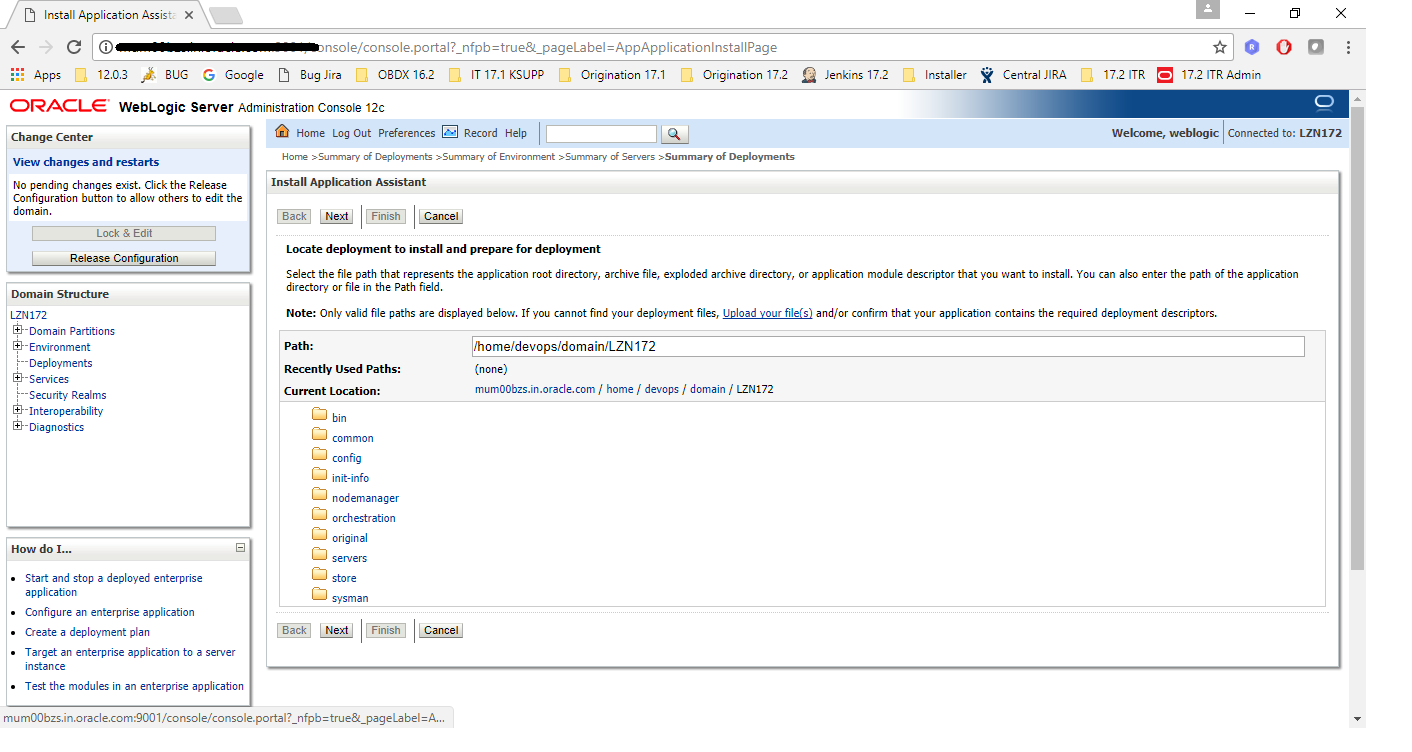
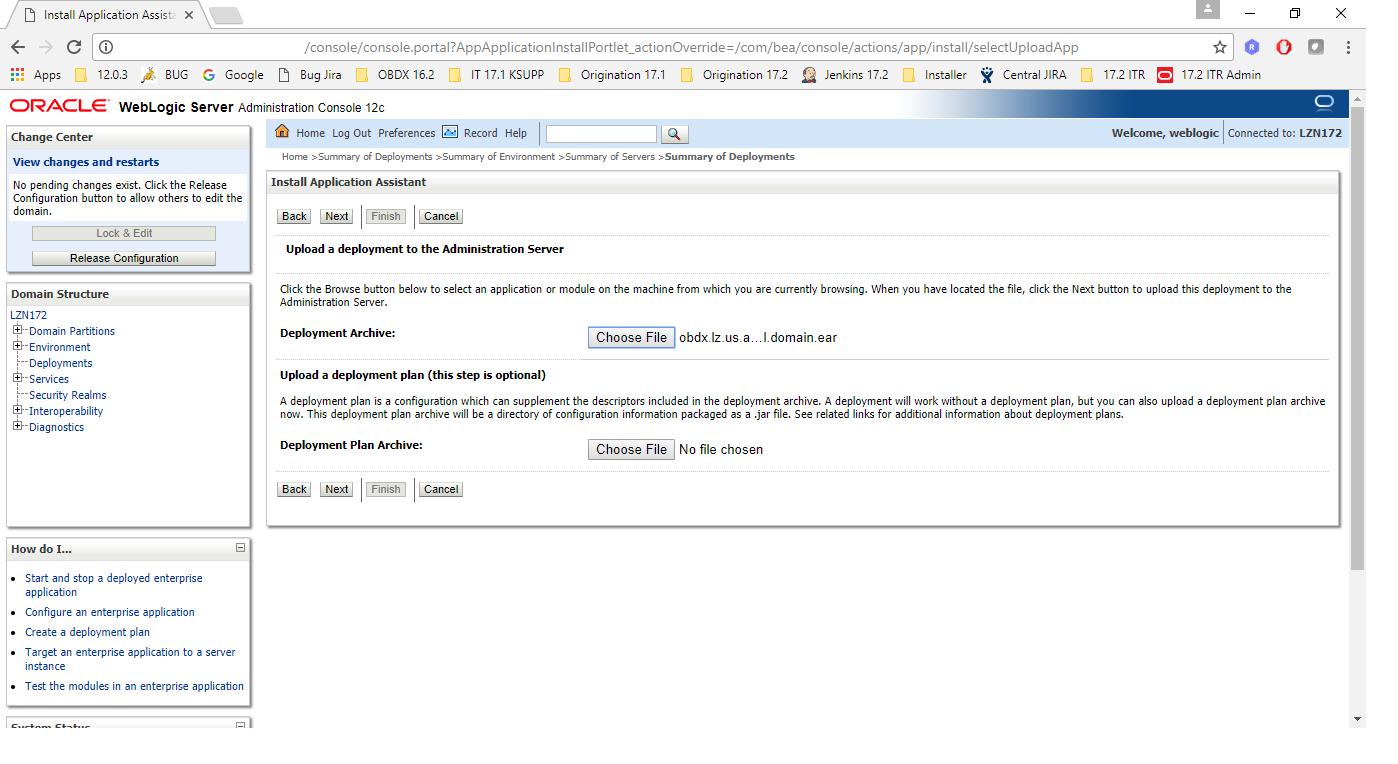
- Click on ‘Choose File’ to select the library / application to upload.
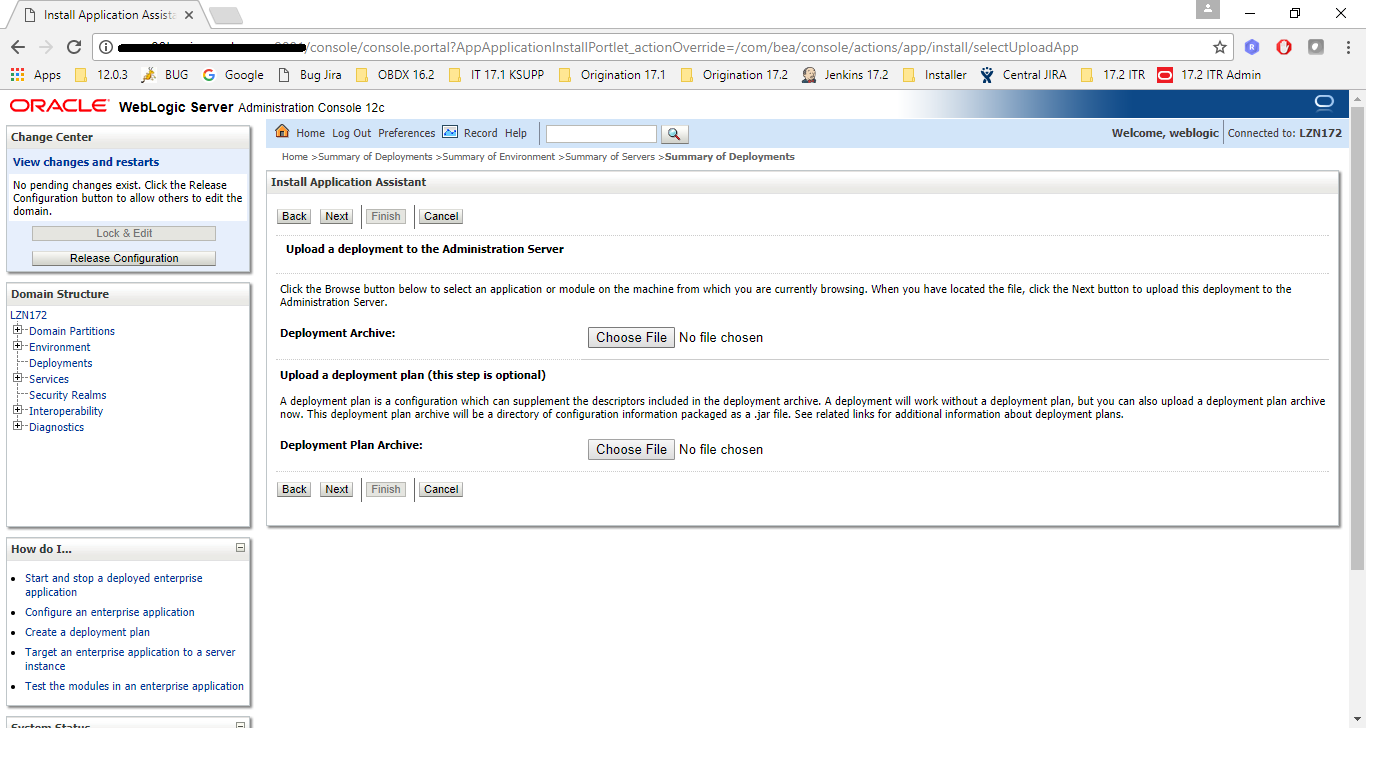
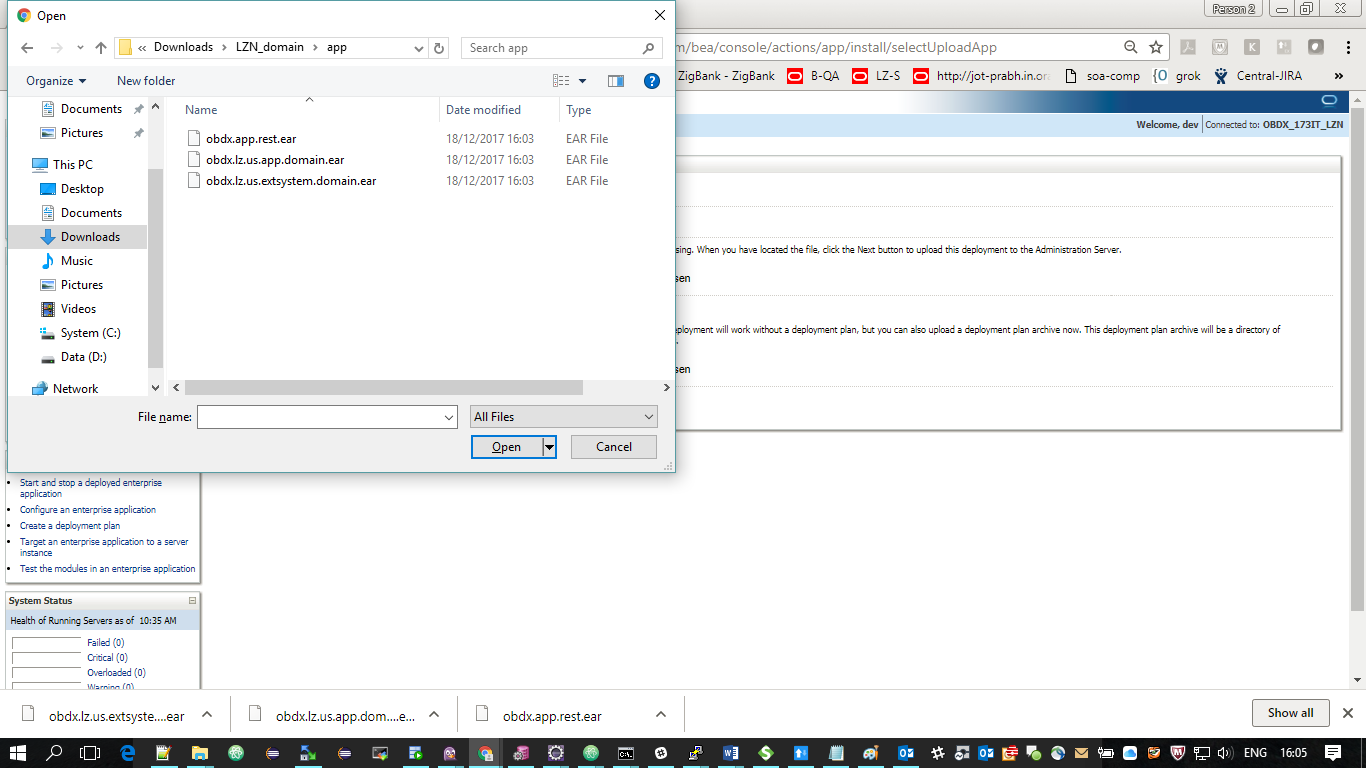
- Click on NEXT button.
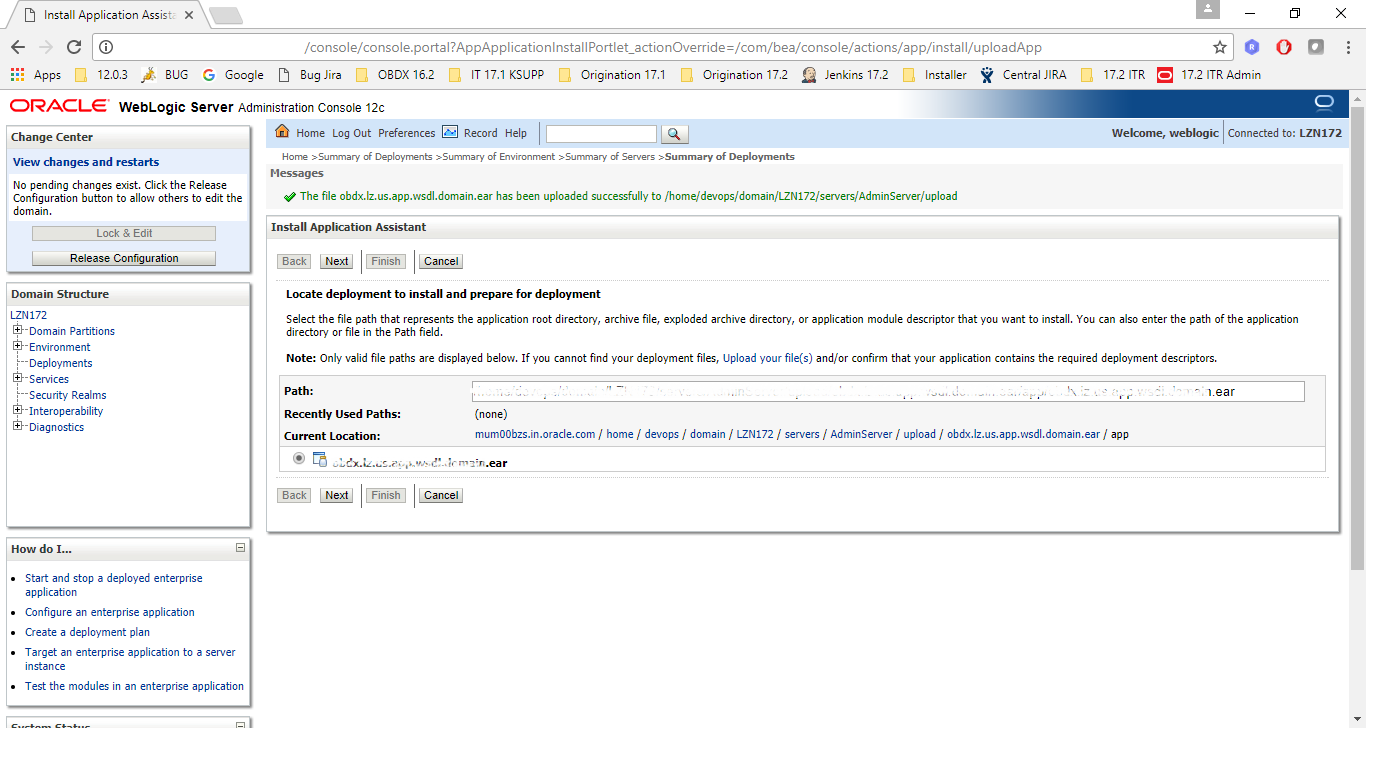
- Again click on NEXT button.
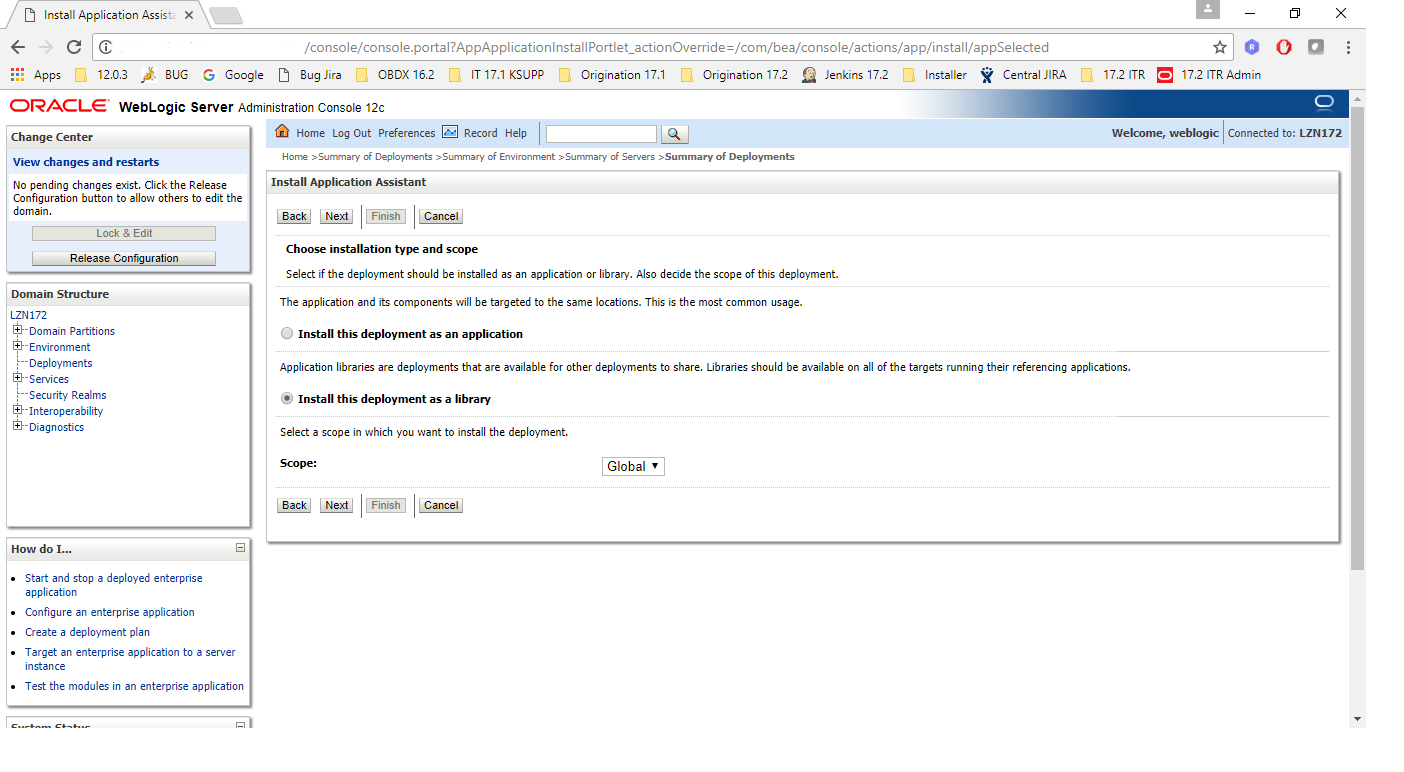
- Select ‘Install as library / application’, as per the deployment.
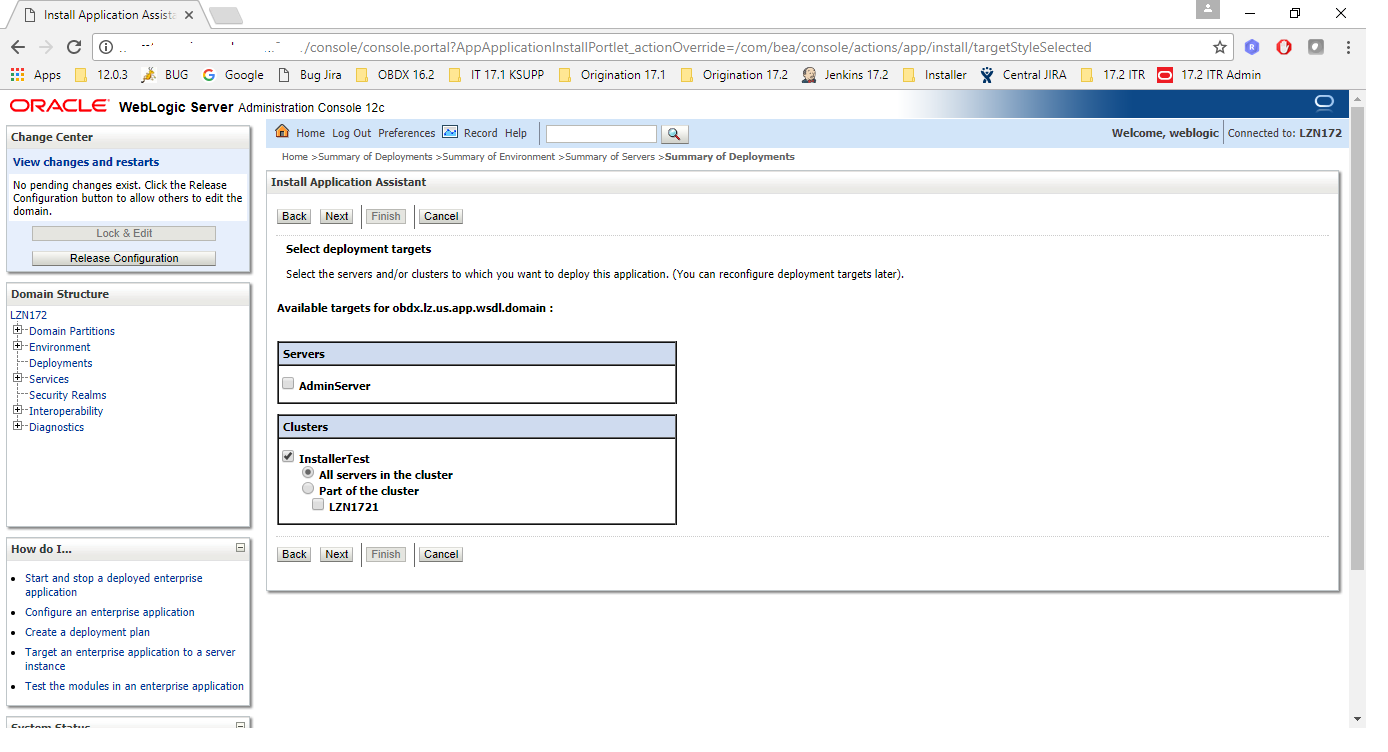
- Select the managed server / cluster to deploy on. Click on Next.
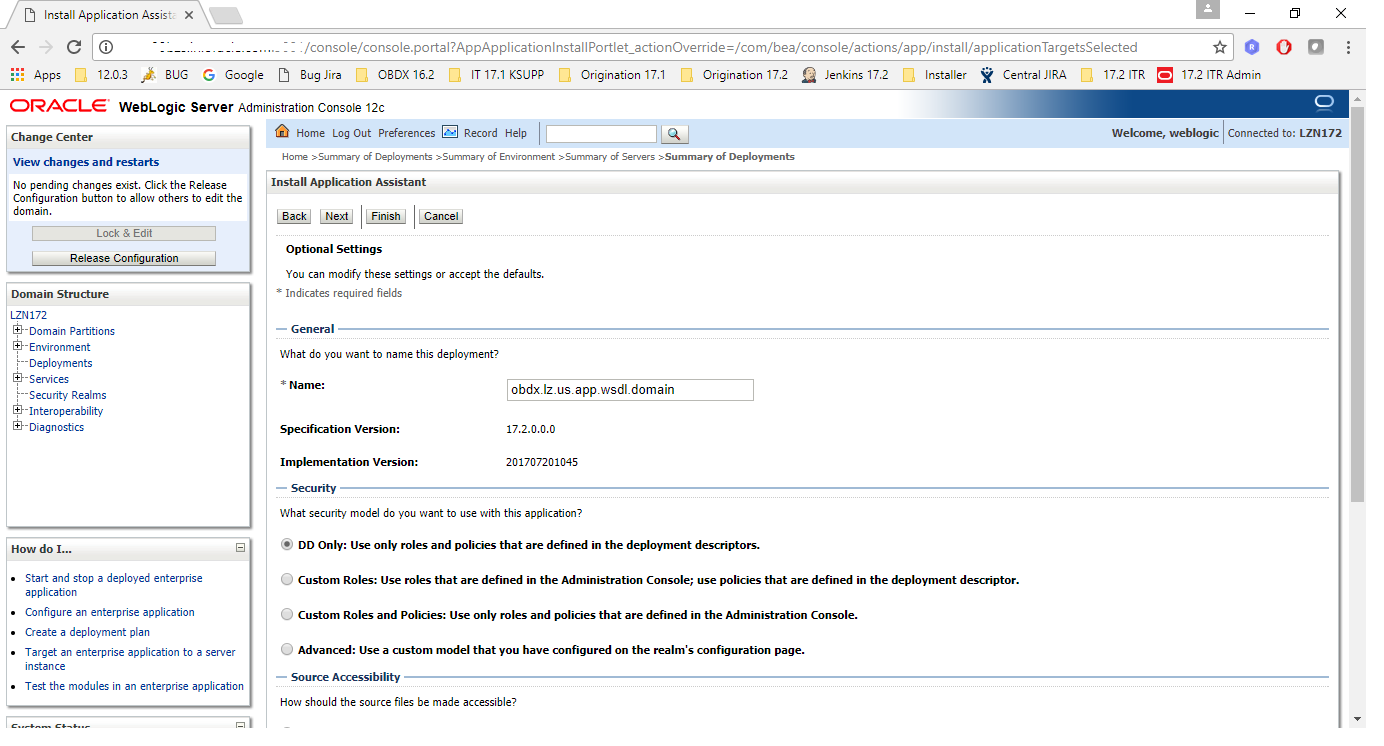
- Click on Finish
- Confirmation of installation will be displayed.
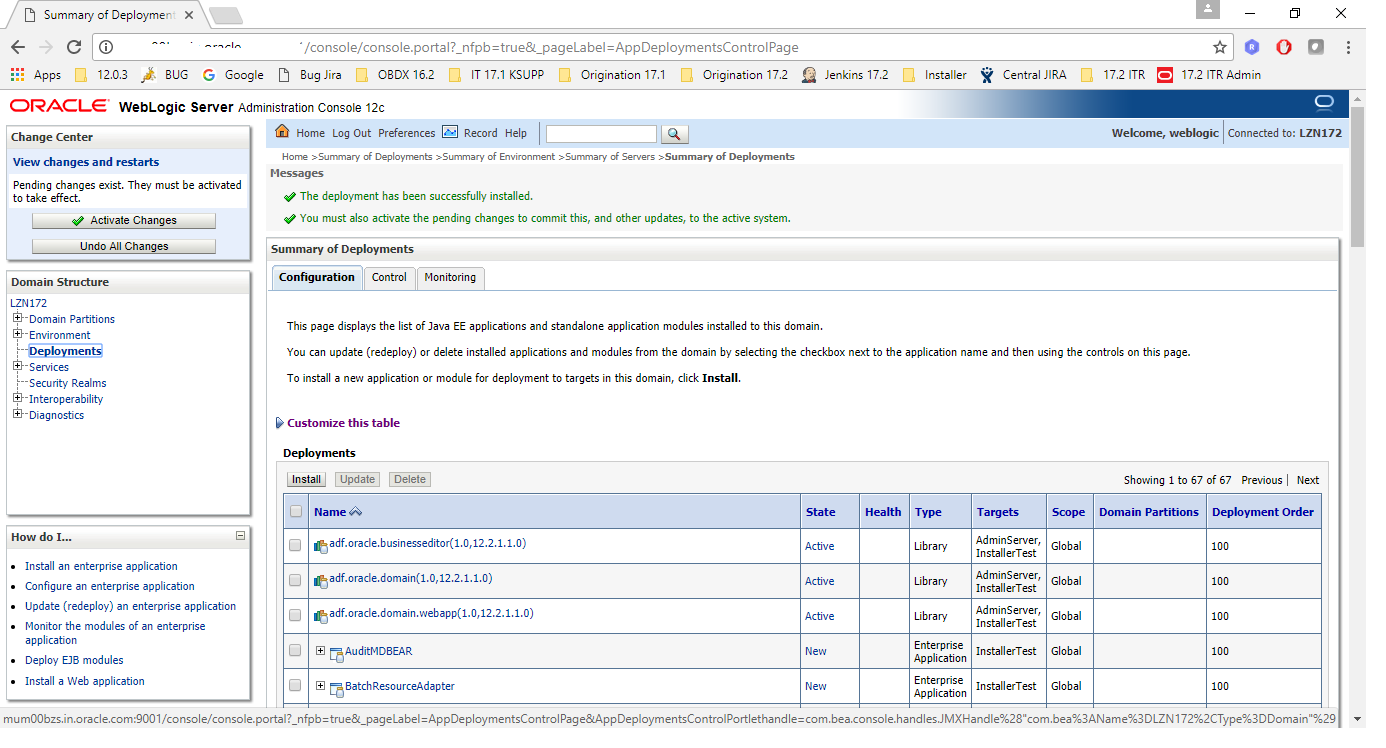


Deployments after OBDX 18.2.0.0.0 OFSLL Installation


Security credential mapping for connector.ear
Please follow following steps
- Login into Weblogic console.
- Click on Deployments.
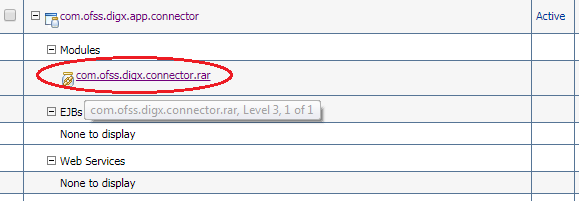
- Expand by clicking ‘+’ icon present in front of com.ofss.digx.app.connector application as shown below.

- Click com.ofss.digx.connector.rar as shown below.
- Click ‘Security’ tab and then click ‘Outbound Credential Mappings’ sub tab as shown below.
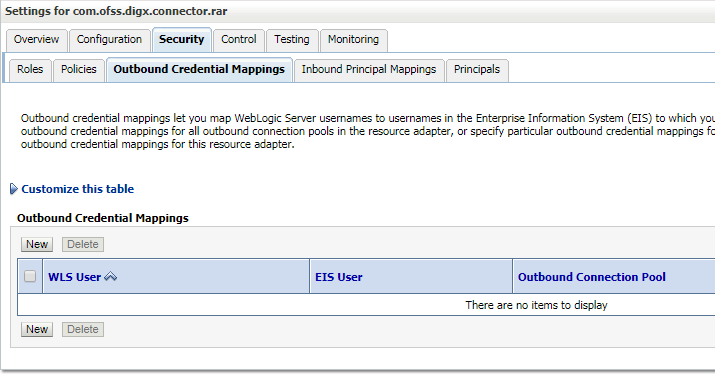
- Click on ‘New’ Button. Following screen will be appearing.
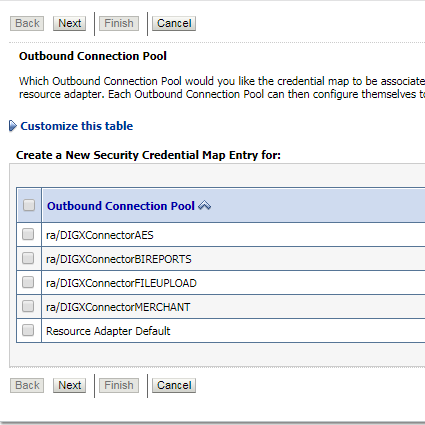
- Select ‘ra/DIGXConnectorAES’ and click then ‘Next’ button. Following screen will be appearing.
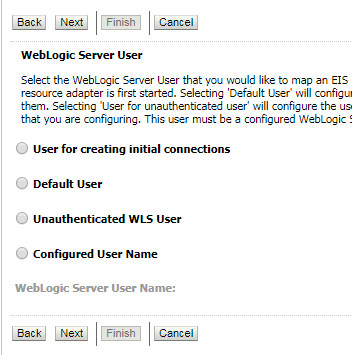
- Select ‘Default User’ and then click ‘Next’ button. Following screen will be appearing.
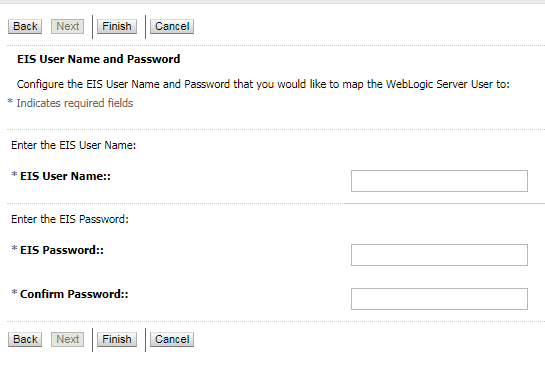
- Enter following details and then click ‘Finish’ button
- EIS User Name > AES_KEY
- EIS Password > OBDX_PASSWORD123
- Confirm Password > OBDX_PASSWORD123
- Restart the manage server to activate the changes.
BI credential mapping for connector.ear
Please follow following steps
- Login into Weblogic console.
- Click on Deployments.
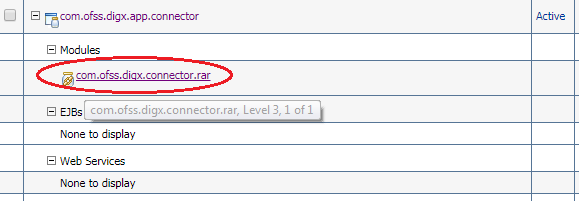
- Expand by clicking ‘+’ icon present in front of com.ofss.digx.app.connector application as shown below.

- Click com.ofss.digx.connector.rar as shown below.
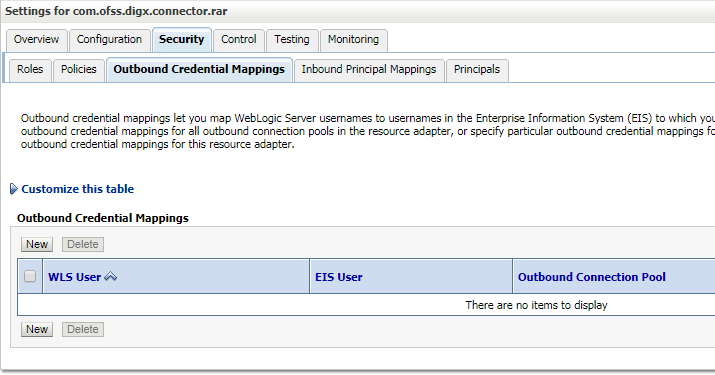
- Click ‘Security’ tab and then click ‘Outbound Credential Mappings’ sub tab as shown below.
- Click on ‘New’ Button. Following screen will be appearing.
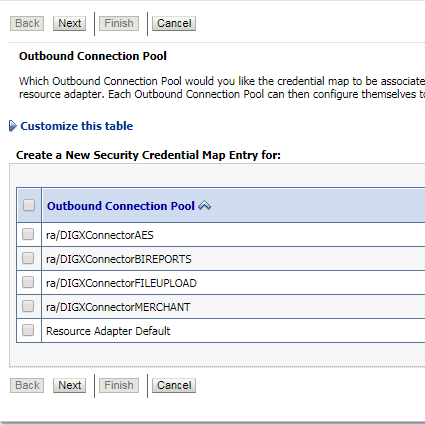
- Select ‘ra/DIGXConnectorBIREPORTS’ and click then ‘Next’ button. Following screen will be appearing.
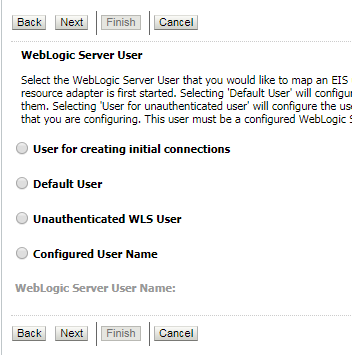
- Select ‘Default User’ and then click ‘Next’ button. Following screen will be appearing.
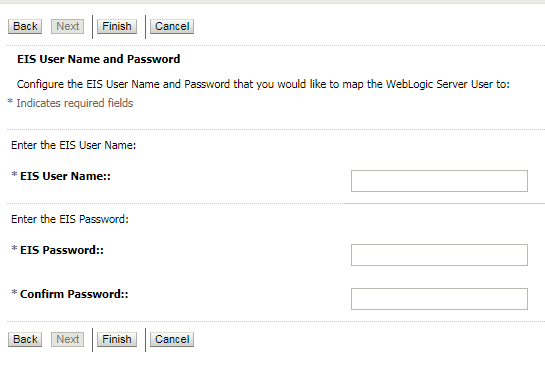
- Enter administrative authentication credentials of BIP and then click ‘Finish’ button.
- Restart the manage server to activate the changes.
Database scripts deployment
The ‘db’ directory will have two sub-directories: dml and ddl. Executes all scripts present in the dml folder
Note: There are no ddl scripts to execute.
UI![]() User Interface deployment
User Interface deployment
The ‘ui’ directory contains all the UI related files. The UI deployed by OBDX 18.2.0.0.0 Base installation should be replaced by the UI contents of this directory.
Note: No change required in OHS.
Database configuration
Following configurations need to be done post installation
Additional (functional) Configurations
These are non-mandatory configurations. Default values for these configurations are available through day 0 scripts. Bank can change these values as per their business need
Table ‘digx_fw_config_var_b’
|
Category ID |
Property ID |
Description |
|---|---|---|
|
OriginationUserRole |
USER_ROLE_CUSTOMER |
Default roles for Origination user creation. The prop_id does not matter. All roles for category_id 'OriginationUserRole' would be assigned to the created user. |
|
OriginationConfig |
ORG_DOB_AGE_LIMIT_CHECK |
Whether DOB check is local or to be done remotely. Possible values are LOCAL or REMOTE. For this setup it will be REMOTE. |
|
OriginationConfig |
ORG_DOB_AGE_LIMIT |
DOB Age Limit Value. In case the above property value is LOCAL, the age limit in number is to be specified for this property. |
|
OriginationConfig |
USERNAME_TYPE |
Username type while registering the prospect. Possible values EMAIL/OTHERS |
|
OriginationConfig |
LIST_CANCELLATION_DAYS |
Submission |
|
OriginationConfig |
ORIG_PI_EMAIL_VERIFICATION_REQUIRED |
If Email Verification via OTP is required |
|
OriginationConfig |
CONTENT_UPLOAD_ALLOWED_TYPE_LIST |
File types allowed for document uploading. Example:- .txt,.png,.xlsx,.doc,.pdf,.jpeg,.jpg |
|
OriginationConfig |
CONTENT_UPLOAD_MIME_TYPES_WHITE_LIST |
Allowed MIME types for file uploading. Example:- application/pdf,image/jpeg,image/png |
|
OriginationConfig |
CONTENT_UPLOAD_MIME_TYPES_ZIP_LIST |
Allowed MIME types for uploading zip document. Example:- application/x-compressed |
|
OriginationConfig |
DRIVING_LICENSE_EXPIRY_DURATION |
Value should be in years. Driving License expiry date should be less than current date + this value |
|
OriginationConfig |
DRIVING_LICENSE_MAX_LENGTH |
Driving License number’s maximum length allowed |
|
OriginationConfig |
EMPLOYMENT_STABILITY_MONTH_DURATION |
Value should be in months. This value is used to decide employment stability |
|
OriginationConfig |
IS_REGISTRATION_MANDATORY |
This flag used to force mandatory channel registration while submitting application. |
|
OriginationConfig |
MAX_ALLOWED_VEHICLE_AGE |
Maximum age allowed for vehicle |
|
OriginationConfig |
ORG_REG_LINK_TIMEOUT |
Channel registration link time out value |
|
OriginationConfig |
ORIGINATION_WORKFLOW_LOADER |
Workflow loader configuration |
|
OriginationConfig |
VEHICLE_MILEAGE_MAX_LIMIT |
Maximum mileage of used vehicle needs to be captured |
|
OriginationConfig |
VEHICLE_YEAR_MAX_LIMIT |
Maximum duration of used vehicle needs to be captured |
|
OriginationConfig |
RESIDENT_STABILITY_MONTH_DURATION |
Value should be in months. This value is used to decide residential stability |
|
OriginationConfig |
SSN |
Maximum length allowed for Social Security Number |
Disclosure configurations
Please follow doc (Origination_disclosure_configuration.doc) for configuring disclosures in OBDX OFSLL application
Promo code maintenance
Promo codes (which exist in OFSLL application) can be maintained in OBDX database at table ‘digx_or_promo_codes’.
Dealer maintenance
Dealer details can be maintained in OBDX database at table ‘digx_or_dealer_details’
Social Media Integration
Please refer ‘User Manual Oracle Banking Digital Experience Origination Social Media Integration.docx’ document to have social media integration.
Product configuration
To enable the products execute the following script.
Update DIGX_OR_PRODUCT_TYPE set STATUS = 'ACTIVE' where ID IN ('PAYDAYLOANH2','AUTOLOANH2') and DETERMINANT_VALUE='OBDX_BU![]() Business Unit';
Where ‘OBDX_BU’ is the entity id for which the system is configured.
Business Unit';
Where ‘OBDX_BU’ is the entity id for which the system is configured.
This will enable the payday loans, and auto loans products.
Admin Maintenance
Accommodation Type maintenance:
Execute the following scripts to add accommodation type maintenance.
Where OBDX_BU is the entity id for which the OFSLL host is configured.
INSERT INTO DIGX_OR_ACC_TYPE (CODE, DESCRIPTION, ORDINAL, DETERMINANT_VALUE, CREATED_BY, CREATION_DATE, LAST_UPDATED_BY, LAST_UPDATE_DATE, OBJECT_STATUS, OBJECT_VERSION_NUMBER) VALUES ('OTHER', 'Other', 100, 'OBDX_BU', 'superadmin', sysdate, 'superadmin', sysdate, '', 1);
INSERT INTO DIGX_OR_ACC_TYPE (CODE, DESCRIPTION, ORDINAL, DETERMINANT_VALUE, CREATED_BY, CREATION_DATE, LAST_UPDATED_BY, LAST_UPDATE_DATE, OBJECT_STATUS, OBJECT_VERSION_NUMBER) VALUES ('PARENTS', 'Living with parents', 30, 'OBDX_BU', 'superadmin', sysdate, 'superadmin', sysdate, '', 1);
INSERT INTO DIGX_OR_ACC_TYPE (CODE, DESCRIPTION, ORDINAL, DETERMINANT_VALUE, CREATED_BY, CREATION_DATE, LAST_UPDATED_BY, LAST_UPDATE_DATE, OBJECT_STATUS, OBJECT_VERSION_NUMBER) VALUES ('OWN', 'I own this home', 10, 'OBDX_BU', 'superadmin', sysdate, 'superadmin', sysdate, '', 1);
INSERT INTO DIGX_OR_ACC_TYPE (CODE, DESCRIPTION, ORDINAL, DETERMINANT_VALUE, CREATED_BY, CREATION_DATE, LAST_UPDATED_BY, LAST_UPDATE_DATE, OBJECT_STATUS, OBJECT_VERSION_NUMBER) VALUES ('RENT', 'I pay rent', 20, 'OBDX_BU', 'superadmin', sysdate, 'superadmin', sysdate, '', 1);
Financial Parameters maintenance:
Execute the following scripts to add financial parameters.
Where OBDX_BU is the entity id for which the OFSLL host is configured.
Insert into DIGX_OR_FINANCIAL_PARAMETERS (CODE, DETERMINANT_VALUE, DESCRIPTION, FIN_PARAM_TYPE, ORDINAL, PRODUCT_SUB_CLASS) values ('EM', 'OBDX_BU', 'Salary', 'Income', 10, 'AUTOLOANFLL');
Insert into DIGX_OR_FINANCIAL_PARAMETERS (CODE, DETERMINANT_VALUE, DESCRIPTION, FIN_PARAM_TYPE, ORDINAL, PRODUCT_SUB_CLASS) values ('RE', 'OBDX_BU', 'Rental Income', 'Income', 20, 'AUTOLOANFLL');
Insert into DIGX_OR_FINANCIAL_PARAMETERS (CODE, DETERMINANT_VALUE, DESCRIPTION, FIN_PARAM_TYPE, ORDINAL, PRODUCT_SUB_CLASS) values ('PN', 'OBDX_BU', 'Pension', 'Income', 30, 'AUTOLOANFLL');
Insert into DIGX_OR_FINANCIAL_PARAMETERS (CODE, DETERMINANT_VALUE, DESCRIPTION, FIN_PARAM_TYPE, ORDINAL, PRODUCT_SUB_CLASS) values ('SS', 'OBDX_BU', 'Social Security', 'Income', 40, 'AUTOLOANFLL');
Insert into DIGX_OR_FINANCIAL_PARAMETERS (CODE, DETERMINANT_VALUE, DESCRIPTION, FIN_PARAM_TYPE, ORDINAL, PRODUCT_SUB_CLASS) values ('IN', 'OBDX_BU', 'Investment Income', 'Income', 50, 'AUTOLOANFLL');
Insert into DIGX_OR_FINANCIAL_PARAMETERS (CODE, DETERMINANT_VALUE, DESCRIPTION, FIN_PARAM_TYPE, ORDINAL, PRODUCT_SUB_CLASS) values ('AL', 'OBDX_BU', 'Alimony', 'Income', 60, 'AUTOLOANFLL');
Insert into DIGX_OR_FINANCIAL_PARAMETERS (CODE, DETERMINANT_VALUE, DESCRIPTION, FIN_PARAM_TYPE, ORDINAL, PRODUCT_SUB_CLASS) values ('CS', 'OBDX_BU', 'Child Support', 'Income', 70, 'AUTOLOANFLL');
Insert into DIGX_OR_FINANCIAL_PARAMETERS (CODE, DETERMINANT_VALUE, DESCRIPTION, FIN_PARAM_TYPE, ORDINAL, PRODUCT_SUB_CLASS) values ('DI', 'OBDX_BU', 'Damages for Injury/Disability', 'Income', 80, 'AUTOLOANFLL');
Insert into DIGX_OR_FINANCIAL_PARAMETERS (CODE, DETERMINANT_VALUE, DESCRIPTION, FIN_PARAM_TYPE, ORDINAL, PRODUCT_SUB_CLASS) values ('EM', 'OBDX_BU', 'Salary', 'Income', 90, 'PAYDAY');
Insert into DIGX_OR_FINANCIAL_PARAMETERS (CODE, DETERMINANT_VALUE, DESCRIPTION, FIN_PARAM_TYPE, ORDINAL, PRODUCT_SUB_CLASS) values ('RE', 'OBDX_BU', 'Rental Income', 'Income', 100, 'PAYDAY');
Insert into DIGX_OR_FINANCIAL_PARAMETERS (CODE, DETERMINANT_VALUE, DESCRIPTION, FIN_PARAM_TYPE, ORDINAL, PRODUCT_SUB_CLASS) values ('PN', 'OBDX_BU', 'Pension', 'Income', 110, 'PAYDAY');
Insert into DIGX_OR_FINANCIAL_PARAMETERS (CODE, DETERMINANT_VALUE, DESCRIPTION, FIN_PARAM_TYPE, ORDINAL, PRODUCT_SUB_CLASS) values ('SS', 'OBDX_BU', 'Social Security', 'Income', 120, 'PAYDAY');
Insert into DIGX_OR_FINANCIAL_PARAMETERS (CODE, DETERMINANT_VALUE, DESCRIPTION, FIN_PARAM_TYPE, ORDINAL, PRODUCT_SUB_CLASS) values ('IN', 'OBDX_BU', 'Investment Income', 'Income', 130, 'PAYDAY');
Insert into DIGX_OR_FINANCIAL_PARAMETERS (CODE, DETERMINANT_VALUE, DESCRIPTION, FIN_PARAM_TYPE, ORDINAL, PRODUCT_SUB_CLASS) values ('AL', 'OBDX_BU', 'Alimony', 'Income', 140, 'PAYDAY');
Insert into DIGX_OR_FINANCIAL_PARAMETERS (CODE, DETERMINANT_VALUE, DESCRIPTION, FIN_PARAM_TYPE, ORDINAL, PRODUCT_SUB_CLASS) values ('CS', 'OBDX_BU', 'Child Support', 'Income', 150, 'PAYDAY');
Insert into DIGX_OR_FINANCIAL_PARAMETERS (CODE, DETERMINANT_VALUE, DESCRIPTION, FIN_PARAM_TYPE, ORDINAL, PRODUCT_SUB_CLASS) values ('DI', 'OBDX_BU', 'Damages for Injury/Disability', 'Income', 160, 'PAYDAY');