ADD Biller
The online banking application enables the user to add billers of the specific categories for the payment of bills and prepaid recharge electronically. Following types of billers are added.
- Presentment Type: Billers presents the bill or invoice to the customer/ user online before paying the bill
- Payment Type: : Biller does not present bills. Biller allows the users to pay their bills anytime using their current and savings or credit card account that is credited to the billers account
- Presentment and Payment Type: Billers has features similar to both Presentment as well as Payment type of billers. The bills/ invoice can be presented to the users for bill payment or the users can pay bills without the invoice
- Recharge Type: Billers allows users to do “Recharge” their prepaid services like Mobile, DTH or Internet
Users can create billers by specifying the Nickname of the biller(nickname should be unique), biller specific single /multiple unique customer IDs e.g. Relationship![]() Relationship signifies the relationship between parties and accounts whenever the relationship is mapped to account. no, Account number etc., and other Biller labels as maintained in the Biller Maintenance administration screen. Multiple but unique registrations with the same biller are allowed.
Relationship signifies the relationship between parties and accounts whenever the relationship is mapped to account. no, Account number etc., and other Biller labels as maintained in the Biller Maintenance administration screen. Multiple but unique registrations with the same biller are allowed.
Prerequisites:
- Transaction access is provided to the retail user
- Billers are maintained in host system
- Admin Biller Category maintenance is done
Features supported in the application
- Create Biller
Workflow
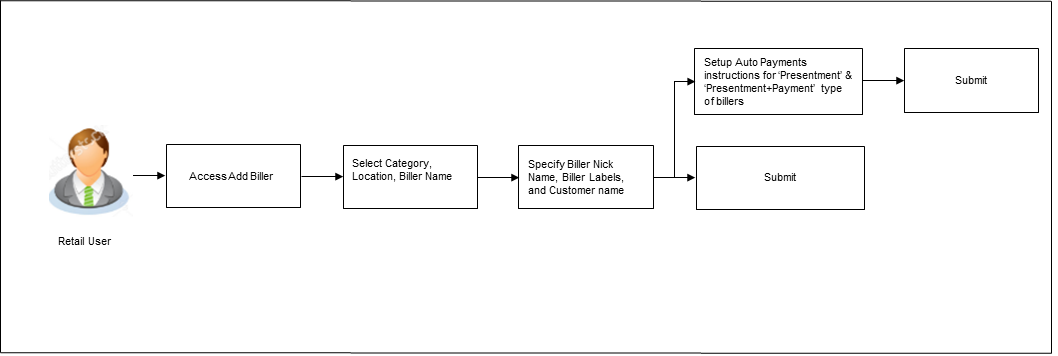
![]() How to reach here:
How to reach here:
Dashboard > Toggle Menu > Bill Payments > Add Billers
OR
Dashboard > Toggle Menu > Bill Payments > Bills > Add Billers
|
Field Name |
Description |
|---|---|
|
Category |
The category of the registered biller. |
|
Location |
Operational area of the biller of the biller as maintained in the administrator biller maintenance. |
|
Biller Name |
Name of the biller as maintained in the administrator biller maintenance. |
|
Biller Type |
On selecting the biller name, the biller type is displayed. The biller type can be:
|
|
Biller Nickname |
Nickname of the biller. The nickname has to be unique i.e. same nickname cannot be used for more than one biller. |
|
Sample Bill |
Link to upload the image of the physical bill presented by the biller. This field appears for Presentment and Presentment and Payment type of billers. |
|
Biller Labels |
Biller labels as maintained by the bank administrator, for which user has entered the data are displayed. Only biller labels that are defined as mandatory in the administrator biller maintenance requires customers to enter the appropriate values. |
|
Customer Name |
Customer name as maintained in biller records (entered by user while adding the biller). |
|
Following fields appears for Presentment and Presentment and Payment type of billers. |
|
|
Auto Pay |
The facility to automatic pay the bills on the specified date. The options are:
This feature is available for Presentment and Presentment & Payment type billers only. |
|
Note |
The text displaying payment methods accepted by the biller appears on the screen. The text is maintained for biller in the administrator biller maintenance. This field appears if you select Yes option in the Auto Pay field. |
|
Payment Method |
The payment methods accepted as maintained for the biller by Bank Administrator The payment type can be:
This field appears if you select Yes option in the Auto Pay field. |
|
Pay From |
Depending on payment method selection, the values in the drop-down have active current accounts, savings account/ debit cards/ credit cards of the customer. This field appears if you select Yes option in the Auto Pay field. |
|
Pay |
Indicates the current selection for bill pay amount. The options are:
This field appears if you select Yes option in the Auto Pay field. |
|
Limit Amount |
The limit amount the user wants to pay to schedule the auto payment. |
To add a biller:
- From the Category list, select the category of the biller.
- From the Location list, select the category of the biller.
- From the Biller Name list, select the registered biller name.
- In the Biller Nickname field, modify the biller nickname if required.
- In the Biller Label 1, 2 and 3, enter the required details.
- In the Customer Name field, modify the biller nickname if required.
- If you have selected the Presentment or Presentment or Payment type of biller from the Biller Name list:
- From the Auto Pay list, select the appropriate option, if you select the option Yes, select the bill payment method.
- From the Pay From list, select the source account/ debit card / credit card to be debited.
- In the Pay field, you can enter the entire bill amount in the Bill Amount field, or enter the limit amount in the Limit Amount field.
- Click to add a biller.
OR
Click to cancel the operation and navigate back to ‘Dashboard’. - The Add Biller - Review screen appears. Verify the details, and click .
OR
Click to navigate back to the previous screen.
OR
Click to cancel the operation and to navigate back to ‘Dashboard’. - The success message appears along with the biller details.
Click Pay Bills to pay the bills.
OR
Click View Bills to view the bills.
OR
Click Add More Biller to add more billers.
OR
Click Go to Dashboard, to navigate to the dashboard.
FAQs
![]() Can I delete billers that I no longer need to make payments to?
Can I delete billers that I no longer need to make payments to?
![]() When can I make the payment to newly added biller?
When can I make the payment to newly added biller?
![]() If I delete or edit a biller, what will happen to the in-flight transactions?
If I delete or edit a biller, what will happen to the in-flight transactions?