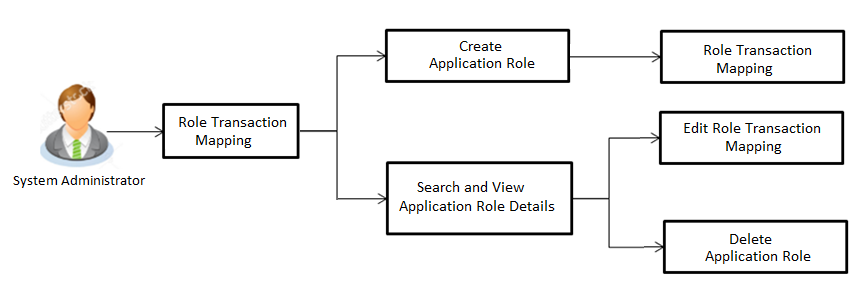
Role transaction Mapping
OBDX application has many roles for different type of users defined under different user segments i. e. Retail, Corporate, and Admin. These roles are defined for internal as well as for external touch points.
Application roles mapped to Internal Touch Points (Internet, Mobile Application, SIRI, Chatbot.etc.) are used by OBDX itself, whereas Application roles mapped to External Touch Points are defined for being used by third party system. Each External role is mapped to a scope (defined in Identity Management System) and the same scopes are mapped to External Touch Points in Touch Point Maintenance screen.
For Internal Touch Points, a user can perform only those transactions which are mapped to the application role assigned to that user. Whereas for External Touch Points, third party system can only perform only those transactions (on behalf of the user), which are mapped to the application role, mapped to the scope assigned to that external touch point (third party system).
Using this option a customer can define an Application role. Application Roles are mapped to Entitlements for various Touch Points, so that System Administrator![]() Administrator is a set of individuals that administer the applicant/Affiliate entity. For example, Accountants, Authorized Signatories for organizations, Power of Attorney for individuals. can decide which all transactions should be available for which touch points.
Administrator is a set of individuals that administer the applicant/Affiliate entity. For example, Accountants, Authorized Signatories for organizations, Power of Attorney for individuals. can decide which all transactions should be available for which touch points.
Pre-Requisites
- Transaction access is provided to System Administrator.
- Approval rule set up for System Administrator to perform the actions.
Workflow
Features supported in application
Using this option System Administrator can perform the following actions:
![]() How to reach here:
How to reach here:
Administrator Dashboard > Access Policies > Role Transaction Mapping
Search Application Role
Using this option, System Administrator can search application roles based on the search criteria. By default all the application roles will be displayed on this screen, Administrator can filter the list by entering the values in search criteria.
To search application role/ application roles:
- In the User Segment field, select the segment of the user.
- In the Application Role Name field, enter the name of the application role.
- Click .
The search result based on search criteria displayed in Application Role Details section.
OR
Click to reset the search parameters.
OR
Click to cancel the search process and to go back to dashboard.
Search Application Roles - Search Results
|
Field Name |
Description |
|---|---|
|
User Segment |
Segment of the user for which the application role is created. Retail, Corporate and Administrator are three segments available in the application. |
|
Application Role Name |
Name of the application role. |
|
Application Role Details Application roles can be views based on Touch Point Type-Internal and External in different tabs. Application roles are grouped and displayed User Segment wise |
|
|
User Segment |
Name of the User Segment. |
|
Application Role Name |
Name of the application role. |
|
Application Role Description |
Description of the application role. |
- Click on the Application Role Name to view the details. Role Transaction Mapping - View screen appears.
Role Transaction Mapping - View
|
Field Name |
Description |
|---|---|
|
Application Role View |
|
|
Application Role Name |
Name of the application role. |
|
Description |
Description of the application role. |
|
User Segment |
Segment of the user for which the application role is created. |
|
Touch Point Type |
Type of Touch Point. |
|
Map Transactions |
|
|
Module Name |
Name of the module for which role transaction mapping is done. |
|
Map Transactions to Touch Points |
Touch points for which the transaction mapping is done for application role. |
|
Transactions |
Displays all the transactions for the selected module which are mapped to the application role for the selected touch points. Transactions are grouped under Transaction Categories and Module. |
|
Type of Action |
Name of the action that can be performed for that transaction by the user to which this application role is assigned.
|
- Click
 against the particular category to view the transaction mapping details.
 - Click
 to modify the transaction role mapping. The Role Transaction Mapping screen appears in editable form.
OR
Click To delete the application role along with the transaction mapping.
(Deletion of any role is only allowed if there are no users attached to that role)
OR
Click to navigate back to previous screen.
OR
Click to cancel the search process and to go back to dashboard.
Edit Application Role
Using this option System Administrator can edit or update the details of an existing role transaction mapping.
To modify role transaction mapping:
- Repeat step 1 to 4 of Search Application Role section.
- Click
 against the Map Transactions.
Screen in editable mode appears.
- Update the role description if required .
- Select/ deselect module names for which the transaction mapping is to be done
- Check/ uncheck the touch points for which the transaction mapping is to be done
- Click to proceed to map/ unmap transactions.
OR
Click to go back to previous screen. -
Note: If the administrator deselect a module from Module name field, transaction mapping done for all the transactions under that module will get removed for that module. Similarly if the administrator unchecks and existing touch point, transaction mapping done for all modules for that touch point will get removed for that Touch Point.
Note: Application Role Name, User Segment and Touch Type fields cannot be edited.
- Modify the transactions mapping for different touch points. click against the particular category to view and update the transaction mapping.
- Click on the next touch point tab, a pop up window appears for asking Copy data from touch point.
- Click to select the touch point from which the data has to be copied.
- Copy transaction mapping details of touch point to another popup window .
- From the Select list, select the touch point from the list.
- Click .
OR
Click . to do the mapping operationally. - Modify the transactions mapping for current touch points if required.
- Click to save the updates.
OR
Click to cancel the transaction.
OR
Click to navigate back to previous screen. - The screen with success message appears. Click OK to close the message screen.
Delete Application Role
Using this option System Administrator can delete an existing role transaction mapping. Deletion of any role is only allowed if there are no users attached to that role.
To delete role transaction mapping:
- Repeat step 1 to 4 of Search Application Role section.
- Click to delete the application role along with the transaction mapping.
The Delete Warning message appears.
- Click .
The Role Transaction Mapping screen with the successful role deletion message appears.
OR
Click to cancel the transaction.
Create Application Role
Using this option System Administrator can define an application role and map transactions to it for selected touch points.
To create an application role transaction mapping:
- In the Role Transaction Mapping screen, click Create. The Role Transaction Mapping - Create screen appears.
|
Field Name |
Description |
|---|---|
|
Application Role Name |
Name of the application role. |
|
Description |
Description of the application role. |
|
User Segment |
Segment of the user for which the application role is to be created. The options are:
|
|
Touch Point Type |
Type of Touch Point. The options are:
|
|
Scope |
List the scopes for the external touch point. This field is displayed and enabled, if you select External option in the Touch Type field. Once a scope is mapped to a role, it cannot be mapped to any other role. |
- In the Application Role Name field, enter the name of the application role.
- In the Description field, enter the description of the application role.
- From the User Segment list, select appropriate segment for which role is to be created.
- From the Touch Type list, select appropriate option.
- If you select External;
- From the Scope Name list, select the appropriate scope to map to application role.
- Click to map transaction to the role.
The Application Role Creation screen to add transaction modules and touch points appears.
OR
Click to cancel the transaction and to go back to dashboard.
OR
Click to navigate back to previous screen.
|
Field Name |
Description |
|---|---|
|
Module Name |
The modules for which the transactions mapping is to be done. Transactions under the selected modules will get displayed for mapping. Note: Select All option from the drop-down to select all modules. |
|
Map Transactions to Touch Points |
The internal touch points for which the transaction mapping is done for application role. All the internal touch point maintained in the system gets displayed here. This field is displayed and enabled, only if you select the Internal option in the Touch Type field. |
- Select appropriate modules for transactions mapping.
- Select the checkbox (against the list of Touch Points to map the transactions to selected touch points.
- Click . The entitlement mapping section Map Transaction appears.
OR
Click to reset the entered details.
OR
Click to cancel the transaction and to go back to dashboard.
OR
Click to navigate back to previous screen.
|
Field Name |
Description |
|---|---|
|
Transaction Name |
Name of transaction to be mapped to the application role. |
|
Action |
Name of the action that can be performed for that transaction by the user to which this application role is assigned.
|
- Click on the desired Touch Point tab for e.g. Internet.
- To map the transactions to the role, click against the particular module, then select the transaction type, and then transactions to be mapped.
- Select the respective check boxes preceding to transaction to be mapped.
OR
Select the checkbox at header level if you want to map all the transactions below that at one instance. - Click on the next touch point tab, a pop up window appears for asking Copy data from touch point.
-
- Click to select the touch point from which the data has to be copied.
- Copy transaction mapping details of touch point to another popup window .
-
- From the Select list, select the touch point from the list.
- Click .
OR
Click . to do the mapping operationally.
- Click to save the changes.
OR
Click to cancel the transaction.
OR
Click to navigate back to the previous screen. - The Role Transaction Mapping - Review screen appears. Verify the details, and click .
OR
Click to cancel the transaction.
OR
Click to navigate back to the previous screen. - The screen with success message of Application Role Policy Map appears. Click OK to complete the transaction.
FAQs
![]() Is it mandatory to map transactions to the created application role?
Is it mandatory to map transactions to the created application role?
![]() Do I need to mandatorily map transactions for each touch point for the new application role created?
Do I need to mandatorily map transactions for each touch point for the new application role created?
![]() Why am I unable to select an action against a specific entitlement for a transaction?
Why am I unable to select an action against a specific entitlement for a transaction?
![]() Can I copy the same transaction mapping for an application role from one touch point to another?
Can I copy the same transaction mapping for an application role from one touch point to another?