
|
|
|
Adding a Menu to an Event
To add a menu to an event, use the Select Menu screen. To access this screen, choose Business Management > Events from the main menu. Use the Event Search screen to find the event to attach a menu to. Highlight the event in the results grid and select the Resources button to display the Event Resources screen. Finally, select the F&B button on the Event Resources screen to display the Select Menu screen. You can also select the Resources button on the Events screen to reach the Event Resources screen, then select the F&B button to arrive at the Select Menu screen.
These menus will generate the expected Food & Beverage revenue for the event, as well as providing details for customer and internal documentation.
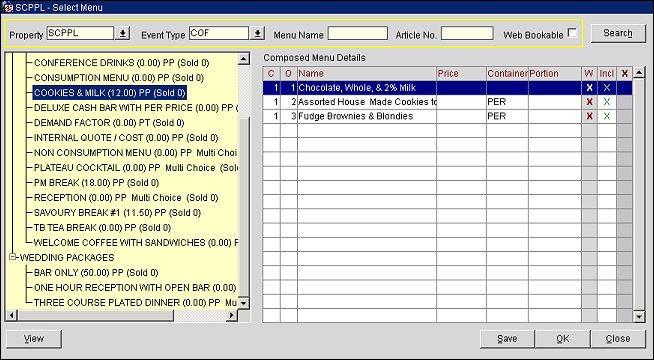
The left side of the screen shows a tree-style display of menu classes. Click on the + sign to expand a class and display the menus in that class. The number sold is the total number sold for the day when the event takes place.
The right side of the screen (Composed Menu Details) lists the food and beverage items that are included in the menu that you have highlighted in the menu tree.
To add a menu to an event, click on the menu in the menu tree in the left side of the screen. The menu details will display in the grid on the right side of the screen. Select the Save button to save the menu to the event and add additional menus, or OK to save the menu to the event and close this screen.
Property. If the MHOT Multi-property add-on license is active, select the down arrow to choose the property to search for menu items.
Event Type. The event type is the kind of event where the menu is customarily served. When accessing the Select Menu screen, the event type of the current event will automatically be filled into the Event Type field at the top of the screen, in order to display only menu classes and menus that can be served for this event type. The available menu classes are displayed in a tree format underneath the search box. Each menu class can be expanded by clicking on the '+' sign to show the available menus within the class. To search for menus that are not specifically configured for the current event type, select the Event Type down arrow and select one or several other event types.
Menu Name. Enter the full menu name or any part of the menu name. The menu tree will expand to display any occurrence of the string you type. If multiple menus in different classes have the same name, the nodes of the menu class tree that contain that name are expanded.
Article Number. Enter the Article Number assigned to the menu. If the article number is found, the menu class's tree is expanded and the menu is highlighted.
Web Bookable. Available when the S&C/OWS license code WCS_<version number> Webservices Sales & Catering or WCC_<version number> Webservices Conference Center is active. Also available if the application parameter Blocks > Function Space Config is active when the WCS/WSS license codes are not active. Select this check box to filter by web bookable menus.
When the cursor is placed on a specific menu in the menu tree structure, the Composed Menu Details grid will automatically be updated with the menu items contained within the highlighted menu.
C. Course order number for the appropriate menu item.
O. Internal order of menu items within a course.
Name. Menu item name.
Price. The price of this specific menu item.
Container. Mostly used for beverages. Shows the container the menu item is served in. Can indicate different serving sizes.
Portion. Indicates what is considered one portion (e.g., 3 pieces of chicken, 300 grams of steak, 6-oz glass of juice, etc.).
W. (Web bookable.) Available when the license codes Webservices Sales & Catering WCS_<version number> or the Webservices Conference Center WCC_<version number> are active. The W column is also available if the WCS/WSS license codes are not active, but the application parameter Blocks > Function Space Config is active. When X displays in this column, it indicates that the event is available for booking via the website.
Incl. An X in this column indicates that the menu item is included in the total menu price. On the BEO, price and container will not print for an item marked as Included.
X. If the menu highlighted in the menu tree is a multi-choice menu, you can select individual menu items by placing an X in this column.
Note: Mandatory menu items will have an X pre-selected in this column and cannot be un-selected. Mandatory menu items can be configured for multi-choice menus only. See Composed Menu Item Editing for details.
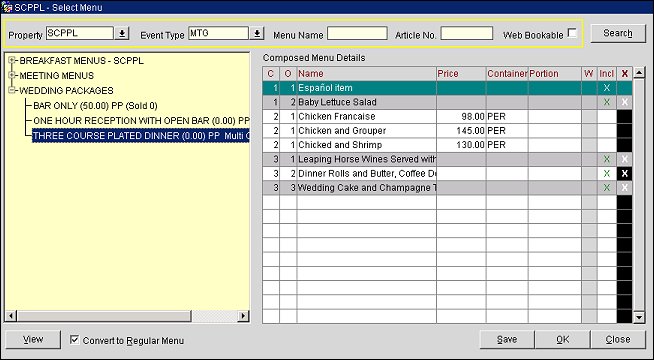
When working with multi-choice menus, you can make your menu selections and then convert the menu to a regular menu. To do so, mark your menu selections in the X column. Then select the Convert to Regular Menu check box and select the Save or OK buttons. If you make any choices other than the mandatory selections, this check box is automatically selected and cannot be unselected (in which case selecting the Save or OK buttons will convert the menu). Once the multi-choice menu has been converted to a regular menu, the (M) indicator before the menu name in the Resources grid on the Event Resources screen is removed.
Highlight a menu item in the menu tree and select the View button to see the (view- only) Composed Menu Setup screen. This screen shows the complete details of the menu, including revenue information.
From the Event Resource screen select the F&B button to access the Select Menu screen.
If the event is a package event, a prompt appears asking if the menu should be made part of the package. If Y is selected, the menu price will automatically be shown as 'Incl'.
The current event type is passed into the Event Type field on the Select Menu screen and only menu classes and menus that are available for this specific event type will be shown.
Change the search criteria if necessary and select Search to refresh the menu class tree and Composed Menu Details display.
To look for specific menus contained with the displayed menu classes tree, click on the + sign in front of the menu class. Menu details will be displayed in the Composed Menu Details grid as soon as the cursor is placed onto a specific menu.
See Also