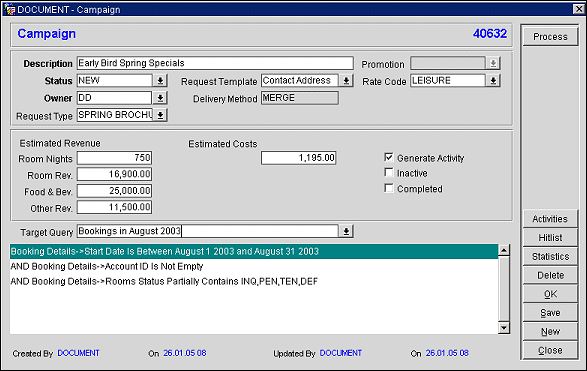
Campaign Screen
The Campaign screen shows the details related to your campaign and allows you to track activities and revenues related to the campaign. At the top right-hand side of the screen is a unique ID number associated with the campaign, generated by the system when the new campaign was saved.
In Sales and Catering, this feature is activated when you set the Activity>Campaign Management application function to Y. In ORS/OCIS, campaign management is available when OPR_CAMP add-on license for Campaign Management is activated. The OPR_CAMP add-on license for Campaign Management can be activated in ORS when the OCIS (OPI>version number>OCIS) license code is active.
In Sales and Catering or ORS, select Miscellaneous>Campaign Management to display a list of current and completed campaigns. From the Campaign Search screen select the New button to create a new campaign or highlight an existing campaign and select the Edit button to monitor and manage an existing campaign. The Campaign screen appears.
Provide the following information and select the Save button. (When Edit is selected from the Campaign Search screen, the fields are already populated.)

Description. Description of the campaign.
Status. Select the down arrow to choose the campaign status (as configured in Campaign Status Codes).
Owner. Select the down arrow to choose the campaign sales manager owner. The default owner is the logged in user.
When the Owner field has a gray background, it indicates that the owner listed is an inactive primary owner. Select a new active owner, if desired.
Campaign Type. Select the down arrow to choose the campaign type for this campaign. The campaign type you choose determines the campaign type templates available when you select the Request Template down arrow.
Template. The campaign type templates (document templates associated with the campaign type) available and associated with this campaign.
Delivery Method. The output of campaign processing; for example, MERGE for mail-merge document, EMAIL for HTML email message, EXPORT for export file. This field is view only and is filled automatically when you have chosen the request template.
Promotion/Rate Code. Either a marketing program (MP) profile promotion code or an MP rate code (ALLOTHER) can be selected for the campaign. Select the down arrow next to the Promotion/Rate Code field to choose. All of the columns from the Promotion Setup screen appear. The promotion code or rate code is usually unique to the campaign, thereby allowing you to track reservations and other business generated by the campaign. For more information on configuring promotion codes, refer to Promotion Codes.
MP PROFILE Promotion Codes
MP PROFILE promotion codes only work with profile memberships and cannot be attached to a reservation or tracked via booked reservations. When the MP PROFILE promotion codes are created, they always have to be linked to a Central Membership Type. Once this promotion is created, every profile with that membership type will be selected for the promotion. This promotion could be used to enroll all of these guests in a specific reward program. When a guest from this promotion responds and enrolls in the program, then they will receive the reward points every time they stay at a participating property, regardless of what rate or other promotion they have used. The MP PROFILE promotion code is attached to the Individual Guest Profile, and the only thing that can be tracked is how many points/rewards they received from the time they joined the program. The MP PROFILE promotion codes can only be Global, and can never be property specific.
MP RATE(ALLOTHER) Promotion Codes
Creating the MP RATE(ALLOTHER) promotion codes will not require a Membership Type. The MP RATE(ALLOTHER) promotion codes can be property specific, and can be attached to a rate code. The same MP RATE(ALLOTHER) promotion code can be attached to a different rate code for different property. However, the MP RATE(ALLOTHER) promotion code does not have to be attached to a rate code, and that will allow the Booking agent to use any rate code available at the property. The MP RATE(ALLOTHER) promotion codes will be attached to every reservation created using the promotion code, and will be able to be tracked via different reports from ORS.
These fields allow you to track revenue statistics related to the campaign (see Campaign Revenue Statistics for details.) (In ORS, the system does not generate this information for reports or other automatic statistical tracking.)
Room Nights. Estimated number of room nights to be generated by this campaign.
Room Revenue. Estimated room revenue to be generated by this campaign.
Food & Bev. Estimated food and beverage revenue to be generated by this campaign.
Other Rev. Estimated other revenue to be generated by this campaign.
Estimated Costs. Estimated expenses associated with this campaign (e.g., printing, mailing, email distribution costs).
Generate Activity. Select this check box to generate activities associated with the campaign. Following processing, select the Hitlist button to see these activities. The label to this check box changes. (In ORS, only the Generate Profile Request is functional as it pertains to guest profiles. The Generate Activity option is not functional in ORS, and will only display when a new screen is displayed. Once the Target Query is selected the label will change to Generate Profile Request.)
Inactive. Select this check box to make this campaign inactive. At your option, inactive campaigns can be included or left out of campaign searches using the Campaign Search screen.
Completed. Select this check box if the campaign is completed. At your option, completed campaigns can be included or left out of campaign searches using the Campaign Search screen.
Target Query. Select the down arrow to choose from the data extraction queries available for the selected campaign type. The query statements appear in the text area below the Target Query. Select the ellipsis button to create a new query. See Extract Query for details.
The following functions are available from the Campaign screen.
Process. After you have provided the necessary information to create the campaign process, select the Process button. See Processing the Campaign, below.
Activities. (Not available in ORS.) This feature is available when the OPS <version number> OPERA Sales & Catering license is active or when the OPF <version number> Sales Force Administration license is active. Displays the Activity Search screen. Search for and display activities associated with the current campaign, but not activities specifically related to the request processed by the current campaign.
Hitlist. (Not available in ORS.) This feature is available when the OPS <version number> OPERA Sales & Catering license is active or when the OPF <version number> Sales Force Administration license is active. Displays the Activity Search screen. Search for and display a list of activities associated with the request processed by the current campaign. These activities are the result of processing the campaign with the Generate Activities check box selected.
Statistics. Displays the Campaign Revenue Overview screen. This screen shows the estimated revenue for this campaign compared to the actual revenue. See Campaign Statistics for details.
Delete. Deletes the entire campaign from the system. It will no longer be available for selection.
Save. Saves the new campaign or any edits made to an existing campaign.
New. Clears the existing information on the screen so you can begin creating or editing another campaign.
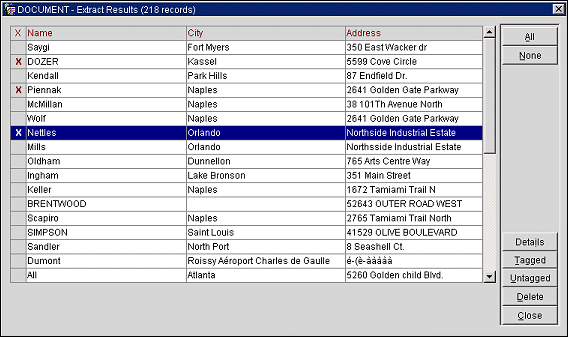
The Process button becomes available when the information required to process the campaign has been specified and the campaign has been saved. Select the Process button to extract the data and create records for your campaign. The results are sent to the appropriate server for fulfillment.
The Extract Results screen appears. The screen is similar to the standard Extract Results screen except that the output options are not offered at the bottom of the screen since you have already specified the delivery method (See Extract Results for details.)

You can view campaigns (as well as Request Types) that have been sent to a specific profile. Select Profiles>Profiles>Search>Options>Requests. The Profile Request screen appears displaying Campaign or Request types.
See Also